Fender FUSE 2-0 Manual

2.0

 2.0
2.0
Getting Started |
Firmware Update |
Introduction
This manual is your step-by-step guide to the Fender® FUSE™ software for your Mustang™ or G-DEC® 3 amplifier. Fender FUSE allows you to control your amplifier from your computer and to perform many functions beyond what the amplifiers provide on their own. System requirements: To run Fender FUSE, you must have a PC computer running Windows 7, Vista or XP, or a Macintosh computer with Intel® processors running OS X version 10.5 (Leopard) or above.
Installing Fender® FUSE™
To install Fender FUSE on your computer please download the latest version of the Setup file from http://www.fender. com/support/gdec3/ or http://www.fender.com/support/ mustang/.
To install Fender FUSE:
1.Double-click on the Fender FUSE Setup.exe file (for PC) or the FUSE Installer.dmg (for Mac) and follow the onscreen instructions.
2.If any device drivers or auxiliary program windows pop up during the Fender FUSE installation process, always allow them to be installed. Examples:
Select "Run"

 Select "Install"
Your Mustang or G-DEC 3 amplifier may need a firmware update to operate properly with Fender FUSE.
To update the Firmware on your Mustang amplifier:
1.Connect your Mustang amplifier to your computer's USB port and open the Fender FUSE software.
2.Turn the amplifier off.
3.MUSTANG I/II: Press and hold the SAVE button on the amplifier while turning the power switch back on. Continue holding the SAVE button until it starts to blink red.
4.The Firmware Update Instructions will automatically open and give you two options. Select the "Bundled Update" option unless you have downloaded a newer firmware update from http://www.fender.com/support/mustang/.
Select "Bundled Update"
5.Turn the amplifier off and then back on again to finalize the firmware update.
To update the Firmware on your G-DEC 3 amplifier:
1.Download the latest firmware file from: http://www. fender.com/support/gdec3/. To check what version your G-DEC 3 currently is running, watch the start up screen on the G-DEC 3 and the firmware version number will display in the lower right corner for 3 seconds after the initial Fender logo screen (for example, "v 1.03").
2.Unzip the compressed file that you just downloaded, which contains the firmware update file.
3.Connect your G-DEC 3 amplifier to your computer's USB port.
4.Open Fender FUSE and click on "Update Firmware" from the Utilities menu (under Main Menu).
5.Select the firmware update file that you downloaded and unzipped in Step 2.
6.Watch the G-DEC 3 screen for update progress. Firmware update takes about 20 seconds.
2 |
f e n d e r . c o m |

 2.0
2.0
Preset Editor
This is the first screen you will see when you start up Fender® FUSE™. When your amplifier is connected to your computer via USB cable, the Fender FUSE screen will mirror exactly what the amplifier is doing. If you click and drag a knob in Fender FUSE it immediately affects the corresponding control on your amplifier and visa-versa.
A.PRESET CONTROL PANEL — Click on the right side of this drop down menu to select a preset or use the up/down arrows to scroll through presets. Click on the left side of the drop down menu to choose between amp or computer presets. The five buttons below allow you to create a new preset from scratch, open a preset on your computer, import one or more components of a different preset to the current preset (Amp/FX/ Band settings), save a preset or delete a preset.
B.EFFECTS CONFIGURATION (Mustang™ I/II Only) — These knobs function as they do on the Mustang amp. If you click on these knobs, a status window will appear.
C.PHRASE SAMPLER (G-DEC® 3 Only) — These buttons function as they do on the G-DEC 3 amp.
D.SEARCH PANEL — This window allows you to search for presets and audio files in the location(s) selected with the buttons below. Search results are displayed via the Media Library which can also be accessed quickly by clicking the Media Library button.
E.TUNER — The Fender FUSE tuner provides the features of a studio rack mounted guitar tuner.
F.PRESET INFO — Click to edit preset information (see page 7).
G.AMP CONTROLS — Click and drag any of these knobs to adjust the amplifier's settings for the current preset. Any "grayed-out" knobs are controls that have not been activated yet.
H.START / BAND — Click Start to play the band track. Click Band to select a band track and edit band track settings (see page 8).
I.AMPLIFIER — Click on the drop down menu to select an amplifier type or use the up/down arrows to scroll through amp types.
J.ADVANCED AMP — Click to open up the advanced amp settings window (see page 6).
K.EFFECT FOOTPEDALS — Click on any of these four slots to add an effects footpedal and edit effect settings (see page 4).
L.AMP ICON — Click on this icon to return to editing amp tone settings after adjusting effect settings.
M.RACK EFFECTS — Click on any of these four slots to add a rack mounted effect and edit effect settings (see page 5).
N.AMP CONNECTED — Indicates when your amp is connected.
O.COMMUNITY — Click to open the Fender Amplifier Online Community website (see page 11).
P.LOGIN — Click to login to the Fender Amplifier Online Community website (see page 11).
f e n d e r . c o m |
3 |

 2.0
2.0
Pedal Effects
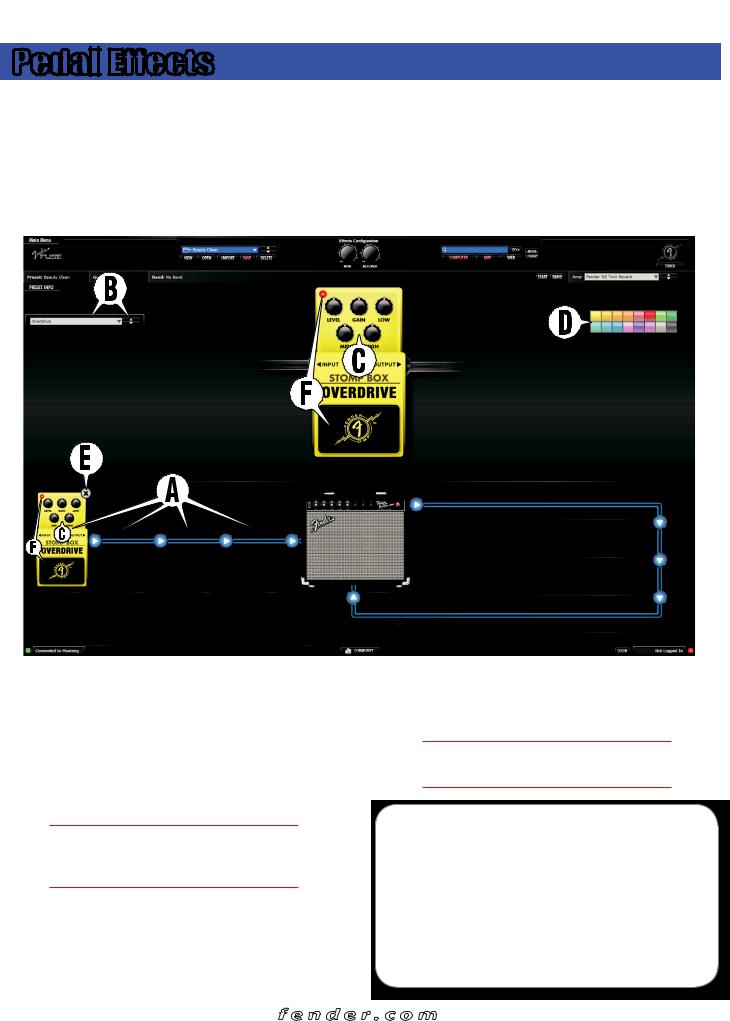
Click on any of the four slots {A} to the left of the amplifier icon to select an effect and open the Pedal Effects edit screen. These effects are located before the amp model in the signal path to provide a sound similar to effects that are connected inline with your guitar cord before the input of the amplifier.
Fender® FUSE™ gives you access to effects combinations beyond what the amp has on its own. For example, you can put an echo pedal before the amp, which could be just the thing for a rockabilly tone. Modulation effects like flangers and phasers sound very different in front of the amp. NOTE: Mustang™ amplifiers also allow you to change the order of effects (which affects their sound) by dragging the effect icons to different slots {A}.
B.EFFECT PEDAL SELECTOR— Click on the drop down menu to select an effect, or use the up/down arrows to scroll through effects in the currently selected effect category {A}. Effects are separated into four categories: Stompbox, Modulation, Delay and Reverb.
C.EFFECT SETTINGS — Click and drag any of these knobs to adjust the effect pedal settings. The precise level of each setting will be displayed under the Effect Pedal Selector {B} window.
♫You can also adjust the knobs on the smaller version of the effect pedal icon below, which is convenient when you are in the Preset Editor window.
D.PEDAL COLOR — Click on any of these color swatches to change the color of the effect pedal. Color changes are for your preference and do not change the sound of the effects.
E.DELETE — Click on the "X" to remove the effect from the current preset.
F.BYPASS — Click on the footpedal switch to turn the effect on-off (bypass). The red light in the upper left corner indicates when the effect is on or off.
♫You can also click the on-off switch on the smaller version of the effect pedal icon below.
EXCLUSIVE 
 FEATURES:
• EFFECTS POSITION Pre– or Post–Amp
• EFFECTS BYPASS
These Fender® FUSE™ features add functionality beyond what your amplifier provides on its own. Fender FUSE allows you to position your effects before or after the amplifier in the signal path for a wider variety of sonic options. Fender FUSE also allows you to bypass an effect temporarily rather than deleting it and losing all your effect settings each time you want to turn an effect on-off.
4 |
f e n d e r . c o m |
 Loading...