


OVENS
 CONTENTS
THANK YOU
1. |
IMPORTANT SAFETY NOTICES . . . . . . . . . . . . . . . . . . . . . . . . . . . . . . . . . . . |
6 |
2. |
INSTALLATION . . . . . . . . . . . . . . . . . . . . . . . . . . . . . . . . . . . . . . . . . . . . . . . . |
9 |
|
2.1. Unpacking . . . . . . . . . . . . . . . . . . . . . . . . . . . . . . . . . . . . . . . . . . . . . . . . . |
9 |
|
2.2. Installation and Electrical Connection . . . . . . . . . . . . . . . . . . . . . . . . . . . . . |
9 |
3. |
USING THE OVEN AND PRACTICAL TIPS . . . . . . . . . . . . . . . . . . . . . . . . . . . |
12 |
|
3.1. Before using the oven for the fi rst time . . . . . . . . . . . . . . . . . . . . . . . . . . . . |
12 |
|
3.2. Control Panel . . . . . . . . . . . . . . . . . . . . . . . . . . . . . . . . . . . . . . . . . . . . . . . |
13 |
|
3.3. Operating the oven . . . . . . . . . . . . . . . . . . . . . . . . . . . . . . . . . . . . . . . . . . . |
15 |
|
3.4. Accessories . . . . . . . . . . . . . . . . . . . . . . . . . . . . . . . . . . . . . . . . . . . . . . . . |
16 |
|
3.5. Practical advice and cooking table . . . . . . . . . . . . . . . . . . . . . . . . . . . . . . . |
19 |
4. |
OVEN CLEANING AND MAINTENANCE . . . . . . . . . . . . . . . . . . . . . . . . . . . . . |
24 |
|
4.1. Cleaning . . . . . . . . . . . . . . . . . . . . . . . . . . . . . . . . . . . . . . . . . . . . . . . . . . . |
24 |
|
4.1.1. Oven Exterior . . . . . . . . . . . . . . . . . . . . . . . . . . . . . . . . . . . . . . . . . . |
24 |
|
4.1.2. Oven Interior . . . . . . . . . . . . . . . . . . . . . . . . . . . . . . . . . . . . . . . . . . |
25 |
|
4.1.3. Accessories . . . . . . . . . . . . . . . . . . . . . . . . . . . . . . . . . . . . . . . . . . . |
27 |
|
4.1.4. Side Supports .. . . . . . . . . . . . . . . . . . . . . . . . . . . . . . . . . . . . . . . . . |
27 |
|
4.2. Replacing the interior light bulb . . . . . . . . . . . . . . . . . . . . . . . . . . . . . . . . . |
28 |
5. |
TROUBLESHOOTING . . . . . . . . . . . . . . . . . . . . . . . . . . . . . . . . . . . . . . . . . . . |
29 |
6. |
ENERGY-SAVING TIPS . . . . . . . . . . . . . . . . . . . . . . . . . . . . . . . . . . . . . . . . . . |
31 |
7. |
STOP/START DIGITAL TIMER . . . . . . . . . . . . . . . . . . . . . . . . . . . . . . . . . . . . |
32 |
|
7.1. Clock . . . . . . . . . . . . . . . . . . . . . . . . . . . . . . . . . . . . . . . . . . . . . . . . . . . . . |
33 |
|
7.2. Timer Functions . . . . . . . . . . . . . . . . . . . . . . . . . . . . . . . . . . . . . . . . . . . . . |
34 |
|
7.3. Safety Functions . . . . . . . . . . . . . . . . . . . . . . . . . . . . . . . . . . . . . . . . . . . . |
35 |
|
7.4. Timer Beeping . . . . . . . . . . . . . . . . . . . . . . . . . . . . . . . . . . . . . . . . . . . . . . |
39 |

THANK YOU
Congratulations!
You are now the proud owner of a FAGOR oven and we would like to thank you for the confidence you have placed in us.
FAGOR offers a complete range of high quality and eco-friendly products that are designed to work hard while consuming less.
We strive to bring energy efficiency to the forefront with products that consistently deliver on that promise.
FAGOR’s complete appliance range offers a wide selection of cooktops, range hoods, dishwashers, washing machines, and refrigerators that you can combine with your new oven.
Before using your oven for the first time, we recommend you read user manual carefully.You will find information you will need to make the most of new FAGOR oven. Please pay special attention to the safety advice, as well as use & care guidelines contained in this manual.
At the same time, we recommend you keep this manual in a safe place. If you pass the appliance on to another person, please be sure to enclose the manual.
Thank you,
FAGOR America Inc.
5

1.IMPORTANT SAFETY INSTRUCTIONS
When properly cared for, your new Fagor oven has been designed to be a safe, reliable appliance. Read all instructions carefully before using this oven. These precautions will reduce the risk of burns, electric shock, fire and injuries.
When operating this appliance, basic safety precautions must be followed, including the following:
•This appliance must be properly installed and grounded by a qualified technician. See electric preparation and connection instructions in the Installation Instructions.
•This appliance should only be serviced by an authorized service technician. Contact the nearest authorized service center for inspection, repair or adjustment.
•Do not repair or replace any part of the oven unless specifically recommended. Refer service to an authorized service center.
•Do not operate this appliance if it is not working properly or if it has been damaged, until an authorized technician by Fagor has inspected it.
•Install or locate this appliance only in accordance with the Installation Instructions.
•Use this oven only as intended by the manufacturer. If you have any questions, contact the manufacturer.
•Do not cover or block any openings on this appliance.
•Use this appliance only for its intended use as described in this manual. Do not use corrosive chemicals, vapors, or nonfood products in this appliance. This type of oven is specifically designed to heat or cook in a residential environment. It is not designed for industrial or laboratory use. The use of corrosive chemicals in heating or cleaning will damage the appliance.
•In the event that personal clothing or hair catches fire, DROP AND ROLL IMMEDIATELY to extinguish flames.
•This oven is intended for residential use only. It is not approved for outdoor use.
•Do not line the oven bottom with any type of foil, liners or cookware because permanent damage will occur to the oven bottom.
6

•Do not allow children to use this appliance unless closely supervised by an adult. Children and pets should not be left alone or unattended in the area where the appliance is in use. Never allow children to sit or stand on any part of the oven.
•Do not store items of interest to children above the oven. If children should climb onto the appliance to reach these items, they could be seriously injured.
To reduce the risk of fire in the oven cavity:
1.Do not store flammable materials in or near the oven.
2.Do not use water on a grease fire. Smother fire or use a dry chemical or foam-type extinguisher.
3.Have a fire extinguisher readily available and highly visible next to any cooking appliance. Be sure you know how to use it.
4.Do not overcook food. Carefully attend oven if paper, plastic or other combustible materials are placed inside the oven.
5.Do not use the cavity for storage purposes. Do not leave paper products, cooking utensils or food in the cavity when not being used.
6.If materials inside the oven should ignite, keep oven door closed. Turn oven off and disconnect the circuit at the circuit breaker box.
7.Do not block any vent openings.
8.Be sure the blower fan runs when the oven is in operation. If the fan does not operate, do not use the oven. Call an authorized service center.
9.Never use the oven to warm or heat a room. This can damage the oven parts.
10.For personal safety, wear proper clothing. Loose fitting garments or garments with hanging sleeves should never be worn while using this appliance.
7

SAFETY PRECAUTIONS
•Tie long hair so that it doesn’t hang loose near the oven cavity.
•The heating elements may be hot even though they are dark in color. Interior surfaces of an oven become hot enough to cause serious burns.
•During and after use, do not press or let clothing or other flammable materials contact the heating elements or the interior surfaces of the oven until they have had sufficient time to cool.
•The trim on the top and sides of the oven door may become hot enough to cause burns.
•Use care when opening the door. Open the door slightly to let hot air or steam escape before removing or replacing food.
•Do not heat unopened food containers. Buildup of pressure may cause the container to burst and result in injury.
•Always place oven racks in desired location while the oven is cool. If a rack must be moved while the oven is hot, do not let potholder contact the heating elements.
•Use only dry potholders. Moist or damp potholders on hot surfaces may result in burns from steam. Do not let potholders touch hot heating elements. Do not use a towel or other bulky cloth material.
8
2.INSTALLATION AND ASSEMBLY
2.1UNPACKING
1.Cut the plastic film covering the entire package.
2.Carefully remove all the oven’s protective elements: top cover, edge protection and polystyrene base.
2.2 INSTALLATION & ELECTRICAL CONNECTION
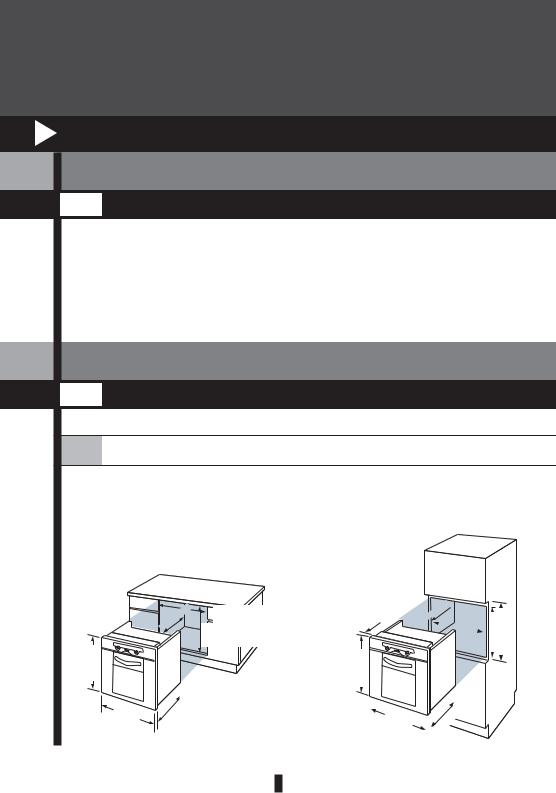
a24” Multi-Function Wall Oven 5HA-196 X
1.The measurements of the Cabinet unit in which
the oven is to be mounted must coincide with those indicated in the diagrams, depending on whether the unit is wall-mounted or installed below a counter top.
0
13/16” 

2327/64”
23 |
5/ |
|
16” |
22” |
. |
”min |
|
/16 |
|
13 |
|
21 |
|
MINIMUM COUNTERTOP CLEARANCE REQUIREMENT:
235/8” (with induction cooktop installation above) 231/2” (without induction cooktop installation)
” 13/16 0 
2327/64”
. ”min 13/16 21
22”
|
|
|
|
|
|
|
|
|
|
|
|
|
|
|
|
|
|
|
|
|
|
|
|
|
|
|
|
|
|
|
|
|
|
|
|
|
|
|
|
|
” |
|
|
|
|
|
|
|
|
|
|
|
|
|
|
|
|
|
|
|
|
” |
||
|
|
/50 |
|
|
|
23 |
|
|
|
|
|
|
|
43 |
|
|
|
|
5 |
|
|
|
|
/50 |
|
|
|
|
|
|
|
/ |
|
|
43 |
|
||
20 |
|
|
|
-Figure 1- |
|
16” |
|
20 |
|
|||
|
|
|
|
|
|
|
|
|
|
|
|
|
|
|
|
|
|
|
|
|
32” |
2” |
||
/ |
/ |
||
7 |
1 |
||
23 |
23 |
||
|
|
|
|
|
|
|
|
9

b Side Swing 24” Multi-Function Oven 5HA-200 LX 5HA-200 RX
IMPORTANT:
-The measurements of the figure 1 or 2 must be taken into consideration to properly mount the oven.
-Once the oven is placed in the space, fasten it to the cabinet with the 2 supplied screws in the positions marked “A”.
-Do not hang from the door when it is opened.
10

2.At the back of the oven you will find a 3-wire “A”which is used to make the electrical connection in this way:
Oven Wire Color |
House Wire Color |
Black |
Black (L1) |
White |
Red (L2) |
|
|
Green/Yellow |
White (Neutral) & Green/Copper |
|
(Ground) |
WARNING: before making any connections, check the following:
•that the power supply corresponds to the voltage indicated on the feature identification plate B, figure 2.
•that the power supply of the oven is to be connected to is powerful enough for the maximum power the oven absorbs, indicated on the feature identification plate.
ELECTRICAL SPECIFICATIONS |
|
|
|
Model |
Volts |
Watts |
Amps |
5HA-196 X |
|
|
|
5HA-200 LX |
240 |
3.6 KW |
15 |
5HA-200 RX |
|
|
|
3.After it is connected, place the oven into the cabinet opening, taking special care not to leave any surplus cable lying on top of the oven.
4. Fasten the oven to the cabinet with the 2 screws provided.
B
-Figure 2-
5.If the cooking function selector is not at position “0”, turn it to “0”and set the time on the oven( section 7.1).
11
3. USING THE OVEN AND PRACTICAL TIPS
3.1 BEFORE USING THE OVEN FOR THE FIRST TIME
Adjusting the Clock
We recommend that you set thecorrect time (section7.1) after connecting the oven to the power supply.
Getting Started
Before using your new oven for the first time, make sure you have removed all packing materials and protective plastic. Heat the oven empty for about 30 minutes, with the door closed. Adjust the cooking functions selector in position  and set a temperature of 500ºF.
During this process, you may detect some odor and possibly smoke, both which are normal. By heating up your oven for the first time in this way, you will effectively remove any traces of oil residue inside the oven that may exist as a result of the manufacturing process. Once the oven has cooled down, be sure to follow the cleaning procedures outlined in section“4.Cleaning and Maintenance”.
Before using any of the interior trays for the first time, clean with a mild detergent and a sponge or soft cloth.
12

3.2 CONTROL PANEL
|
|
|
|
|
|
|
|
|
|
|
|
|
|
|
|
|
|
|
|
|
|
|
|
|
|
|
|
|
|
|
|
|
|
|
|
1 |
|
|
3 |
|
2 |
|||
1.Cooking Program Selector
2.Temperature Selector
3.Programmer
aCooking Program Selector
Your oven offers eight (8) different cooking programs and one convection defrost program. With the cooking program selector, you will be able to select the most suitable cooking program for the type of food you wish to cook.
This oven is equipped with retractable controls. Can be set to sit flush to the control board panel by depressing them at any time.
13

Read below only the description of those functions coinciding with the symbols appearing on your function selector:
Bake: This program is recommended for baking bread, cakes and stuffed pastries. Also recommended for roasting lean meats.
Mini Broil: Recommended for broiling meats, chops, lamb, steaks, hamburgers, browning toast and in general, small-sized foods since only the central part of the broiler is used.
Maxi-broil: This program is recommended for cooking the same foods as with the Mini-broil, but covering the entire tray surface. Recommended for all types of broiling: pasta, soufflé, and béchamel sauce.
Convection Maxi-broil: Special program for cooking large roasts and also ideal for cooking and broiling at the same time: red meats, pot roast, poultry, etc.
Traditional Heat with Fan: This program allows you to cook any type of dish: meat, fish or desserts. You can even cook more than one dish at the same time without mixing flavors.
Defrosting: The defrosting function can be used to thaw any type of frozen food: meat, fish, or vegetables, in minimal time. It speeds up normal defrosting times.
Turbo Plus: The oven is heated up by the central round heating element. The fan distributes the heat evenly within the oven.
Pizza: The intense heat that comes from the bottom, and the fan that distributes it evenly, give you a crusty pizza base. Not necessary to preheat the oven prior to using this setting.
Celeris (fast preheat): If a dish requires the oven to be pre-heated, nothing is faster than the CELERIS program. It will reach 400°F in less than 5 minutes.
14

The general power light will remain on whenever any cooking program is selected.
bTemperature Selector
With the temperature selector, you can adjust the cooking temperature at any time to the most suitable for preparing the food in question. The controls turn to the right from100ºF up to 500ºF.
The thermostat indicator light will go out when the selected temperature is reached and then it will come on and off from time to time while cooking maintain the desired temperature.
3.3 OPERATING THE OVEN
Follow these steps to turn on your oven:
1.Place the food in the oven, on the recommended tray and level (see tables on pages 20-23).
2.Select a cooking program using the
cooking program selector (see tables on pages 20-23). For example: 
3.Set a temperature by turning the temperature selector or following the instructions given in the timer operating section (see tables on pages 20-23). For example: 400ºF.
 5
5
 4
4
 3
3
 2
2
 1
1
15

4.Once the cooking is finished, do not forget to turn the function selector back to the “0”position and the temperature selector to the lowest position “■“
3.4 ACCESORIES
The oven has five levels on which you may place a cooking rack. These levels are engraved at the entrance to the cavity.
Your oven comes from the factory with some of the accessories described below:
Baking Tray
Aluminium tray ideal for baking.
Standard Tray
For all kinds of food.
Deep Tray
The new deep tray is suitable for cooking dishes with a large amount of sauce or gravy, ideal for frozen food and large roasts.
16
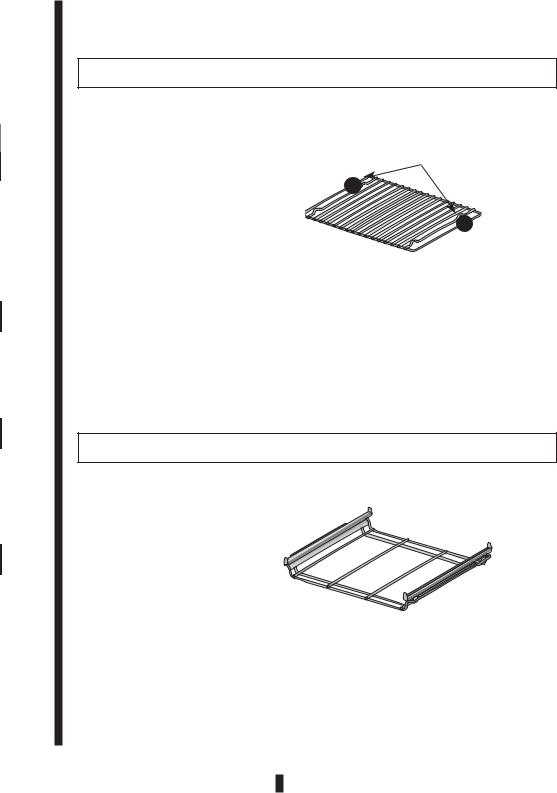
Grill with Non-Tip Safety Catch
The grill is equipped with its non-tip safety catches that enable the grill to
be slid out of its housing about three
Catch
quarters of the way without tipping over.
This feature facilitates removing food easily from inside the oven. In addition, it gives you the possibility of placing it on any of the 5 levels available in the oven.
This grill can be used to hold any kind of container with food to be roasted or toasted. It may also be used for making roasts by placing the meat directly on the grill, in which case we recommend you place a tray underneath the grill to collect any juices that may drip from the meat and to keep your oven clean.
The grill should be slid into place on an even angle with the catches facing down, as indicated above.
Telescopic Rack
With the Telescopic Rack, food handling is more convenient and easier since this allows the trays to slide in and out smoothly.
The telescopic rack may be placed on any of the 4 lower levels of the oven, making it easy and safer for you to remove food from the cooking trays.
17

Inserting the telescopic rack and trays:
1.Insert the Telescopic Rack onto the side slots as far as it will go; you will have to raise it slightly to set it properly past the catches. Bear in mind that the round pegs should be facing the back of the oven.
2.Next, extend the telescopic runners as far as they will go.
3.Position a tray on the runners as shown.
If you wish you may also insert the grill on top of the combination of the telescopic rack and tray, but with the catches facing upwards.
4.Slide the rack and trays inside the oven completely.
Removing the trays from inside the oven:
Once cooking has been completed, slide the telescopic rack out, you can then do one of two things, as required:
a.Remove the tray from the telescopic rack completely.
b.Remove both the tray and telescopic rack. To do so, you will have to lift the “Telescopic Rack” slightly to get past the catches that prevent it from tipping over.
Remember that the “Telescopic Rack” set of tray and/or grill with its non-tip safety feature can be placed on any of the 4 lower levels.
18

3.5 PRACTICAL ADVICE AND COOKING TABLE
aSuggestions and Practical Tips for Baking
PROBLEM |
POSSIBLE REASON |
SOLUTION |
Cakes and pastries do |
•Wrong function |
•Check the function |
not rise enough |
selected |
selected against the |
|
|
temperature shown in |
|
|
the table |
|
•The oven has not been |
•Check the table |
|
pre-heated enough |
for any pre-heating |
|
|
recommendations |
|
|
|
The food is not |
•Temperature too low |
•Check the temperature |
browning |
|
selected against the |
|
|
temperature shown in |
|
|
the table; increase it |
|
|
slightly if necessary |
|
|
|
The food is very dark |
•Temperature too high |
•Check the temperature |
or burnt |
|
selected against the |
|
|
temperature shown |
|
|
in the table; reduce it |
|
|
slightly if necessary |
|
|
|
The food is dry |
•The cooking time is |
•Check the temperature |
|
very long because the |
selected against the |
|
temperature selected is |
temperature shown in |
|
too low |
the table |
|
|
|
The food is too moist |
•Too much liquid in the |
•Check the temperature |
|
dough |
selected against the |
|
|
temperature shown in |
|
|
the table; increase it |
|
|
slightly if necessary. |
|
|
•Prepare the dough with |
|
|
less liquid. |
|
|
|
19

bTraditional Baking Time & Temperature Charts
FOOD |
PROGRAM |
TEMPERATURE |
TIME |
FOOD |
PRE-HEATING ACCESSORIES |
|
POSITION |
||||||
|
|
|
|
|
||
MEAT AND POULTRY |
|
|
|
|
||
Veal |
|
210ºC |
560-60 min |
|
No |
|
3 lbs |
|
410ºF |
|
|
|
|
Pork loin |
|
220ºC |
560-60 min |
|
No |
|
3 lbs |
|
425°F |
|
|
|
|
Roasted |
|
230ºC |
560-60 min |
|
No |
|
chicken |
|
446ºF |
|
|
|
|
3 lbs |
|
|
|
|
|
|
Roasted |
|
220ºC |
40-50 min |
|
No |
|
lamb |
|
428ºF |
|
|
|
|
2 lbs |
|
|
|
|
|
|
Pork leg |
|
180ºC |
85-95 min |
|
No |
|
3 lbs |
|
356ºF |
|
|
|
|
Pork ribs |
|
220ºC |
30-40 min |
|
No |
|
3 lbs |
|
428ºF |
|
|
|
|
Turkey legs |
|
170ºC |
40-50 min |
|
No |
|
(2) |
|
338ºF |
|
|
|
|
Turkey |
|
190ºC |
115-125 min |
|
No |
|
9 lbs |
|
374ºF |
|
|
|
|
DESSERTS |
|
|
|
|
|
|
Caramel |
|
150ºC |
30-40 min |
|
No |
|
custard |
|
302ºF |
|
|
|
|
Sponge |
|
180ºC |
25-35 min |
|
Yes |
|
cake |
|
356ºF |
|
|
|
|
Pears baked |
|
240ºC |
50-60 min |
|
No |
|
in wine |
|
464ºF |
|
|
|
|
Pastries |
|
220ºC |
8-12 min |
|
No |
|
|
|
428ºF |
|
|
|
|
20

Traditional Baking Time & Temperature Charts
FOOD |
PROGRAM |
TEMPERATURE |
TIME |
FOOD |
PRE-HEATING ACCESSORIES |
|
POSITION |
||||||
|
|
|
|
|
||
STARTERS AND VEGETABLES |
|
|
|
|
||
Stuffed |
|
220ºC |
12-16 min |
|
Yes |
|
eggplant |
|
428ºF |
|
|
|
|
Roasted |
|
210ºC |
30-40 min |
|
No |
|
peppers 3 lbs |
|
410ºF |
|
|
|
|
Stuffed |
|
220ºC |
15-19 min |
|
No |
|
tomatoes |
|
428ºF |
|
|
|
|
(4) |
|
|
|
|
|
|
Stuffed |
|
200ºC |
25-35 min |
|
No |
|
zucchini (2) |
|
392ºF |
|
|
|
|
FISH AND SEAFOOD |
|
|
|
|
||
Roast hake |
|
230ºC |
7-9 min |
|
Yes |
|
3 lbs |
|
446ºF |
|
|
|
|
Baked |
|
240ºC |
4 min |
|
Yes |
|
prawns 2 lbs |
|
464ºF |
|
|
|
|
Trout |
|
250ºC |
9-11 min |
|
Yes |
|
2 lbs |
|
482ºF |
|
|
|
|
Tuna |
|
230ºC |
10-14 min |
|
No |
|
fillets |
|
446ºF |
|
|
|
|
Roasted |
|
220ºC |
13-17 min |
|
No |
|
fish 2 lbs |
|
428ºF |
|
|
|
|
Baked |
|
250ºC |
8-10 min |
|
Yes |
|
salmon (4) |
|
482ºF |
|
|
|
|
Baked cod |
|
220ºC |
7-9 min |
|
Yes |
|
3 lbs |
|
428ºF |
|
|
|
|
VARIOUS |
|
|
|
|
|
|
Pizza |
|
220ºC |
18-22 min |
|
Yes |
|
|
|
428ºF |
|
|
|
|
Bread |
|
220ºC |
18-22 min |
|
No |
|
|
|
428ºF |
|
|
|
|
Buns |
|
210ºC |
15-19 min |
|
Yes |
|
|
|
410ºF |
|
|
|
|
21
Traditional Baking Time & Temperature Charts
FOOD |
PROGRAM |
TEMPERATURE |
TIME |
FOOD |
PRE-HEATING ACCESSORIES |
|
POSITION |
||||||
|
|
|
|
|
||
MEAT AND POULTRY |
|
|
|
|
||
Veal |
|
190ºC |
50-60 min |
|
No |
|
3 lbs |
|
374ºF |
|
|
|
|
Pork loin |
|
200ºC |
50-60 min |
|
No |
|
3 lbs |
|
392ºF |
|
|
|
|
Roasted |
|
210ºC |
50-60 min |
|
No |
|
chicken |
|
410ºF |
|
|
|
|
3 lbs |
|
|
|
|
|
|
Roasted |
|
230ºC |
25-35 min |
|
No |
|
rabbit |
|
446ºF |
|
|
|
|
3 lbs |
|
|
|
|
|
|
Roasted |
|
200ºC |
40-55 min |
|
No |
|
lamb |
|
392ºF |
|
|
|
|
2 lbs |
|
|
|
|
|
|
Pork leg |
|
150ºC |
85-95 min |
|
No |
|
3 lbs |
|
302ºF |
|
|
|
|
Pork ribs |
|
200ºC |
30-40 min |
|
No |
|
3 lbs |
|
392ºF |
|
|
|
|
Turkey legs |
|
150ºC |
40-50 min |
|
No |
|
(2) |
|
302ºF |
|
|
|
|
Turkey |
|
170ºC |
115-125 min |
|
No |
|
9 lbs |
|
338ºF |
|
|
|
|
DESSERTS |
|
|
|
|
|
|
Caramel |
|
150ºC |
30-40 min |
|
No |
|
custard |
|
302ºF |
|
|
|
|
Sponge |
|
180ºC |
15-25 min |
|
No |
|
cake |
|
356ºF |
|
|
|
|
Pears baked |
|
220ºC |
50-60 min |
|
No |
|
in wine |
|
428ºF |
|
|
|
|
Pastries |
|
200ºC |
8-12 min |
|
No |
|
|
|
392ºF |
|
|
|
|
THAWING |
|
|
|
|
|
|
For all kinds |
|
75ºC |
|
|
No |
|
of food |
|
165ºF |
|
|
|
|
22

Traditional Baking Time & Temperature Charts
FOOD |
PROGRAM |
TEMPERATURE |
TIME |
FOOD |
PRE-HEATING ACCESSORIES |
|
POSITION |
||||||
|
|
|
|
|
||
STARTERS AND VEGETABLES |
|
|
|
|
||
Stuffed |
|
200ºC |
12-16 min |
|
Yes |
|
eggplant |
|
392ºF |
|
|
|
|
Roasted red |
|
190ºC |
30-40 min |
|
No |
|
peppers 3 lbs |
|
374ºF |
|
|
|
|
Stuffed |
|
200ºC |
15-19 min |
|
No |
|
tomatoes |
|
392ºF |
|
|
|
|
(4) |
|
|
|
|
|
|
Stuffed |
|
180ºC |
25-35 min |
|
No |
|
zucchini (2) |
|
356ºF |
|
|
|
|
FISH AND SEAFOOD |
|
|
|
|
||
Roast ed |
|
210ºC |
7-9 min |
|
Yes |
|
hake 3 lbs |
|
410ºF |
|
|
|
|
Baked |
|
220ºC |
4 min |
|
Yes |
|
prawns 2 lbs |
|
428ºF |
|
|
|
|
Trout |
|
240ºC |
9-11 min |
|
Yes |
|
2 lbs |
|
464ºF |
|
|
|
|
Tuna |
|
250ºC |
10-14 min |
|
No |
|
fillets |
|
482ºF |
|
|
|
|
Roasted |
|
200ºC |
13-17 min |
|
Yes |
|
fish 2 lbs |
|
392ºF |
|
|
|
|
Baked |
|
240ºC |
8-10 min |
|
Yes |
|
salmon (4) |
|
464ºF |
|
|
|
|
Baked cod |
|
210ºC |
7-9 min |
|
Yes |
|
3 lbs |
|
410ºF |
|
|
|
|
VARIOUS |
|
|
|
|
|
|
Pizza |
|
200ºC |
18-22 min |
|
No |
|
|
|
392ºF |
|
|
|
|
Bread |
|
200ºC |
18-22 min |
|
No |
|
|
|
392ºF |
|
|
|
|
Buns |
|
220ºC |
13-17 min |
|
Yes |
|
|
|
428ºF |
|
|
|
|
23

4. OVEN CLEANING AND MAINTENANCE
4.1 CLEANING
4.1.1. Oven Exterior
Clean the oven exterior preferably with warm water and a mild detergent. Rinse thoroughly & dry with a soft cloth.
If any stains are difficult to remove we recommend you use products specifically designed for stainless steel. Test the product on a small area before you apply it to the entire surface. Follow the manufacturer’s indications closely.
4.1.2. Oven Interior
In order to maintain the apperance of your oven, you should clean the inside of it regularly, preferably every time you use it; this way you will ensure it operates properly and does not generate smoke or unpleasant odors while cooking.
The oven’s special enamel easy-to-clean enamel surface prevents food from adhering well to the inside of the oven. When necessary, clean the inside of the oven while it is still warm using hot water with a little soap or a solution of water and vinegar; after cleaning, dry the inner walls thoroughly with a soft cloth. For in-depth cleaning or if the dirt is particularly difficult to remove, we recommend the use of specialized oven-cleaners, following the manufacturer’s instructions. Only use specialized oven-cleaners on a cold oven.
24
WARNING: Never clean the rear plate or the side panels with oven cleaners.
Clean the side walls on the inside of the oven while it is still warm using hot water with a little soap; dry the walls carefully with a soft cloth.
For in-depth cleaning or if the dirt is particularly difficult to remove, we recommend the use of specialised oven-cleaners, following the manufacturer’s instructions. Only ever use specialized oven-cleaners on a cold oven.
Helpful Tips:
•Enable the interior lamp to illuminate the oven cavity while cleaning. To do so: turn the temperature selector to the “0”position and the function selector to any function, the light will then be on.
•If you want to clean the glass cover protecting the oven lamp: unscrew the cover and clean it, preferably with washing liquid.
Once it is clean, replace the lamp cover.
25
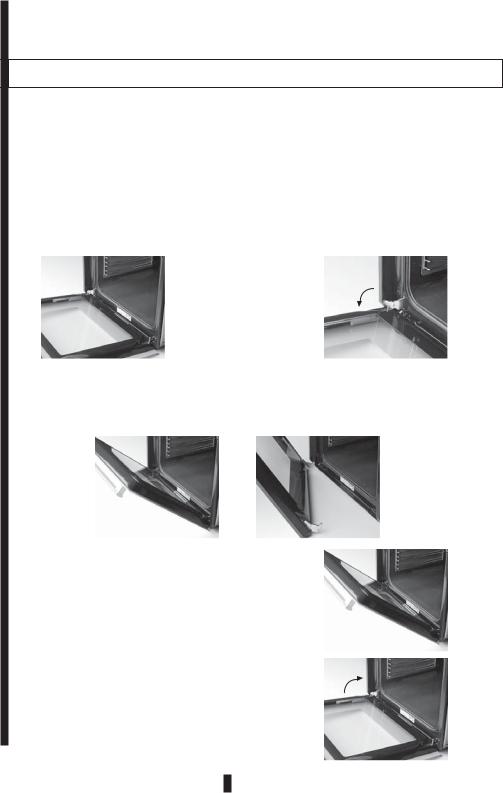
Model 5HA-196 X
•In order to remove the oven door, follow these steps described below:
Note: Doors cannot be removed on side opening models 5HA-200 LX and 5HA-200 RX.
Removing the door: |
|
1. Open the door fully. |
2. Rotate the stirrups (or catches) |
|
of the hinges as illustrated by |
|
the arrow. The stirrups (catches) |
|
then lock the hinges to allow for |
|
removal. |
3.Close the oven door gently until you hear the catch engage;once you reach the position of the catch, take hold of the door with both hands and continueto push it closed while pulling upwards at the same time to lift the hinges fromtheir slots.The door will then be released.
Installing the door after cleaning:
1.Align the hinges with their slots until they hook into place, as indicated.
2.Open the door fully, and the door will then be correctly installed.
26

•It is possible to fold down the broil element in order to clean the ceiling of the oven. WARNING: the oven must be cold.
Folding the grill down:
1. Lift up the broil element. 2. Press it in towards the back of the oven.
Re-inserting the element after cleaning:
1.Press the element’s rod towards the back of the oven and hook the element back into place in its support.
4.1.3.Accessories
Soak the accessories immediately after use in a mild dish washing detergent. Food residue can be easily removed by scrubbing with a sponge or a soft brush.
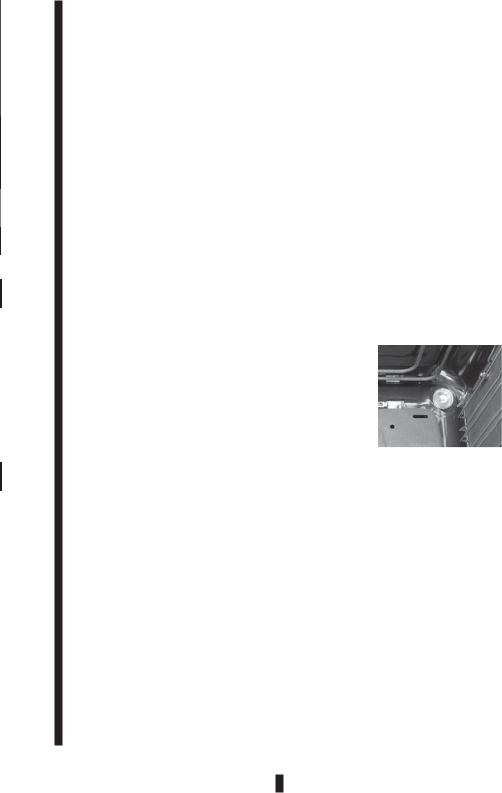
4.1.4. Side Supports
The supports may be removed for cleaning. To do so, follow the steps described below:
1.Grip them by depressing your thumb to squeeze the top rail downward in order to release it from its support peg.
2.Pull the grill outwards toward the center cavity of the oven and remove it. It may be easily snapped back into place using the same method and securing it back to its support peg.
Clean the support rack in the dishwasher. To eliminate any stubborn dirt you can use rougher cleaning a fibrous pad or brush.
Re-inserting after cleaning:
Replace by following the steps indicated above but in reverse order.
27

4.2 REPLACING THE INTERIOR LIGHT BULB
You can replace the bulb if it stops working. You can obtain heat-resistant 25W replacement bulbs capable of withstanding 600ºF from Fagor’s Technical service department. To replace the bulb do the following:
1.Interrupt the power supply to the oven at the main circuit breaker panel in the home. If hot let the oven cool down.
2.Unscrew the cover over the lamp by turning it to the left.
3.Replace the bulb with one of the same type.
4.Replace the cover.
5.Turn the power supply to the oven back on.
28

5. TROUBLESHOOTING
You may experience small anomalies that do not necessarily indicate existence of a product failure and do not require a Technical Service call.
These anomalies are often easy to correct. In order to avoid an unnecessary call to technical support, check to see if the problem you have encountered is included in the troubleshooting table below:
29

YOU NOTICE THAT... |
POSSIBLE REASONS |
WHAT TO DO |
||||||
The oven is NOT |
•No power supply. |
•Check the status of the |
||||||
working. The luminous |
|
electrical installation. |
||||||
symbols are not lit. |
•The oven is not connected. |
•Connect the oven. |
||||||
|
|
|
||||||
The oven is NOT |
•The timer control is in |
•Turn the selector |
||||||
working. |
|
|
position “0”or |
manually |
or set the |
|||
|
|
|
|
|
|
|
desired cooking time. |
|
|
|
|
||||||
The oven is beeping. |
•There may be several |
•Read the timer’s user |
||||||
|
|
|
|
|
|
reasons for this. |
manual carefully. |
|
|
|
|
||||||
The oven is NOT |
•Several hours have passed |
•Turn the function selector |
||||||
working. |
|
symbol is |
with the oven operating, |
to the “0”position. |
||||
flashing. |
|
|
without any timer button |
|
|
|||
|
|
|
|
|
|
being pressed. |
•Turn the function selector |
|
|
|
|
|
|
|
•Interruption of the power |
to the “0”position and set |
|
|
|
|
|
|
|
supply, with the function |
the clock to the right time. |
|
|
|
|
|
|
|
selector not in position “0”. |
|
|
|
|
|
|
|
|
•Oven installed with the |
|
|
|
|
|
|
|
|
function selector not in |
|
|
|
|
|
|
|
|
position “0”. |
|
|
|
|
|
||||||
The oven is NOT |
Oven just installed, or |
Set the clock to the right |
||||||
working. |
|
symbol is |
interruption in the power |
time and the oven will |
||||
flashing. |
|
|
supply, with the function |
start. |
|
|||
|
|
|
|
|
|
selector not in position “0”. |
|
|
|
|
|
||||||
The oven is NOT |
The time pre-set for cooking |
Turn the function selector |
||||||
working. |
|
|
|
symbol is |
has elapsed. |
and The temperature |
||
|
|
|
||||||
flashing. |
|
|
|
|
|
selector to the “0”position. |
||
|
|
|
||||||
The oven is NOT |
Oven locked with the |
Release the timer as |
||||||
working. |
|
|
symbol |
function selector in position |
indicated in the “ Child |
|||
is lit. |
|
|
|
“0”. |
Safety Lock” part of the |
|||
|
|
|
|
|
|
|
timer’s user manual. |
|
|
|
|
||||||
The oven IS working, |
The time set for the oven |
Press any button. |
||||||
but the |
|
symbol is |
alarm has elapsed. |
|
|
|||
flashing. |
|
|
|
|
|
|
||
|
|
|
||||||
The oven light is NOT |
•The bulb needs to be |
•Change the bulb. |
||||||
working. |
|
|
replaced. |
|
|
|||
|
|
|
|
|
|
•The oven is not connected |
•Connect the oven or |
|
|
|
|
|
|
|
or your electrical system |
check if the fuse has |
|
|
|
|
|
|
|
has a fault and the fuse has |
tripped. |
|
|
|
|
|
|
|
tripped. |
|
|
|
|
|
||||||
Smoke comes out when |
•Oven temperature is too |
•Reduce the oven |
||||||
in use. |
|
|
high. |
temperature. |
|
|||
|
|
|
|
|
|
•Greasy oven. |
•Clean the oven. |
|
|
|
|
||||||
The oven makes a |
The oven’s cooling fan is |
This is absolutely normal. |
||||||
noise after cooking is |
operating following use in |
|
|
|||||
completed. |
|
|
order to cool down the area |
|
|
|||
|
|
|
|
|
|
surrounding the oven. |
|
|
|
|
|
||||||
The interior glass of the |
An accessory (grill, tray) is |
Push the accessory |
||||||
oven door is covered in |
in contact with the glass. |
further into the oven to |
||||||
condensation. |
|
prevent it coming into |
||||||
|
|
|
|
|
|
|
contact with the glass. |
|
|
|
|
|
|
|
|
|
|
30

6. ENERGY-SAVING TIPS
•Pre-heat the oven only when indicated in the recipe.
•It is better to use dark colored bakeware, preferably enamelled in black, as these materials absorb heat particularly well.
•If you wish to bake a batch of several cakes, you should do so one after the other. As the oven is already hot, the baking times of second and subsequent cakes are shorter. You may also prepare two cakes simultaneously by placing rectangular pans side by side.
•If using the oven continuously for a long time, you may switch it off 5 or 10 minutes before the time indicated and take advantage of the residual heat to finish cooking the food.
•Use the “mini broil” function whenever you plan to prepare small amounts of food, placing the food in the central part of rack.
31
 Loading...