


Dishwasher
Instruction Manual
FBID 8PR 14S

 14 place settings

 Auto program
 Read this Manual
Dear Customer,
 Please carefully read this manual before using the dishwasher, it will help you to use and maintain the dishwasher properly.
 Keep it as a refer in the later days.
 Pass it on to any subsequent owner of the appliance.
This manual contains sections on safety Instructions, Operating Instructions, Installation Instructions and Troubleshooting Tips, etc.
Before Calling for Service
 To review the section on troubleshooting Tips will help you to solve some common problems by yourself .
 If you can not solve the problems by yourself , please ask for the help of professional technicians.
NOTE:
The manufacturer, following a policy of constant development and updating of the product, may make modifications without giving prior notice.
1) Safety Information.......................................... |
1 |
|
2) Quick operation guide..................................... |
4 |
|
3) Operation Instructions..................................... |
5 |
|
Control Panel................................................... |
5 |
|
Dishwasher Features.................................... ... |
5 |
|
4) Prior using for the first time............................... |
6 |
|
A |
Water Softener........................................... |
6 |
B |
Loading the Salt into the Softener................. |
7 |
C |
Fill the Rinse Aid Dispenser......................... |
7 |
D |
Function of Detergent ................................. |
8 |
5) Loading the Dishwasher Basket....................... |
11 |
|
Attention before or after loading the Dishwasher |
||
Baskets........................................................ |
11 |
|
Loading the upper Basket............................... |
12 |
|
Loading the Lower Basket............................... |
12 |
|
6) Starting a washing programme........................ |
13 |
|
Wash Cycle Table........................................... |
13 |
|
Turning on the Appliance................................ |
13 |
|
Change the Programme.................................. |
14 |
|
At the end of the Wash Cycle........................... |
14 |
|
7) Maintenance and cleaning.............................. |
15 |
|
Filtering System............................................. |
15 |
|
Caring for the Dishwasher............................... |
16 |
|
8) Installation instruction.................................... |
17 |
|
Installation preparation.................................. |
17 |
|
Aesthetic panel's dimensions and installation... |
18 |
|
Tension adjustment of the door spring.............. |
20 |
|
Connection of drain hoses.............................. |
20 |
|
Dishwasher installation steps......................... |
21 |
|
About Electricity Connecting........................... |
22 |
|
Cold Water Connection.................................. |
23 |
|
9) Troubleshooting Tips...................................... |
24 |
|
Before calling for service................................. |
24 |
|
Error codes................................................... |
25 |
|
Technical information..................................... |
26 |
|
Loading the baskets according to En50242

1.IMPORTANT SAFETY INFORMATION
WARNING! When using your dishwasher, follow the precautions listed below:
 This appliance is intended to be used in household and similar applications such as:
-staff kitchen areas in shops, offices and other working environments;
-farm houses;
-by clients in hotels, motels and other residential type environments;
-bed and breakfast type environments.
 This appliance can be used by children aged from 8 years and above and persons with reduced physical, sensory or mental capabilities or lack of experience and knowledge if they have been given supervision or instruction concerning use of the appliance in a safe way and understand the hazards involved. Children shall not play with the appliance. Cleaning and user maintenance shall not be made by children without supervision.
 For EN60335-1
 This appliance is not intended for use by persons(including children )with reduced physical, sensory or mental capabilities, or lack of experience and knowledge ,unless they have been given supervision or instruction concerning use of the appliance by a person responsible for their safety.
 For IEC60335-1
 This appliance is for indoor use only, for household use only. To protect against the risk of electrical shock, do not immerse the unit, cord or plug in water or other liquid.
 Please unplug before cleaning and maintenance the appliance .Use a soft cloth moisten with mild soap, and then use a dry cloth to wipe it again .
EARTHING INSTRUCTIONS
 This appliance must be earthed. In the event of a malfunction or breakdown, earthing will reduce the risk of an electric shock by providing a path of least resistance of electric current. This appliance is equipped with a cord having an equipment-earthing conductor and an earthing plug.
 The plug must be plugged into an appropriate outlet that is installed and earthed in accordance with all local codes and ordinances.
 Improper connection of the equipment-earthing conductor can result
in the risk of an electric shock. Check with a qualified electrician or service representative if you are in doubt whether the appliance is properly earthed.
 Do not modify the plug provided with the appliance; If it does not fit the outlet. Have a proper outlet installed by a qualified electrician.
1

 Do not abuse, sit on, or stand on the door or dish rack of the dishwasher.
 Do not operate your dishwasher unless all enclosure panels are properly in place.
 Open the door very carefully if the dishwasher is operating, there is a risk of water squirting out.
 Do not place any heavy objects on or stand on the door when it is open. The appliance could tip forward.
 When loading items to be washed:
1)Locate sharp items so that they are not likely to damage the door seal;
2)Warning: Knives and other utensils with sharp points must be loaded in the basket with their points down or placed in a horizontal position.
 Check that the detergent powder is empty after completion of the wash cycle.
 Do not wash plastic items unless they are marked dishwasher safe or the equivalent. For plastic items not so marked, check the manufacturer's recommendations.
 Use only detergent and rinse additives designed for an automatic dishwasher.
 Never use soap, laundry detergent, or hand washing detergent in your dishwasher.
 Children should be supervised to ensure that they do not play with the appliance.
 The door should not be left open, since this could increase the risk of tripping.
 If the supply cord is damaged, it must be replaced by the manufacturer or its service agent or a similarly qualified person in order to avoid a hazard.
 During installation, the power supply must not be excessively or dangerously bent or flattened.
 Do not tamper with controls.
 The appliance is to be connected to the water mains using new hose sets and that old hose-sets should not be reused.
 The maximum number of place settings to be washed is 14.
 The maximum permissible inlet water pressure is 1MPa.
 The minimum permissible inlet water pressure is 0.04MPa.
2
Disposal
Dispose of the dishwasher packaging material correctly. All packaging materials can be recycled.
Plastic parts are marked with the standard international abbreviations:
PE |
|
|
|
|
for polyethylene, e.g. sheet wrapping material |
PS |
|
|
|
|
for polystyrene, e.g. padding material |
|
|
|
|
||
POM |
|
polyoxymethylene, e.g. plastic clips |
|||
|
|||||
PP |
|
|
polypropylene, e.g. Salt filler |
||
|
|
||||
ABS |
|
Acrylonitrile Butadiene Styrene, e.g. Control Panel . |
|||
|
|||||
WARNING!
Packaging material could be dangerous for children!
 For disposing of package and the appliance please go to a recycling centre. Therefore cut off the power supply cable and make the door closing device unusable.
 Cardboard packaging is manufactured from recycled paper and should be disposed in the waste paper collection for recycling.
 By ensuring this product is disposed of correctly, you will help prevent potential negative consequences for the environment and human health, which could otherwise be caused by inappropriate waste handling of this product.
 For more detailed information about recycling of this product, please contact your local city office and your household waste disposal service.
 DISPOSAL: Do not dispose this product as unsorted municipal waste. Collection of such waste separately for special treatment is necessary.
3

2.Quick operation guide
For detailed operating method read the corresponding content on the instruction manual.
Switch on the appliance |
Open the door,press the On/Off button to switch on the appliance . |
|
|||
|
|
|
Compartment |
A: |
B |
|
|
|
|||
|
|
|
|||
|
|
|
With each wash cycle. |
|
|
Fill the detergent dispenser |
Compartment |
B: |
|
||
For programmes with pre-wash only.
|
(Follow the user instructions!) |
|
|
C |
|
|
A |
|
Check the rinse aid level |
Mechanical indicator C. |
|
Electric indicator on control panel (if provided). |
||
|
||
|
(On models with water softener system only.) |
|
Check the regeneration |
Electric indicator on control panel (if provided). |
|
salt level |
If there is no salt warning light in the control panel |
|
|
(for some models), you can estimate when to fill the salt into |
|
|
the softener by the number of cycles the dishwasher has run. |
|
Load the baskets |
Scrape off any large amount of leftover food. Soften remnants of burnt food in pans, |
|
then load the baskets. Refer to the dishwasher loading instructions. |
||
|
||
Select a programme |
Press the Programme Button until the selected programme lights up. |
|
( See the section entitled Operation instruction ) |
||
|
Running the dishwasher |
T urn on the water tap ,close the door . The machine will start working at once. |
||||
Changing the programme |
1. A running cycle can only be modified if it has been running for a short time. Otherwise the detergent |
||||
may have already been released and the water already drained. If this is the case, the detergent |
|||||
|
|
|
dispenser must be refilled. |
|
|
|
|
|
2.Open the door. |
|
|
|
|
|
3. Press the Programme Button for more than 3 seconds to cancel the running programme. |
||
|
|
|
4. Select a new programme. |
|
|
|
|
|
5. Restart the dishwasher. |
WARNING! |
|
Add forgotten dishes in the |
1.Open the door a little to stop the dishwasher. |
||||
|
|||||
dishwasher. |
2.After the spray arms stop working, you can open the door completely. |
Open the door carefully. |
|||
|
|
|
3.Add the forgotten dishes. |
Hot steam may escape |
|
|
|
|
4.Close the door, the dishwasher will start running again . |
when the door is opened! |
|
If the appliance is switched |
If the appliance is switched off during a wash cycle, when switched |
|
|||
off during a wash cycle. |
on again, please re-select the washing cycle and operate the dishwasher |
|
|||
|
|
|
according to the original Power-on state ). |
|
|
|
|
|
When the working cycle has finished, the buzzer of the dishwasher will sound 8 times, then stop. |
||
|
|
|
|||
Switch off the appliance |
Turn off the appliance using the On/Off Button. |
|
|||
|
|
|
Since the appliance is standing by, it will power off automaticly after 30 minutes without any operation. |
||
|
|
|
Warning: wait a few minutes (about 15 minutes) before unloading the dishwasher to avoid handling |
||
Turn off the water tap, |
|||||
the dishes and utensils while they are still hot and more susceptible to break. |
|||||
unload the baskets |
|||||
They will also dry better.Unload the appliance, starting from the lower basket. |
|||||
|
|
|
|||
4
3.Operation Instruction
IMPORTANT To get the best performance from your dishwasher, read all operating instructions
before using it for the first time.
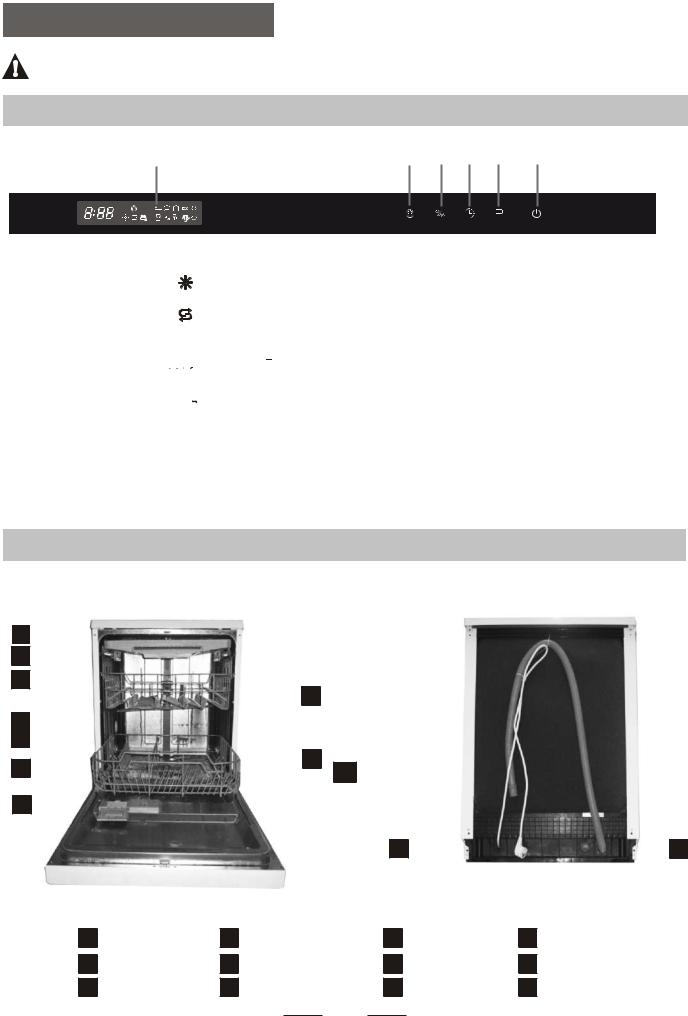
Control Panel
1 2 3 4 5 6
1. Display screen: to show the error code,delay time etc.
 Rinse Aid indicator:
Indicates when the dispenser needs to be refilled.
 Add salt indicator:
Indicates when the dispenser needs to be refilled.
 Delay time or error codes indicator:


 Program indicators:


 Alt functions indicator:


 Extra drying indicators:
2.Extra drying function choose Button: To choose Extra drying function
Extra drying function only apply to intensive,normal ECO glass ,90min programs
3.Alt Button: Dual zone wash function, touch the button to select either upper basket or lower basket loaded.and the response indicator will light.
4.Delay Button : To touch the button to delay. 5.Program Button : To touch the button to select a
wash Program. 6.On/off Button:
To turn on/off the power supply.
Dishwasher Features
|
|
|
|
|
Front view |
|
|
|
|
Back |
View |
||||||||
|
|
|
|
|
|
|
|
|
|
|
|
|
|
|
|
|
|
|
|
1 |
|
|
|
|
|
|
|
|
|
|
|
|
|
|
|
|
|
|
|
|
|
|
|
|
|
|
|
|
|
|
|
|
|
|
|
|
|
|
|
|
2 |
|
|
|
|
|
|
|
|
|
|
|
|
|
|
|
|
|
|
|
|
|
|
|
|
|
|
|
|
|
|
|
|
|
|
|
|
|
|
3 |
|
|
|
|
|
|
|
|
|
|
8 |
|
|
|
|
|
|
||
|
|
|
|
|
|
|
|
|
|
|
|
|
|
|
|
||||
|
|
|
|
|
|
|
|
|
|
|
|
|
|
|
|
|
|
||
|
|
|
|
|
|
|
|
|
|
|
|
|
|
|
|
|
|
||
|
|
|
|
|
|
|
|
|
|
|
|
|
|
|
|
|
|
|
|
4 |
|
|
|
|
|
|
|
|
|
|
|
|
|
|
|
|
|
|
|
|
|
|
|
|
|
|
|
|
|
|
|
|
|
|
|
|
|
||
|
|
|
|
|
|
|
|
|
|
|
|
|
|
|
|
|
|
|
|
5 |
|
|
|
|
|
|
|
|
|
9 |
|
|
|
|
|
|
|||
|
|
|
|
|
|
|
|
|
|
|
|
|
|
|
|||||
6 |
|
|
|
|
|
|
|
|
|
10 |
|
|
|
|
|
||||
|
|
|
|
|
|
|
|
|
|
|
|
|
|
|
|
|
|||
|
|
|
|
|
|
|
|
|
|
|
|
|
|
|
|
||||
7 |
|
|
|
|
|
|
|
|
|
11 |
|
|
|
|
12 |
||||
|
|
|
|
|
|
|
|
|
|
|
|
|
|||||||
|
|
|
|
|
|
|
|
|
|
|
|
|
|
|
|||||
|
|
|
|
|
|
|
|
|
|
|
|
|
|
|
|||||
1
2
3
Top spray arm
Cutlery rack
Upper basket
4
5
6
Inner pipe
Lower basket
Salt container
7
8
9
Dispenser
Cup shelf
Spray arms
10

11

12

Filter assembly
Inlet pipe connector
Drain pipe
5

4.Prior using for the first time
Before using your dishwasher for the first time:
A.Set the water softener
B.Add 1.5Kg dishwasher salt and then full fill the salt container with water
C.Fill the rinse aid dispenser
D.Fill in detergent
A. Water Softener
The water softener must be set manually, using the water hardness dial.
The water softener is designed to remove minerals and salts from the water, which would have a detrimental or adverse effect on the operation of the appliance.
The higher the content of these minerals and salts, the harder your water is.
The softener should be adjusted according to the hardness of the water in your area. Your local Water Authority can advise you on the hardness of the water in your area.
Adjusting Salt Consumption
The dishwasher is designed to allow for adjustment in the amount of salt consumed based on the hardness of the water used. This is intended to optimise and customise the level o f salt consumption.
Please follow the steps below for adjustment in salt consumption.
1.Open the door ,Switch on the appliance;
2.Press the Program button for more than 5 seconds to start the water softener set model within 60seconds after the appliance was switched on( The Salt and Rinse aid warninglights will be on periodically when it get in the set model );
3.Press the Program button to select the proper set according to your local environment, the sets will change in the following sequence: H1->H2->H3->H4->H5->H6->H1;
4.Press the Power button to end the set up model.
|
WATER HARDNESS |
|
|
Salt co nsumption |
||
|
|
|
|
Selector Position |
||
|
|
|
|
|||
dH |
fH |
Clarke |
mmol/l |
(gram/cycle) |
||
|
||||||
|
|
|
|
|
|
|
0~5 |
0~9 |
0~6 |
0~0.94 |
H1 |
0 |
|
6-11 |
10-20 |
7-14 |
1.0-2.0 |
H2 |
9 |
|
|
|
|
|
|
|
|
12-17 |
21-30 |
15-21 |
2.1-3.0 |
H3 |
12 |
|
18-22 |
31-40 |
22-28 |
3.1-4.0 |
H4 |
20 |
|
23-34 |
41-60 |
29-42 |
4.1-6.0 |
H5 |
30 |
|
35-55 |
61-98 |
43-69 |
6.1-9.8 |
H6 |
60 |
|
Note:1
¡ã1¡ãdH=1.25¡ãClarke=1.78¡ãfH=0.178mmol/l
dH: German degree
¡ã
fH: French degree
¡ãClark: British degree
Note:2
The manufactory setting: H3 (EN 50242)
Contact your local water board for information on the hardness of your water supply.
 NOTE: If your model does not have any water softener, you may skip this section.
WATER SOFTENER
The hardness of the water varies from place to place. If hard water is used in the dishwasher, deposits will form on the dishes and utensils.
The appliance is equipped with a special softener that uses a salt container specifically designed to eliminate lime and minerals from the water.
6
B. Loading the Salt Into the Softener
Always use the salt intended for use with dishwasher.
The salt container is located beneath the lower basket and should be filled as explained in the following:
Attention!
 Only use salt specifically designed for the use in dishwashers! Every other type of salt not specifically designed for the use in a dishwasher, especially table salt, will damage the water softener. In case of damages caused by the use of unsuitable
salt the manufacturer does not give any warranty nor is liable for any damages caused.  Only fill with salt just before starting one of the complete washing programs.
This will prevent any grains of salt or salty water, which may have been spilled, remaining on the bottom of the machine for any period of time, which may cause corrosion.
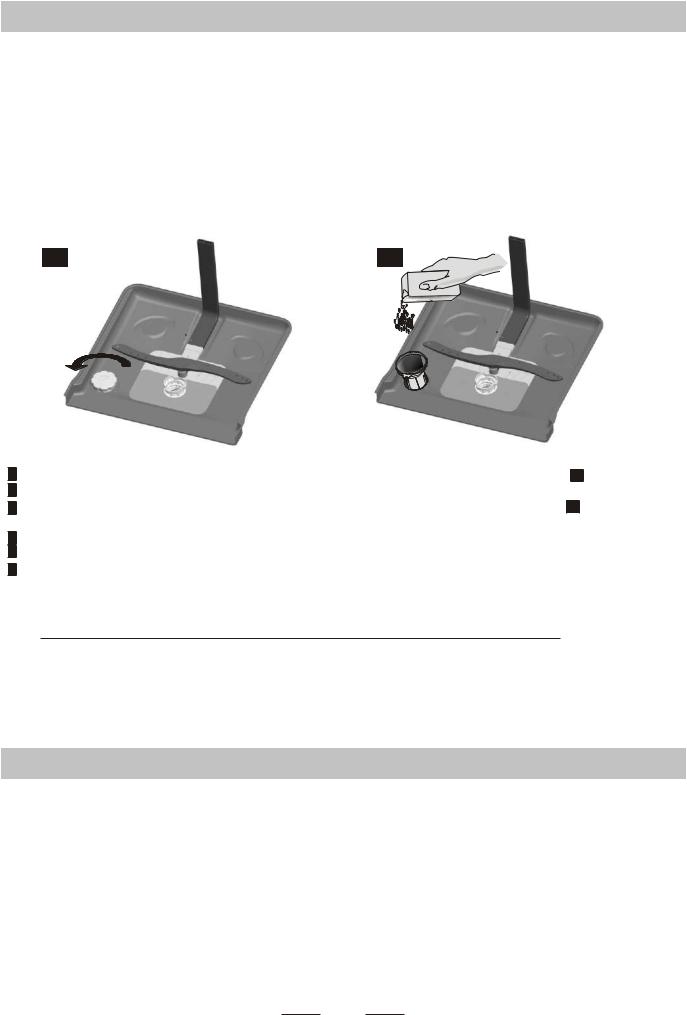
1 |
|
2 |
Open
A After the lower basket has been removed, unscrew and remove the cap from the salt container. |
1 |
B Place the end of the funnel (supplied) into the hole and introduce about 1.5kg of dishwasher salt. |
|
C Full fill the salt container with water,It is normal for a small amount of water to come out of the |
2 |
salt container. |
|
DAfter filling the container , screw the cap tightly back clockwise.
EThe salt warning light will stop being after the salt container has been filled with salt.
FImmediately after filling the salt into the salt container, a washing program should be started (We suggest to use a short program). Otherwise the filter system, pump or other important parts of the machine may be damaged
by salty water. This is out of warranty.
 NOTE:
NOTE:
1.The salt container must only be refilled when the salt warning light in the control panel comes on. Depending on how well the salt dissolves, the salt warning light may still be on even though the salt container is filled.
If there is no salt warning light in the control panel (for some Models),you can estimate when to fill the salt into the softener by the cycles that the dishwasher has run.
2.If there are spills of the salt, a soak or a rapid program should be run to remove the excessive salt.
C.Fill the Rinse Aid Dispenser
Rinse Aid Dispenser
The rinse aid is released during the final rinse to prevent water from forming droplets on your dishes, which can leave spots and streaks. It also improves drying by allowing water to roll off the dishes. Your dishwasher is designed to use liquid rinse aids. The rinse aid dispenser is located inside the door next to the detergent dispenser. To fill the dispenser, open the cap and pour the rinse aid into the dispenser until the level indicator turns completely black. The volume of the rinse aid container is about 110ml.
Function of Rinse Aid
Rinse aid is automatically added during the last rinse, ensuring thorough rinsing, and spot and streak free drying.
Attention!
Only use branded rinse aid for dishwasher. Never fill the rinse aid dispenser with any other substances (e.g. Dishwasher cleaning agent, liquid detergent). This would damage the appliance.
7

When to Refill the Rinse Aid Dispenser
If there is no rinse-aid warning light in the control panel, you can estimate the amount from the colour of the optical level indicator C
C located next to the cap. When the rinse-aid container is full, the whole
indicator will be dark .As the rinse-aid diminishes, the size of the dark dot decreases. You should never let the rinse aid level fall 1 / 4 full.
C (Rinse-Aid indicator)
As the rinse aid diminishes, the size of the black dot
on the rinse aid level indicator changes, as illustrated below.
Full
3 / 4 ful l
1 / 2 ful l
1 / 4 full - Should refill to eliminate spotting Empty
1 |
|
|
2 |
|
|
3 |
|
|
|
|
|
|
|
|
|
|
|
|
|
|
|
|
|
1To open the dispenser, turn the cap to the "open" (left) arrow and lift it out.
2Pour the rinse aid into the dispenser, being careful not to overfill.
3Replace the cap by inserting it aligned with "open" arrow and turning it to the closed (right) arrow.
NOTE: Clean up any rinse aid spilled while during filling with an absorbent cloth to avoid excessive foaming
during the next wash. Don't forget to replace the cap before you close dishwasher door.
Adjusting Rinse Aid Dispenser
 MAX
MAX 
Adjust lever The rinse aid dispenser has six or four settings. Always start with the dispenser (Rinse) set on "4". If spots and poor drying are a problem, increase the amount of rinse
aid dispensed by removing the dispenser lid and rotating the dial to "5". If the dishes still are not drying properly or are show spots, adjust the dial to the next higher lever until your dishes are spot-free. The recommended setting is "4". (Factory value is "4".)
 NOTE:
NOTE:
Increase the dose if there are drops of water or lime spots on the dishes after washing. Reduce it if there are sticky whitish stains on your dishes or a bluish film on glassware or knife blades.
D. Function of Detergent
Detergents with its chemical ingredients are necessary to remove dirt, crush dirt and transport it out of the dishwasher. Most of the commercial quality detergents are suitable for this purpose.
Attention!
Proper Use of Detergent
Use only detergent specifically made for the use in dishwashers. Keep your detergent fresh and dry. Don't put powdered detergent into the dispenser until you're ready to wash dishes.
8
 Loading...