


Libretto di Istruzioni Instructions Manual
Bedienungsanleitung Manual de instrucciones Instrukcja Obsługi
Руководство по эксплуатации
Εγχειρίδιο οδηγιών
Käyttöohje Brugsvejledning Bruksanvisning
Priročnik za uporabo Uputstva za Korištenje Uživatelská Pøíruèka
Инструкции Ръководство
Príručka na obsluhu
بيكرتلا ليلد

INDICE |
IT |
CONSIGLI E SUGGERIMENTI.............................................................................................................................................. |
5 |
CARATTERISTICHE.............................................................................................................................................................. |
8 |
INSTALLAZIONE ................................................................................................................................................................... |
9 |
USO...................................................................................................................................................................................... |
10 |
MANUTENZIONE ................................................................................................................................................................ |
12 |
INDEX |
EN |
RECOMMENDATIONS AND SUGGESTIONS ................................................................................................................... |
13 |
CHARACTERISTICS ........................................................................................................................................................... |
16 |
INSTALLATION.................................................................................................................................................................... |
17 |
USE ...................................................................................................................................................................................... |
18 |
MAINTENANCE ................................................................................................................................................................... |
20 |
INHALTSVERZEICHNIS |
DE |
EMPFEHLUNGEN UND HINWEISE ................................................................................................................................... |
21 |
CHARAKTERISTIKEN ......................................................................................................................................................... |
24 |
MONTAGE ........................................................................................................................................................................... |
25 |
BEDIENUNG........................................................................................................................................................................ |
26 |
WARTUNG........................................................................................................................................................................... |
28 |
ÍNDICE |
ES |
CONSEJOS Y SUGERENCIAS........................................................................................................................................... |
29 |
CARACTERÍSTICAS ........................................................................................................................................................... |
32 |
INSTALACIÓN ..................................................................................................................................................................... |
33 |
USO...................................................................................................................................................................................... |
34 |
MANTENIMIENTO ............................................................................................................................................................... |
36 |
SPIS TREŚCI |
PL |
UWAGI I SUGESTIE............................................................................................................................................................ |
37 |
WŁAŚCIWOŚCI TECHNICZNE........................................................................................................................................... |
40 |
INSTALACJA........................................................................................................................................................................ |
41 |
UŻYTKOWANIE................................................................................................................................................................... |
42 |
KONSERWACJA ................................................................................................................................................................. |
44 |
УКАЗАТЕЛЬ |
RU |
СОВЕТЫ И РЕКОМЕНДАЦИИ.......................................................................................................................................... |
45 |
ХАРАКТЕРИСТИКИ............................................................................................................................................................ |
48 |
УСТАНОВКА........................................................................................................................................................................ |
49 |
ЭКСПЛУАТАЦИЯ................................................................................................................................................................ |
50 |
УХОД.................................................................................................................................................................................... |
52 |
2

ΠΕΡΙΕΧΟΜΕΝΑ |
GR |
ΣΥΜΒΟΥΛΕΣ ΚΑΙ ΣΥΣΤΑΣΕΙΣ............................................................................................................................................ |
53 |
ΧΑΡΑΚΤΗΡΙΣΤΙΚΑ............................................................................................................................................................... |
56 |
ΕΓΚΑΤΑΣΤΑΣΗ.................................................................................................................................................................... |
57 |
ΧΡΗΣΗ................................................................................................................................................................................. |
58 |
ΣΥΝΤΗΡΗΣΗ........................................................................................................................................................................ |
60 |
SISÄLTÖ |
FI |
OHJEET JA SUOSITUKSET ............................................................................................................................................... |
61 |
MITAT JA OSAT .................................................................................................................................................................. |
64 |
ASENNUS ............................................................................................................................................................................ |
65 |
KÄYTTÖ ............................................................................................................................................................................... |
66 |
HUOLTO .............................................................................................................................................................................. |
68 |
INDHOLD |
DK |
RÅD OG ANVISNINGER ..................................................................................................................................................... |
69 |
APPARATBESKRIVELSE ................................................................................................................................................... |
72 |
INSTALLATION.................................................................................................................................................................... |
73 |
BRUG ................................................................................................................................................................................... |
74 |
VEDLIGEHOLDELSE .......................................................................................................................................................... |
76 |
INNHOLD |
NO |
ANBEFALINGER OG FORSLAG ........................................................................................................................................ |
77 |
EGENSKAPER..................................................................................................................................................................... |
80 |
INSTALLASJON................................................................................................................................................................... |
81 |
BRUK ................................................................................................................................................................................... |
82 |
VEDLIKEHOLD .................................................................................................................................................................... |
84 |
KAZALO |
SI |
PRIPOROČILA IN NASVETI ............................................................................................................................................... |
85 |
ZNAČILNOSTI...................................................................................................................................................................... |
88 |
NAMESTITEV ...................................................................................................................................................................... |
89 |
UPORABA............................................................................................................................................................................ |
90 |
VZDRŽEVANJE ................................................................................................................................................................... |
92 |
KAZALO |
HR |
SAVJETI I PREPORUKE..................................................................................................................................................... |
93 |
SVOJSTVA PROIZVODA .................................................................................................................................................... |
96 |
INSTALIRANJE.................................................................................................................................................................... |
97 |
KORIŠTENJE....................................................................................................................................................................... |
98 |
ODRŽAVANJE ................................................................................................................................................................... |
100 |
3

OBSAH |
CZ |
|
RADY A DOPORUČENÍ .................................................................................................................................................... |
101 |
|
HLAVNÍ PARAMETRY....................................................................................................................................................... |
104 |
|
INSTALACE ....................................................................................................................................................................... |
105 |
|
POUŽITÍ ............................................................................................................................................................................. |
106 |
|
ÚDRŽBA............................................................................................................................................................................. |
108 |
|
ИНДЕКС |
BG |
|
СЪВЕТИ И ТРИКОВЕ....................................................................................................................................................... |
109 |
|
ХАРАКТЕРИСТИКИ.......................................................................................................................................................... |
112 |
|
ИНСТАЛАЦИЯ.................................................................................................................................................................. |
113 |
|
УПОТРЕБА........................................................................................................................................................................ |
114 |
|
ПОДДРЪЖКА.................................................................................................................................................................... |
116 |
|
OBSAH |
SK |
|
RADY A ODPORÚČANIA.................................................................................................................................................. |
117 |
|
CHARAKTERISTIKY.......................................................................................................................................................... |
120 |
|
INŠTALÁCIA ...................................................................................................................................................................... |
121 |
|
POUŽÍVANIE...................................................................................................................................................................... |
122 |
|
ÚDRŽBA............................................................................................................................................................................. |
124 |
|
سﺮﻬﻔﻟا |
SA |
|
تﺎ ﺣاﺮﺘﻗا و تادﺎ ﺷرا............................................................................................................................................ |
125 |
|
ﺺﺋﺎ |
ﺼﺨﻟا......................................................................................................................................................... |
128 |
ﺐ |
ﻴآﺮﺘﻟا........................................................................................................................................................... |
129 |
ماﺪﺨﺘ |
ﺳﻻا........................................................................................................................................................... |
130 |
ﺔﻧﺎﻴ |
ﺼﻟا ﺔ ﻴﻠﻤﻋ.................................................................................................................................................. |
132 |
4
CONSIGLI E SUGGERIMENTI
Le Istruzioni per l’uso si riferiscono ai diversi modelli di questo apparecchio. Pertanto, si potrebbero trovare descrizioni di singole caratteristiche che non appartengono al proprio apparecchio specifico.
INSTALLAZIONE
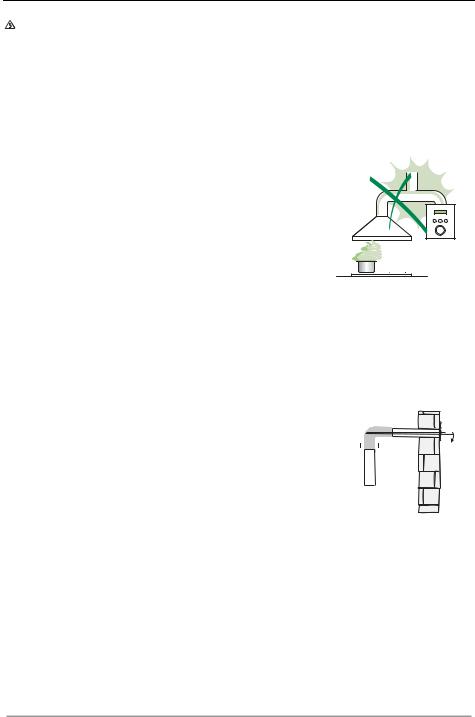
•Il fabbricante non potrà ritenersi responsabile per eventuali danni risultanti da un’installazione o utilizzazione impropria.
•La distanza minima di sicurezza tra il piano cottura e la cappa aspirante è di 650 mm (alcuni modelli
possono essere installati a un’altezza inferiore; vedere il paragrafo relativo alle dimensioni di lavoro e all'installazione).
• Controllare che la tensione di rete corrisponda a quella indicata sulla targa dati applicata all’interno della cappa.
• |
Per gli apparecchi di Classe I, controllare che la rete di alimentazione |
|
||||
|
domestica disponga di un adeguato collegamento a massa. |
|
||||
|
Collegare l'aspiratore al condotto dei fumi mediante un tubo con diametro |
|
||||
|
minimo di 120 mm. Il percorso dei fumi deve essere il più corto possibile. |
|
||||
• |
Non collegare la cappa aspirante ai condotti fumari che trasportano fumi di |
|
||||
|
combustione (per es. caldaie, camini ecc.). |
|
||||
• |
Se l’aspiratore è utilizzato in combinazione con |
2° |
||||
|
apparecchi non elettrici (per es. apparecchi a gas), |
|||||
|
|
|||||
|
deve essere garantito un sufficiente grado di |
|
|
|
||
|
|
|
|
|||
|
|
|
|
|
||
|
aerazione nel locale per impedire il ritorno di flusso |
|
|
|
||
|
dei gas di scarico. La cucina deve avere un'apertura |
|
|
|
||
|
comunicante direttamente con l'esterno per garantire |
|
|
|
|
|
|
|
|
|
|
|
|
|
|
|
|
|
|
|
|
l'afflusso di aria pulita. Quando la cappa per cucina è utilizzata in |
|
||||
|
combinazione con apparecchi non alimentati dalla corrente elettrica, la |
|
||||
|
pressione negativa nel locale non deve superare 0,04 mbar per evitare che i |
|||||
|
fumi vengano riaspirati nel locale dalla cappa. |
|
||||
•In caso di danneggiamento del cavo di alimentazione, occorre farlo sostituire dal produttore o dal reparto di assistenza tecnica per evitare qualsiasi rischio.
IT |
|
55 |

•Se le istruzioni di installazione del piano cottura a gas specificano una distanza maggiore di quella sopra indicata, è necessario tenerne conto. Devono essere rispettate tutte le normative riguardanti lo scarico dell'aria.
•Usare solo viti e minuteria di tipo idoneo per la cappa.
Avvertenza: la mancata installazione delle viti o dei dispositivi di fissaggio in conformità alle presenti istruzioni può comportare rischi di scosse elettriche.
•Collegare la cappa all'alimentazione di rete mediante un interruttore bipolare con distanza tra i contatti di almeno 3 mm.
USO
•La cappa aspirante è progettata esclusivamente per l’uso domestico allo scopo di eliminare gli odori dalla cucina.
•Non usare mai la cappa per scopi diversi da quelli per cui è stata progettata.
•Non lasciare mai fiamme alte sotto la cappa quando è in funzione.
•Regolare l'intensità della fiamma in modo da dirigerla esclusivamente verso il fondo del recipiente di cottura, assicurandosi che non ne avvolga i lati.
•Le friggitrici devono essere costantemente controllate durante l’uso: l’olio surriscaldato
potrebbe incendiarsi.
•Non cuocere al flambé sotto la cappa: si potrebbe sviluppare un incendio.
•Questo apparecchio può essere utilizzato da
bambini di età non inferiore a 8 anni e da persone con ridotte capacità psico- fisico-sensoriali o con esperienza e conoscenze insufficienti, purché attentamente sorvegliati e istruiti su come utilizzare in modo sicuro l'apparecchio e sui pericoli che ciò comporta. Assicurarsi che i bambini non giochino con l'apparecchio. Pulizia e manutenzione da parte dell'utente non devono essere effettuate da bambini, a meno che non siano sorvegliati.
IT |
|
66 |

•“ ATTENZIONE: le parti accessibili possono diventare molto calde durante l’uso degli apparecchi di cottura ”.
MANUTENZIONE
•Spegnere o scollegare l’apparecchio dalla rete di alimentazione prima di qualunque operazione di pulizia o manutenzione.
•Pulire e/o sostituire i filtri dopo il periodo di tempo specificato (pericolo di incendio).
•I filtri antigrasso devono essere puliti ogni 2 mesi di funzionamento o più frequentemente in caso di utilizzo molto intenso e possono essere lavati in lavastoviglie.
•Il filtro al carbone attivo non è lavabile né è rigenerabile e deve essere sostituito ogni 4 mesi di funzionamento circa o più frequentemente in caso di utilizzo molto intenso.
•"Vi è il rischio di incendio se la pulizia non viene effettuata secondo le istruzioni".
•Pulire la cappa utilizzando un panno umido e un detergente liquido neutro.
Il simbolo  sul prodotto o sulla sua confezione indica che il prodotto non può essere smaltito come un normale rifiuto domestico. Il prodotto da smaltire deve essere conferito presso un apposito centro di raccolta per il riciclaggio dei componenti elettrici ed elettronici. Assicurandosi che questo prodotto sia smaltito correttamente, si contribuirà a prevenire potenziali conseguenze negative per l’ambiente e per la salute che potrebbero altrimenti derivare dal suo smaltimento inadeguato. Per informazioni più dettagliate sul riciclaggio di questo prodotto, contattare il Comune, il servizio locale di smaltimento rifiuti oppure il negozio dove è stato acquistato il prodotto.
IT |
|
77 |

CARATTERISTICHE
Ingombro
IT |
|
88 |
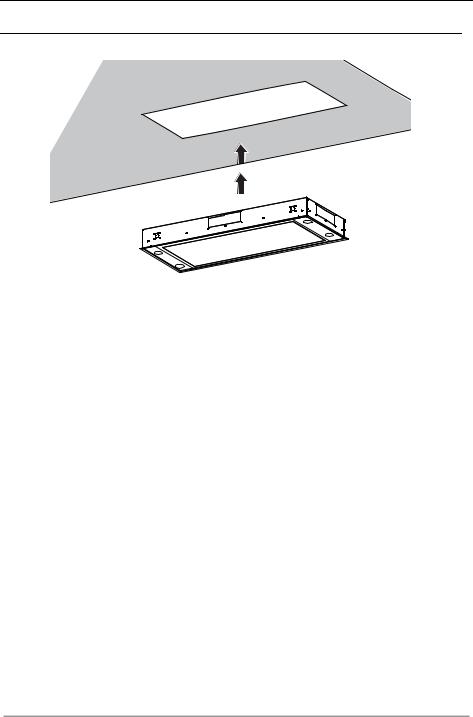
INSTALLAZIONE
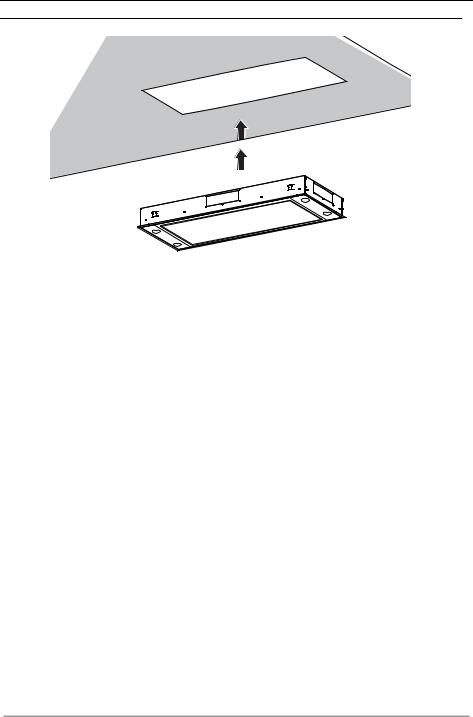
Fissaggio Cappa
•In tutti i casi in cui il Soffitto non fosse sufficientemente robusto sul punto di sospensione, l’Installatore dovrà provvedere a irrobustirlo con opportune piastre e contropiastre ancorate a parti strutturalmente resistenti.
CONNESSIONE ELETTRICA
•Collegare la Cappa all’Alimentazione di Rete interponendo un Interruttore bipolare con a- pertura dei contatti di almeno 3 mm.
IT |
|
99 |
USO
|
|
|
|
|
S1 |
|
|
S1 |
|
|
|
|
|
|
|
|
|
|
|
|
|
|
|
L |
T1 |
T2 |
T3 |
T4 |
|
|
L |
T1 |
T2 |
T3 |
T4 |
|
|
|
|
|
|
|
|||||
|
|
|
S1 |
|
|
|
|
|
|
|
|
|
|
|
F |
|
|
|
|
|
|
|
|
|
|
|
|
|
2 |
3 |
I |
|
|
|
|
|
|
|
L |
T1 |
T2 |
T3 |
T4 |
|
|
|
|
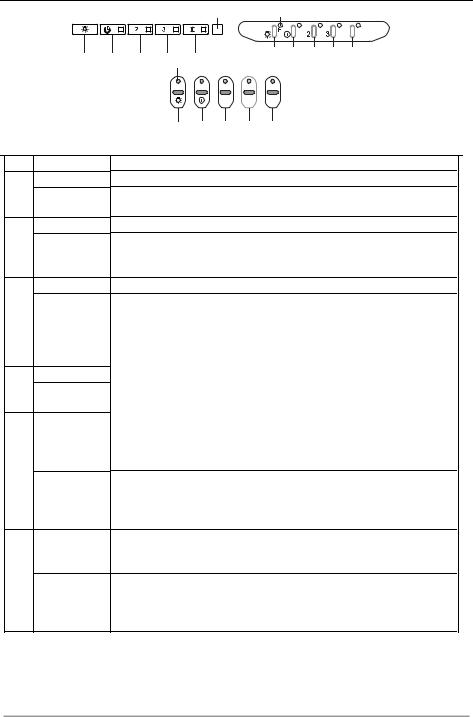
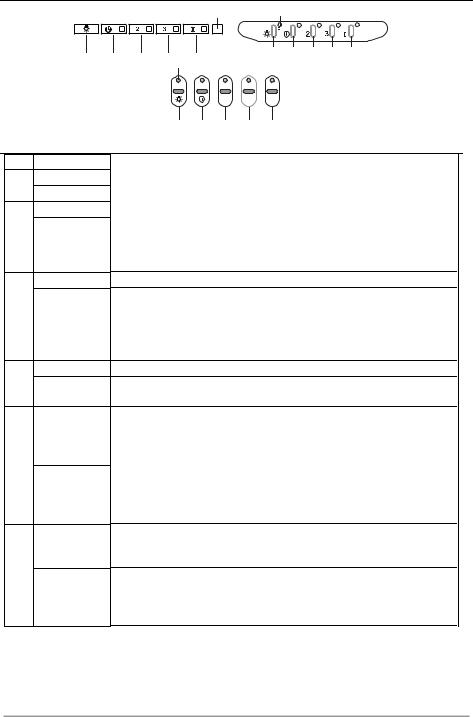
Quadro comandi
Tasto Led
L -
T1 Fisso
Lampeggiante
T2 Fisso
T3 Fisso
T4 Fisso
S1 Fisso
Lampeggiante
Funzione
Accende/Spegne le luci alla massima luminosità.
Premuto per 2 secondi circa accende/spegne l’impianto d’illuminazione ad intensità ridotta.
Accende/Spegne il motore alla prima velocità.
Funzione Delay:
Tenendo premuto il tasto per circa 3 sec., Attiva/Disattiva la funzione Delay (lo spegnimento automatico del Motore, delle Ventole e dell’Illuminazione ritardato di 30’).
Non attivabile con Intensiva o 24h accesi. Accende il motore alla seconda velocità.
Tenendo il tasto premuto per circa 5 secondi, quando tutti i carichi sono spenti (Motore+Luce), si attiva l’allarme dei Filtri al Carbone attivo visualizzando un doppio lampeggio del relativo Led.
Per disattivarlo, si preme di nuovo il tasto per altri 5 secondi visualizzando un lampeggio singolo del relativo Led.
Accende il motore alla terza velocità.
Tenendo premuto il tasto per circa 3 secondi, quando tutti i carichi sono spenti (Motore+Luce), si effettua il reset visualizzando il triplo lampeggio del Led S1.
Accende il motore alla velocità INTENSIVA.
Questa velocità è temporizzata a 6 minuti. Terminato il tempo, il sistema ritorna automaticamente alla velocità precedentemente selezionata. Se attivata da motore spento una volta finito il tempo passa alla modalità OFF.
Tenendo premuto per 5 secondi si abilità il telecomando visualizzando un doppio lampeggio del medesimo led.
Tenendo il tasto premuto per 5 secondi si disabilita il telecomando visualizzando il lampeggio del rispettivo led una sola volta.
Segnala l’allarme saturazione Filtri Antigrasso Metallici e la necessità di lavarli. L’allarme entra in funzione dopo 100 ore di lavoro effettivo della Cappa. (Reset vedi parag. Manutenzione)
Segnala, quando è attivato, l’allarme saturazione Filtro Antiodore al Carbone Attivo, che deve essere sostituito; devono anche essere lavati i Filtri Antigrasso Metallici. L’allarme saturazione Filtro Antiodore al Carbone Attivo entra in funzione dopo 200 ore di lavoro effettivo della Cappa. (Attivazione e Reset vedi parag. Manutenzione)
IT |
|
1 |
|
10 |
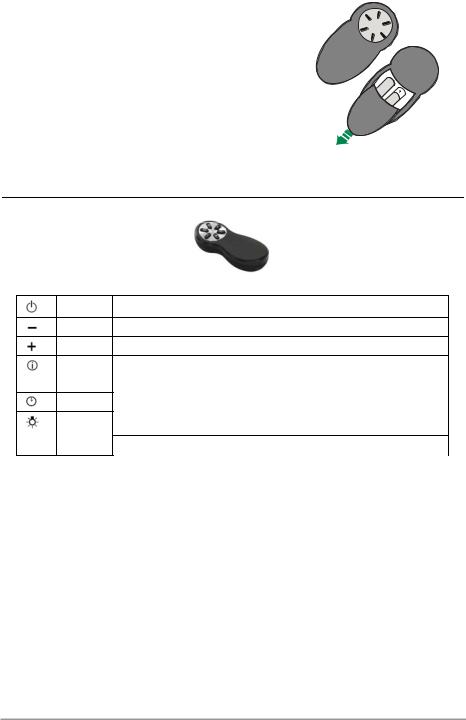
TELECOMANDO
Questo apparecchio può essere comandato per mezzo di un telecomando, alimentato con pile alcaline zincocarbone da 1,5 V del tipo standard LR03-AAA (non incluse).
•Non riporre il telecomando in prossimità di fonti di calore.
•Non disperdere le pile nell’ambiente, depositarle negli appositi contenitori.
Quadro comandi Telecomando
Motore On / Off Motore
Decrementa la velocità di esercizio ad ogni pressione. Incrementa la velocità di esercizio ad ogni pressione.
Intensiva Attiva la funzione Intensiva
Delay Attiva / Disattiva la funzione Delay Luce On / Off Luci
Premuto per 2 secondi modifica l’intensità della Luce.
IT |
|
1 |
|
11 |
MANUTENZIONE
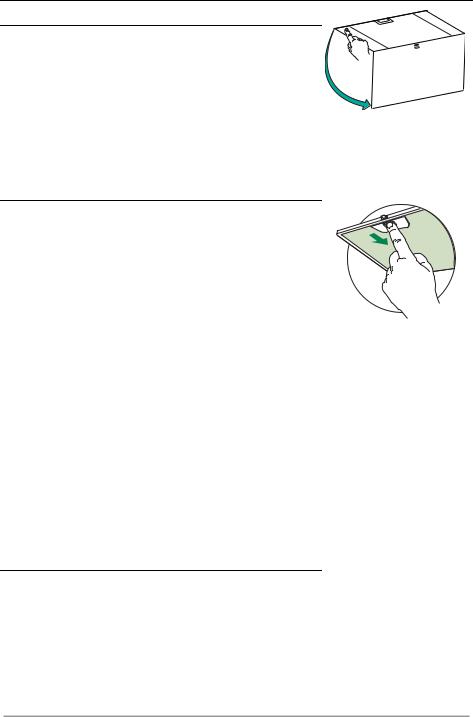
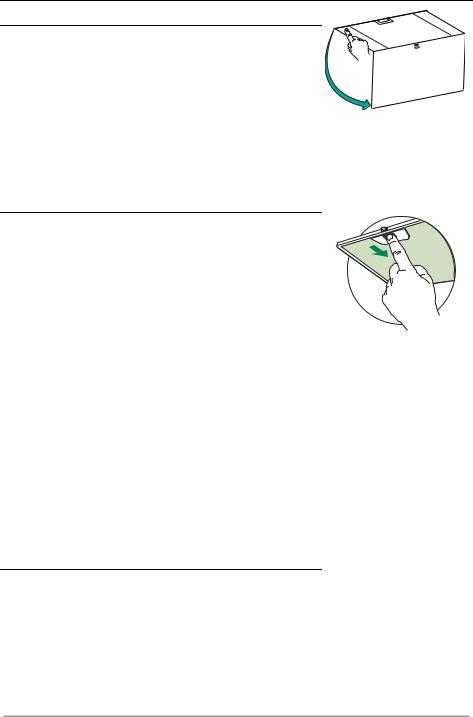
Apertura Pannello
•Aprire il Pannello tirandolo.
•Pulirlo esternamente con un panno umido e detersivo liquido neutro.
•Pulirlo anche internamente utilizzando un panno umido e detergente neutro; non utilizzare panni o spugne bagnate, né getti d’acqua; non utilizzare sostanze abrasive.
Filtri antigrasso metallici
Sono lavabili in lavastoviglie, e necessitano di essere lavati quando il Led S1 si accende o almeno ogni 2 mesi circa di utilizzo o più frequentemente, per un uso particolarmente intenso.
PULIZIA FILTRI
Reset del segnale di allarme
•Spegnere le Luci e il Motore di aspirazione.
•Premere il tasto T3 per almeno 3 secondi, sino al triplo lampeggio di conferma del Led.
Pulizia Filtri
•Aprire le Ante.
•Togliere il Filtro spingendolo verso la parte posteriore del gruppo e tirando contemporaneamente verso il basso.
•Lavare il filtro evitando di piegarlo, e lasciarlo asciugare prima di rimontarlo (un’eventuale cambiamento del colore della superficie del filtro, che potrebbe verificarsi nel tempo, non pregiudica assolutamente l’efficienza dello stesso).
•Rimontarlo facendo attenzione a mantenere la maniglia verso la parte visibile esterna.
•Richiudere le Ante.
Illuminazione
•Per la sostituzione contattare l’Assistenza Tecnica ("Per l'acquisto rivolgersi all'assistenza tecnica").
IT |
|
1 |
|
12 |
RECOMMENDATIONS AND SUGGESTIONS
The Instructions for Use apply to several versions of this appliance. Accordingly, you may find descriptions of individual features that do not apply to your specific appliance.
INSTALLATION
•The manufacturer will not be held liable for any damages resulting from incorrect or improper installation.
•The minimum safety distance between the cooker top and the extractor hood is 650 mm (some models can
be installed at a lower height, please refer to the paragraphs on working dimensions and installation).
• Check that the mains voltage corresponds to that indicated on the rating plate fixed to the inside of the hood.
• For Class I appliances, check that the domestic power supply guarantees adequate earthing.
Connect the extractor to the exhaust flue through a pipe of minimum diameter 120 mm. The route of the flue must be as short as possible.
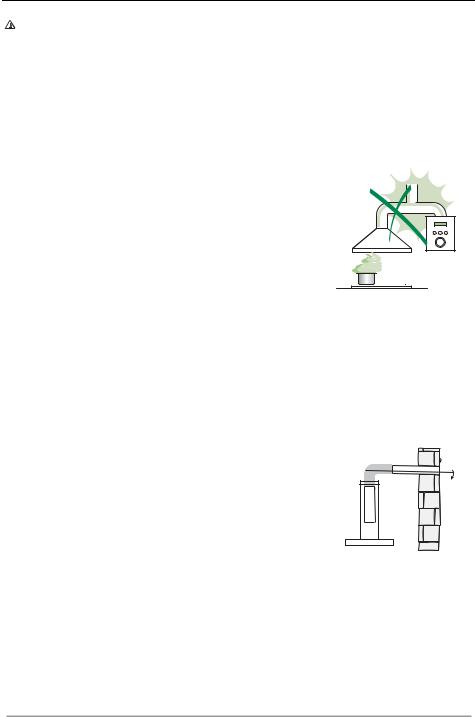
•Do not connect the extractor hood to exhaust ducts carrying combustion fumes (boilers, fireplaces, etc.).
•If the extractor is used in conjunction with non-
electrical appliances (e.g. gas burning |
|
appliances), a sufficient degree of aeration must |
2° |
be guaranteed in the room in order to prevent the |
|
backflow of exhaust gas. The kitchen must have |
|
an opening communicating directly with the open |
|
air in order to guarantee the entry of clean air. |
|
When the cooker hood is used in conjunction with |
|
appliances supplied with energy other than electric, the negative pressure in the room must not exceed 0,04 mbar to prevent fumes being drawn back into the room by the cooker hood.
•In the event of damage to the power cable, it must be replaced by the manufacturer or by the technical service department, in order to prevent any risks.
EN |
|
1 |
|
13 |

•If the instructions for installation for the gas hob specify a greater distance specified above, this has to be taken into account. Regulations concerning the discharge of air have to be fulfilled.
•Use only screws and small parts in support of the hood.
Warning: Failure to install the screws or fixing device in accordance with these instructions may result in electrical hazards.
•Connect the hood to the mains through a two-pole switch having a contact gap of at least 3 mm.
USE
•The extractor hood has been designed exclusively for domestic use to eliminate kitchen smells.
•Never use the hood for purposes other than for which it has been designed.
•Never leave high naked flames under the hood when it is in operation.
•Adjust the flame intensity to direct it onto the bottom of the pan only, making sure that it does not engulf the sides.
•Deep fat fryers must be continuously monitored during use: overheated oil can burst into flames.
• Do not flambè under the range hood; risk of fire.
• This appliance can be used by children aged from 8 years and above and persons with reduced
physical, sensory or mental capabilities or lack of
experience and knowledge if they have been given supervision or instruction concerning use of the appliance in a safe way and understand the hazards involved. Children shall not play with the appliance. Cleaning and user maintenance shall not be made by children without supervision.
EN |
|
1 |
|
14 |

•“CAUTION: Accessible parts may become hot when used with cooking appliances.”
MAINTENANCE
•Switch off or unplug the appliance from the mains supply before carrying out any maintenance work.
•Clean and/or replace the Filters after the specified time period (Fire hazard).
•The Grease filters must be cleaned every 2 months of operation, or more frequently for particularly heavy usage, and can be washed in a dishwasher.
•The Activated charcoal filter is not washable and cannot be regenerated, and must be replaced approximately every 4 months of operation, or more frequently for particularly heavy usage.
•"Failure to carry out cleaning as indicated will result in a fire hazard".
•Clean the hood using a damp cloth and a neutral liquid detergent.
The symbol  on the product or on its packaging indicates that this product may not be treated as household waste. Instead it shall be handed over to the applicable collection point for the recycling of electrical and electronic equipment. By ensuring this product is disposed of correctly, you will help prevent potential negative consequences for the environment and human health, which could otherwise be caused by inappropriate waste handling of this product. For more detailed information about recycling of this product, please contact your local city office, your household waste disposal service or the shop where you purchased the product.
EN |
|
1 |
|
15 |
CHARACTERISTICS
Dimensions
EN |
|
1 |
|
16 |
INSTALLATION
Fixing the Hood
•In all cases where the ceiling is not strong enough at the suspension point, the installer must provide strengthening using suitable plates and backing pieces anchored to the structurally sound parts.
ELECTRICAL CONNECTION
•Connect the hood to the mains through a two-pole switch having a contact gap of at least 3 mm..
EN |
|
1 |
|
17 |
USE
|
|
|
|
|
|
|
|
|
|
|
|
S1 |
|
|
|
|
|
S1 |
|
|
|
|
|
|
|||
|
|
|
|
|
|
|
|
|
|
|
|
|
|
|
|
|
L |
|
|
|
|
|
|
|
|
|
|
|
|
|
|
|
|
|
|
|
|
|
|
|
|
|
|
|
|
|
|
|
|
|
|
|
|
|
|
|
|
L |
|
|
T1 |
|
T2 |
T3 |
T4 |
|
|
|
|
|
T1 |
T2 |
T3 T4 |
||||||||||
|
|
|
|
|
|
|
|
|
|
|
|
|
|
|
|
|
|
|
|
||||||||
|
|
|
|
|
|
|
|
S1 |
|
|
|
|
|
|
|
|
|
|
|
|
|
|
|
|
|
||
|
|
|
|
|
|
|
|
F |
|
|
2 |
3 |
|
|
I |
|
|
|
|
|
|
|
|
|
|
||
|
|
|
|
|
|
|
|
|
|
|
|
|
|
|
|
|
|
|
|
|
|
||||||
|
|
|
|
|
|
|
|
|
|
|
|
|
|
|
|
|
|
|
|
|
|
|
|
|
|||
|
|
|
|
|
|
|
|
|
|
|
|
|
|
|
|
|
|
|
|
|
|
|
|
|
|||
|
|
|
|
|
|
|
|
L |
T1 |
T2 |
T3 |
T4 |
|
|
|
|
|
|
|
|
|
|
|||||
Button |
Led |
Function |
|
|
|
|
|
Control panel |
|
|
|
|
|
|
|
|
|
|
|
|
|||||||
|
|
|
|
|
|
|
|
|
|
|
|
|
|
|
|
|
|
|
|
|
|
||||||
L |
- |
|
TurnsthelightsON/OFFat maximumstrength. |
|
|
|
|
|
|
|
|
|
|
|
|
||||||||||||
T1 |
|
|
Pressandholdforapprox.2secondstoturnthelightingsystemonandoffatreducedintensity. |
||||||||||||||||||||||||
Fixed |
Turnsthemotoron/offatspeedone. |
|
|
|
|
|
|
|
|
|
|
|
|
|
|
|
|||||||||||
|
|
|
Delay function: |
|
|
|
|
|
|
|
|
|
|
|
|
|
|
|
|
|
|
|
|
||||
|
|
|
Press and hold the button for approx. 3 seconds to Activate/Deactivate the Delay function |
||||||||||||||||||||||||
|
|
|
(automatic switching off of the Motor, the Fans and the Lighting with a 30' delay). |
||||||||||||||||||||||||
T2 |
|
|
CannotbeenabledwhenIntensiveor24hareon. |
|
|
|
|
|
|
|
|
|
|
|
|
||||||||||||
Fixed |
TurnstheMotoronatspeedtwo. |
|
|
|
|
|
|
|
|
|
|
|
|
|
|
|
|||||||||||
|
|
|
Press and hold the button for approximately 5 seconds,with all the loads turned off (Motor and Lights), |
||||||||||||||||||||||||
|
|
|
toturntheActivatedCharcoalFilteralarmon.TherelevantLEDflashestwicetoconfirm. |
||||||||||||||||||||||||
|
|
|
To turn the alarm off, press the button again and hold for at least 5 seconds. The relevant LED flashes |
||||||||||||||||||||||||
T3 |
|
|
once. |
|
|
|
|
|
|
|
|
|
|
|
|
|
|
|
|
|
|
|
|
|
|
||
Fixed |
TurnstheMotoronatspeedthree. |
|
|
|
|
|
|
|
|
|
|
|
|
|
|
|
|||||||||||
|
|
|
Press and hold the button for approximately 3 seconds,with all the loads turned off (Motor and Lights), |
||||||||||||||||||||||||
T4 |
|
|
toperformareset.TheLEDS1flashesthreetimes. |
|
|
|
|
|
|
|
|
|
|
||||||||||||||
Fixed |
TurnstheMotoronatINTENSIVESpeed. |
|
|
|
|
|
|
|
|
|
|
|
|
|
|
||||||||||||
|
|
|
This speed is timed to run for 6 minutes. At the end of this time, the system returns automatically to the |
||||||||||||||||||||||||
|
|
|
speed that was set before. If it is activated with the motor turned off, it will switch to OFF at the end of |
||||||||||||||||||||||||
|
|
|
thetime. |
|
|
|
|
|
|
|
|
|
|
|
|
|
|
|
|
|
|
|
|
|
|
||
|
|
|
Pressandholdfor5secondstoenabletheremotecontrol,indicatedbytheLEDflashingtwice. |
||||||||||||||||||||||||
S1 |
|
|
Pressandholdfor5secondstodisabletheremotecontrol,indicatedbytheLEDflashingjustonce. |
||||||||||||||||||||||||
Fixed |
Signals the Metal Grease Filter saturation alarm, indicating that it is necessary to wash the filters. The |
||||||||||||||||||||||||||
|
|
|
alarm is triggered after the Hood has been in operation for 100 working hours. (Reset see the parag. |
||||||||||||||||||||||||
|
|
|
Maintenance) |
|
|
|
|
|
|
|
|
|
|
|
|
|
|
|
|
|
|
|
|
||||
|
Flashing |
When this is activated, it signals the Activated Charcoal Filter saturation alarm, indicating that the filter |
|||||||||||||||||||||||||
|
|
|
must be changed; the Metal Grease Filters must also be washed. The Activated Charcoal Filter satura- |
||||||||||||||||||||||||
|
|
|
tion alarm comes into operation after the Hood has been working for 200 hours. (Activation and Reset |
||||||||||||||||||||||||
|
|
|
seetheparag.Maintenance) |
|
|
|
|
|
|
|
|
|
|
|
|
|
|
|
|
|
|||||||
EN |
|
1 |
|
18 |
REMOTE CONTROL
The appliance can be controlled using a remote control powered by a 1.5 V carbon-zinc alkaline batteries of the standard LR03-AAA type (not included).
•Do not place the remote control near to heat sources.
•Used batteries must be disposed of in the proper
manner.
Remote control panel
Motor Motor On / Off.
Decreases the working speed each time it is pressed.
Increases the working speed each time it is pressed.
Intensive Activates the Intensive function
Delay Activates / Deactivates the Delay function
Light Lights On / Off
Press for 2 seconds to modify the intensity of the Light.
EN |
|
1 |
|
19 |
MAINTENANCE
Opening Panel
•Open the Panel by pulling it.
•Clean the outside with a damp cloth and neutral detergent.
•Clean the inside using a damp cloth and neutral detergent; do not use wet cloths or sponges, or jets of water; do not use abrasive substances.
Metal grease filters
These can be washed in the dishwasher, and need to be cleaned whenever the S1 Led comes on or at least once every 2 months use, or more frequently if use is particularly intensive.
CLEANING THE FILTERS
Resetting the alarm signal
•Turn the Lights and the Suction Motor off.
•Press T3 and hold for at least 3 seconds, until LED flashes three times in confirmation.
Cleaning the Filters
•Open the doors.
•Remove the Filter, pushing it towards the back of the unit and at the same time pulling downward.
•Wash the filter without bending it, and leave it to dry thoroughly before replacing (if the surface of the filter changes colour over time, this will have absolutely no effect on its efficiency).
•Replace, taking care to ensure that the handle faces forwards.
•Close the doors again.
Lighting unit
•For replacement contact technical support ("To purchase contact technical support").
EN |
|
2 |
|
20 |
EMPFEHLUNGEN UND HINWEISE
Diese Gebrauchsanleitungen beziehen sich auf die verschiedenen Modelle der Abzugshaube. Darum kann es möglich sein, dass die Beschreibung bestimmter Merkmale für das vorliegende Gerät nicht zutrifft.
INSTALLATION
•Der Hersteller haftet nicht für etwaige Schäden, die durch die fehlerhafte Installation oder falschen Gebrauch entstehen könnten.
•Der min. Sicherheitsabstand zwischen Kochfeld und Abzugshaube beträgt 650 mm (einige Modelle
können auch niedriger installiert werden; siehe Absatz Installation).
• Kontrollieren Sie, ob die Netzspannung den Daten des Typenschilds im Innern der Haube entspricht.
• Für Geräte der Klasse I muss kontrolliert werden, ob das häusliche Versorgungsnetz korrekt geerdet ist.
Die Absaughaube mit Hilfe eines Rohrs mit einem Mindestdurchmesser von 120 mm mit dem Rauchabzug verbinden. Der Verlauf des Rauchabzugs soll so kurz wie möglich sein.
•Die Abzugshaube darf nicht an einen Schacht angeschlossen werden, in den Rauchgase geleitet werden (z. B. von Heizkessel, Kaminen, usw.).
•Falls in dem Raum neben dem Abzug auch nicht
mit Strom betriebene Geräte (zum Beispiel |
|
Gasgeräte) eingesetzt werden, muss für eine |
2° |
ausreichende Belüftung gesorgt werden, damit der |
|
Rückfluss der Abgase verhindert wird. Die Küche |
|
muss eine direkte Öffnung nach Außen aufweisen, |
|
damit ein ausreichender Luftaustausch |
|
gewährleistet wird. Wird die Abzugshaube |
|
zusammen mit nicht mit Strom betriebenen Geräte eingesetzt, darf der |
|
Unterdruck im Raum 0,04 mbar nicht überschreiten, damit die Abgase nicht |
|
wieder angesaugt werden. |
|
•Schadhafte Kabel müssen durch den Hersteller oder vom Kundendienst ausgewechselt werden, damit jedes Risiko ausgeschlossen wird.
DE |
|
2 |
|
21 |
•Falls die Montageanweisungen für die gasbetriebene Kochmulde einen größeren Abstand vorschreiben, als der oben angegebene, muss diese Vorgabe befolgt werden. Es sind sämtliche Abluftvorschriften zu beachten.
•Nur für die Abzugshaube geeignete Schrauben und Kleinteile verwenden. Achtung: Werden die Schrauben und Befestigungselemente nicht entsprechend der vorliegenden Anleitungen verwendet, besteht Stromschlaggefahr.
•Die Abzugshaube mittels zweipoligem Schalter mit einer Öffnung der Kontakte von mindestens 3 mm an das Netz anschließen.
GEBRAUCH
•Die Abzugshaube wurde ausschließlich für den häuslichen Gebrauch entwickelt, um Kochdünste zu beseitigen.
•Die Haube darf nur für die ihr zugedachten Zwecke benutzt werden.
•Unter der eingeschalteten Haube keine offenen Flammen benutzen.
•Die Flamme so regulieren, dass sie nicht über den Boden des Kochgeschirrs hinausreicht.
•Fritteusen müssen während des Gebrauchs
ständig überwacht werden: überhitztes Öl könnte sich entzünden.
•Auf keinen Fall unter der Haube flambieren: Brandgefahr.
•Kinder ab 8 Jahren und Personen mit
eingeschränkten physischen, sensorischen oder psychischen Fähigkeiten, oder mit mangelnden Erfahrungen oder Kenntnissen dürfen nicht mit dem Gerät umgehen, es sei denn, sie werden von einer für ihre Sicherheit verantwortlichen Person beaufsichtigt oder angeleitet. Sicherstellen, dass Kinder nicht mit dem Gerät herumspielen können. Reinigungsund Wartungsarbeiten dürfen nicht von unbeaufsichtigten Kindern durchgeführt werden.
DE |
|
2 |
|
22 |

•ACHTUNG: Die zugänglichen Teile können während des Gebrauchs der Kochgeräte sehr heiß werden.
WARTUNG
•Vor Reinigungsoder Wartungsarbeiten am Gerät, muss dieses ausgeschaltet und spannungslos gemacht werden.
•Die Filter stets nach den angegebenen Intervallen reinigen oder auswechseln (Brandgefahr).
•Die Fettfilter sind alle 2 Monate oder bei intensiver Nutzung öfter zu reinigen und können in der Spülmaschine gespült werden.
•Der Aktivkohlefilter ist weder waschbar, noch regenerierbar und muss bei normalem Betrieb zirka alle 4 Monate oder auch öfter ausgewechselt werden, je nach Intensität des Gebrauchs.
•„Wenn die Reinigung nicht nach den Anweisungen durchgeführt wird, besteht Brandgefahr“.
•Die Haube mit einem feuchten Lappen und einem neutralen Reinigungsmittel abwischen.
Das Symbol  am Produkt oder auf der Verpackung weist darauf hin, dass das Gerät nicht als normaler Hausmüll entsorgt werden darf. Das ausrangierte Gerät muss vielmehr bei einer speziellen Sammelstelle für elektrische und elektronische Geräte abgegeben werden. Mit der vorschriftsmäßigen Entsorgung des Gerätes trägt der Benutzer dazu bei, schädliche Auswirkungen auf Umwelt und Gesundheit zu vermeiden. Weitere Informationen zum Recycling dieses Produktes können bei der zuständigen Behörde, der örtlichen Abfallbeseitigung oder bei dem Händler, der das Gerät verkauft hat, eingeholt werden.
DE |
|
2 |
|
23 |
CHARAKTERISTIKEN
Platzbedarf
DE |
|
2 |
|
24 |
MONTAGE
Montage der Dunstabzugshaube
•Sollte die Decke am Befestigungspunkt nicht robust genug sein, muss der Installateur geeignete Platten und Gegenplatten verwenden, die an strukturell widerstandsfähigen Teilen verankert werden
ELEKTROANSCHLUSS
•Bei Anschluss der Haube an das Stromnetz muss ein zweipoliger Schalter mit einem Öffnungsweg von mindestens 3 mm zwischengeschaltet werden.
DE |
|
2 |
|
25 |
BEDIENUNG
|
|
|
|
|
S1 |
|
|
S1 |
|
|
|
L |
T1 |
T2 |
T3 |
T4 |
|
|
L |
T1 |
T2 |
T3 |
T4 |
|
|
|
|
|
|
|
|||||
|
|
|
S1 |
|
|
|
|
|
|
|
|
|
|
|
F |
|
|
|
|
|
|
|
|
|
|
|
|
|
2 |
3 |
I |
|
|
|
|
|
|
|
L |
T1 |
T2 |
T3 |
T4 |
|
|
|
|
Schalttafel
Taste LED
L -
T1 Bleibend
Blinkend
T2 Bleibend
T3 Bleibend
T4 Bleibend
S1 Bleibend
Blinkend
Funktion
Schaltet die Beleuchtung bei maximaler Intensität ein/aus.
Schaltet bei zirka 2 Sekunden langem Drücken die verminderte Beleuchtung ein oder aus.
Schaltet den Motor bei der ersten Betriebsgeschwindigkeit ein/aus.
Funktion Delay:
Mit zirka 3 Sekunden langem Gedrückthalten wird die Funktion Delay (das um 30‘ verzögerte Abschalten des Motors, der Lüfterräder und der Beleuchtung) aktiviert/deaktiviert.
Nicht aktivierbar bei laufender Funktion Intensiv oder 24H. Schaltet den Motor bei der zweiten Betriebsgeschwindigkeit ein.
Mit zirka 5 Sekunden langem Gedrückthalten der Taste bei abgeschalteten Verbrauchern (Motor+Licht) wird der Alarm für aktive Aktivkohlefilter aktiviert und die entsprechende LED blinkt zweimal.
Zum Abstellen die Taste erneut 5 Sekunden lang drücken, die entsprechende LED blinkt ein Mal.
Schaltet den Motor bei der dritten Betriebsgeschwindigkeit ein.
Mit zirka 3 Sekunden langem Gedrückthalten der Taste bei abgeschalteten Verbrauchern (Motor+Licht) erfolgt ein Reset und die LED S1 blinkt drei Mal.
Schaltet den Motor bei Intensivgeschwindigkeit ein.
Diese Geschwindigkeit ist auf 6 Minuten zeitgeregelt. Nach Ablauf dieser Zeit kehrt das System zu der zuvor eingestellten Geschwindigkeit zurück. Wird sie bei abgestelltem Motor aktiviert, wird nach Ablauf der Zeit zum Betriebsmodus OFF übergegangen.
Mit 5 Sekunden langem Gedrückthalten wird die Fernbedienung aktiviert und die entsprechende LED blinkt zwei Mal.
Mit 5 Sekunden langem Gedrückthalten wird die Fernbedienung deaktiviert und die entsprechende LED blinkt nur ein Mal.
Meldet den Alarm für Sättigung der Metallfettfilter und die Notwendigkeit, diese zu waschen. Dieser Alarm wird nach 100 effektiven Betriebsstunden der Abzugshaube ausgelöst. (Reset siehe Absatz. Wartung).
Meldet, sofern aktiviert, den Alarm für Sättigung des Aktivkohlefilters, der ausgewechselt werden muss; auch die Metallfettfilter müssen gewaschen werden. Der Alarm für Sättigung des Aktivkohlefilters wird nach 200 effektiven Betriebsstunden der Abzugshaube ausgelöst. (Aktivierung und Reset siehe Absatz. Wartung).
DE |
|
2 |
|
26 |
FERNBEDIENUNG
Dieses Gerät kann mit einer Fernbedienung gesteuert werden, welche mit alkalischen Zink-Kohle- Batterien 1,5 V des Standardtyps LR03-AAA versorgt wird (nicht im Lieferumfang enthalten).
•Die Fernbedienung nicht in die Nähe von Hitzequellen legen.
•Batterien müssen vorschriftsmäßig entsorgt werden.
Bedienfeld der Fernbedienung
Motor
Intensivg eschwind igkeit
Delay
Beleucht ung
On / Off Motor.
Vermindert bei jedem Drücken die Betriebsgeschwindigkeit. Erhöht bei jedem Drücken die Betriebsgeschwindigkeit.
Aktiviert die Intensivgeschwindigkeit.
Aktiviert/Deaktiviert die Funktion Delay.
On / Off Beleuchtung
Verändert bei 2 Sekunden langem Drücken die Intensität der Beleuchtung.
DE |
|
2 |
|
27 |
WARTUNG
Öffnen des Paneels
•Das Paneel herausziehen.
•Die Außenflächen mit einem feuchten Lappen und einem neutralen Flüssigreiniger säubern.
•Auch Innen mit einem feuchten Lappen und einem neutralen Reinigungsmittel säubern; keine nassen Tücher oder Schwämme, oder gar Wasser verwenden, und keine schleifenden Mittel einsetzen.
Metallfettfilter
Die Fettfilter sind spülmaschinengeeignet und müssen gewaschen werden, sobald sich die LED S1 einschaltet, oder mindestens alle 2 Monate, oder auch öfter, je nach Intensität des Gebrauchs.
REINIGUNG DER FILTER
Reset des Alarmsignals
•Die Beleuchtung und den Absaugmotor abstellen.
•Die Taste T3 mindestens 3 Sekunden lang drücken, bis der Vorgang durch dreimaliges Blinken der LED bestätigt wird.
Reinigung der Filter
•Die Klappen öffnen.
•Den Filter zu dem hinteren Teil der Gruppe schieben und gleichzeitig nach unten ziehen.
•Den Filter waschen, ohne ihn zu verbiegen, und vor dem Wiedereinbau trocknen lassen (die Farbe der Filteroberfläche kann sich mit der Zeit verändern, was aber die Wirksamkeit keinesfalls beeinträchtigt.)
•Nun den Filter wieder einbauen, so dass der Griff zur Aussenseite zeigt.
•Die Klappen wieder schließen.
Beleuchtung
LED-Strahler
•Für den Austausch der LED-Strahler wenden Sie sich bitte an den Kundendienst.
DE |
|
2 |
|
28 |
CONSEJOS Y SUGERENCIAS
Las instrucciones de uso se aplican a varios modelos de este aparato. Por lo tanto, usted puede encontrar descripciones de características individuales que no pertenecen a su aparato en concreto.
INSTALACIÓN
•El fabricante no se hace responsable de los daños provocados por una instalación o uso indebido.
•La distancia mínima de seguridad entre el plano de cocción y la campana extractora es de 650 mm
(algunos modelos pueden ser instalados a una altura inferior; véase el párrafo relativo a las dimensiones de trabajo y la instalación).
• Compruebe que la tensión de alimentación corresponda a la indicada en la placa de datos colocada en el interior de la campana.
•Para los aparatos de Clase I, compruebe que la red eléctrica doméstica tenga una conexión a tierra adecuada.
Conecte la campana extractora al conducto de humo a través de un tubo con un diámetro mínimo de 120 mm. La trayectoria del humo debe ser lo más corta posible.
•No conecte la campana extractora a los conductos de humo que transportan humo de combustión (ej. calderas, chimeneas, etc.).
•Si la campana extractora se utiliza en combinación con
aparatos no eléctricos (por ejemplo, aparatos de gas),
debe garantizarse un grado suficiente de ventilación en el  2°
2°
recinto para evitar el retorno del flujo de los gases de escape. La cocina debe tener una abertura comunicante directamente con el exterior para asegurar la entrada de aire fresco. Cuando se utiliza la campana para cocina en
combinación con aparatos no alimentados por corriente eléctrica, la presión negativa en el recinto no debe superar los 0,04 mbar para evitar que el humo sea reaspirado en el recinto por la campana.
•En caso de daños en el cable de alimentación, éste debe ser sustituido por el fabricante o el departamento de servicio para evitar cualquier riesgo.
ES |
|
2 |
|
29 |

•Si las instrucciones de instalación del plano de cocción de gas especifican una distancia mayor de la indicada anteriormente, es necesario tenerlo en cuenta. Se tienen que respetar todas las normativas con respecto a la descarga del aire.
•Utilizar sólo los tornillos y accesorios metálicos de un tipo adecuado para la campana.
Advertencia: No instalar tornillos o sujetadores de acuerdo con estas instrucciones puede provocar descargas eléctricas.
•Conectar la campana a la alimentación de red interponiendo un interruptor bipolar con distancia entre los contactos de por lo menos 3 mm.
USO
•La campana extractora está diseñada exclusivamente para uso doméstico, para eliminar los olores de la cocina.
•Nunca utilice la campana para fines distintos de aquellos para los que fue diseñada.
•No deje nunca llamas altas bajo la campana cuando está en funcionamiento.
•Ajuste la intensidad de la llama para dirigirla sólo a la parte inferior del recipiente de cocción, asegurándose de que no llegue a los lados.
•Las freidoras deben ser controladas continuamente
durante su uso: el aceite recalentado puede incendiarse.
•No realice flambeados bajo la campana: se podría producir un incendio.
•Este aparato puede ser usado por niños de edad no
inferior a 8 años y por personas con reducidas capacidades psicológicas, físicas y sensoriales o con experiencia o conocimiento inadecuados, siempre que estén cuidadosamente supervisados e instruidos sobre cómo utilizar de forma segura el equipo y los peligros que esto implica. Asegúrese de que los niños no jueguen con el aparato. La limpieza y mantenimiento por parte del usuario no deben ser realizados por los niños, a menos que sean supervisados.
ES |
|
3 |
|
30 |
 Loading...