


Epson® PowerLite® 1705c/1715c
Multimedia Projector
User’s Guide

Important Safety Information
WARNING: Never look into the projector lens when the lamp is turned on; the bright light can damage your eyes. Never let children look into the lens when it is on. Never open any cover on the projector, except the lamp and filter covers. Dangerous electrical voltages inside the projector can severely injure you. Except as specifically explained in this User’s Guide, do not attempt to service this product yourself. Refer all servicing to qualified service personnel.
WARNING: The projector and its accessories come packaged in plastic bags. Keep plastic bags away from small children to avoid any risk of suffocation.
Caution: When you replace the lamp, never touch the new lamp with your bare hands; the invisible residue left by the oil on your hands may shorten the lamp life. Use a cloth or glove to handle the new lamp.
Copyright Notice
All rights reserved. No part of this publication may be reproduced, stored in a retrieval system, or transmitted in any form or by any means, electronic, mechanical, photocopying, recording, or otherwise, without the prior written permission of Seiko Epson Corporation. The information contained herein is designed only for use with this Epson product. Epson is not responsible for any use of this information as applied to other products.
Neither Seiko Epson Corporation nor its affiliates shall be liable to the purchaser of this product or third parties for damages, losses, costs, or expenses incurred by purchaser or third parties as a result of: accident, misuse, or abuse of this product or unauthorized modifications, repairs, or alterations to this product, or (excluding the U.S.) failure to strictly comply with Seiko Epson Corporation’s operating and maintenance instructions.
Seiko Epson Corporation shall not be liable for any damages or problems arising from the use of any options or any consumable products other than those designated as Original Epson Products or Epson Approved Products by Seiko Epson Corporation.
Epson is a registered trademark, and Exceed Your Vision and EasyMP are trademarks of Seiko Epson Corporation.
PrivateLine, Presenters Club, and PowerLite are registered trademarks; SizeWise is a trademark; and Epson Connection, Epson Store, and Epson Extra Care are service marks of Epson America, Inc.
Pixelworks, DNX, and the DNX logo are trademarks of Pixelworks, Inc.
General Notice: Other product names used herein are for identification purposes only and may be trademarks of their respective owners. Epson disclaims any and all rights in those marks.
© 2006 Epson America, Inc. |
6/06 |
CPD-21951
2

|
Contents |
|
|
Welcome . . . . . . . . . . . . . . . . . . . . . . . . . . . . . . . . . . . . . |
. 9 |
|
Using Your Documentation . . . . . . . . . . . . . . . . . . . . . . . . . |
10 |
|
Getting More Information . . . . . . . . . . . . . . . . . . . . . . . |
10 |
|
Registration and Warranty . . . . . . . . . . . . . . . . . . . . . . . . . . |
11 |
|
Unpacking the Projector. . . . . . . . . . . . . . . . . . . . . . . . . . . . |
12 |
|
Additional Components. . . . . . . . . . . . . . . . . . . . . . . . . |
13 |
|
Optional Accessories . . . . . . . . . . . . . . . . . . . . . . . . . . . |
13 |
|
Displaying and Adjusting the Image . . . . . . . . |
15 |
1 |
Positioning the Projector . . . . . . . . . . . . . . . . . . . . . . . . . . . |
16 |
|
Projecting the Image. . . . . . . . . . . . . . . . . . . . . . . . . . . . . . . |
17 |
|
Turning On the Projector . . . . . . . . . . . . . . . . . . . . . . . |
17 |
|
Selecting the Image Source. . . . . . . . . . . . . . . . . . . . . . . |
19 |
|
Troubleshooting Display Problems. . . . . . . . . . . . . . . . . . . . |
20 |
|
You Can’t Project an Image . . . . . . . . . . . . . . . . . . . . . . |
20 |
|
The Projector and Notebook Don’t Display the |
|
|
Same Image . . . . . . . . . . . . . . . . . . . . . . . . . . . . . . . |
20 |
|
Adjusting the Image . . . . . . . . . . . . . . . . . . . . . . . . . . . . . . . |
22 |
|
Adjusting the Height of Your Image . . . . . . . . . . . . . . . |
22 |
|
Focusing and Zooming Your Image . . . . . . . . . . . . . . . . |
23 |
|
Adjusting the Image Shape. . . . . . . . . . . . . . . . . . . . . . . |
23 |
|
Correcting Computer Images. . . . . . . . . . . . . . . . . . . . . |
25 |
|
Shutting Down the Projector . . . . . . . . . . . . . . . . . . . . . . . . |
25 |
|
Using the Direct Power On Function . . . . . . . . . . . . . . |
26 |
3

|
Using the Remote Control . . . . . . . . . . . . . . . |
. . . . 27 |
2 |
Using the Remote Control . . . . . . . . . . . . . . . . . . . . . . . |
. . . 28 |
|
Replacing the Batteries. . . . . . . . . . . . . . . . . . . . . . . |
. . . 28 |
|
Controlling the Picture and Sound. . . . . . . . . . . . . . . . . |
. . . 29 |
|
Switching Between Picture Sources . . . . . . . . . . . . . |
. . . 29 |
|
Turning Off the Picture and Sound . . . . . . . . . . . . . |
. . . 30 |
|
Stopping Action. . . . . . . . . . . . . . . . . . . . . . . . . . . . |
. . . 30 |
|
Zooming Part of Your Image . . . . . . . . . . . . . . . . . . |
. . . 31 |
|
Controlling the Volume. . . . . . . . . . . . . . . . . . . . . . |
. . . 31 |
|
Resizing Video Images . . . . . . . . . . . . . . . . . . . . . . . |
. . . 32 |
|
Adjusting the Color Mode . . . . . . . . . . . . . . . . . . . . |
. . . 32 |
|
Operating Your Computer with the Remote Control . . . |
. . . 33 |
|
Highlighting Your Presentation . . . . . . . . . . . . . . . . . . . |
. . . 34 |
|
Using the Pointer Tool . . . . . . . . . . . . . . . . . . . . . . |
. . . 34 |
|
Customizing the Pointer Tool . . . . . . . . . . . . . . . . . |
. . . 34 |
|
Connecting to Computers, Cameras, and |
|
3 |
Other Equipment. . . . . . . . . . . . . . . . . . . . . . . . . |
. . . 35 |
|
Connecting to a Computer. . . . . . . . . . . . . . . . . . . . . . . |
. . . 36 |
|
Connecting to the Computer Port . . . . . . . . . . . . . . |
. . . 36 |
|
Connecting the Cable for Remote Mouse Control |
. . . . 37 |
|
Connecting to Video Equipment . . . . . . . . . . . . . . . . . . |
. . . 38 |
|
Connecting a Composite Video Source . . . . . . . . . . |
. . . 39 |
|
Connecting an S-Video Source . . . . . . . . . . . . . . . . |
. . . 40 |
|
Connecting a Component Video Source . . . . . . . . . |
. . . 41 |
|
Connecting an RGB Video Source. . . . . . . . . . . . . . |
. . . 42 |
|
Connecting to a Digital Camera or Other Device. . . . . . |
. . . 43 |
|
Removing the USB Cable . . . . . . . . . . . . . . . . . . . . |
. . . 43 |
|
Playing Sound Through the Projector . . . . . . . . . . . . . . |
. . . 44 |
|
Connecting External Speakers . . . . . . . . . . . . . . . . . |
. . . 45 |
4

|
Presenting Through a Wireless Network . . . |
. 47 |
4 |
Starting EasyMP. . . . . . . . . . . . . . . . . . . . . . . . . . . . . . . . . |
. 48 |
|
Configuring Basic Settings . . . . . . . . . . . . . . . . . . . . . . . . . |
. 49 |
|
Configuring the Connection. . . . . . . . . . . . . . . . . . . . . . . . |
. 50 |
|
Using Ad Hoc Mode . . . . . . . . . . . . . . . . . . . . . . . . . . |
. 51 |
|
Using Access Point Mode. . . . . . . . . . . . . . . . . . . . . . . |
. 57 |
|
Using Wireless Security Options. . . . . . . . . . . . . . . . . . . . . |
. 67 |
|
Enabling WEP Encryption. . . . . . . . . . . . . . . . . . . . . . |
. 67 |
|
Enabling WPA Security . . . . . . . . . . . . . . . . . . . . . . . . |
. 69 |
|
Enabling EAP, LEAP, or PEAP Authentication . . . . . . |
. 70 |
|
Enabling EAP-TLS Certificate Validation . . . . . . . . . . |
. 72 |
|
Projecting Over a Network . . . . . . . . . . . . . . . . . . . . . . . . . |
. 73 |
|
Solving Connection Problems . . . . . . . . . . . . . . . . . . . |
. 75 |
|
Using the Control Bar . . . . . . . . . . . . . . . . . . . . . . . . . |
. 76 |
|
Connecting in Advanced Connection Mode . . . . . . . . |
. 77 |
|
Enabling Network Security . . . . . . . . . . . . . . . . . . . . . |
. 78 |
|
Multi-screen Projection . . . . . . . . . . . . . . . . . . . . . . . . . . . |
. 81 |
|
Removing the Wireless 802.11g/b/a Module . . . . . . . . . . . |
. 83 |
|
Connecting to a Wired Network . . . . . . . . . . . . . . . . . . . . |
. 84 |
|
Using Projector E-mail Alerts . . . . . . . . . . . . . . . . . . . . . . . |
. 86 |
|
Presenting from a Digital Camera or |
|
5 |
External Drive. . . . . . . . . . . . . . . . . . . . . . . . . . . . . . |
. 89 |
|
Creating a Slideshow on the Fly . . . . . . . . . . . . . . . . . . . . . |
. 90 |
|
Displaying the Slideshow . . . . . . . . . . . . . . . . . . . . . . . |
. 90 |
|
Controlling Your Slideshow . . . . . . . . . . . . . . . . . . . . . |
. 91 |
|
Changing Timing and Other Settings . . . . . . . . . . . . . |
. 91 |
|
Presenting Image Files From a Digital Camera . . . . . . . . . . |
. 93 |
|
Presenting Image Files From an External Drive . . . . . . . . . |
. 94 |
|
Creating a Scenario. . . . . . . . . . . . . . . . . . . . . . . . . . . . . . . |
. 95 |
|
Converting a PowerPoint File to a Scenario . . . . . . . . . |
. 95 |
|
Creating a Scenario from Scratch . . . . . . . . . . . . . . . . . |
. 96 |
|
Transferring Your Scenario to a USB Drive . . . . . . . . . . . . |
104 |
|
Presenting Scenarios . . . . . . . . . . . . . . . . . . . . . . . . . . . . . . |
106 |
|
Controlling Your Scenario . . . . . . . . . . . . . . . . . . . . . . |
107 |
|
Supported File Formats . . . . . . . . . . . . . . . . . . . . . . . . . . . |
108 |
5

|
Fine-Tuning the Projector. . . . . . . . . . . . . . . . . . |
109 |
6 |
Using the Menu System . . . . . . . . . . . . . . . . . . . . . . . . . . . |
110 |
|
Restoring the Default Settings . . . . . . . . . . . . . . . . . . . |
111 |
|
Adjusting the Image . . . . . . . . . . . . . . . . . . . . . . . . . . . . . |
112 |
|
Adjusting Signal Settings . . . . . . . . . . . . . . . . . . . . . . . . . . |
113 |
|
Customizing Projector Features . . . . . . . . . . . . . . . . . . . . . |
115 |
|
Using the Projector Security Features . . . . . . . . . . . . . . . . . |
116 |
|
Enabling Password Protection . . . . . . . . . . . . . . . . . . . |
117 |
|
Creating Your Own Startup Screen . . . . . . . . . . . . . . . |
119 |
|
Disabling the Projector’s Buttons. . . . . . . . . . . . . . . . . |
121 |
|
Customizing Power and Operation . . . . . . . . . . . . . . . . . . |
121 |
|
Managing Projectors . . . . . . . . . . . . . . . . . . . . . . . |
125 |
7 |
Using EMP Monitor . . . . . . . . . . . . . . . . . . . . . . . . . . . . . |
126 |
|
Opening and Closing EMP Monitor . . . . . . . . . . . . . . |
126 |
|
Registering a Projector . . . . . . . . . . . . . . . . . . . . . . . . . |
127 |
|
Monitoring Your Projectors . . . . . . . . . . . . . . . . . . . . . |
129 |
|
Controlling Your Projectors. . . . . . . . . . . . . . . . . . . . . |
133 |
|
Configuring the Monitoring Interval . . . . . . . . . . . . . . |
134 |
|
Using E-mail Alerts . . . . . . . . . . . . . . . . . . . . . . . . . . . . . . |
135 |
|
Understanding the Notification Messages. . . . . . . . . . . . . . |
136 |
|
Using a Browser to Monitor the Projector . . . . . . . . . . . . . |
136 |
|
Maintaining the Projector. . . . . . . . . . . . . . . . . . |
139 |
8 |
Cleaning the Lens. . . . . . . . . . . . . . . . . . . . . . . . . . . . . . . . |
140 |
|
Cleaning the Projector Case . . . . . . . . . . . . . . . . . . . . . . . . |
140 |
|
Cleaning the Air Filter and Vent . . . . . . . . . . . . . . . . . . . . |
141 |
|
Replacing the Lamp and Air Filter . . . . . . . . . . . . . . . . . . . |
142 |
|
Resetting the Lamp Timer . . . . . . . . . . . . . . . . . . . . . . |
145 |
|
Transporting the Projector . . . . . . . . . . . . . . . . . . . . . . . . . |
146 |
6

|
Solving Problems . . . . . . . . . . . . . . . . . . . . . . . . . . . |
147 |
9 |
Using On-Screen Help . . . . . . . . . . . . . . . . . . . . . . . . . . . . |
148 |
|
Checking Projector Status. . . . . . . . . . . . . . . . . . . . . . . . . . |
149 |
|
What To Do When the Lights Flash . . . . . . . . . . . . . . |
149 |
|
Viewing Lamp Usage and Other Information . . . . . . . |
151 |
|
Solving Projector Operation Problems . . . . . . . . . . . . . . . . |
151 |
|
Solving Problems with the Image or Sound . . . . . . . . . . . . |
152 |
|
Solving Network Problems . . . . . . . . . . . . . . . . . . . . . . . . |
157 |
|
Solving EasyMP Problems . . . . . . . . . . . . . . . . . . . . . . . . . |
160 |
|
Solving Problems with the Remote Control . . . . . . . . . . . . |
161 |
|
Where To Get Help . . . . . . . . . . . . . . . . . . . . . . . . . . . . . . |
162 |
|
Speak to a Support Representative . . . . . . . . . . . . . . . . |
162 |
|
Software Installation . . . . . . . . . . . . . . . . . . . . . . . |
165 |
A |
Windows System Requirements . . . . . . . . . . . . . . . . . . . . . |
165 |
|
Mac System Requirements . . . . . . . . . . . . . . . . . . . . . . . . . |
165 |
|
Installing the Software on a Windows System. . . . . . . . . . . |
166 |
|
Installing the Software on a Mac. . . . . . . . . . . . . . . . . . . . . |
166 |
B C D
Projector Installation . . . . . . . . . . . . . . . . . . . . . . . 167
Technical Specifications . . . . . . . . . . . . . . . . . . . . 169
Notices . . . . . . . . . . . . . . . . . . . . . . . . . . . . . . . . . . . . . . 175
Important Safety Instructions . . . . . . . . . . . . . . . . . . . . . . . 175
Remote Control Information . . . . . . . . . . . . . . . . . . . . . . . 177
Declaration of Conformity . . . . . . . . . . . . . . . . . . . . . . . . . 178
FCC Compliance Statement. . . . . . . . . . . . . . . . . . . . . . . . 179
Warranty . . . . . . . . . . . . . . . . . . . . . . . . . . . . . . . . . . . . . . 180
Index. . . . . . . . . . . . . . . . . . . . . . . . . . . . . . . . . . . . . . . . 183
7

8

-
Welcome
The Epson® PowerLite® 1705c/1715c is an easy-to-use projector that weighs less than 4 pounds. The projector offers up to 2700 lumens (1715c) or 2200 lumens (1705c) of brightness. You can connect it to a wide range of computers and video sources, or you can project from a USB storage device, or over an 802.11g, 802.11b, or 802.11a wireless network.
Easy control
The projector’s keystone correction feature automatically corrects image distortion, and you can use the remote control to take charge of your presentation from almost anywhere in the room. Freeze the action, zoom in on part of the picture, or use the remote as a pointer. You can even use it in place of your computer’s mouse to control your computer and change slides in Microsoft® PowerPoint®.
EasyManagement
With the projector’s EasyManagement™ system, you can use a Windows® PC to remotely monitor and control the projector over a network.
Security
To prevent unauthorized use, this projector includes several security features including a password, user’s logo, and the ability to lock the projector buttons.
9

Using Your Documentation
This book contains all the information you need to set up and use your projector. Please follow these guidelines as you read through it:
■Warnings must be followed carefully to avoid bodily injury.
■Cautions must be observed to avoid damage to your equipment.
■Notes contain important information about your projector.
■Tips contain additional projection hints.
Getting More Information
Need tips on giving presentations? Quick steps for setting up your projector? Here’s where you can look for help:
■Quick Setup sheet
Gives you the instructions you need to get your projector up and running if you are connecting to a notebook, MacBook,TM PowerBook,® or iBook® computer, or projecting over a wireless network.
■Projector kit
Includes this User’s Guide, your Quick Setup sheet, warranty brochures, and Epson PrivateLine® Support card. Keep the kit with your projector at all times.
■Built-in help system
Provides assistance for common problems. Available from the Help button on the projector or the remote control. See page 148 for details.
■http://support.epson.com
Download FAQs and e-mail your questions to Epson support.
■If you still need help after checking this User’s Guide and the sources listed above, you can use the Epson PrivateLine Support service to get help fast. Call (800) 637-7661 and enter the PIN on the PrivateLine card. Or take advantage of Epson’s automated support services 24 hours a day. See page 162 for more information.
10 Welcome
■presentersonline.com
Includes a library of articles covering presentation tips, tricks, and technology. The site provides templates, clip art and sound clips, as well as Presenters Services to use on the road. Even more resources and services are available if you register to join the Presenters Club®—and it’s free.
Registration and Warranty
Your projector comes with a basic carry-in 2-yearr and 90-day lamp warranty as well as an international warranty that let you project with confidence anywhere in the world. For details, see page 180 and the warranty brochure included with your projector.
In addition, for customers who register their projector, Epson offers free Extra CareSM Road Service. In the unlikely event of an equipment failure, you won’t have to wait for your unit to be repaired. Instead, Epson will ship you a replacement unit anywhere in the United States or Canada, usually via overnight delivery. See the brochure included with your projector for details.
To register, simply fill out the registration card and mail it to Epson. Or you can register online at http://www.epson.com/webreg. Registering also lets you receive special updates on new accessories, products, and service.
Welcome 11
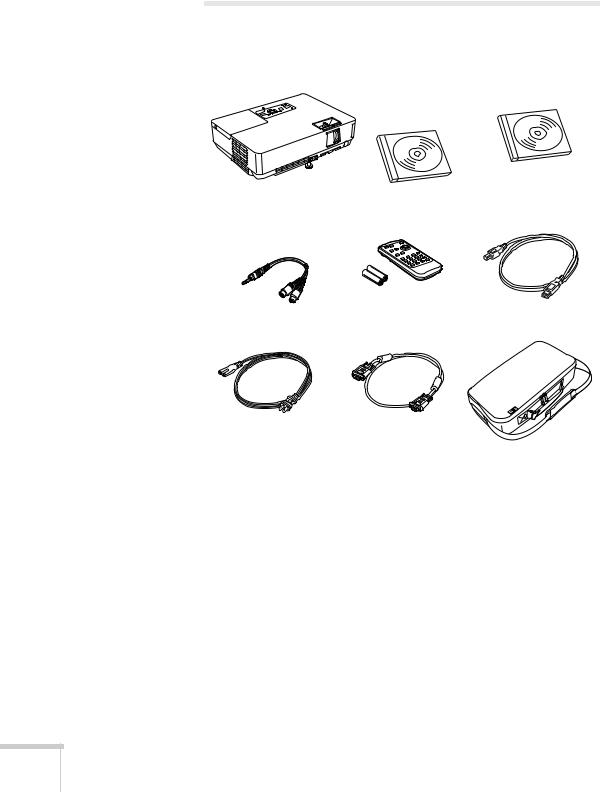
Unpacking the Projector
After unpacking the projector, make sure you have all the parts shown below:
|
EasyMP software |
|
Projector with |
CD-ROM |
|
PDF manual and |
||
802.11g/b/a wireless |
||
registration CD-ROM |
||
adapter |
||
|
|
Remote control and |
|
Audio adapter |
2 AAA batteries |
USB cable |
|
Power cable |
VGA computer cable |
Carrying case
Save all packaging in case you need to ship the projector. Always use the original packaging (or the equivalent) when you need to send the projector to another location. If you are moving the projector by hand, use the carrying case. See page 13 for ordering information, and page 146 for transportation instructions.
12 Welcome

Additional Components
Depending on how you plan to use the projector, you may need additional components:
■To receive an S-Video signal, you’ll need an S-Video cable. One may be provided with your video equipment, or you can purchase one from Epson; see page 13.
■To receive a component video signal from a VCR or other video device, you’ll need an HD15 to component video cable. You can purchase one from Epson; see below.
Optional Accessories
To enhance your use of the projector, Epson provides the following optional accessories:
Product |
Part number |
|
|
|
|
Replacement lamp |
V13H010L38 |
|
|
|
|
Air filter replacement set (2 filters) |
V13H13408 |
|
|
|
|
ATA molded hardshell case |
ELPKS54 |
|
Samsonite® wheeled soft case |
ELPKS35-S |
|
Notebook/projector soft shoulder bag |
ELPKS43 |
|
Soft carrying case |
ELPKS16B |
|
|
|
|
Universal ceiling mount |
ELPMBUNI |
|
False ceiling plate |
ELPMBFCP |
|
ELPMBSEC |
||
Security bracket/cabling for gyro lock mounts |
||
ELPMBACC |
||
Adjustable ceiling channel |
||
ELPMBAPL |
||
Suspension adapter |
||
|
||
|
|
|
Kensington® security lock |
ELPSL01 |
|
|
|
|
50-inch portable screen (4:3 aspect ratio) |
ELPSC06 |
|
60-inch portable pop-up screen (4:3 aspect ratio) |
ELPSC07 |
|
80-inch portable pop-up screen (4:3 aspect ratio) |
ELPSC08 |
|
83.6-inch hanging pull-down screen (4:3 aspect |
ELPSC09 |
|
ratio) |
|
|
|
|
|
Component video cable |
ELPKC19 |
|
S-Video cable |
ELPSV01 |
|
|
|
|
Distribution amplifier |
ELPDA01 |
|
|
|
|
Image presentation camera (ELPDC05) |
V12H162020 |
|
|
|
|
Ethernet LAN module |
V12H005M02 |
|
|
|
Welcome 13

You can purchase screens, carrying cases, or other accessories from an Epson authorized reseller. To find the nearest reseller, call 800-GO-EPSON (800-463-7766). Or you can purchase online at www.epsonstore.com (U.S. sales) or www.epson.ca (Canadian sales).
14 Welcome

Displaying and Adjusting
the Image
Whether you’re presenting from a computer or video equipment, you need to follow some basic steps to display your image on the screen.
Follow the guidelines in this chapter for:
■Positioning the projector
■Turning the projector on and selecting the image source
■Troubleshooting display problems
■Adjusting the image
■Turning off the projector
15
note
You can mount the projector on the ceiling, or place it behind a translucent screen for rear projection. See page 167 for details.
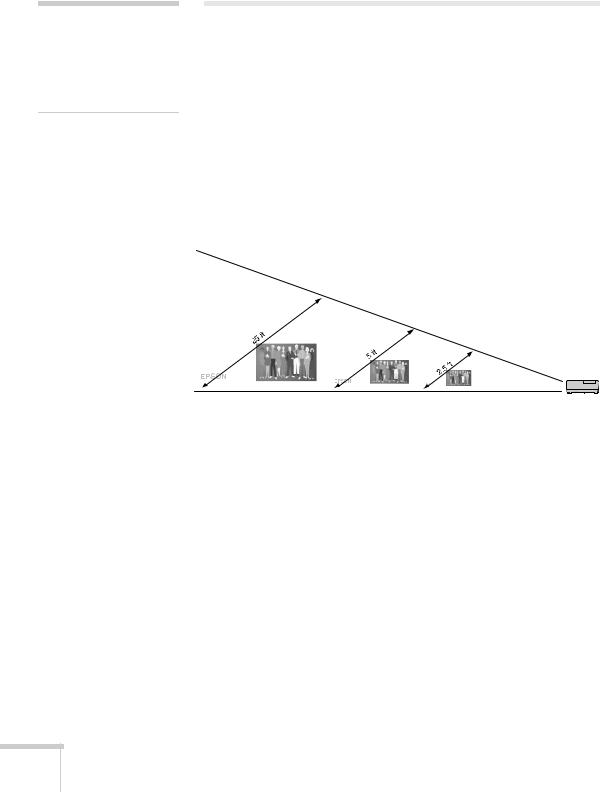
Positioning the Projector
If the projector isn’t already installed in the room you’re using, you’ll probably want to place it on a table in front of the screen, as shown. This lets you stand in the front of the room, face the audience, and remain close enough to the equipment to be able to control it. Try to leave as much space as possible between the projector and the screen to get a good-size image.
Use the figure below to help you determine placement. Image size increases with distance, but can vary depending on how you position the zoom ring and whether you’ve adjusted the image with other settings.
TBD
|
|
|
|
|
|
|
|
|
|
|
|
|
|
|
|
|
|
|
|
|
|
|
|
|
|
|
|
|
|
|
|
|
|
|
|
|
|
|
|
|
|
|
|
|
|
|
|
|
|
|
|
|
|
|
|
|
|
|
|
33.1 to 39.7 ft |
6.6 to 7.9 ft |
3.2 to 3.9 ft |
Distance from screen |
||||||||
Also keep these considerations in mind:
■Place the projector on a sturdy, level surface.
■Make sure there is plenty of space for ventilation around and under the projector. Do not set the projector on top of anything that could block the vents under the projector.
■Make sure the projector is within 10 feet of a grounded electrical outlet or extension cord.
16 Displaying and Adjusting the Image
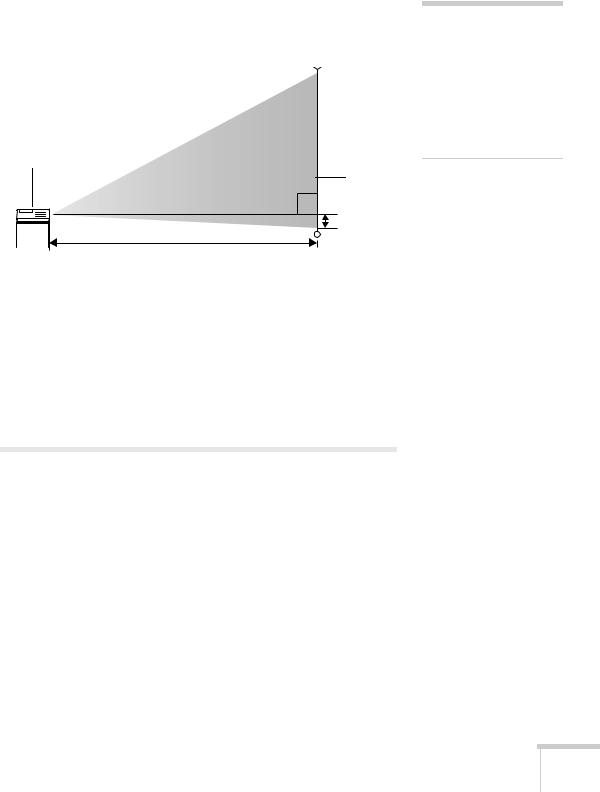
Ideally, you should place the projector directly in front of the center of the screen, facing it toward the screen squarely. The base of the lens should be at about the level of the bottom of the screen.
Projector
Screen
note
After positioning the projector, you may want to connect a Kensington MicroSaver® anti-theft device to the lock port on the projector. You can purchase this from Epson; see
page 13.
If you place the projector below screen level, you’ll have to tilt it up by extending the front adjustable foot. This causes the image to become “keystone” shaped, but you can correct the distortion by pressing the buttons on the projector. See page 23 for detailed information about correcting the image shape.
For instructions on installing the projector in a permanent location, such as a theater or conference room, see page 167.
Projecting the Image
Make sure your projector and other equipment are set up as described on page 35. Then follow the instructions below to start the projector and display an image.
Turning On the Projector
Turn on any connected computer or video equipment before starting the projector so it can automatically detect and display the image source. If you turn on the projector first, or have multiple pieces of connected equipment, you may have to select the image source manually (see page 19).
Displaying and Adjusting the Image 17
note
To shut down the projector, see page 25. Shutting down the projector correctly prevents premature lamp failure and possible damage from overheating.
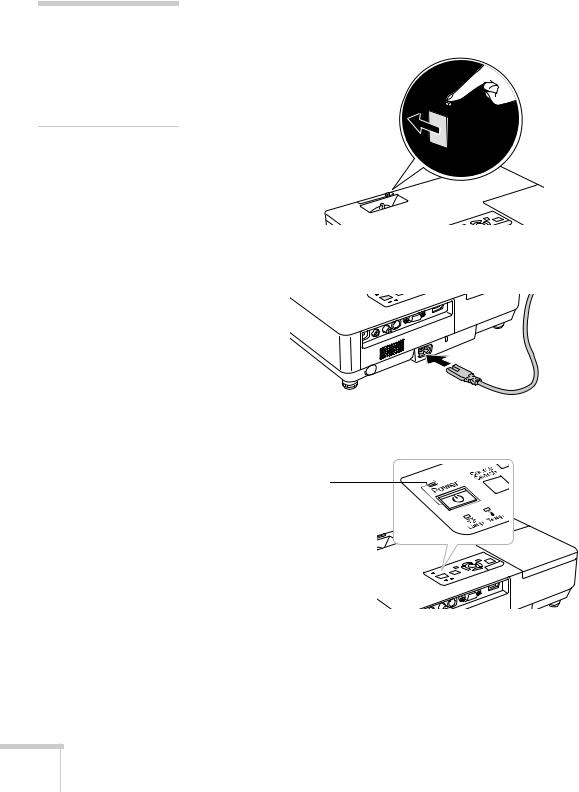
Follow these steps to turn on the projector:
1. Open the A/V Mute slide (lens cover).
2.Plug one end of the power cable into the projector, and the other end into an electrical outlet.
The Power light turns orange.
Power light
18 Displaying and Adjusting the Image
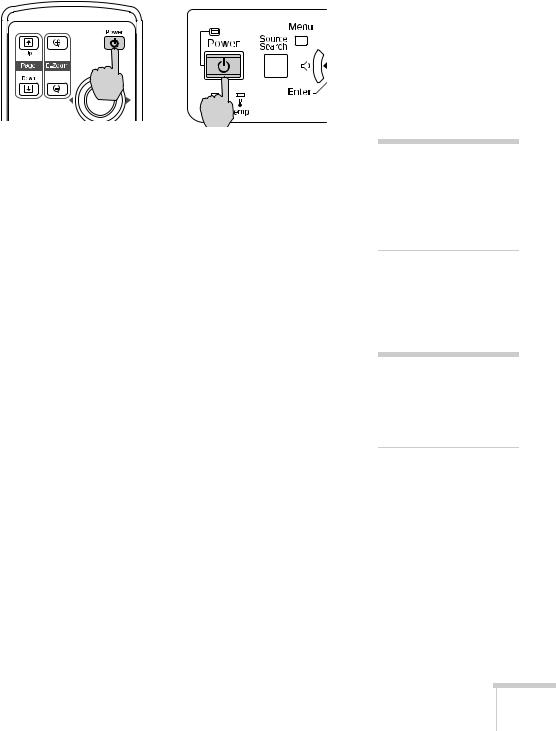
3.Press the red PPower button on the remote control or on top of the projector.
The projector beeps once and the Power light flashes green as the projector warms up, then an image begins to appear. When the Power light stops flashing and remains green, the projector is ready for use.
4.If you’ve connected a Windows-based computer to the projector, you may see a New Hardware Wizard screen saying your computer has found a plug-and-play monitor; if so, click Cancel.
5.If you are prompted to enter a password, see page 117.
warning
Never look into the lens when the lamp is on. This can damage your eyes, and is especially dangerous for children.
Selecting the Image Source
Selecting the image source lets you switch between images input from different pieces of connected equipment (such as a computer or DVD player).
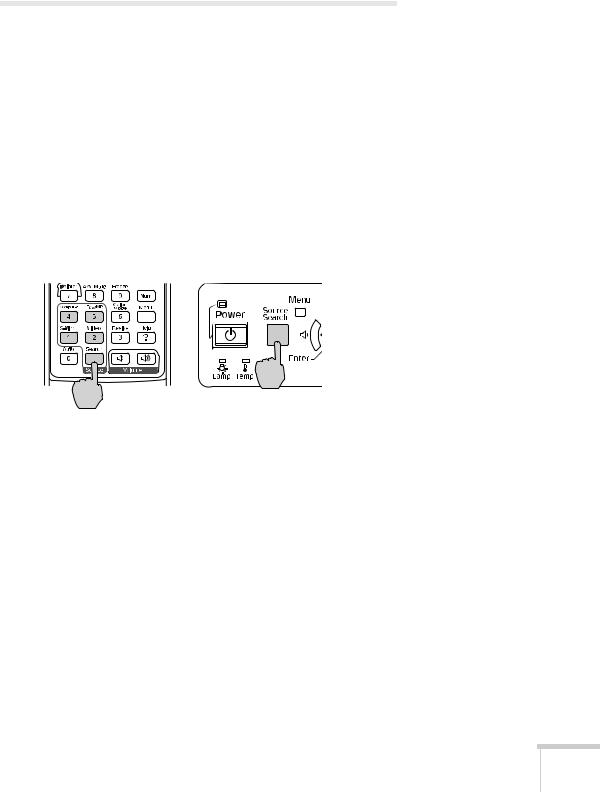
If you don’t see the image you want, press the Source Search button on the projector or the Search button on the remote control until you see the image you want to project.
You can also use the Source buttons on the remote control to switch between devices connected to the ports identified on each button, or select EasyMP™ to project wirelessly or from a USB drive.
note
To focus and adjust the image, see page 22. If a projected image fails to appear, see page 20 for help.
Displaying and Adjusting the Image 19

Troubleshooting Display Problems
Follow these guidelines if you’re having trouble displaying an image.
You Can’t Project an Image
If you don’t see the image you are trying to project, try the following:
■Make sure the cables are connected correctly, as described beginning on page 35.
■Make sure the Power light is green and not flashing and the A/V Mute slide is open.
■If you’ve connected more than one computer and/or video source, you may need to press the Source Search button on the projector’s control panel or Search button on the remote control to select the correct source. (Allow a few seconds for the projector to sync up after pressing the button.)
■If you’re using a PC notebook, press the function key on your keyboard that lets you display on an external monitor. It may be
labeled CRT/LCD or have an icon such as  . You may have to hold down the Fn key while pressing it. Allow a few seconds for
the projector to sync up after changing the setting.
The Projector and Notebook Don’t Display the
Same Image
If you’re projecting from a notebook, and you can’t see your image on the projection screen and on your computer at the same time, follow these guidelines.
If you’re using a PC notebook:
■On most systems, there’s a function key that lets you toggle between the LCD screen and the projector, or display on both at the same time. It may be labeled CRT/LCD or have an icon such as
 . You may have to hold down the Fn key while pressing it. Allow a few seconds for the projector to sync up after changing the setting.
20 Displaying and Adjusting the Image
■If the function key doesn’t permit you to display simultaneously on both screens, you should check your monitor settings to make sure both the LCD screen and the external monitor port are enabled.
From the Control Panel, open the Display utility. In the Display Properties dialog box, click the Settings tab, then click Advanced. The method for adjusting the settings varies by brand; you may need to click a Monitor tab, then make sure the external Monitor port is set as your primary display and/or enabled. See your computer’s documentation or online help for details.
If you’re using Mac OS X:
You may need to set up your system to display on the projector screen as well as the LCD screen. Follow these steps:
1.From the Apple® menu, select System Preferences, then select
Displays.
2.Make sure the VGA Display or Color LCD dialog box is selected.
3.Click the Arrangement (or Arrange) tab.
Make sure Mirror Displays is checked
4. Make sure the Mirror Displays checkbox is selected.
Displaying and Adjusting the Image 21
Adjusting the Image
Once you see your image, you need to make certain adjustments:
■If the image is too high or too low, you can reposition it. See below.
■To focus or zoom your image, see page 23.
■If the image isn’t square, see page 23.
■If a computer image displays incorrectly, see page 25.
■If you need to fine-tune the image and/or sound, see Chapter 6.
Adjusting the Height of Your Image
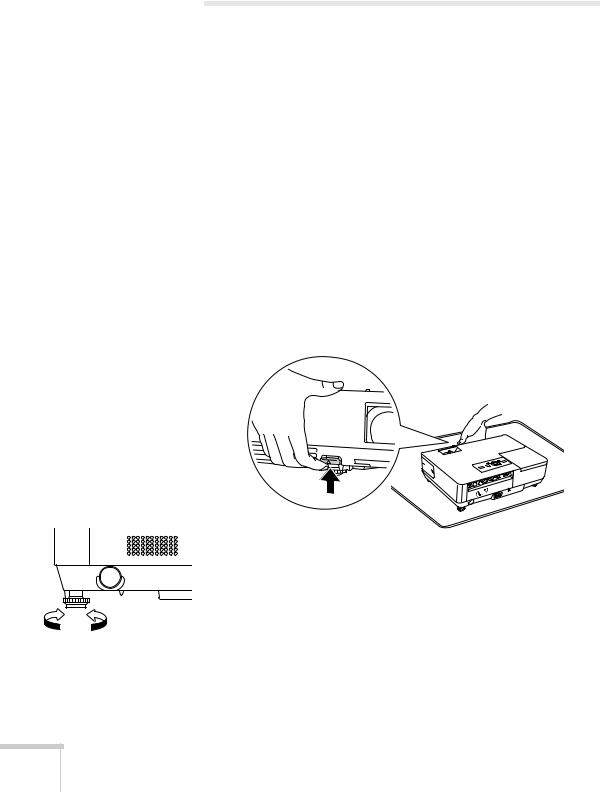
If the image is too low on the screen, you can use the front adjustable foot to raise it.
1.Stand behind the projector. Press the blue foot release lever up and lift the front of the projector.
2. Once the image is positioned where you want it, release the lever to lock the foot in position.
3. If necessary, you can fine-tune the height or level the image by turning the projector’s adjustable rear foot.
Projector rear foot |
Raising the projector causes the image to distort or “keystone,” but |
|
|
|
you can correct the shape as described on page 23. |
22 Displaying and Adjusting the Image
Focusing and Zooming Your Image
Turn the focus ring on the projector to sharpen the image.
Turn the zoom ring on the projector to reduce or enlarge the image.
Focus |
Zoom |
If the image still isn’t large enough, you may need to move the projector farther away from the screen. You can also use the buttons on the remote control to zoom in on a portion of the image. See page 31 for instructions.
Adjusting the Image Shape
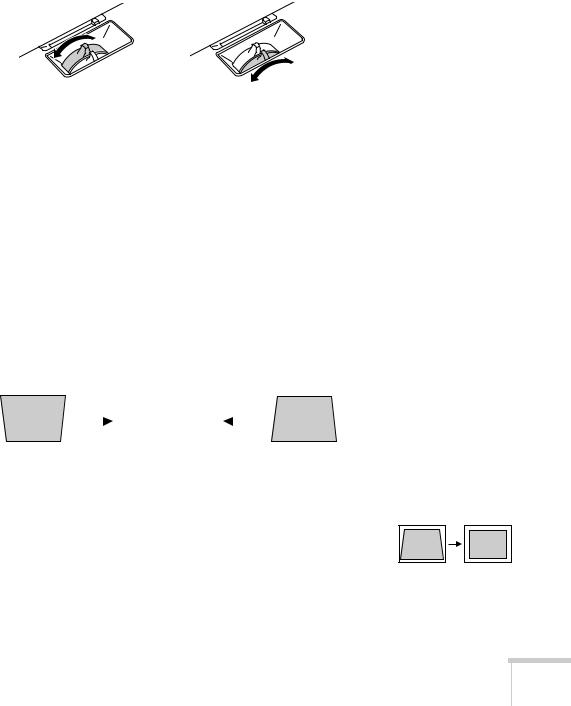
In most cases, you can maintain a square or rectangular image by placing the projector directly in front of the center of the screen with the base of the lens level with the bottom of the screen.
Even if the projector is slightly tilted (within a range of 30° up or down), the projector has an automatic keystone correction function that detects and corrects vertical keystone distortion.
|
|
|
|
|
|
|
|
|
|
|
|
|
|
|
|
|
|
|
|
|
|
|
|
|
|
|
|
|
|
|
|
|
|
|
|
|
|
|
|
|
|
|
|
|
|
|
|
|
|
|
|
Projector tilted up |
|
|
Corrected image |
Projector tilted down |
||||||||
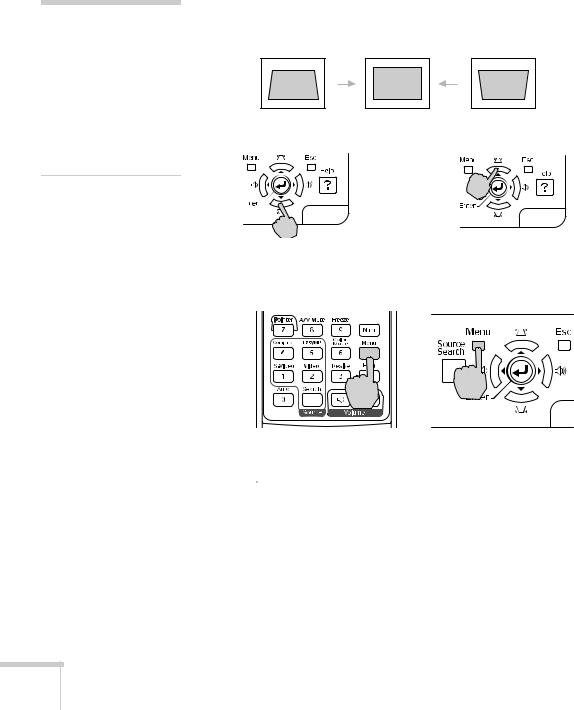
It takes about one second after projection starts for the image to be corrected. During this time, a vertical keystone correction gauge appears on the screen.
If your image is still distorted, you can correct it using the Keystone buttons on the projector’s control panel or the projector’s Setting menu.
Keystone correction
Displaying and Adjusting the Image 23
note
The image will be slightly smaller after adjusting. If it’s important to maintain the correct aspect ratio, use the menu system to perform keystone correction, then use the remote’s Resize button to adjust the aspect ratio. See page 32.
Using Keystone Correction
To adjust your image when it is wider on the top or bottom, do the following:
■Press one of the two triangular buttons on the projector’s control panel, as shown below. Continue pressing the button until you are satisfied with the shape of the image.
■Or press the Menu button on the remote control or projector, select the Setting menu, and press Enter.
From the Setting menu, select Keystone and press Enter. Use the 
 pointer button on the remote control to adjust the keystone setting as needed.
If the image becomes uneven, decrease the sharpness setting. (See page 113.)
24 Displaying and Adjusting the Image

Correcting Computer Images
If you’re connected to a computer and the image doesn’t look right, press the Auto button on the remote control or the Enter button on the projector. This automatically resets the projector’s tracking, sync, resolution, and position settings.
If the Auto button doesn’t correct the problem, you may need to adjust the tracking or sync using the projector’s Signal menu. See page 114 for more information.
note
You must be projecting an image for this button to have any effect. The Auto button works only with computer images projected through the VGA port.
Shutting Down the Projector
When you’ve finished using the projector, follow the recommended procedure to shut it down. This extends the life of the lamp and protects the projector from possible overheating.
1.Turn off any equipment plugged into the projector.
2.To turn off the projector, press the red PPower button on the remote control or projector.
You see a confirmation message. (If you don’t want to turn it off, press any other button.)
note
Lamp life results will vary depending on mode selected, environmental conditions, and usage.
Turn off this product when not in use to prolong the life of the projector.
Displaying and Adjusting the Image 25
note
You can set the projector to automatically turn off the projector lamp and enter “sleep mode” when it has not received any signals for 30 minutes. This conserves electricity, cools the projector, and extends the life of the lamp. If you want to start projecting again, press the P Power button. If you are done using the projector, unplug the power cord. To enable sleep mode, see page 122.
3.Press the PPower button again. The lamp turns off. When the projector beeps twice, you can unplug the power cord.
(If the projector is mounted on the ceiling, you will need to wait 20 seconds for the projector to cool down before you can unplug the power cord.)
If you want to turn the projector on again, make sure the orange light is not flashing, then press the PPower button.
4.If you extended the adjustable front foot, press up on the blue foot release lever to retract it.
5.Close the A/V Mute slide.
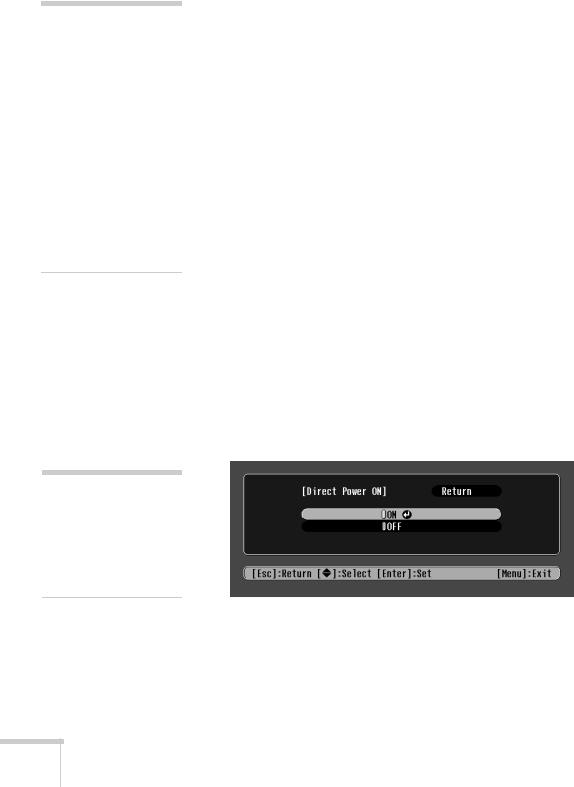
Using the Direct Power On Function
The Direct Power On function enables faster setup. The projector will start up automatically when you plug it in; you won’t have to press the PPower button.
Follow these steps to enable Direct Power On:
1.Press the Menu button on the remote control and select the
Extended menu.
2.Choose Operation and press Enter.
3.Choose Direct Power On and press Enter.
note
If a power outage occurs when Direct Power On is enabled and the projector is plugged in, the projector will start when the power is restored.
4.Highlight On and press Enter.
5.Press Esc or Menu to exit.
The setting will take effect the next time you plug in the projector.
26 Displaying and Adjusting the Image

note
For information and resources to help you give the most professional presentation, be sure to visit presentersonline.com.
Using the Remote Control
The projector includes a number of tools to enhance your presentation. All of them can be accessed using the remote control, which lets you operate the projector from anywhere in the room—up to 20 feet away.
You can use the remote control to adjust the picture and sound (page 29) or as a pointer to highlight your presentation (page 34). You can also use it to adjust the color mode for various environments (page 32) or as a wireless mouse when projecting from a computer (page 33).
This chapter covers:
■Using the remote control
■Controlling the picture and sound
■Operating your computer with the remote control
■Highlighting your presentation
27

note
If a button is pressed longer than 30 seconds, the remote control stops operating to conserve power. When you release the button, normal operation resumes.
Using the Remote Control
Follow these tips for using the remote control:
■Point the remote control at the front of the projector or at the screen.
■Stand within 20 feet of the projector.
■Avoid using the remote under bright fluorescent lamps or in direct sunlight, or the projector may not respond properly.
caution
When replacing batteries, take the following precautions:
■Replace the batteries as soon as they run out. If the batteries leak, wipe away battery fluid with a soft cloth. If fluid gets on your hands, wash immediately.
■Do not expose batteries to heat or flame.
■Dispose of used batteries according to local regulations.
■Remove the batteries if you won’t be using the projector for a long period of time.
Replacing the Batteries
Replace the batteries as described below:
1.Turn the remote control over.
2.Press down on the tab on the battery cover as you lift the cover off.
3.Install two AAA batteries, inserting the + and – ends as shown.
4.Position the cover as shown, then press down until it snaps into place.
28 Using the Remote Control
Controlling the Picture and Sound
You can use the remote control to preview and select your picture sources, temporarily turn off the picture and sound, freeze the action, zoom in on the picture, and adjust the volume.
Switching Between Picture Sources
If your projector is connected to more than one computer and/or video source, you can switch between the different sources:
■The easiest way to select your source is to press the Search button on the remote control (or the Source Search button on the projector) repeatedly until you see the image you want on the screen.
■On the remote control, there are four Source buttons. Use them to switch between equipment connected to the port identified on each button, or to use EasyMP to project wirelessly or from a USB drive.
After you select a source, the screen goes dark for a moment before the image appears.
Using the Remote Control 29
note
This function pauses the image, but not the sound. Also, because the source continues to transmit signals, you won’t resume the action from the point you stopped it.
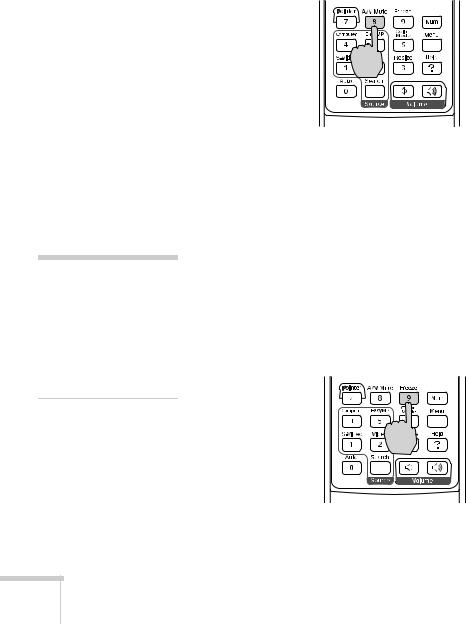
Turning Off the Picture and Sound
You can use the A/V Mute button on the remote control to turn off the image and sound. This feature is useful if you want to temporarily redirect your audience’s attention.
■To turn off the picture and sound, press the A/V Mute button. The screen turns black.
■To turn the image and sound back on, press the button again.
You can have the screen turn blue when you press the A/V Mute button. You can also have an image, such as a company logo, display on the screen (see page 119).
Stopping Action
You can use the remote control to stop the action in your video or computer image.
■To stop the action and keep the current image on the screen, press the Freeze button. The sound continues.
■To restart it, press the Freeze button again.
30 Using the Remote Control
 Loading...