


Epson Stylus® Pro 4800
PRINTER GUIDE

All rights reserved. No part of this publication may be reproduced, stored in a retrieval system, or transmitted in any form or by any means, electronic, mechanical, photocopying, recording, or otherwise, without the prior written permission of Seiko Epson Corporation. The information contained herein is designed only for use with these Epson printers. Epson is not responsible for any use of this information as applied to other printers.
Trademarks
Epson, Epson Stylus, Epson ESC/P, and MicroWeave are registered trademarks of Seiko Epson Corporation.
PhotoEnhance, UltraSmooth, and Epson UltraChromeK3 are trademarks, and Epson Preferred and Epson Store are service marks, of Epson America, Inc.
General Notice: Other product names used herein are for identification purposes only and may be trademarks of their respective owners. Epson disclaims any and all rights in those marks.
The ENERGY STAR emblem does not represent EPA endorsement of any product or service.
Legal Notices
Neither Seiko Epson Corporation nor its affiliates shall be liable to the purchaser of this product or third parties for damages, losses, costs, or expenses incurred by purchaser or third parties as a result of: accident, misuse, or abuse of this product or unauthorized modifications, repairs, or alterations to this product, or (excluding the U.S.) failure to strictly comply with Seiko Epson Corporation’s operating and maintenance instructions.
Seiko Epson Corporation shall not be liable for any damages or problems arising from the use of any options or any consumable products other than those designated as Original Epson Products or Epson Approved Products by Seiko Epson Corporation.
 Printed on recycled paper.
|
|
|
|
|
|
|
|
© 2006 Epson America, Inc. 1/06 |
CPD-19586R1 |
||
FCC Compliance Statement
For United States Users
This equipment has been tested and found to comply with the limits for a Class B digital device, pursuant to Part 15 of the FCC Rules. These limits are designed to provide reasonable protection against harmful interference in a residential installation. This equipment generates, uses, and can radiate radio frequency energy and, if not installed and used in accordance with the instructions, may cause harmful interference to radio or television reception. However, there is no guarantee that interference will not occur in a particular installation. If this equipment does cause interference to radio and television reception, which can be determined by turning the equipment off and on, the user is encouraged to try to correct the interference by one or more of the following measures:
•Reorient or relocate the receiving antenna.
•Increase the separation between the equipment and receiver.
•Connect the equipment into an outlet on a circuit different from that to which the receiver is connected.
•Consult the dealer or an experienced radio/TV technician for help.
WARNING
The connection of a non-shielded equipment interface cable to this equipment will invalidate the FCC Certification of this device and may cause interference levels which exceed the limits established by the FCC for this equipment. It is the responsibility of the user to obtain and use a shielded equipment interface cable with this device. If this equipment has more than one interface connector, do not leave cables connected to unused interfaces. Changes or modifications not expressly approved by the manufacturer could void the user’s authority to operate the equipment.
For Canadian Users
This Class B digital apparatus complies with Canadian ICES-003.
Cet appareil numérique de la classe B est conforme à la norme NMB-003 du Canada.
Contents Introduction
Warnings, Cautions, Notes, and Tips . . . . . . . . . . . . . . . . . . . . . . . . 9
Options and Accessories . . . . . . . . . . . . . . . . . . . . . . . . . . . . . . . . . . . . 10
Where To Get Help . . . . . . . . . . . . . . . . . . . . . . . . . . . . . . . . . . . . . . . 10
Macintosh System Requirements . . . . . . . . . . . . . . . . . . . . . . . . . . . . . 11
Windows System Requirements . . . . . . . . . . . . . . . . . . . . . . . . . . . . . . 12
Important Safety Instructions . . . . . . . . . . . . . . . . . . . . . . . . . . . . . . . . 13
Ink Cartridge Safety Instructions . . . . . . . . . . . . . . . . . . . . . . . . . . 15
1 Setting Up the Printer
Unpacking . . . . . . . . . . . . . . . . . . . . . . . . . . . . . . . . . . . . . . . . . . . . . . 17
Setting Up and Plugging In . . . . . . . . . . . . . . . . . . . . . . . . . . . . . . . . . 19
Installing Ink . . . . . . . . . . . . . . . . . . . . . . . . . . . . . . . . . . . . . . . . . . . . 19
Connecting to Your System . . . . . . . . . . . . . . . . . . . . . . . . . . . . . . . . . 22
Connecting to the Network . . . . . . . . . . . . . . . . . . . . . . . . . . . . . . . . . 23
Installing the Software for Macintosh . . . . . . . . . . . . . . . . . . . . . . . . . . 24
Adding the Printer in Mac OS X 10.4.x . . . . . . . . . . . . . . . . . . . . . 26
Adding the Printer in Mac OS X 10.3.x . . . . . . . . . . . . . . . . . . . . . 28
Installing the Software for Windows . . . . . . . . . . . . . . . . . . . . . . . . . . . 30
Updating Your Printer Firmware . . . . . . . . . . . . . . . . . . . . . . . . . . . . . 32
Downloading the Firmware . . . . . . . . . . . . . . . . . . . . . . . . . . . . . . 32
Updating the Firmware . . . . . . . . . . . . . . . . . . . . . . . . . . . . . . . . . 32
2 Handling Paper and Other Media
Selecting Media for Your Printer . . . . . . . . . . . . . . . . . . . . . . . . . . . . . . 35
Guidelines for Using Epson Media . . . . . . . . . . . . . . . . . . . . . . . . . 36
Using Cut Sheet Paper . . . . . . . . . . . . . . . . . . . . . . . . . . . . . . . . . . . . . 36
Cut Sheet Paper Paths . . . . . . . . . . . . . . . . . . . . . . . . . . . . . . . . . . 37
Loading Paper in the Paper Tray . . . . . . . . . . . . . . . . . . . . . . . . . . 38
Using the Front Manual Feed Slot . . . . . . . . . . . . . . . . . . . . . . . . . 44
Using the Top Manual Feed Slot . . . . . . . . . . . . . . . . . . . . . . . . . . 47
Contents |
| 6 |
Using Roll Paper . . . . . . . . . . . . . . . . . . . . . . . . . . . . . . . . . . . . . . . . . . |
48 |
Roll Paper Guidelines . . . . . . . . . . . . . . . . . . . . . . . . . . . . . . . . . . . |
48 |
Loading the Paper onto the Spindle . . . . . . . . . . . . . . . . . . . . . . . . |
49 |
Placing the Paper in the Printer . . . . . . . . . . . . . . . . . . . . . . . . . . . |
50 |
Removing Paper from the Spindle . . . . . . . . . . . . . . . . . . . . . . . . . |
54 |
Switching Between 2-Inch and 3-Inch Roll Paper . . . . . . . . . . . . . |
54 |
Cutting Paper Manually with the Built-in Cutter . . . . . . . . . . . . . . |
55 |
Printing Trim Lines . . . . . . . . . . . . . . . . . . . . . . . . . . . . . . . . . . . . |
56 |
Adjusting the Platen Gap for Thick or Thin Paper . . . . . . . . . . . . . |
56 |
Optimizing the Settings for Your Paper . . . . . . . . . . . . . . . . . . . . . . . . |
57 |
Creating Paper Configurations . . . . . . . . . . . . . . . . . . . . . . . . . . . . |
58 |
Selecting Paper Configurations . . . . . . . . . . . . . . . . . . . . . . . . . . . . |
59 |
3 Printing with Epson Drivers for Macintosh |
|
Choosing Page Setup Options . . . . . . . . . . . . . . . . . . . . . . . . . . . . . . . |
62 |
Choosing Basic Print Options . . . . . . . . . . . . . . . . . . . . . . . . . . . . . . . . |
65 |
Choosing Color Management and Paper Configuration Options . . . . . 69 |
|
Choosing Roll Paper Options . . . . . . . . . . . . . . . . . . . . . . . . . . . . . . . . |
71 |
Borderless Printing . . . . . . . . . . . . . . . . . . . . . . . . . . . . . . . . . . . . . |
73 |
Creating a Custom Preset and Printing . . . . . . . . . . . . . . . . . . . . . . . . . |
74 |
Choosing Advanced Black and White Photo Settings . . . . . . . . . . . . . . |
75 |
Monitoring Print Jobs . . . . . . . . . . . . . . . . . . . . . . . . . . . . . . . . . . . . . . |
77 |
Checking Ink Levels and Maintenance Tank . . . . . . . . . . . . . . . . . . . . |
78 |
4 Printing with Epson Drivers for Windows
Choosing Basic Print Options . . . . . . . . . . . . . . . . . . . . . . . . . . . . . . . . 82
Choosing Paper and Layout Options . . . . . . . . . . . . . . . . . . . . . . . . . . 84
Choosing Cut Sheet Paper Options . . . . . . . . . . . . . . . . . . . . . . . . 85
Choosing Roll Paper Options . . . . . . . . . . . . . . . . . . . . . . . . . . . . . 86
Borderless Printing . . . . . . . . . . . . . . . . . . . . . . . . . . . . . . . . . . . . . 89
Choosing Layout Options . . . . . . . . . . . . . . . . . . . . . . . . . . . . . . . 90
Choosing Advanced Print Options . . . . . . . . . . . . . . . . . . . . . . . . . . . . 91
Choosing Advanced Black and White Photo Settings . . . . . . . . . . . 94
Managing Print Jobs . . . . . . . . . . . . . . . . . . . . . . . . . . . . . . . . . . . . . . . 97
Using the Progress Meter . . . . . . . . . . . . . . . . . . . . . . . . . . . . . . . . 97
Setting Monitoring Preferences and Optimizing Print Speed . . . . . 98
Contents | 7
5 Maintaining and Transporting the Printer |
|
Checking Printer Status and Part Life . . . . . . . . . . . . . . . . . . . . . . . . |
102 |
Printing Status Information . . . . . . . . . . . . . . . . . . . . . . . . . . . . . |
102 |
Viewing Status Information . . . . . . . . . . . . . . . . . . . . . . . . . . . . . |
103 |
Checking and Cleaning the Print Head . . . . . . . . . . . . . . . . . . . . . . . |
104 |
Running a Power Cleaning Cycle . . . . . . . . . . . . . . . . . . . . . . . . . |
106 |
Aligning the Print Head . . . . . . . . . . . . . . . . . . . . . . . . . . . . . . . . . . . |
107 |
Replacing Ink Cartridges . . . . . . . . . . . . . . . . . . . . . . . . . . . . . . . . . . . |
109 |
Changing the Black Ink Cartridge . . . . . . . . . . . . . . . . . . . . . . . . . . . |
113 |
Draining the Old Ink . . . . . . . . . . . . . . . . . . . . . . . . . . . . . . . . . . |
114 |
Installing the New Black Ink Cartridge . . . . . . . . . . . . . . . . . . . . |
115 |
Updating the Printer Driver Information . . . . . . . . . . . . . . . . . . . |
116 |
Performing Additional Maintenance Tasks . . . . . . . . . . . . . . . . . . . . . |
116 |
Changing the Date and Time . . . . . . . . . . . . . . . . . . . . . . . . . . . . |
116 |
Using the Maintenance Mode . . . . . . . . . . . . . . . . . . . . . . . . . . . |
117 |
Replacing the Paper Cutter Blade . . . . . . . . . . . . . . . . . . . . . . . . . . . |
118 |
Replacing the Maintenance Tank . . . . . . . . . . . . . . . . . . . . . . . . . . . . |
121 |
Cleaning the Printer . . . . . . . . . . . . . . . . . . . . . . . . . . . . . . . . . . . . . . |
123 |
Transporting or Storing the Printer . . . . . . . . . . . . . . . . . . . . . . . . . . . |
123 |
Preparing the Printer for Shipment . . . . . . . . . . . . . . . . . . . . . . . |
124 |
Setting Up the Printer After Transportation . . . . . . . . . . . . . . . . . |
125 |
Uninstalling and Reinstalling the Printer Driver . . . . . . . . . . . . . . . . . |
126 |
Macintosh . . . . . . . . . . . . . . . . . . . . . . . . . . . . . . . . . . . . . . . . . . |
126 |
Windows . . . . . . . . . . . . . . . . . . . . . . . . . . . . . . . . . . . . . . . . . . . |
126 |
Removing the Optional Print Server Card . . . . . . . . . . . . . . . . . . . . . |
127 |
6 Solving Problems
Diagnosing Problems . . . . . . . . . . . . . . . . . . . . . . . . . . . . . . . . . . . . . 129 Checking Error Messages and Lights . . . . . . . . . . . . . . . . . . . . . . . . . . 130 Improving Print Quality . . . . . . . . . . . . . . . . . . . . . . . . . . . . . . . . . . . 135 Solving Operational Problems . . . . . . . . . . . . . . . . . . . . . . . . . . . . . . . 138 Solving Miscellaneous Printing Problems . . . . . . . . . . . . . . . . . . . . . . 139 Solving Paper Problems . . . . . . . . . . . . . . . . . . . . . . . . . . . . . . . . . . . 141
Clearing Roll Paper Jams . . . . . . . . . . . . . . . . . . . . . . . . . . . . . . . 142 Clearing Paper Tray Jams . . . . . . . . . . . . . . . . . . . . . . . . . . . . . . . 144 Clearing Paper Jams from the Manual Feed Slots . . . . . . . . . . . . . 146
Contents | 8
A Specifications
Environmental . . . . . . . . . . . . . . . . . . . . . . . . . . . . . . . . . . . . . . . . . . 149
Electrical . . . . . . . . . . . . . . . . . . . . . . . . . . . . . . . . . . . . . . . . . . . . . . . 149
Dimensions . . . . . . . . . . . . . . . . . . . . . . . . . . . . . . . . . . . . . . . . . . . . . 149
Weight . . . . . . . . . . . . . . . . . . . . . . . . . . . . . . . . . . . . . . . . . . . . . . . . . .150
Printer Interfaces . . . . . . . . . . . . . . . . . . . . . . . . . . . . . . . . . . . . . . . . . 150
Safety Approvals . . . . . . . . . . . . . . . . . . . . . . . . . . . . . . . . . . . . . . . . . 150
Media . . . . . . . . . . . . . . . . . . . . . . . . . . . . . . . . . . . . . . . . . . . . . . . . . 150
Roll Paper . . . . . . . . . . . . . . . . . . . . . . . . . . . . . . . . . . . . . . . . . . 150
Cut Sheets . . . . . . . . . . . . . . . . . . . . . . . . . . . . . . . . . . . . . . . . . . 151
Printable Area . . . . . . . . . . . . . . . . . . . . . . . . . . . . . . . . . . . . . . . . 151
Ink Cartridges . . . . . . . . . . . . . . . . . . . . . . . . . . . . . . . . . . . . . . . . . . . 152
Index. . . . . . . . . . . . . . . . . . . . . . . . . . . . . . . . . . . . . . . . . . . . . . . . 153
|
9 |
Introduction |
This Printer Guide provides important information on setting up and using |
|
your printer, selecting paper, and replacing ink cartridges. It also tells you |
|
how to maintain your printer to keep it working at its best, and provides |
|
troubleshooting tips in case you have a problem. |
|
For additional information, see the following: |
|
• The Quick Reference Guide provides a handy summary of procedures for |
|
daily use and printer maintenance—loading paper, replacing ink |
|
cartridges and other components, checking and aligning the print head, |
|
and understanding error messages. Attach it to your printer for easy |
|
reference. |
|
• The electronic Reference Guide on the CD-ROM provides additional |
|
information about the printer, drivers, and utility software. You can read |
|
the guide using a web browser, such as SafariTM 1.0 or later, Mozilla |
|
FireFox 1.0 or later, or Netscape® Navigator® or Microsoft® Internet |
|
Explorer, versions 4.0 or later. |
|
Warnings, Cautions, Notes, and Tips |
|
These symbols are used in this book: |
|
WARNINGS must be followed carefully to avoid bodily injury. |
|
Cautions must be observed to avoid damage to your equipment. |
|
Notes contain important information about your printer. |
|
Tips contain additional hints on how to get the most out of your printer. |
10 | Introduction
Tip: Check the Epson Pro Graphics web site at http://prographics.epson. com for accessories and options that are currently available.
Options and Accessories
Your Epson Stylus® Pro 4800 offers these optional upgrades and accessories:
Optional equipment and software
Option |
Part number |
Epson Stylus Pro 4800 Printer Cabinet Stand |
C4800STAND |
|
|
Internal 10/100 BaseTX (Ethernet™) Type-B Print Server |
C12C824052 |
(interface card)* |
|
|
|
Paper Roller Spindle (Normal Tension) — 2- or 3-inch |
C12C811171 |
|
|
Paper Roller Spindle (High Tension) — 2- or 3-inch |
C12C811191 |
|
|
One-year extended warranty |
EPP48B1 |
|
|
Two-year extended warranty |
EPP48B2 |
|
|
* See Appendix A for details. |
|
In addition, you can order these user-replaceable items:
Consumables and user-replaceable parts
Part |
Part number |
Replacement Ink Maintenance Tank* |
C12C890191 |
|
|
Replacement Printer Cutter Blade** |
C12C815291 |
|
|
Ink Cartridges |
See page 110 for a |
|
complete listing. |
|
|
*See page 121 for details.
**Replaces the blade for the printer’s built-in cutter (see page 118).
You can purchase genuine Epson® ink and paper from an authorized Epson reseller. To find the nearest reseller, call 800-GO-EPSON (800-463-7766). In the U.S., you can also purchase online at www.epsonstore.com. In Canada, you can also purchase at www.epson.ca or 800-807-7766.
Where To Get Help
Epson provides technical support and information on the installation, configuration, and operation of professional printing products through the Epson PreferredSM Protection Plan. Dial (888) 377-6611, 6 AM to 6 PM, Pacific Time, Monday through Friday. Support hours and days are subject to change without notice.
Tip: If you experience difficulty with the toll-free line or your Unit ID number, call (562) 276-1305.
Caution: Using an improperly shielded cable—especially a cable more than 10 feet long—may cause the printer to malfunction.
Note: USB 2.0 is required to allow the printer to run at full speed.
Introduction | 11
Before you call, make sure you have your Unit ID number, which is included with the Epson Preferred Protection Plan information that came with your printer. You’ll also need your printer serial number and proof of purchase.
Epson also provides technical assistance 24 hours a day through the World Wide Web. You can reach Epson Support at http://support.epson.com. At this site, you can download drivers, firmware, and other files, look at product documentation, access troubleshooting information, and receive technical advice through e-mail.
You can purchase genuine Epson ink and paper from an authorized Epson reseller. To find the nearest reseller, call 800-GO-EPSON (800-463-7766). In the U.S., you can also purchase online at www.epsonstore.com. In Canada, you can also purchase at www.epson.ca or 800-807-7766.
Macintosh System Requirements
To use your printer in either a stand-alone or peer-to-peer network environment, your Macintosh® system should include the requirements listed below:
•Mac OS X 10.3.9 or later
•1.25 GHz or higher processor (G5 recommended)
•At least 1GB of RAM
•At least 60MB of free hard disk space to install the software, and at least 2GB of free hard disk space for processing files (8GB or more available hard disk space recommended)
•Quad-speed (4×) or faster CD-ROM or DVD drive for installing the printer software
•For USB connection: a compliant USB 2.0 port and a shielded USB “AB” cable from Series A (computer) to Series B (printer), up to 10 feet long
•For IEEE 1394 (FireWire) connection: a shielded IEEE 1394 cable up to 10 feet long
•For network connection: the optional Ethernet card (described on page 10) and a compatible cable
12 | Introduction
Windows System Requirements
To use your printer in either a stand-alone or peer-to-peer network environment, your system should include the requirements listed below:
•IBM®-compatible PC with a Pentium® IV 1.7 GHz or higher processor recommended
•Windows® 2000 or XP
•For 10/100 Base TX Ethernet connection: Ethernet equipped PC
•At least 1GB of RAM
•At least 100MB of free hard disk space to install the software, and at least 2GB of free hard disk space for processing files (8GB or more available hard disk space recommended)
•Quad-speed (4×) CD-ROM or DVD drive for installing the printer software
•For USB connection: a Windows-compliant USB 2.0 port and a shielded USB “AB” cable from Series A (computer) to Series B (printer), up to 10 feet long
•For IEEE 1394 (FireWire) connection: a shielded IEEE 1394 cable up to 10 feet long
•For network connection: the optional Ethernet interface card (described on page 10) and a compatible cable
Introduction | 13
Important Safety Instructions
Before using your printer, read the following safety instructions to make sure you use the equipment safely and effectively.
•The printer weighs about 88 lb (without ink or paper), and should be lifted by two people.
•When setting up the printer, make sure you have enough space around it, as shown below. You may need more space behind the printer if you print on large sheets of heavy stock or posterboard.
15.7 in.
5.9 in.
5.9 in.
13.8 in.
•Place the printer on a flat, stable surface that is larger than this product. This printer will not operate properly if it is tilted or at an angle.
•Avoid places subject to rapid changes in temperature and humidity. Also keep this product away from direct sunlight, strong light, or heat sources.
•Avoid places subject to shocks and vibrations.
•Keep this product away from dusty areas.
•Place this product near a wall outlet where the plug can be easily unplugged.
•If you use a stand, make sure it can support at least 110.3 lb (50 kg)
•Use only the type of power source indicated on the label.
•Use only the power cord that comes with this product. Use of another cord may result in fire or electric shock.
14 | Introduction
Caution: Always turn the printer off using the P Power button. When you press this button, POWER OFF appears on the LCD panel. Do not unplug the printer or turn off the power to the printer until the panel shuts off. This ensures that the print head is safely capped.
•This product’s power cord is designed for use with this product only. Using it with other equipment may result in fire or electric shock.
•Do not use a damaged or frayed power cord.
•If you use an extension cord with this product, make sure the total ampere rating of devices plugged into the extension cord does not exceed the cord’s ampere rating. Also, make sure the total ampere rating of all devices plugged into the wall outlet does not exceed the wall outlet’s ampere rating.
•Do not block or cover the openings in this product’s cabinet.
•Do not put your hand inside this product or touch the ink cartridges during printing.
•Do not move the print head by hand; otherwise you may damage this product.
•Do not insert objects through the slots. Take care not to spill liquid on this product.
•Do not attempt to service this product yourself.
•Power down the printer from the control panel, unplug the printer, and refer servicing to qualified service personnel under the following conditions:
The power cord or plug is damaged; liquid has entered this product; this product has been dropped or the cabinet damaged; this product does not operate normally or exhibits a distinct change in performance.
Caution: Do not shake cartridges (that have been installed previously) with too much force.
Introduction | 15
Ink Cartridge Safety Instructions
•Keep ink cartridges out of the reach of children and do not drink the ink.
•Store ink cartridges in a cool, dark place.
•If ink gets on your skin, wash it off with soap and water. If ink gets in your eyes, flush them immediately with water.
•Shake an ink cartridge well before installing it for best results.
•Do not use an ink cartridge beyond the date printed on the cartridge carton.
•Use up the ink cartridge within six months of installation for best results.
•Do not dismantle the ink cartridges or try to refill them. This could damage the print head.
•Do not touch the ink supply port or its surrounding area and the green IC chip on the side of the ink cartridge. Doing so may affect normal operation and printing.
16 | Introduction
Chapter 1:
Setting Up
the Printer
17
This chapter includes the following information:
•Unpacking
•Setting up and plugging in
•Installing ink
•Connecting to your system
•Connecting to the network
•Installing the software
•Updating your printer firmware
Unpacking
1. Make sure you have all these parts for your Epson Stylus Pro 4800:
WARNING: The printer weighs about 88 pounds, and should be lifted by two people.
Note: The printer also includes a black ink
conversion kit (3
Printer
cartridges). Save the kit in case you want to change your black ink cartridge
later. (See page 113.)
IEEE 1394
FireWire Cable
The printer includes a |
|
Roll paper spindle |
|
|
Spindle adapters |
||
Photo Black cartridge. If |
Power cord |
||
(attached to spindle) |
|||
you prefer to use Matte |
|
||
|
|
||
Black, the Matte Black |
|
|
|
cartridge can be |
|
|
|
purchased separately. |
|
|
|
See page 110. |
|
|
Paper tray
Ink cartridges
(includes Photo Black ink cartridge)
Black ink conversion cartridges

18| Setting Up the Printer
2.Remove all the packing materials and tape. Save the box and packaging in case you need to ship the printer.
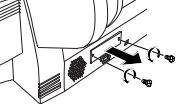
3.Remove the two screws and remove the carriage retainer bracket. Store
Note: To prevent paper jams, don’t place the screws back in the printer.
the screws and retainer bracket in case you need to transport the printer later.
4.Unlock the print head carriage by pulling the green tab to the left. Do not push down and do not remove the tab.
Note: The default black ink cartridge is Photo Black. If you prefer to use Matte Black (sold separately; see
page 110), you can install the Matte Black cartridge immediately instead of installing the supplied Photo Black cartridge.
Setting Up the Printer | 19
Setting Up and Plugging In
1.Connect the power cord to the AC inlet on the back of the printer.
2.Plug the other end of the power cord into a properly grounded electrical outlet.
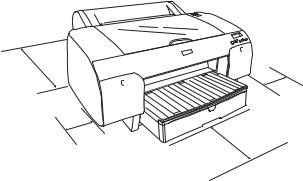
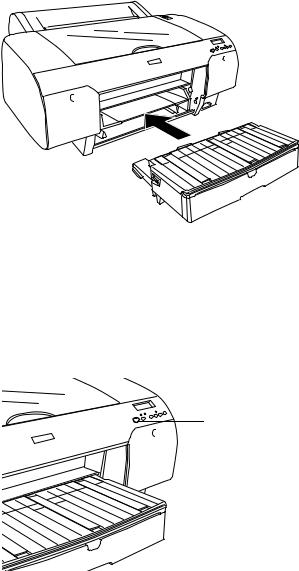
3.Insert the paper tray into the slots at the front of the printer.
Installing Ink
Use the ink cartridges that came with your printer for initial ink charging. During the initial installation process, it is normal for up to one-third of the ink in each cartridge to be used.
1. Press the P Power button to turn on the printer.
Power button
20| Setting Up the Printer
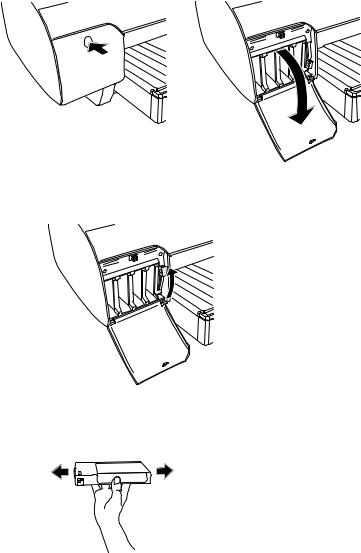
2.Press both ink compartment covers to open them.
3. Raise both ink levers.
4.Remove each ink cartridge from its package and gently shake the cartridge.
Caution: Charging takes about 8 minutes. Never turn off the printer, release the paper lever, or open the cover while the Pause light is flashing, or you may damage the printer.
Setting Up the Printer | 21
5.Install the ink cartridges in the printer. Hold each cartridge with the arrow pointing toward the printer, then insert it into its slot. Make sure you insert each cartridge in the correct slot.
6. After installing all 8 cartridges, lower the ink levers. The printer begins charging the ink delivery system and the 
 Pause light flashes.
7.When ink lever messages appear on the LCD, follow the instructions to raise or lower the ink levers.
8.When READY appears on the LCD display, charging is complete. Press the 
 Pause button as indicated and close the ink compartment covers.

22 | Setting Up the Printer
Connecting to Your System
You can use either USB or FireWire connections. Make sure your system has the appropriate port, and you have a standard, shielded cable 10 feet long or less.
USB Cable |
FireWire Cable (included) |
1.Make sure that both the printer and the computer are off.
2.Plug the interface cable into the appropriate port on the printer.
FireWire port |
USB port |
3.Plug the other end of the cable into the appropriate connector on your computer.
Caution: You must unplug the printer from the power outlet, or you may damage the printer and the card.
Note: You need to remove the card when shipping the printer. See page 127.
Setting Up the Printer | 23
Connecting to the Network
If you plan to attach the printer to your network, you need the optional EpsonNet print server card. The EpsonNet print server is a 10/100 BaseTX Type B Ethernet interface card (part number C12C824052).
You can purchase the print server card and other optional equipment and and supplies from an authorized Epson reseller. To find the nearest reseller, call 800-GO-EPSON (800-463-7766).
In the U.S., you can also purchase online www.epsonstore.com.
In Canada, you can also purchase at www.epson.ca or (800) 807-7766.
Make sure you have the correct cable for connecting the printer. To connect to a network hub, you need a standard RJ-45 “straight-through” network cable. To connect directly to your computer’s network interface, you need an RJ-45 crossover cable.
Before you install the print server, make sure you check the documentation included with the card for additional instructions. Then follow these steps to install the card:
1.Turn off your computer and printer.
2.IMPORTANT: Unplug the printer from its electrical outlet. Not doing so may cause damage to the printer and the card.
3.Disconnect any interface cables from the printer.
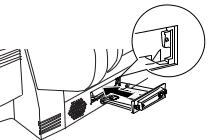
4.Use a cross-head screwdriver to remove the two screws securing the optional interface cover. Then lift off the cover as shown:
Make sure you keep the screws in case you need to remove the card and replace the cover.
24| Setting Up the Printer
5.Slide the card along the slots inside the compartment. Push it in firmly to fully insert the connector into the printer’s internal slot.
Note: You can check for a newer version of your printer driver on the Epson support site at www.support.epson.com.
6.Use the two screws included with the card to secure it.
7.Connect one end of the appropriate cable to the card. Then connect the other end to your computer’s Ethernet port or hub.
8.Plug in the printer’s power cord.
Once the printer is connected to your network, you need to configure it. Turn on the printer and press the small black button on the back of the Ethernet card. Hold it down until the printer starts printing a series of status sheets. See the documentation that came with the print server for instructions on configuring it for your network.
Installing the Software for Macintosh
Follow the steps below to install the software on a Macintosh. For Windows, see page 30.
1.Turn on your Macintosh and your printer.
2.Insert the printer software CD-ROM. If necessary, double-click the Epson CD-ROM to open its window.
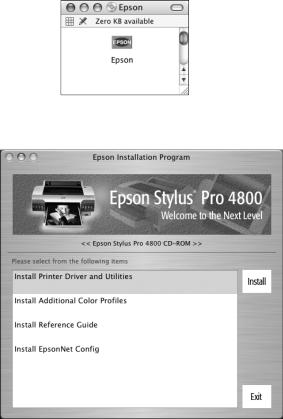
Setting Up the Printer | 25
You see the Epson installer icon.
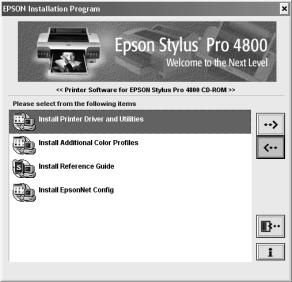
3. Double-click the Epson installer icon.
4.Double-click Install Printer Driver and Utilities.
5.Enter your password and follow the on-screen instructions to install your software.
6.Enter your password again and follow the on-screen instructions to install the EPSON LFP Remote Panel.
7.Double-click Install Additional Color Profiles to install the profiles for your printer.
8.Double-click Install Reference Guide and wait while the guide is installed.

26| Setting Up the Printer
9.Do one of the following:
•If you are finished installing software, click Exit.
•If you installed the optional EpsonNet print server card, double-click Install EpsonNet Config. Enter your password and follow the on-screen instructions. You can use EpsonNet Config to configure your printer for network use.
When you see the prompt, click Restart.
Remove the printer software CD-ROM and follow the instructions below for Mac OS X 10.4 or on page 28 for Mac OS X 10.3.
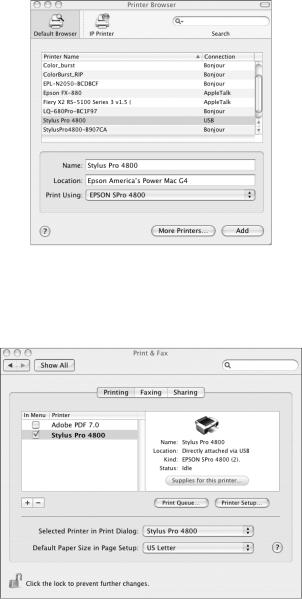
Adding the Printer in Mac OS X 10.4.x
1.Open the Apple menu, select System Preferences, then open the
Print & Fax Utility. Or, go to Hard Drive > Applications > Utilities > Printer Setup Utility.
Click here to add your printer
Setting Up the Printer | 27
2. Click the + plus sign. You see your printer in the Printer Browser:
Tip: If you want to rename the printer for easier identification, enter a new name for it in the Name field on this screen.
Note: If your Macintosh cannot find the printer, click More Printers and select the appropriate interface.
3.Wait while your Macintosh finds the printer driver and the Add button becomes available. Then click the Add button.
Your printer appears in the Print & Fax utility:
4.Close the utility. Go to page 32 to update your printer firmware, if necessary.
28 | Setting Up the Printer
Adding the Printer in Mac OS X 10.3.x
1.Open the Applications folder, then open the Utilities folder and open the Printer Setup Utility.
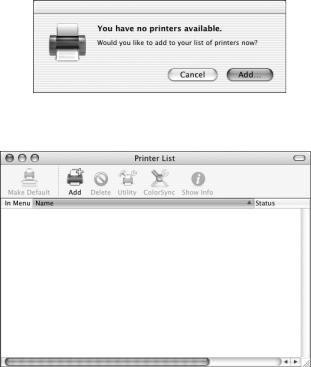
2.If you see a message like this, click Add, then skip to step 4.
3. Click the Add icon at the top of the Printer List window.
Tip: If you want to rename the printer for easier identification, select the printer name in the list and click Show Info. Type a new name and click Apply Changes.
Setting Up the Printer | 29
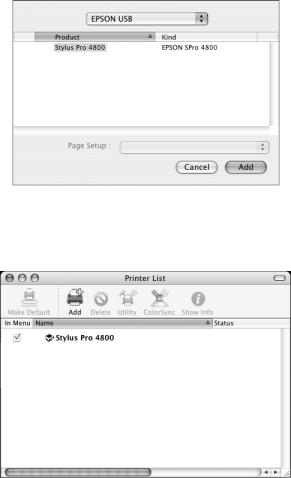
4.Pull down the menu and select the connection you are using—either
EPSON USB, EPSON FireWire, or EPSON TCP/IP. The Stylus Pro 4800 appears on the screen.
5.Click Stylus Pro 4800, then click Add.
You see the Stylus Pro 4800 in the Printer list.
6.Leave this window open. Go to page 32 to update your printer firmware, if necessary.
30 | Setting Up the Printer
Installing the Software for Windows
1.Make sure your printer is turned off.
2.Turn on your computer.
3.Insert the printer software CD-ROM in your computer. The installer starts automatically. If it doesn’t start, double-click My Computer or click Start > My Computer. Then double-click your CD-ROM icon.
4. Double-click Install Printer Driver and Utilities.
 Loading...