

BrightLink 475Wi/480i/485Wi
Connection Guide
BrightLink® interactive projectors provide many options for connecting computers,
document cameras, video devices, and more. BrightLink users can also annotate without
connecting a computer or any other device to the projector.
This guide helps you connect the projector for maximum functionality and ease of use.
After the projector has been installed on the wall or mounted on a table, follow the
instructions in this guide to connect the equipment that will be used with the projector. You
may need to consult with the school’s tech coordinator or IT director (or with the classroom
teacher) on what equipment to use and which connections they prefer for various devices.
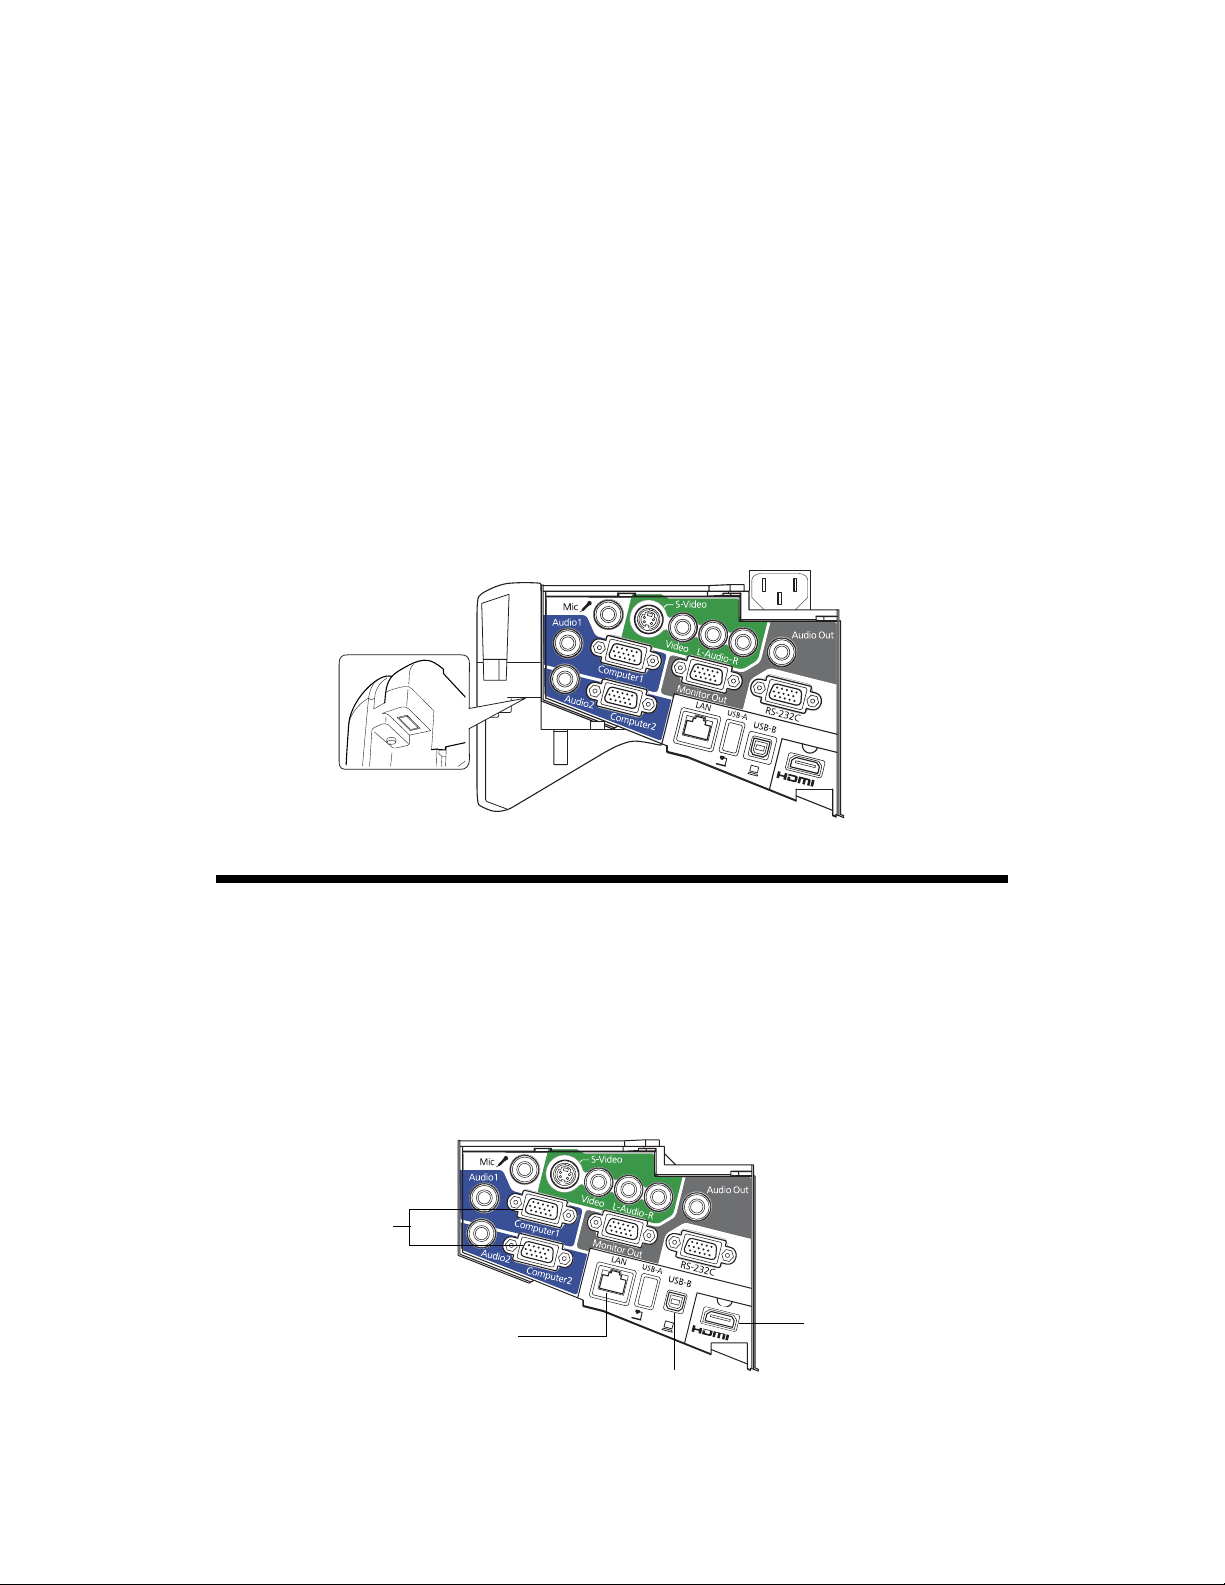
The following illustration shows the projector’s interface panel and available ports.
Connecting Computers
You can use any of the following ports to connect computers to the projector:
■ Computer1 or Computer2 (VGA connections)
■ HDMI
■ USB-B (USB display, not recommended because of reduced interactive performance)
■ LAN (RJ-45)
VGA connection
LAN connection
USB connection required (in addition to other
connections) for full interactivity and dual pen support
HDMI connection
1
If you connect VGA cables to both the Computer1 and Computer2 ports, make sure you
label the cables. The teacher or other user needs to know which port is being used so that the
correct source for full interactivity can be selected in the Easy Interactive Function menu
screen.
For full computer interactivity and dual pen support (using Easy Interactive Tools or other
dual-pen application), you also need to connect a USB cable from the computer to the
projector.
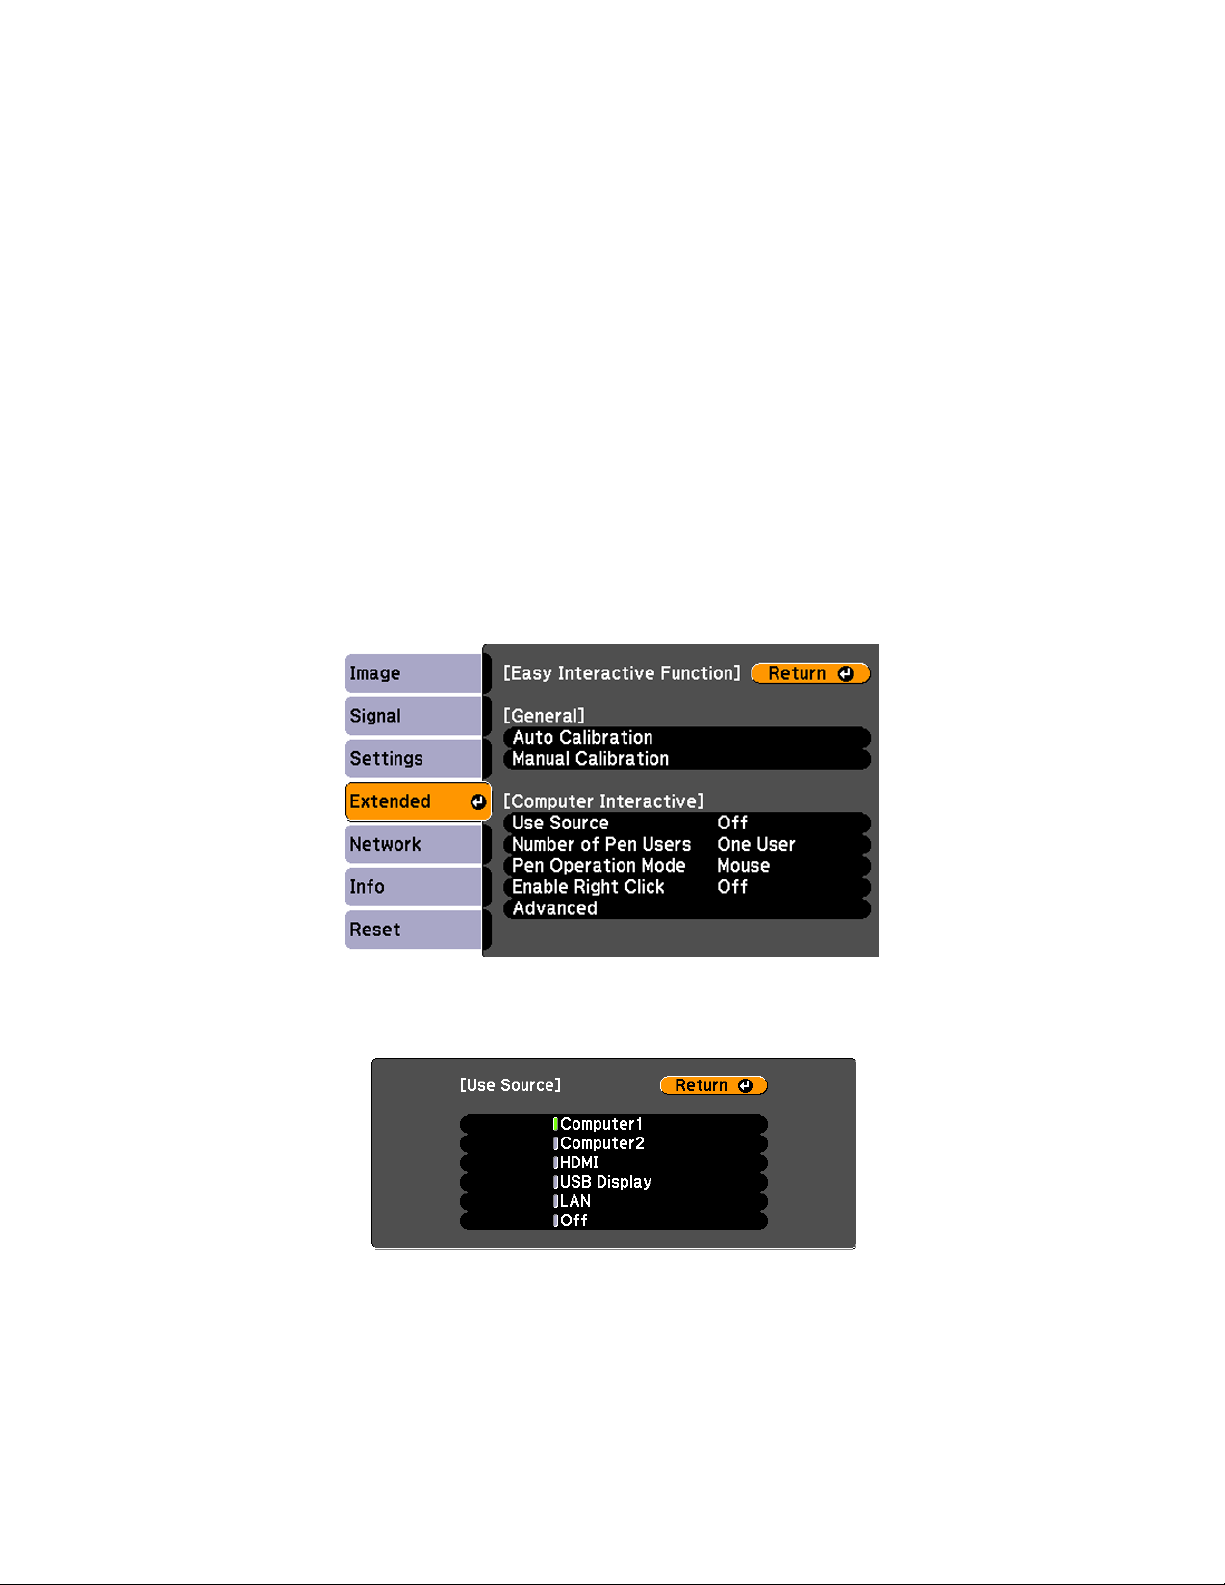
Selecting the Source for Interactivity
Selecting the source for Computer Interactive enables Easy Interactive Tools to be used on the
“main computer” connected to the projector.
Computers or other devices connected to other sources (and not selected) can use the built-in
(embedded) interactive toolbar.
1. Press the
2. Select the
3. Select
Use Source and press Enter.
Menu button, select the Extended menu, and press Enter.
Easy Interactive Function setting and press Enter.
4. Select the source where the computer is connected. For example, if you connected the
computer to the projector’s
computer to the projector’s
Computer1 port, select Computer 1. If you connected the
HDMI port, select HDMI.
A computer connected to the selected source (and also connected to the projector with a
USB cable) will work with Easy Interactive Tools and have dual-pen support.
2

The built-in toolbar will be available on equipment connected to the other (non-selected)
sources, providing PC-free annotation (single-pen support). Use the remote control to
switch sources.
Connecting Through a Network
If both the projector and computer are connected to the same network by Ethernet®
cable, users can project through the network. You must install the EasyMP Network
Projection software on the computer (Windows
the
EPSON Projector Software CD that came with the projector or at
epson.com/brightlinkdownloads.
For full computer interactivity (using Easy Interactive Tools software), you also need to
connect a USB cable from the computer to the projector and select
described on page 2.
If your network includes a wireless router, users can connect to the projector wirelessly from
computers (using EasyMP Network Projection software). Users can also connect wirelessly
from an iPad
®
, iPhone®, or iPod® touch using the optional EPSON iProjection™ app.
When the projector is connected to these devices, only the built-in toolbar is available (single
pen support).
®
or Mac®). This software is available on
LAN as the source, as
Wireless router
or access point
Wireless network connection with
interactivity using the built-in toolbar
If the projector is not connected to a network (or the network does not include a wireless
router), you can purchase the optional wireless LAN module for the projector. This will allow
wireless projection directly from a computer to the projector and use of the built-in interactive
toolbar.
You can purchase the optional wireless LAN module (part number V12H418P12)
from an EPSON
®
authorized reseller. To find the nearest reseller, call 800-GO-EPSON
(800-463-7766). Or you can purchase online at www.epsonstore.com (U.S. sales) or
www.epson.ca (Canadian sales).
3

Connecting Document Cameras
Document cameras have several different types of ports for connecting to the projector.
For cameras that have USB ports, such as the EPSON DC-11 and EPSON DC-06, the best
way to connect is directly to the computer’s USB port, as shown below. This will enable full
interactivity and dual pen support (using Easy Interactive Tools software) on the document
camera image.
To projector
Although you can connect the EPSON DC-06 directly to the projector’s
USB cable, this will provide only limited interactivity (using the built-in interactive toolbar).
For document cameras that do not have a USB port, you can connect to the projector’s VGA
Computer2) or HDMI port. This will allow use of the projector’s built-in interactive toolbar
(
on the camera image.
If the document camera has USB and VGA connectors, you can connect a USB cable from
the camera to the computer and a VGA cable directly to the projector. This will provide two
ways of connecting. The USB connection can be used when the computer is on, and the VGA
connection can be used when the teacher wants to work with the document camera without
turning on the computer.
USB-A port using a
Using a Switch Box
You can use a switch box or control box to connect various video inputs to the projector.
However, the primary computer should always be connected directly to the projector with a
USB cable for interactivity and another cable for video output (VGA, HDMI, or Ethernet).
This allows maximum interactivity and dual pen support (using Easy Interactive Tools
software) for the computer. The projector’s built-in toolbar will be available for images from
equipment connected through the switch box.
4

Connecting Video Equipment
You can connect various video devices, such as DVD players, satellite/cable systems, VCRs, or
game systems.
Depending on the connectors available on the equipment, you can use any of the projector
ports in the following list. The projector ports are listed in order from highest to lowest
quality; if your equipment has multiple connectors, choose the one that provides the best
quality image.
■ HDMI
■ Computer2 (with component to VGA video cable or adapter)
■ S-Video
■ Video (composite video)
S-Video
connection
Component to
VGA connection
Composite Video
connection
HDMI connection
The projector’s built-in toolbar can be used for annotating on the video image from any of
these sources. However, it must be a different source from the one selected for
Interactive Function
cannot be used on the source that is selected for
in the Extended menu, as described on page 2. The built-in toolbar
Easy Interactive Function.
Easy
5

Audio Connections
A variety of audio connections are available:
■ You can connect a dynamic microphone to the Mic port and output the sound through
the projector.
■ You can also output computer audio. If you connected the computer using a VGA cable,
you need to connect an optional 3.5 mm stereo mini-jack audio cable for sound. If you
are using more than one audio connection, label the cables
■ If you connected the computer using an HDMI or Ethernet cable, you can output both
video and audio through the cable.
■ To enhance the sound from your presentation, you can connect the projector to external
speakers with built-in amplifiers. The volume can be controlled using the projector’s
remote control.
If you want to output audio from the external speakers (or use the microphone) when the
projector is turned off, you need to adjust the
Extended menu. In standby mode, you can output only
Standby Setup settings in the projector’s
Computer1 or Computer2 audio or
composite audio (red and white RCA connectors).
Audio1 or Audio2.
Microphone
connection
Computer1 audio
connection
Computer2 audio
connection
Ethernet connection
(video and audio)
RCA audio
connections
External speaker
connection
HDMI connection
(video and audio)
Installing Software
You need to install software for use with the projector. Use the CD that came with the
projector, labeled
■ For Macs, you need to install Easy Interactive Driver and Easy Interactive Tools. For
Windows, you only need Easy Interactive Tools.
■ For Linux, the pen will function as a mouse, but Easy Interactive Tools is not supported.
Third-party interactive software may be supported.
EPSON Projector Software for Easy Interactive Function.
■ For projecting over a network on a PC or Mac, you also need to install the EasyMP
Network Projection software from the
All software is available at
© 2012 Epson America, Inc. 3/12 CPD-37081
epson.com/brightlinkdownloads.
EPSON Projector Software CD.
6
 Loading...