


 Loading...
1
User's Guide

Notations Used in This Guide |
2 |
|
|
fSafety Indications
So that you can use the projector safely and correctly, symbols are applied in the documentation and on the projector to indicate possible harm to the user or to others and the risk of damage to property.
The indications and their meaning are as follows. Make sure you understand them properly before reading the guide.
|
|
|
Warning |
Indicates the possibility of death or serious injury if this symbol is ignored or if sufficient care is not taken. |
|
|
|
|
|
|
|
|
|
|
Caution |
Indicates the possibility of injury or damage to property if this symbol is ignored or if sufficient care is not taken. |
|
|
|
|
|
|
|
f General Information Indications |
|||||
|
|
|
|
|
|
|
|
Attention |
Indicates procedures which may result in damage or injury if sufficient care is not taken. |
||
|
|
|
|
|
|
|
|
|
q |
Indicates additional information and points which may be useful to know regarding a topic. |
|
|
|
|
|
|
|
|
|
|
|
|
|
|
|
|
s |
Indicates a page where detailed information regarding a topic can be found. |
|
|
|
|
|
|
|
|
|
|
g |
Indicates that an explanation of the underlined word or words in front of this symbol appears in the glossary of terms. See |
|
|
|
|
the "Glossary" section of the "Appendices". s p.64 |
||
|
|
|
|
|
Indicates operating methods and the order of operations. |
|
|
Procedure |
|
||
|
|
|
The procedure indicated should be carried out in the order of the numbered steps. |
||
|
|
|
|
|
|
|
|
[ (Name) ] |
Indicates the name of the buttons on the remote control or the control panel. |
||
|
|
Example: [Esc] button |
|||
|
|
|
|
|
|
|
|
|
|
|
|
|
|
"(Menu Name)" |
Indicates configuration menu items. |
||
|
|
Example: "Image" - "Brightness" |
|||
|
|
|
|
|
|
|
|
|
|
|
|

Contents |
3 |
|
|
Projector Features...................................................................................... |
4 |
Part Names and Functions ........................................................................ |
5 |
Front/Top.............................................................................................................. |
5 |
Rear ..................................................................................................................... |
6 |
Control Panel ....................................................................................................... |
7 |
Remote Control .................................................................................................... |
8 |
Base ..................................................................................................................... |
9 |
Useful Functions |
|
Changing the Projection Mode................................................................ |
11 |
Changing the Projected Image (Source Search) ................................... |
12 |
Functions for Enhancing Projection....................................................... |
13 |
Selecting the Projection Quality (Selecting Color Mode) ................................... |
13 |
Hiding the Image and Sound Temporarily (A/V Mute) ....................................... |
14 |
Freezing the Image (Freeze).............................................................................. |
14 |
Changing the Aspect Ratio (Aspect) .................................................................. |
15 |
Enlarging Part of the Image (E-Zoom) ............................................................... |
18 |
Security Functions ................................................................................... |
19 |
Managing Users (Password Protect) ................................................................. |
19 |
Restricting Operation (Operation Lock).............................................................. |
22 |
Anti-Theft Lock ................................................................................................... |
23 |
Configuration Menu |
|
Using the Configuration Menu ................................................................ |
25 |
List of Functions....................................................................................... |
26 |
Image Menu ....................................................................................................... |
26 |
Signal Menu ....................................................................................................... |
27 |
Settings Menu .................................................................................................... |
28 |
Extended Menu.................................................................................................. |
29 |
Network Menu .................................................................................................... |
31 |
Info Menu (Display Only).................................................................................... |
34 |
Reset Menu........................................................................................................ |
35 |
Troubleshooting |
|
Using the Help .......................................................................................... |
37 |
Problem Solving ....................................................................................... |
38 |
Reading the Indicators ....................................................................................... |
38 |
When the Indicators Provide No Help ................................................................ |
41 |
Appendices |
|
Installation Methods ................................................................................ |
49 |
Cleaning .................................................................................................... |
50 |
Cleaning the Projector's Surface ....................................................................... |
50 |
Cleaning the Lens.............................................................................................. |
50 |
Cleaning the Air Filter and Air Intake Vent......................................................... |
50 |
Replacing Consumables ......................................................................... |
51 |
Replacing the Remote Control Batteries ........................................................... |
51 |
Replacing the Lamp........................................................................................... |
52 |
Replacing the Air Filter ...................................................................................... |
56 |
Important notice when transporting....................................................... |
57 |
Saving a User's Logo............................................................................... |
58 |
Screen Size and Distance........................................................................ |
60 |
Connecting to External Equipment ........................................................ |
61 |
Connecting to an External Monitor .................................................................... |
61 |
Connecting to External Speakers ...................................................................... |
61 |
Connecting a LAN Cable ......................................................................... |
62 |
Optional Accessories and Consumables .............................................. |
63 |
Glossary.................................................................................................... |
64 |
ESC/VP21 Commands ............................................................................. |
66 |
Command List.................................................................................................... |
66 |
Communications protocol .................................................................................. |
66 |
Cable Layouts.................................................................................................... |
67 |
PJLink ....................................................................................................... |
68 |
List of Supported Monitor Displays ....................................................... |
69 |
Specifications........................................................................................... |
71 |
Appearance............................................................................................... |
72 |
Index.......................................................................................................... |
73 |

Projector Features
Ease of use
f Short-distance projection
The shortest recommended projection distance to the screen is a remarkably short 54 cm (21 in.)*. You can place the projector close to the screen. For example, if you project images onto the screen by a ceiling projection, you can stand close to the screen and explain projected images without casting your shadow.
Also when you stand with your back to the screen, the light from the projector will not come into your sight so you will not be dazzled.
*At this distance, the projected image will measure about 110 ^ 67 cm (43 ^ 26 in.).
f WXGA-Compatible projection
The projector can handle the image from a computer with a 16:10 WXGA wide LCD display, keeping the aspect ratio as is. This lets you make the best use of a wide surface, such as a whiteboard, as a screen.
f Network-Based control
By connecting the projector to a LAN environment, you can monitor and control the projector from a computer.
4
Enhanced security functions
f Password Protect to restrict and manage users
By setting a password you can restrict who can use the projector. s p.19
f Operation Lock restricts button operation on the control panel
You can use this to prevent people from changing projector settings without permission at events, in schools, and so on. s p.22
f Equipped with various anti-theft devices
The projector is equipped with the following security devices. s p.23
•Security slot
•Security cable installation point
Easy to handle
f Direct power On/Off
In places where power is managed centrally, such as in a conference room, the projector can be set to power on and off automatically when the power source to which the projector is connected is switched on or off.
f No cool down delay
After turning the projector's power off, you can disconnect the projector's power cable without having to wait for the projector to cool down first.

Part Names and Functions
Front/Top
I
H
A |
|
B |
G |
|
|
|
F |
C |
|
|
J |
D |
|
E |
|
Name |
Function |
A Control panel |
s p.7 |
B Lamp cover |
Open this cover when replacing the projector's |
|
lamp. s p.53 |
C Air exhaust vent |
Caution |
|
|
|
Do not place objects that may become warped |
|
or otherwise affected by heat near the air |
|
exhaust vent and do not put your face or |
|
hands near the air exhaust vent while |
|
projection is in progress. |
5
|
Name |
Function |
D |
Front adjustable |
Extend and adjust the position of the projected |
|
feet |
image when the projector is placed on a |
|
|
surface such as a desk. s Quick Start Guide |
|
|
|
E |
Foot adjust lever |
Pull out the foot lever to extend and retract the |
|
|
front foot. s Quick Start Guide |
|
|
|
F |
Air filter (Air |
Prevents dust from being drawn into the |
|
intake vent) |
projector. s p.50 |
|
|
|
G |
Remote receiver |
Receives signals from the remote control. |
|
|
s Quick Start Guide |
|
|
|
H |
Focus ring |
Adjusts the image focus. s Quick Start Guide |
|
|
|
I |
Security slot (j) |
The security slot is compatible with the |
|
|
Microsaver Security System manufactured by |
|
|
Kensington. s p.23 |
|
|
|
J |
Lens cover |
Protects the lens from any damages and dirt. |
|
|
|

Part Names and Functions
Rear
A H G F
|
B C |
D E |
|
|
|
|
Name |
Function |
A |
Remote receiver |
Receives signals from the remote control. |
|
|
s Quick Start Guide |
|
|
|
B |
Speaker |
|
|
|
|
C |
Monitor Out port |
Outputs the image signal from the computer |
|
|
connected to the Computer1 input port to an |
|
|
external monitor. This is not available for |
|
|
component videog signals or other signals |
|
|
being input to any port other than the |
|
|
Computer1 input port.s p.61 |
|
Audio Out port |
Outputs the sound of the image currently being |
|
|
projected to external speakers. s p.61 |
|
|
|
6
|
Name |
Function |
D |
Power inlet |
Connects to the power cable. |
|
|
s Quick Start Guide |
|
|
|
E |
RS-232C port |
When controlling the projector from a |
|
|
computer, connect it to the computer with an |
|
|
RS-232C cable. This port is for control use and |
|
|
should not normally be used. s p.67 |
|
|
|
F |
Computer1 input |
For video signals from a computer and |
|
port |
component videog signals from other video |
|
|
sources. |
|
Audio1 input port |
Connect to the audio out port of the computer |
|
|
connected to the Computer1 input port. |
|
Computer2 input |
For video signals from a computer and |
|
port |
component videog signals from other video |
|
|
sources. |
|
Audio2 input port |
Connect to the audio out port of the computer |
|
|
connected to the Computer2 input port. |
|
|
s Quick Start Guide |
|
|
|
G S-Video input |
For S-videog signals from video sources. |
|
|
port |
|
|
Video input port |
For composite videog signals from video |
|
|
sources. |
|
Audio-L/R input |
Connects to the audio out port of the |
|
port |
equipment connected to the S-Video port or |
|
|
Video input port. s Quick Start Guide |
|
|
|
H LAN port |
When a LAN cable is connected, you can |
|
|
|
monitor and control the projector over a LAN. |
|
|
s p.62 |
|
|
|
Part Names and Functions
Control Panel
A I H G
|
|
|
|
|
|
|
|
|
|
|
|
|
|
|
|
|
|
|
|
|
|
|
|
|
|
|
|
|
|
|
|
|
|
|
|
|
|
|
|
|
|
|
|
|
|
|
|
|
|
|
|
|
|
|
|
|
|
|
|
|
|
|
|
|
|
|
|
|
|
|
|
|
|
|
|
|
|
|
|
|
|
|
|
|
|
|
|
|
|
|
|
|
|
|
|
|
|
|
|
|
|
|
|
|
|
|
|
|
|
|
|
|
|
|
|
|
|
|
|
|
|
|
|
|
|
|
|
|
|
|
|
|
|
|
|
|
|
|
|
|
|
|
|
|
|
|
|
|
|
|
|
|
|
|
|
|
|
|
|
|
|
|
|
|
|
|
|
|
|
|
|
|
|
|
|
|
|
|
|
|
|
|
|
|
|
|
|
|
|
|
|
|
|
|
|
|
|
|
|
|
|
|
|
|
|
|
|
|
|
|
|
|
|
|
|
|
|
|
|
|
|
|
|
|
|
|
|
|
|
|
|
|
|
|
|
|
|
|
|
|
B |
C |
D |
|
E F |
|||||||||
|
|
|
|
|
|
|
|
|
|
|
|
|
|
|
Name |
|
|
|
|
|
|
|
Function |
||||||
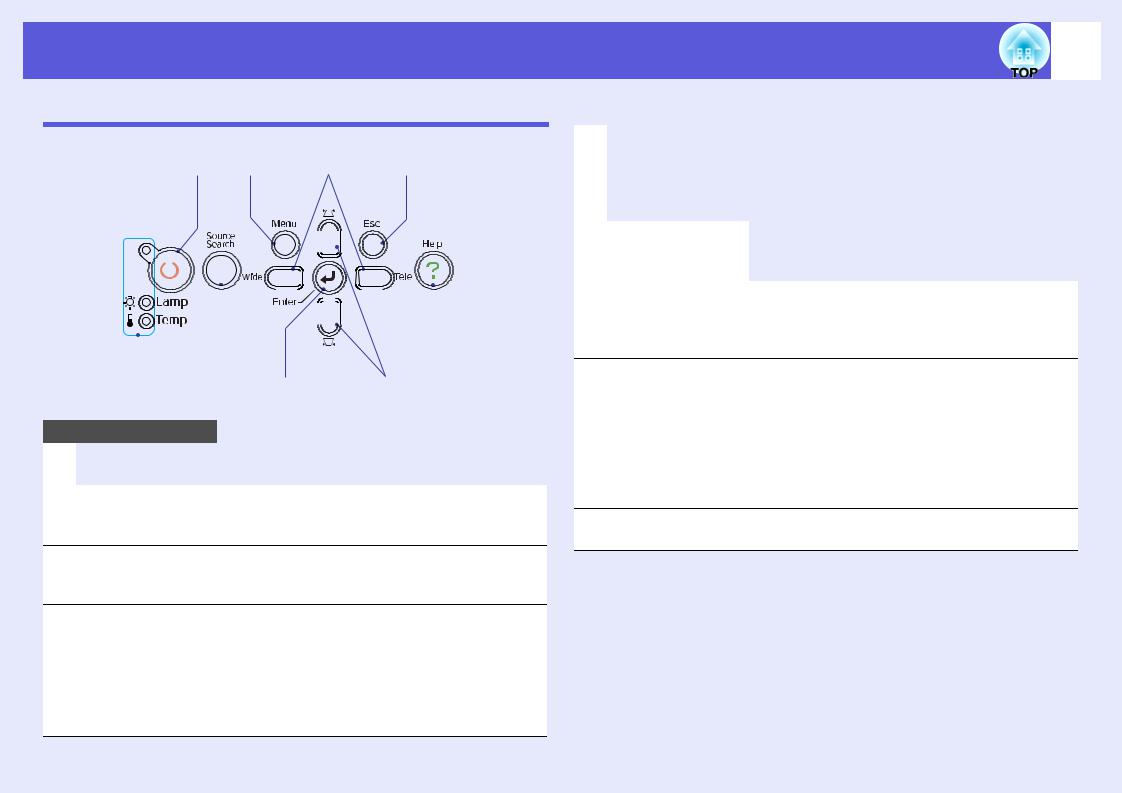
A [t] button |
|
Turns the projector power on or off. |
||||||||||||
|
|
|
|
s Quick Start Guide |
||||||||||
|
|
|
|
|
|
|
|
|
|
|
|
|
|
|
B Status indicators The color of the indicators and whether they are flashing or lit indicates the status of the projector. s p.38
C [Source Search] Changes to the next input source that is button connected to the projector and is sending an
image.s p.12
D [Enter] button If pressed during projection of computer signal images, it automatically adjusts the tracking, synchronization, and position to project the optimum image.
When a configuration menu or a help screen is displayed, it accepts and enters the current selection and moves to the next level.s p.25
7
|
Name |
Function |
E [v] [w] buttons |
Corrects keystone distortion. |
|
|
|
If pressed when a configuration menu or a help |
|
|
screen is displayed, these buttons select menu |
|
|
items and setting values. |
|
|
s Quick Start Guide, p.25 |
|
|
|
F |
[Help] button |
Displays and closes the help screen which |
|
|
shows you how to deal with problems if they |
|
|
occur.s p.37 |
|
|
|
G [Esc] button |
Stops the current function. |
|
|
|
If pressed when a configuration menu is |
|
|
displayed, it moves to the previous menu |
|
|
level.s p.25 |
H [Tele] [Wide]
buttons
Press to switch between Tele/Wide. When you press the [Tele] button, the projected image becomes smaller; when you press [Wide], the image becomes larger.
If pressed when a configuration menu or a help screen is displayed, these buttons select menu items and setting values.
s Quick Start Guide, p.25
I [Menu] button Displays and closes the configuration menu.s p.25
Part Names and Functions
Remote Control
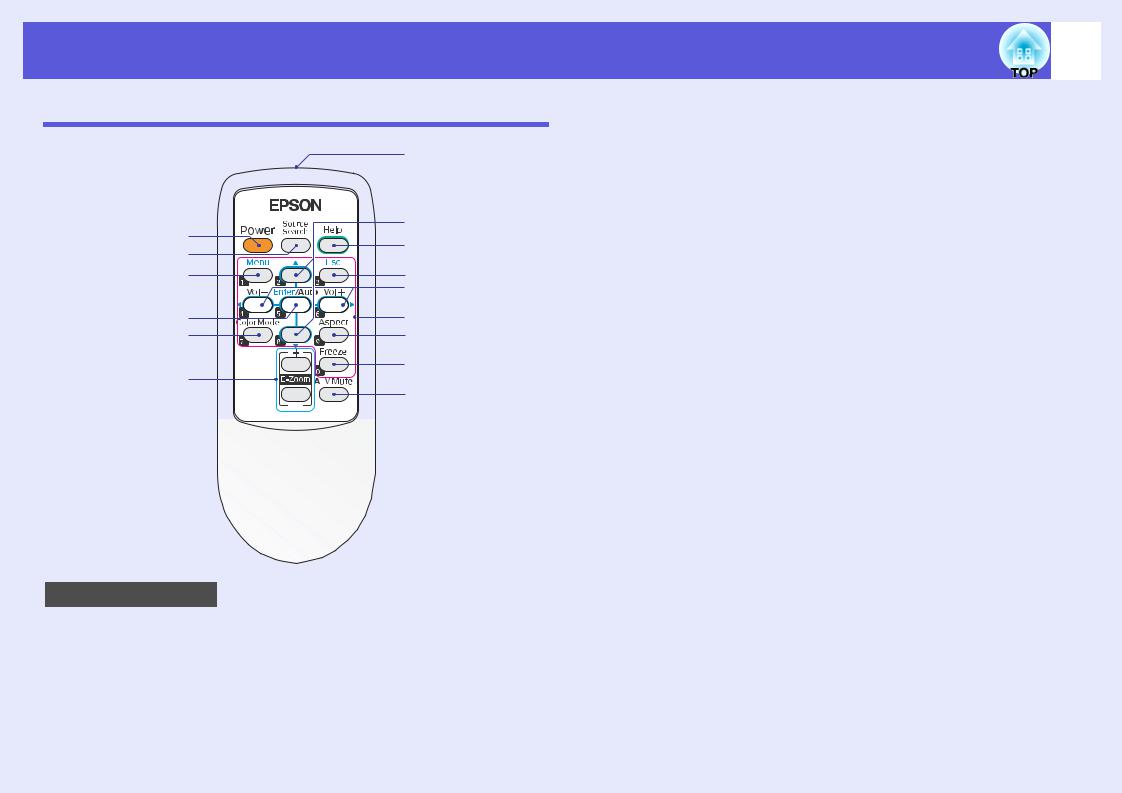
|
O |
|
A |
N |
|
M |
||
B |
||
L |
||
C |
||
K |
||
|
||
D |
J |
|
E |
I |
F |
H |
|
G |
||
|
|
|
|
|
|
|
Name |
|
|
Function |
A |
[Power] button |
Turns the projector power on or off. |
||
|
|
s Quick Start Guide |
||
|
|
|
|
|
B |
[Source Search] |
Changes to the next input source that is |
||
|
button |
connected to the projector and is sending an |
||
|
|
image.s p.12 |
||
|
|
|
|
|
8
|
Name |
Function |
C |
[Menu] button |
Displays and closes the configuration menu. |
|
|
s p.25 |
|
|
|
D |
[Enter/Auto] |
If pressed during projection of computer signal |
|
button |
images, it automatically adjusts the tracking, |
|
|
synchronization, and position to project the |
|
|
optimum image. s p.27 |
|
|
When a configuration menu or a help screen is |
|
|
displayed, it accepts and enters the current |
|
|
selection and moves to the next level.s p.25 |
|
|
|
E |
[Color Mode] |
Each time the button is pressed, the color |
|
button |
mode changes.s p.13 |
|
|
|
F |
[E-Zoom] button |
(+) Enlarges the image without changing the |
|
(+) (-) |
projection size. |
|
|
(-) Reduces parts of the image that have been |
|
|
enlarged using the [+] button.s p.18 |
|
|
|
G |
[A/V Mute] button |
Turns the video and audio on or off. s p.14 |
|
|
When you hold this button down for about 5 |
|
|
seconds, the screen is cleared and then the |
|
|
projection mode switches from "Front" to |
|
|
"Front/Ceiling". s p.29 |
|
|
|
H |
[Freeze] button |
Images are paused or unpaused.s p.14 |
|
|
|
I |
[Aspect] button |
The aspect ratiog changes each time the |
|
|
button is pressed.s p.15 |
|
|
|
J |
Numeric buttons |
Use these buttons when entering a password. |
|
|
s p.20 |
|
|
|

Part Names and Functions
Name |
Function |
|
|
K [Volume -/l] button [Volume +/r] button
Press [Volume -/l] to lower the volume and press [Volume +/r] to raise the volume.
If pressed when a configuration menu or a help screen is displayed, these buttons select menu items and setting values.
s Quick Start Guide , p.25
L [Esc] button Stops the current function. If pressed when a configuration menu is displayed, it moves to the previous level. s p.25
M [Help] button Displays and closes the help screen which shows you how to deal with problems if they occur.s p.37
N [u] [d] buttons If pressed when a configuration menu or a help screen is displayed, these buttons select menu items and setting values. s p.25
O Remote control Outputs remote control signals.
light-emitting s Quick Start Guide area
9
Base
A
C
|
|
B |
|
|
|
|
Name |
Function |
A |
Suspension |
Attach the optional ceiling mount here when |
|
bracket fixing |
suspending the projector from a ceiling. |
|
points (5 points) |
s p.49, 63 |
|
|
|
B |
Rear foot |
Turn to extend and retract to adjust the |
|
(2 points) |
horizontal tilt. s Quick Start Guide |
|
|
|
|
|
|
C |
Security cable |
Pass a commercially available anti-theft wire |
|
installation point |
lock through here when you want to secure the |
|
|
projector to a fixed object. s p.23 |
|
|
|

Useful Functions
This chapter explains useful functions for giving presentations and so on, and the security functions.
Changing the Projection Mode.......................... |
11 |
Changing the Projected Image |
|
(Source Search) .................................................. |
12 |
Functions for Enhancing Projection................. |
13 |
• Selecting the Projection Quality |
|
(Selecting Color Mode) ..................................................... |
13 |
• Hiding the Image and Sound Temporarily |
|
(A/V Mute) ......................................................................... |
14 |
• Freezing the Image (Freeze)............................................. |
14 |
• Changing the Aspect Ratio (Aspect)................................ |
15 |
"Auto"............................................................................................. |
15 |
"Normal", "16:9", "Zoom" ............................................................. |
15 |
"Full", "Through" ........................................................................... |
16 |
Security Functions.............................................. |
19 |
• Managing Users (Password Protect)............................... |
19 |
Type of Password Protect .............................................................. |
19 |
Setting Password Protect................................................................ |
20 |
Entering the Password.................................................................... |
21 |
• Restricting Operation (Operation Lock)........................ |
22 |
• Anti-Theft Lock ................................................................ |
23 |
Installing the wire lock................................................................... |
23 |
• Enlarging Part of the Image (E-Zoom) ........................... |
18 |
Changing the Projection Mode |
11 |
|
|
The default projection mode is "Front" that project images from in front of the screen. To use the projector for ceiling projection, change the projection mode to "Front/Ceiling", using the following procedure.
Procedure
Hold down the "A/V Mute" button on the remote control for about 5 seconds.
The screen is cleared and then the projection mode switches from "Front" to "Front/Ceiling". s p.29

Changing the Projected Image (Source Search) |
12 |
|
|
The projector automatically detects signals being input from connected equipment, and the image being input from the equipment is projected. You can project the target image quickly because it skips input ports where no image is being input.
|
|
|
|
Computer1 |
|
Computer2 |
|
S-Video |
Video |
|||||||||||
|
|
|
|
|
|
|
|
|
|
|
|
|
|
|
|
|
|
|
|
|
|
|
|
|
|
|
|
|
|
|
|
|
|
|
|
|
|
|
|
|
|
|
|
|
|
|
|
|
|
|
|
|
|
|
|
|
|
|
|
|
|
|
|
|
|
|
|
|
|
|
|
|
|
|
|
|
|
|
|
|
|
|
|
|
|
|
|
|
|
|
|
|
|
|
|
|
|
|
|
|
|
|
|
|
|
|
|
|
|
|
|
|
|
|
|
|
|
|
|
|
|
|
|
|
|
|
|
|
|
|
|
|
|
|
|
|
|
|
|
|
|
|
|
|
|
|
The input port where no image signal is being input is skipped.
Procedure
When your video equipment is connected, start playback before beginning this operation.
Using the remote control |
Using the control panel |
||||||||||||||
|
|
|
|
|
|
|
|
|
|
|
|
|
|
|
|
|
|
|
|
|
|
|
|
|
|
|
|
|
|
|
|
|
|
|
|
|
|
|
|
|
|
|
|
|
|
|
|
|
|
|
|
|
|
|
|
|
|
|
|
|
|
|
|
|
|
|
|
|
|
|
|
|
|
|
|
|
|
|
|
|
|
|
|
|
|
|
|
|
|
|
|
|
|
|
|
|
|
|
|
|
|
|
|
|
|
|
|
|
|
|
|
|
|
|
|
|
|
|
|
|
|
|
|
|
|
|
|
|
|
|
|
|
|
|
|
|
|
|
|
|
|
|
|
When two or more pieces of equipment are connected, press the [Source Search] button until the target image is projected.
The following screen showing the status of image signals is q displayed when only the image that the projector is
currently displaying is available, or when no image signal can be found. You can select the input port where the connected equipment you want to use is projecting. If no operation is performed after about 10 seconds, the screen closes.

Functions for Enhancing Projection |
13 |
|
|
Selecting the Projection Quality (Selecting Color
Mode)
You can easily obtain the optimum image quality simply by selecting the setting that best corresponds to your surroundings when projecting. The brightness of the image varies depending on the mode selected.
Mode |
Application |
Game |
Ideal for use in a bright room. This is the brightest |
|
mode and reproduces shadow tones well. |
|
|
Presentation |
Ideal for making presentations using color materials |
|
in a bright room. |
|
|
Text |
Ideal for making presentations using black-and- |
|
white materials in a bright room. |
|
|
Theatre |
Ideal for watching films in a dark room. This gives |
|
images a natural tone. |
|
|
Photo |
(When computer images are input) |
|
Ideal for projecting still pictures, such as photos, in a |
|
bright room. This makes images vivid and brings |
|
them into contrast. |
|
|
Sports |
(When component video, S-video, or composite |
|
video images are input) |
|
Ideal for watching TV programmes in a bright room. |
|
This makes images vivid and brings them to life. |
|
|
sRGBg |
Ideal for images that conform to the sRGB color |
|
standard. |
|
|
Blackboard |
Even if you are projecting onto a blackboard |
|
(greenboard), this setting gives your images a natural |
|
tint, just like when projecting onto a normal screen. |
|
|
Procedure
Remote control
Each time you press the button, the color mode name is displayed on the screen and the color mode changes.
If you press the button while the color mode name is displayed on the screen, it changes to the next color mode.
q The color mode can also be set using "Color Mode" from the "Image" menu in the configuration menu. s p.26
Functions for Enhancing Projection |
|
|
14 |
|
|
|
|
|
|
Hiding the Image and Sound Temporarily (A/V Mute) |
Freezing the Image (Freeze) |
|||
|
|
|
|
|
|
|
|
|
|
You can use this when you want to focus the audience's attention on what you are saying, or if you do not want to show details such as when you are changing between files during presentations from a computer.
When the moving image on the screen is frozen, the image continues to project, so you can project a moving image one frame at a time like a still photo. Also, you can perform operations such as changing between files during presentations from a computer without projecting any images if the Freeze function is activated beforehand.
Procedure |
Remote control
Procedure
Remote control
Each time you press the button, A/V Mute turns on or off.
• If you use this function when projecting moving images, q the images and sound continue to be played back by the
source, and you cannot return to the point where A/V Mute was activated.
•From the remote control you can choose to display black, blue, or logo as the A/V mute display using the "Extended" - "Display" - "A/V Mute" setting in the configuration menu. s p.29
Each time you press the button, Freeze turns on or off.
q |
• Audio does not stop. |
• The image source continues to play back the moving |
|
|
images even while the screen is frozen, so it is not possible |
|
to resume projection from the point where it was paused. |
|
• If the [Freeze] button is pressed while the configuration |
|
menu or a help screen is displayed, the menu or help |
|
screen being displayed is cleared. |
|
• Freeze still works while E-Zoom is being used. |
|
|

Functions for Enhancing Projection |
15 |
|
|
Changing the Aspect Ratio (Aspect)
The "aspectg" is the ratio between an image's length and its height. With this projector, you can switch the ratio by using the [Aspect] button on the remote control. The aspect ratio can be set in six modes; "Auto", "Normal", "16:9", "Full", "Zoom", and "Through". By switching the aspect, you can set the best projection for a given input signal. To set up, refer to the following explanation.
f"Auto"
With the "Auto" setting, projection mode is switched according to the signal, as follows.
•4:3 input signal: Normal
•Squeeze-recorded input signal: 16:9
•Letterboxing input signal: Zoom
*1 The "Auto" cannot be used for images from a computer and some component video signals. *2 "Normal" is applied if the connected device does not conform to EIAJ standards.
f"Normal", "16:9", "Zoom"
The input signal, recommended aspect mode and the operation are as shown in the following table.
Input signal |
Recommended |
Operation |
|
|
|
|
|
|
|
Image |
|
|
Notes |
|||||||
aspect mode |
|
|
|
|
|
|
|
|
|
|||||||||||
|
|
|
|
|
|
|
|
|
|
|
|
|
|
|
|
|
|
|
|
|
|
|
|
For 4:3 image |
|
|
|
||||||||||||||
|
|
|
|
|
|
|
|
|
|
|
1280 |
|
|
|
|
|
|
|
|
|
|
|
|
|
|
|
|
|
|
|
|
|
|
|
|
|
|||||
|
|
|
|
|
|
|
|
|
|
|
|
|
|
|
|
|
|
|
|
|
|
|
|
|
|
|
|
|
|
|
|
|
|
|
|
|
|
|
|
|
|
|
|
|
|
|
|
|
|
|
|
|
|
|
|
|
|
|
|
|
|
|
|
|
|
|
|
|
|
|
|
|
|
|
|
|
|
|
|
|
800 |
When projecting a 4:3 image, a black band |
|
• Normal TV broadcast |
|
|
|
|
|
|
|
|
|
|
|
|
|
|
|
|
|
|
|
|
|
Makes full use of the |
|
|
|
|
|
|
|
|
|
|
|
|
|
|
|
|
|
appears to the left and right. |
|
• Standard-size (4:3) image |
|
|
|
|
|
|
|
|
|
|
|
|
|
|
|
|
|
|
When projecting an HDTV image, the |
|
Normal |
projection area while |
|
|
|
|
|
|
|
|
|
|
|
|
|
|
|
|
|
||
• Computer image (including |
|
|
|
|
|
|
|
|
|
1067 |
|
|
|
|
|
|
|
aspect ratio is 16:9 with a black band at the |
||
maintaining the aspect |
|
|
|
|
|
|
|
|
|
|
|
|
|
|
||||||
16:10 WXGA display |
|
For 16:9 image |
|
|
top and bottom. |
|||||||||||||||
|
ratio of the input image. |
|
|
|||||||||||||||||
images) |
|
|
|
|
|
|
|
|
|
1280 |
|
|
|
|
|
|
|
When projecting a 16:10 image, the entire |
||
|
|
|
|
|
|
|
|
|
|
|
|
|
|
|
|
|
||||
|
|
|
|
|
|
|
|
|
|
|
|
|
|
projection area is used. |
||||||
|
|
|
|
|
|
|
|
|
|
|
|
|
|
|
|
|
|
|
|
|
|
|
|
|
|
|
|
|
|
|
|
|
|
|
|
|
|
|
|
|
|
|
|
|
|
|
|
|
|
|
|
|
|
|
|
|
|
|
|
|
|
|
|
|
|
|
720 |
|
|
|
|
|
|
|
|
|
|
|
|
800 |
|
||
|
|
|
|
|
|
|
|
|
|
|
|
|
|
|
|
|
|
|
|
|
|
|
|
|
|
|
|
|
|
|
|
|
|
|
|
|
|
|
|
|
|
|
|
|
|
|
|
|
|
|
|
|
|
|
|
|
|
|
|
|
|
|
|
|
|
|
|
|
|
|
|
|
|
|
|
|
|
|
|
|
|
|
|

Functions for Enhancing Projection |
16 |
|
|
Input signal |
Recommended |
Operation |
|
|
|
|
Image |
|
|
|
Notes |
|
|
||||||||
aspect mode |
|
|
|
|
|
|
|
|
|
||||||||||||
|
|
|
|
|
|
|
|
|
|
|
|
|
|
|
|
|
|
|
|
|
|
|
|
|
Image recorded in squeeze mode (an image |
When a 4:3 image is projected, it is |
|||||||||||||||||
|
|
|
recorded in squeeze mode is stretched to |
elongated horizontally. |
|
|
|||||||||||||||
|
|
The aspect ratio of the |
16:9 for display) |
|
|
|
|
|
|
|
|
|
|
|
|
|
|
|
|||
|
|
|
|
|
|
|
|
|
|
|
|
|
|
|
|
|
|
|
|
|
|
Squeeze-recorded images, |
16:9 |
input image is converted |
|
|
|
|
|
1280 |
|
|
|
|
|
|
|
1280 |
|
|
|
|
|
|
|
|
|
|
|
|
|
|
|
|
|
||||||||||
such as those from a video |
to 16:9, such that the full |
|
|
|
|
|
|
|
|
|
|
|
|
|
|
|
|
|
|
|
|
|
|
|
|
|
|
|
|
|
|
|
|
|
|
|
|
|
|
|
|||
|
|
|
|
|
|
|
|
|
|
|
|
|
|
|
|
|
|
|
|||
camera or DVD software |
|
width of the projection |
|
|
|
|
|
|
|
|
|
|
|
|
|
|
|
|
|
|
|
|
|
area is used. |
|
|
|
|
|
|
|
|
|
|
|
|
|
|
|
|
|
|
|
|
|
720 |
|
|
|
|
|
|
800 |
720 |
|
|
|
|
|
800 |
|||||
|
|
|
|
|
|
|
|
|
|
|
|
|
|
|
|
|
|
|
|
|
|
|
|
|
|
|
|
|
|
|
|
|
|
|
|
|
|
|
|
|
|
|
|
|
|
|
|
|
|
|
|
|
|
|
|
|
|
|
|
|
|
|
|
|
|
|
|
|
|
|
|
|
|
|
|
|
|
|
|
|
|
|
|
|
|
|
|
|
|
|
Letterboxing image from a DVD, and so |
When a 4:3 image is projected, the top and |
||
|
|
|
on. |
|
bottom of the image are cut off. |
|
|
|
Makes full use of the |
|
1280 |
1280 |
80 |
|
|
|
|
|
|
|
Letterboxing image from a |
|
projection area width |
|
|
|
|
Zoom |
while maintaining the |
|
|
|
|
|
DVD, and so on |
720 |
800 |
|
|
||
|
aspect ratio of the input |
960 |
800 |
|||
|
|
|
|
|||
|
|
image. |
|
|
|
|
|
|
|
|
|
|
80 |
Screen sizes are defined in units of dots.
f"Full", "Through"
Setting "Full" allows the projected image to use the full width of the projection area. The aspect ratio is not maintained. "Full" is set when you want to use the full projection area to project an input signal.
• When a 4:3 image is projected, it is elongated horizontally.
When "Through" is set, the aspect ratio and resolution of the input image are maintained. "Through" is set when you want to project an image as is, without any enlargement or reduction of the input signal.
•Because input images with a resolution of up to 1280 ^ 800 dots will be smaller than the projection area, a black band appears at the top and bottom, as well as at the left and right.
•For input images with a resolution in excess of 1280 ^ 800 dots, the edges of the image are cut off.

Functions for Enhancing Projection |
17 |
|
|
Procedure
Remote control
Each time you press the button, the aspect name is displayed on the screen and the aspect changes.
q This can also be set using "Aspect" from the "Signal" menu in the configuration menu. s p.27

Functions for Enhancing Projection
Enlarging Part of the Image (E-Zoom)
This is useful when you want to expand images such as graphs and tables to see them in greater detail.
Procedure
A Start E-Zoom.
Remote control
18
B Move the cross to the area of the image that you want to enlarge.
Remote control
Cross |
C Enlarge.
Remote control
Each time the button is pressed, the area is expanded. You can expand quickly by holding the button down.
You can reduce the enlarged image by pressing the [-] button. Press the [Esc] button to cancel.
• The enlargement ratio appears on the screen. The q selected area can be enlarged to between 1 to 4 times in 25
incremental steps.
• You can scroll the image by pressing [u], [d], [l], or [r].

Security Functions
The projector has the following enhanced security functions.
•Password Protect
You can limit who can use the projector.
•Operation Lock
You can prevent people from changing the settings on the projector without permission.
•Anti-Theft Lock
The projector is equipped with various types of anti-theft security devices.
Managing Users (Password Protect)
When the Password Protect function is activated, people who do not know the password cannot use the projector to project images even if the projector power is on. Furthermore, the user's logo that is displayed when you turn on the projector cannot be changed. This acts as an anti-theft device as the projector cannot be used even if it is stolen. At the time of purchase the Password Protect function is not activated.
fType of Password Protect
The following three kinds of password protect settings can be made according to how the projector is being used.
1."Power On Protect"
When "Power On Protect" is "On", the password must be entered whenever the projector is turned on after it has been disconnected from the power supply to which it was connected the last time the password was entered. If the correct password is not entered, projection does not start.
19
2"User's Logo Protect"
When "User's Logo Protect" is set to "On" the following setting changes are prohibited.
•Capturing a user's logo
•Settings for "Display Background", "Startup Screen", and "A/V Mute" are changed from "Display" in the configuration menu.
3"Network Protect"
When "Network Protect" is set to "On" setting changes for "Network" in the configuration menu are prohibited.

Security Functions
fSetting Password Protect
Use the following procedure to set Password Protect.
Procedure
A Holdseconds.down the [Freeze] button for about five
The password protect setting menu is displayed.
Remote control
• If Password Protect is already activated, you must enter q theIf thepassword.password is entered correctly, the password protect
setting menu is displayed.
s "Entering the Password" p.21
•When the password is set, stick the password protect sticker in a visible position on the projector as a further theft deterrent.
B Turn on "Power On Protect".
(1)Select "Power On Protect", and then press the [Enter] button.
(2)Select "On", and then press the [Enter] button.
(3)Press the [Esc] button.
C
D
E
20
Turn on "User's Logo Protect"*.
(1)Select "User's Logo Protect", and then press the [Enter] button.
(2)Select "On", and then press the [Enter] button.
(3)Press the [Esc] button.
Turn on "Network Protect".
(1)Select "Network Protect", and then press the [Enter] button.
(2)Select "On", and then press the [Enter] button.
(3)Press the [Esc] button.
Set the password.
(1)Select "Password", and then press the [Enter] button.
(2)When the message "Change the password?" is displayed, select "Yes" and then press the [Enter] button. The default setting for the password is "0000". Change this to your own desired password. If you select "No", the Password Protect setting menu shown in step 1 is displayed again.
(3)Enter a four digit number using the numeric buttons. The number entered is displayed as "* * * *". When you enter the fourth digit, the confirmation screen is displayed.
Remote control
Numeric buttons
(4)Re-enter the password.
The message "Password accepted." is displayed.
If you enter the password incorrectly, a message is displayed prompting you to re-enter the password.
Security Functions |
21 |
|
|
fEntering the Password
When the password entry screen is displayed, enter the password using the numeric buttons on the remote control.
Procedure
Enter the password by using the numeric buttons.
When you enter the correct password, projection begins.
Attention
•If an incorrect password is entered three times in succession, the message "The projector's operation will be locked." is displayed for about five minutes, and then the projector switches to standby mode. If this happens, disconnect the power plug from the electrical outlet and then reinsert it and turn the projector's power back on. The projector displays the password entry screen again so that you can enter the correct password.
•If you have forgotten the password, make a note of the "Request Code: xxxxx" number that appears on the screen and contact the nearest address provided in the Support and Service Guide. sEpson Projector Contact List
•If you continue to repeat the above operation and input the wrong password thirty times in succession, the following message is displayed and the projector does not accept any more password entries. "The projector's operation will be locked. Contact Epson as described in your documentation." sEpson Projector Contact
List

Security Functions
Restricting Operation (Operation Lock)
Do one of the following to lock the operation buttons on the control panel.
•Full Lock
All of the buttons on the control panel are locked. You cannot perform any operations from the control panel, including turning the power on or off.
•Operation Lock
All of the buttons on the control panel, except for the [t] button, are locked.
This is useful at events or shows when you want to deactivate all buttons and only project, or at schools when you want to limit button operation. The projector can still be operated using the remote control.
Procedure
A Press the [Menu] button and select "Settings" -
"Operation Lock" in the configuration menu. s "Using the Configuration Menu" p.25
Using the remote control |
Using the control panel |
22
Check the buttons you can use and the operations they perform in the guide under the menu.
B Select either "Full Lock" or "Operation Lock".
C Selectdisplayed."Yes" when the confirmation message is
The control panel buttons are locked according to the setting you chose.
You can release the control panel lock by one of the q following two methods.
•From the remote control, select "Off" from "Settings" - "Operation Lock" in the configuration menu.
•When you press and hold down the [Enter] button on the control panel for about seven seconds, a message is displayed and the lock is released.
Security Functions
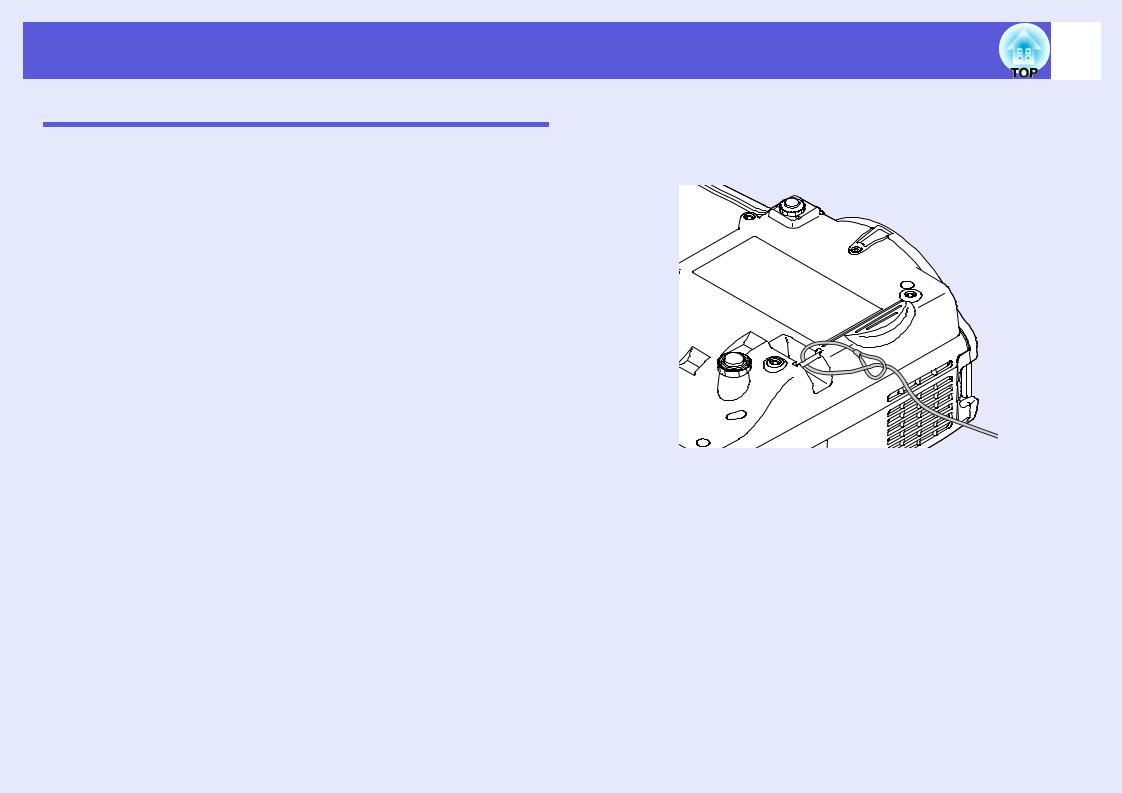
Anti-Theft Lock
As the projector is often setup on ceiling mounts and left in rooms unattended, it is possible that someone may try and take the projector, so the projector includes the following security devices.
•Security slot
The security slot is compatible with the Microsaver Security System manufactured by Kensington. You can find details about the Microsaver Security System on the Kensington homepage http://www.kensington.com/.
•Security cable installation point
A commercially available theft-prevention wire lock can be passed through the installation point to secure the projector to a desk or pillar.
23
fInstalling the wire lock
Pass an anti-theft wire lock through the installation point. See the documentation supplied with the wire lock for locking instructions.
Loading...