


EMT757-F
GB DIGITAL SWITCHING SOCKET
CZ DIGITÁLNÍ SPÍNACÍ ZÁSUVKA
SK DIGITÁLNA SPÍNACIA ZÁSUVKA
PL CYFROWY PROGRAMATOR CZASOWY
www.emos.cz
1

GB Digital switching socket, type EMT757–F
A. Functions
1.The Programmable Digital Timer (hereinafter refer as“Timer”) can preset specific on/off time of your home electrical appliances. It is ideal for energy saving and home security.
2.The countdown function can switch on/off your appliance on your pre–set time and random functions allows you to switch on and off the appliance in irregular time, it is not only ideal for home automation, also prevent burglary during your absence.
3.The LCD displays program setting status and real time.
4.With maximum 140 on/off programs per week .
B. Specifications
Current: |
230V~, 50Hz, 8.7A |
Max. Power: |
2000W |
IP Rating: |
IP20 |
Working Temperature: |
0 to 55°C |
Time Setting Interval: |
1 Minute |
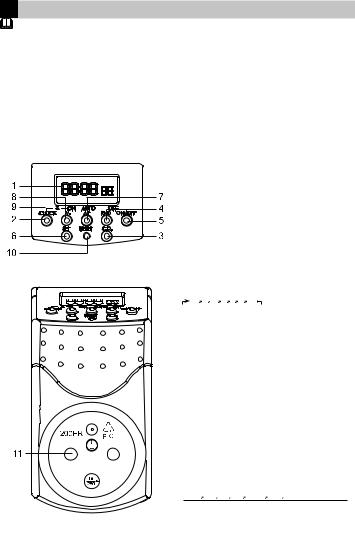
C. Diagram & Descriptions
No. Description |
Functions |
|
1 |
LCD Display |
Shows time and program setting. |
2 |
CLOCK button |
Return to real time display when in program setting |
|
|
press together with SET Button to set real time and week |
|
|
press together with – Button to change to Summer Time |
3 |
CD button |
Press the button to start/stop countdown program when it is in AUTO |
|
|
status |
4 |
RND button |
Press the button to start/stop random program when it is in AUTO |
|
|
status |
5 |
On/Off button |
Change the setting mode to ON, AUTO or OFF. When press the button |
|
|
each time, the horizontal line in the LCD moves to ON AUTO OFF |
|
|
which were silk printed on the Timer |
6 |
SET button |
To set time and week and to confirm setting |
7 |
+ button |
Press the button to increase the time, week or program group |
8 |
– button |
Press the button to reduce the time, week or program group |
9 |
S – silk screen |
Press CLOCK Button and – Button at the same time to change to |
|
printing |
Summer Time. Time display adds one hour automatically and“S”are |
|
|
shown on the LCD. |
10 |
Reset button |
Press once to reset all your preset programs |
11 |
Socket & Plug |
Connect your appliance to the socket and plug the timer to the wall |
|
|
AC socket to get power |
D. Time Display
There are two different kinds of time displays:
1.12–hour display: the digital number is from 11:59 to 12:00 with AM or PM shown on the LCD
2.24–hourdisplay:thedigitalnumberisfrom00:00to23:59,noAMorPMisshownontheLCD
3.To change from 12–hour display to 24–hour display, or vice versa, press CLOCK Button and hold it till the LCD display changes. Press CLOCK Button again to return to original display.
E.Week & Time Setting
1.Week Setting
1.1Press and hold the SET Button until the week display flashes, which indicates setting is
|
ready |
|
|
|
|
|
|
|
1.2 |
Press |
+ Button to increase the day, or |
– Button to reduce the day, the sequence of the |
|||||
|
display is shown as follows: |
|
Mo |
Tu We |
Th Fr Sa Su |
|
|
|
1.3 |
Press |
+/ – Button once will increase or reduce the day by sequence slowly.To press and |
||||||
|
hold the button, the week display moves quickly. Release the button until your desired |
|||||||
|
day of the week shown on the display. Press SET Button to confirm your setting. |
|||||||
2. |
Time Setting |
|
|
|
|
|
|
|
2.1 |
After setting the day of the week, hour display flashes to indicate setting time can be |
|||||||
|
started |
|
|
|
|
|
|
|
2.2 |
Press |
+Button to increase number of hour, or |
– Button to reduce hour. |
|||||
2.3 |
Press |
+/ – Button once will increase or reduce each hour slowly. To press and hold |
||||||
the button, the hour display moves quickly. Release the button until your desired hour shown on the display. Press SET Button to confirm your setting.
2.4“Minute” display then flashes to indicate setting minute is ready. Repeat the same procedures in setting hour as in #2.2 and #2.3 to set minutes.
3. Summer Time Setting
3.1. Press CLOCK Button and – Button at the same time to change to summer time, time display automatically adds one hour and“S”is shown on the LCD.
3.2. By pressing Clock Button and – Button again to cancel the summer time setting.
Noted: LCD must be in real time display to start week and time setting. If LCD is in program setting display, press CLOCK Button once to return to real time display.
F. Program Setting
1. When the LCD is in real time display, press + Button once to change to program setting display,“1ON”will be shown on the lower left corner of the LCD:
1.1“1”indicates the program group’s number (program group is from 1 to 14)
1.2“ON”indicates power on time.
1.3“OFF”indicates power off time
2. To chose the program group and on/off status, press + Button to increase the group number, sequence as follows:
 1ON 1OFF …… 20ON 20OFF d ON/OFF (for countdown) real time display
3.To reduce the program group number, press –Button, LCD displays in the following sequence:
 d ON/OFF (for countdown) 20OFF 20ON …… 1OFF 1ON real time display
4. After choosing the program group, then can set the week and time. Press SET Button until the week display flashes, press + Button each time, the LCD will display the following in sequence:
2

4.1MO TU WE TH FR SA SU
4.2MO TU
TU WE
WE TH
TH FR
FR SA
SA SU
SU
4.3MO WE FR
4.4TU TH SA
4.5SA SU
4.6MO TU WE
4.7TH FR SA
4.8MO TU WE TH FR and
4.9MO TU WE TH FR SA
5. |
By pressing the – Button, the week display will be shown in the opposite direction as |
|
above sequence. |
6. |
Press +/ – Button once will increase or reduce the week display slowly. To press and |
|
hold the button, the display moves quickly. Release the button until your desired week |
|
pattern shown on the display. Press SET Button to confirm, week display stops flashing. |
7.After set the day of the week, the hour display flashes, repeat procedures mentioned in
Part E 2 – Time Setting to set time.
8.To set other program group’s on/off time, repeat procedures mentioned from #2 to #7.
Noted:
(a). To change a preset program, repeat procedures #2 to #7 as mentioned in Part F and input the new data to replace the old setting
(b). After program setting, press CLOCK Button to return to clock display at once, or it will be returned automatically after 15 seconds without pressing any other buttons.
G. Countdown Setting
1. When the LCD is in real time display, press – Button once to change to countdown setting display, “d ON (or OFF)”will be shown on the lower left corner of the LCD
1.1“d”: indicates the program is in countdown mode
1.2“ON”: counting down the power on time
1.3“OFF”: counting down the power off time
2.Press SET Button until the on/off display flashes, setting the countdown power on/off status is ready.
3. |
Press +/ – Button to chose countdown on/off program and press SET Button to confirm |
|
4. |
Hour display flashes after setting the on/off status, then press +/ – Button to increase |
|
|
or reduce hour and press SET Button to confirm. |
|
5. |
Minute display then flashes, press |
+/ – Button to increase or reduce minute and press |
|
SET Button to confirm |
|
6. |
Second display flashes, press +/ |
– Button to increase or reduce the hour display and |
press SET Button to confirm. Setting interval is from 99:59:59 to 1 second.
7.Connect the Timer to the AC socket and set the Timer to AUTO status in order to start / stop the countdown functions.
8.Press CD Button once to start the countdown function, “d ON (or OFF)” flashes in the lower corner of the LCD to indicate countdown is in progress. Press CD Button again to stop the countdown function.
Noted:
(a). When countdown is in progress, LCD is in real time display, press – Button once to view the countdown details.
(b) To change a preset program, repeat the above procedures #2 to #6 in Part G - Countdown Setting and input the new data to replace the old setting
(b). After program setting, press CLOCK Button to return to clock display at once, or it will be returned automatically after 15 seconds without pressing any other buttons.
H. Random Setting
1.Random function turns on and off the appliance irregularly: 1.1 Minimum time for power off: 26 minutes
1.2 Maximum time for power off: 42 minutes
1.3 Minimum time for power on: 10 minutes
1.4 Maximum time for power on: 26 minutes
2.Connect theTimer to the AC socket and set the program to AUTO status in order to start/ stop the random function.
3.Press RND Button once,“r OFF”is flashing in the lower corner of the LCD, random function is activated. Power is off for 26 to 42 minutes. The mode will change to “r ON”, where power turns on from 10 to 26 minutes. Then back to“r OFF”again.
4.Press RND Button again can stop the random function,“r OFF”or“r ON”disappears from the LCD.
I. Override/Resume Preset Program
Press ON/OFF Button each time can override/resume the preset program, LCD changes the display in the following sequence:
1. ON: |
override the preset program and appliance remains on at all time |
2. AUTO: |
resume the preset program, appliance will be turned on and off |
|
automatically according to the preset time |
3. OFF: |
override the preset program and appliance remains off at all time |
Noted:
(a). The preset countdown or random functions only activates when the Timer is in AUTO status.
(b). When countdown function is activated, random and auto on/off program setting will not active.
(c). When random function is activated, countdown and auto on/off program setting will not active.
J.Connections
1.Preset your desired On/off programs on the Timer as mentioned above.
2.Switch off your electrical appliance
3.Connect your appliance’s power cord to the Timer’s socket, then connect the Timer to the AC socket to get power
4.Switch on your appliance.
5.Appliance will then be turned on/off according to your preset programs unless manual override pressed.
K.Safety Precaution
•The appliance is designed only for use in a dry interior environment. Protect it from rain, snow and other extreme conditions. Using of the appliance in the outdoors is forbidden!
•Do not overload the appliance to avoid damage.
•The appliance may be connected and used only in the electricity network 230 V AC (~)/ 50 Hz, with grounding according to the valid electricity regulations.
•The extension line may connect only to electrical appliances, which are powered and connected to the voltage of 230 V AC (~)/ 50 Hz.
•Pay attention to the data on the type label of the electrical appliances connected to the equipment.The maximum power input of all the connected appliances must not exceed 2000 W (max. current 8,7 A). Maximum induction load is 1A.
•Any other use of this appliance, than the one defined above, can damage the product and is connected with the risk of short–circuit, electric shock etc. The appliance must not be modified or tampered with! Follow the safety warnings.
•We do not provide any warranty for damages or injuries caused by improper handling of the appliance or by negligence to the safety warnings in the manual. In such situations, the warranty is invalidated.
•The grounding safety conduit the appliance must not be broken – otherwise people may be in the risk of death.
•The recommended operating temperatures are –10°C to + 40 °C.
•The appliance must not be operated in hazardous environment such as flammable gases, vapours and dust.
•Do not tamper with the appliance installation and do not take it apart! In case of damage or malfunction of the appliance, contact the seller.
•When cleaning the appliance and its LCD, use only a soft dry cloth. Do not use any detergents and do not dip the appliance into water!
•The appliance must not be operated by children and by persons, whose physical, sensory or mental incapability or lack of experience prevents them from safe use of the appliance, unless they are under a supervision of a person overseeing their safety. The charger must be kept out of the reach of children. Children must be watched not to play with this equipment.
Do not throw electrical appliances into unsorted communal waste. Use sorted waste collection points instead.
For the latest info about waste collecting points, contact your local authorities. If there are any electrical
appliances on waste dumps, the hazardous substances may leak into underground water and may get into
the food chain and harm your health.
3
CZ Digitální spínací zásuvka, typ EMT757-F
A. Funkce
1.Pomocí programovatelného digitálního časového spínače (dále jen spínač) lze předem nastavit určitý čas zapnutí či vypnutí (on/off ) vašich domácích spotřebičů. Je ideální pro úsporu energie a bezpečnost ve vaší domácnosti.
2.Funkce odpočítávání umožňuje zapnutí či vypnutí spotřebiče v předem nastaveném čase a funkce náhodného zapnutí/vypnutí (random) vám umožňuje zapínat či vypínat spotřebiče v nepravidelných časech, takže je ideální nejen pro některé automatické funkce ve vaší domácnosti, ale také vás chrání před vloupáním během vaší nepřítomnosti.
3.LCD displej ukazuje stav nastavení programu a reálný čas.
4.Maximální počet programů pro vypnutí/zapnutí je 140 za týden.
B. |
Specifikace |
|
1. |
Napájení: |
230V~, 50Hz, 8.7A |
2. |
Max. zátěž: |
2000W |
3. |
IP krytí: |
IP20 |
4. |
Pracovní teplota: |
0 až 55°C |
5. |
Interval pro nastavení času: |
1 minuta |
C. Diagram & popis
č. |
popis |
funkce |
1 |
LCD displej |
Udává čas a nastavení programu |
2 |
Tlačítko CLOCK |
Návrat k zobrazení reálného času, pokud jste v režimu nastavení |
|
|
programu |
|
|
Změna 12/24hod. zobrazení času |
3 |
Tlačítko C.D. |
V režimu auto stiskněte toto tlačítko, chcete-li nastartovat/zastavit |
|
|
program odpočítávání, který si předem nastavíte |
4 |
Tlačítko RND |
V režimu auto stiskněte toto tlačítko, chcete-li nastartovat/zastavit |
|
|
program náhodného zapnutí/vypnutí (random), na LCD displeji se |
|
|
zobrazí písmeno“R” |
5 |
Tlačítko On/Off |
Mění nastavení na ON, AUTO nebo OFF. Při stisknutí tohoto tlačítka |
|
(zapnout/vypnout) |
se na LCD displeji vždy zobrazí ON, AUTO nebo OFF dle vašeho |
|
|
nastavení |
6 |
Tlačítko SET |
Pro nastavení času, dne v týdnu a pro potvrzení nastavení |
7 |
Tlačítko Λ+ |
Tototlačítkostiskněteprozvýšeníhodnotyčasovéhoúdaje,nastavení |
|
|
následujícího dne v týdnu nebo posun na vyšší skupiny programů |
8 |
Tlačítko V- |
Tototlačítkostiskněteprosníženíhodnotyčasovéhoúdaje,nastavení |
|
|
předešlého dne v týdnu nebo posun na nižší skupiny programů |
9 |
Tlačítko S |
Stiskněte zároveň tlačítko CLOCK a tlačítko V- pro změnu na letní |
|
|
čas. Na displeji se automaticky zvýší časový údaj o hodinu a zobrazí |
|
|
se písmeno“S” |
10 |
Tlačítko Reset |
Stiskněte pro resetování všech předem nastavených programů |
11 |
Zásuvka a zástrčka |
Zapojtespotřebičdozásuvkyvespínačiaspínačzapojtedoelektrické |
|
|
zásuvky ve zdi pro napájení elektrickým proudem |
D. Zobrazení času
Čas se zobrazuje dvěma odlišnými způsoby.
1.12hodinové zobrazení času: digitální zobrazení čísel od 00:00 do 11:59 s tím, že na displeji je uvedeno AM (od půlnoci do poledne) nebo PM (od poledne do půlnoci).
2.24hodinové zobrazení času: digitální zobrazení čísel od 00:00 do 23:59, na displeji není uvedeno AM nebo PM.
3.Pro změnu z 12hodinového zobrazení času na 24hodinové nebo naopak stiskněte tlačítko CLOCK a držte je, dokud se nezmění způsob zobrazení na LCD displeji.
E.Nastavení dne v týdnu a času
1.Nastavení dne v týdnu
1.1Stiskněte a držte tlačítko SET, dokud nezačne blikat označení dne, což znamená, že je možné zahájit nastavení dne v týdnu.
1.2Stiskněte tlačítko Λ+ pro nastavení následujícího dne nebo V- pro nastavení předešlého dne. Pořadí dnů (zkratek názvů dnů) se zobrazuje takto:
|
Mo Tu We Th Fr Sa Su |
|
|
Mo = pondělí, Tu = úterý, We = středa, Th = čtvrtek, Fr = pátek, Sa = sobota, Su = neděle |
|
1.3 |
Stisknete-li jednorázově tlačítka Λ+ / V- , nastavují se tak následující nebo předešlé dny |
|
|
v pořadí pomalu. Pokud tato tlačítka stisknete a držíte, probíhá zobrazení jednotlivých |
|
|
dní v týdnu v příslušném pořadí rychle.Tlačítko uvolněte, když se na displeji objeví vámi |
|
|
požadovaný den v týdnu. Pro potvrzení nastavení stiskněte tlačítko SET. |
|
2. |
Nastavení času |
|
2.1Po nastavení dne v týdnu začne blikat zobrazení času, což znamená, že je možné zahájit nastavení času.
2.2Stiskněte tlačítko Λ+ pro zvýšení časového údaje nebo tlačítko V- pro snížení tohoto údaje.
2.3Stisknete-li jednorázově tlačítka Λ+ / V- , zvyšujete nebo snižujete časový údaj pomalu. Pokud tato tlačítka stisknete a držíte, pohybují se časové údaje rychle.Tlačítko uvolněte, když se na displeji objeví vámi požadovaná hodina. Pro potvrzení nastavení stiskněte tlačítko SET.
2.4Poté začne blikat zobrazení minut na displeji, což znamená, že je možné nastavit minuty. Pro nastavení minut postupujte stejným způsobem jako u nastavení hodin, tak jak je
uvedeno v bodu 2.2 a 2.3.
3. Nastavení letního času
3.1Stiskněte zároveň tlačítka CLOCK a V- pro změnu na letní čas. Na displeji se automaticky zvýší časový údaj o hodinu a zároveň se zobrazí písmeno“S”.
3.2Opětovným stisknutím tlačítek CLOCK a V- zrušíte nastavení letního času, hodnota času
se sníží o hodinu a z displeje zmizí písmeno“S”.
Poznámka: Pro nastavení dne v týdnu a času musí být LCD displej v režimu zobrazení reálného času. Je-li LCD displej v režimu nastavení programů, stiskněte tlačítko CLOCK a displej se vrátí do režimu zobrazení reálného času.
F.Nastavení programů
1.Zobrazuje-li LCD displej reálný čas, stiskněte jednou tlačítko Λ+ pro změnu na režim nastavení programu, na levé straně LCD displeje se zobrazí“1ON”.
1.1“1”označuje číslo skupiny programu (čísla skupin programů jsou od 1 do 20).
1.2“ON”znamená stav zapnuto.
1.3“OFF”znamená stav vypnuto.
2.Pro volbu skupiny programu a stavu zapnuto/vypnuto (on/off ) stiskněte tlačítko Λ+ pro volbu vyššího čísla skupiny, kdy pořadí je následující:
 1ON 1OFF 2ON 2OFF . . . 20ON 20OFF d ON/OFF (pro odpočítávání)
  Reálný čas se zobrazí automaticky po 15s nečinnosti v nastavení nebo stiskněte tlačítko CLOCK.
4
 Loading...