


MXDM66
INSTALLATION/OWNER'S MANUAL
AM/FM/CD/MP3/WMA/USB/3.5mm Marine Receiver with Detachable Face

MXDM66 INSTALLATION
Preparation
Please read entire manual before installation.
Before You Start
•Disconnect negative battery terminal. Consult a qualified technician for instructions.
•Avoid installing the unit where it would be subject to high temperatures, such as from direct sunlight, or where it would be subject to dust, dirt or excessive vibration.
Getting Started
•Remove trim ring from unit,
•Remove 2 transit screws located on top of the unit.
•Insert the supplied keys into the slots as shown, and slide the unit out of the mounting sleeve.
•Install mounting sleeve into opening, bending tabs to secure.
•Connect wiring harness and antenna. Consult a qualified technician if you are unsure.
•Certain vehicles may require an installation kit and/or wiring harness adapter (sold separately).
•Test for correct operation and slide into mounting sleeve to secure.
•Snap trim ring into place.
HEX BOLT
KEYS
MOUNTING STRAP
HEX NUT
PLAIN WASHER
MOUNTING SLEEVE
TYPICAL FRONT-LOAD DIN MOUNTING METHOD
2
MXDM66 INSTALLATION
Wiring Diagram
RCA Connections
Right Channel (Red)
Left Channel (White)
|
REAR |
FRONT |
SUBWOOFER |
SUB/W
L-CH
R-CH
Antenna
Connector
FUSE
When replacing the fuse, make sure new fuse is the correct type and amperage. Using an incorrect fuse could damage the radio. The MXDM66 uses one
10 amp ATM fuse located beside the wiring connector.
3
MXDM66 OPERATION
Control Locations - Receiver
1 |
2 |
3 |
4 |
5 |
6 |
7 |
8 |
9 |
10 |
|
20 |
19 |
18 |
17 |
16 |
1 |
Release |
|
|
|
11 |
2 |
Mode |
|
|
|
12 |
3 |
Power ( |
)/Select |
|
13 |
|
4 |
Preset 1/Repeat |
|
14 |
||
5 |
Preset 4/Play/Pause |
|
15 |
||
6 |
Preset 2/Random |
|
16 |
||
7 |
Preset 5/Folder Down |
|
17 |
||
8 |
Preset 3/Intro |
|
18 |
||
9 |
Preset 6/Folder Up |
|
19 |
||
10 |
Eject |
|
|
|
20 |
15 |
14 |
13 |
12 |
11 |
USB Port (with silicone cover)
Auxiliary Input (with silicone cover)
Tune/Track Up
Tune/Track Down
Display
Band/ESC
EQ
Scan/PS
Mute
Audio/Menu
The MXDM66 allows playback of your favorite MP3 and WMA files recorded on CD-R and CD-RW discs. Its powerful on-board DSP processor decodes the compressed audio while maintaining near-CD sound quality. An internal SRAM buffer provides ESP (Electronic Skip Protection) to virtually eliminate skipping and allows alphanumeric or direct track search - even while a song is currently playing!
4
MXDM66 OPERATION
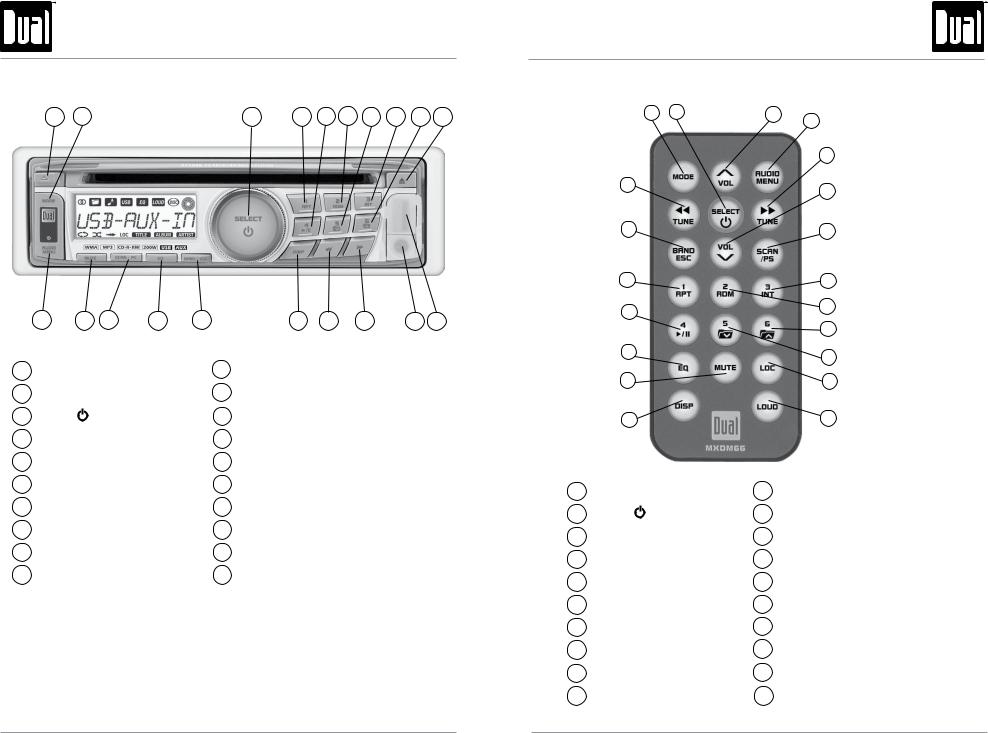
Control Locations - Remote
1 |
2 |
3 |
4 |
|
|
|
|
|
|
|
5 |
20 |
|
|
6 |
|
|
|
|
19 |
|
|
7 |
18 |
|
|
8 |
17 |
|
|
9 |
|
|
|
|
|
|
|
10 |
16 |
|
|
11 |
|
|
|
|
15 |
|
|
12 |
14 |
|
|
13 |
1 |
Mode |
11 |
Preset 5/Folder Down |
2 |
Power ( )/Select |
12 |
Local/Distance Tuning |
3 |
Volume Up |
13 |
Loudness |
4 |
Audio/Menu |
14 |
Display |
5 |
Tune/Track Up |
15 |
Mute |
6 |
Volume Down |
16 |
EQ |
7 |
Scan/PS |
17 |
Preset 4/Play/Pause |
8 |
Preset 3/Intro |
18 |
Preset 1/Repeat |
9 |
Preset 2/Random |
19 |
Band/ESC |
10 |
Preset 6/Folder Up |
20 |
Tune/Track Down |
5

MXDM66 OPERATION
General Operation
Faceplate Removal
Semi-Permanent
Faceplate Installation
Power On/Off
Mode
Auxiliary Input
Volume
Mute
Preset EQ Curves
Reset
Display
Set the Clock
12/24-hour Clock
Press RELEASE and pull away from the left side to remove. To re-install, insert right side of faceplate first then push left side to secure.
Remove trim ring and install supplied #1 x 7/32” Phillips head screw through left side of mounting frame into faceplate.
Press |
|
or any other button (except eject) to turn the unit |
|
||
|
on. Inserting a disc will turn the unit on automatically. Press
and hold |
|
to turn the unit off. |
|
||
|
Press MODE to select between AM/FM, CD player, auxiliary input and USB. Modes of operation are indicated in the display.
Note: CD mode will not appear unless a CD is inserted.
Insert 3.5 mm plug to connect your portable audio device.
Adjust volume using rotary encoder (00-46).
Press MUTE to silence the audio. “MUTE” will flash in the display. Press MUTE again to cancel.
Press EQ to enter EQ setup menu, then use the rotary encoder to select between POP, JAZZ, CLASSIC, BEAT, ROCK and FLAT (default) equalization curves. Any adjustment to the Bass or Treble settings automatically cancels the current EQ curve (if one is selected).
Press to RESET the unit upon initial installation or if abnormal operation occurs. The reset button is located behind the faceplate.
Press DISP to select between clock and different types of information, such as radio frequency, CD track or MP3/USB song information.
With the unit on, press and hold DISP until the clock begins to flash, then release. Press TUNE nnto adjust the hours and TUNE llto adjust the minutes. Press DISP momentarily to save the selected time.
The clock will display 12-hour AM/PM time in USA frequency spacing mode (PM 10:00). In European frequency spacing mode, the clock will display 24-hour time (22:00).
6
MXDM66 OPERATION
General Operation
Setup Menu Press and hold AUDIO/MENU for more than 3 seconds to access the setup menu, then press AUDIO/MENU to cycle
through menu options. When desired option appears in the display, rotate the rotary encoder left/right to adjust or activate the desired function. Press ESC to exit the menu at any time.
|
|
Setup Menu |
|
|
|
|
|
Menu Function |
Options |
Action |
|
|
|
|
|
Auto Station |
AUTO STORE |
Press SELECT to seek and save 6 strong stations in the current band. |
|
Store |
Note: This option only appears in Tuner mode. |
||
|
|||
|
LOUD OFF |
Disables the loudness function. |
|
Loudness |
|
Enables the loudness function. Activating this feature will enhance the |
|
Curve |
LOUD ON |
bass and treble frequencies when listening to music at low volumes. |
|
|
|
|
|
|
FREQ USA |
Programs unit to USA tuner spacing. |
|
Tuner Frequency |
(200kHz for FM and 10kHz for AM) |
||
|
|||
Spacing |
FREQ EUR |
Programs unit to European tuner spacing. |
|
|
(50kHz for FM and 9kHz for AM) |
||
|
|
||
Clock |
CLK OFF |
Programs unit to not display the clock when the power is off. |
|
|
|
||
Display |
CLK ON |
Programs unit to display the clock when the power is off. |
|
|
|||
|
|
|
|
Auxiliary |
AUX ON |
Enables the front panel 3.5mm auxiliary input. |
|
|
|
||
Input |
AUX OFF |
Disables the auxiliary input. |
|
|
|||
|
|
|
|
Beep Confirmation |
BEEP OFF |
Disables the confirmation beep. |
|
BEEP ON |
Enables the confirmation beep. |
||
|
|||
|
|
|
|
Programmable |
PRO-VOL # |
Programs unit to turn on at a specific volume |
|
Turn On Volume |
(default is OFF). |
||
|
|||
Local/Distance |
LOCAL OFF |
Activates distance tuning. |
|
|
|
||
Tuning |
LOCAL ON |
Activates local tuning for strong station reception only. |
|
|
|||
|
|
|
|
Power on Message |
MSG OFF |
Disables power on message. |
|
|
|
||
MSG ON |
Enables power on message to be displayed. |
||
|
|||
|
|
|
|
|
SCROLL ONCE |
Programs unit to scroll once, then show the first 10 characters on the |
|
Scrolling |
display. |
||
SCROLL ON |
Programs unit to scroll continuously. |
||
Option |
|||
|
SCROLL OFF |
Programs unit to show the first 10 characters on the display. |
|
|
|
|
|
|
DIMMER HI |
Programs unit to the brightest illumination level. |
|
Illumination |
|
|
|
DIMMER MED |
Programs unit to the middle illumination level. |
||
Dimmer |
|||
|
|
||
|
DIMMER LOW |
Programs unit to the dimmest illumination level. |
|
|
|
|
|
Demonstration |
DEMO OFF |
Disables the demonstration mode. |
|
|
|
||
Mode |
DEMO ON |
Enables the "FULL SPEED USB INPUT " message. |
|
|
|||
|
|
|
|
|
|
|
|
|
|
7 |
 Loading...