


XDMA6540
INSTALLATION/OWNER'S MANUAL
AM/FM/CD Receiver
TM

XDMA6540 INSTALLATION
Preparation
Please read entire manual before installation.
Before You Start
•Disconnect negative battery terminal. Consult a qualified technician for instructions.
•Avoid installing the unit where it would be subject to high temperatures, such as from direct sunlight, or where it would be subject to dust, dirt or excessive vibration.
Getting Started
•Remove trim ring from unit.
•Insert the supplied keys into the slots
as shown, and slide the unit out of |
|
the mounting sleeve. |
|
• Install mounting sleeve into opening, |
|
bending tabs to secure. |
|
• Connect wiring harness and |
|
antenna. Consult a qualified |
|
technician if you are unsure. |
|
• Certain vehicles may require an |
|
installation kit and/or wiring |
|
harness adapter (sold separately). |
|
• Test for correct operation and slide |
Removal Keys |
into mounting sleeve to secure. |
|
• Snap trim ring into place. |
|
Dashboard or Installation Kit
Head Unit
Mounting Sleeve
TYPICAL FRONT-LOAD DIN MOUNTING METHOD
2

XDMA6540 INSTALLATION
Wiring Diagram
RCA Preamp Outputs
External Amplifer Connections
SUB
REAR
FRONT
YELLOW - Rear RCA Input
Connect a portable device
BLUE - 10-pin Female Mini-DIN
HDM90 HD Radio™ Tuner Connection (sold separately)
BLACK - Antenna Input
Connect the vehicle antenna
 SiriusXM Vehicle Tuner Connection
(tuner sold separately)
Steering Wheel Interface Input
(PAC SWI-PS sold separately)
BLACK |
Bluetooth Microphone Input |
|
Connect the included |
|
Bluetooth microphone. |
|
Bluetooth Microphone |
|
(must be connected for Bluetooth functionality) |
FUSE
When replacing the fuse, make sure new fuse is the correct type and amperage. Using an incorrect fuse could damage the radio.
The XDMA6540 uses one 10 amp ATM fuse located beside the wiring connector.
3
XDMA6540 OPERATION
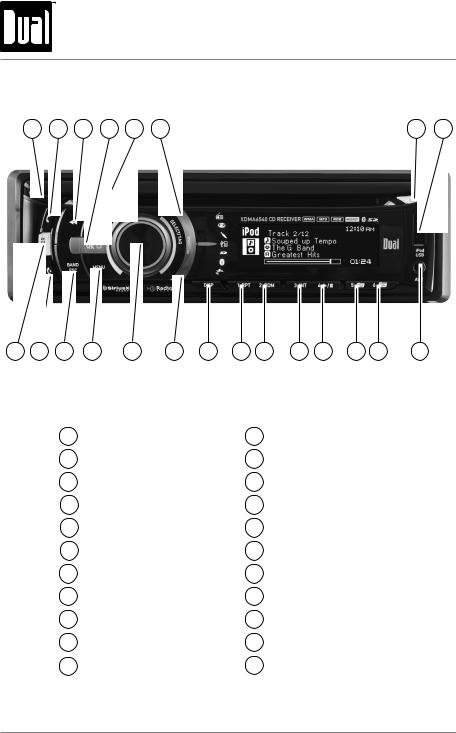
Control Locations - Receiver
1 |
2 |
3 |
4 |
5 |
6 |
7 |
8 |
22 |
21 |
20 |
19 |
18 |
17 |
16 |
15 |
14 |
13 |
12 |
11 |
10 |
9 |
1 |
Release |
|
12 |
Preset 4 / Play / Pause |
2 |
Bluetooth Talk |
13 |
Preset 3 / Intro |
|
3 |
Tune / Track Down |
14 |
Preset 2 / Random |
|
4 |
Mute / Power |
15 Preset 1 / Repeat |
||
5 |
Tune / Track Up |
16 |
Display |
|
6 |
Mode Up |
17 |
Mode Down |
|
7 |
CD Eject |
|
18 |
Volume knob / Select/ Tag |
8 |
USB Port |
19 |
Menu |
|
9 |
Auxiliary Input |
20 |
Band / Escape |
|
10 |
Preset 6 |
/ Folder Up |
21 |
Bluetooth End Call |
11 |
Preset 5 |
/ Folder Down |
22 |
Color |
4
XDMA6540 OPERATION
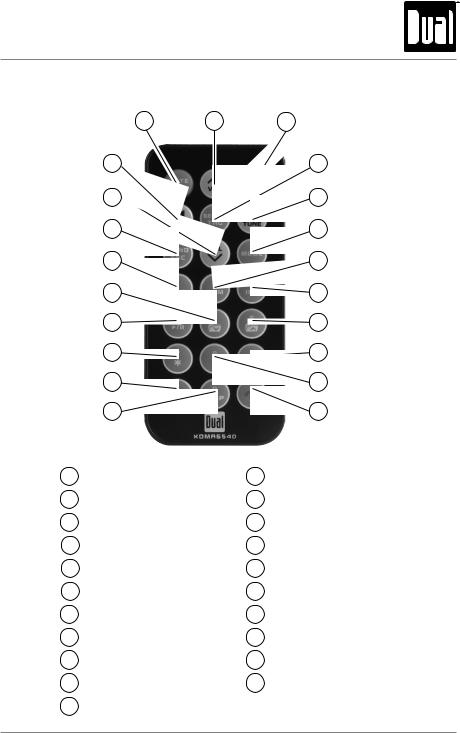
Control Locations - Remote
1 |
2 |
3 |
21 |
|
4 |
20 |
|
5 |
19 |
|
6 |
18 |
|
7 |
17 |
|
8 |
16 |
|
9 |
15 |
|
10 |
14 |
|
11 |
13 |
|
12 |
1 |
Mute / Power |
12 |
Bluetooth End Call |
|
2 |
Volume Up |
13 |
Key 0 / Display |
|
3 |
Menu / Scan |
14 |
Bluetooth Talk |
|
4 |
Select / Tag |
15 Key 7 / Key * |
||
5 |
Tune / Track Up |
16 Preset 4 |
/ Play / Pause |
|
6 |
Mode |
17 Preset 5 |
/ Folder Down |
|
7 |
Preset 2 / Random |
18 |
Preset 1 |
/ Repeat |
8 |
Preset 3 / Intro |
19 |
Band / Escape |
|
9 |
Preset 6 / Folder Up |
20 |
Volume Down |
|
10 |
Key 9 / Key # |
21 |
Tune / Track Down |
|
11 |
Key 8 |
|
|
|
5

XDMA6540 OPERATION
General Operation
Power On/Off Press  or any other button to turn unit on. Press and hold
  to turn unit off.
Faceplate Removal Press RELEASE and pull away from the left side to remove. To re-install, insert right side of faceplate first then push left side to secure.
Semi-permanent Remove trim ring and install supplied #1 x 7/32” Faceplate Installation Phillips head screw through left side of mounting
frame into faceplate.
Changing Modes Press MODE DOWN to cycle down or press MODE UP to cycle up through the below operating modes. A mode indicator located to the left of the LCD will point to the current mode of operation.
AM/FM Tuner Mode
CD Player Mode
Auxiliary Input (front/rear) Modes
USB and Operation of iPod®/iPhone® Modes
SD Card Mode
Bluetooth Mode
SiriusXM Satellite Radio Mode
Available Modes SiriusXM mode will not appear unless the SiriusXM Connect Vehicle Tuner (sold separately) is connected.
Operation of iPod mode will not appear unless an iPod device (sold separately) has been connected.
CD, USB and SD modes will not appear unless a CD, USB device or SD card (sold separately) have been connected.
HD Radio™ mode will replace AM/FM tuner mode when the Dual HDM90 HD Radio tuner (sold separately) is connected.
6

XDMA6540 OPERATION
General Operation
Volume Adjust volume using volume knob (00-46).
Mute Press MUTE to silence the audio. “MUTE” will flash in the display. Press MUTE again to cancel.
Display Press DISP to toggle between items such as ID3 tag song information, file/folder information or the clock.
Select / Tag Push the volume knob inward to activate the SELECT function. Push and hold the volume knob inward to activate the TAG function.
Steering Wheel The steering wheel interface input located on the back Interface Input of the head unit allows connection to the PAC (Pacific
Accessory Corporation) SWI-PS interface module (sold separately). Visit www.pac-audio.com for details.
To configure steering wheel controls, follow the instructions provided with the PAC SWI-PS interface module. After installing the interface module, insert the module's 3.5mm jack into the port labeled "REMOTE IN" on the back of the head unit.
Auxiliary Inputs The XDMA6540 features two auxilary inputs. Insert a 3.5mm connector in the front panel AUX port, or
connect RCA-type cables into the rear AUX port. Press MODE UP/DOWN to select Aux Front or Aux Rear modes.
Reset Press the RESET button, located behind the front panel, to reset the unit back to the factory settings if abnormal operation occurs.
Setting the Clock With the unit on, press and hold DISP until the clock begins to flash, then release. Press TUNE nn
to adjust the hours and TUNE llto adjust the minutes. Press DISP momentarily to save the selected time.
Note: The clock can also be set in the GENERAL menu. See page 11 for details.
12/24-Hour Clock The clock will display 12-hour AM/PM time in USA frequency spacing mode (PM 10:00). In European frequency spacing mode, the clock will display 24-hour time (22:00).
Note: 24-hour time and European frequency spacing are not available if the HDM90 HD Radio™ tuner are connected.
7

XDMA6540 OPERATION
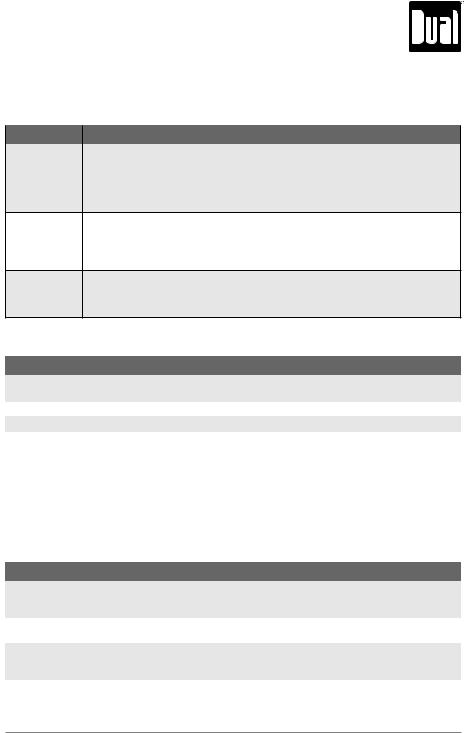
Setup Menu
Press MENU to access the setup menu, then turn the volume knob to cycle through menu categories:
Audio, Color, Display, Tuner, iPod, Bluetooth, SiriusXM and General.
•When desired category appears in the display, press SELECT, then rotate the volume knob left/ right to cycle through the options in each category.
•When desired option appears in the display, press SELECT, then rotate the volume knob left/ right to adjust or activate desired function. Note: Some functions are toggled by pressing SELECT and may not require turning the volume knob.
•Press ESC to return to the previous menu, or exit the menu while the main menu is displayed.
Audio Menu
Function |
Options |
Action |
|
Bass |
Level |
Adjust the bass frequency ouput from -6 to +6. |
|
Treble |
Level |
Adjust the treble frequency output from -6 to +6. |
|
Balance |
Left - Right |
Shift the speaker output from the left (-12) to the right (+12). |
|
Fader |
Front - Rear |
Shift the speaker output from the front (-12) to the rear (+12). |
|
Equalizer |
Preset EQs |
Select between Flat, Pop, Jazz, Classic, Beat, Rock, User. |
|
|
|
• Any Bass or Treble adjustments are saved as the "User" EQ. |
|
Subwoofer |
Level |
Adjust the level of the subwoofer output from 0 (off) to +12. |
|
Loudness |
Off/On |
Set the loud setting to On or Off. |
|
• Enhances the bass and treble frequencies at low volumes. |
|||
|
|
||
Source Level |
-6 to +6 |
Adjusts the output level for each mode individually from -6 to +6. |
Color Menu
Menu Function |
|
Options |
|
Auto Change |
Sets the unit to rotate between all illumination colors automatically. Setting a preset or user |
||
color will cancel the automatic color change. |
|||
|
|||
|
Adjust the color of the button and LCD illumination between 31 preset colors. |
||
|
• |
Off: sets the color to white. (default) |
|
Set Color |
• |
Day/Night: sets the color to change to different colors during the day or night. The day and |
|
|
night colors must be set in the Day/Night color menu below. |
||
|
|
||
•User: sets the color to the custom color. The custom color must be set in the menu below.
•1-31: choose from any of the 31 preset colors.
Set Custom |
Individually select the level of Red, Green and Blue from 1 - 32. Any combination of these |
|
colors can be selected. Important Note: Setting each Red, Green and Blue levels to 1 will turn |
||
Color |
off set turn off the illumination for the LCD and buttons. If this color is set, press COLOR to |
|
|
change to a color. |
|
Set Day/Night |
Sets inidvidual colors for the day or night. (The clock must be set for proper function). |
|
• |
Day Color: sets the daytime color to a preset or custom color. |
|
Color |
• |
Night Color: sets the nighttime color to a preset or custom color. |
|
• Time: adjusts the night time span. Turn the volume knob to adjust. (default is 7pm to 7am). |
|
8
|
XDMA6540 OPERATION |
|
|
|
|
|
Setup Menu |
|
|
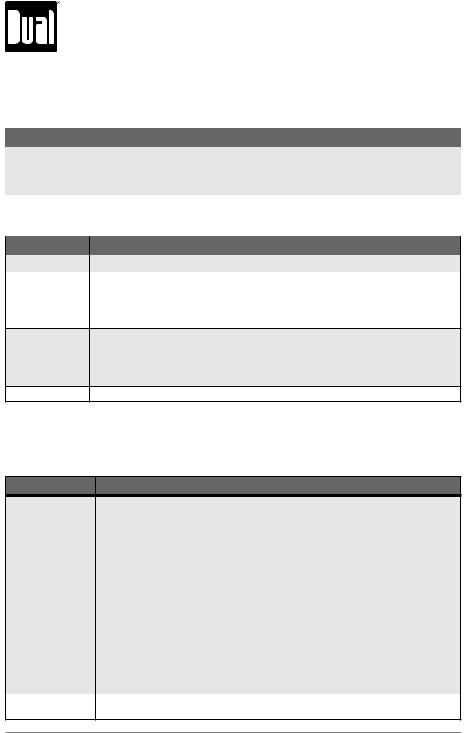
Display Menu |
|
|
|
|
Menu Function |
Options |
|
|
Changes the scrolling style used for displayed information on the LCD between: |
|
|
• Off: information will not scroll. |
|
Scrolling |
• Once: information will scroll one time per song. |
|
• 15 seconds: information will scroll once per 15 seconds. |
||
|
||
|
• Page: information will cycle instead of scrolling. (default) |
|
|
• On: information will constantly scroll. |
Adjusts the illumination level for the buttons and LCD between:
• High: brightest illumination level. (default) Dimmer • Medium: middle illumination level.
•Low: dimmest illumination level.
•NA: illumination level is locked and cannot be changed when day/night color is enabled.
|
Sets the LCD illumination type |
||
LCD Type |
• |
Positive: Color background with black text. |
|
• |
Negative: Black background with color text. |
||
|
|||
|
• |
Automatic: Switches to positive during the daytime, and negative during the night. (default) |
|
|
Tuner Menu |
|
|
|
|
Menu Function |
Options |
|
|
|
|
Auto Station Store |
band.Press SELECT to begin storing strong radio stations to the 1 - 6 preset buttons in the current |
|
Local |
Allow only strong radio stations to be received, blocking stations with weak signal. |
|
Frequency Sp. |
Changes the tuner to receive USA (default) or European radio frequencies. |
|
|
Switches the function of the seek/tune up and down buttons: |
|
Tune/Seek |
• Seek: Quick press will seek to the next strong channel. Press and hold to activate manual |
|
tuning. |
||
Priority |
||
• Tune: Quick press will manually tune to the next station. Press and hold to seek to the |
||
|
||
|
next strong channel. (default) |
HD Radio™ Tuner Menu
When the optional HDM90 HD Radio tuner (sold separately) is connected, the following additional menu options will appear in the Tuner menu.
Menu Function |
Options |
|
HD Seek |
Limits the seek and auto station store functions to only access HD Radio channels. |
|
• On: Seek and Auto Station Store will only access digital HD Radio channels. |
||
|
• Off: All analog and digital channels will be accessed. (default) |
|
Delete All Tags |
Press SELECT to erase all Tags that are saved in memory. (Does not affect Tags that have |
|
been transferred to an iPod device.) |
||
|
||
Tuner Mode |
Enables/disables the digital HD Radio channel reception. |
|
• Analog: Limits the reception to standard analog channels only. |
||
|
• Digital: Allows both digital and analog channels to be received. (default) |
9
XDMA6540 OPERATION
|
Setup Menu |
|
iPod Menu |
|
|
|
|
|
Menu Function |
Options |
|
|
|
|
|
Switches the control between the head unit and the iPod/iPhone device. |
|
iPod Control |
• Full: Enables total control of the iPod device from the XDMA6540. (default) |
|
• Manual: Releases the control of the iPod device. Music searches and track selections |
||
|
||
|
must be done from the device. The iPod device will continue to charge. |
|
Bluetooth™ Menu |
||
|
|
|
Menu Function |
Options |
|
Bluetooth |
Enables/disables Bluetooth functionality. |
|
|
Answers all incoming calls automatically without requiring a button press. |
|
Auto Answer |
• On: Automatically accepts all incoming calls after 2-3 rings without pressing the TALK |
|
button. |
||
•Off: Incoming calls can be accepted by pressing the TALK button, or refused by pressing the END button. (default)
|
Connects the most recently paired Bluetooth device automatically. |
Auto Connect |
• On: Connects automatically when the XDMA6540 is powered on and the Bluetooth device |
is in range. (default) |
•Off: Will not connect to any Bluetooth device unless you manually select the device from the "paired devices" menu.
Speaker Output Directs the Bluetooth audio to only the front speakers (default) or to all four speakers.
SiriusXM Tuner Menu
When the optional SiriusXM Satellite Radio tuner (sold separately) is connected, the following additional menu options will appear in the Setup Menu.
Menu Function |
Options |
Press SELECT to enter the Parental Control menu. This menu is locked by a 4 digit code, and a prompt will appear to enter the code. Unless changed using the Edit Code menu (see below), the default code is "0000". Enter this code using one of these two methods:
•Enter "0000" using the remote control, by pressing the numbers directly. Press SELECT to confirm.
•Turn the volume knob to select the first digit, then press SELECT. Continue with the remaining digits until the code is entered.
Parental Control |
Once the code is entered, choose from the below menu options: |
|
(default code: 0000) |
Edit Code: Choose this option to program a new 4-digit code. Enter the new code using the |
|
|
input method described above. |
|
|
Channel Lock: Once selected, the channel list will appear. Turn the volume knob to cycle |
|
|
through the list of channels. Press SELECT to lock the desired channel; a locked channel |
|
|
will not be available in the channel lineup. A lock icon will appear next to the channel |
|
|
name when the channel is locked. Pressing SELECT on a locked channel will unlock it. |
|
|
Clear All: Choose this option to reset the locked channels back to the factory default. All |
|
|
currently subscribed channels will be unlocked. |
|
Delete All Tags |
Press SELECT to erase all Tags that are saved in memory. (Does not affect Tags that have |
|
been transferred to an iPod device.) |
||
|
10
|
XDMA6540 OPERATION |
|
|
|
|
|
Setup Menu |
|
|
General Menu |
|
|
|
|
Menu Function |
Options |
|
|
|
|
Clock |
Enables/disables the clock to be displayed on the LCD when the XDMA6540 is powered |
|
off using the power button. |
||
|
Enables/disables the 3.5mm auxiliary input on the front panel. Aux Front • On: The auxiliary input is enabled. (default)
• Off: Auxiliary input mode is removed from the list of available modes.
Enables/disables the RCA auxiliary input located behind the head unit. Aux Rear • On: The auxiliary input is enabled. (default)
• Off: Auxiliary input mode is removed from the list of available modes.
When enabled, every button press will output a beep tone. Beep • On: Every button press will output a single beep tone.
• Off: Only press-and-hold button functions will output a double beep tone. (default)
Sets the XDMA6540 to power-on to the same volume level every time. Prog. Volume • Off: The unit will turn on at the last volume level that was set. (default)
• 1-30: Choosing a volume level will program the unit to always turn on at that volume.
Power-on Allows the "Good Morning/Afternoon/Evening" message that may be shown when the Message unit is powered on.
Demo mode Enables/disables the demonstration mode for display purposes.
|
Adjusts the time for the internal clock. |
||
Set Clock |
• Press nnto adjust the hours. |
||
|
• Press llto adjust the minutes. |
||
|
AM/FM Tuner Operation |
||
|
Display |
|
Press DISP to toggle the display between the frequency and clock. |
|
|
||
|
|
|
Note: when using the HDM90 HD Radio™ tuner, refer to page 12. |
|
Seek Tuning |
|
Press TUNE nn or TUNE llfor more than one second to seek |
|
|
|
the next strong station. |
|
Manual Tuning |
|
Press TUNE nnor TUNE llmomentarily to move radio |
|
|
|
frequency up or down one step at a time. Press and hold to advance |
|
|
|
quickly. |
|
|
|
Note: Tuning options can be changed in the tuner setup menu. |
|
Scan Tuning |
|
Press SCAN on the remote control momentarily to preview strong |
|
|
|
stations on the current band, pausing for five seconds at each. |
|
|
|
Press SCAN on the remote control again to cancel. |
|
Band |
|
Press BAND to select between FM1, FM2, FM3, AM1 and AM2 |
|
|
|
bands. Up to six presets can be programmed for each band. |
Storing and Recalling Station |
|
Up to 18 FM stations and 12 AM stations can be stored in memory. |
|
|
Presets |
|
To store a station, select the desired band and station. Press and |
|
|
|
hold the desired preset button (1-6) for more than two seconds. |
|
|
|
When stored, the preset number will appear in the display. The |
|
|
|
station can be recalled by pressing the corresponding preset |
|
|
|
button. |
|
|
|
|
|
|
11 |
|
 Loading...