


XDVD236BT
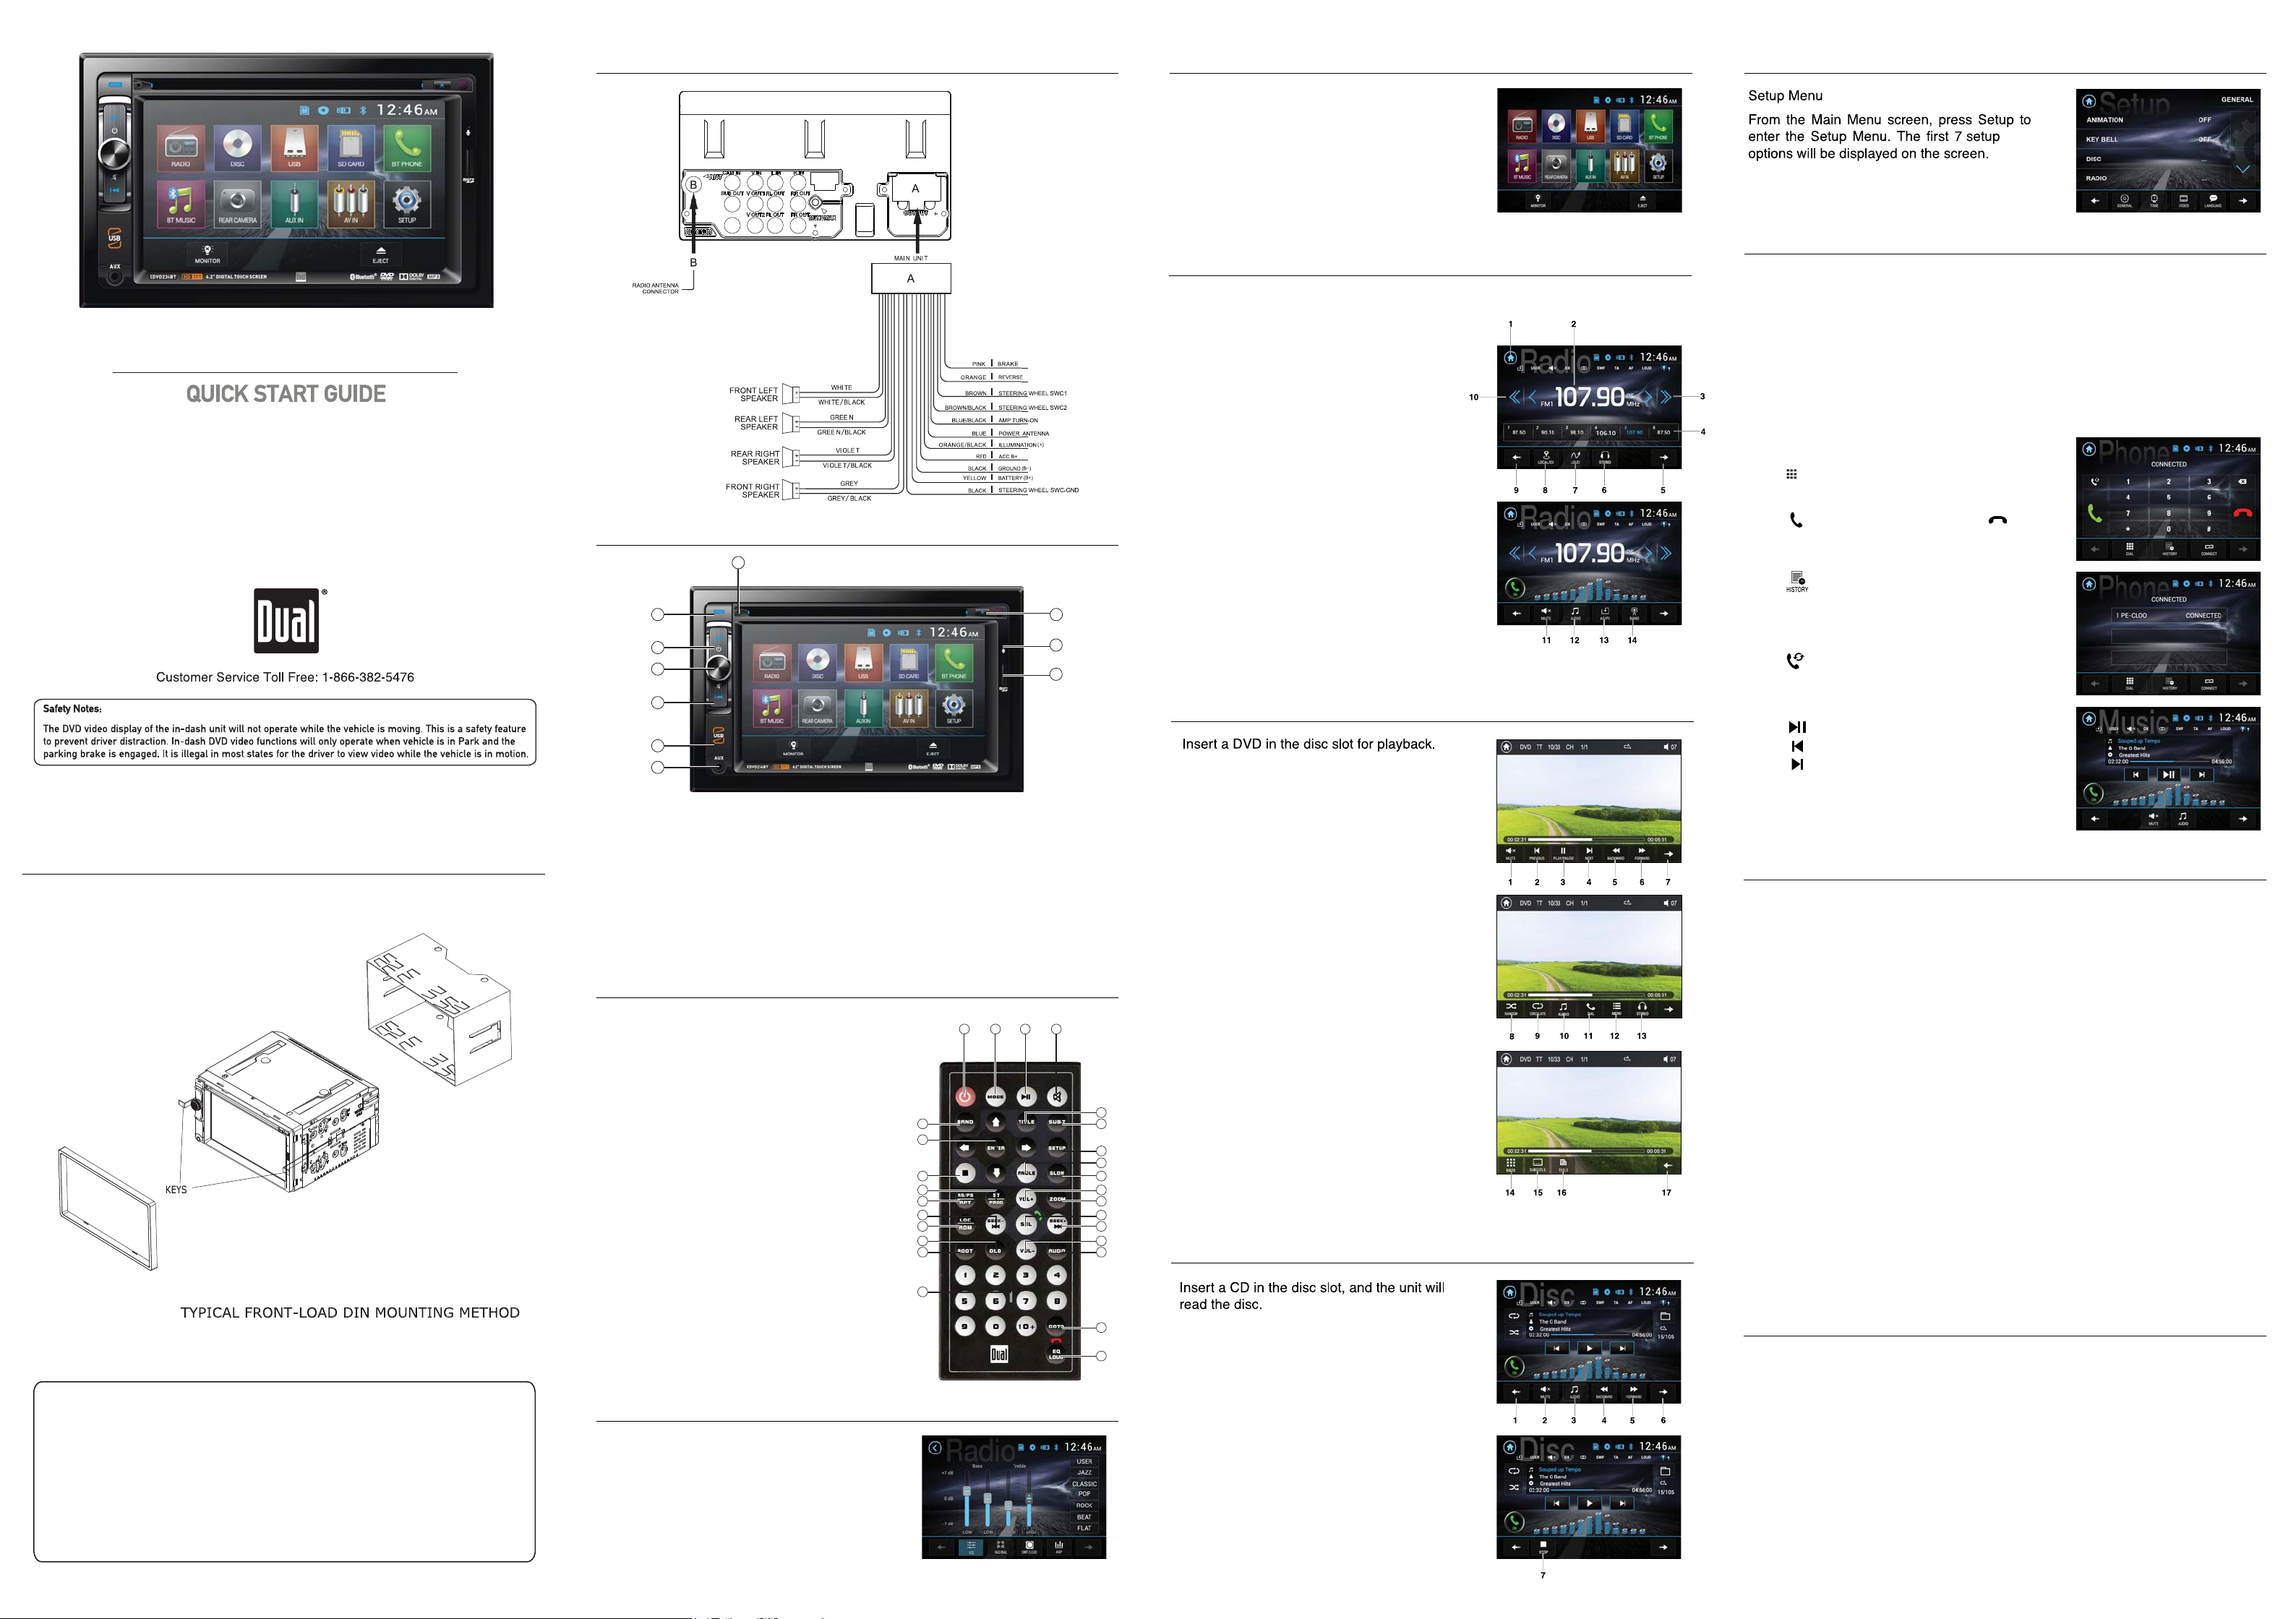
XDVD236BT
Multimedia DVD Receiver with Bluetooth
featuring a 6.2” digital TFT LCD
This Quick Start Guide gives you the basics to
start using your XDVD236BT. Please visit
www.dualav.com/support/manuals.php
to download a complete owner’s manual or call customer
service at 1-866-382-5476 (Monday-Friday, 9AM-5PM EST).
Wiring Diagram - Inputs/Outputs Main Menu General Operation
In the Menu mode, press the desired icon
to enter the corresponding mode: Tuner, Disc,
USB, SD Card, BT Phone, BT Music, Aux In,
AV In, Setup.
Bluetooth Operation
Control Locations
5
Tuner Operation
Select the Tuner icon from the Main Menu screen or press MODE unit Tuner
is selected.
1. Current Mode Indicator
2. Information Display
3. Tune Up
4. Preset Station Display
5. Previous Menu
6. Stereo
7. Loud
8. Local/Dx
9. Next Menu
10. Tune Down
4
3
11. Mute
12. Audio
13. As/Ps
14. Band
Bluetooth Microphone
The microphone is built-in to the receiver.
Pairing and Connecting
Before you can use a Bluetooth device, it must be paired and connected. The
Multi Media broadcasts the pairing signal constantly when no devices are
currently connected. Complete the pairing sequence from your Bluetooth device.
The device name is "Dual BT". The Bluetooth passcode "0000". Once pairing is
complete, most Bluetooth will connect automatically if the device is in range
when the unit is powered-on.
Dialing a Number
Press to display keypad and dial a number.
Making and Ending a Call
Press to connect a call, and press to
end a call.
Accessing Recent Call List
Press to access the recent call list and
view/select numbers from recent Received,
Dialed or Missed calls.
Installation
Copyright and Trademark Notes
This product incorporates copyright protection technology that is protected by method claims of certain U.S.
patents and other intellectual property rights owned by Macrovision Corporation and other rights owners.
Use of this copyright protection technology must be authorized by Macrovision Corporation, and
is intended for home and other limited viewing uses only unless otherwise authorized by Macrovision
Corporation. Reverse engineering or disassembly is prohibited. Manufactured under license from Dolby
Laboratories. Dolby and the double-D symbol are trademarks of Dolby Laboratories. DVD Logo is a
trademark of DVD Format/Logo Licensing Corporation registered in the U.S., Japan and other countries.
SD Logo is a trademark of SD-3C, LLC. iPod and iPhone are trademarks of Apple Inc., registered in the U.S.
and other countries. Dual Electronics Corporation is not affiliated with Apple, Inc. Other trademarks and
trade names are those of their respective owners.
6
7
8
9
10
1. microSD Card
2. Mic
3. Eject - Press to eject disc
4. Reset
5. Mode
6. Tune/Track Up
7. Power/Volume/Mute
8. Tune/Track Down
9. USB Slot
10. AV Input
Remote Control
1. Power
2. Mode
3. Play/Pause
4. Mute
5. Title
6. Sub Title
7. Setup
8. Angle
9. Slow
10. Volume UP
11. Zoom
12. Select/Talk
13. Seek UP/Next Track
14. Volume Down
15. Audio
16. Goto
17. EQ/Loud/End call
18. Number keys
19. Root
20. OSD
(On Screen Display)
21. Local/Random
22. Seek Down/
Prevous Track
23. AS/PS/Repeat
24. Stereo/Program
25. Stop
26. Enter
27. Band
Audio Control
Tap VOL to select between Volume, Bass, Treble,
Balance and Fader. You can adjust the level for
each audio option by turning the rotary left and
right.
2
1
DVD Operations
Transfering Audio
Press to transfer audio between the head unit
and mobile phone.
Streaming Audio
Press to play or pause the music.
Press to skip to the previous track.
Press to advance to the next track.
1. Mute
2. Previous
3. Play/Pause
4. Next Track
5. Backward
6. Forward
7. Next Menu
8. Random
9. Circulate
10. Audio
11. Dial
1 2 3 4
12. Menu
13. Stereo
14. Goto
27
26
25
24
23
22
21
20
19
18
5
6
7
8
9
10
11
12
13
14
15
16
17
15. Subtitle
16. Title
17. Previous Menu
CD Operations
1. Previous Menu
2. Mute
3. Audio
4. Backward
5. Forward
6. Next Menu
7. Stop
One-Year Limited Warranty
This warranty gives you specific legal rights. You may also have other rights which vary from state to state.
Dual Electronics Corp. warrants this product to the original purchaser to be free from defects in material and
workmanship for a period of one year from the date of the original purchase.
Dual Electronics Corp. agrees, at our option, during the warranty period, to repair any defect in material or workmanship or to furnish an equal new, renewed or comparable product (whichever is deemed necessary) in exchange
without charges, subject to verification of the defect or malfunction and proof of the date of purchase. Subsequent
replacement products are warranted for the balance of the original warranty period.
Who is covered? This warranty is extended to the original retail purchaser for products purchased from an authorized
Dual dealer and used in the U.S.A.
What is covered? This warranty covers all defects in material and workmanship in this product. The following are not
covered: software, installation/removal costs, damage resulting from accident, misuse, abuse, neglect, product
modification, improper installation, incorrect line voltage, unauthorized repair or failure to follow instructions supplied
with the product, or damage occurring during return shipment of the product. Specific license conditions and copyright
notices for the software can be found via www.dualav.com.
What to do?
1. Before you call for service, check the troubleshooting guide in your owner’s manual. A slight adjustment of any
custom controls may save you a service call.
2. If you require service during the warranty period, you must carefully pack the product (preferably in the original
package) and ship it by prepaid transportation with a copy of the original receipt from the retailer to an
authorized service center.
3. Please describe your problem in writing and include your name, a return UPS shipping address (P.O. Box not
acceptable), and a daytime phone number with your shipment.
4. For more information and for the location of the nearest authorized service center please contact us by one of the
following methods:
&DOOXVWROOIUHHDW
(Monday-Friday, 9:00 a.m. to 5:00 p.m. EST)
(PDLOXVDWFV#GXDODv.com
Exclusion of Certain Damages: This warranty is exclusive and in lieu of any and all other warranties, expressed or
implied, including without limitation the implied warranties of merchantability and fitness for a particular purpose and
any obligation, liability, right, claim or remedy in contract or tort, whether or not arising from the company’s negligence,
actual or imputed. No person or representative is authorized to assume for the company any other liability in
connection with the sale of this product. In no event shall the company be liable for indirect, incidental or consequential
damages.
FCC Compliance
This device complies with Part 15 of the FCC Rules. Operation is subject to the following two conditions:
(1) this device may not cause harmful interference, and
(2) this device must accept any interference received, including interference that may cause undesired operation.
Warning: Changes or modifications to this unit not expressly approved by the party responsible for compliance could
void the user’s authority to operate the equipment.
Note: This equipment has been tested and found to comply with the limits for a Class B digital device, pursuant to Part
15 of the FCC Rules. These limits are designed to provide reasonable protection against harmful interference in a
:
residential installation. This equipment generates, uses and can radiate radio frequency energy and, if not installed and
used in accordance with the instructions, may cause harmful interference to radio communications.
However, there is no guarantee that interference will not occur in a particular installation. If this equipment does cause
harmful interference to radio or television reception, which can be determined by turning the equipment off and on,
the user is encouraged to try to correct the interference by one or more of the following measures:
Reorient or relocate the receiving antenna.
Increase the separation between the equipment and receiver.
Connect the equipment into an outlet on a circuit different from that to which the receiver is connected.
Consult the dealer or an experienced radio/TV technician for help.
www.dualav.com
©2016 Dual Electronics Corp.
NSC0116-V02
Printed in China
 Loading...