


MR100
INSTALLATION/OWNER'S MANUAL
Digital Media Marine Receiver
MR100 INSTALLATION
Preparation
Please read entire manual before installation.
Before You Start
•Disconnect negative battery terminal. Consult a qualified technician for instructions.
•Avoid installing the unit where it would be subject to high temperatures or where it would be subject to dust, dirt or excessive vibration.
Getting Started
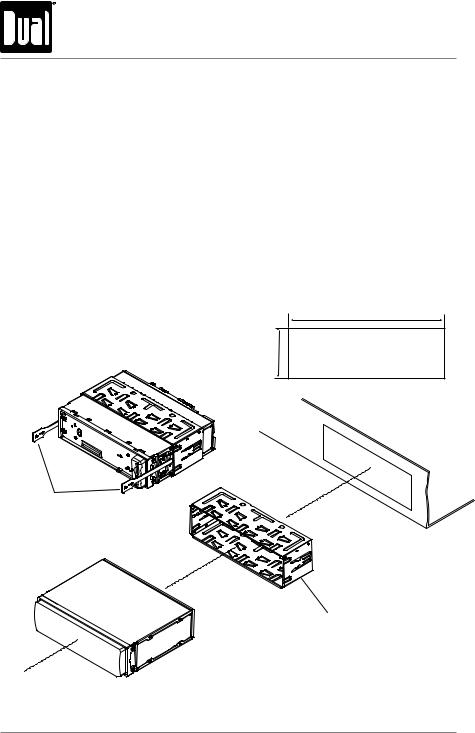
•Insert the supplied keys into the slots as shown, and slide the unit out of the mounting sleeve.
•Install mounting sleeve into opening, bending tabs to secure.
•Connect wiring harness and antenna. Consult a qualified technician if you are unsure.
•Test for correct operation and slide into the mounting sleeve to secure.
•Snap trim ring into place.
Mounting sleeve opening dimensions 7-11/64" x 2-3/32" (182 mm x 53 mm)
REMOVAL KEYS
MOUNTING SLEEVE
TYPICAL MOUNTING METHOD
2

MR100 INSTALLATION
Wiring Diagram
FUSE
When replacing the fuse, make sure new fuse is the correct type and amperage.
Using an incorrect fuse could damage the radio. The MR100 uses one 10 amp AGC fuse located in-line.
3
MR100 OPERATION
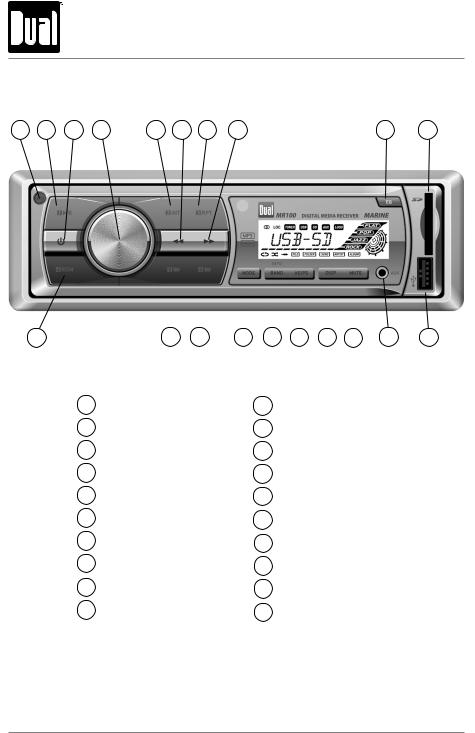
Control Locations - Receiver
1 |
2 |
3 |
4 |
5 |
6 |
7 |
8 |
9 |
10 |
20 |
19 |
18 |
17 |
16 |
15 |
14 |
13 |
12 |
11 |
1 |
Release |
11 |
USB Port |
2 |
Preset 1 / Play / Pause |
12 |
Auxiliary Input |
3 |
Power |
13 |
Mute |
4 |
Volume Knob |
14 |
Display |
5 |
Preset 2 / Intro |
15 |
AS / PS |
6 |
Tune / Track Down |
16 |
Band / Info |
7 |
Preset 3 / Repeat |
17 |
Mode |
8 |
Tune / Track Up |
18 |
Preset 6 / Folder Up |
9 |
EQ |
19 |
Preset 5 / Folder Down |
10 |
SD Slot |
20 |
Preset 4 / Random |
4
MR100 OPERATION
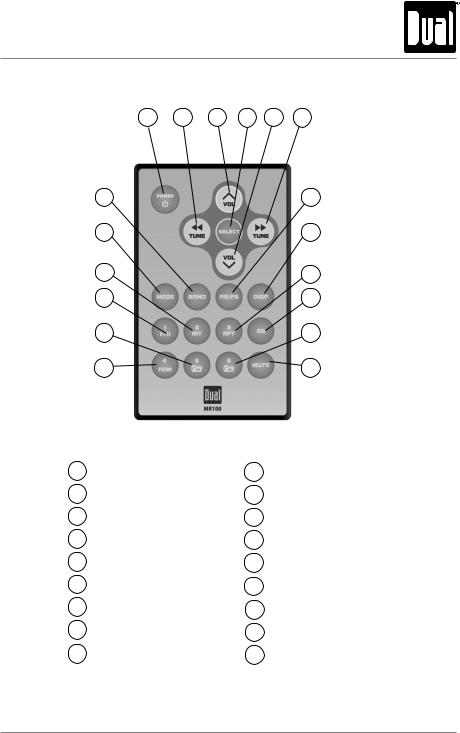
Control Locations - Remote
1 |
2 |
3 |
4 |
5 |
6 |
18 |
7 |
17 |
8 |
16 |
9 |
15 |
10 |
14 |
11 |
13 |
12 |
1 |
Power |
10 |
EQ |
2 |
Tune / Track Down |
11 |
Preset 6 / Folder Up |
3 |
Volume Up |
12 |
Mute |
4 |
Select |
13 |
Preset 4 / Random |
5 |
Volume Down |
14 |
Preset 5 / Folder Down |
6 |
Tune / Track Up |
15 |
Preset 1 / Play / Pause |
7 |
AS / PS |
16 |
Preset 2 / Intro |
8 |
Display |
17 |
Mode |
9 |
Preset 3 / Repeat |
18 |
Band |
5
 Loading...