


GB |
Original instructions |
10 |
S |
Bruksanvisning i original |
44 |
|
|
|
|
|
|
D |
Originalbetriebsanleitung |
15 |
N |
Original driftsinstruks |
49 |
|
|
|
|
|
|
F |
Notice d'utilisation |
21 |
FIN |
Alkuperäiset käyttö-/turvallisuusohjeet |
55 |
|
|
|
|
|
|
I |
Istruzioni originali |
27 |
EST |
Algupärane kasutusjuhend |
60 |
|
|
|
|
|
|
NL |
Originele gebruiksaanwijzing |
33 |
LT |
Originali instrukcija |
65 |
|
|
|
|
|
|
DK |
Original brugsanvisning |
39 |
LV |
Instrukcijām oriģinālvalodā |
71 |
|
|
|
|
|
|
Dremel Europe
The Netherlands
2610399729 08/2009 www.dremel.com All Rights Reserved
1 |
2 |
3 |
4 |
5 |
6
C
D
B
A |
E |
F
F
H 
 G
G
K
 J I
J I
2

7 |
|
|
10 |
|
B |
|
|
|
A |
|
|
|
|
|
F |
|
C |
|
11 |
|
|
|
|
|
|
D |
E |
|
|
|
|
8 |
A |
|
|
|
|
B |
|
|
|
|
12 |
E
C
D
9
3

105
106
107
108
110
111
113
114
115
117
118
125
134
144
191
192
193
194
196
199
403
404
405
407
408
409
414
420
422
423S
425
426
428
429
430
431
432
438
442
443
453
454
455
457
462
502
504
511S
512S
516
520
530
| <![if ! IE]> <![endif]>RPM |
|
|
|
|
|
|
|
|
| <![if ! IE]> <![endif]>Max |
|
|
|
Al |
|
|
Cu |
|
|
|
|
|
|
|
|
||
35.000 |
|
N |
N |
|
N |
|
|
|
35.000 |
|
N |
N |
|
N |
|
|
|
35.000 |
|
N |
N |
|
N |
|
|
|
35.000 |
|
N |
N |
|
N |
|
|
|
35.000 |
|
N |
N |
|
N |
|
|
|
35.000 |
|
N |
N |
|
N |
|
|
|
35.000 |
|
N |
N |
|
N |
|
|
|
30.000 |
|
N |
N |
|
N |
|
|
|
30.000 |
|
N |
N |
|
N |
|
|
|
30.000 |
|
N |
N |
|
N |
|
|
|
30.000 |
|
N |
N |
|
N |
|
|
|
30.000 |
|
N |
N |
|
N |
|
|
|
30.000 |
|
N |
N |
|
N |
|
|
|
30.000 |
|
N |
N |
|
N |
|
|
|
30.000 |
|
N |
N |
|
N |
|
|
|
30.000 |
|
N |
N |
|
N |
|
|
|
30.000 |
|
N |
N |
|
N |
|
|
|
30.000 |
|
N |
N |
|
N |
|
|
|
30.000 |
|
N |
N |
|
N |
|
|
|
30.000 |
|
N |
N |
|
N |
|
|
|
15.000 |
|
|
|
N |
N |
N |
N |
N |
15.000 |
|
|
|
N |
N |
N |
N |
N |
15.000 |
|
|
|
N |
N |
N |
N |
N |
35.000 |
|
N |
N |
N |
N |
N |
N |
N |
35.000 |
|
N |
N |
N |
N |
N |
N |
N |
35.000 |
402 |
N |
N |
N |
N |
N |
|
N |
20.000 |
401 |
|
|
N |
N |
N |
N |
N |
35.000 |
402 |
N |
N |
N |
N |
N |
|
N |
20.000 |
401 |
|
|
N |
N |
N |
N |
N |
20.000 |
(SC)402 |
|
|
N |
N |
N |
N |
N |
20.000 |
402 |
|
|
N |
N |
N |
N |
N |
35.000 |
402 |
N |
N |
|
N |
N |
|
N |
15.000 |
|
|
|
N |
N |
N |
N |
N |
20.000 |
401 |
|
|
N |
N |
N |
N |
N |
35.000 |
|
N |
N |
N |
N |
N |
N |
N |
35.000 |
|
N |
N |
N |
N |
N |
N |
N |
35.000 |
|
N |
N |
N |
N |
N |
N |
N |
35.000 |
|
N |
N |
N |
N |
N |
N |
N |
15.000 |
|
|
|
N |
N |
N |
N |
N |
15.000 |
|
|
|
N |
N |
N |
N |
N |
30.000 |
1453 |
|
|
N |
N |
N |
|
|
30.000 |
1453 |
|
|
N |
N |
N |
|
|
30.000 |
1453 |
|
|
N |
N |
N |
|
|
30.000 |
1453 |
|
|
N |
N |
N |
|
|
30.000 |
|
|
|
N |
N |
N |
|
|
35.000 |
|
N |
N |
N |
N |
N |
N |
N |
35.000 |
|
N |
N |
N |
N |
N |
N |
N |
20.000 |
(SC)402 |
N |
N |
|
|
|
|
|
20.000 |
(SC)402 |
N |
N |
|
|
|
|
|
20.000 |
|
|
|
N |
N |
N |
N |
N |
20.000 |
|
|
|
N |
N |
N |
N |
N |
15.000 |
|
|
|
N |
N |
N |
N |
N |
4

Ag |
Plastic |
Plexi |
|
|
|
|
N |
N |
N |
|
|
|
|
|
|
|
|
|
|
|
N |
N |
N |
|
|
|
|
|
|
|
|
|
|
|
N |
N |
N |
|
|
|
|
|
|
|
|
|
|
|
N |
N |
N |
|
|
|
|
|
|
|
|
|
|
|
N |
N |
N |
|
|
|
|
|
|
|
|
|
|
|
N |
N |
N |
|
|
|
|
|
|
|
|
|
|
|
N |
N |
N |
|
|
|
|
|
|
|
|
N |
N |
|
N |
N |
N |
|
|
|
|
|
|
|
|
N |
N |
|
N |
N |
N |
|
|
|
|
|
|
|
|
N |
N |
|
N |
N |
N |
|
|
|
|
|
|
|
|
N |
N |
|
N |
N |
N |
|
|
|
|
|
|
|
|
N |
N |
|
N |
N |
N |
|
|
|
|
|
|
|
|
N |
N |
|
N |
N |
N |
|
|
|
|
|
|
|
|
N |
N |
|
N |
N |
N |
|
|
|
|
|
|
|
|
N |
N |
|
N |
N |
N |
|
|
|
|
|
|
|
|
N |
N |
|
N |
N |
N |
|
|
|
|
|
|
|
|
N |
N |
|
N |
N |
N |
|
|
|
|
|
|
|
|
N |
N |
|
N |
N |
N |
|
|
|
|
|
|
|
|
N |
N |
|
N |
N |
N |
|
|
|
|
|
|
|
|
N |
N |
|
N |
N |
N |
|
|
|
|
|
|
|
N |
|
|
|
|
|
|
|
|
|
|
|
|
|
N |
|
|
|
|
|
|
|
|
|
|
|
|
|
N |
|
|
|
|
|
|
|
|
|
|
|
|
|
N |
|
|
|
N |
N |
|
|
|
|
|
|
|
|
N |
|
|
|
N |
N |
|
|
|
|
|
|
|
|
N |
N |
N |
N |
N |
|
|
|
|
|
|
|
|
|
N |
|
|
|
N |
N |
|
|
|
|
|
|
|
|
N |
N |
N |
N |
N |
|
|
|
|
|
|
|
|
|
N |
|
|
|
N |
N |
|
|
|
|
|
|
|
|
N |
|
|
|
N |
N |
|
|
|
|
|
|
|
|
N |
|
|
|
N |
N |
|
|
|
|
|
|
|
|
N |
N |
N |
N |
N |
|
|
|
|
|
|
|
|
|
N |
|
|
|
|
|
|
|
|
|
|
|
|
|
N |
|
|
|
N |
N |
|
|
|
|
|
|
|
|
N |
|
|
|
N |
N |
|
|
|
|
|
|
|
|
N |
|
|
|
N |
N |
|
|
|
|
|
|
|
|
N |
|
|
|
N |
N |
|
|
|
|
|
|
|
|
N |
|
|
|
N |
N |
|
|
|
|
|
|
|
|
N |
|
|
|
|
|
|
|
|
|
|
|
|
|
N |
|
|
|
|
|
|
|
|
|
|
|
|
|
|
|
|
|
|
|
|
|
|
|
|
|
|
|
|
|
|
|
|
|
|
|
|
|
|
|
|
|
NN
N N
N N
N
N N
N
5

<![endif]>Max RPM
Al |
Cu |
531 |
15.000 |
|
|
|
N |
N |
N |
N |
N |
532 |
15.000 |
|
|
|
N |
N |
N |
N |
N |
|
|
|
|
|
|
|
|
|
|
535 |
15.000 |
|
|
|
|
|
|
N |
N |
|
|
|
|
|
|
|
|
|
|
536 |
15.000 |
|
|
|
|
|
|
N |
N |
|
|
|
|
|
|
|
|
|
|
537 |
15.000 |
|
|
|
|
|
|
N |
N |
|
|
|
|
|
|
|
|
|
|
538 |
20.000 |
|
|
|
N |
|
|
|
|
|
|
|
|
|
|
|
|
|
|
540 |
35.000 |
402 |
N |
N |
N |
N |
N |
|
N |
|
|
|
|
|
|
|
|
|
|
542 |
35.000 |
|
N |
N |
N |
|
|
|
|
|
|
|
|
|
|
|
|
|
|
546 |
35.000 |
670 |
N |
N |
|
|
|
|
|
|
|
|
|
|
|
|
|
|
|
561 |
35.000 |
565 |
N |
N |
N |
|
|
|
|
|
|
|
|
|
|
|
|
|
|
562 |
35.000 |
566 |
|
|
|
|
|
|
|
|
|
|
|
|
|
|
|
|
|
569 |
20.000 |
568 |
|
|
|
|
|
|
|
|
|
|
|
|
|
|
|
|
|
570 |
20.000 |
568 |
|
|
|
|
|
|
|
|
|
|
|
|
|
|
|
|
|
612 |
35.000 |
231/335 |
N |
N |
|
|
|
|
|
|
|
|
|
|
|
|
|
|
|
615 |
35.000 |
231/335 |
N |
N |
|
|
|
|
|
640 |
35.000 |
231/335 |
N |
N |
|
|
|
|
|
650 |
35.000 |
231/335 |
N |
N |
|
|
|
|
|
652 |
35.000 |
231/335 |
N |
N |
|
|
|
|
|
|
|
|
|
|
|
|
|
|
|
654 |
35.000 |
231/335 |
N |
N |
|
|
|
|
|
|
|
|
|
|
|
|
|
|
|
655 |
35.000 |
231/335 |
N |
N |
|
|
|
|
|
|
|
|
|
|
|
|
|
|
|
932 |
25.000 |
|
|
|
N |
N |
N |
N |
N |
|
|
|
|
|
|
|
|
|
|
952 |
25.000 |
|
|
|
N |
N |
N |
N |
N |
|
|
|
|
|
|
|
|
|
|
953 |
25.000 |
|
|
|
N |
N |
N |
N |
N |
|
|
|
|
|
|
|
|
|
|
997 |
25.000 |
|
|
|
N |
N |
N |
N |
N |
|
|
|
|
|
|
|
|
|
|
4485 |
35.000 |
|
|
|
|
|
|
|
|
|
|
|
|
|
|
|
|
|
|
4486 |
35.000 |
|
|
|
|
|
|
|
|
|
|
|
|
|
|
|
|
|
|
7103 |
25.000 |
|
|
|
|
N |
N |
N |
N |
|
|
|
|
|
|
|
|
|
|
7105 |
25.000 |
|
|
|
|
N |
N |
N |
N |
|
|
|
|
|
|
|
|
|
|
7122 |
25.000 |
|
|
|
|
N |
N |
N |
N |
|
|
|
|
|
|
|
|
|
|
7134 |
25.000 |
|
|
|
|
N |
N |
N |
N |
7144 |
25.000 |
|
|
|
|
N |
N |
N |
N |
8153 |
25.000 |
|
|
|
N |
N |
N |
N |
N |
8193 |
20.000 |
|
|
|
N |
N |
N |
N |
N |
|
|
|
|
|
|
|
|
|
|
8215 |
20.000 |
|
|
|
N |
N |
N |
N |
N |
|
|
|
|
|
|
|
|
|
|
9901 |
30.000 |
|
|
N |
N |
N |
N |
|
|
|
|
|
|
|
|
|
|
|
|
9903 |
30.000 |
|
|
N |
N |
N |
N |
|
|
|
|
|
|
|
|
|
|
|
|
9905 |
30.000 |
|
|
N |
N |
N |
N |
|
|
|
|
|
|
|
|
|
|
|
|
9910 |
30.000 |
|
|
N |
N |
N |
N |
|
|
|
|
|
|
|
|
|
|
|
|
9911 |
30.000 |
|
|
N |
N |
N |
N |
|
|
|
|
|
|
|
|
|
|
|
|
9931 |
35.000 |
|
N |
N |
N |
N |
|
|
|
|
|
|
|
|
|
|
|
|
|
9934 |
35.000 |
|
N |
N |
N |
N |
|
|
|
|
|
|
|
|
|
|
|
|
|
9936 |
35.000 |
|
N |
N |
N |
N |
|
|
|
|
|
|
|
|
|
|
|
|
|
83322 |
25.000 |
|
|
|
|
|
|
|
|
|
|
|
|
|
|
|
|
|
|
84922 |
25.000 |
|
|
|
|
|
|
|
|
|
|
|
|
|
|
|
|
|
|
85422 |
20.000 |
|
|
|
|
|
|
|
|
|
|
|
|
|
|
|
|
|
|
85602 |
20.000 |
|
|
|
|
|
|
|
|
|
|
|
|
|
|
|
|
|
|
SC406 |
35.000 |
SC402 |
N |
N |
N |
N |
N |
|
N |
|
|
|
|
|
|
|
|
|
|
SC409 |
35.000 |
SC402 |
N |
N |
N |
N |
N |
|
N |
SC456 |
35.000 |
SC402 |
N |
N |
N |
N |
N |
|
N |
SC476 |
35.000 |
SC402 |
|
|
|
|
|
|
|
SC544 |
35.000 |
SC402 |
N |
N |
N |
|
|
|
|
|
|
|
|
|
|
|
|
|
|
SC545 |
35.000 |
SC402 |
|
|
|
|
|
|
|
|
|
|
|
|
|
|
|
|
|
6

Ag |
Plastic |
Plexi |
N
N
N
N
N
N N N N N
N N N N
N N
N
N
N N N
N N N
N N N
N N N
N N N
N N N
N N N
N
N
N
N
N N N
N N N
N N N
N N N
N N N
N
N
N
N N N
N N N
N N N
N N N
N N N
N N N
N N N
N N N
N N N N N
N N N N N
N N N N N
N N N N N
N N N N N
N N N N N
N N N N N
N N
N N N N N
7

GB
CE DECLARATION OF CONFORMITY We declare under our sole responsibility that this product is in conformity with the following standards or standardized documents: EN 60 745, EN 55 014, in accordance with the provisions of the directives 2006/95/EC, 2004/108/EC, 98/37/EC (until Dec. 28, 2009), 2006/42/EC (from Dec. 29, 2009 on).
NOISE/VIBRATION Measured in accordance with EN 60 745 the sound pressure level of this tool is 78 dB(A) and the sound power level 89 dB(A) (standard deviation: 3 dB), and the vibration 1 m/s2 (hand-arm method).
Technical file at: SKIL Europe BV (PT-SEU/PJE), 4825 BD Breda, NL.
D
CE KONFORMITÄTSERKLÄRUNG Wir erklären in alleiniger Verantwortung, dass dieses Produkt mit den folgenden Normen oder normativen Dokumenten
übereinstimmt: EN 60 745, EN 55 014, gemäß den Bestimmungen der Richtlinien 2006/95/EG, 2004/108/EG, 98/37/EG (bis 28.12.2009), 2006/42/EG (ab 29.12.2009). GERÄUSCH/VIBRATION Gemessen gemäß EN 60 745 beträgt der Schalldruckpegel dieses Gerätes 78 dB(A) und der Schalleistungspegel 89 dB(A) (Standardabweichung: 3 dB), und die Vibration 1 m/s2 (Hand-Arm Methode).
Technische Unterlagen bei: SKIL Europe BV (PT-SEU/PJE), 4825 BD Breda, NL.
N
CE SAMSVARSERKLÆRING Vi erklærer at det er under vårt ansvar at dette produkt er i samsvar med følgende standarder eller standarddokumenter: EN 60 745, EN 55 014, i samsvar med reguleringer 2006/95/EF, 2004/108/EF, 98/37/EF (frem til 28.12.2009), 2006/42/EF (fra 29.12.2009). STØY/VIBRASJON Målt ifølge EN 60 745 er lydtrykknivået av dette
verktøyet 78 dB(A) og lydstyrkenivået 89 dB(A) (standard deviasjon: 3 dB), og vibrasjonsnivået 1 m/s2 (hånd-arm metode).
Tekniske underlag hos: SKIL Europe BV (PT-SEU/PJE), 4825 BD Breda, NL.
FIN
CE TODISTUS STANDARDINMUKAISUUDESTA Todistamme täten ja vastaamme yksin siitä, että tämä tuote on allalueteltujen standardien ja standardoimisasiakirjojen vaatimusten mukainen EN 60 745, EN 55 014, seuraavien sääntöjen mukaisesti 2006/95/EY, 2004/108/EY, 98/37/EY (28.12.2009 asti), 2006/42/EY (29.12.2009 alkaen).
MELU/TÄRINÄ Mitattuna EN 60 745 mukaan työkalun melutaso on 78 dB(A) ja yleensä työkalun äänen voimakkuus on 89 dB(A) (keskihajonta: 3 dB), ja tärinän voimakkuus 1 m/s2 (käsi-käsivarsi metodi).
Tekninen tiedosto kohdasta: SKIL Europe BV (PT-SEU/PJE), 4825 BD Breda, NL.
F
CE DÉCLARATION DE CONFORMITÉ Nous déclarons sous notre propre responsabilité que ce produit est en conforme aux normes ou documents normalisés suivants: EN 60 745, EN 55 014, conforme aux réglementations 2006/95/CE, 2004/108/CE, 98/37/CE (jusqu’au 28.12.2009), 2006/42/CE (à partir du 29.12.2009).
BRUIT/VIBRATION Mesuré selon EN 60 745 le niveau de la pression sonore de cet outil est 78 dB(A) et le niveau de la puissance sonore 89 dB(A) (déviation standard: 3 dB), et la vibration 1 m/s2 (méthode main-bras).
Dossier technique auprès de: SKIL Europe BV (PT-SEU/PJE), 4825 BD Breda, NL.
EST
CE VASTAVUSDEKLARATSIOON Kinnitame ainuvastutajana, et see toode vastab järgmistele standarditele või normdokumentidele: EN 60 745, EN 55 014 vastavalt direktiivide 2006/95/EÜ, 2004/108/EÜ, 98/37/EÜ (kuni 28.12.2009), 2006/42/EÜ (alates 29.12.2009) nõuetele.
MÜRA/VIBRATSIOON Vastavalt kooskõlas normiga EN 60 745 läbi viidud mõõtmistele on antud seadme helirõhk 78 dB(A) jahelitugevus 89 dB(A) (standardkõrvalekalle: 3 dB), ja vibratsioon 1 m/s2 (käe-randme-meetod).
Tehniline toimik saadaval aadressil: SKIL Europe BV (PT-SEU/PJE), 4825 BD Breda, NL.
I
CE DICHIARAZIONE DI CONFORMITÀ Dichiaramo, assumendo la piena responsabilità di tale dichiarazione, che il prodotto è conforme alle seguenti normative e ai relativi documenti: EN 60 745, EN 55 014 in base alle prescrizioni delle direttive 2006/95/EG, 2004/108/EG, 98/37/EG (fino al 28.12.2009), 2006/42/EG (a partire dal 29.12.2009).
RUMOROSITÀ/VIBRAZIONE Misurato in conformità al EN 60 745 il livello di pressione acustica di questo utensile è 78 dB(A) ed il livello di potenza acustica 89 dB(A) (deviazione standard: 3 dB), e la vibrazione 1 m/s2 (metodo mano-braccio). Fascicolo tecnico presso: SKIL Europe BV (PT-SEU/PJE), 4825 BD Breda, NL.
LT
CE ATITIKTIES DEKLARACIJA Mes atsakingai pareiškiame, kad šis gaminys atitinka tokius standartus ir normatyviniusdokumentus: EN 60 745, EN 55 014 pagal reglamentų 2006/95/EB, 2004/108/EB, 98/37/EB (iki 2009-12-28), 2006/42/EB (nuo 2009-12-29) nuostatas.
TRIUKŠMINGUMAS/VIBRACIJA Šio prietaiso triukšmingumas buvo išmatuotas pagal EN 60 745 reikalavimus keliamo triukšmo garso slėgio lygis siekia 78 dB(A) ir akustinio galingumo lygis 89 dB(A) (standartinis nuokrypis: 3 dB), ir vibracijos pagreitis rankos plaštakos srityje tipiniu atveju yra mažesnis, kaip 1 m/s2. Techninė byla laikoma: SKIL Europe BV (PT-SEU/PJE), 4825 BD Breda, NL.
NL
CE CONFORMITEITSVERKLARING Wij verklaren, dat dit product voldoet aan de volgende normen of normatieve documenten: EN 60 745, EN 55 014,
overeenkomstig de bepalingen van de richtlijnen 2006/95/EG, 2004/108/EG, 98/37/ EG (tot 28-12-2009), 2006/42/EG (vanaf 29-12-2009).
GELUID/VIBRATIE Gemeten volgens EN 60 745 bedraagt het geluidsdrukniveau van deze machine 78 dB(A) en het geluidsvermogen-niveau 89 dB(A) (standaard deviatie: 3 dB), en de vibratie 1 m/s2 (hand-arm methode). Technisch dossier bij: SKIL Europe BV (PT-SEU/PJE), 4825 BD Breda, NL.
DK
CE KONFORMITETSERKLÆRING Vi erklærer under almindeligt ansvar, at dette produkt er i overensstemmelse med følgende normer eller normative dokumenter: EN 60 745, EN 55 014, i henhold til bestemmelserne i direktiverne 2006/95/EF, 2004/108/EF, 98/37/EF (indtil 28.12.2009), 2006/42/EF (fra 29.12.2009). STØJ/VIBRATION Måles efter EN 60 745 er lydtrykniveau af dette værktøj
78 dB(A) og lydeffektniveau 89 dB(A) (standard deviation: 3 dB), og vibrationsniveauet 1 m/s2 (hånd-arm metoden).
Teknisk dossier hos: SKIL Europe BV (PT-SEU/PJE), 4825 BD Breda, NL.
S
CE KONFORMITETSFÖRKLARING Vi intygar och ansvarar för, att denna produkt överensstämmer med följande norm och dokument: EN 60 745, EN 55 014, enl. bestämmelser och riktlinjema 2006/95/EG, 2004/108/EG, 98/37/EG
(till 28.12.2009), 2006/42/EG (from 29.12.2009).
LJUD/VIBRATION Ljudtrycksnivån som uppmätts enligt EN 60 745 är på denna maskin 78 dB(A) och ljudeffektnivån 89 dB(A) (standard deviation: 3 dB), och vibration 1 m/s2 (hand-arm metod).
Teknisk tillverkningsdokumentation finns hos: SKIL Europe BV (PT-SEU/PJE), 4825 BD Breda, NL.
LV
CE DEKLARĀCIJA PAR ATBILSTĪBU STANDARTIEM Mēs ar pilnu atbildību paziņojam, ka šis izstrādājums atbilst standartiem vai standartizācijas dokumentiem EN 60 745, EN 55 014 un ir saskaņā ar direktīvām 2006/95/ES, 2004/108/ES, 98/37/ES (līdz 28.12.2009) un 2006/42/ES (no 29.12.2009). TROKSNIS/VIBRĀCIJA Saskaņā ar standartu EN 60 745 noteiktais instrumenta radītā trokšņa skaņas spiediena līmenis ir 78 dB(A) un skaņas jaudas līmenis ir 89 dB (A) (pie tipiskās izkliedes: 3 dB), un vibrācijas intensitāte ir 1 m/s2 (strādājot rokas reÏīmā).
Tehniskā lieta no: SKIL Europe BV (PT-SEU/PJE), 4825 BD Breda, NL.
Skil Europe B.V. A. v.d. Kloot
8

|
|
|
|
|
1 |
|
|
|
|
|
|
|
|
|
4000 |
|
|
|
|
|
|
|
|
|
|
5 |
|
|
|
|
|
|
|
|
|
|
|
|
|
|
|
1 |
|
2,9 m/s2 |
|
1,5 m/s2 |
|
|
|
|
|
|
|
|
|
|
|
|
|
|
|
2 |
|
2,6 m/s2 |
|
1,5 m/s2 |
|
|
|
|
|
|
|
|
|
|
|
|
|
|
|
3 |
|
7,2 m/s2 |
|
1,5 m/s2 |
|
|
|
|
|
|
|
|
|
|
|
|
|
|
|
4 |
|
11,4 m/s2 |
|
2,8 m/s2 |
|
|
|
|
|
|
|
|
|
|
|
|
|
|
|
|
|
|
|
|
|
|
|
|
1 |
|
|
2 |
|
3 |
|
4 |
5 |
|
|
|
|
|
|
|
|
||
GB |
While drilling |
|
While polishing |
While wire-brushing |
|
While sanding |
Uncertainty (K) |
||
|
|
|
|
|
|
|
|
|
|
D |
Beim Bohren |
|
Beim Polieren |
Beim Abbürsten |
|
Beim |
Unsicherheit (K) |
||
|
Sandpapierschleifen |
||||||||
|
|
|
|
|
|
|
|
||
|
|
|
|
|
|
|
|
|
|
F |
Au cours du perçage |
|
|
Polissage |
|
Brossage |
Au cours du ponçage |
Incertitude (K) |
|
|
|
|
|
|
|
|
|
||
I |
In perforazione |
|
In lucidatura |
In spazzolatura |
|
In sabbiatura |
Non noto (K) |
||
|
|
|
|
|
|
|
|
|
|
NL |
Bij het boren |
Tijdens het polijsten |
Tijdens het bewerken |
|
Bij het schuren |
Onzekerheid (K) |
|||
met staalborstel |
|
||||||||
|
|
|
|
|
|
|
|
||
|
|
|
|
|
|
|
|||
DK |
Under boringen |
|
Ved polering |
Ved stålbørstning |
Under slibningen |
Usikkerhed (K) |
|||
|
|
|
|
|
|
|
|
|
|
S |
Vid borrning |
|
Vid polering |
Vid arbeten med |
|
Vid |
Osäkerhet (K) |
||
|
|
stålborste |
sandpappersslipning |
||||||
|
|
|
|
|
|
|
|||
|
|
|
|
|
|
|
|
|
|
N |
Under drilling |
|
Ved polering |
Ved stålbørsting |
Under sliping med |
Usikkert (K) |
|||
|
|
sandpapir |
|||||||
|
|
|
|
|
|
|
|
|
|
|
|
|
|
|
|
|
|
|
|
FIN |
Porattaessa |
|
Kiillotettaessa |
|
Käytettäessä |
|
Hiottaessa |
Epävarmuus (K) |
|
|
|
teräsharjaa |
|
||||||
|
|
|
|
|
|
|
|
|
|
|
|
|
|
|
|
|
|
||
EST |
Puurimisel |
|
Poleerimisel |
Terasharjamisel |
|
Lihvimisel |
Määramatus (K) |
||
|
|
|
|
|
|
|
|
|
|
LT |
Kai gręžiama |
|
|
Poliruojant |
Šveičiant vieliniu |
|
Kai šlifuojama |
Neaiškumas (K) |
|
|
|
|
šepečiu |
|
|||||
|
|
|
|
|
|
|
|
|
|
|
|
|
|
|
|
|
|
|
|
LV |
Urbšanas laikā |
|
|
Pulējot |
Pulējot ar metāla suku |
Slīpēšanas laikā |
Neskaidrības gadījumā |
||
|
|
(K) |
|||||||
|
|
|
|
|
|
|
|
|
|
|
|
|
|
|
|
|
|
|
|
9

GB GENERAL POWER TOOL SAFETY WARNINGS
! WARNING READ ALL SAFETY WARNINGS AND ALL INSTRUCTIONS.
(PICTURE 1)
Failure to follow the warnings and instructions may result in electric shock, fire and/or serious injury.
Save all warnings and instructions for future reference.
The term “power tool” in the warnings refers to your mainsoperated (corded) power tool or battery-operated (cordless) power tool.
WORK AREA SAFETY
a.Keep work area clean and well lit. Cluttered and dark areas invite accidents.
b.Do not operate power tools in explosive atmospheres, such as in the presence of flammable liquids, gases or dust.
Power tools create sparks which may ignite the dust or fumes.
c.Keep children and bystanders away while operating a power tool. Distractions can cause you to lose control.
ELECTRICAL SAFETY
a.Power tool plugs must match the outlet. Never modify the plug in any way. Do not use any adapter plugs with earthed (grounded) power tools. Unmodified plugs and matching outlets will reduce risk of electric shock.
b.Avoid body contact with earthed or grounded surfaces such as pipes, radiators, ranges and refrigerators. There is an increased risk of electric shock if your body is earthed or grounded.
c.Do not expose power tools to rain or wet conditions. Water entering a power tool will increase the risk of electric shock.
d.Do not abuse the cord. Never use the cord for carrying, pulling or unplugging the power tool. Keep cord away from heat, oil, sharp edges or moving parts. Damaged or tangled cords increase the risk of electric shock.
e.When operating a power tool outdoors, use an extension cord suitable for outdoor use. Use of a cord suitable for outdoor use reduces the risk of electric shock.
f.If operating a power tool in a damp location is unavoidable, use an earth leakage circuit breaker. Use of an earth leakage circuit breaker reduces the risk of electric shock.
PERSONAL SAFETY
a.Stay alert, watch what you are doing and use common sense when operating a power tool. Do not use a power tool while you are tired or under the influence of drugs, alcohol or medication. A moment of inattention while operating
|
power tools may result in serious personal injury. |
b. |
Use safety equipment. |
|
Always wear eye protection. |
|
Safety equipment such as |
|
dust mask, non-skid safety shoes, hard hat, or hearing |
|
protection used for appropriate conditions will reduce |
|
personal injuries. (PICTURE 2 + 3 + 4) |
c.Prevent unintentional starting. Ensure the switch is in the off-position before connecting to power source and/or battery pack, picking up or carrying the tool. Carrying power tools with your finger on the switch or energising power tools that have the switch on invites accidents.
d.Remove any adjusting key or wrench before switching the power tool on. A wrench or a key left attached to a rotating part of the power tool may result in personal injury.
e.Do not overreach. Keep proper footing and balance at all times. This enables better control of the power tool in unexpected situations.
f.Dress properly. Do not wear loose clothing or jewellery. Keep your hair, clothing and gloves away from moving parts. Loose clothes, jewellery or long hair can be caught in moving parts.
g.If devices are provided for the connection of dust extraction and collection facilities, ensure these are connected and properly used. Use of these devices can reduce dust related hazards.
POWER TOOL USE AND CARE
a.Do not force the power tool. Use the correct power tool for your application. The correct power tool will do the job better and safer at the rate for which it was designed.
b.Do not use the power tool if the switch does not switch it on and off. Any power tool that cannot be controlled with the switch is dangerous and must be repaired.
c.Disconnect the plug from the power source before making any adjustments, changing accessories, or storing power tools. Such preventive safety measures reduce the risk of starting the power tool accidentally.
d.Store idle power tools out of the reach of children and do not allow persons unfamiliar with the power tool or these instructions to operate the power tool. Power tools are dangerous in the hands of untrained users.
e.Maintain power tools. Check for misalignment or binding of moving parts, breakage of parts and any other condition that may affect the power tools operation. If damaged, have the power tool repaired before use. Many accidents are caused by poorly maintained power tools.
f.Keep cutting tools sharp and clean. Properly maintained cutting tools with sharp cutting edges are less likely to bind and are easier to control.
g.Use the power tool, accessories and tool bits etc., in accordance with these instructions, taking into account the working conditions and the work to be performed. Use of the power tool for operations different from those intended could result in a hazardous situation.
! |
WARNING |
Do not work with materials containing |
|
|
asbestos (asbestos is considered |
|
carcinogenic). |
|
! |
WARNING |
Take protective measures when during |
work dust can develop that is harmful to one's health, combustible or explosive (some dusts are considered carcinogenic); wear a dust mask and work with dust/chip extraction when connectable.
10
SERVICE
a.Have your power tool serviced by a qualified repair person using only identical replacement parts. This will ensure that the safety of the power tool is maintained.
SAFETY WARNINGS COMMON FOR GRINDING, SANDING, WIRE BRUSHING, POLISHING OR ABRASIVE CUTTINGOFF OPERATIONS
a.This power tool is intended to function as a grinder, sander, wire brush, polisher or cut-off tool. Read all safety warnings, instructions, illustrations and specifications provided with this power tool. Failure to follow all instructions listed below may result in electric shock, fire and/or serious injury.
b.Do not use accessories which are not specifically designed and recommended by the tool manufacturer. Just because the accessory can be attached to your power tool, it does not assure safe operation.
c.The rated speed of the accessory must be at least equal to the maximum speed marked on the power tool. Accessories running faster than their rated speed can fall apart.
d.The outside diameter and the thickness of your accessory must be within the capacity rating of your power tool.
Incorrectly sized accessories cannot be adequately guarded or controlled.
e.The arbour size of wheels, flanges, backing pads or any other accessory must properly fit the spindle of the power tool. Accessories with arbour holes that do not match the mounting hardware of the power tool will run out of balance, vibrate excessively and may cause loss of control.
f.Do not use a damaged accessory. Before each use inspect accessories such as abrasive wheels for chips and cracks, backing pads for cracks, tear or excess wear, and wire brushes for loose or cracked wires. If the power tool or accessory is dropped, inspect for damage or install an undamaged accessory. After inspecting and installing an accessory, position yourself and bystanders away from the plane of the rotating accessory and run the power tool at maximum no load speed for one minute. Damaged accessories will normally break apart during this test time.
g.Wear personal protective equipment. Depending on application, use face shield, safety goggles or safety glasses. As appropriate, wear dust mask, hearing protectors, gloves and shop apron capable of stopping small abrasive or workpiece fragments. The eye protection must be capable of stopping flying debris generated by various operations. The dust mask or respirator must be capable of filtrating particles generated by your operation. Prolonged exposure to high intensity noise may cause hearing loss.
h.Keep bystanders a safe distance away from work area. Anyone entering the work area must wear personal protective equipment. Fragments of the workpiece or of a broken accessory may fly away and cause injury beyond the immediate area of operation.
i.Hold the power tool only by the insulated gripping surfaces when performing an operation where the cutting tool may contact hidden wiring or its own power cord. Contact with a “live” wire will also make exposed metal parts of the power tool “live” and shock the operator.
j.Position the cord clear of the spinning accessory. If you lose control, the cord may be cut or snagged and your hand or arm may be pulled into the spinning accessory.
k.Never lay the power tool down until the accessory has come to a complete stop. The spinning accessory may grab the surface and pull the power tool out of your control.
l.Do not run the power tool while carrying it at your side.
Accidental contact with the spinning accessory could snag your clothing, pulling the accessory into your body.
m.Regularly clean the power tool’s air vents. The motor’s fan will draw the dust inside the housing and excessive accumulation of powdered metal may cause electrical hazards.
n.Do not operate the power tool near flammable materials.
Sparks could ignite these materials.
o.Do not use accessories that require liquid coolants. Using water or other liquid coolants may result in electrocution or shock.
p.Do not use excessively oversized sanding disc paper. Follow manufacturers recommendations, when selecting sanding paper. Larger sanding paper extending beyond the sanding pad presents a laceration hazard and may cause snagging, tearing of the disc or kickback.
q.Do not allow any loose portion of the polishing bonnet or its attachment strings to spin freely. Tuck away or trim any loose attachment strings. Loose and spinning attachment strings can entangle your fingers or snag on the workpiece.
KICKBACK AND RELATED WARNINGS
Kickback is a sudden reaction to a pinched or snagged rotating wheel, backing pad, brush or any other accessory. Pinching or snagging causes rapid stalling of the rotating accessory which in turn causes the uncontrolled power tool to be forced in the direction opposite of the accessory’s rotation at the point of the binding. For example, if an abrasive wheel is snagged or pinched by the workpiece, the edge of the wheel that is entering into
the pinch point can dig into the surface of the material causing the wheel to climb out or kick out. The wheel may either jump toward or away from the operator, depending on direction of the wheel’s movement at the point of pinching. Abrasive wheels may also break under these conditions. Kickback is the result of power tool misuse and/or incorrect operating procedures or conditions and can be avoided by taking proper precautions as given below.
a.Maintain a firm grip on the power tool and position your body and arm to allow you to resist kickback forces. Always use auxiliary handle, if provided, for maximum control over kickback or torque reaction during start-up. The operator can control torque reactions or kickback forces, if proper precautions are taken.
b.Never place your hand near the rotating accessory. Accessory may kickback over your hand.
11

c.Do not position your body in the area where the power tool will move if kickback occurs. Kickback will propel the tool in direction opposite to the wheel’s movement at the point of snagging.
d.Use special care when working corners, sharp edges etc. Avoid bouncing and snagging the accessory. Corners, sharp edges or bouncing have a tendency to snag the rotating accessory and cause loss of control or kickback.
e.Do not attach a saw chain woodcarving blade or toothed saw blade. Such blades create frequent kickback and loss of control.
SAFETY WARNINGS SPECIFIC TO GRINDING AND ABRASIVE CUTTING-OFF OPERATIONS
a.Use only wheel types that are recommended for your power tool and the specific guard designed for the selected wheel.
Wheels for which the power tool was not designed cannot be adequately guarded and are unsafe.
b.Wheels must be used only for recommended applications. For example: do not grind with the side of cut-off wheel. Abrasive cut-off wheels are intended for peripheral grinding, side forces applied to these wheels may cause them to shatter.
c.Always use undamaged wheel flanges that are of correct size and shape for your selected wheel. Proper wheel flanges support the wheel thus reducing the possibility of wheel breakage. Flanges for cut-off wheels may be different from grinding wheel flanges.
d.Do not use worn-down wheels from larger power tools.
Wheel intended for larger power tool is not suitable for the higher speed of a smaller tool and may burst.
ADDITIONAL SAFETY WARNINGS SPECIFIC TO ABRASIVE CUTTING OFFOPERATIONS
a.Do not "jam" the cut-off wheel or apply excessive pressure. Do not attempt to make an excessive depth of cut. Overstressing the wheel increases the loading and susceptibility to twisting or binding of the wheel in the cut and the possibility of kickback or wheel breakage.
b.Do not position your body in line with and behind the rotating wheel. When the wheel, at the point of operation, is moving away from your body, the possible kickback may propel the spinning wheel and the power tool directly at you.
c.When wheel is binding or when interrupting a cut for any reason, switch off the power tool and hold the power tool motionless until the wheel comes to a complete stop. Never attempt to remove the cut-off wheel from the cut while the wheel is in motion otherwise kickback may occur. Investigate and take corrective action to eliminate the cause of wheel binding.
d.Do not restart the cutting operation in the workpiece. Let the wheel reach full speed and carefully re-enter the cut. The wheel may bind, walk up or kickback if the power tool is restarted in the workpiece.
e.Support panels or any oversized workpiece to minimize the risk of wheel pinching and kickback. Large workpieces tend to sag under their own weight. Supports must be placed under the workpiece near the line of cut and near the edge of the workpiece on both sides of the wheel.
f.Use extra caution when making a "pocket cut" into existing walls or other blind areas. The protruding wheel may cut gas or water pipes, electrical wiring or objects that can cause kickback.
SAFETY WARNINGS SPECIFIC TO
WIRE BRUSHING OPERATIONS
a.Be aware that wire bristles are thrown by the brush even during ordinary operation. Do not overstress the wires by applying excessive load to the brush. The wire bristles can easily penetrate light clothing and/or skin.
b.If the use of a guard is recommended for wire brushing, do not allow any interference of the wire wheel or brush with the guard. Wire wheel or brush may expand in diameter due to work load and centrifugal forces.
c.Do not exceed 15,000 RPM when using wire brushes.
ENVIRONMENT
DISPOSAL
The machine, accessories and packaging should be sorted for environmental-friendly recycling.
ONLY FOR EC COUNTRIES
Do not dispose of power tools with household waste! According the European Guideline 2002/96/EC for Waste Electrical and Electronic Equipment and its implementation into national law, power tools that are no longer usable must be collected separately and disposed of in an environmentally-correct manner.
SPECIFICATIONS
GENERAL SPECIFICATIONS
Voltage Rating . . . . . . . . . . . |
230-240 V, 50-60 Hz |
|
Related Power . . . . . . . . . . . |
175 W |
|
Rated Speed (n) . . . . . . . . . . |
35,000 RPM |
|
Collet Capacity . . . . . . . . . . |
0.8 mm, 1.6 mm, 2.4 mm, |
|
|
|
3.2 mm |
|
|
|
|
Class II construction . . . . |
Double insulated construction tools |
|
||
(PICTURE 5) |
|
|
EXTENSION CORDS
Use completely unrolled and safe extension cords with a capacity of 5 Amps.
ASSEMBLY
ALWAYS UNPLUG MULTITOOL BEFORE CHANGING ACCESSORIES, CHANGING COLLETS, OR SERVICING THE TOOL.
12

GENERAL
The Dremel multitool is a high quality precision tool that can be used to perform detailed and intricate tasks. The wide range of Dremel accessories and attachments allow you to perform a large variety of tasks. These include tasks such as sanding, carving, engraving, routing, cleaning and polishing.
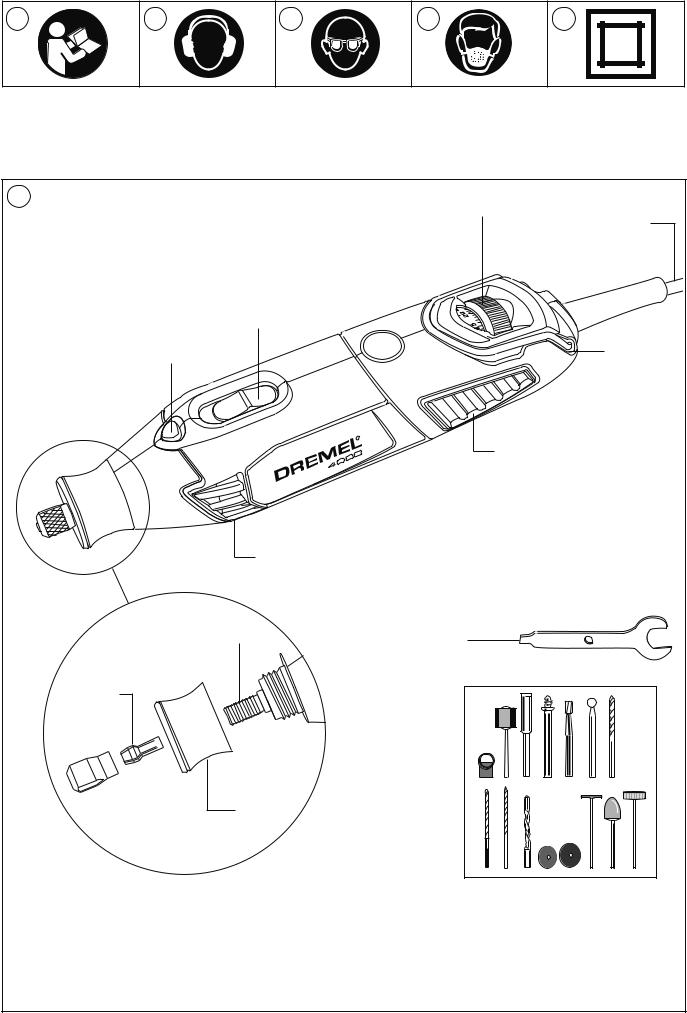
PICTURE 6
A.Shaft lock button
B.On/Off switch
CVariable speed dial
D.Power cord
E.Hanger
F.Ventilation openings
G.Collet wrench
H.Shaft
I.Housing cap
J.Collet nut
K.Collet
COLLETS
The Dremel accessories available for the multitool come with various shank sizes. Four size collets are available to
accommodate the different shank sizes. Collet sizes are identified by the rings on the back of the collet.
PICTURE 7
A.Collet nut
B.3.2 mm Collet without ring (480)
C.2.4 mm Collet with three rings (481)
D.1.6 mm Collet with two rings (482)
E.0.8 mm Collet with one ring (483)
F.Indentification rings
NOTE: Some multitool kits may not include all four collet sizes. Collets are available separately.
Always use the collet that matches the shank size of the accessory you plan to use. Do not force a larger diameter shank into a smaller collet.
CHANGING COLLETS
PICTURE 8
A.Collet wrench
B.Shaft lock button
C.Collet nut
D.To loosen
E.To tighten
1.Press the shaft lock button, hold down and rotate the shaft by hand until it engages the shaft lock. Do not engage the shaft lock button while multitool is running.
2.With the shaft lock button engaged, loosen and remove the collet nut. Use the collet wrench if necessary.
3.Remove the collet by pulling it free from the shaft.
4.Install the appropriate size collet fully into the shaft and reinstall the collet nut finger tight. Do not fully tighten the nut when there is no bit or accessory installed.
CHANGING ACCESSORIES
PICTURE 8
1.Press the shaft lock button and rotate the shaft by hand until it engages the shaft lock. Do not engage the shaft lock button while multitool is running.
2.With the shaft lock button engaged, loosen (do not remove) the collet nut. Use the collet wrench if necessary.
3.Insert the bit or accessory shank fully into the collet.
4.With the shaft lock button engaged, finger tighten the collet nut until the bit or accessory shank is gripped by the collet.
NOTE: Be sure to read the instructions supplied with your Dremel accessory for further information on its use.
Use only Dremel tested, high performance accessories.
BALANCING ACCESSORIES
For precision work, it is important that all accessories be in good balance (much the same as the tires on your automobile). To true up or balance an accessory, slightly loosen collet nut and give the accessory or collet a 1/4 turn. Re tighten collet nut and run the Rotary Tool. You should be able to tell by the sound and feel if your accessory is running in balance. Continue adjusting in this fashion until best balance is achieved.
GETTING STARTED
USE
The first step in using the multitool is to get the "feel" of it. Hold it in your hand and feel its weight and balance. Feel the taper of the housing. This taper permits the tool to be grasped much like a pen or pencil.
Always hold the tool away from your face. Accessories can be damaged during handling and can fly apart as they come up to speed.
When holding tool, do not cover the ventilation openings with your hand. Blocking the ventilation openings could cause the motor to overheat.
IMPORTANT! Practice on scrap material first to see how the tool’s high-speed action performs. Keep in mind that your multitool
will perform best by allowing the speed, along with the correct Dremel accessory and attachment, to do the work for you. Do not put pressure on the tool during use, if possible. Instead, lower the spinning accessory lightly to the work surface and allow it to touch the point at which you want to begin. Concentrate on guiding the tool over the work using very little pressure from your hand. Allow the accessory to do the work.
Usually it is better to make a series of passes with the tool rather than to do the entire job with one pass. A gentle touch gives the best control and reduces the chance of error.
HOLDING THE TOOL
For best control in close work, grip the multitool like a pencil between your thumb and forefinger. PICTURE 9
13

The "golf" grip method is used for heavier operations such as grinding or cutting. PICTURE 10
Nose Piece
For performing precision tasks a separate nose piece is available. It has a trilobular shape which allows the user to pinch the nose piece comfortably between thumb and forefinger. Its sleek shape has an excellent line of sight for performing detailed etching, carving and engraving work. This nose piece is not included in every kit. PICTURE 11
OPERATING SPEEDS
To select the right speed for each job, use a practice piece of material.
SLIDE "ON/OFF" SWITCH
The tool is switched "ON" by the slide switch located on the top side of the motor housing.
TO TURN THE TOOL "ON", slide the switch button forward. TO TURN THE TOOL "OFF", slide the switch button backward.
HIGH PERFORMANCE MOTOR
Your tool is equipped with a high performance rotary tool motor. This motor expands the versatility of the rotary tool by driving additional Dremel attachments.
ELECTRONIC FEEDBACK
Your tool is equipped with an internal electronic feedback system that provides a “soft start”, which will reduce the stresses that occur from a high torque start. The system also helps to keep the preselected speed virtually constant between no-load and load conditions.
VARIABLE SPEED DIAL
Your tool is equipped with a variable speed dial. The speed may be adjusted during operation by presetting the dial on or between any one of the settings.
The speed of Rotary Tool is controlled by setting this dial on the housing. PICTURE 12
Settings for Approximate Revolutions
Switch Setting |
Speed Range |
|
|
|
|
5 |
5,000 |
RPM |
|
|
|
10 |
10,000 |
RPM |
|
|
|
*15 |
15,000 |
RPM |
20 |
20,000 |
RPM |
25 |
25,000 |
RPM |
30 |
30,000 |
RPM |
35 |
35,000 |
RPM |
|
|
|
* Do not exceed 15,000 RPM when using wire brushes.
Refer to the Speed Settings chart on pages 4-7 to help determine the proper speed for the material being worked on and the accessory to use.
Most jobs can be accomplished using the tool at the highest setting. However, certain materials (some plastics and metals) can be damaged by high-speed generated heat and should be worked on at relatively low speeds. Low speed operation (15,000 RPM or less) is usually best for polishing operations employing the felt polishing accessories. All brushing
applications require lower speeds to avoid wire discharge from the holder. Let the performance of the tool do the work for you when using lower speed settings. Higher speeds are better for hardwoods, metals and glass and for drilling, carving, cutting, routing and shaping.
Some guidelines regarding tool speed:
Ř 3ODVWLF DQG RWKHU PDWHULDOV WKDW PHOW DW ORZ WHPSHUDWXUHV should be cut at low speeds.
Ř 3ROLVKLQJ EXIƂQJ DQG FOHDQLQJ ZLWK D ZLUH EUXVK PXVW EH done at speeds no greater than 15,000 RPM to prevent damage to the brush and your material.
Ř :RRG VKRXOG EH FXW DW KLJK VSHHG
Ř ,URQ RU VWHHO VKRXOG EH FXW DW KLJK VSHHG
Ř ,I D KLJK VSHHG VWHHO FXWWHU VWDUWV WR YLEUDWH LW XVXDOO\ indicates that it is running too slowly.
Ř $OXPLQLXP FRSSHU DOOR\V OHDG DOOR\V ]LQF DOOR\V DQG WLQ may be cut at various speeds, depending on the type of cutting being done. Use a paraffin (not water) or other suitable lubricant on the cutter to prevent the cut material from adhering to the cutter teeth.
NOTE: Increasing pressure on the tool is not the answer when it is not performing properly. Try a different accessory or speed setting to achieve the desired result.
MAINTENANCE
Preventive maintenance performed by unauthorized personnel may result in misplacing of internal wiring and components which could cause serious hazard. We recommend that all tool service be performed by a Dremel Service Facility. To avoid injury from unexpected starting or electrical shock, always remove plug from wall outlet before performing service or cleaning.
|
|
CLEANING |
|
|
TO AVOID ACCIDENTS, ALWAYS |
! |
WARNING |
|
|
|
DISCONNECT THE TOOL AND/OR CHARGER |
|
|
FROM THE POWER SUPPLY BEFORE CLEANING. The tool can be cleaned most effectively with compressed dry air. Always wear safety goggles when cleaning tools with compressed air.
Ventilation openings and switch levers must be kept clean and free of foreign matter. Do not attempt to clean the tool by inserting pointed objects through an opening.
! |
WARNING |
CERTAIN CLEANING AGENTS AND |
|
|
SOLVENTS DAMAGE PLASTIC PARTS. |
|
|
Some of these are: gasoline, carbon tetrachloride, chlorinated cleaning solvents, ammonia and household detergents that contain ammonia.
14
SERVICE AND WARRANTY
! |
WARNING |
NO USER SERVICEABLE PARTS INSIDE. |
|
|
Preventive maintenance performed by |
|
|
unauthorized personnel may result in incorrect connection of internal wiring and components which could cause serious hazard. We recommend that all tool service be performed by a Dremel Service Centre. SERVICEMEN: Disconnect the tool and/or charger from the power source before servicing.
This DREMEL product is guaranteed in accordance with statutory/country-specific regulations; damage due to normal wear and tear, overload or improper handling are excluded from the warranty.
In case of a complaint, send the undismantled tool or charger and proof of purchase to your dealer.
CONTACT DREMEL
For more information on the Dremel product range, support and hotline, go to www.dremel.com.
Dremel Europe, P.O. Box 3267, 4800 DG Breda, The Netherlands
ALLGEMEINE SICHERHEITSHINWEISE
FÜR ELEKTROWERKZEUGE
! WARNUNG LESEN SIE SÄMTLICHE SICHERHEITSHINWEISE UND
ANWEISUNGEN (ABBILDUNG 1)
Die Nichtbeachtung der folgenden Sicherheitshinweise und Anweisungen kann zu elektrischem Schlag, Feuer und/oder schweren Verletzungen führen.
Bewahren Sie alle Sicherheitshinweise und Anweisungen zum künftigen Nachschlagen auf.
Der in den Sicherheitshinweisen verwendete Begriff „Elektrowerkzeug“ bezieht sich auf netzbetriebene Elektrowerkzeuge (kabelgebunden) und auf akkubetriebene Elektrowerkzeuge (kabellos).
SICHERHEIT AM ARBEITSPLATZ
a.Halten Sie Ihren Arbeitsbereich sauber und aufgeräumt.
Unordnung und unbeleuchtete Arbeitsbereiche können zu Unfällen führen.
b.Arbeiten Sie mit dem Gerät nicht in explosionsgefährdeter Umgebung, in der sich brennbare Flüssigkeiten, Gase oder Stäube befinden. Elektrowerkzeuge erzeugen Funken, die den Staub oder die Dämpfe entzünden können.
c.Halten Sie Kinder und andere Personen während der Benutzung des Elektrowerkzeugs fern. Bei Ablenkung können Sie die Kontrolle über das Gerät verlieren.
ELEKTRISCHE SICHERHEIT
a.Der Anschlussstecker des Gerätes muss in die Steckdose passen. Der Stecker darf in keiner Weise verändert
werden. Verwenden Sie keine Adapterstecker gemeinsam mit schutzgeerdeten Geräten. Unveränderte Stecker und passende Steckdosen verringern das Risiko eines elektrischen Schlages.
b.Vermeiden Sie Körperkontakt mit geerdeten Oberflächen wie Rohren, Heizungen, Herden und Kühlschränken. Es besteht ein erhöhtes Risiko durch elektrischen Schlag, wenn Ihr Körper geerdet ist.
c.Halten Sie das Gerät von Regen oder Nässe fern. Das Eindringen von Wasser in ein Elektrogerät erhöht das Risiko eines elektrischen Schlages.
d.Zweckentfremden Sie das Kabel nicht, um das Gerät zu tragen, aufzuhängen oder um den Stecker aus der
Steckdose zu ziehen. Halten Sie das Kabel fern von Hitze, Öl, scharfen Kanten oder sich bewegenden Geräteteilen.
Beschädigte oder verwickelte Kabel erhöhen das Risiko eines elektrischen Schlages.
e.Wenn Sie mit einem Elektrowerkzeug im Freien arbeiten, verwenden Sie nur Verlängerungskabel, die auch für den Außenbereich zugelassen sind. Die Anwendung eines für den Außenbereich geeigneten Verlängerungskabels verringert das Risiko eines elektrischen Schlages.
f.Wenn der Betrieb des Elektrowerkzeuges in feuchter Umgebung nicht vermeidbar ist, verwenden Sie einen Fehlerstromschutzschalter. Der Einsatz eines
Fehlerstromschutzschalters vermindert das Risiko eines elektrischen Schlages.
D
SICHERHEIT VON PERSONEN
a.Seien Sie aufmerksam, achten Sie darauf, was Sie tun und gehen Sie mit Vernunft an die Arbeit mit einem Elektrowerkzeug. Benutzen Sie das Gerät nicht, wenn Sie müde sind oder unter dem Einfluss von Drogen, Alkohol oder
Medikamenten stehen. Ein Moment der Unachtsamkeit bei dem
|
Gebrauch des Gerätes kann zu ernsthaften Verletzungen führen. |
b. |
Tragen Sie persönliche |
|
Schutzausrüstung und immer |
|
eine Schutzbrille. Das Tragen |
|
persönlicher Schutzausrüstung, wie Staubmaske, rutschfeste |
|
Sicherheitsschuhe, Schutzhelm oder Gehörschutz, je nach Art |
|
und Einsatz des Elektrowerkzeuges, verringert das Risiko |
|
von Verletzungen. (ABBILDUNG 2 + 3 + 4) |
c.Vermeiden Sie eine unbeabsichtigte Inbetriebnahme. Vergewissern Sie sich, dass das Elektrowerkzeug ausgeschaltet ist, bevor Sie den Stecker in die Steckdose stecken. Wenn Sie beim Tragen des Gerätes den Finger am Schalter haben oder das eingeschaltete Gerät an die
Stromversorgung anschließen, kann dies zu Unfällen führen.
d.Entfernen Sie Einstellwerkzeuge oder Schraubenschlüssel, bevor Sie das Gerät einschalten. Ein Werkzeug oder Schlüssel, der sich in einem drehenden Geräteteil befindet, kann zu Verletzungen führen.
e.Überschätzen Sie sich nicht. Sorgen Sie für einen sicheren Stand und halten Sie jederzeit das Gleichgewicht. Dadurch können Sie das Gerät in unerwarteten Situationen besser kontrollieren.
f.Tragen Sie geeignete Kleidung. Tragen Sie keine weite Kleidung oder Schmuck. Halten Sie Haare, Kleidung und Handschuhe fern von sich bewegenden Teilen. Lockere
15

Kleidung, Schmuck oder lange Haare können von sich bewegenden Teilen erfasst werden.
g.Wenn Staubabsaugund -auffangeinrichtungen montiert werden können, vergewissern Sie sich, dass diese angeschlossen sind und richtig verwendet werden. Das Verwenden dieser Einrichtungen verringert die Gefährdungen durch Staub.
SORGFÄLTIGER UMGANG MIT UND GEBRAUCH
VON ELEKTROWERKZEUGEN
a.Überlasten Sie das Gerät nicht. Verwenden Sie für Ihre Arbeit das dafür bestimmte Elektrowerkzeug. Mit dem passenden Elektrowerkzeug arbeiten Sie besser und sicherer im angegebenen Leistungsbereich.
b.Benutzen Sie kein Elektrowerkzeug, dessen Schalter defekt ist. Ein Elektrowerkzeug, das sich nicht mehr einoder ausschalten lässt, ist gefährlich und muss repariert werden.
c.Ziehen Sie den Stecker aus der Steckdose, bevor Sie Geräteeinstellungen vornehmen, Zubehörteile wechseln oder das Gerät weglegen. Diese Vorsichtsmaßnahme verhindert den unbeabsichtigten Start des Gerätes.
d.Bewahren Sie Elektrowerkzeuge außerhalb der Reichweite von Kindern auf. Lassen Sie niemanden das Gerät benutzen, der mit diesem nicht vertraut ist oder diese Anweisungen nicht gelesen hat. Elektrowerkzeuge sind gefährlich, wenn sie von unerfahrenen Personen benutzt werden.
e.Pflegen Sie das Gerät mit Sorgfalt. Kontrollieren Sie, ob bewegliche Geräteteile einwandfrei funktionieren und nicht klemmen, ob Teile gebrochen oder so beschädigt sind, dass die Funktion des Gerätes beeinträchtigt ist. Lassen Sie beschädigte Teile vor dem Einsatz des Gerätes reparieren. Viele Unfälle haben ihre Ursache in schlecht gewarteten Elektrowerkzeugen.
f.Halten Sie Schneidwerkzeuge scharf und sauber. Sorgfältig gepflegte Schneidwerkzeuge mit scharfen Schneidkanten verklemmen sich weniger und sind leichter zu führen.
g.Verwenden Sie Elektrowerkzeug, Zubehör, Einsatzwerkzeuge usw. entsprechend diesen Anweisungen und so, wie
es für diesen speziellen Gerätetyp vorgeschrieben ist. Berücksichtigen Sie dabei die Arbeitsbedingungen und die auszuführende Tätigkeit. Der Gebrauch von Elektrowerkzeugen für andere als die vorgesehenen Anwendungen kann zu gefährlichen Situationen führen.
! WARNUNG Bearbeiten Sie kein asbesthaltiges Material (Asbest gilt als krebserregend).
! WARNUNG Treffen Sie Schutzmaßnahmen, wenn beim Arbeiten gesundheitsschädliche,
brennbare oder explosive Stäube entstehen können
(manche Stäube gelten als krebserregend); tragen Sie eine Staubschutzmaske und verwenden Sie, wenn anschließbar, eine Staub-/ Späneabsaugung.
SERVICE
a.Lassen Sie Ihr Gerät nur von qualifiziertem Fachpersonal und nur mit Original-Ersatzteilen reparieren. Damit wird sichergestellt, dass die Sicherheit des Gerätes erhalten bleibt.
GEMEINSAME WARNHINWEISE
FÜR DAS SCHLEIFEN,
SANDPAPIERSCHLEIFEN, ARBEITEN MIT DRAHTBÜRSTEN, POLIEREN ODER TRENNSCHLEIFEN
a.Dieses Elektrowerkzeug ist zu verwenden als Schleifer, Sandpapierschleifer, Drahtbürste, Polierer und Trennschleifmaschine. Beachten Sie alle Warnhinweise, Anweisungen, Darstellungen und Daten, die Sie mit dem Werkzeug erhalten. Wenn Sie die folgenden Anweisungen nicht beachten, kann es zu elektrischem Schlag, Feuer und/ oder schweren Verletzungen kommen.
b.Verwenden Sie kein Zubehör, das vom Hersteller nicht speziell für dieses Elektrowerkzeug vorgesehen und empfohlen wurde. Nur weil Sie das Zubehör an Ihrem Elektrowerkzeug befestigen können, garantiert das keine sichere Verwendung.
c.Die zulässige Drehzahl des Zubehörs muss mindestens so hoch sein wie die auf dem Elektrowerkzeug angegebene Höchstdrehzahl. Zubehör, das sich schneller als zulässig dreht, kann zerstört werden.
d.Außendurchmesser und Dicke des Zubehörs müssen den Maßangaben Ihres Elektrowerkzeugs entsprechen. Falsch bemessenes Zubehör kann nicht ausreichend abgeschirmt oder kontrolliert werden.
e.Schleifscheiben, Flansche, Schleifteller oder anderes Zubehör müssen genau auf die Schleifspindel Ihres Elektrowerkzeugs passen. Zubehör, das nicht genau auf die Schleifspindel des Elektrowerkzeugs passt, dreht sich ungleichmäßig, vibriert sehr stark und kann zum Verlust der Kontrolle führen.
f.Verwenden Sie kein beschädigtes Zubehör. Kontrollieren Sie vor jeder Verwendung Zubehör wie Schleifscheiben auf Absplitterungen und Risse, Schleifteller auf Risse, Verschleiß oder starke Abnutzung, Drahtbürsten auf lose oder gebrochene Drähte. Wenn das Elektrowerkzeug oder
das Zubehör herunterfällt, überprüfen Sie, ob es beschädigt ist, oder verwenden Sie ein unbeschädigtes Zubehör. Wenn Sie das Zubehör kontrolliert und eingesetzt haben, bleiben Sie und in der Nähe befindliche Personen außerhalb der Ebene des rotierenden Zubehörs. Lassen Sie das Werkzeug eine Minute lang mit Höchstdrehzahl laufen. Beschädigtes Zubehör bricht meist in dieser Testzeit.
g.Tragen Sie persönliche Schutzausrüstung. Verwenden Sie je nach Anwendung Vollgesichtsschutz, Augenschutz oder Schutzbrille. Soweit angemessen, tragen Sie Staubmaske, Gehörschutz, Schutzhandschuhe oder Spezialschürze, die kleine Schleifund Materialpartikel von Ihnen fernhält. Die Augen sollen vor herumfliegenden Fremdkörpern geschützt werden, die bei verschiedenen Anwendungen entstehen.
Stauboder Atemschutzmaske müssen den bei der Anwendung entstehenden Staub filtern. Wenn Sie lange lautem Lärm ausgesetzt sind, können Sie einen Hörverlust erleiden.
h.Achten Sie bei anderen Personen auf sicheren Abstand zu Ihrem Arbeitsbereich. Jeder, der den Arbeitsbereich betritt, muss persönliche Schutzausrüstung tragen. Bruchstücke des Werkstücks oder gebrochenes Zubehör können wegfliegen und Verletzungen auch außerhalb des direkten Arbeitsbereichs verursachen.
16

i.Fassen Sie das Elektrowerkzeug nur an den isolierten Griffflächen an, wenn Sie Arbeiten ausführen, bei denen das Zubehör verborgene Stromleitungen oder das eigene Netzkabel treffen kann. Kontakt mit einer spannungsführenden Leitung setzt auch Metallteile des Elektrowerkzeuges unter Spannung und führt zu einem elektrischen Schlag.
j.Halten Sie das Netzkabel von rotierendem Zubehör fern.
Wenn Sie die Kontrolle über das Werkzeug verlieren, kann das Netzkabel durchtrennt oder erfasst werden und Ihre Hand oder Ihr Arm in das rotierende Zubehör geraten.
k.Legen Sie das Elektrowerkzeug niemals ab, bevor das Zubehör völlig zum Stillstand gekommen ist. Das rotierende Zubehör kann in Kontakt mit der Ablagefläche geraten, wodurch Sie die Kontrolle über das Elektrowerkzeug verlieren können.
l.Lassen Sie das Elektrowerkzeug nicht laufen, während Sie es tragen. Ihre Kleidung kann durch zufälligen Kontakt mit dem rotierenden Zubehör erfasst werden, und das Zubehör sich in Ihren Körper bohren.
m.Reinigen Sie regelmäßig die Lüftungsschlitze Ihres Elektrowerkzeugs. Das Motorgebläse zieht Staub in das Gehäuse, und eine starke Ansammlung von Metallstaub kann elektrische Gefahren verursachen.
n.Verwenden Sie das Elektrowerkzeug nicht in der Nähe brennbarer Materialien. Funken können diese Materialien entzünden.
o.Verwenden Sie kein Zubehör, das flüssige Kühlmittel erfordern. Die Verwendung von Wasser oder anderen flüssigen Kühlmitteln kann zu einem elektrischen Schlag führen.
RÜCKSCHLAG UND ENTSPRECHENDE
WARNHINWEISE
Rückschlag ist die plötzliche Reaktion infolge eines hakenden oder blockierten drehenden Zubehörs, wie Schleifscheibe, Schleifteller, Drahtbürste usw. Verhaken oder Blockieren führt zu einem abrupten Stopp des rotierenden Zubehörs. Dadurch wird ein unkontrolliertes Elektrowerkzeug gegen die Drehrichtung des Zubehörs an der Blockierstelle beschleunigt. Wenn z. B. eine Schleifscheibe im Werkstück hakt oder blockiert, kann sich die Kante der Schleifscheibe, die in das Werkstück eintaucht, verfangen und dadurch die Schleifscheibe ausbrechen oder einen Rückschlag verursachen. Die Schleifscheibe bewegt
sich dann auf die Bedienperson zu oder von ihr weg, je nach Drehrichtung der Scheibe an der Blockierstelle. Hierbei können Schleifscheiben auch brechen. Ein Rückschlag ist die Folge eines falschen oder fehlerhaften Gebrauchs des Elektrowerkzeugs. Er kann durch geeignete Vorsichtsmaßnahmen, wie nachfolgend beschrieben, verhindert werden.
a.Halten Sie das Elektrowerkzeug gut fest und bringen Sie Ihren Körper und Ihre Arme in eine Position, in der Sie die Rückschlagkräfte abfangen können. Verwenden Sie immer den Zusatzgriff, falls vorhanden, um die größtmögliche Kontrolle über Rückschlagkräfte oder Reaktionsmomente beim Hochlauf zu haben. Die Bedienperson kann durch geeignete Vorsichtsmaßnahmen die Rückschlagund Reaktionskräfte beherrschen.
b.Bringen Sie Ihre Hand nie in die Nähe rotierender Zubehöre. Das Zubehör kann sich beim Rückschlag über Ihre Hand bewegen.
c.Meiden Sie mit Ihrem Körper den Bereich, in den das Elektrowerkzeug bei einem Rückschlag bewegt wird. Der Rückschlag treibt das Elektrowerkzeug in die Richtung entgegengesetzt zur Bewegung der Schleifscheibe an der Blockierstelle.
d.Arbeiten Sie besonders vorsichtig im Bereich von Ecken, scharfen Kanten usw. Verhindern Sie, dass Zubehöre vom Werkstück zurückprallen und verklemmen. Das rotierende Zubehör neigt bei Ecken, scharfen Kanten oder wenn es abprallt dazu, sich zu verklemmen. Dies verursacht einen Kontrollverlust oder Rückschlag.
e.Verwenden Sie kein Kettenoder gezähntes Sägeblatt.
Solche Zubehöre verursachen häufig einen Rückschlag oder den Verlust der Kontrolle über das Elektrowerkzeug.
BESONDERE WARNHINWEISE ZUM SCHLEIFEN
UND TRENNSCHLEIFEN
a.Verwenden Sie ausschließlich die für Ihr Elektrowerkzeug zugelassenen Schleifkörper und die für diese Schleifkörper vorgesehene Schutzhaube. Schleifkörper, die nicht für
das Elektrowerkzeug vorgesehen sind, können nicht ausreichend abgeschirmt werden und sind unsicher.
b.Schleifkörper dürfen nur für die empfohlenen Einsatzmöglichkeiten verwendet werden. Z. B.: Schleifen Sie nie mit der Seitenfläche einer Trennscheibe. Trennscheiben sind
zum Materialabtrag mit der Scheibenkante bestimmt. Seitliche Krafteinwirkung auf diese Schleifkörper kann sie zerbrechen.
c.Verwenden Sie immer unbeschädigte Spannflansche in der richtigen Größe und Form für die von Ihnen gewählte Schleifscheibe. Geeignete Flansche stützen die Schleifscheibe und verringern so die Gefahr eines Schleifscheibenbruchs. Flansche für Trennscheiben können sich von den Flanschen für andere Schleifscheiben unterscheiden.
d.Verwenden Sie keine abgenutzten Schleifscheiben von größeren Elektrowerkzeugen. Schleifscheiben für größere Elektrowerkzeuge sind nicht für die höheren Drehzahlen von kleineren Elektrowerkzeugen ausgelegt und können brechen.
WEITERE BESONDERE WARNHINWEISE
ZUM TRENNSCHLEIFEN
a.Vermeiden Sie ein Blockieren der Trennscheibe oder zu hohen Anpressdruck. Führen Sie keine übermäßig tiefen Schnitte aus.
Eine Überlastung der Trennscheibe erhöht deren Beanspruchung und die Anfälligkeit zum Verkanten oder Blockieren und damit die Möglichkeit eines Rückschlags oder Schleifkörperbruchs.
b.Meiden Sie den Bereich vor und hinter der rotierenden Trennscheibe. Wenn Sie die Trennscheibe im Werkstück von sich wegbewegen, kann im Falle eines Rückschlags das Elektrowerkzeug mit der rotierenden Scheibe direkt auf Sie zugeschleudert werden.
c.Falls die Trennscheibe verklemmt oder Sie die Arbeit unterbrechen, schalten Sie das Elektrowerkzeug aus und halten Sie es ruhig, bis die Scheibe zum Stillstand gekommen ist. Versuchen Sie nie, die noch laufende Trennscheibe aus dem Schnitt zu ziehen, sonst kann ein Rückschlag erfolgen.
Ermitteln und beheben Sie die Ursache für das Verklemmen.
d.Schalten Sie das Elektrowerkzeug nicht wieder ein, solange es sich im Werkstück befindet. Lassen Sie die
17

Trennscheibe erst ihre volle Drehzahl erreichen, bevor Sie den Schnitt vorsichtig fortsetzen. Anderenfalls kann die Scheibe verhaken, aus dem Werkstück springen oder einen Rückschlag verursachen.
e.Stützen Sie Platten oder große Werkstücke ab, um das Risiko eines Rückschlags durch eine eingeklemmte Trennscheibe zu vermindern. Große Werkstücke können sich unter ihrem eigenen Gewicht durchbiegen. Das Werkstück muss auf beiden Seiten abgestützt werden, und zwar sowohl in der Nähe des Trennschnitts als auch an der Kante.
f.Seien Sie besonders vorsichtig bei „Taschenschnitten“ in bestehende Wände oder andere nicht einsehbare Bereiche.
Die eintauchende Trennscheibe kann beim Schneiden in Gasoder Wasserleitungen, elektrische Leitungen oder andere Objekte einen Rückschlag verursachen.
BESONDERE WARNHINWEISE ZUM
ARBEITEN MIT DRAHTBÜRSTEN
a.Beachten Sie, dass die Drahtbürste auch während des üblichen Gebrauchs Drahtstücke verliert. Überlasten Sie die Drähte nicht durch zu hohen Anpressdruck. Wegfliegende Drahtstücke können sehr leicht durch dünne Kleidung und/ oder die Haut dringen.
b.Wird eine Schutzhaube empfohlen, verhindern Sie, dass sich Schutzhaube und Drahtbürste berühren können.
Tellerund Topfbürsten können durch Anpressdruck und Zentrifugalkräfte ihren Durchmesser vergrößern.
c.Bei der Verwendung von Drahtbürsten dürfen 15.000 U/min nicht überschritten werden.
UMGEBUNG
ENTSORGUNG
Elektrowerkzeuge, Zubehöre und Verpackungen sollen einer umweltgerechten Wiederverwertung zugeführt werden.
NUR FÜR EU-LÄNDER
Werfen Sie Elektrowerkzeuge nicht in den Hausmüll! Gemäß der Europäischen Richtlinie 2002/96/EG über Elektround Elektronik-Altgeräte und ihrer Umsetzung in nationales Recht müssen nicht mehr gebrauchsfähige Elektrowerkzeuge getrennt gesammelt und einer umweltgerechten Wiederverwertung zugeführt werden.
SPEZIFIKATIONEN
ALLGEMEINE SPEZIFIKATIONEN
Spannung . . . . . . . . . . . . . . . . 230-240 V, 50-60 Hz Nennaufnahme . . . . . . . . . . . . . 175 W Nenndrehzahl (n) . . . . . . . . . . . 35.000 U/min
Spannzangen für . . . . . . . . . . . 0,8 mm, 1,6 mm, 2,4 mm, 3,2 mm
 Klasse-II-Ausführung. . . . . . . Doppelt isolierte Geräte (ABBILDUNG 5)
VERLÄNGERUNGSKABEL
Verwenden Sie nur vollständig abgewickelte und unbeschädigte Verlängerungskabel mit einer Kapazität von mindestens 5 A.
MONTAGE
ZIEHEN SIE DEN STECKER DES MULTITOOL IMMER AB, BEVOR SIE DIE ZUBEHÖRTEILE ODER SPANNZANGEN WECHSELN ODER SERVICEARBEITEN AM WERKZEUG DURCHFÜHREN.
ALLGEMEIN
Dremel Multitool ist ein hochpräzises Werkzeug für besonders feine und detaillierte Arbeiten. Das breite Spektrum der Dremel Zubehörteile und Vorsatzgeräte bietet Ihnen eine große Vielzahl von Anwendungen. Hierzu gehört beispielsweise Schleifen, Schnitzen, Gravieren, Fräsen, Schneiden/Trennen, Reinigen/Säubern und Polieren.
ABBILDUNG 6
A.Spindelarretierung
B.Ein/Aus-Schalter
C.Einstellrad für stufenlose Drehzahl
D.Netzanschlussleitung
E.Aufhängevorrichtung
F.Lüftungsschlitze
G.Spannzangenschlüssel
H.Spindel
I.Gehäusekappe
J.Spannmutter
K.Spannzange
SPANNZANGEN
Dremel Multitool Zubehörteile haben unterschiedliche Schaftdurchmesser. Für diese unterschiedlichen Durchmesser stehen vier Spannzangen zur Verfügung. Die Größe der Spannzange ist jeweils an den Ringen auf der Rückseite der Spannzange erkennbar.
ABBILDUNG 7
A.Spannmutter
B.3,2 mm Spannzange ohne Ring (480)
C.2,4 mm Spannzange mit drei Ringen (481)
D.1,6 mm Spannzange mit zwei Ringen (482)
E.0,8 mm Spannzange mit einem Ring (483)
F.Kennzeichnungsringe
HINWEIS: Manche Multitool Kits enthalten nicht alle vier Spannzangen. Spannzangen sind separat als Zubehör erhältlich.
Verwenden Sie stets die für den Schaftdurchmesser des Zubehörteils passende Spannzange. Drücken Sie einen Schaft mit einem größeren Durchmesser niemals gewaltsam in eine kleinere Spannzange.
18

WECHSELN VON SPANNZANGEN
ABBILDUNG 8
A.Spannzangenschlüssel
B.Spindelarretierung
C.Spannmutter
D.Lösen
E.Anziehen
1.Drücken Sie den Spindelarretierungsknopf, halten Sie ihn gedrückt und drehen Sie den Schaft von Hand, bis er blockiert. Betätigen Sie die Spindelarretierung nie bei laufendem Werkzeug.
2.Lösen Sie bei gedrücktem Spindelarretierungsknopf die Spannmutter und nehmen Sie sie ab. Verwenden Sie ggf. den Spannzangenschlüssel.
3.Ziehen Sie die Spannzange von der Spindel ab.
4.Setzen Sie die Spannzange der gewünschten Größe vollständig in die Spindel ein und ziehen Sie die Spannmutter leicht an. Ziehen Sie die Mutter nie vollständig fest, wenn kein Zubehörteil eingesetzt ist.
WECHSELN VON ZUBEHÖRTEILEN
ABBILDUNG 8
1.Drücken Sie den Spindelarretierungsknopf und drehen Sie den Schaft von Hand, bis er blockiert. Betätigen Sie die Spindelarretierung nie bei laufendem Werkzeug.
2.Lösen Sie bei gedrücktem Spindelarretierungsknopf die Spannmutter ohne sie abzunehmen. Verwenden Sie ggf. den Spannzangenschlüssel.
3.Schieben Sie den Schaft des Zubehörteils vollständig in die Spannzange.
4.Ziehen Sie die Spannmutter bei betätigter Spindelarretierung mit der Hand an, bis die Spannzange den Schaft des Zubehörteils greift.
HINWEIS: Beachten Sie unbedingt auch die Bedienungsund Sicherheitshinweise des jeweiligen Zubehörteils!
Verwenden Sie nur Dremel-geprüfte Hochleistungs-Zubehör- komponenten.
AUSWUCHTEN VON ZUBEHÖRTEILEN
Für Präzisionsarbeiten ist es wichtig, dass alle Zubehörteile gut ausgewuchtet sind (wie auch beim Reifen Ihres Autos). Lösen Sie zum Ausrichten bzw. Auswuchten eines Zubehörteils die Spannmutter leicht, und drehen Sie das Zubehörteil bzw. die Spannzange eine Viertelumdrehung. Ziehen Sie die Spannmutter wieder an, und schalten Sie das Dremel Multitool ein. Am Geräusch und der Handhabung sollten Sie feststellen können, ob das Zubehörteil noch eine Unwucht hat. Wiederholen Sie die Ausrichtung auf diese Weise, bis die geringste Unwucht vorliegt.
ERSTE SCHRITTE
VERWENDUNG
Als ersten Schritt für die Verwendung des Multitool sollten Sie ein Gefühl für das Werkzeug bekommen. Nehmen Sie das Werkzeug in die Hand und machen Sie sich mit seinem Gewicht und Schwerpunkt vertraut. Beachten Sie die Verjüngung des Gehäuses, durch die sich das Werkzeug wie ein Füllfederhalter oder Bleistift halten lässt.
Halten Sie das Werkzeug stets von Ihrem Gesicht abgewandt und tragen Sie immer eine Schutzbrille. Teile von beschädigtem Zubehör könnten sich beim Erreichen hoher Drehzahlen unter Umständen lösen.
Halten Sie das Werkzeug so, dass Sie die Lüftungsschlitze nicht mit der Hand abdecken. Durch Blockieren der Lüftungsschlitze könnte der Motor überhitzen.
WICHTIG! Üben Sie zunächst mit etwas Abfallmaterial, um ein Gefühl dafür zu bekommen, wie sich das Werkzeug bei hoher Drehzahl verhält. Denken Sie daran, dass Ihr Multitool die besten Ergebnisse liefert, wenn Sie die richtige Drehzahl sowie geeignete Zubehörteile und Vorsatzgeräte verwenden. Arbeiten Sie ohne Druck. Durch die hohe Rotationsgeschwindigkeit ist es ausreichend, das Multitool nur leicht über die Oberfläche des Werkstücks zu führen.
Normalerweise erzielen Sie bessere Ergebnisse, wenn Sie mit dem Werkzeug mehrmals über die Oberfläche fahren, als mit einem einzigen Arbeitsgang. Außerdem haben Sie bei drucklosem Arbeiten eine bessere Kontrolle und verringern das Fehlerrisiko.
HALTEN DES WERKZEUGS
Detailarbeiten können Sie am besten verrichten, wenn Sie das Multitool wie einen Stift zwischen Daumen und Zeigefinger halten. ABBILDUNG 9
Die "Golfgriff"-Methode wird für schwerere Arbeiten wie Schleifen oder Schneiden/Trennen angewendet. ABBILDUNG 10
Nasenstück
Für Präzisionsarbeiten ist ein separates Nasenstück erhältlich. Dieses hat eine dreilappige Form, durch die sich das Nasenstück bequem zwischen Daumen und Zeigefinger zusammendrücken lässt. Die glatte Form ermöglicht eine ausgezeichnete Sichtlinie für genaues Arbeiten beim Radieren, Schnitzen und Gravieren. Das Nasenstück ist nicht in jedem Kit enthalten. ABBILDUNG 11
BETRIEBSGESCHWINDIGKEIT
Verwenden Sie ein Übungswerkstück, um die richtige Drehzahl für die einzelnen Arbeiten zu wählen.
„EIN/AUS“-SCHIEBESCHALTER
Das Werkzeug wird mit dem Schiebeschalter an der Oberseite des Motorgehäuses „EIN“ geschaltet.
ZUM „EIN“-SCHALTEN DES WERKZEUGS schieben Sie den Schalter nach vorne.
ZUM „AUS“-SCHALTEN DES WERKZEUGS schieben Sie den Schalter nach hinten.
19

HOCHLEISTUNGSMOTOR
Ihr Werkzeug ist mit einem Dremel Multitool-Hochleistungsmotor ausgestattet. Dieser Motor erweitert die Vielseitigkeit des Dremel Multitools, indem er zusätzliche Dremel Vorsatzgeräte antreiben kann.
ELEKTRONISCHE DREHZAHLREGELUNG
Ihr Werkzeug ist mit einem internen elektronischen Drehzahlregelungssystem ausgestattet, das einen „Sanftanlauf“ gewährleistet und die Belastung bei einem Anlauf mit großem Drehmoment verringert. Das System dient außerdem dazu, die vorgewählte Drehzahl in Situationen mit und ohne Last nahezu konstant zu halten.
EINSTELLRAD FÜR STUFENLOSE DREHZAHL
Das Elektrowerkzeug ist mit einem Einstellrad für die stufenlose Drehzahlregelung ausgestattet. Die Drehzahl kann während
des Betriebs durch Voreinstellung des Einstellrades auf oder zwischen eine der Schalterstellungen verstellt werden.
Die Drehzahl des Dremel Multitools wird über dieses Einstellrad am Gehäuse geregelt. ABBILDUNG 12
Stellungen für ungefähre Drehzahlen
Schalterstellung |
Drehzahlbereich |
|
5 |
5.000 |
U/min |
10 |
10.000 |
U/min |
|
|
|
*15 |
15.000 |
U/min |
|
|
|
20 |
20.000 |
U/min |
|
|
|
25 |
25.000 |
U/min |
|
|
|
30 |
30.000 |
U/min |
|
|
|
35 |
35.000 |
U/min |
*Bei der Verwendung von Drahtbürsten dürfen 15.000 U/min nicht überschritten werden.
Die den einzelnen Stufen entsprechende Drehzahl finden Sie im Diagramm auf den Seiten 4-7. So können Sie die jeweils optimale Drehzahl für Zubehör und Material ermitteln.
Die meisten Aufgaben können mit der höchsten Drehzahleinstellung des Werkzeugs erledigt werden. Einige Materialien (bestimmte Kunststoffe und Metalle) können jedoch durch die bei hoher Drehzahl erzeugte Hitze beschädigt werden und sollten daher mit niedrigerer Drehzahl bearbeitet werden. Niedrige Drehzahlen (15.000 U/Min. oder weniger) eignen sich normalerweise am Besten zum Polieren mit Filz-Polierzubehör. Bei allen Anwendungen mit Bürsten sind niedrigere Drehzahlen erforderlich, um ein Lösen der Drähte und Borsten aus der Halterung zu vermeiden. Auch bei niedrigen Drehzahlen sollten Sie ohne Druck arbeiten. Höhere Drehzahlen eignen sich
für Hartholz, Metall und Glas sowie zum Bohren, Schnitzen, Schneiden, Fräsen, Formen, Kehlen und Nuten in Holz.
Einige die Drehzahl betreffende Hinweise:
Ř .XQVWVWRIIH XQG DQGHUH :HUNVWRIIH PLW QLHGULJHP
Schmelzpunkt sind mit niedrigen Drehzahlen zu bearbeiten.
Ř 'DV 3ROLHUHQ *ODQ]VFKOHLIHQ XQG 5HLQLJHQ PLW HLQHU
Drahtbürste muss bei Drehzahlen von maximal 15.000 U/ Min erfolgen, um einer Beschädigung der Bürste und des Materials vorzubeugen.
Ř 6FKQHLGDUEHLWHQ LQ +RO] P¾VVHQ PLW KRKHU 'UHK]DKO HUIROJHQ Ř 6FKQHLGDUEHLWHQ LQ (LVHQ RGHU 6WDKO P¾VVHQ PLW KRKHU
Drehzahl erfolgen.
Ř :HQQ HLQ +RFKJHVFKZLQGLJNHLWV 6WDKOIU¦VHU ]X YLEULHUHQ beginnt, so ist das meist ein Hinweis darauf, dass er zu langsam läuft.
Ř $OXPLQLXP .XSIHU %OHL =LQNOHJLHUXQJHQ XQG =LQQ N¸QQHQ je nach Art der Arbeit mit unterschiedlichen Drehzahlen bearbeitet werden. Fetten Sie das Schneidwerkzeug mit Paraffin oder einem anderen geeigneten Schmiermittel (nicht Wasser) ein, um zu verhindern, dass sich Späne an den Schneidkanten des Werkzeugs festsetzen.
HINWEIS: Ein höherer Druck auf das Werkzeug wird das Ergebnis nicht verbessern. Verwenden Sie ein anderes Zubehörteil oder eine andere Drehzahleinstellung, um das gewünschte Ergebnis zu erzielen.
WARTUNG
Um Beschädigungen und/oder Risiken vorzubeugen, sollten Wartungsund Reparaturarbeiten ausschließlich durch autorisierte Personen erfolgen. Wir empfehlen, Wartung und Reparatur
von Dremel-Serviceniederlassungen durchführen zu lassen. Auf jeden Fall ist aus Sicherheitsgründen vor Wartungsund Reinigungsarbeiten immer der Netzstecker zu ziehen.
|
|
REINIGUNG |
|
|
UM UNFÄLLE ZU VERMEIDEN, TRENNEN |
! |
WARNUNG |
|
|
|
SIE DAS WERKZEUG BZW. DAS LADEGERÄT |
|
|
VOR DEM REINIGEN STETS VOM STROMNETZ. Zur Reinigung des Werkzeuges ist Druckluft am besten geeignet. Tragen Sie stets eine Schutzbrille, wenn Sie Werkzeuge mit Druckluft reinigen.
Die Lüftungsschlitze und Schalter müssen stets sauber und frei von Fremdkörpern gehalten werden. Versuchen Sie nicht, das Werkzeug zu reinigen, indem Sie spitze Gegenstände durch eine Öffnung einführen.
! WARNUNG BESTIMMTE REINIGUNGSUND LÖSEMITTEL KÖNNEN KUNSTSTOFFTEILE
ANGREIFEN. Hierzu gehören: Benzin, Tetrachlorkohlenstoff, chlorhaltige Reinigungsmittel, Ammoniak und ammoniakhaltige Haushaltsreiniger.
SERVICE UND GEWÄHRLEISTUNG
! WARNUNG IM INNEREN BEFINDEN SICH KEINE VOM BENUTZER ZU WARTENDEN TEILE.
Vorbeugende Wartung, die von nicht autorisiertem Personal durchgeführt wird, kann zu einer falschen Anbringung der internen Verdrahtung und Komponenten und dadurch zu schwerwiegenden Gefährdungen führen. Es wird empfohlen,
20
Wartungsarbeiten an dem Werkzeug von einer DremelServiceniederlassung durchführen zu lassen. WARTUNGSTECHNIKER: Trennen Sie vor Wartungsarbeiten das Werkzeug bzw. das Ladegerät von der Stromquelle.
Die Garantie für dieses DREMEL-Produkt entspricht den länderspezifischen gesetzlichen Regelungen. Schäden, die auf normale Abnutzung, Überlastung oder unsachgemäße Behandlung zurückzuführen sind, bleiben von der Garantie ausgeschlossen.
Senden Sie das Werkzeug bzw. das Ladegerät im Falle einer Beanstandung zusammen mit dem Kaufbeleg unzerlegt an Ihren Händler.
DREMEL KONTAKTINFORMATIONEN
Weitere Informationen über das Produktsortiment von Dremel sowie zu Support und Hotline finden Sie unter www.dremel.com.
Dremel Europe, P.O. Box 3267, 4800 DG Breda, Die Niederlande
AVERTISSEMENTS DE SÉCURITÉ GÉNÉRAUX CONCERNANT LES OUTILS ÉLECTROPORTATIFS
! ATTENTION LIRE L'ENSEMBLE DES CONSIGNES ET
AVERTISSEMENTS DE SÉCURITÉ. (ILLUSTRATION 1)
Le non-respect de ces avertissements et de ces consignes peut entraîner un choc électrique, un incendie et/ou des blessures corporelles graves.
Conservez l'ensemble de ces avertissements et de ces instructions à des fins de référence future.
Le terme "outil électroportatif" mentionné dans tous les avertissements fait référence à un outil électroportatif branché sur le secteur (avec cordon électrique) ou sur batterie (sans fil).
SÉCURITÉ DE LA ZONE DE TRAVAIL
a.Faites en sorte que la zone de travail soit propre et bien éclairée. Un espace encombré et sombre est propice aux accidents.
b.Ne faites pas fonctionner des outils électroportatifs dans les atmosphères explosives, notamment en présence de liquides, gaz ou poussières inflammables. Les outils électroportatifs produisent des étincelles susceptibles d’enflammer les poussières ou fumées.
c.Tenez les enfants et spectateurs à distance pendant le fonctionnement d’un outil électroportatif. Toute distraction peut entraîner une perte de contrôle de l’outil.
SECURITE ELECTRIQUE
a.La fiche de l’outil électroportatif doit être appropriée à la prise de courant. Ne modifiez en aucune circonstance la fiche. N’employez pas d’adaptateur avec les outils électroportatifs mis à la terre. L’utilisation de fiches non modifiées et de prises appropriées réduira le risque de choc électrique.
b Evitez tout contact corporel avec des éléments reliés à la terre, tels que tuyauterie, radiateurs, cuisinières, réfrigérateurs. La mise à la terre du corps accroît le risque de choc électrique.
c.Conservez les outils électroportatifs à l’abri de la pluie et de l’humidité. La pénétration d’eau dans un outil électroportatif accroît le risque de choc électrique.
d.N’exercez aucune action dommageable sur le cordon d’alimentation. Ne jamais utiliser le cordon d’alimentation pour transporter ou débrancher l’outil électroportatif. Eloignez le cordon d’alimentation de la chaleur, des huiles, des arêtes vives ou des pièces en mouvement. Les cordons endommagés ou emmêlés accroissent le risque de choc électrique.
e.Lors de l’utilisation d’un outil électroportatif à l’extérieur, employez une rallonge appropriée. L’utilisation d’un cordon conçu pour l’extérieur réduit le risque de choc électrique.
f.Si l’usage d’un outil dans un emplacement humide est inévitable, utilisez un disjoncteur de fuite à la terre.
L’utilisation d’un disjoncteur de fuite à la terre réduit le risque de choc électrique.
SECURITE PERSONNELLE
a. |
Restez vigilant et attentif à ce que vous faites et faites |
F |
|
preuve de bon sens lorsque vous utilisez un outil |
|
|
électroportatif. Ne vous servez pas de ce type d’outil |
|
|
lorsque vous êtes fatigué ou sous l’emprise d’une drogue |
|
|
quelconque, de l’alcool ou d’un médicament. Un instant |
|
|
d’inattention risque, dans ce cas, d’entraîner des blessures |
|
|
corporelles graves. |
|
b. |
Utilisez des équipements de |
|
|
protection. Portez toujours un |
|
|
équipement de protection |
|
|
oculaire. Les équipements de protection tels que masque |
|
|
anti-poussière, chaussures de sécurité antidérapantes, |
|
|
casque ou protection auditive employés dans les cas |
|
|
appropriés réduiront les blessures corporelles. |
|
|
(ILLUSTRATION 2 + 3 + 4) |
|
c.Evitez tout démarrage accidentel. Assurez-vous que l’interrupteur est en position Arrêt avant de brancher la fiche. Le fait de transporter les outils électroportatifs en ayant le doigt sur l’interrupteur ou de brancher des outils avec l’interrupteur sur la position Marche constitue une situation propice aux accidents.
d.Retirez toute clé de réglage avant de mettre l’outil sous tension. Une clé laissée au contact d’un élément en rotation de l’outil électroportatif peut entraîner des blessures corporelles.
e.Ne travaillez pas dans une position instable. Conservez à tout moment un bon appui et un bon équilibre du corps. Vous serez ainsi plus en mesure de garder le contrôle de l’outil électroportatif dans les situations imprévues.
f.Ayez une tenue appropriée. Ne portez pas de vêtements amples ni de bijoux. N’approchez jamais les cheveux, vêtements ou gants, de pièces en mouvement. Des vêtements amples, bijoux ou cheveux longs peuvent être happés par des pièces en mouvement.
g.En présence de dispositifs pour l’aspiration et la collecte des poussières, vérifiez que ceux-ci sont branchés et correctement employés. L’utilisation de ces appareils peut réduire les risques liés à la poussière.
21

PRECAUTIONS D’UTILISATION DE L’OUTIL
ELECTROPORTATIF
a.Ne forcez pas sur l’outil électroportatif. Employez l’outil correspondant à votre application. L’outil électroportatif approprié accomplira sa tâche plus efficacement et plus sûrement s’il est utilisé à la vitesse pour laquelle il a été conçu.
b.N’utilisez pas l’outil électroportatif si l’interrupteur ne fonctionne pas correctement. Un outil dont l’interrupteur est défectueux est dangereux et doit être réparé.
c.Débranchez l’outil de la prise électrique murale avant d’effectuer un réglage, de changer d’accessoire ou de ranger l’outil. Ces précautions réduisent le risque d’un démarrage accidentel de l’outil.
d.Les outils électroportatifs doivent être rangés hors de portée des enfants et ne pas être utilisés par des personnes ne connaissant pas leur fonctionnement ou les présentes instructions. Entre les mains d’utilisateurs inexpérimentés, les outils électroportatifs sont dangereux.
e.Entretenez les outils électroportatifs. Vérifiez la présence d’un défaut d’alignement ou grippage des pièces mobiles, de pièces cassées ou de toute autre condition pouvant altérer le fonctionnement des outils électroportatifs. Faites réparer un outil électroportatif endommagé avant de l’utiliser. Nombre d’accidents sont provoqués par des outils électroportatifs mal entretenus.
f.Les outils de coupe doivent être affûtés et propres. S’ils sont bien entretenus, les outils avec des arêtes de coupe affûtées sont moins susceptibles d’accrocher et sont plus faciles à contrôler.
g.Utilisez l’outil électroportatif, ses accessoires et embouts, etc. conformément aux présentes instructions, en particulier en tenant compte des conditions de travail et de la nature du travail à réaliser. L’utilisation de l’outil électroportatif pour d’autres applications que celles prévues présente un risque.
! ATTENTION Ne pas travailler de matériaux contenant de l'amiante (l'amiante est
considérée comme étant cancérigène).
! ATTENTION Prenez des mesures de sécurité lorsque des poussières nuisibles à la santé,
inflammables ou explosives peuvent être générées lors du travail (certaines poussières sont considérées comme étant cancérigènes); portez un masque anti-poussières et utilisez un dispositif d'aspiration de poussières/de copeaux s'il est possible de raccorder un tel dispositif.
REPARATION
a.Confiez la réparation de votre outil électroportatif à un réparateur qualifié qui utilise exclusivement des pièces de rechange identiques. Vous garantirez ainsi la fiabilité de l’outil électroportatif.
AVERTISSEMENTS DE SÉCURITÉ COMMUNS POUR LE MEULAGE, LE PONÇAGE, LE BROSSAGE MÉTALLIQUE, LE POLISSAGE ET LA DÉCOUPE À LA MEULE ABRASIVE
a.Cet outil électroportatif est à utiliser en tant que meuleuse, ponceuse au papier de verre, brosse métallique, polisseuse et en tant qu’outil de tronçonnage. Respecter tous les avertissements, instructions, représentations et données qui sont fournis avec l’outil électroportatif. Un non-respect des instructions suivantes peut entraîner un choc électrique et / ou de graves blessures.
b.Ne pas utiliser des accessoires qui ne sont pas spécialement prévus et recommandés par le fabricant pour cet outil électroportatif. Le fait de pouvoir monter les accessoires sur votre outil électroportatif ne garantit pas une utilisation en toute sécurité.
c.La vitesse de rotation admissible de l’accessoire doit être au moins égale à la vitesse de rotation maximale de l’outil électroportatif. Les accessoires qui tournent à une vitesse de rotation supérieure à celle qui est admise risquent d’être détruits.
d.Le diamètre extérieur et la largeur de l’accessoire doivent correspondre aux cotes de votre outil électroportatif. Les accessoires de mauvaises dimensions ne peuvent pas être protégés ni contrôlés de façon suffisante.
e.Les meules, les brides, les plateaux de ponçage ou les autres accessoires doivent correspondre exactement à la broche de votre outil électroportatif. Les accessoires qui ne correspondent pas exactement à la broche de l’outil électroportatif tournent de façon irrégulière, ont de fortes vibrations et peuvent entraîner une perte de contrôle.
f.Ne pas utiliser des accessoires endommagés. Avant chaque utilisation, contrôler les accessoires tels que meules pour détecter des éclats et des fissures, les plateaux de ponçage pour détecter des fissures, une certaine usure ou des signes de forte usure, les brosses métalliques pour détecter des fils détachés ou cassés. Au cas où l’outil électroportatif ou l’accessoire tomberait, contrôler s’il est endommagé ou utiliser un accessoire intact. Après avoir contrôlé et monté l’accessoire, l'utilisateur et les personnes se trouvant à proximité doivent se tenir à distance de l'outil électroportatif et de l'accessoire. Ensuite, laisser tourner l’outil électroportatif à la vitesse maximale pendant une minute.
Dans la plupart des cas, les accessoires endommagés cassent pendant ce temps d’essai.
g.Porter des équipements de protection personnels. Selon l’utilisation, porter une protection complète pour le visage, une protection oculaire ou des lunettes de protection. Si nécessaire, porter un masque anti-poussière, une protection acoustique, des gants de protection ou un tablier spécial qui vous protège de petites particules de matériau causées par le meulage. Protéger vos yeux de corps étrangers projetés dans l’air lors des différentes utilisations. Les masques anti-poussière ou les masques respiratoires doivent filtrer la poussière générée lors de l’utilisation. Une exposition trop longue au bruit fort peut entraîner une perte d’audition.
22

h.Garder une distance de sécurité suffisante entre votre zone de travail et les personnes se trouvant à proximité. Toute personne entrant dans la zone de travail doit porter un équipement de protection individuel. Des fragments de pièces ou d’accessoires cassés peuvent être projetés et
causer des blessures même en dehors de la zone directe de travail.
i.Ne tenir l’outil électroportatif qu’aux poignées isolées, si, pendant les travaux, l’accessoire risque de toucher des câbles électriques cachés ou son propre câble
d’alimentation. Le contact avec des conduites sous tension a pour conséquence une mise sous tension des parties métalliques de l’outil et provoque une décharge électrique.
j.Garder le câble de secteur à distance des accessoires en rotation. Si vous perdez le contrôle de l’outil, le câble de secteur peut être sectionné ou happé et votre main ou votre bras risquent d’être happés par l’accessoire en rotation.
k.Déposer l’outil électroportatif seulement après l’arrêt total de l’accessoire. L’accessoire en rotation peut toucher la surface sur laquelle l’outil est posé, ce qui risque de vous faire perdre le contrôle de l’outil électroportatif.
l.Ne pas laisser tourner l’outil électroportatif pendant que vous le portez. Suite à un contact involontaire, vos
vêtements peuvent être happés par l’accessoire en rotation, et l’accessoire peut rentrer dans votre corps.
m.Nettoyer régulièrement les ouïes de ventilation de votre outil électroportatif. La ventilation du moteur aspire de la poussière dans le carter, et de la poussière de métal en trop grande quantité peut causer des dangers électriques.
n.Ne pas utiliser l’outil électroportatif lorsqu’il y a des matériaux inflammables à proximité. Les étincelles risquent d’enflammer ces matériaux.
o.Ne pas utiliser des accessoires qui nécessitent des liquides de refroidissement. L’utilisation d’eau ou d’autres liquides de refroidissement peut entraîner un choc électrique.
CONTRECOUP ET AVERTISSEMENTS ASSOCIES
Un contrecoup est une réaction soudaine provoquée par une meule, un plateau de ponçage, une brosse ou tout autre accessoire en rotation qui se bloque ou se coince. Un blocage entraîne l’arrêt rapide de l’accessoire en rotation et la projection de l’outil électroportatif dans la direction opposée à la rotation de l’accessoire au point de blocage. Par exemple, si une meule se coince ou se bloque dans la pièce à travailler, le bord de la meule pénétrant au point de blocage peut entamer la surface du matériau et la meule peut ressortir ou être éjectée. En fonction du sens de rotation de la meule au point de blocage, celle-ci peut être projetée vers l’utilisateur ou à l’opposé de celui-ci. Dans ces conditions, les meules peuvent également casser. Le contrecoup résulte d’une utilisation incorrecte de l’outil électroportatif et/ou de mauvaises conditions ou procédures d’utilisation. Ce phénomène peut être évité en prenant les précautions suivantes.
a.Maintenez fermement l’outil et campez votre corps et vos bras de manière à résister aux forces de contrecoup. Utilisez systématiquement la poignée supplémentaire, s’il y en a une, pour contrôler au maximum les forces de contrecoup ou le couple de réaction au démarrage. Les forces de contrecoup ou le couple de réaction peuvent être amortis par l’utilisateur si les précautions correctes sont observées.
b.Ne placez jamais votre main à proximité de l’accessoire en rotation. Lors d’un contrecoup, l’accessoire risque de rebondir sur celle-ci.
c.Ne restez pas dans la zone de contrecoup possible de l’outil électroportatif. Le contrecoup entraînera l’outil dans la direction opposée au mouvement de la meule au point de blocage.
d.Soyez extrêmement vigilant lors du travail des coins, arêtes coupantes, etc. Evitez que l’accessoire rebondisse contre la pièce à travailler et qu’il se coince. L’accessoire en rotation a tendance à accrocher au niveau des coins, des arêtes coupantes ou lorsqu’il rebondit, avec une possibilité de perte de contrôle ou de contrecoup.
e.N’utilisez pas de lames de scie à chaîne ou dentées. Ce type de lame provoque fréquemment des contrecoups et une perte de contrôle.
CONSIGNES DE SECURITE SPECIFIQUES AU PONCAGE ET A LA DECOUPE A L’ABRASIF
a.N’utilisez que des meules recommandées pour votre outil électroportatif et le capot de protection conçu pour la meule sélectionnée. Les meules non conçues pour l’outil électroportatif ne peuvent pas être suffisamment protégées et présentent alors un danger.
b.Employez les meules exclusivement pour les applications recommandées. Par exemple: ne meulez pas avec la surface latérale d’un disque à tronçonner. Les meules à tronçonner sont conçues pour enlever de la matière avec le bord et les forces latérales appliquées à ces meules peuvent provoquer leur destruction.
c.Utilisez systématiquement des brides de serrage en parfait état, dont la taille et la forme sont appropriées à la meule sélectionnée. Les brides appropriées servent de support à la meule et réduisent ainsi le risque de rupture de celle-ci. Les brides pour les disques à tronçonner peuvent différer de celles utilisées pour d'autres meules.
d.N’utilisez pas les meules usées d’outils électroportatifs de plus grande taille. Les meules prévues pour un outil électroportatif plus grand ne sont pas conçues pour les vitesses de rotation accrues des outils électroportatifs plus petits et risquent de casser.
CONSIGNES DE SECURITE SUPPLEMENTAIRES
POUR LA DECOUPE A L’ABRASIF
a.Evitez de coincer le disque à tronçonner ou d’appliquer une pression excessive. N’essayez pas de réaliser des coupes trop profondes. Une surcharge du disque en augmente la sollicitation et donc les risques de torsion ou de blocage, ce qui entraînerait un contrecoup ou la destruction de la meule.
b.Ne vous placez pas dans l’axe de la meule en rotation ni derrière celle-ci. Si la meule au contact de la zone travaillée s’éloigne de vous, un contrecoup risque de ramener le disque et l’outil électroportatif directement sur vous.
c.Lorsque le disque se bloque ou que vous interrompez une coupe pour une raison ou une autre, éteignez puis immobilisez l’outil jusqu’à ce que le disque s’arrête complètement. N’essayez en aucun cas de sortir le disque
à tronçonner en rotation du matériau, il existe un risque de
23

contrecoup. Recherchez la cause du blocage et prenez les mesures nécessaires pour y remédier.
d.Ne redémarrez pas l’opération de découpe dans la pièce à travailler. Attendez que la meule ait atteint sa vitesse de rotation maximale et introduisez-la précautionneusement dans le matériau. En cas de redémarrage de l’outil
électroportatif dans la pièce à travailler, le disque risque de se coincer, de ressortir ou de provoquer un contrecoup.
e.Utilisez des supports pour les panneaux ou toute pièce de grandes dimensions, afin de réduire le risque de blocage de la meule et de contrecoup. Les pièces de grandes dimensions ont tendance à s’arquer sous leur propre poids. Les supports doivent être placés sous la pièce à travailler, près de la ligne de coupe et près du bord de la pièce, des deux côtés de la meule.
f.Redoublez de prudence lorsque vous effectuez une "coupe traversante" dans des murs existants ou autres parois aveugles.
Le disque à tronçonner peut sectionner des canalisations de gaz ou d’eau, des câbles électriques ou des objets pouvant causer un contrecoup.
CONSIGNES DE SECURITE SPECIFIQUES POUR LE BROSSAGE METALLIQUE
a.Ayez à l’esprit que la brosse perd des fils métalliques même pendant le travail normal. Evitez une sollicitation trop élevée des fils métalliques en appliquant une pression excessive sur la brosse. Les fils métalliques arrachés peuvent pénétrer facilement dans des vêtements légers et/ou la peau.
b.Si un capot de protection est recommandé pour le brossage métallique, évitez tout contact entre ce capot et la brosse métallique. Les brosses métalliques circulaires ou autres peuvent augmenter de diamètre en raison de la pression
et des forces centrifuges.
c.Ne dépassez pas 15 000 tr/min lors de l'utilisation de brosses métalliques.
ENVIRONNEMENT
MISE AU REBUT
Les outils électroportatifs, ainsi que leurs accessoires et emballages doivent être triés en vue de leur recyclage approprié.
SEULEMENT POUR LES PAYS DE L’UNION
EUROPEENNE
Ne jetez pas votre appareil électroportatif avec les ordures ménagères!
Conformément à la directive européenne 2002/96/CE relative à la mise au rebut des équipements électriques
et électroniques, et à sa transposition dans le droit national, les outils électroportatifs inutilisables doivent faire l’objet d’une collecte distincte et être mis au rebut d’une manière respectueuse pour l’environnement.
SPECIFICATIONS
SPECIFICATIONS GENERALES
Tension nominale . . . . . . . . . . . . . . |
230-240 V, 50-60 Hz |
|
Puissance nominale . . . . . . . . . . . . . |
175 W |
|
Régime nominal (n) . . . . . . . . . . . . . |
35.000 tr/m |
|
Pince . . . . . . . . . . . . . . . . . . . . . . . . |
0,8 mm, 1,6 mm, 2,4 mm, |
|
|
|
3,2 mm |
|
|
|
|
Appareil de classe II . . . . . . . . . |
Outils à double isolation |
(ILLUSTRATION 5) |
|
|
RALLONGES
Utilisez des rallonges entièrement déroulées et fiables d’une intensité de 5 A.
MONTAGE
DEBRANCHEZ SYSTEMATIQUEMENT L’OUTIL MULTIFONCTIONS AVANT DE CHANGER D’ACCESSOIRE OU DE PINCE, OU POUR REPARER L’OUTIL.
GENERALITES
L’outil multifonctions Dremel est un outil de précision de très grande qualité, capable d’accomplir des tâches minutieuses et complexes. La palette étendue d’accessoires et de fixations Dremel permet d’effectuer une grande diversité de travaux, notamment le ponçage, la sculpture et la gravure, ainsi que le défonçage, la découpe, le nettoyage et le polissage.
ILLUSTRATION 6
A.Bouton de verrouillage de l’arbre
B.Interrupteur de marche/arrêt
C.Variateur de vitesse
D.Cordon d’alimentation
E.Support
F.Orifices de ventilation
G.Clé à pince
H.Arbre
I.Capuchon
J.Ecrou de blocage
K.Pince
PINCES PORTE-EMBOUT
Les accessoires Dremel disponibles pour l’outil multifonctions sont fournis avec différentes tailles de queues. Quatre tailles de pinces sont disponibles pour les différentes queues. Ces tailles sont identifiées par les bagues au dos de la pince.
ILLUSTRATION 7
A.Ecrou de blocage
B.Pince 3,2 mm sans bague (480)
C.Pince 2,4 mm avec trois bagues (481)
D.Pince 1,6 mm avec deux bagues (482)
E.Pince 0,8 mm avec une bague (483)
F.Anneaux d’identification
24
 Loading...