


IMPORTANT |
IMPORTANT |
IMPORTANTE |
Read Before Using |
Lire avant usage |
Leer antes de usar |
Operating/Safety Instructions |
||
Consignes d’utilisation/de sécurité |
||
Instrucciones de funcionamiento y seguridad |
||
3D40 |
|
|
Idea Builder |
|
|
P.O. Box 081126 Racine, WI 53408-1126 |
||
Call Toll Free for Consumer Information & Service Locations |
||
Pour obtenir des informations et les adresses de nos centres de service après-vente, appelez ce numéro gratuit |
||
Llame gratis para obtener información para el consumidor y ubicaciones de servicio |
||
1-844-4DRML3D (1-844-437-6533) |
www.dremel.com |
|
For English Version |
Version française |
Versión en español |
See page 2 |
Voir page 37 |
Ver la página 73 |

Table of Contents |
|
Safety Symbols.................................................................................... |
2 |
General Safety Warnings.................................................................. |
3-5 |
Additional Safety Warnings.................................................................. |
5 |
Symbols ............................................................................................... |
5 |
Dremel Remote and Mobile Services .................................................. |
5 |
FCC Compliance ................................................................................. |
6 |
Information on Intellectual Property ..................................................... |
6 |
Specifications....................................................................................... |
7 |
Resources............................................................................................ |
8 |
Glossary of Terms............................................................................. |
8-9 |
Introduction ........................................................................................ |
10 |
Kit Contents ....................................................................................... |
10 |
Unpacking .......................................................................................... |
11 |
Getting To Know Your Dremel 3D40 ............................................. |
12,13 |
Touch Screen................................................................................ |
14-20 |
Initial Setup ........................................................................................ |
21 |
Getting Started with Your Dremel 3D App ......................................... |
22 |
Print Studio Software Overview ......................................................... |
23 |
Getting Ready to Build.................................................................. |
24-28 |
Building......................................................................................... |
29-30 |
Removing Your Object ....................................................................... |
31 |
Maintenance ...................................................................................... |
32 |
Troubleshooting ................................................................................. |
33 |
Best Practices.................................................................................... |
34 |
Dremel® Consumer Limited Warranty ................................................ |
35 |
Safety Symbols
The definitions below describe the level of severity for each signal word. Please read the manual and pay attention to these symbols.
This is the safety alert symbol. It is used to alert you to potential
! personal injury hazards. Obey all safety messages that follow this symbol to avoid possible injury or death.
DANGER indicates a hazardous situation which, if not avoided, will result in death or serious injury.
WARNING indicates a hazardous situation which, if not avoided, will result in death or serious injury.
CAUTION, used with the safety alert symbol, indicates a hazardous situation which, if not avoided, will result in minor or moderate injury.
2
|
|
|
|
|
|
||
|
|
|
|
General Safety Warnings |
|||
|
|
|
|
Read all instructions in this manual and familiarize yourself with the |
|||
! WARNING |
|
||||||
|
Dremel 3D40 before setup and use. Failure to comply with the warnings |
||||||
and instructions |
may result in fire, equipment damage, property damage, or personal |
||||||
injury. |
|
|
|
READ ALL INSTRUCTIONS |
|||
|
|
|
|
||||
SAVE ALL WARNINGS AND INSTRUCTIONS FOR FUTURE REFERENCE |
|||||||
|
Work Area Safety |
Dress properly. Do not wear loose clothing |
|||||
Keep work area clean and well lit. Cluttered |
or jewelry. Keep your hair, clothing and |
||||||
or dark areas invite accidents. |
gloves away from moving parts. Loose |
||||||
Do not operate Dremel 3D40 in the |
clothes, jewelry or long hair can be caught in |
||||||
moving parts. |
|||||||
presence of flammable liquids, gases or |
|||||||
dust. |
Dremel 3D40 creates high |
Dremel 3D40 Use and Care |
|||||
temperatures which may ignite the dust or |
Before every use check Dremel 3D40 for |
||||||
fumes. |
|
|
|
|
misalignment or binding of moving parts, |
||
Store idle 3D40 out of reach of children |
breakage of parts and any other condition |
||||||
and other untrained persons. Injury can |
that may affect the Dremel 3D40’s |
||||||
occur in hands of untrained users. |
operation. If damage is suspected have |
||||||
|
|
Electrical Safety |
the Dremel 3D40 repaired by authorized |
||||
|
|
Dremel service center before use. Use of |
|||||
Always use the Dremel 3D40 with a |
Dremel 3D40 when damaged may result in |
||||||
properly grounded outlet. Do not modify |
poor quality of object creation, further |
||||||
Dremel 3D40 plug. Improper grounding and |
equipment damage, property damage or |
||||||
modified plugs increase risk of electric shock. |
personal injury. |
||||||
Do not use Dremel 3D40 in damp or wet |
Do not touch the extruder tip during |
||||||
locations. Do not expose Dremel 3D40 to |
Dremel 3D40 operation or until it has |
||||||
rain. Presence of moisture increases risk of |
cooled down to at least 60°C (140°F). |
||||||
electric shock. |
|
Contact with the extruder tip during or after |
|||||
Do not abuse the cord. Never use the cord |
operation before tip has cooled may result in |
||||||
for pulling or unplugging the Dremel 3D40. |
personal injury. |
||||||
Keep cord away from heat, oil, sharp |
Set up the Dremel 3D40 in a well-ventilated |
||||||
edges or moving parts. Damaged or |
area. Place Dremel 3D40 printer on flat |
||||||
entangled cords increase the risk of electric |
nonflammable surface and away from |
||||||
shock. |
|
|
|
|
flammable materal. Provide at least 8 |
||
Avoid using this product during an |
inches of unobstructed spacing around |
||||||
electric storm. |
There may be a remote risk |
Dremel 3D40. Dremel 3D40 melts plastic |
|||||
of a power surge from lightning that may |
during building. Plastic odors emitted during |
||||||
result in electric shock hazard. |
Dremel 3D40 operation may irritate eyes and |
||||||
In case of emergency unplug Dremel 3D40 |
airways. Locating Dremel 3D40 close to |
||||||
surrounding objects prevents proper |
|||||||
from outlet. |
|
|
|
||||
Personal Safety |
ventilation. |
||||||
|
|
Do not reach inside the Dremel 3D40 while |
|||||
Stay alert, watch what you are doing and |
it is in operation. Contact with Dremel 3D40 |
||||||
use common sense when operating a |
moving parts during operation may result in |
||||||
Dremel 3D40. Do not use Dremel 3D40 |
poor build quality, equipment damage or |
||||||
while you are tired or under the influence |
personal injury. |
||||||
of drugs, alcohol or medication. A moment |
Always monitor the Dremel 3D40 during |
||||||
of inattention while operating Dremel 3D40 |
|||||||
operation. Use of Dremel 3D40 by persons |
|||||||
may result in personal injury. |
|||||||
unfamiliar with these warnings and |
|||||||
Use personal protective equipment. The |
|||||||
instructions may result in equipment or |
|||||||
use of protective equipment such as heat |
property damage and personal injury. |
||||||
resistant gloves and safety glasses will |
|
|
|||||
reduce the risk of personal injuries. |
|
|
|||||
|
|
|
|
|
3 |
|
|

Use only DREMEL filament. Use of filament not authorized by Dremel may result in equipment and property damage.
Ensure small objects created by Dremel 3D40 are not accessible to young children.
Small objects are potential choking hazards for young children.
Do not create illegal or inappropriate objects using Dremel 3D40.
Do not use Dremel 3D40 to create objects intended for use with candles, liquid fuels, and other heat sources. Plastic may melt when exposed to fire or other heat sources. Such use of objects created by Dremel 3D40 may result in fire, property damage and personal injury.
Do not use Dremel 3D40 to create objects intended for food or drink applications such as preparation, decoration, storage, or consumption. Such use of objects created by Dremel 3D40 may result in illness or personal injury.
Do not use Dremel 3D40 to create objects intended with use with electrical components or housings of electrical components. PLA plastic is not suitable for electrical applications. Such use of objects created by Dremel 3D40 may result in property damage and personal injury.
Do not put plastic objects in or around your mouth. PLA plastic is not suitable for food or drink preparation and food utensils. Such use of objects created by Dremel 3D40 may result in illness or personal injury.
Do not use Dremel 3D40 to create objects intended for chemical storage. PLA plastic is not suitable for chemical storage. Such use of objects created by Dremel 3D40 may result in property damage and personal injury.
Do not modify Dremel 3D40 or alter factory settings. Modifications may result in equipment and property damage, and personal injury.
Do not expose Dremel 3D40 to temperatures exceeding 70°C (158°F).
Dremel 3D40 may become damaged. Dremel 3D40 is intended to operate in temperature between 16-29° C (60 - 85° F).
Do not move or bump Dremel 3D40 or the extruder during operation. The object may build incorrectly.
Do not change filament spool unless the building process is completed, stopped, or paused. Changing the filament during
building will cancel the object and may damage the extruder.
Do not pull the filament out. Doing so may damage the extruder.
Use extra care not to damage the extruder tip when clearing debris. Dremel 3D40 will not work properly with damaged extruder tip and will require replacement.
Before every build make sure that the build platform is covered with Dremel specified build tape. Use of improper build tape may result in equipment damage and poor object build quality.
Be aware of your body position when using hand tools to remove objects from the build platform. Sudden tool slip and improper body position during object removal from the build platform may result in personal injury.
Avoid scratching the build platform when removing objects. Scratches in the build platform will result in improper object creation.
Do not drop the build platform. Tempered glass plate may break and result in personal injury.
Do not remove tempered glass plate from plastic holder. Contact with tempered glass plate edge may result in personal injury.
Do not twist or bend the build platform while removing objects. Tempered glass plate may separate from plastic holder and result in personal injury.
Dremel is not responsible for structural integrity or utility of objects created using Dremel 3D40. Structural models created by inexperienced designers may result in property damage and personal injury.
Service
Always unplug Dremel 3D40 from its power before performing any service procedures. Failure to do so may result in personal injury and equipment damage.
Have your Dremel 3D40 serviced only by an authorized Dremel service center using only Dremel replacement parts. This will ensure that proper operation and safety of Dremel 3D40 is maintained.
Use only Dremel approved materials and components. Use of filament or 3D objects other than Dremel® approved filament and genuine Dremel® components may void warranty.
4

|
|
|
|
|
|
|
|
|
|
Additional Safety Warnings |
|
|
|
|
This product may contain or discharge chemicals known to the State of |
||
! WARNING |
|||||
|
|
|
California to cause cancer and birth defects or other reproductive harm. |
||
|
|
|
|||
|
|
|
|
SAVE THESE INSTRUCTIONS |
|
|
|
|
|
|
|
|
|
|
|
Symbols |
|
IMPORTANT: |
Some of the following symbols may be used on your 3D40. Please study them |
||||
and learn their meaning. Proper interpretation of these symbols will allow you to operate the |
|||||
tool better and safer. |
|||||
|
|
|
|
|
|
Symbol |
|
Designation / Explanation |
|||
|
V |
|
Volts (voltage) |
||
|
|
|
|
||
|
A |
|
Amperes (current) |
||
|
|
|
|
||
|
Hz |
|
Hertz (frequency, cycles per second) |
||
|
|
|
|
||
ø |
|
|
Diameter |
||
0 |
|
|
Off position |
||
|
|
|
|
|
|
|
|
|
|
Alternating current (type or a characteristic of current) |
|
|
|
|
|
|
|
|
|
|
|
Hot surface hazard symbol. Contact may cause burn. Allow to cool before |
|
|
|
|
|
servicing. |
|
|
|
|
|
|
|
|
|
|
|
Alerts user to read manual. |
|
|
|
|
|
|
|
|
|
|
|
This symbol designates that this tool is listed by Underwriters Laboratories, |
|
|
|
|
|
to United States and Canadian Standards. |
|
|
|
|
|
|
|
|
|
|
Dremel Remote and Mobile Services |
||
Dremel remote and mobile services provide you with information and services regarding your
Dremel 3D products. The type of information provided by Dremel remote and mobile services may change from time to time. All product information and services are provided for your convenience, “As is” and “As Available”.
Dremel does not guarantee that the information or services will be available, accurate, or reliable, or that product information or services will provide safety in your home. You use all
product information, services, and products at your discretion and risk. The product information and services are not intended as a substitute for direct means of obtaining information.
Network connectivity requires an access point and high speed internet connection. Internet service provider charges may apply.
Mobile printing requires a compatible mobile device and data plan. Carrier charges may apply.
5

FCC and IC Compliance
FCC COMPLIANCE
NOTE: This equipment has been tested and found to comply with the limits for a Class B digital device, pursuant to Part 15 of the FCC Rules. These limits are designed to provide reasonable protection against harmful interference in a residential installation. This equipment generates, uses, and can radiate radio frequency energy and, if not installed and used in accordance with the instructions, may cause harmful interference to radio communications. However, there is no guarantee that interference will not occur in a particular installation. If this equipment does cause harmful interference to radio or television reception, which can be determined by turning the equipment off and on, the user is encouraged to try to correct the interference by one or more of the following measures:
• Reorient or relocate the receiving antenna.
• Increase the separation between the equipment and receiver.
• Connect the equipment into an outlet on a circuit different from that to which the receiver is connected.
• Consult the dealer or an experienced radio/TV technician for help.
Changes and Modifications not expressly approved by the manufacturer or registrant of this equipment can void your authority to operate this equipment under Federal Communications Commission’s rules.
INDUSTRY CANADA (IC)
This device complies with Industry Canada’s licence-exempt RSSs. Operation is subject to the following two conditions:
(1) This device may not cause interference; and
(2) This device must accept any interference, including interference that may cause undesired operation of the device.
The device meets the exemption from the routine evaluation limits in section 2.5 of RSS 102 and compliance with RSS-102 RF exposure, users can obtain Canadian information on RF exposure and compliance.
Information on Intellectual Property
The Dremel 3D40 is intended for 3D printing objects from digital files that you create or own, or have the right to print using the Dremel 3D40. When making objects using the Dremel 3D40, it is your responsibility to ensure that you do not infringe any third party intellectual property rights or violate any applicable laws or regulations, such as U.S. or foreign intellectual property laws.
The Dremel 3D40 may not be used to make objects protected by intellectual property rights owned by third parties without such third parties’ permission. Using the Dremel 3D40 to do any of the following may require the permission of third parties: to make a duplicate or facsimile (in whole or in part) of any object not created by you, to make an object from a digital file you do not own, or to make an object from a scan of a physical
object that you did not create. It is your responsibility to obtain such permission. In some cases, you may not be able to obtain such permission. Where such permission cannot be obtained, you should not 3D print such object, or you do so at your own risk. You may not modify, reverse engineer, decompile, or disassemble the Dremel 3D40 or its software or firmware, except as permitted by applicable law.
If you use the Dremel 3D40 in any way other than as recommended and described in these Operating/Safety Instructions, you do so at your own risk. Using the Dremel 3D40 to make objects that infringe any intellectual property rights owned by third parties could result in civil or criminal prosecution and penalties, and you could be liable for money damages, fines, or imprisonment.
6
Specifications
BUILDING
Extruder: Single extrusion
Extruder temperature: Up to 230°C (397°F) Operating Interface: 3.5” full color IPS touch screen
Maximum Build Volume: 10” x 6” x 6.7” (255mm x 155mm x 170mm)
Layer Thickness: 4 mil | 0.004 inches 100 microns | 0.10 mm
Filament Colors: See Dremel3D.com for color choices
Internal Storage: 4GB
External Storage: USB Flash Drive
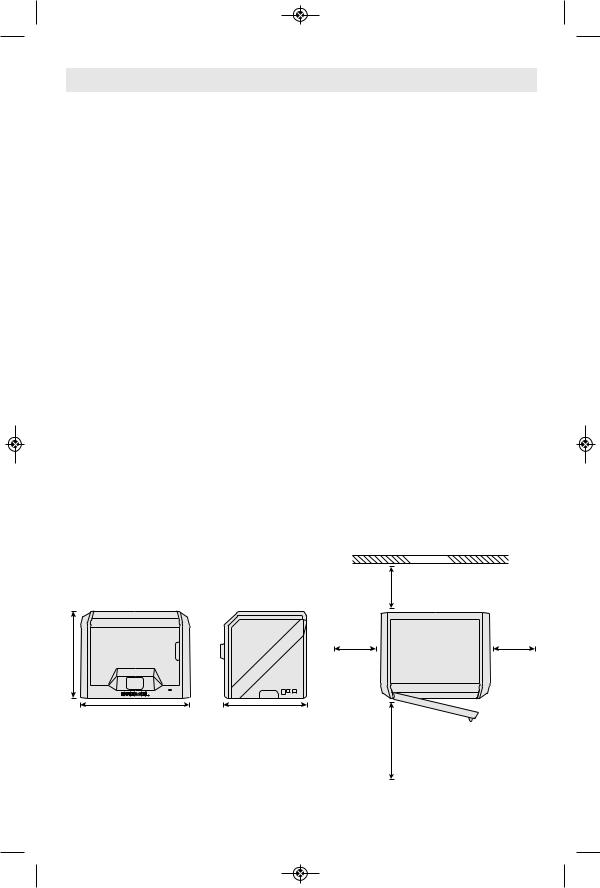
WEIGHT & DIMENSIONS
Weight (without spool): 16kg (35lbs) Dimensions: 20.25” x 16” x 15.9” (515mm x 406mm x 394mm)
FILAMENT
ONLY works with Dremel 1.75mm filament
FILAMENT STORAGE
All polymers degrade with time. Do not unpack until filament is needed. Filament should be stored at room temperature: 16-29° C (60-85° F) and in dry conditions.
SOFTWARE
Dremel 3D40 comes with complimentary Autodesk Print Studio software for Windows and Mac OSX. This application converts your 3D digital files into buildable files.
SUPPORTED OPERATING SYSTEMS
• Apple® Mac® OS® X v10.9 or later (Mavericks)
• Microsoft® Windows® 8.1
• Microsoft® Windows® 7 SP1
MINIMUM SYSTEM SPECIFICATIONS
• CPU: 64-bit processor (32-bit not supported)
• Memory: 3 GB RAM (4 GB or more recommended)
• Disk space: ~2 GB free disk space for installation
• Display card: 1,024 MB GDDR RAM or more. Microsoft® Direct3D® 11 capable graphics card or higher
• Pointing device: Three-button mouse
ELECTRICAL REQUIREMENTS
3D40 input rating: 100-240V, 47-60Hz,
0.8A-1.8A
OPERATING ENVIRONMENT
Room Temperature: 16-29° C (60 - 85° F) Level workspace
Dry workspace environment
WALL
8” (203mm)
16” (406mm)
8” (203mm) |
8” (203mm) |
20.25” (515mm) |
15.5” (394mm) |
14” (356mm)
7
Resources
|
|
|
Resource |
Description |
Location |
Quick Start |
Provides illustrated walkthrough of |
Printed version of the Quick Start |
Guide |
how to un-box your 3D40 and start |
Guide is located in the rectangular |
|
building out of the box. |
component carton. It is also |
|
|
available on www.dremel3d.com |
|
|
|
Dremel 3D |
Provides the latest 3D40 software, |
www.dremel3d.com |
Website |
product information, customer support, |
|
|
and 3D model and project downloads. |
|
|
|
|
Dremel 3D |
Contact Dremel for product support, |
1-844-4DRML3D |
Customer |
maintenance, and service. |
(1-844-437-6533) |
Support |
|
www.dremel3d.com |
|
|
|
Print Studio |
Allows you to upload, edit, and build |
Installed from www.dremel3d.com |
Software |
3D files. |
or from USB flash drive provided |
|
|
with the Dremel 3D40. |
|
|
|
|
|
|
|
Glossary of Terms |
|
Term |
Definition |
|
|
|
|
Build Platform |
The flat surface used by your Dremel 3D40 to build objects. The build platform is |
|
|
comprised of a tempered glass plate with a plastic holder. |
|
|
|
|
Build Platform Clip |
Clip located at the front of the build platform base that is used to secure the build platform |
|
|
in place. |
|
|
|
|
Build Tape |
Adhesive tape that improves the consistency of your objects and helps them stick to the |
|
|
build plate surface. |
|
|
|
|
Build Volume |
The three dimensional (3D) amount of space that an object will use once it is completed. |
|
|
Your Dremel 3D40 has a maximum build volume which means that objects with a larger |
|
|
build volume cannot be built unless they are resized or broken into sub-objects. |
|
|
|
|
Door |
Your Dremel 3D40 has a door located on the front panel. This allows for easy access to |
|
|
the build platform, extruder, filament, and your objects. This door is made with a |
|
|
transparent material so you can monitor the progress of your objects while keeping the |
|
|
build environment stable. |
|
|
|
|
Ethernet Port |
A local area wired networking technology that allow electronic devices to communicate. |
|
|
|
|
Extruder |
An assembly that uses gears to pull filament through the extruder intake, heat the filament |
|
|
to the build temperature, and push the heated filament out of the extruder tip. |
|
|
|
|
Extruder Fan |
A fan used to cool the outer assembly of the extruder and gear motor. |
|
|
|
|
Extruder Fan Baffle |
A plastic piece that directs air from the extruder fan onto the build platform to assist in |
|
|
cooling the active build. |
|
|
|
|
Extruder Intake |
An opening located at the top of the extruder where filament is inserted for building. |
|
|
|
|
Extruder Lever |
A lever located on the side of the extruder that is used to loosen the grip of the extruder |
|
|
gear motor. |
|
8
Extruder Tip |
A nozzle located at the bottom of the extruder where heated filament is forced out for |
|
building. |
|
|
Filament |
A threadlike strand of plastic material. |
|
|
Filament Guide Tube |
A plastic piece that guides the filament from the filament spool through a passage in |
|
the outer housing of your Dremel 3D40. |
|
|
Filament Jam Sensor |
A sensor in the extruder that pauses your printer if filament stops extruding properly. |
|
|
Filament Runout Sensor |
A sensor in the extruder intake that pauses your printer if it runs out of filament |
|
during a build. |
|
|
Filament Spool |
A cylindrical piece on which a long strand of filament is wound for storage and |
|
continuous use. |
|
|
.G3Drem/.G4Drem |
A buildable file format compatible with your Dremel 3D40. |
|
|
Leveling Knobs |
Knobs located under the build platform base that are used to create proper spacing |
|
between the extruder tip and the build platform. |
|
|
Leveling Sensor |
A sensor that detects the height of the build platform and assists in proper leveling. |
|
|
Lid |
Your Dremel 3D40 has a pivoting lid on the top. This allows for more access to the |
|
build platform, extruder, filament, and objects when necessary. |
|
|
Needle Nose Pliers |
Common tool used to hold small objects and to grab excess material that may be too |
|
hot to touch directly. |
|
|
OBJ File |
A common digital file format used in a wide range of 3D model software. This file is |
|
created in 3rd party 3D software or downloaded from Dremel3D.com. |
|
|
Object Removal Tool |
A tool used to separate your objects from the build platform. |
|
|
PLA |
A bioplastic derived from renewable resources such as corn starch. |
|
|
Spool Holder |
A plastic piece located to the left of the build platform inside your Dremel 3D40 build |
|
area that is designed to hold a filament spool. |
|
|
Spool Door |
A removable door which locks the filament spool to the spool holder. |
|
|
Stepper Motor |
A brushless DC electric motor used to drive the guide rails and extruder gears. |
|
|
.STL File |
A common digital file format used in a wide range of 3D model software. This file is |
|
created in 3rd party 3D software or downloaded from Dremel3D.com. |
|
|
Touch Screen |
Full color display that is touch activated. It allows you to monitor your Dremel 3D40 |
|
and objects while also providing commands directly to your Dremel 3D40 without the |
|
use of a computer. |
|
|
USB Flash Drive |
A portable memory card used on a wide array of devices. |
|
|
WIFI |
A local area wireless networking technology that allow electronic devices to |
|
communicate. |
|
|
X-Axis Guide Rails |
A set of rails on either side of the extruder that allow a stepper motor to move the |
|
extruder to the left or right side of the build area. |
|
|
Y-Axis Guide Rails |
A set of rails on either side of the build area that allow a stepper motor to move the |
|
extruder to the front or back of the build area. |
|
|
Z-Axis Guide Rails |
A set of rails located at the back of the build area that allow a stepper motor to move |
|
the build platform up or down. |
9
Introduction
Welcome to the world of Dremel 3D. Our mission is to mentor you through the 3D building process and share best practices for bringing your ideas to life.
3D building is a process that will involve experimentation and persistence. Thankfully, the Dremel experts are here to make your job easier with online tips and live support.
Dremel 3D40 brings new functionality to Dremel3D such as network connectivity and remote printing. To get started with 3D40 follow the initial setup routine on the touch screen to connect and register the printer.
You can create a user profile by either going to www.dremel3d.com or by downloading the Dremel3D mobile application on your compatible mobile device. Your profile gives you access to high-quality models, support and software downloads, and remote printing services powered by Spark. Once setup and registration is complete you are ready to start building.
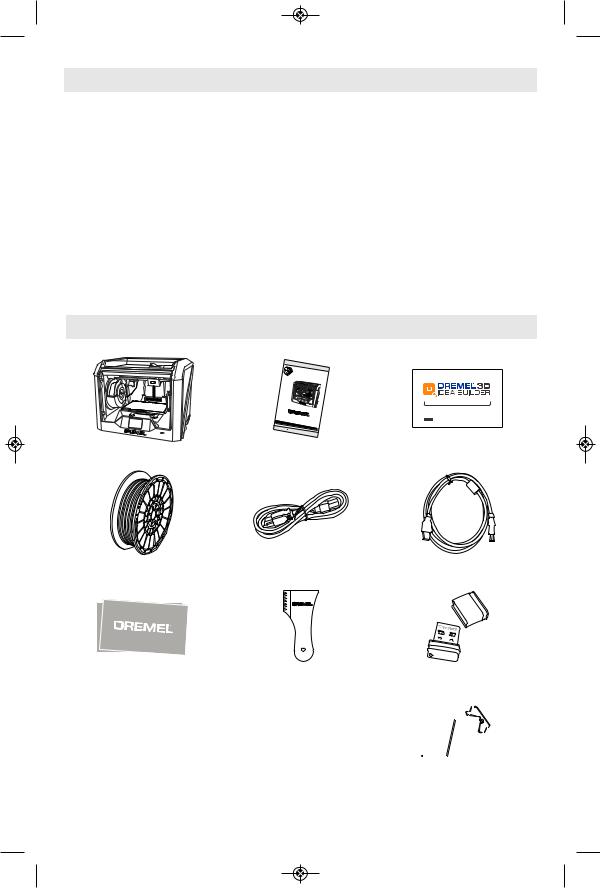
Kit Contents*
Dremel 3D40
|
IMPORTANT |
|
|
|
|
|
|
||
|
Read Before Using |
|
|
IMPO |
|
|
|||
|
|
|
|
|
|
|
Lire avantRTANT |
IMPORTANTE |
|
|
|
|
|
|
|
|
|
usage |
|
|
|
|
Operat |
ing/Safety |
Leer antes de usar |
||||
|
|
I |
Con |
|
|
Instructions |
|||
|
|
nstrucciones |
|
on/de |
|||||
|
|
|
signes d’utilisati |
|
|
||||
|
|
|
|
|
|
|
de funcionamsécurité |
||
|
|
|
|
|
|
|
|
|
iento y seguridad |
3D40 |
|
|
|
|
|
|
|
|
|
Idea Builder |
|
|
|
|
|
|
|
|
|
|
P.O. Box 081126 |
Racine, WI 53408-1126 |
|
||||||
Call Toll Free for Co |
|
|
|
|
|||||
|
|
nsumer Information & |
|
|
|||||
1-844- |
|
|
|
|
|
|
Service Locations |
||
|
|
|
|
|
|
|
|
|
|
4DRML3D (1-8 |
|
|
|
|
|
|
|
||
For |
|
|
|
|
|
|
|
|
|
English Version |
|
|
|
|
|
|
|
|
|
See page 2 |
Version |
française |
|
|
|
|
|||
|
Voir |
|
Versión en español |
||||||
|
|
|
|
page 16 |
|
||||
|
|
|
|
|
|
|
Ver la página 30 |
||
Instruction Manual
3D40 Quick Start Guide
 WARNING
Quick Start Guide
Filament Spool** |
Power Cable |
USB Cable |
Build Tape Object Removal Tool USB Flash Drive
*Quantities may vary depending on kit. **Do not store in moist or hot environment.
Unclog Tool
10

Unpacking
1. |
Place box on table, cut tape, and open. |
6. Open door and remove middle insert. |
2. |
Remove top insert. |
|
3. Remove 3D40 and place on table. |
7. Remove bottom insert. |
|
4. Open lid and remove top insert. |
||
|
5. Raise build plate by lifting from both sides.
Tip: Keep packaging for future transportation and storage.
11

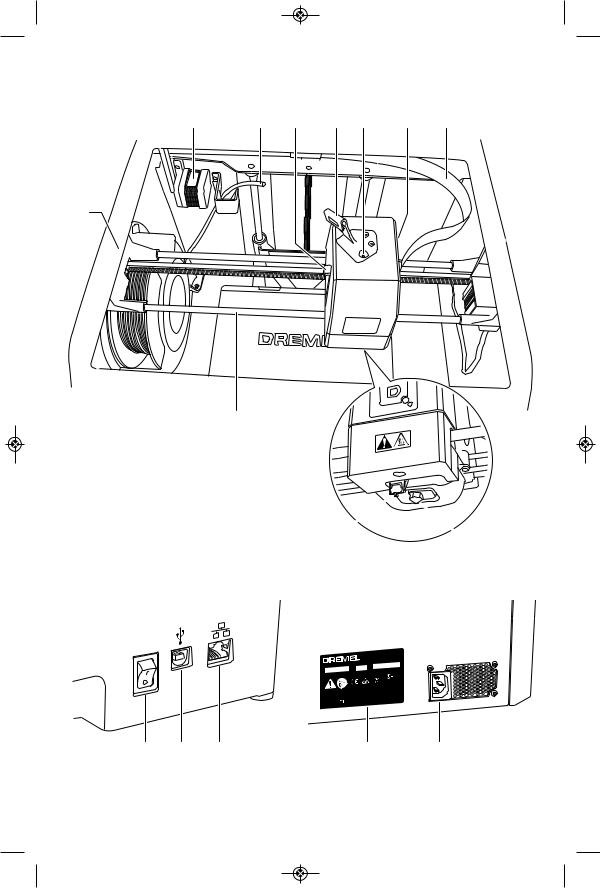
Getting To Know Your 3D40
1 2
12
11
10 |
9 |
8 |
7 |
6 |
1. |
Lid |
2. |
Extruder |
3. |
Z-Axis Guide rail |
4. |
Door |
5. |
Gripping Handles |
6. |
USB A Port |
7. |
Leveling Knobs |
8. |
Build Platform Clip |
9. |
Touch Screen |
10. |
Build Platform |
11. |
Filament Spool Holder |
12. |
Filament Spool |
13. |
Y-Axis Guide Rail |
14. |
Stepper motor |
15.Filament Guide Tube
16.Extruder Lever
17.Filament Guide Clip
18.Extruder Intake
19.Extruder Fan
20.Ribbon Cable
21.X-Axis Guide Rail
22.Leveling Sensor
23.Extruder Tip
24.Power Switch
25.USB B Port
26.Ethernet Port
27.Nameplate
28.Power Input
3
4
5
12
14 |
15 |
16 |
17 |
18 |
19 |
20 |
13
21
22
 23
23
Model 3D40 |
F0133D4000 |
|
100V–240V~ |
47–63Hz |
0.8–1.8A |
Ø1.75mm (0.069") |
|
|
SN
XXXXXXXXX |
MM/YYYY |
|
LISTED 3D PRINTER E469311
1U1
Dremel |
KONIJNENBERG 60, |
Mount Prospect, IL |
4825BD BREDA-NL |
Made in China |
|
24 |
25 |
26 |
27 |
28 |
13
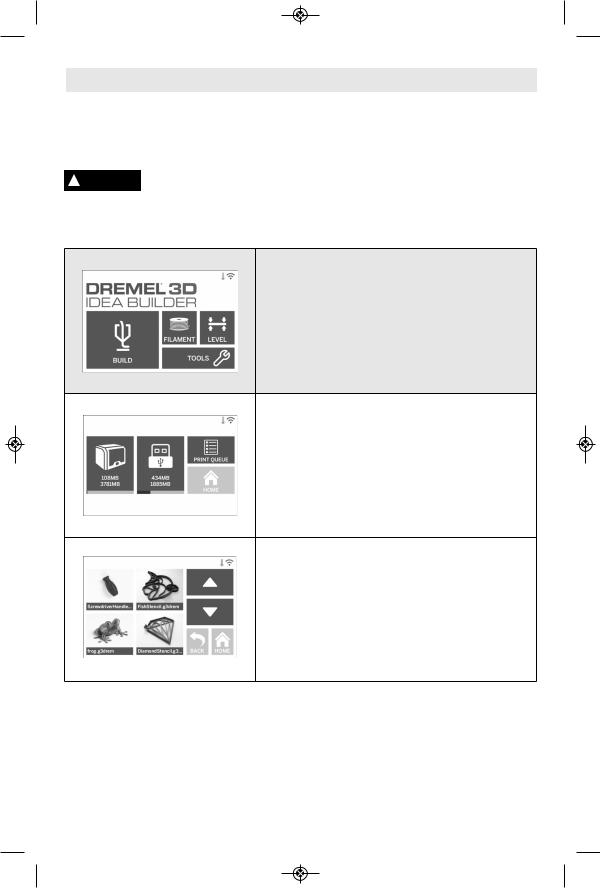
Touch Screen
Using your Dremel 3D40 without a computer is easy with the onboard software and full color |
|
touch screen. |
|
Before building your model we want to familiarize you with the touch screen menu structure |
|
and options. |
Observe all provided warnings and safety instructions when using the |
|
|
! WARNING Dremel 3D40. Failure to do so may result in fire, equipment damage, property |
|
damage or personal injury.
BUILD
Tap to select a 3D model and begin build process. (see page 28 for detailed build instructions)
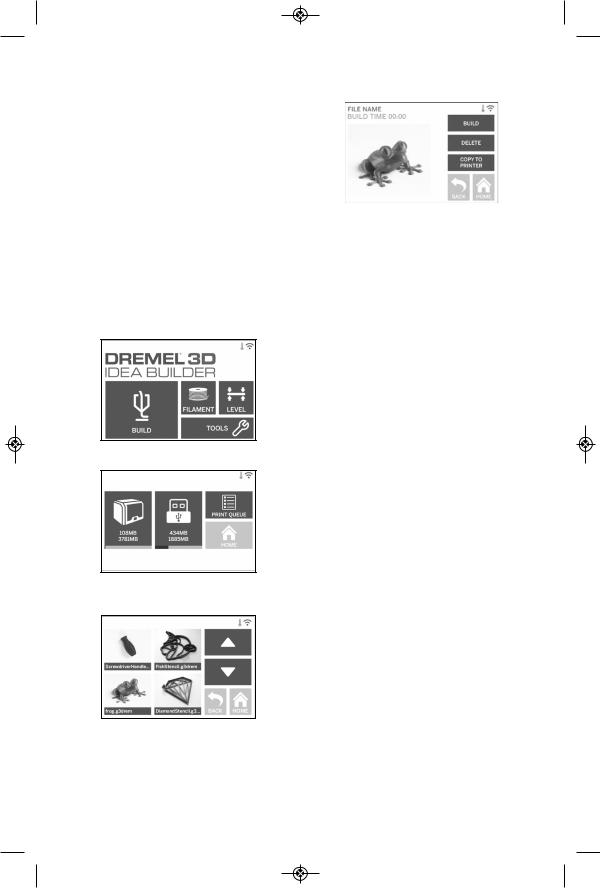
BUILD MENU
Tap Printer, USB Flash Drive, or Print Queue to choose the destination of your desired file.
MODEL MENU
Tap to select the desired model or use arrows to scroll through pages to find your model.
14
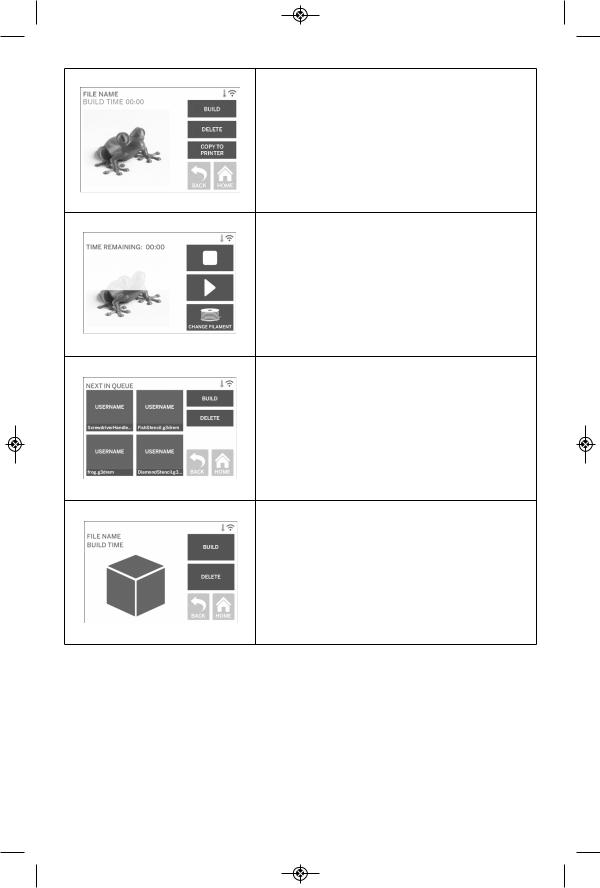
FILE DETAILS
BUILD – Tap to begin build process.
DELETE – Tap to remove model file from on-printer storage or USB flash drive.
COPY TO PRINTER – From USB flash drive, tap to copy model file to on-printer storage.
BUILD STATUS
STOP – Tap to cancel the current build process. PAUSE/PLAY – Tap to pause or resume the current build process. Pause will allow you to access the filament button.
CHANGE FILAMENT – Tap to change filament during the current build process to add more filament or change colors.
PRINT QUEUE MENU
BUILD – Tap to view details of next build. DELETE – Tap to remove next build from queue.
PRINT QUEUE MODEL DETAILS BUILD – Tap to begin build process.
DELETE – Tap to remove model file from queue.
15

FILAMENT
Tap to begin heating and start filament load/change process. (See page 24 for instructions on filament load/change process)
LEVEL
Tap to begin build platform leveling process. (see page 27 for instructions on leveling the build platform)
16

TOOLS
Tap to access the following individual printer functions and settings.
SERVICE
Tap to enter service menu to see customer service contact information.
NETWORK
Tap to enter Network menu to connect or disconnect
WiFi and Set Proxy.
CONNECT WIFI – Tap to connect to WiFi.
DISCONNECT WIFI – Tap to turn Wifi off.
SET PROXY – Tap to set manual proxy.
17

CALIBRATE
Tap to move extruder and build platform to zero position.
JOG MODE
Tap to display options to move extruder and build platform along the X, Y, and Z-axis.
18

SETTINGS
LANGUAGE – Tap to pick alternate menu language. DISPLAY – Tap to customize cabinet LEDs or main menu hotkeys.
Z-AXIS OFFSET – Used to calibrate build plate height during assembly.
SOUNDS – Tap to turn 3D40 sounds On/Off. DEMO MODE – Tap to turn retail demo mode On/Off.
FACTORY RESET – Tap to remove all information stored on 3D40 and return it to factory defaults. GET NEW TOKEN – Tap to release current token and get a new token when connected to Wifi or Ethernet.
CHECK FOR UPDATES – Tap to check for new firmware version when connected to Wifi or Ethernet.
PREHEAT
Tap to automatically begin preheating the extruder for building or removing excess debris.
PURGE – Once extruder is hot, tap to manually extrude filament.
STOP/START – Tap to stop or start preheating.
19

ABOUT
Tap to see 3D40 information such as firmware version, usage counter, printer status, MAC address, and token.
Touch Screen Icons
!Indicates that there is an error such as filament empty or door open.
Indicates that Ethernet is connected.
Indicates WiFi signal strength and if connected to WiFi symbol will be blue.
Indicates that the extruder is cool. Indicates that the extruder is warm.
Indicates that the extruder is hot.
Indicates that the printer is connected to Spark 3D printing services and that it can receive remote commands.
20
Initial Setup
The first time you power on your Dremel 3D40 you will be prompted to perform an initial setup of network, cloud services, and printer registration. Completing this process will give you access to features such as printing wirelessly from your PC or Dremel3D mobile app, printer sharing amongst your friends and family, notifications of firmware updates, and printer status monitoring.
NOTE: Dremel3D mobile app can be downloaded from the app stores for iOS or Android.
1. To complete initial setup, tap “Yes” when prompted on the initial setup screen. If you decline this setup you can always setup network and register later.
2. If you choose “Yes”, 3D40 will automatically connect to your ethernet (if plugged into router skip to step 5) or search for available wireless networks.
3. Choose your wireless network using the touchscreen. Use the arrows to scroll through the list of available wireless
networks. When your wireless network name is highlighted, tap “Accept”.
4.Enter your wireless network password and tap “Accept”.
5.Tap “Yes” to register your 3D40 and write down the token displayed at the bottom of the touchscreen. This token will be used to link your 3D40 to your Dremel3D.com account.
6.Tap “Done” to complete the initial setup process on your printer.
7.Visit Dremel3D.com or launch the Dremel3D mobile app and follow the prompts to complete your user profile creation and 3D40 registration.
21

Getting Started with Your Dremel 3D App
The Dremel 3D app allows you to connect to your 3D40 from your mobile device. With the Dremel 3D app you can view models and projects in the Dremel 3D library, send, pause and cancel builds, monitor build status, receive push notification updates, and more. Download the Dremel 3D app from your mobile application store and follow the setup steps below to get started.
1. After installing and launching the Dremel3D app on your mobile device you will need to Log In with your existing Dremel3D user information or Social Log In or Sign Up to create a new account.
2. Sign Up by entering the required information, read and agree to the Dremel3D terms and conditions, and tap “Sign Up”. This information can now be used to also log in at www.Dremel3D.com.
3. Register your 3D40 by filling in the required information and tapping “Register”. The serial number of your 3D40 is a 9 digit number that can be found near the power cable, it is important to enter this number exactly as it appears on your 3D40.
22
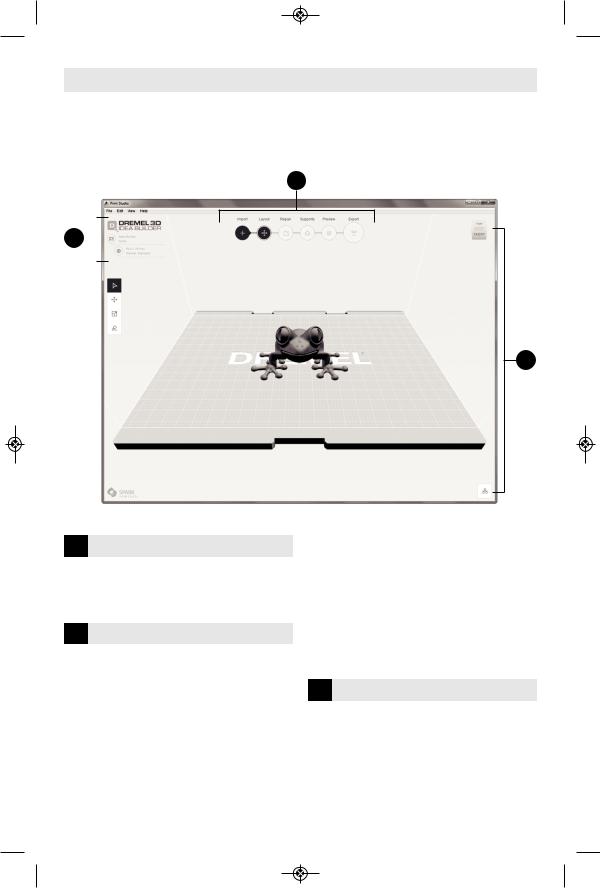
Print Studio Software Overview
Dremel 3D40 is compatible with Autodesk Print Studio which can be installed from the USB flash drive that came with your printer or downloaded from www.dremel3d.com. Print Studio allows you to import, edit, and build 3D files. The overview below highlights the key controls, while additional support resources are available in the HELP menu.
2
1 
3
1 SETUP
Printers – Choose you printer type
Settings – Choose your material and build resolution
2
Import – Add models to the build plate from file menu or drag and drop
Layout – Arrange models on the build plate, scale, and rotate
Repair – Automatic repair or manual model healing, crop, plane cut, patch holes, and balancing (manual commands recommended for advanced users)
Supports – Create automatic or manual supports for parts with overhangs
Preview – Create and view the paths that the extruder will follow when building your part
Print / Export – Send your build directly to your Idea Builder when connected via USB cable or save to you computer to load via USB flash drive
3 VIEW
View Cube – Choose the standard orientation that you’d like to view
Object Browser – See a list of all objects on your build plate and turn On/Off automatic supports
23
Getting Ready to Build
|
|
Observe |
all provided |
||
! |
WARNING |
||||
warnings |
and safety |
||||
instructions when using the Dremel 3D40. |
|||||
Failure to do so may result in fire, equipment |
|||||
damage, property damage or personal injury. |
|||||
|
|
Do not touch the extruder |
|||
! |
WARNING |
||||
tip during operation or |
|||||
until it has cooled down to at least 60°C |
|||||
(140°F). Contact with the extruder tip during |
|||||
or after operation before tip has cooled may |
|||||
result in personal injury. |
|
||||
|
|
Use only DREMEL filament. |
|||
! |
WARNING |
||||
|
|
Use |
of |
filament not |
|
|
|
||||
authorized by Dremel may result in |
|||||
equipment and property damage. |
|||||
|
|
Do not pull the filament |
|||
! |
CAUTION |
||||
|
|
out. |
Doing so may damage |
||
the extruder. |
|||||
|
|
|
|||
|
LOADING/CHANGING FILAMENT |
||||
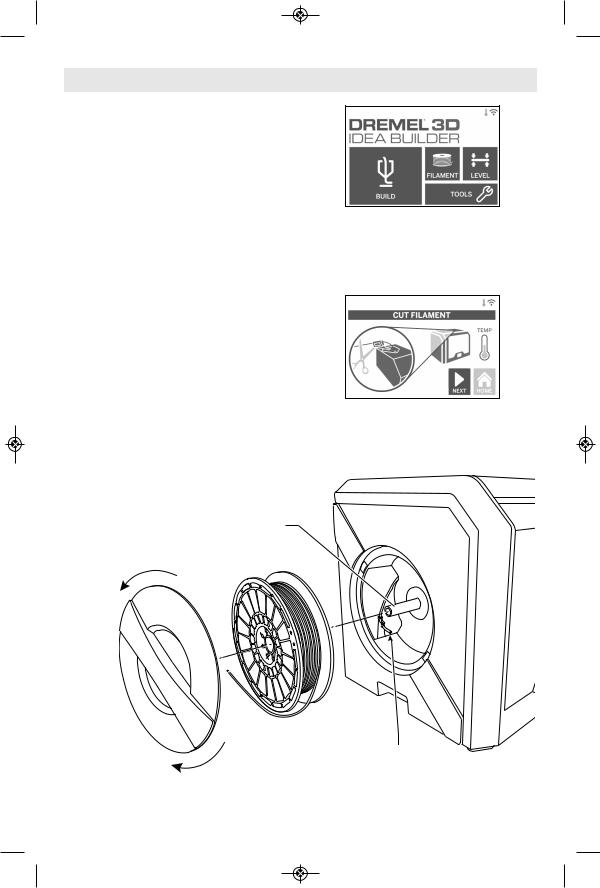
1. Start filament load/change process by tapping “Filament” button on touchscreen. Extruder will move to front right corner of print area and extruder tip will begin to heat.
2.After extruder stops moving, open the 3D40 Lid for better access to extruder.
3.If existing filament is loaded, cut existing filament near extruder intake and tap “Next” button on touchscreen.
4.Remove Spool door by rotating it counter clockwise and remove existing spool if one is present, see figure 1.
|
|
|
|
|
|
Spool |
|
FIG. 1 |
|
|
|
|
Holder |
|
|
|
|
|
|
|
|
|
|
Open
Filament |
Filament |
Close |
Guide Tube |
24
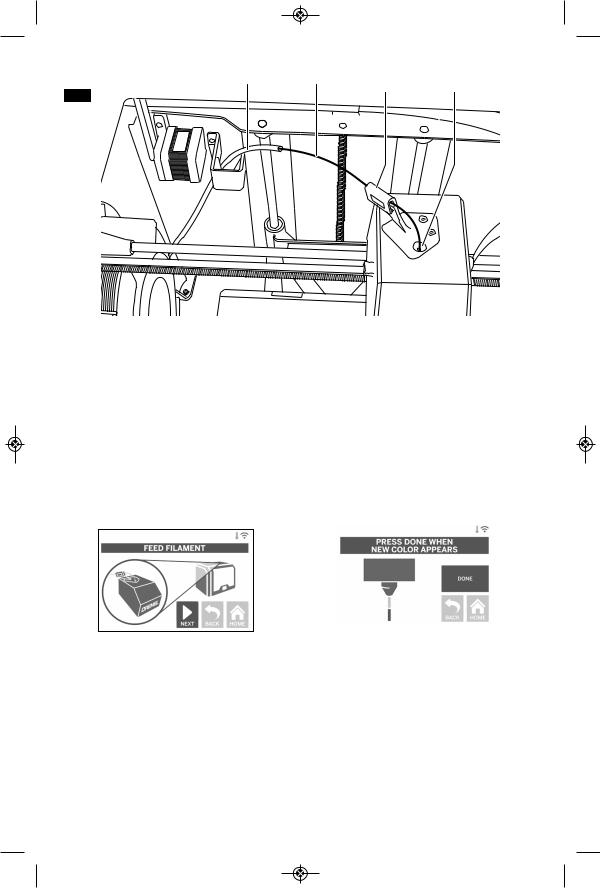
|
|
|
Filament |
Extruder |
Guide Tube |
Filament |
|||
|
|
|
Guide |
Intake |
|
|
|
FIG. 2
5.Thread tip of new filament through guide tube, place spool on spool holder, replace spool door by aligning locking tabs and rotating clockwise, see figure 1. Tap “Next” on touchscreen.
6.If changing existing filament, 3D40 will automatically purge existing filament.
7.When Feed Filament screen appears, tap “Next” on touchscreen and thread filament coming from guide tube into extruder intake until extruder feeds through on its own, see figure 2.
8.Filament will be drawn into the extruder and begin to exit from the hot extruder tip.
NOTE: Your Dremel 3D40 was tested by building objects before leaving the factory. These test objects may have
been made with a different filament color than you are using. Therefore, a small amount of filament may be remaining in the extruder.
9. When new filament appears from extruder tip, tap “done” on touchscreen to complete filament load process, return to main menu, and calibrate extruder. Carefully remove excess filament without touching hot extruder tip. If necessary, carefully remove debris from extruder tip with needle nose pliers.
|
|
|
|
|
|
|
|
|
Use extra care not to |
||
! |
CAUTION |
||||
damage the extruder tip |
|||||
when clearing debris. Dremel 3D40 will not work properly with a damaged extruder tip and will require replacement.
10. Close 3D40 lid and door.
25
|
PREPARING BUILD PLATFORM |
||
|
|
Do not drop the build |
|
! |
WARNING |
||
platform. Tempered glass |
|||
plate may break and result in personal injury. |
|||
|
|
Do not remove tempered |
|
! |
WARNING |
||
glass plate from plastic |
|||
holder. Contacting with tempered glass plate |
|||
edge may result in personal injury. |
|||
|
|
Before every build make |
|
! |
CAUTION |
||
sure that the build platform is |
|||
covered with Dremel specified build tape. Use of improper build tape may result in equipment damage and poor object build quality.
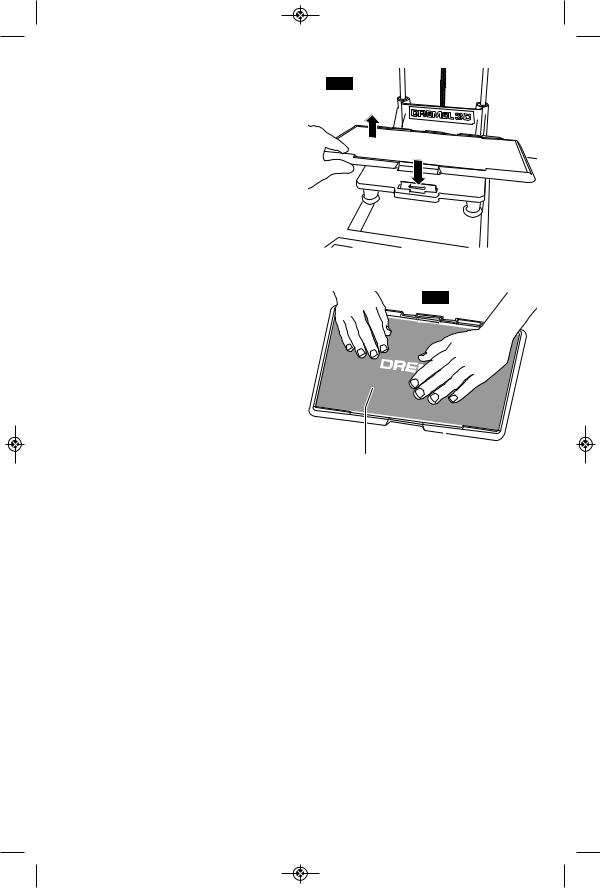
1. If build platform is installed, remove by pinching the clip located at the front of the build platform and lifting the build platform off the base, figure 3.
2. Remove adhesive liner from Build Tape and place Build Tape over Build Platform. For best results, apply Build Tape at center of Build Platform first and smooth outward to remove any air bubbles, figure 4.
3. Install the build platform using the build platform clips.
FIG. 3
LIFT
PRESS
FIG. 4
Build Tape |
|
|
Build |
||
|
Platform |
|
26

LEVELING BUILD PLATFORM
! Do not touch the extruder WARNING tip during Dremel 3D40 operation or until it has cooled down to 60°C (140°F). Contact with the extruder tip during or after operation before tip has
cooled may result in personal injury.
It is important you level the build platform every time you replace the build tape or reinstall the build platform to ensure that the build platform is evenly spaced from the extruder head. Make sure to remove any air bubbles from between the build platform and the build tape. Not leveling the build platform or eliminating air bubbles may cause objects to not build properly.
1. Make sure you have placed Build Tape on Build Platform and no objects are present. Applying Build Tape after leveling may effect the consistency of your object.
2. Tap “Level” on 3D40’s touchscreen.
3. The extruder and build platform will move into position to level the build platform. 3D40 will first check level at the back center of the build platform. The two knobs under the build platform are used to raise and lower the build platform on the left and right. The extruder contains a sensor that detects if the bed is level, no additional tools are necessary.
4. The touchscreen will indicate if your build platform is too high or too low. If the build platform is too high, adjust the appropriate knob by rotating right until you hear a “beep” and the touchscreen indicates that it is ready to verify that the bed is level.
5.If the build platform is too low, adjust the knob by rotating left until you hear a “beep” and the touchscreen indicates that it is ready to verify that the bed is level.
6.Tap “Verify” to check the bed level. If further adjustment is needed the touchscreen will indicate the direction, if the level is correct, the extruder will move to the next point and the level process can be repeated.
7.Repeat steps 4-6 for the second position, when you bed is fully level the extruder will automatically move to the calibration position and complete the leveling process.
27

CONNECTING USB CABLE
1. Ensure 3D40 power switch is in the off position.
2. Connect the included USB cable to your
3D40 and computer, figure 5.
3. Open software.
4. Turn your Dremel 3D40 on using the power switch to sync your computer to your Dremel 3D40.
CONNECTING ETHERNET
1. Ensure 3D40 power switch is in the off position.
2. Plug ethernet cable into your 3D40, figure 6.
3. Turn your Dremel 3D40 on using the power switch. Ethernet connection should be detected automatically. Tap “Accept” to confirm connection.
FIG. 5
USB
FIG. 6
Ethernet
|
|
|
|
|||
|
|
Building |
||||
|
Observe |
all provided |
a small amount of filament may be remaining |
|||
! WARNING |
||||||
warnings |
and safety |
in the extruder. The start of your first object |
||||
instructions when using the Dremel 3D40. |
may have some of this filament color until it |
|||||
Failure to do so may result in fire, equipment |
transitions over to your filament color. |
|||||
damage, property damage or personal injury. |
You have several options when building on |
|||||
|
Do not reach inside the |
your 3D40: |
||||
! WARNING |
||||||
|
Dremel 3D40 while it is in |
1) |
On-Printer Storage |
|||
operation. Contact with Dremel 3D40 moving |
||||||
2) |
USB Flash Drive |
|||||
parts during operation may result in poor build |
||||||
3) |
Online Print Queue |
|||||
quality, equipment damage or personal injury. |
||||||
4) |
Computer |
|||||
NOTE: Your Dremel 3D40 will build test |
||||||
objects before leaving the factory. These test objects may have been made with a different filament color than you are using. Therefore,
28
BEFORE YOU BUILD
1. Ensure an adequate amount of filament is loaded (see page 24).
TIP: You can determine whether you have enough filament to complete your object before building by comparing the length of filament needed as displayed by Print Studio to the length of filament on spool indicated by the length gauge.
If 3D40 runs out of filament during a build, it will pause until more filament is added.
2. Ensure build tape is applied, build platform is level and clear of objects.
BUILDING FROM
ON-PRINTER STORAGE
1. On the main menu tap “Build”.
2. On the build menu tap the printer icon.
3. Tap the model file you would like to build. (Use arrows to scroll through pages)
4.In the model detail page tap “Build” to begin building process.
5.Your 3D40 will first align the extruder and build platform to their zero positions then the level sensor will lightly touch the build platform to complete alignment. Your extruder tip will begin to heat which may take a few minutes. Once the proper temperature is reached your model will begin to build.
6.Once your object is finished your 3D40 will automatically align the extruder and build platform to their calibration positions and cool the extruder tip.
7.Wait until the touch screen indicates that the extruder is “cool” to remove your object. See section for removing object from build platform below for object removal instructions.
29
BUILDING FROM USB FLASH DRIVE
1. On main menu tap “Build”.
2. Tap USB icon to access contents of USB flash drive.
3. Follow steps 3-7 from Build from OnPrinter storage to complete build from USB flash drive.
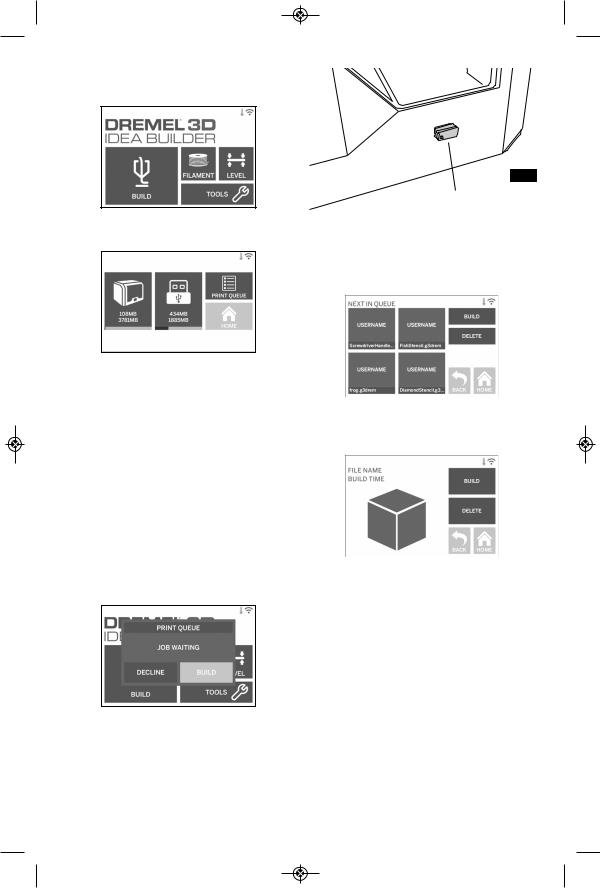
BUILDING FROM PRINT QUEUE
If your 3D40 is registered and added to your Dremel3D profile, you can send Builds from your web browser at www.Dremel3D.com or by using the Dremel3D mobile app for iOS or Android.
1. If your 3D40 is displaying the Print Queue notification tap “Build” in the notification window to access the Print Queue. If you choose “Decline” you can later access your Print Queue by tapping “Build” then “Print Queue”.
USB Flash
FIG. 7
Drive
2.In the Print Queue menu you can choose to “Build” the next model in the queue or “Delete” it and advance to the next model.
3.In Model Details tap “Build” to begin building process or “Delete” to remove the file.
BUILD FROM COMPUTER
Dremel 3D40 is compatible with Print Studio from Autodesk. Follow the instructions that came with this software to complete a Build from your computer.
CANCELING YOUR BUILD ON 3D40
To cancel your object during preheating or building, tap “Stop” on the touch screen. If you confirm “Yes” the extruder and build platform will move to their calibration positions.
30
 Loading...