


GB
DE
FR
IT
NL
DA
SV
Original instructions |
21 |
Übersetzung der Originalbedienungsanleitung |
27 |
Traduction de la notice originale |
34 |
Traduzione delle istruzioni originali |
41 |
Vertaling van de originele gebruiksaanwijzing |
49 |
Oversættelse af betjeningsvejledning |
56 |
Översättning av originalinstruktioner |
62 |
NO
FI
ET
LT
LV
AR
Oversettelse av originalinstruksjonene |
69 |
Käännös alkuperäisistä ohjeista |
75 |
Algsete juhiste tõlge |
81 |
Originalių instrukcijų vertimas |
88 |
Oriģinālās lietošanas pamācības tulkojums |
95 |
ةيلصلأا تاميلعتلا ةمجرت |
107 |
C/N
2610Z07345 10/2015 |
All Rights Reserved |

1 |
200 |
2 |
|
|
|
|
|
|
|
|
|
|
|
|
|
|
|
|
|
C |
D |
I |
F |
G |
|
A |
B |
|
|
|
||
|
|
|
|
|
|
||
|
|
|
|
E |
H |
|
|
|
|
|
|
2 |
|
|
|

3000
3 |
A |
B |
C |
D |
E |
F |
I H I G
4000
4200
4 |
|
|
|
J |
|
|
|
|
|
G |
|
|
|
|
|
|
|
|
|
|
H |
|
|
|
|
E |
|
|
|
|
|
D |
|
|
F |
|
|
|
|
|
|
|
B |
|
|
I |
|
|
|
|
|
|
|
|
|
I |
K |
|
|
|
|
|
|
|
|
|
A |
C |
|
|
|
|
|
|
|
|
|
5 |
C |
E |
H |
J |
G |
B M L I F
3

6 |
7 |
N |
|
|
D |
|
O |
|
|
|
|
|
P |
|
|
|
|
|
Q |
|
|
|
|
|
|
|
A |
|
|
|
A |
R |
|
|
|
|
|
|
K T |
S |
|
8 |
|
|
9 |
|
 D
D
B
T |
S |
|
10
h |
h |
hmax = |
MAX |
1/2 h |
|
45 mm |
|
11 3000/4000
12
C
 D
D
T  B
B
 S
S
4

13 |
15 |
200/3000 |
17 |
4200 |
14 |
16 |
200/3000 |
18 |
4200 |
5
19 |
|
20 |
4200 |
|
4200 |
|
B |
|
|
M |
C |
21 |
|
22 |
4200 |
M |
4200 |
|
|
|
|
B |
|
|
|
M |
M
B
1 
1
2
3
 3
3
6

1
3
2
4
GB
DE
FR
IT
NL
DA
SV
NO
FI
ET |
Optimaalse jõudluse tagamiseks laske oma uuel Flexshaft-seadmel |
enne kasutamist 2 minutit suurel kiirusel vertikaalasendis töötada. |
|
LT |
Kad veiktų optimaliai, prieš pirmąkart naudodami leiskite ant sukamojo |
įrankio uždėtam „Flexshaft“ dideliu greičiu vertikaliai veikti 2 minutes. |
|
LV |
Lai nodrošinātu optimālu ierīces darbību, divas minūtes pirms ierīces |
lietošanas darbiniet jauno, elastīgo skrūvvārpstu uz rotējošā rīka |
|
|
vertikālā stāvoklī. |
AR |
|
7

1 |
2 |
3 |
4 |
5 |
200/3000/4000 |
200/3000/4000 |
200/3000/4000 |
3 |
4 |
6 |
4200 |
4200 |
|
7 |
|
|
8
1
3
1
2 |
4 |
2 |
3 |
9 |

1 |
2 |
3 |
4 |
565
566
5 |
6 |
7 |
8 |
|
9 |
10
1 |
2 |
568 |
3 |
4 |
5 |
6 |
7 |
8 |
|
9 |
11

1 |
4 |
7 |
8 |
2 |
5 |
7a |
8a |
3 |
678 |
6
CM |
7b |
8b |
12

1 |
2 |
A
3 |
4 |
A B
5 |
6 |
575
B
A
7 |
8 |
13
1 |
2 |
550 |
3
14
15

Max RPM
Al |
Cu |
105-113 |
35.000 |
|
■ |
■ |
|
■ |
|
|
|
114-199 |
30.000 |
|
■ |
■ |
|
■ |
|
|
|
403-405 |
15.000 |
|
|
|
■ |
■ |
■ |
■ |
■ |
407-408 |
35.000 |
|
■ |
■ |
■ |
■ |
■ |
■ |
■ |
409 |
35.000 |
402 |
■ |
■ |
■ |
■ |
■ |
|
■ |
414 |
20.000 |
401 |
|
|
■ |
■ |
■ |
■ |
■ |
420 |
35.000 |
402 |
■ |
■ |
■ |
■ |
■ |
|
■ |
422-425 |
20.000 |
401 |
|
|
■ |
■ |
■ |
■ |
■ |
426 |
35.000 |
402 |
■ |
■ |
|
■ |
■ |
|
■ |
428 |
15.000 |
|
|
|
■ |
■ |
■ |
■ |
■ |
429 |
20.000 |
401 |
|
|
■ |
■ |
■ |
■ |
■ |
430-438 |
35.000 |
|
■ |
■ |
■ |
■ |
■ |
■ |
■ |
442-443 |
15.000 |
|
|
|
■ |
■ |
■ |
■ |
■ |
453-457 |
30.000 |
1453 |
|
|
■ |
■ |
■ |
|
|
462 |
30.000 |
|
|
|
■ |
■ |
■ |
|
|
502-504 |
35.000 |
|
■ |
■ |
■ |
■ |
■ |
■ |
■ |
511S-512S |
20.000 |
(SC)402 |
■ |
■ |
|
|
|
|
|
516 |
20.000 |
|
|
|
■ |
■ |
■ |
■ |
■ |
520 |
20.000 |
|
|
|
■ |
■ |
■ |
■ |
■ |
530-532 |
15.000 |
|
|
|
■ |
■ |
■ |
■ |
■ |
535-537 |
15.000 |
|
|
|
|
|
|
■ |
■ |
538 |
20.000 |
|
|
|
■ |
|
|
|
|
540 |
35.000 |
402 |
■ |
■ |
■ |
■ |
■ |
|
■ |
542 |
35.000 |
|
■ |
■ |
■ |
|
|
|
|
546 |
35.000 |
670 |
■ |
■ |
|
|
|
|
|
561 |
35.000 |
565 |
■ |
■ |
■ |
|
|
|
|
562 |
35.000 |
566 |
|
|
|
|
|
|
|
569-570 |
20.000 |
568 |
|
|
|
|
|
|
|
612-655 |
35.000 |
231/335 |
■ |
■ |
|
|
|
|
|
932-997 |
25.000 |
|
|
|
■ |
■ |
■ |
■ |
■ |
4485-4486 |
35.000 |
|
|
|
|
|
|
|
|
7103-7144 |
25.000 |
|
|
|
|
■ |
■ |
■ |
■ |
8153-8215 |
25.000 |
|
|
|
■ |
■ |
■ |
■ |
■ |
9901-9911 |
30.000 |
|
|
■ |
■ |
■ |
■ |
|
|
9931-9936 |
35.000 |
|
■ |
■ |
■ |
■ |
|
|
|
83322-85602 |
25.000 |
|
|
|
|
|
|
|
|
SC406-SC456 |
35.000 |
SC402 |
■ |
■ |
■ |
■ |
■ |
|
■ |
SC476 |
35.000 |
SC402 |
|
|
|
|
|
|
|
SC544 |
35.000 |
SC402 |
■ |
■ |
■ |
|
|
|
|
SC545 |
35.000 |
SC402 |
|
|
|
|
|
|
|
16

Ag |
Plastic |
Plexi |
|
|
|
|
|
■ |
■ |
■ |
|
|
|
|
|
|
|
|
|
■ |
■ |
|
|
■ |
■ |
■ |
|
|
|
|
|
|
|
|
■ |
|
|
|
|
|
|
|
|
|
|
|
|
|
|
|
■ |
|
|
|
|
■ |
■ |
|
|
|
|
|
|
|
|
|
■ |
■ |
■ |
|
■ |
■ |
|
|
|
|
|
|
|
|
|
|
■ |
|
|
|
|
■ |
■ |
|
■ |
■ |
■ |
|
■ |
■ |
|
|
|
|
|
|
|
|
|
|
■ |
|
|
|
|
■ |
■ |
|
|
|
|
|
|
|
|
|
■ |
■ |
■ |
|
■ |
■ |
|
|
|
|
|
|
|
|
|
|
■ |
|
|
|
|
|
|
|
|
|
|
|
|
|
|
|
■ |
|
|
|
|
■ |
■ |
|
|
|
|
|
|
|
|
|
■ |
|
|
|
|
■ |
■ |
|
|
|
|
|
|
|
|
|
■ |
|
|
|
|
|
|
|
|
|
|
|
|
|
|
|
|
|
|
|
|
|
|
|
|
|
■ |
|
■ |
|
|
|
|
|
|
|
|
|
|
|
■ |
|
|
|
|
■ |
|
|
|
|
|
|
|
|
|
|
|
|
|
|
|
|
|
|
■ |
|
|
|
|
|
|
|
|
|
|
|
|
|
|
|
■ |
|
|
|
|
■ |
|
|
■ |
|
|
|
|
|
|
|
|
|
|
|
|
|
|
|
■ |
|
|
|
|
|
|
|
|
|
|
|
|
|
|
|
|
|
|
|
|
|
|
|
■ |
■ |
■ |
|
■ |
■ |
|
|
|
|
|
|
|
|
|
|
|
|
|
|
|
|
|
|
|
|
|
|
|
|
|
|
|
|
■ |
|
|
■ |
■ |
■ |
|
|
|
|
|
|
|
|
|
■ |
|
|
|
■ |
|
|
|
|
|
|
|
■ |
|
|
|
|
|
|
|
|
|
|
|
|
|
|
|
■ |
■ |
■ |
|
|
|
|
|
|
|
|
■ |
|
|
|
|
|
|
|
|
|
|
|
|
|
|
|
|
|
|
|
|
|
|
|
■ |
|
|
■ |
|
|
|
■ |
|
|
|
|
|
|
|
|
■ |
|
|
|
|
|
|
|
|
|
|
|
|
|
|
|
|
|
■ |
|
■ |
■ |
|
|
|
|
|
|
|
|
|
|
|
|
|
|
■ |
■ |
|
■ |
|
|
|
|
|
|
|
|
|
■ |
■ |
■ |
■ |
|
|
■ |
|
|
|
|
|
|
|
|
■ |
■ |
■ |
|
■ |
■ |
|
|
|
|
|
|
|
|
|
|
|
|
|
|
|
■ |
■ |
|
|
|
|
|
|
|
|
|
|
|
|
|
|
|
|
|
|
■ |
■ |
■ |
■ |
■ |
|
|
|
|
|
|
|
|
|
|
17

GB
EU DECLARATION OF CONFORMITY We declare under our sole responsibility that this product is in conformity with the following standards or standardized documents: EN60745, EN55014, EN61000, in accordance with the provisions of the directives 2006/42/EC, 2004/108/EC (until 19 April, 2016), 2014/30/EU (from 20 April 2016), 2011/65/EU.
Noise / Vibration |
200 |
3000 |
4000 |
4200 |
|
|
|
|
|
Sound Pressure Level dB(A) |
74.5 |
77.1 |
78.0 |
74.4 |
Sound Power Level dB(a) |
85.5 |
88.1 |
89.0 |
85.4 |
(standard deviation 3dB) |
|
|
|
|
|
|
|
|
|
Vibration m/s2 (triax vector sum) |
12.2 |
12.8 |
11.4 |
18.0 |
Uncertainty K m/s2 |
1.5 |
1.5 |
1.5 |
3.3 |
NOTE: The declared vibration total value has been measured in accordance with a standard test method and may be used for comparing one tool with another. It may also be used in a preliminary assessment of exposure.
The vibration emission during actual use of the power tool can differ ! WARNING from the declared total value depending on the ways in which you use the tool. Make an estimation of the exposure in the actual conditions
of use and identify the safety measures for personal protection accordingly (taking account of all parts of the operating cycle such as the times when the tool is switched off and when it is running idle in addition to the trigger time).
Technical file at: Dremel (PT-SEU/ENG1), Konijnenberg 60, 4825 BD, Breda, NL
DE
EG-KONFORMITÄTSERKLÄRUNG Wir erklären in alleiniger Verantwortung, dass dieses Produkt den folgenden Standards und standardisierten Dokumenten entspricht: EN 60745, EN 55014, EN 61000 gemäß den Bestimmungen der Richtlinien 2006/42/EG, 2004/108/EG (bis 19. April 2016), 2014/30/EU (ab 20. April 2016), 2011/65/EU.
Geräusche/Vibrationen |
200 |
3000 |
4000 |
4200 |
|
|
|
|
|
Schalldruckpegel dB(A) |
74,5 |
77,1 |
78,0 |
74,4 |
Schallleistungspegel dB(a) |
85,5 |
88,1 |
89,0 |
85,4 |
(Standardabweichung: 3 dB) |
|
|
|
|
|
|
|
|
|
Vibration m/s2 (Triax-Vektorsumme) |
12,2 |
12,8 |
11,4 |
18,0 |
Unsicherheit K m/s2 |
1,5 |
1,5 |
1,5 |
3,3 |
HINWEIS: Der angegebene Vibrationsgesamtwert wurde entsprechend einer Standard-Testmethode gemessen und kann zum Vergleich von Werkzeugen verwendet werden. Er kann auch zur vorläufigen Einschätzung der Exposition genutzt werden.
! |
WARNUNG |
In Abhängigkeit von der Art, in der das Werkzeug verwendet wird, |
kann die Schwingungsemission während der eigentlichen Arbeit von |
||
dem angegebenen Gesamtwert abweichen. Um die Exposition unter |
den tatsächlich Anwendungsbedingungen abzuschätzen und zu bestimmen, welche persönlichen Schutzmaßnahmen erforderlich sind, sollten zusätzlich zu den Bedienungszeiten auch die Zeiten berücksichtigt werden, in denen das Gerät abgeschaltet ist oder im Leerlauf läuft.
Technische Unterlagen erhalten Sie bei: Dremel (PT-SEU/ENG1), Konijnenberg 60, 4825 BD, Breda, NL
FR
DÉCLARATION DE CONFORMITÉ UE Nous déclarons, sous notre propre responsabilité, que ce produit est conforme aux normes ou aux documents normalisés suivants : EN60745, EN55014, EN61000, conformément aux dispositions des directives 2006/42/CE, 2004/108/CE (jusqu›au 19 avril 2016), 2014/30/UE (à partir du 20 avril 2016), 2011/65/UE.
Bruit/Vibration |
200 |
3000 |
4000 |
4200 |
|
|
|
|
|
Niveau de pression sonore dB(A) |
74,5 |
77,1 |
78,0 |
74,4 |
Niveau de puissance sonore dB(a) |
85,5 |
88,1 |
89,0 |
85,4 |
(écart-type 3 dB) |
|
|
|
|
|
|
|
|
|
Vibrations m/s2 (somme vectorielle triaxiale) |
12,2 |
12,8 |
11,4 |
18,0 |
Incertitude K m/s2 |
1,5 |
1,5 |
1,5 |
3,3 |
REMARQUE : La valeur totale de vibration déclarée a été mesurée selon une méthode de test standard, permettant de comparer les outils entre eux. Elle peut également être utilisée dans une évaluation préliminaire d›exposition.
L›émission de vibrations lors de l›utilisation de l›outil électroportatif ! ATTENTION peut différer de la valeur totale déclarée selon la manière dont vous l›utilisez. Estimez l›exposition à ces dernières dans les conditions
réelles d›utilisation, qui vous permettra d›identifier les mesures de sécurité à prendre en matière de protection personnelle (en tenant compte de l›ensemble des parties du cycle d›exploitation, telles que le moment où l›outil est éteint et celui où il est en veille, en plus de celui où il est activé).
Fiche technique disponible auprès de : Dremel (PT-SEU/ENG1), Konijnenberg 60, 4825 BD, Breda,
Pays-Bas
IT
DICHIARAZIONE DI CONFORMITÀ UE Dichiariamo sotto la nostra esclusiva responsabilità che questo prodotto è conforme ai seguenti standard o documenti standardizzati: EN60745, EN55014, EN61000, secondo le disposizioni previste dalle direttive 2006/42/CE, 2004/108/CE (fino al 19 aprile 2016), 2014/30/UE (a partire dal 20 aprile 2016), 2011/65/UE.
Rumore / Vibrazioni |
200 |
3000 |
4000 |
4200 |
|
|
|
|
|
Livello di pressione sonora dB(A) |
74,5 |
77,1 |
78,0 |
74,4 |
Livello di potenza sonora dB(a) |
85,5 |
88,1 |
89,0 |
85,4 |
(deviazione standard 3dB) |
|
|
|
|
|
|
|
|
|
Vibrazioni m/s2 (somma vettoriale delle |
12,2 |
12,8 |
11,4 |
18,0 |
tre direzioni) |
|
|
|
|
Incertezza K m/s2 |
1,5 |
1,5 |
1,5 |
3,3 |
N.B.: Il valore totale dichiarato delle vibrazioni è misurato secondo un metodo di prova standard e può essere utilizzato per confrontare un utensile con un altro. Potrebbe essere utilizzato anche in una valutazione preliminare dell’esposizione.
L’emissione di vibrazioni durante l’utilizzo dell’elettroutensile può ! ATTENZIONE variare dal valore totale dichiarato in base al modo in cui si utilizza
l’utensile. Fare una stima dell’esposizione nelle condizioni di utilizzo attuali e, di conseguenza, identificare le misure di sicurezza per la protezione personale (prendendo in considerazione tutte le parti del ciclo di funzionamento come le volte in cui l›utensile viene spento e quando funziona in folle oltre al tempo di azionamento).
Documentazione tecnica presso: Dremel (PT-SEU/ENG1), Konijnenberg 60, 4825 BD, Breda, NL
NL
EU-CONFORMITEITSVERKLARING Wij verklaren onder eigen verantwoordelijkheid dat dit product voldoet aan de volgende normen of normatieve documenten: EN60745, EN55014, EN61000, overeenkomstig de bepalingen van de richtlijnen 2006/42/EG, 2004/108/EG (tot 19 april 2016), 2014/30/EU (vanaf 20 april 2016), 2011/65/EU.
Geluid/trillingen |
200 |
3000 |
4000 |
4200 |
Geluidsdrukniveau dB(A) |
74,5 |
77,1 |
78,0 |
74,4 |
Geluidsdrukniveau dB(a) |
85,5 |
88,1 |
89,0 |
85,4 |
(standaardafwijking 3 dB) |
|
|
|
|
|
|
|
|
|
Trilling m/s2 (triaxiale vectorsum) |
12,2 |
12,8 |
11,4 |
18,0 |
Onzekerheid K m/s2 |
1,5 |
1,5 |
1,5 |
3,3 |
OPMERKING: Het opgegeven totale trillingsniveau is gemeten volgens een standaard testmethode en kan worden gebruikt om een gereedschap te vergelijken met een ander. Het kan ook worden gebruikt als preliminaire evaluatie van de blootstelling hieraan.
De trillingsemissie tijdens het daadwerkelijke gebruik van het
! LET OP gereedschap kan afwijken van de opgegeven totale waarde. Dit is afhankelijk van de manier waarop u het gereedschap gebruikt. Maak
een inschatting van de mate waarin u tijdens daadwerkelijk gebruik aan trillingen wordt blootgesteld en stel aan de hand hiervan de persoonlijke beschermingsmaatregelen vast (waarbij u rekening houdt met alle onderdelen van de bedrijfscyclus, waaronder de tijden dat het gereedschap is uitgeschakeld of is ingeschakeld maar niet wordt gebruikt, evenals de blootstellingstijd).
Technisch dossier bij: Dremel (PT-SEU/ENG1), Konijnenberg 60, 4825 BD, Breda, NL
DA
EU OVERENSSTEMMELSESERKLÆRING Vi erklærer under eneansvar, at dette produkt er i overensstemmelse med følgende normer eller standardiserede dokumenter: EN60745, EN55014, EN61000, i overensstemmelse med bestemmelserne i direktiverne 2006/42/EF, 2004/108/EF (indtil 19. april 2016), 2014/30/EU (fra 20. april 2016), 2011/65/EU.
Støj / vibration |
200 |
3000 |
4000 |
4200 |
|
|
|
|
|
Lydtrykniveau dB(A) |
74,5 |
77,1 |
78,0 |
74,4 |
Lydtryksniveay dB(a) |
85,5 |
88,1 |
89,0 |
85,4 |
(standardafvigelse 3dB) |
|
|
|
|
|
|
|
|
|
Vibration m/s2 (triax-vektorsum) |
12,2 |
12,8 |
11,4 |
18,0 |
Usikkerhed K m/s2 |
1,5 |
1,5 |
1,5 |
3,3 |
|
|
|
|
|
BEMÆRK: Den opgivede samlede måleværdi for vibrationen er blevet målt i henhold til en standardiseret målemetode. Denne målemetode kan bruges til at sammenligne forskellige værktøjer med hinanden. Den kan også anvendes som en foreløbig vurdering af eksponeringen.
Under faktisk brug af el-værktøjet kan vibrationsemissionen afvige fra ! ADVARSEL den angivne samlede værdi, afhængigt af, hvordan værktøjet bruges.
Foretag en eksponeringsvurdering i de omgivelser, hvor værktøjet skal bruges, og tag derefter de nødvendige sikkerhedsforanstaltninger (alle aspekter af arbejdsforløbet skal indgå i vurderingen; også de perioder, hvor værktøjet er slukket eller kører i tomgang).
Teknisk fil hos: Dremel (PT-SEU/ENG1), Konijnenberg 60, 4825 BD, Breda, Holland
18

SV
EU-FÖRSÄKRAN OM ÖVERENSSTÄMMELSE Vi deklarerar härmed att denna produkt uppfyller villkoren i följande standarder eller standardiserade dokument: EN60745, EN55014, EN61000, i enlighet med direktiv 2006/42/EC, 2004/108/EC (till 19 april 2016), 2014/30/EU (från 20 april 2016), 2011/65/EU.
Buller / Vibration |
200 |
3000 |
4000 |
4200 |
|
|
|
|
|
Ljudtrycksnivå dB(A) |
74,5 |
77,1 |
78,0 |
74,4 |
Ljudeffektsnivå dB(a) |
85,5 |
88,1 |
89,0 |
85,4 |
(standardavvikelse 3 dB) |
|
|
|
|
|
|
|
|
|
Vibration m/s2 (triax vektorsumma) |
12,2 |
12,8 |
11,4 |
18,0 |
Osäkerhet K m/s2 |
1,5 |
1,5 |
1,5 |
3,3 |
OBS! Det angivna totala vibrationsvärdet har uppmätts i enlighet med en standardtestmetod och får användas för att jämföra ett verktyg med ett annat. Det kan även användas vid en preliminär exponeringsbedömning.
Beroende på hur verktyget används kan vibrationerna vid användning ! VARNING av verktyget skilja sig från det angivna totala vibrationsvärdet. Gör en uppskattning av exponeringen under verkliga användningsförhållanden
och vidta skyddsåtgärder för personalen därefter (ta hänsyn till alla delar i användningsförloppet, som när verktyget stängs av och utöver starttiden, när det går på tomgång).
Teknisk fil på: Dremel (PT-SEU/ENG1), Konijnenberg 60, 4825 BD, Breda, Nederländerna
NO
EU-SAMSVARSERKLÆRING Vi erklærer som eneansvarlig at dette produktet er i samsvar med følgende standarder eller standardiserte dokumenter: EN60745, EN55014, EN61000, i samsvar med bestemmelsene i direktivene 2006/42/EC, 2004/108/EC (til 19. april 2016) 2014/30/EU (fra 20. april 2016), 2011/65/EU.
Støy/vibrasjon |
200 |
3000 |
4000 |
4200 |
|
|
|
|
|
Lydtrykknivå dB (A) |
74,5 |
77,1 |
78,0 |
74,4 |
Lydkraftnivå dB (a) |
85,5 |
88,1 |
89,0 |
85,4 |
(standardavvik 3dB) |
|
|
|
|
Vibrasjon m/s2 (triax vektorsum) |
12,2 |
12,8 |
11,4 |
18,0 |
Usikkerhet K m/s2 |
1,5 |
1,5 |
1,5 |
3,3 |
MERK: Den erklærte totalverdien for vibrasjon er målt i henhold til en standard testmetode og kan brukes til å sammenligne et verktøy med et annet. Den kan også brukes til innledende eksponeringsvurdering.
Vibrasjonsemisjonen under faktisk bruk av elektroverktøyet kan avvike ! ADVARSEL fra de oppgitte verdiene, avhengig av måten verktøyet brukes på.
Vurder eksponeringen i de omgivelsene som verktøyet skal brukes i, og sørg deretter for nødvendige sikkerhetstiltak (alle aspekter av driftssyklusen skal tas med i vurderingen, også de periodene når verktøyet er slått av eller går på tomgang).
Teknisk fil finnes hos: Dremel (PT-SEU/ENG1), Konijnenberg 60, 4825 BD, Breda, Nederland
FI
EU-VAATIMUSTENMUKAISUUSVAKUUTUS Vakuutamme, että tämä tuote täyttää seuraavien standardien tai standardiasiakirjojen vaatimukset: EN60745, EN55014, EN61000, direktiivien 2006/42/EY, 2004/108/EY (19. huhtikuuta 2016 saakka), 2014/30/EU (alkaen 20. huhtikuuta 2016), 2011/65/EU mukaisesti.
Melu/tärinä |
200 |
3000 |
4000 |
4200 |
Äänenpainetaso dB(A) |
74,5 |
77,1 |
78,0 |
74,4 |
Äänitehotaso dB(a) |
85,5 |
88,1 |
89,0 |
85,4 |
(standardipoikkeama 3dB) |
|
|
|
|
|
|
|
|
|
Tärinä m/s2 (kolmiakselinen vektorisumma) |
12,2 |
12,8 |
11,4 |
18,0 |
Epävarmuus K m/s2 |
1,5 |
1,5 |
1,5 |
3,3 |
HUOM.: Ilmoitettu tärinän kokonaisarvo on mitattu standardisoidun testausmenetelmän mukaan ja kokonaisarvon avulla voidaan verrata työkaluja toisiinsa. Sitä voidaan käyttää myös alustavaan altistusarviointiin.
Värinä sähkötyökalun todellisen käytön aikana voi poiketa ilmoitetusta ! VAROITUS kokonaisarvosta sen mukaan, millä tavalla työkalua käytetään. Arvioi altistus todellisissa käyttöoloissa ja tunnista sen mukaiset tarvittavat
toimet henkiloköhtaista suojaa varten (ottaen huomioon kaikki käyttösyklin osat, kuten ajat, jolloin työkalu on sammutettu tai vapaalla, varsinaisen käytön lisäksi).
Tekninen asiakirja osoitteessa: Dremel (PT-SEU/ENG1), Konijnenberg 60, 4825 BD, Breda, NL
ET
ELi VASTAVUSDEKLARATSIOON Avaldame, et vastutame ainuüksi selle eest, et toode vastab järgmistele standarditele või standarditud dokumentidele: EN60745, EN55014, EN61000 kooskõlas direktiivide 2006/42/EÜ, 2004/108/EÜ (kuni 19. aprillini 2016), 2014/30/EL (alates 20. aprillist 2016), 2011/65/EL sätetega.
Müra/vibratsioon |
200 |
3000 |
4000 |
4200 |
|
|
|
|
|
Helirõhu tase dB(A) |
74,5 |
77,1 |
78,0 |
74,4 |
Helivõimsuse tase dB(a) |
85,5 |
88,1 |
89,0 |
85,4 |
(standardhälve 3 dB) |
|
|
|
|
|
|
|
|
|
Vibratsioon m/s2 (kolmeteljeline vektori |
12,2 |
12,8 |
11,4 |
18,0 |
summa) |
|
|
|
|
Umbkaudu K m/s2 |
1,5 |
1,5 |
1,5 |
3,3 |
MÄRKUS. Vibratsiooni deklareeritud koguväärtust on mõõdetud vastavalt standardsele katsemeetodile ja seda võib kasutada ühe tööriista võrdlemisel teisega. Seda võib kasutada ka kokkupuute eelhindamisel.
Vibratsiooni emissioon seadme kasutamisel võib erineda deklareeritud ! ETTEVAATUST koguväärtusest, olenevalt sellest, millisel viisil tööriista kasutatakse.
Hinnake ligikaudselt vibratsiooniga kokkupuute aega tegelikes kasutustingimustes ja määrake kindlaks sobivad ohutusmeetmed isiklikuks kaitseks (võttes arvesse kõiki töötsükli etappe nagu nt aega, mil tööriist on välja lülitatud ja aega, mil see töötab tühjalt lisaks käivitusajale).
Tehnilise dokumendi asukoht. Dremel (PT-SEU/ENG1), Konijnenberg 60, 4825 BD, Breda, NL
LT
ES ATITIKTIES DEKLARACIJA Prisiimdami visą atsakomybę pareiškiame, kad šis produktas atitinka toliau nurodomus standartus arba standartizuotuosius dokumentus: EN60745, EN55014, EN61000, pagal direktyvų 2006/42/EB, 2004/108/EB (iki 2016 m. balandžio 19 d.), 2014/30/ES (nuo 2016 m. balandžio 20 d.), 2011/65/ES nuostatas.
Triukšmas ir vibracija |
200 |
3000 |
4000 |
4200 |
|
|
|
|
|
Garso slėgio lygis dB(A) |
74,5 |
77,1 |
78,0 |
74,4 |
Garso slėgio lygis dB(a) |
85,5 |
88,1 |
89,0 |
85,4 |
(standartinis nuokrypis 3 dB) |
|
|
|
|
|
|
|
|
|
Vibracija m/s2 (triašio vektoriaus suma) |
12,2 |
12,8 |
11,4 |
18,0 |
Neapibrėžtis K m/s2 |
1,5 |
1,5 |
1,5 |
3,3 |
PASTABA: Deklaruojamoji suminė vibracijos vertė buvo išmatuota standartiniu bandymų metodu, todėl ja galima remtis lyginant vieną įrankį su kitu. Ja taip pat galima naudotis atliekant preliminarųjį poveikio vertinimą.
Naudojant elektrinį įrankį susidaranti vibracija gali skirtis nuo bendrojo ! ĮSPĖJIMAS deklaruojamo vibracijos dydžio priklausomai nuo to, kokiu būdu
naudojate įrankį. Įvertinkite vibracijos dozę konkrečiu atveju ir parinkite atitinkamas asmens apsaugos priemones atsižvelgdami į visas darbo ciklo dalis, tame tarpe ir į laiką, per kurį prietaisas buvo išjungtas arba veikė tuščiąja eiga.
Techninė byla laikoma adresu: Dremel (PT-SEU/ENG1), Konijnenberg 60, 4825 BD, Breda, Nyderlandai
LV
ES ATBILSTĪBAS DEKLARĀCIJA Mēs, uzņemoties pilnu atbildību, paziņojam, ka šis izstrādājums atbilst zemāk minētajiem standartiem vai standartizētajiem dokumentiem: EN60745, EN55014, EN61000, saskaņā ar direktīvu 2006/42/EK, 2004/108/EK (līdz 2016. gada 19. aprīlim), 2014/30/ES (no 2016. gada 20. aprīļa), 2011/65/ES prasībām.
Troksnis/Vibrācija |
200 |
3000 |
4000 |
4200 |
|
|
|
|
|
Skaņas jaudas līmenis dB(A) |
74,5 |
77,1 |
78,0 |
74,4 |
Skaņas jaudas līmenis dB(a) |
85,5 |
88,1 |
89,0 |
85,4 |
(standartnovirze 3dB) |
|
|
|
|
Vibrācijas m/s2 (trīsdzīslu vektoru summa) |
12,2 |
12,8 |
11,4 |
18,0 |
Kļūdas pielaide K m/s2 |
1,5 |
1,5 |
1,5 |
3,3 |
PIEZĪME: Minētā vibrācijas kopējā vērtība ir mērīta saskaņā ar standarta testēšanas metodi un var tikt lietota, lai salīdzinātu vienu instrumentu ar citu. To var izmantot arī iepriekšējai iedarbības novērtēšanai.
Elektriskā instrumenta lietošanas laikā sasniegtā vibrācijas emisijas UZMANĪBU vērtība var atšķirties no norādītās kopējās vērtības atkarībā no
instrumenta izmantošanas veida. Nosakiet instrumenta radīto iedarbību faktiskajos izmantošanas apstākļos un izvēlieties attiecīgus drošības pasākumus personiskai aizsardzībai (ņemot vērā visus darba cikla faktorus, piemēram, cik reižu instruments ir izslēgts un cik ilgi pēc ieslēgšanas tas darbojas brīvgaitā).
Tehniska rakstura fails: Dremel (PT-SEU/ENG1), Konijnenberg 60, 4825 BD, Breda, Nīderlande
19

AR
:ةيلاتلا ةيــسايقلا قئاثولا وأ ريياعملا عم قباطتي جتنملا اذه نأب ةصاخلا انتيلوئــسم تحت رقن اننإ ةيبورولأا ريياعملا ةقباطم نلاعإ ،)2016 ليربأ 19 ىتح( 2004/108/EC، 2006/42/EC تاــهيجوت ماكــحلأ اــقفو ،EN60745، EN55014، EN61000
.2011/65/EU ،)2016 ليربأ 20 نــم( 2014/30/EU
4200 |
4000 |
3000 |
200 |
زازتهلاا / ءاضوضلا |
|
|
|
|
|
74.4 |
78.0 |
77,1 |
74.5 |
)أ( لبيسيدلاب توصلا طغض ىوتسم |
85.4 |
89.0 |
88,1 |
85.5 |
)أ( لبيسيدلاب توصلا ةقاط ىوتسم |
|
|
|
|
)لبيسيد 3 غلبي يرايعم فارحنا ( |
|
|
|
|
|
18.0 |
11.4 |
12,8 |
12.2 |
)ديلا عارذ ةقيرط( 2ةيناث/رتم زازتهلاا |
3.3 |
1.5 |
1.5 |
1.5 |
2ةيناث/رتم K كشلا |
نكميو ،ىرخأ ةادأب ةادأ ةنراقم يف اهب ةناعتــسلاا نكميو ةيــسايق صحف ةقيرط عم قفتي امب ةنلعملا ةيلامجلإا زازتهلاا ةميق سايق متي :ةظوحلم
.ضرعتلل يلوأ مييقت ةيلمع يف اضيأً اهمادختــسا
كلذو ةنلعملا ةيلامجلإا ةميقلا نع ةيبرهكلا ةادلأل يلعفلا مادختــسلاا ءانثأ زازتهلاا ثاعبنا توافتي |
|
! |
عيمج رابتعلاا يف ذخلأا عم( ريدقتلا كلذل اقفوً ةيصخــشلا ةيامحلل ةمزلالا ناملأا تاءارجإ ددحو |
||
،مادختــسلال ةيلعفلا فورظلا يف ضرعتلا ريدقتب مق .ةادلأا اهللاخ نم مدختــست يتلا قرطلا بــسح |
|
|
.)ليغــشتلا تقو ىلإ ةفاضلإاب ةئيطب ةعرــسب اهليغــشت اهيف متي يتلاو ةادلأا ليغــشت فاقيإ اهيف متي يتلا تاقولأا لثم ليغــشتلا ةرود ءازجأ Dremel (PT-SEU/ENG1), Konijnenberg 60, 4825 BD, Breda, NL :ىلع ينفلا فلملا
Dremel
Marijn van der Hoofden
Operations & Engineering
Olaf Dijkgraaf
Approval Manager
Konijnenberg 60,
4825 BD Breda,
The Netherlands
Breda, 14-10-2015
20
ORIGINAL INSTRUCTIONS
USED SYMBOLS
READ THESE INSTRUCTIONS
USE HEARING PROTECTION
USE EYE PROTECTION
USE A DUST MASK
CLASS II CONSTRUCTED
DO NOT DISPOSE OF ELECTRIC
TOOLS, ACCESSORIES AND
PACKAGING TOGETHER WITH
HOUSEHOLD WASTE MATERIAL
GENERAL POWER TOOL SAFETY
WARNINGS
! WARNING READ ALL SAFETY
WARNINGS AND ALL
INSTRUCTIONS.
Failure to follow the warnings and instructions may result in electric shock, fire and/or serious injury.
Save all warnings and instructions for future reference.
The term “power tool” in the warnings refers to your mains-operated (corded) power tool or battery-operated
(cordless) power tool.
WORK AREA SAFETY
a.Keep work area clean and well lit. Cluttered and dark areas invite accidents.
b.Do not operate power tools in explosive atmospheres, such as in the presence of flammable liquids, gases or dust. Power tools create sparks which may ignite the dust or fumes.
c.Keep children and bystanders away while operating a power tool. Distractions can cause you to lose control.
ELECTRICAL SAFETY
a.Power tool plug must match the outlet. Never modify the plug in any way. Do not use any adapter plugs with earthed (grounded) power tools.
Unmodified plugs and matching outlets will reduce risk of electric shock.
b.Avoid body contact with earthed or grounded surfaces such as pipes, radiators, ranges and refrigerators. There is an increased risk of electric shock if your body is earthed or grounded.
c. Do not expose power tools to rain or wet |
GB |
conditions. Water entering a power tool will increase |
|
|
|
the risk of electric shock. |
|
d.Do not abuse the cord. Never use the cord for carrying, pulling or unplugging the power tool. Keep cord away from heat, oil, sharp edges or moving parts. Damaged or entangled cords increase the risk of electric shock.
e.When operating a power tool outdoors, use an extension cord suitable for outdoor use. Use of a cord suitable for outdoor use reduces the risk of electric shock.
f.If operating a power tool in a damp location is unavoidable, use an earth leakage circuit breaker (ELCB) protected supply. Use of an earth leakage circuit breaker reduces the risk of electric shock.
PERSONAL SAFETY
a.Stay alert, watch what you are doing and use common sense when operating a power tool. Do not use a power tool while you are tired or under the influence of drugs, alcohol or medication. A moment of inattention while operating power tools may result in serious personal injury.
b.Use personal protective equipment. Always wear eye protection. Protective equipment such as dust mask, non-skid safety shoes, hard hat, or hearing protection used for appropriate conditions will reduce personal injuries.
c.Prevent unintentional starting. Ensure the switch is in the off-position before connecting to power source and/or battery pack, picking up or carrying the tool. Carrying power tools with your finger on the switch or energising power tools that have the switch on invites accidents.
d.Remove any adjusting key or wrench before turning the power tool on. A wrench or a key left attached to a rotating part of the power tool may result in personal injury.
e.Do not overreach. Keep proper footing and balance at all times. This enables better control of the power tool in unexpected situations.
f.Dress properly. Do not wear loose clothing or jewellery. Keep your hair, clothing and gloves away from moving parts. Loose clothes, jewellery or long hair can be caught in moving parts.
g.If devices are provided for the connection of dust extraction and collection facilities, ensure these are connected and properly used. Use of these devices can reduce dust related hazards.
POWER TOOL USE AND CARE
a.Do not force the power tool. Use the correct power tool for your application. The correct power tool will do the job better and safer at the rate for which it was designed.
b.Do not use the power tool if the switch does not turn it on and off. Any power tool that cannot be controlled with the switch is dangerous and must be repaired.
c.Disconnect the plug from the power source and/or the battery pack from the power tool before making any adjustments, changing accessories, or storing power tools. Such preventive safety measures reduce the risk of starting the power tool accidentally.
d.Store idle power tools out of the reach of children and do not allow persons unfamiliar with the power tool or these instructions to operate the power tool.
Power tools are dangerous in the hands of untrained users.
21

e.Maintain power tools. Check for misalignment or binding of moving parts, breakage of parts and any other condition that may affect the power tools operation. If damaged, have the power tool repaired before use. Many accidents are caused by poorly maintained power tools.
f.Keep cutting tools sharp and clean. Properly maintained cutting tools with sharp cutting edges are less likely to bind and are easier to control.
g.Use the power tool, accessories and tool bits etc., in accordance with these instructions, taking into account the working conditions and the work to be performed. Use of the power tool for operations different from those intended could result in a hazardous situation.
SERVICE
a.Have your power tool serviced by a qualified repair person using only identical replacement parts.
This will ensure that the safety of the power tool is maintained.
SAFETY INSTRUCTIONS FOR
ALL OPERATIONS
SAFETY WARNINGS COMMON FOR GRINDING, SANDING, WIRE BRUSHING, POLISHING, CARVING OR ABRASIVE CUTTING-OFF OPERATIONS
a.This power tool is intended to function as a grinder, sander, wire brush, polisher, carving or cut-off tool. Read all safety warnings, instructions, illustrations and specifications provided with this power tool. Failure to follow all instructions listed below may result in electric shock, fire and/or serious injury.
b.Do not use accessories which are not specifically designed and recommended by the tool manufacturer. Just because the accessory can be attached to your power tool, it does not assure safe operation.
c.The rated speed of the grinding accessories must be at least equal to the maximum speed marked on the power tool. Grinding accessories running faster than their rated speed can break and fly apart.
d.The outside diameter and the thickness of your accessory must be within the capacity rating of your power tool. Incorrectly sized accessories cannot be adequately controlled.
e.The arbour size of wheels, sanding drums or any other accessory must properly fit the spindle or collet of the power tool. Accessories that do not match the mounting hardware of the power tool will run out of balance, vibrate excessively and may cause loss of control.
f.Mandrel mounted wheels, sanding drums, cutters or other accessories must be fully inserted into the collet or chuck. If the mandrel is insufficiently held and/or the overhang of the wheel is too long, the mounted wheel may become loose and be ejected at high velocity.
g.Do not use a damaged accessory. Before each use inspect the accessory such as abrasive wheels for chips and cracks, sanding drum for cracks, tear or excess wear, wire brush for loose or cracked wires. If power tool or accessory is dropped, inspect for damage or install an undamaged accessory. After inspecting and installing an accessory, position
yourself and bystanders away from the plane of the rotating accessory and run the power tool at maximum no-load speed for one minute. Damaged accessories will normally break apart during this test time.
h.Wear personal protective equipment. Depending on application, use face shield, safety goggles or safety glasses. As appropriate, wear dust mask, hearing protectors, gloves and workshop apron capable of stopping small abrasive or workpiece fragments. The eye protection must be capable of stopping flying debris generated by various operations.
The dust mask or respirator must be capable of filtrating particles generated by your operation.
Prolonged exposure to high intensity noise may cause hearing loss.
i.Keep bystanders a safe distance away from work area. Anyone entering the work area must wear personal protective equipment. Fragments of workpiece or of a broken accessory may fly away and cause injury beyond immediate area of operation.
j.Hold power tool by insulated gripping surfaces only, when performing an operation where the cutting accessory may contact hidden wiring or its own cord. Cutting accessory contacting a “live” wire may make exposed metal parts of the power tool “live” and could give the operator an electric shock.
k.Always hold the tool firmly in your hand(s) during the start-up. The reaction torque of the motor, as it accelerates to full speed, can cause the tool to twist.
l.Use clamps to support workpiece whenever practical. Never hold a small workpiece in one hand and the tool in the other hand while in use.
Clamping a small workpiece allows you to use your hand(s) to control the tool. Round material such as dowel rods, pipes or tubing have a tendency to roll while being cut, and may cause the bit to bind or jump toward you.
m.Position the cord clear of the spinning accessory.
If you lose control, the cord may be cut or snagged and your hand or arm may be pulled into the spinning accessory.
n.Never lay the power tool down until the accessory has come to a complete stop. The spinning accessory may grab the surface and pull the power tool out of your control.
o.After changing the bits or making any adjustments, make sure the collet nut, chuck or any other adjustment devices are securely tightened. Loose adjustment devices can unexpectedly shift, causing loss of control, loose rotating components will be violently thrown.
p.Do not run the power tool while carrying it at your side. Accidental contact with the spinning accessory could snag your clothing, pulling the accessory into your body.
q.Regularly clean the power tool’s air vents. The motor’s fan will draw the dust inside the housing and excessive accumulation of powdered metal may cause electrical hazards.
r.Do not operate the power tool near flammable materials. Sparks could ignite these materials.
s.Do not use accessories that require liquid coolants.
Using water or other liquid coolants may result in electrocution or shock.
KICKBACK AND RELATED WARNINGS
Kickback is a sudden reaction to a pinched or snagged rotating wheel, sanding band, brush or any other accessory. Pinching or snagging causes rapid stalling of the rotating accessory which in turn causes the
22

uncontrolled power tool to be forced in the direction opposite of the accessory’s rotation.
For example, if an abrasive wheel is snagged or pinched by the workpiece, the edge of the wheel that is entering into the pinch point can dig into the surface of the material causing the wheel to climb out or kick out. The wheel may either jump toward or away from the operator, depending on direction of the wheel’s movement at the point of pinching. Abrasive wheels may also break under these conditions.
Kickback is the result of power tool misuse and/or incorrect operating procedures or conditions and can be avoided by taking proper precautions as given below.
a.Maintain a firm grip on the power tool and position your body and arm to allow you to resist kickback forces. The operator can control kickback forces, if proper precautions are taken.
b.Use special care when working corners, sharp edges etc. Avoid bouncing and snagging the accessory. Corners, sharp edges or bouncing have a tendency to snag the rotating accessory and cause loss of control or kickback.
c.Do not attach a toothed saw blade. Such blades create frequent kickback and loss of control.
d.Always feed the bit into the material in the same direction as the cutting edge is exiting from the material (which is the same direction as the chips are thrown). Feeding the tool in the wrong direction causes the cutting edge of the bit to climb out of the work and pull the tool in the direction of this feed.
e.When using rotary files, cut-off wheels, high-speed cutters or tungsten carbide cutters, always have the work securely clamped. These wheels will grab if they become slightly canted in the groove, and can kickback. When a cut-off wheel grabs, the wheel itself usually breaks. When a rotary file, high-speed cutter or tungsten carbide cutter grabs, it may jump from the groove and you could lose control of the tool.
SAFETY WARNINGS SPECIFIC FOR GRINDING AND ABRASIVE CUTTING-OFF OPERATIONS
a.Use only wheel types that are recommended for your power tool and only for recommended applications. For example: do not grind with the
side of a cut-off wheel. Abrasive cut-off wheels are intended for peripheral grinding, side forces applied to these wheels may cause them to shatter.
b.For threaded abrasive cones and plugs use only undamaged wheel mandrels with an unrelieved shoulder flange that are of correct size and length.
Proper mandrels will reduce the possibility of breakage.
c.Do not “jam” a cut-off wheel or apply excessive pressure. Do not attempt to make an excessive depth of cut. Overstressing the wheel increases the loading and susceptibility to twisting or snagging of the wheel in the cut and the possibility of kickback or wheel breakage.
d.Do not position your hand in line with and behind the rotating wheel. When the wheel, at the point of operation, is moving away from your hand, the possible kickback may propel the spinning wheel and the power tool directly at you.
e.When wheel is pinched, snagged or when interrupting a cut for any reason, switch off the power tool and hold the power tool motionless until the wheel comes to a complete stop. Never attempt to remove the cut-off wheel from the cut while the wheel is in motion otherwise kickback may occur.
Investigate and take corrective action to eliminate the cause of wheel pinching or snagging.
f.Do not restart the cutting operation in the workpiece. Let the wheel reach full speed and carefully re-enter the cut. The wheel may bind, walk up or kickback if the power tool is restarted in the workpiece.
g.Support panels or any oversized workpiece to minimize the risk of wheel pinching and kickback.
Large workpieces tend to sag under their own weight.
Supports must be placed under the workpiece near the line of cut and near the edge of the workpiece on both sides of the wheel.
h.Use extra caution when making a “pocket cut” into existing walls or other blind areas. The protruding wheel may cut gas or water pipes, electrical wiring or objects that can cause kickback.
SAFETY WARNINGS SPECIFIC FOR WIRE BRUSHING
OPERATIONS
a.Be aware that wire bristles are thrown by the brush even during ordinary operation. Do not overstress the wires by applying excessive load to the brush.
The wire bristles can easily penetrate light clothing and/or skin.
b.Allow brushes to run at operating speed for at least one minute before using them. During this time no one is to stand in front or in line with the brush.
Loose bristles or wires will be discharged during the run-in time.
c.Direct the discharge of the spinning wire brush away from you. Small particles and tiny wire fragments may be discharged at high velocity during the use of these brushes and may become imbedded in your skin.
d.Do not exceed 15,000 RPM when using wire brushes.
! WARNING DO NOT WORK WITH MATERIALS
CONTAINING ASBESTOS (ASBESTOS IS CONSIDERED CARCINOGENIC).
! WARNING TAKE PROTECTIVE MEASURES
WHEN DURING WORK DUST CAN DEVELOP THAT IS HARMFUL TO ONE’S HEALTH, COMBUSTIBLE OR EXPLOSIVE (SOME DUSTS ARE CONSIDERED CARCINOGENIC); WEAR A DUST MASK AND WORK WITH DUST/CHIP EXTRACTION WHEN CONNECTABLE.
ENVIRONMENT
DISPOSAL
The machine, accessories and packaging should be sorted for environmental-friendly recycling.
ONLY FOR EC COUNTRIES
Do not dispose of power tools with household waste!
According the European Guideline 2012/19/EC for Waste Electrical and Electronic Equipment and its implementation into national law, power tools that are no longer usable must be collected separately and disposed of in an environmentallycorrect manner.
23

SPECIFICATIONS
GENERAL SPECIFICATIONS
|
|
|
200 |
3000 |
4000 |
4200 |
|
|
|
|
|
|
|
Rated Power (W) |
125 |
130 |
175 |
175 |
||
|
|
|
|
|
|
|
|
Voltage Rating |
230-240 V, |
230 V, |
230-240 V, |
230-240 V, |
|
|
50-60 Hz |
50 Hz |
50-60 Hz |
50-60 Hz |
||
|
|
|
||||
|
|
|
|
|
|
|
|
Collet Capacity |
0.8 mm, 1.6 mm, 2.4 mm, 3.2 mm |
|
|||
|
|
|
|
|
|
|
|
Rated Speed (n) |
35,000 |
33,000 |
35,000 |
33,000 |
|
|
|
|
RPM |
RPM |
RPM |
RPM |
|
|
|
|
|
|
|
|
|
Class II |
Double insulated construction tools |
|
||
|
|
Construction |
|
|||
|
|
|
|
|
|
|
|
|
|
|
|
|
|
EXTENSION CORDS
Use completely unrolled and safe extension cords with a capacity of 5 Amps.
MOTOR SPECIFICATIONS
Only 3000
This multitool utilizes a variable high speed motor. It is wired for operation on 230 V, 50 Hz. Always check that the supply voltage is the same as the voltage indicated on the nameplate of the tool.
ASSEMBLY
ALWAYS UNPLUG MULTITOOL BEFORE CHANGING ACCESSORIES, CHANGING COLLETS, OR SERVICING THE TOOL.
GENERAL
The Dremel multitool is a high quality precision tool that can be used to perform detailed and intricate tasks. The wide range of Dremel accessories and attachments allow you to perform a large variety of tasks. These include tasks such as sanding, carving, engraving, routing, cleaning and polishing.
PICTURE: 2-5 |
|
|
A. |
Collet nut |
EZ information |
B. |
Collet |
Only 4200 |
C. Housing cap or EZ |
L. EZ Change levers |
|
|
Twist™ integrated |
M. EZ Change chuck |
|
wrench/nose cap |
|
D.Shaft lock button
E.On/Off switch
F.Hanger
G.Power cord
H.Brush cover
I.Ventilation openings
J.Variable speed dial
K.Collet wrench
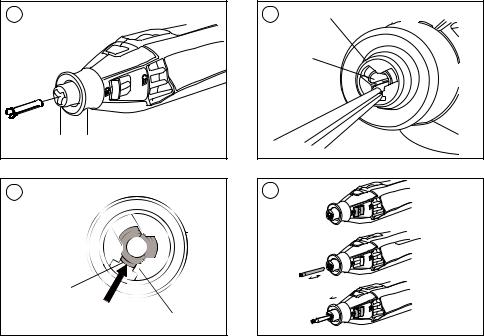
COLLETS
The Dremel accessories available for the multitool come with various shank sizes. Four size collets are available to accommodate the different shank sizes. Collet sizes are identified by the rings on the back of the collet.
PICTURE 6
A. Collet nut
N.3.2 mm Collet without ring (480)
O.2.4 mm Collet with three rings (481)
P.1.6 mm Collet with two rings (482)
Q.0.8 mm Collet with one ring (483)
R.Indentification rings
NOTE: Some multitool kits may not include all four collet sizes. Collets are available separately.
Always use the collet that matches the shank size of the accessory you plan to use. Do not force a larger diameter shank into a smaller collet.
CHANGING COLLETS
PICTURE 7 (200)
PICTURE 11 (3000/4000)
PICTURE 19 (4200)
A. Collet nut
C.Housing cap (EZ Twist™)
D.Shaft lock button
K. Collet wrench
S.To loosen
T.To tighten
1.Press the shaft lock button, hold down and rotate the shaft by hand until it engages the shaft lock. Do not engage the shaft lock button while multitool is running.
2.With the shaft lock button engaged, loosen and remove the collet nut. Use the collet wrench if necessary.
3.Remove the collet by pulling it free from the shaft.
4.Install the appropriate size collet fully into the shaft and reinstall the collet nut finger tight. Do not fully tighten the nut when there is no bit or accessory installed.
CHANGING ACCESSORIES
PICTURE 8
1.Press the shaft lock button and rotate the shaft by hand until it engages the shaft lock. Do not engage the shaft lock button while multitool is running.
2.With the shaft lock button engaged, loosen (do not remove) the collet nut. Use the collet wrench if necessary.
3.Insert the bit or accessory shank fully into the collet.
4.With the shaft lock button engaged, finger tighten the collet nut until the bit or accessory shank is gripped by the collet.
NOTE: Be sure to read the instructions supplied with your Dremel accessory for further information on its use.
Use only Dremel tested, high performance accessories.
EZ TWIST™ INTEGRATED WRENCH/NOSE CAP
Only 3000 and 4000
PICTURE 11
C. EZ Twist™ integrated wrench/nose cap
This nose cap has an integrated wrench allowing you to loosen and tighten the collet nut without the use of the standard collet wrench.
1.Unscrew the nose cap from the tool, line-up the steel insert on inside of the cap with the collet nut.
2.With the shaft lock engaged twist nose cap counter clockwise to loosen the collet nut. Do not engage the shaft lock button while multitool is running.
3.Insert the bit or accessory shank fully into the collet.
24

4.With the shaft lock engaged twist nose cap clockwise to tighten the collet nut.
5.Screw the nose cap back into its original position.
NOTE: Be sure to read the instructions supplied with your Dremel accessory for further information on its use.
Use only Dremel tested, high performance accessories.
BALANCING ACCESSORIES
For precision work, it is important that all accessories be in good balance (much the same as the tires on your automobile). To true up or balance an accessory, slightly loosen collet nut and give the accessory or collet a 1/4 turn. Re tighten collet nut and run the Rotary Tool.
You should be able to tell by the sound and feel if your accessory is running in balance. Continue adjusting in this fashion until best balance is achieved.
USING ATTACHMENTS
Your Dremel can be equipped with different attachments that expand the functionality of your tool.
NOTE
Not all attachments listed below are included in your kit.
Use only Dremel tested, high performance attachments! You can order attachments through the Dremel Service Center or go to www.dremel.com for attachment and accessory compatibility.
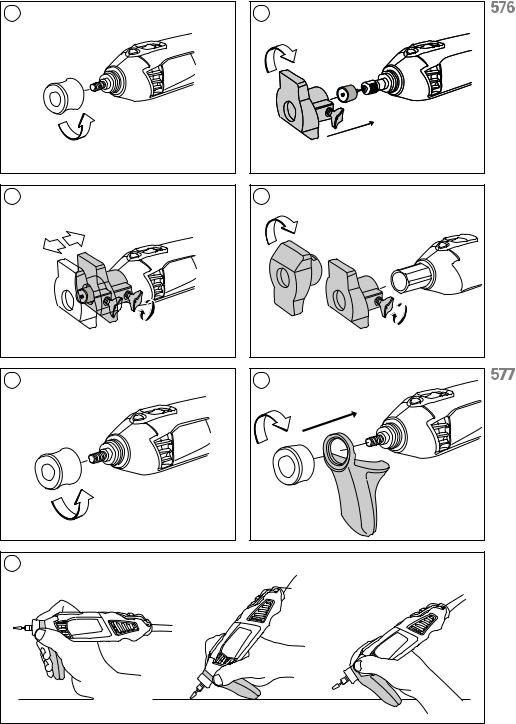
1.Use the Flexible Shaft (225) for precise, detailed work or hard to reach places. SEE PAGE 7.
NOTE
For optimum performance allow your new Flexshaft to run at high speed on your multitool in a vertical position for 2 minutes before use.
2.Use the Dremel Shaping Platform (576) to sand and grind at perfect 90 and 45 degree angles.
SEE PAGE 9.
3.Use the Dremel Detailer’s Grip (577) to have even better control of your Multitool. SEE PAGE 8.
4.Use the Multipurpose Cutting Kit (565/566) for controlled cutting in a variety of materials. SEE PAGE 10.
5.Use the Wall & Floor Grout Removal Kit (568) for removing grout from between wall and floor tiles. SEE PAGE 11.
6.Use the Line & Circle Cutter (678) to make perfect holes and straight cuts. SEE PAGE 12.
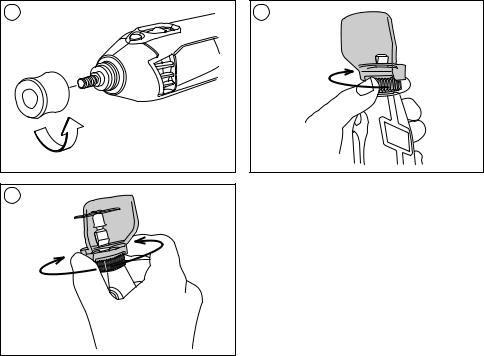
7.Use the Right Angle Attachment (575) to use accessories in right angle for hard to reach places.
SEE PAGE 13.
8.Use the Comfort Guard Attachment to protect you from dust and sparks. SEE PAGE 14.
GETTING STARTED
USE
The first step in using the multitool is to get the “feel” of it. Hold it in your hand and feel its weight and balance. Feel the taper of the housing. This taper permits the tool to be grasped much like a pen or pencil.
Always hold the tool away from your face. Accessories can be damaged during handling and can fly apart as they come up to speed.
When holding tool, do not cover the ventilation openings with your hand. Blocking the ventilation openings could cause the motor to overheat.
IMPORTANT! Practice on scrap material first to see how the tool’s high-speed action performs. Keep in mind that your multitool will perform best by allowing the speed, along with the correct Dremel accessory and attachment, to do the work for you. Do not put pressure on the
tool during use, if possible. Instead, lower the spinning accessory lightly to the work surface and allow it to touch the point at which you want to begin. Concentrate on guiding the tool over the work using very little pressure from your hand. Allow the accessory to do the work. Usually it is better to make a series of passes with the tool rather than to do the entire job with one pass. A gentle touch gives the best control and reduces the chance of error.
HOLDING THE TOOL
For best control in close work, grip the multitool like a pencil between your thumb and forefinger. PICTURE 13 The “golf” grip method is used for heavier operations such as grinding or cutting. PICTURE 14
OPERATING SPEEDS
To select the right speed for each job, use a practice piece of material.
SLIDE “ON/OFF” SWITCH
The tool is switched “ON” by the slide switch located on the top side of the motor housing.
TO TURN THE TOOL “ON”, slide the switch button forward.
TO TURN THE TOOL “OFF”, slide the switch button backward.
HIGH PERFORMANCE MOTOR
Your tool is equipped with a high performance rotary tool motor. This motor expands the versatility of the rotary tool by driving additional Dremel attachments.
ELECTRONIC FEEDBACK
Your tool is equipped with an internal electronic feedback system that provides a “soft start”, which will reduce the stresses that occur from a high torque start. The system also helps to keep the preselected speed virtually constant between no-load and load conditions.
VARIABLE SPEED DIAL
Your tool is equipped with a variable speed dial. The speed may be adjusted during operation by presetting the dial on or between any one of the settings.
The speed of Rotary Tool is controlled by setting this dial on the housing. PICTURE 12
25

Settings for Approximate Revolutions
200 Model
Switch Settings |
Speed Range (RPM) |
|
|
Low |
15,000 |
|
|
High |
35,000 |
|
|
3000 Model |
|
Switch Settings |
Speed Range (RPM) |
|
|
1-2 |
10,000-14,000 |
|
|
3-4 |
15,000-19,000 |
|
|
5-6 |
20,000-23,000 |
|
|
7-8 |
24,000-28,000 |
|
|
9-10 |
29,000-33,000 |
|
|
4000 and 4200 Model |
|
|
|
Switch Settings |
Speed Range (RPM) |
|
|
5 |
5,000 |
|
|
10 |
10,000 |
|
|
*15 |
15,000 |
|
|
20 |
20,000 |
|
|
25 |
25,000 |
|
|
30 |
30,000 |
|
|
33 (4000 only) |
33,000 |
|
|
35 (4200 only) |
35,000 |
* Do not exceed 15,000 RPM when using wire brushes.
Refer to the Speed Settings chart on pages 4-7 to help determine the proper speed for the material being worked on and the accessory to use.
Most jobs can be accomplished using the tool at the highest setting. However, certain materials (some plastics and metals) can be damaged by high-speed generated heat and should be worked on at relatively low speeds.
Low speed operation (15,000 RPM or less) is usually best for polishing operations employing the felt polishing accessories. All brushing applications require lower speeds to avoid wire discharge from the holder. Let the performance of the tool do the work for you when using lower speed settings. Higher speeds are better for hardwoods, metals and glass and for drilling, carving, cutting, routing and shaping.
Some guidelines regarding tool speed:
•Plastic and other materials that melt at low temperatures should be cut at low speeds.
•Polishing, buffing and cleaning with a wire brush must be done at speeds no greater than 15,000 RPM to prevent damage to the brush and your material.
•Wood should be cut at high speed.
•Iron or steel should be cut at high speed.
•If a high speed steel cutter starts to vibrate, it usually indicates that it is running too slowly.
•Aluminium, copper alloys, lead alloys, zinc alloys and tin may be cut at various speeds, depending on the type of cutting being done. Use a paraffin (not water) or other suitable lubricant on the cutter to prevent the cut material from adhering to the cutter teeth.
NOTE: Increasing pressure on the tool is not the answer when it is not performing properly. Try a different accessory or speed setting to achieve the desired result.
MAINTENANCE AND REPAIR
! WARNING ALWAYS UNPLUG THE TOOL FROM
THE POWER SOURCE BEFORE YOU MAKE ANY ADJUSTMENTS, CHANGE ACCESSORIES, SERVICE, CLEAN, ETC. THIS REDUCES THE RISK OF STARTING THE TOOL ACCIDENTALLY.
! WARNING HAVE YOUR POWER TOOL
SERVICED BY A QUALIFIED REPAIR PERSON WHO USES ONLY IDENTICAL REPLACEMENT PARTS. WE RECOMMEND THAT ALL TOOL SERVICE BE PERFORMED BY A DREMEL SERVICE CENTRE. THIS WILL ENSURE THE SAFETY OF THE TOOL. MAINTENANCE PERFORMED BY UNAUTHORIZED PERSONNEL CAN RESULT IN INCORRECT CONNECTION OF INTERNAL WIRING AND COMPONENTS WHICH CAN CAUSE SERIOUS HAZARD.
NOTE
You can only inspect and replace the carbon brushes. There are no other serviceable parts inside the tool.
CLEANING
1.Clean ventilation openings, switch and levers of the tool with compressed dry air.
! WARNING DO NOT CLEAN THE TOOL BY
INSERTING POINTED OBJECTS THROUGH AN OPENING.
! WARNING WEAR SAFETY GOGGLES TO
PROTECT YOUR EYES.
2. Clean the surface of the tool with a damp cloth.
! WARNING DO NOT CLEAN THE TOOL WITH
CLEANING AGENTS AND SOLVENTS, SUCH AS GASOLINE, CARBON TETRACHLORIDE, CHLORINATED CLEANING SOLVENTS, AMMONIA AND HOUSEHOLD DETERGENTS THAT CONTAIN AMMONIA. THEY CAN CAUSE DAMAGE TO THE PLASTIC PARTS.
MAINTAINING THE CARBON BRUSHES
Excluding 4000
To maintain peak efficiency of the motor, inspect the brushes for wear every 40-50 hours of use. Also inspect the brushes when the tool runs erratically, loses power, or makes unusual noises.
! WARNING USING THE TOOL WITH WORN
BRUSHES WILL PERMANENTLY DAMAGE THE MOTOR. USE ONLY ORIGINAL DREMEL REPLACEMENT BRUSHES.
1.Unplug the tool and place it on a clean surface.
2.Remove the two brush caps with the tool wrench as a screwdriver. PICTURE 15 (200/3000), PICTURE 17
(4200).
3.Remove the two brushes from the tool by pulling the springs that are attached. PICTURE 16 (200/3000), PICTURE 18 (4200).
4.Inspect both brushes. If a brush is less than 3mm long and/or the surface of the brush is rough or pitted, replace the carbon brush by a new one.
a. Remove the spring from the brush.
26

b.Throw away the old brush and place the spring on a new brush.
NOTE
If one brush is worn, you should replace both brushes for better performance of your tool.
5.Place the carbon brushes (with spring) back into the tool. There is only one way the brush will fit back into the tool.
6.Replace the brush caps by turning the caps clockwise.
To tighten, use the wrench, but do not over tighten!
7.Refer to First use to start using the tool again.
SERVICE AND WARRANTY
! WARNING |
NO USER SERVICEABLE PARTS |
INSIDE. PREVENTIVE MAINTENANCE |
PERFORMED BY UNAUTHORIZED PERSONNEL MAY RESULT IN INCORRECT CONNECTION OF INTERNAL WIRING AND COMPONENTS WHICH COULD CAUSE SERIOUS HAZARD. We recommend that all tool service be performed by a Dremel Service Centre. SERVICEMEN: Disconnect the tool and/or charger from the power source before servicing.
This DREMEL product is guaranteed in accordance with statutory/country-specific regulations; damage due to normal wear and tear, overload or improper handling are excluded from the warranty.
In case of a complaint, send the undismantled tool or charger and proof of purchase to your dealer.
CONTACT DREMEL
For more information on the Dremel product range, support and hotline, go to www.dremel.com.
Dremel, Konijnenberg 60, 4825 BD, Breda, The
Netherlands
ÜBERSETZUNG DER
ORIGINALBEDIENUNGSANLEITUNG
VERWENDETE SYMBOLE
LESEN SIE DIESE ANWEISUNGEN
TRAGEN SIE GEHÖRSCHUTZ
TRAGEN SIE AUGENSCHUTZ
TRAGEN SIE EINE STAUBMASKE
KLASSE-II-AUSFÜHRUNG
ELEKTROWERKZEUGE, ZUBEHÖR UND
VERPACKUNGSMATERIAL NICHT MIT
DEM HAUSMÜLL ENTSORGEN
ALLGEMEINE SICHERHEITSHINWEISE
FÜR ELEKTROWERKZEUGE
! WARNUNG LESEN SIE ALLE
WARNHINWEISE UND ALLE
ANWEISUNGEN.
Nichtbeachtung der Hinweise und Anweisungen kann zu elektrischem Schlag, Bränden und schweren Verletzungen führen.
Bewahren Sie alle Warnungen und Anweisungen für die Zukunft auf.
Die Bezeichnung Elektrowerkzeug in den Warnhinweisen bezieht sich sowohl auf Werkzeuge, die mit Netzspannung betrieben werden (Werkzeuge mit Netzkabel), als auch auf akkubetriebene Werkzeuge (Werkzeuge ohne Netzkabel).
SICHERHEIT AM ARBEITSPLATZ
a.Halten Sie Ihren Arbeitsbereich sauber und aufgeräumt. Unordnung und unbeleuchtete
Arbeitsbereiche können zu Unfällen führen.
b.Arbeiten Sie mit dem Gerät nicht in explosionsgefährdeter Umgebung, in der sich brennbare Flüssigkeiten, Gase oder Stäube befinden. Elektrowerkzeuge erzeugen Funken, die den
Staub oder die Dämpfe entzünden können.
c.Halten Sie Kinder und andere Personen während der Benutzung des Elektrowerkzeugs fern. Bei Ablenkung können Sie die Kontrolle über das Gerät verlieren.
ELEKTRISCHE SICHERHEIT
a. Der Anschlussstecker des Gerätes muss in die |
|
|
DE |
||
Steckdose passen. Der Stecker darf in keiner |
||
Weise verändert werden. Verwenden Sie keine |
|
|
|
||
Adapterstecker gemeinsam mit schutzgeerdeten |
|
|
Geräten. Unveränderte Stecker und passende |
|
|
Steckdosen verringern das Risiko eines elektrischen |
|
|
Schlages. |
|
b.Vermeiden Sie Körperkontakt mit geerdeten
Oberflächen wie Rohren, Heizungen, Herden und
Kühlschränken. Es besteht ein erhöhtes Risiko durch elektrischen Schlag, wenn Ihr Körper geerdet ist.
c.Halten Sie das Gerät von Regen und Nässe fern.
Das Eindringen von Wasser in ein Elektrogerät erhöht das Risiko eines elektrischen Schlages.
d.Nutzen Sie das Netzkabel ausschließlich für seinen bestimmungsgemäßen Zweck. Verwenden Sie
das Netzkabel nicht, um das Elektrowerkzeug zu tragen oder zu ziehen. Ziehen Sie den Netzstecker nicht am Kabel aus der Steckdose. Halten Sie das Kabel fern von Hitze, Öl, scharfen Kanten und sich bewegenden Geräteteilen. Beschädigte oder verwickelte Kabel erhöhen das Risiko eines elektrischen Schlages.
e.Wenn Sie mit einem Elektrowerkzeug im Freien arbeiten, verwenden Sie nur Verlängerungskabel, die auch für den Außenbereich zugelassen
sind. Die Anwendung eines für den Außenbereich geeigneten Verlängerungskabels verringert das Risiko eines elektrischen Schlages.
27

f.Falls sich der Einsatz eines Elektrowerkzeugs in einer feuchten Umgebung nicht vermeiden
lässt, verwenden Sie einen FI-Schutzschalter. Die
Verwendung eines FI-Schutzschalters verringert das Risiko eines elektrischen Schlages.
SICHERHEIT VON PERSONEN
a.Seien Sie aufmerksam, achten Sie darauf, was Sie tun, und gehen Sie mit Vernunft an die Arbeit mit einem Elektrowerkzeug. Benutzen Sie das Gerät nicht, wenn Sie müde sind oder unter dem Einfluss von Drogen, Alkohol oder Medikamenten stehen.
Ein Moment der Unachtsamkeit beim Gebrauch des
Gerätes kann zu ernsthaften Verletzungen führen.
b.Tragen Sie persönliche Schutzausrüstung. Tragen Sie stets einen Augenschutz. Das Tragen persönlicher Schutzausrüstung, wie Staubmaske, rutschfeste Sicherheitsschuhe, Schutzhelm
oder Gehörschutz, je nach Art und Einsatz des
Elektrowerkzeuges, verringert das Risiko von
Verletzungen.
c.Beugen Sie unbeabsichtigtem Einschalten des Geräts vor. Vergewissern Sie sich, dass der Netzschalter ausgeschaltet ist, bevor Sie das Gerät an die Stromquelle oder den Akku anschließen, das Gerät in die Hand nehmen oder transportieren.
Wenn Sie beim Tragen des Gerätes den Finger am Schalter haben oder das Gerät eingeschaltet an die Stromversorgung anschließen, kann dies zu Unfällen führen.
d.Entfernen Sie Einstellwerkzeuge oder Schraubenschlüssel, bevor Sie das Gerät einschalten. Ein Werkzeug oder Schlüssel, der sich in einem drehenden Geräteteil befindet, kann zu Verletzungen führen.
e.Überschätzen Sie sich nicht. Sorgen Sie für einen sicheren Stand und halten Sie jederzeit das Gleichgewicht. Dadurch können Sie das Gerät in unerwarteten Situationen besser kontrollieren.
f.Tragen Sie geeignete Kleidung. Tragen Sie keinen Schmuck. Halten Sie Haare, Kleidung und Handschuhe fern von sich bewegenden Teilen.
Lockere Kleidung, Schmuck oder lange Haare können von sich bewegenden Teilen erfasst werden.
g.Wenn Staubabsaugund -auffangeinrichtungen montiert werden können und sollen, vergewissern Sie sich, dass diese richtig angeschlossen
und verwendet werden. Das Verwenden dieser
Einrichtungen verringert die Gefährdungen durch
Staub.
SORGFÄLTIGER UMGANG MIT UND GEBRAUCH VON
ELEKTROWERKZEUGEN
a.Überlasten Sie das Gerät nicht. Verwenden Sie für Ihre Arbeit das dafür bestimmte Elektrowerkzeug.
Im dafür jeweils vorgesehenen Leistungsbereich arbeiten Sie mit dem passenden Elektrowerkzeug besser und sicherer.
b.Benutzen Sie kein Elektrowerkzeug, dessen Schalter defekt ist. Ein Elektrowerkzeug, das sich nicht mehr einoder ausschalten lässt, ist gefährlich und muss repariert werden.
c.Trennen Sie Elektrowerkzeuge von der Stromversorgung bzw. dem Akku, bevor Sie Einstellungen vornehmen, Zubehör wechseln oder die Geräte lagern. Diese Vorsichtsmaßnahme verhindert den unbeabsichtigten Start des Gerätes.
d.Bewahren Sie unbenutzte Elektrowerkzeuge außerhalb der Reichweite von Kindern auf. Lassen Sie Personen das Gerät nicht benutzen, die mit
diesem nicht vertraut sind oder diese Anweisungen nicht gelesen haben. Elektrowerkzeuge sind gefährlich, wenn sie von unerfahrenen Personen benutzt werden.
e.Pflegen Sie das Gerät mit Sorgfalt. Kontrollieren
Sie, ob bewegliche Geräteteile einwandfrei funktionieren und nicht klemmen, ob Teile gebrochen oder so beschädigt sind, dass die Funktion des Gerätes beeinträchtigt ist. Lassen Sie beschädigte Teile vor dem Einsatz des Gerätes reparieren. Viele Unfälle haben ihre Ursache in schlecht gewarteten Elektrowerkzeugen.
f.Halten Sie Schneidwerkzeuge scharf und sauber.
Sorgfältig gepflegte Schneidwerkzeuge mit scharfen
Schneidkanten verklemmen sich weniger und sind leichter zu führen.
g.Verwenden Sie Elektrowerkzeug, Zubehör, Einsatzwerkzeuge usw. entsprechend diesen Anweisungen. Berücksichtigen Sie dabei die Arbeitsbedingungen und die auszuführende Tätigkeit. Der Gebrauch von Elektrowerkzeugen für andere als die vorgesehenen Anwendungen kann zu gefährlichen Situationen führen.
REPARATUREN
a.Lassen Sie Ihr Gerät nur von qualifiziertem
Fachpersonal und nur mit Original-Ersatzteilen reparieren. Damit wird sichergestellt, dass die
Sicherheit des Gerätes gewährleistet bleibt.
SICHERHEITSHINWEISE FÜR
ALLE VERWENDUNGSARTEN
ALLGEMEINE WARNHINWEISE FÜR DAS SCHLEIFEN, SANDPAPIERSCHLEIFEN, ARBEITEN MIT DRAHTBÜRSTEN, POLIEREN, FRÄSEN UND TRENNSCHLEIFEN
a.Dieses Elektrowerkzeug kann als Schleifer, Sandpapierschleifer, Drahtbürste, Polierer, Fräser und Trennschleifmaschine verwendet werden. Beachten Sie alle Warnhinweise, Anweisungen, Abbildungen und Daten, die Sie mit dem Werkzeug erhalten. Fehler bei der Einhaltung der nachstehend aufgeführten Anweisungen können elektrischen Schlag,
Brand und/ oder schwere Verletzungen verursachen.
b.Verwenden Sie kein Zubehör, das nicht vom Hersteller speziell für dieses Elektrowerkzeug vorgesehen und empfohlen wurde. Die Tatsache, dass sich ein Einsatzwerkzeug auf Ihrem
Elektrowerkzeug montieren lässt, garantiert noch keine sichere Verwendung.
c.Die zulässige Drehzahl des Schleifzubehörs muss mindestens der auf dem Elektrowerkzeug angegebenen Höchstdrehzahl entsprechen. Wenn sich Schleifzubehör schneller als zulässig dreht, kann es beschädigt werden und vom Werkzeug lösen.
d.Außendurchmesser und Dicke des Einsatzwerkzeugs müssen den Maßen Ihres Elektrowerkzeugs entsprechen. Falsch bemessene Einsatzwerkzeuge können nicht ausreichend kontrolliert werden.
e.Schleifscheiben, Schleifwalzen und andere Zubehörteile müssen genau auf die Schleifspindel oder Spannzange des Elektrowerkzeugs passen.
Zubehör, das nicht genau auf die Schleifspindel des Elektrowerkzeugs passt, dreht sich ungleichmäßig, vibriert sehr stark und kann zum Verlust der Kontrolle führen.
28

f.An einem Spanndorn fixierte Zubehörteile wie
Schleifscheiben, Schleifwalzen und Fräser müssen vollständig in die Spannzange bzw. in das Futter eingeführt werden. Wenn der Spanndorn nicht korrekt fixiert ist und/oder die Schleifscheibe zu weit übersteht, kann sich die Schleifscheibe mit hoher Geschwindigkeit vom Werkzeug lösen.
g.Verwenden Sie kein beschädigtes Zubehör. Kontrollieren Sie Zubehör wie Schleifscheiben vor jeder Verwendung auf Absplitterungen und Risse, Schleifwalzen auf Risse, Verschleiß und starke Abnutzung und Drahtbürsten auf lose oder gebrochene Drähte. Wenn das Elektrowerkzeug oder das Zubehör herunterfällt, überprüfen Sie, ob es beschädigt ist, oder verwenden Sie ein unbeschädigtes Zubehör. Wenn Sie das Zubehör
kontrolliert und eingesetzt haben, halten Sie und in der Nähe befindliche Personen sich außerhalb der
Ebene des rotierenden Zubehörs und lassen Sie das Werkzeug eine Minute lang mit Höchstdrehzahl laufen. Beschädigtes Zubehör bricht meist innerhalb dieser Testzeit.
h.Tragen Sie persönliche Schutzausrüstung. Verwenden Sie je nach Anwendung Vollgesichtsschutz, Augenschutz oder Schutzbrille. Soweit angemessen, tragen Sie Staubmaske, Gehörschutz, Schutzhandschuhe oder Spezialschürze, die kleine Schleifund Materialpartikel von Ihnen fernhält. Die Augen müssen vor herumfliegenden Fremdkörpern geschützt werden, die bei verschiedenen Anwendungen entstehen. Staubund Atemschutzmasken müssen den bei der Anwendung entstehenden Staub filtern. Wenn
Sie lange lautem Lärm ausgesetzt sind, können Sie einen Hörverlust erleiden.
i.Achten Sie bei anderen Personen auf sicheren Abstand zu Ihrem Arbeitsbereich. Jeder, der den Arbeitsbereich betritt, muss persönliche Schutzausrüstung tragen. Bruchstücke des Werkstücks oder gebrochenes Zubehör können wegfliegen und Verletzungen auch außerhalb des direkten Arbeitsbereichs verursachen.
j.Fassen Sie das Elektrowerkzeug nur an isolierten
Griffflächen an, wenn Sie Arbeiten ausführen, bei denen das Einsatzwerkzeug verborgene Stromleitungen oder das eigene Netzkabel treffen könnte. Der Kontakt mit einer spannungsführenden Leitung kann auch Metallteile des Elektrowerkzeuges unter Spannung setzen und zu einem elektrischen
Schlag führen.
k.Halten Sie das Werkzeug beim Einschalten stets fest in der Hand bzw. den Händen. Die
Reaktionskräfte des Motors beim Erreichen der vollen
Drehzahl können einen starken Drehimpuls bewirken.
l.Fixieren Sie das Werkzeug nach Möglichkeit mithilfe von Schraubklemmen. Halten Sie kleine Werkstücke niemals in der Hand, während Sie das Werkzeug mit der anderen Hand bedienen.
Klemmen Sie diese stattdessen fest, um das Werkzeug mit beiden Händen kontrollieren zu können. Runde Materialien wie Rundhölzer, Rohre oder Schläuche können sich beim Schneiden drehen, wodurch das
Bit sich verhaken oder in Ihre Richtung geschleudert werden kann.
m.Halten Sie das Netzkabel von sich drehenden Einsatzwerkzeugen fern. Wenn Sie die Kontrolle über das Werkzeug verlieren, kann das Netzkabel
durchtrennt oder erfasst werden und Ihre Hand oder Ihr
Arm in das sich drehende Zubehör geraten.
n.Legen Sie das Elektrowerkzeug niemals ab, bevor das Zubehör völlig zum Stillstand gekommen ist.
Das sich drehende Zubehör kann in Kontakt mit der
Ablagefläche geraten, wodurch Sie die Kontrolle über das Elektrowerkzeug verlieren können.
o.Stellen Sie nach dem Wechseln von Bits und dem Vornehmen von Einstellungen sicher, dass die Spannmutter, das Futter und alle anderen
Einstellvorrichtungen ordnungsgemäß festgezogen sind. Lose Einstellvorrichtungen können sich unerwartet bewegen und zum Verlust der Kontrolle über das Werkzeug sowie zum Umherfliegen rotierender Teile mit hoher Geschwindigkeit führen.
p.Lassen Sie das Elektrowerkzeug nicht laufen, während Sie es tragen. Ihre Kleidung kann durch zufälligen Kontakt mit dem sich drehenden Einsatzwerkzeug erfasst werden, wodurch Sie akut verletzt werden können.
q.Reinigen Sie regelmäßig die Lüftungsschlitze Ihres Elektrowerkzeugs. Das Motorgebläse zieht Staub
in das Gehäuse und eine starke Ansammlung von
Metallstaub kann elektrische Gefahren verursachen.
r.Verwenden Sie das Elektrowerkzeug nicht in der Nähe brennbarer Materialien. Funken können diese
Materialien entzünden.
s.Verwenden Sie kein Zubehör, das flüssige
Kühlmittel erfordert. Die Verwendung von Wasser oder anderen flüssigen Kühlmitteln kann zu elektrischem Schlag führen.
RÜCKSCHLAG UND ENTSPRECHENDE
WARNHINWEISE
Rückschlag ist die plötzliche Reaktion infolge eines hakenden oder blockierten rotierenden Zubehörteils wie einer Schleifscheibe, Drahtbürste oder einem Schleifband. Verhaken oder Blockieren führt zu einem abrupten Stopp des rotierenden Zubehörs. Dadurch wird ein unkontrolliertes Elektrowerkzeug gegen die Drehrichtung des Zubehörs beschleunigt.
Wenn zum Beispiel eine Schleifscheibe im Werkstück hakt oder blockiert, kann sich die in das Werkstück eintauchende Kante der Schleifscheibe verfangen, wodurch es zum Ausbrechen oder Rückschlag der Schleifscheibe kommen kann. Die Schleifscheibe bewegt sich dann
auf die Bedienperson zu oder von ihr weg, je nach
Drehrichtung der Scheibe an der Blockierstelle. Hierbei können Schleifscheiben auch brechen.
Ein Rückschlag ist die Folge eines falschen oder fehlerhaften Gebrauchs des Elektrowerkzeugs. Er kann durch geeignete Vorsichtsmaßnahmen, wie nachfolgend beschrieben, verhindert werden.
a.Halten Sie das Elektrowerkzeug gut fest und bringen Sie Ihren Körper und Ihre Arme in eine Position, in der Sie die Rückschlagkräfte abfangen können. Durch geeignete Vorsichtsmaßnahmen kann die Bedienperson die Reaktionskräfte beherrschen.
b.Arbeiten Sie besonders vorsichtig im Bereich von Ecken, scharfen Kanten usw. Verhindern Sie, dass Zubehör vom Werkstück zurückprallt und verklemmt. Das rotierende Zubehör neigt bei Ecken, scharfen Kanten oder wenn es abprallt, dazu, sich zu
verklemmen. Dies verursacht einen Kontrollverlust oder Rückschlag.
c.Verwenden Sie kein gezähntes Sägeblatt. Solches
Zubehör verursacht häufig einen Rückschlag oder den Verlust der Kontrolle über das Elektrowerkzeug.
d.Führen Sie das Bit stets in die Richtung in das Material, in die die Schneidkante aus dem Material austritt (dies ist die Richtung, in die die Späne fliegen). Wenn das Werkzeug in die falsche Richtung eingeführt wird, springt die Schneidkante des Bits aus dem Werkstück, sodass das Werkzeug in diese
Einführrichtung gezogen wird.
29
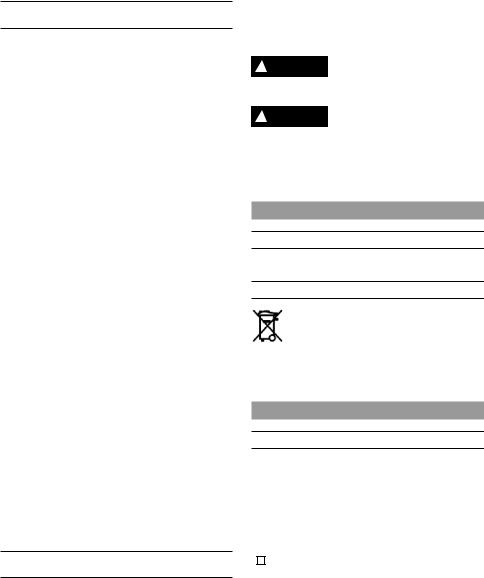
e.Bei Verwendung von Profilraspeln,
Trennscheiben, Hochgeschwindigkeitsfräsern und Wolframkarbidfräsern muss das Werkstück stets fest eingespannt sein. Diese Schleifkörper können sich verhaken, wenn sie leicht schräg in der
Nut geraten, und einen Rückschlag verursachen.
Wenn sich Trennscheiben verhaken, brechen diese normalerweise. Wenn sich Profilraspeln,
Hochgeschwindigkeitsfräser oder Wolframkarbidfräser verhaken, können diese aus der Nut springen und zum
Verlust der Kontrolle über das Werkzeug führen.
BESONDERE WARNHINWEISE ZUM SCHLEIFEN
UND TRENNSCHLEIFEN
a.Verwenden Sie ausschließlich für Ihr Elektrowerkzeug zugelassene und für den jeweiligen Anwendungszweck empfohlene Schleifkörper. Schleifen Sie zum Beispiel nie mit der Seitenfläche einer Trennscheibe. Trennscheiben sind zum Materialabtrag mit der Kante der Scheibe bestimmt. Seitliche Krafteinwirkung auf die Schleifkörper kann diese zerbrechen.
b.Verwenden Sie für Schleifkappen und Schleifwalzen nur unbeschädigte Aufspanndorne mit ungekürztem Kragen von der richtigen Größe und Länge. Dadurch wird die Bruchgefahr reduziert.
c.Vermeiden Sie ein Blockieren der Trennscheibe und zu hohen Anpressdruck. Führen Sie keine übermäßig tiefen Schnitte aus. Eine Überlastung der Trennscheibe erhöht deren Beanspruchung und
Anfälligkeit zum Verkanten oder Blockieren und damit die Gefahr eines Rückschlags oder Schleifkörperbruchs.
d.Halten Sie die Hände nicht in einer Linie mit der rotierenden Trennscheibe oder hinter die rotierende Trennscheibe. Wenn sich die Trennscheibe im Werkstück von Ihrer Hand weg bewegt, kann das Elektrowerkzeug im Fall eines Rückschlags mit der sich drehenden Scheibe direkt auf Sie zu geschleudert werden.
e.Falls die Trennscheibe verklemmt oder blockiert oder Sie die Arbeit unterbrechen, schalten Sie das Elektrowerkzeug aus und halten Sie es ruhig, bis die Scheibe zum Stillstand gekommen ist.
Versuchen Sie nie, die noch laufende Trennscheibe aus dem Schnitt zu ziehen, da es dabei zu einem
Rückschlag kommen kann. Ermitteln und beheben Sie die Ursache für das Verklemmen bzw. Blockieren.
f.Schalten Sie das Elektrowerkzeug nicht wieder ein, solange es sich im Werkstück befindet. Lassen Sie die Trennscheibe erst ihre volle Drehzahl erreichen, bevor Sie den Schnitt vorsichtig fortsetzen.
Anderenfalls kann die Scheibe verhaken, aus dem
Werkstück springen oder einen Rückschlag verursachen.
g.Stützen Sie Platten oder große Werkstücke ab, um das Risiko eines Rückschlags durch eine eingeklemmte Trennscheibe zu vermindern. Große Werkstücke können sich unter ihrem eigenen Gewicht durchbiegen. Solche Werkstücke müssen abgestützt werden, und zwar sowohl an den Kanten als auch auf beiden Seiten der Trennlinie.
h.Seien Sie besonders vorsichtig bei „Taschenschnitten“ in bestehende Wände oder andere nicht einsehbare Bereiche. Die eintauchende Trennscheibe kann beim Schneiden in Gasoder Wasserleitungen, elektrische Leitungen oder andere
Objekte einen Rückschlag verursachen.
BESONDERE WARNHINWEISE FÜR DIE ARBEIT
MIT DRAHTBÜRSTEN
a.Beachten Sie, dass die Drahtbürste auch während des üblichen Gebrauchs Drahtstücke verliert.
Überlasten Sie die Drähte nicht durch zu hohen Anpressdruck. Wegfliegende Drahtstücke können sehr leicht durch dünne Kleidung und die Haut dringen.
b.Lassen Sie die Bürsten vor der Verwendung mindestens eine Minute lang bei Betriebsgeschwindigkeit laufen. Während dieses Zeitraums darf keine Person vor oder gleicher Linie mit der Bürste stehen. Während der Einlaufzeit lösen sich Borsten und Drähte von der Bürste.
c.Richten Sie die rotierende Drahtbürste so aus, dass Sie nicht von den losen Teilen getroffen werden.
Bei der Verwendung der Bürsten können sich kleine
Partikel und winzige Drahtfragmente lösen und mit hoher Geschwindigkeit in die Haut eindringen.
d.Bei der Verwendung von Drahtbürsten dürfen 15.000 U/min nicht überschritten werden.
! WARNUNG BEARBEITEN SIE KEIN
ASBESTHALTIGES MATERIAL (ASBEST GILT ALS KREBSERREGEND).
! WARNUNG TREFFEN SIE
SCHUTZVORKEHRUNGEN, WENN BEIM ARBEITEN GESUNDHEITSSCHÄDLICHE, BRENNBARE ODER EXPLOSIVE STÄUBE ENTSTEHEN KÖNNEN (MANCHE STÄUBE GELTEN ALS KREBSERREGEND); TRAGEN SIE EINE STAUBSCHUTZMASKE UND VERWENDEN SIE EINE STAUB-/SPÄNEABSAUGUNG, FALLS ANSCHLIESSBAR.
UMWELTINFORMATIONEN
ENTSORGUNG
Elektrowerkzeuge, Zubehöre und Verpackungen sollen einer umweltgerechten Wiederverwertung zugeführt werden.
NUR FÜR EU-LÄNDER
Werfen Sie Elektrowerkzeuge nicht in den Hausmüll!
Gemäß der Europäischen Richtlinie 2012/19/ EG über Elektround Elektronik-Altgeräte und ihrer Umsetzung in nationales Recht müssen nicht mehr gebrauchsfähige Elektrowerkzeuge getrennt gesammelt und einer umweltgerechten
Wiederverwertung zugeführt werden.
SPEZIFIKATIONEN
ALLGEMEINE SPEZIFIKATIONEN
|
|
|
200 |
3000 |
4000 |
4200 |
|
|
|
|
|
|
|
|
Nennleistung (W) |
125 |
130 |
175 |
175 |
|
|
|
|
|
|
|
|
|
Nennspannung |
230-240 V, |
230 V, |
230-240 V, |
230-240 V, |
|
|
50-60 Hz |
50 Hz |
50-60 Hz |
50-60 Hz |
||
|
|
|
||||
|
Spannzangen für |
0,8 mm, 1,6 mm, 2,4 mm, 3,2 mm |
|
|||
|
|
|
|
|
|
|
|
Nenndrehzahl (n) |
35.000 |
33.000 |
35.000 |
33.000 |
|
|
|
|
U/min |
U/min |
U/min |
U/min |
|
|
|
|
|
|
|
|
|
Klasse-II- |
Doppelt isolierte Geräte |
|
|
|
|
|
|
|
|||
|
|
Ausführung |
|
|
||
|
|
|
|
|
|
|
|
|
|
|
|
|
|
30
 Loading...