


Integrated

 Effects Switching
System
Owner’s
Manual
Safety Information
The symbols shown above are internationally accepted symbols that warn of potential hazards with electrical products. The lightning flash with arrowpoint in an equilateral triangle means that there are dangerous voltages present within the unit. The exclamation point in an equilateral triangle indicates that it is necessary for the user to refer to the owner’s manual.
These symbols warn that there are no user serviceable parts inside the unit. Do not open the unit. Do not attempt to service the unit yourself. Refer all servicing to qualified personnel. Opening the chassis for any reason will void the manufacturer’s warranty. Do not get the unit wet. If liquid is spilled on the unit, shut it off immediately and take it to a dealer for service. Disconnect the unit during storms to prevent damage.
ELECTROMAGNETIC
COMPATIBILITY
This device complies with part 15 of the FCC Rules and the Product Specifications noted on the Declaration of Conformity. Operation is subject to the following two conditions:
•this device may not cause harmful interference, and
•this device must accept any interference received, including interference that may cause undesired operation.
Operation of this unit within significant electromagnetic fields should be avoided.
•use only shielded interconnecting cables.
If you want to dispose this product, do not mix it with general household waste. There is a separate collection system for used electronic products in accordance with legislation that requires proper treatment, recovery and recycling.
Private household in the 25 member states of the EU, in Switzerland and Norway may return their used electronic products free of charge to designated collection facilities or to a retailer (if you purchase a similar new one).
For Countries not mentioned above, please contact your local authorities for a correct method of disposal.
By doing so you will ensure that your disposed product undergoes the necessary treatment, recovery and recycling and thus prevent potential negative effects on the environment and human health.
WARNING FOR YOUR PROTECTION
READ THE FOLLOWING:
KEEP THESE INSTRUCTIONS HEED ALL WARNINGS FOLLOW ALL INSTRUCTIONS
The apparatus shall not be exposed to dripping or splashing liquid and no object filled with liquid, such as vases, shall be placed on the apparatus
CLEAN ONLY WITH A DRY CLOTH.
DO NOT BLOCK ANY OF THE VENTILATION OPENINGS. INSTALL IN ACCORDANCE WITH THE MANUFACTURER’S INSTRUCTIONS.
DO NOT INSTALL NEAR ANY HEAT SOURCES SUCH AS RADIATORS, HEAT REGISTERS, STOVES, OR OTHER APPARATUS (INCLUDING AMPLIFIERS) THAT PRODUCE HEAT.
ONLY USE ATTACHMENTS/ACCESSORIES SPECIFIED BY THE MANUFACTURER.
UNPLUG THIS APPARATUS DURING LIGHTNING STORMS OR WHEN UNUSED FOR LONG PERIODS OF TIME.
Do not defeat the safety purpose of the polarized or grounding-type plug. A polarized plug has two blades with one wider than the other. A grounding type plug has two blades and a third grounding prong. The wide blade or third prong are provided for your safety. If the provided plug does not fit your outlet, consult an electrician for replacement of the obsolete outlet.
Protect the power cord from being walked on or pinched particularly at plugs, convenience receptacles, and the point where they exit from the apparatus.
Refer all servicing to to qualified service personnel. Servicing is required when the apparatus has been damaged in any way, such as power-supply cord or plug is damaged, liquid has been spilled or objects have fallen into the apparatus, the apparatus has been exposed to rain or moisture, does not operate normally, or has been dropped.
MAINS DISCONNECT: The plug shall remain readily operable. For rack-mount or installation where plug is not accessible, an all-pole mains switch with a contact separation of at least 3 mm in each pole shall be incorporated into the electrical installation of the rack or building.
|
DECLARATION OF CONFORMITY |
Manufacturer’s Name: |
DigiTech |
Manufacturer’s Address: |
8760 S. Sandy Parkway |
|
Sandy, Utah 84070, USA |
declares that the product: |
|
Product name: |
RP 500 |
Product option: |
all (requires Class II power adapter that conforms |
|
to the requirements of EN60065, EN60742, or equivalent.) |
conforms to the following Product Specifications: |
|
Safety: |
IEC 60065 -01+Amd 1 |
EMC: |
EN 55022:2006 |
|
EN 55024:1998 |
|
FCC Part 15 |
Supplementary Information:
The product herewith complies with the requirements of the:
Low Voltage Directive 2006/95/EC
EMC Directive 2004/108/EC.
RoHS Directive 2002/95/EC
WEEE Directive 2002/96/EC
With regard to Directive 2005/32/EC and EC Regulation 1275/2008 of 17 December 2008, this product is designed, produced, and classified as Professional Audio Equipment and thus is exempt from this Directive.
With regard to Directive 2005/32/EC and EC Regulation 278/2009 of 6 April 2009, this regulation applies to Class A (single output) external power supplies.The external power supply used with this product is a multi-output power supply and thus is exempt from this Directive.
Roger Johnsen
Vice-President of Engineering
8760 S. Sandy Parkway
Sandy, Utah 84070, USA
Date: January 12, 2011
European Contact:Your local DigiTech Sales and Service Office or
Harman Music Group
8760 South Sandy Parkway
Sandy, Utah
84070 USA
Ph: (801) 566-8800
Fax: (801) 568-7583

Table of Contents |
|
Section One - Introduction |
|
Getting Acquainted.......................................................... |
1 |
Included Items................................................................... |
1 |
About the RP500.............................................................. |
1 |
Pedalboard Mode........................................................... |
1 |
Preset mode and Pedalboard Mode.......................... |
1 |
Bypass Mode................................................................... |
1 |
Amp/Cabinet Bypass Mode......................................... |
1 |
Tuner Mode..................................................................... |
2 |
Tone Library (Knob 1).................................................. |
2 |
Effects Library (Knob 2)............................................... |
2 |
Effects Level (Knob 3).................................................. |
2 |
Amp Gain/Effect Parameter (Knob 4)....................... |
2 |
Amp Level/Effect Parameter (Knob 5)...................... |
2 |
Master Level (Knob 6).................................................. |
3 |
X-EditTM Editor/Librarian............................................. |
3 |
Presets.............................................................................. |
3 |
Create Your Sound in Three Easy Steps...................... |
3 |
A Guided Tour of the RP500......................................... |
4 |
Front Panel...................................................................... |
4 |
Rear Panel....................................................................... |
7 |
Getting Started................................................................. |
8 |
Making Connections........................................................ |
8 |
Amp/Cabinet Bypass........................................................ |
8 |
Mono Operation - Amplifier....................................... |
8 |
Stereo Operation.......................................................... |
8 |
Applying Power............................................................... |
10 |
Section Two - Editing Functions |
|
Editing/Creating Presets................................................ |
11 |
Storing/Copying/Naming a Preset.............................. |
12 |
Section Three - Effects and Parameters
About the Effects............................................................ |
13 |
Effects Definitions........................................................... |
13 |
Pickup................................................................................ |
13 |
Wah................................................................................... |
13 |
Compressor..................................................................... |
14 |
Distortion......................................................................... |
14 |
Amplifier........................................................................... |
15 |
Cabinet.............................................................................. |
16 |
EQ...................................................................................... |
17 |
Noise Gate/Auto Swell................................................. |
17 |
Chorus/FX........................................................................ |
18 |
Chorus............................................................................ |
18 |
Flanger............................................................................ |
18 |
Phaser............................................................................. |
19 |
Vibrato............................................................................ |
19 |
Rotary Speaker............................................................. |
19 |
VibroPan......................................................................... |
20 |
Unicord Uni-VibeTM..................................................... |
20 |
Tremolo/Panner............................................................ |
20 |
Envelope Filter.............................................................. |
21 |
DOD FX25................................................................... |
21 |
AutoYaTM......................................................................... |
21 |
YaYa™............................................................................. |
21 |
SynthTalkTM.................................................................... |
22 |
Step Filter...................................................................... |
22 |
Sample Hold.................................................................. |
22 |
DigiTech Whammy™.................................................. |
23 |
Pitch Shift....................................................................... |
23 |
Detune........................................................................... |
23 |
Harmony Pitch Shifting (HPS)................................... |
24 |
Boss® OC-2 Octaver.................................................. |
24 |
Delay.................................................................................. |
24 |
Reverb............................................................................... |
25 |
Section Four - Other Functions |
|
CD/MP3 Input................................................................. |
26 |
Expression Pedal............................................................. |
26 |
LFOs.................................................................................. |
26 |
Wah Min/Max.................................................................. |
26 |
Expression Update......................................................... |
27 |
Factory Reset.................................................................. |
27 |
Expression Pedal Calibration....................................... |
27 |
Section Five - Appendix |
|
Specifications................................................................... |
28 |
Tone Library.................................................................... |
29 |
Effects Library................................................................. |
29 |

Warranty
We at DigiTech® are very proud of our products and back up each one we sell with the following warranty:
1.The warranty registration card must be mailed within ten days after purchase date to validate this warranty.
2.DigiTech warrants this product, when used solely within the U.S., to be free from defects in materials and workmanship under normal use and service.
3.DigiTech liability under this warranty is limited to repairing or replacing defective materials that show evidence of defect, provided the product is returned to DigiTech WITH RETURN AUTHORIZATION, where all parts and labor will be covered up to a period of one year.A Return Authorization number may be obtained from DigiTech by telephone.The company shall not be liable for any consequential damage as a result of the product’s use in any circuit or assembly.
4.Proof-of-purchase is considered to be the burden of the consumer.
5.DigiTech reserves the right to make changes in design, or make additions to, or improvements upon this product without incurring any obligation to install the same on products previously manufactured.
6.The consumer forfeits the benefits of this warranty if the product’s main assembly is opened and tampered with by anyone other than a certified DigiTech technician or, if the product is used with AC voltages outside of the range suggested by the manufacturer.
7.The foregoing is in lieu of all other warranties, expressed or implied, and DigiTech neither assumes nor authorizes any person to assume any obligation or liability in connection with the sale of this product. In no event shall DigiTech or its dealers be liable for special or consequential damages or from any delay in the performance of this warranty due to causes beyond their control.
NOTE:The information contained in this manual is subject to change at any time without notification. Some information contained in this manual may also be inaccurate due to undocumented changes in the product or operating system since this version of the manual was completed.The information contained in this version of the owner’s manual supersedes all previous versions.

Section 1 - Introduction
Getting Acquainted
Congratulations on your purchase of the RP500. You now own a very powerful integrated effects switching system allowing you extra control over stompboxes, effects, amplifiers and cabinets.The RP500 combines the simplicity of a stompbox with the control of an effects switching system for control the way you want it. Armed with DigiTech®’s patented AudioDNA2® custom audio DSP chip, the RP500 gives you a huge selection of tones and effects, right at your fingertips. Easily dial up a sound using the Tone and Effects Library knobs. You will appreciate the tone and dynamic interaction of each of the amps, stompboxes, and effects with your system. Add USB support for computer recording and you have the RP500: the key to unlock your creative potential.
Included Items
Before you get started, please make sure that the following items have been included:
•RP500
•Installer DVD: Cubase LE4 Recording Suite, X-EditTM Editor/Librarian Software, and RP500 Windows Drivers
•PS0913B Power Supply
•Warranty Card
The utmost care was taken while your RP500 was being manufactured. Everything should be included and in perfect working order. If anything is missing, contact the factory at once. Please help us become acquainted with you and your needs by sending us your completed warranty card or registering online at www.digitech.com. It is your safeguard should a problem arise with your RP500.
About the RP500
Pedalboard Mode
When you first apply power to the RP500, it powers up in Pedalboard mode. Pedalboard mode provides access to all of the presets within the RP500 via the Up and Down Footswitches. Knob 1 selects a tone from the Tone Library, Knob 2 selects an effects chain from the Effects Library, Knob 3 adjusts the Effects Level, Knob 4 adjusts the Amp Gain, Knob 5 adjusts the Amp Level, and Knob 6 adjusts the Master Level (volume).
Preset Mode and Pedalboard Mode
Since the RP500 has two different footswitch modes of operation (Preset Mode and Pedalboard Mode), presets can be selected in two different ways:
Pedalboard Mode
Pedalboard mode is the default mode, where each numbered footswitch turns on and off the effect labeled above it. Use the Up/Down Footswitches to select presets in Pedalboard mode. When the Pedalboard button is on (lit), Pedalboard mode is active.
Preset Mode
In Preset mode, the numbered footswitches recall presets in the active bank. Use the Up/ Down Footswitches to select preset banks in Preset mode. When the Pedalboard button is off (not lit), Preset mode is active.
Bypass Mode
The RP500 presets can be bypassed via an analog bypass circuit for a clean, unprocessed guitar signal. To bypass the RP500, press the Bypass Footswitch. The Display reads BYPASS indicating the preset is bypassed. Press any Footswitch to exit Bypass and return the RP500 to the last preset used.
Amp/Cabinet Bypass Mode
The RP500 has the unique feature of being able to turn off amp and cabinet modeling globally in all presets. This is extremely useful when you just want to add effects processing to your own core amplifier sound. The RP500 effectively becomes a straight multi-effects box at this point where only Wah, Compressor, Distortion, Equalizer, Noise Gate, Chorus/FX, Delay, and Reverb are being used.
To bypass amp/cabinet modeling in all presets, press the Amp/Cabinet Bypass button. When 1
it is lit, amp/cabinet modeling is globally bypassed in all presets.
Amp/Cabinet Bypass can be used in either Preset or Pedalboard modes.
Tuner Mode
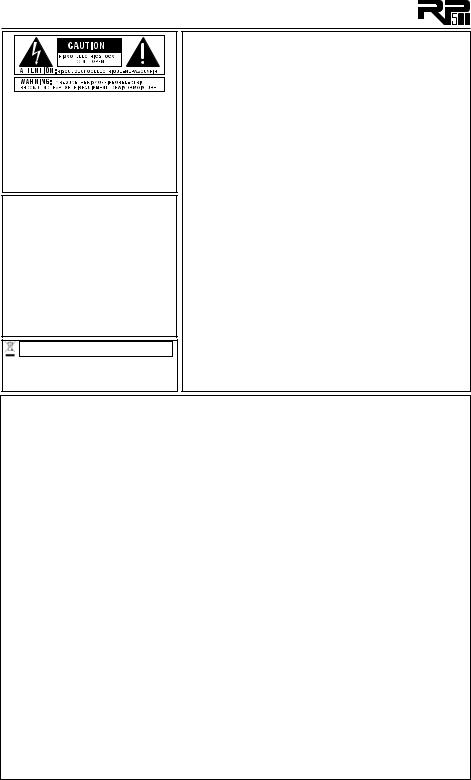
The Tuner in the RP500 allows you to quickly tune or check the tuning on your guitar. Enter Tuner mode by pressing and holding the Bypass Footswitch for 2 seconds. The Display briefly shows TUNER indicating that you are in Tuner mode. To begin tuning, play a note on your guitar (a harmonic at the 12th fret usually works best). The Numeric Display shows the note being played. Arrows on the right indicate the note is sharp and should be tuned down. Arrows on the left indicate the note is flat and should be tuned up. A left and a right arrow in the center indicate the note is in tune. The output is muted in Tuner mode. The Expression Pedal controls the guitar volume while tuning. Exit tuner mode by pressing any Footswitch.
Left and right arrows |
|
in the center indicate |
|
note is in tune |
Note being played |
A
In Tuner mode, you can change your tuning reference. The default factory setting is A=440 Hz
(displayed as A=440). Rotating Knob 1 selects alternate, dropped tunings and tuning references. Alternate tunings are A = A , A = G, A = G
 and tuning references A=427 - A=453.
The display window briefly flashes the current tuning reference.
Tone Library (Knob 1)
In Pedalboard and Preset modes, this knob selects a variety of genre-based amp tone defaults ranging from Blues to Metal to Country. Behind the scenes, the Compressor, Distortion, Amp/ Cabinet types, EQ, and Noise Gate are configured to create a specified tone with a single click of this knob. You can further refine the sound by editing the preset (see Editing/Creating Presets on page 11). Changing between different Tone Library defaults does not change the Chorus/FX, Delay or Reverb, letting you experiment with different amp styles quickly in the context of the current effect chain. When in Amp/Cabinet Bypass Mode, the amplifiers are defeated leaving distortion and overdrive stompboxes as the only means of distortion.
Effects Library (Knob 2)
In Pedalboard and Preset modes, this knob selects a variety of post-amplifier effect chains (Chorus, Chorus + Delay, Delay + Reverb, etc.).You can further refine the sound by editing the preset (see Editing/Creating Presets on page 11). Changing between different Effects Library defaults does not change the Compressor, Distortion, Amp/Cabinet types, EQ, and Noise Gate settings, letting you experiment with different effect chains quickly in the context of the current amp tone.
Effects Level (Knob 3)
In Pedalboard and Preset modes, this knob changes the relative level of the post-amp effects (Chorus/FX, Delay, and Reverb). This can be thought of as an effects mix control, where turning this knob clockwise increases the level of these effects and turning it counter-clockwise decreases the level of these effects.
Amp Gain/Effect Parameter (Knob 4)
This knob adjusts the Gain (distortion) for the selected Amp (not available for Acoustic) and is also used to adjust parameters of other effects in the matrix.The amplifier and cabinets cannot be adjusted when the Amp/Cabinet Bypass button is enabled.
Amp Level/Effect Parameter (Knob 5)
This knob adjusts the Level (volume) of the selected amp and is used to adjust other effect parameters in the matrix. Amp Level cannot be adjusted when the Amp/Cabinet Bypass button is enabled.
2
Master Level (Knob 6)
This knob controls the overall output volume of all of the RP500’s presets and is used to adjust other effect parameters in the matrix.
X-EditTM Editor/Librarian
You can edit your RP500 with your computer, using the X-EditTM Editor/Librarian, found on the included DVD.
Presets
Presets are named and numbered locations of programmed sounds which reside in the RP500. Presets are recalled with the Footswitches. The active effects in each preset are indicated by lighted LEDs in the Effect Matrix. The RP500 comes with 100 User presets (1-00) and 100 Factory presets (F1-F00). The User presets are locations where your creations may be stored. The Factory presets do not allow you to store any changes to them. From the factory, the 100 User presets are exact duplicates of the 100 Factory presets. This allows you to create your own presets without losing the sounds that came with the RP500.
Create Your Sound in Three Easy Steps
1. |
2. |
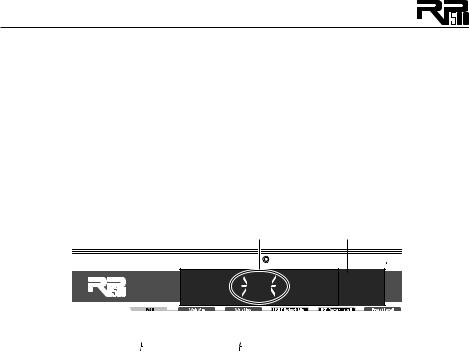
Tone Library
Select one of 40 different tones from rock, metal, blues, country, and more. The tones consist of a combination of Compressor, Distortion Stompbox, Amplifier/Cabinet, EQ, and Noise Gate.
For a complete list of available tones, see page 29.
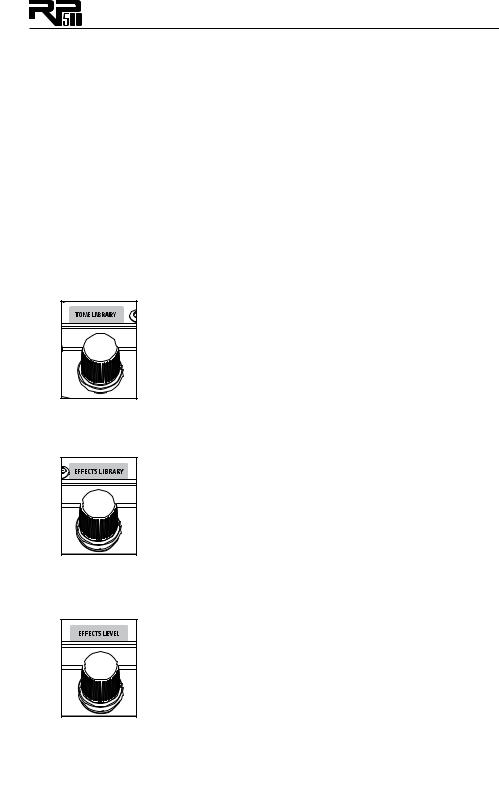
Effects Library
Select one of 40 diffferent effects chains. The effects consist of a combination of Chorus/FX, Delay, and Reverb.
For a complete list of available effects chains, see page 29.
3. |
Effects Level
Adjust the overall level of the post-amp effects to your liking.
To make further edits, refer to page 11. To store the preset, refer to page 12.
3

A Guided Tour of the RP500 |
|
|
|
|
|||
Front Panel |
|
|
|
|
|
|
|
1 |
2 |
3 4 |
5 |
6 |
7 |
8 |
9 |
10
1.Tap Tempo Footswitch
This footswitch is used for setting the delay time in the current preset. By pressing this footswitch repeatedly you can set the delay to repeat in time with your music.
2. Bypass/Tuner Footswitch
This footswitch bypasses all of the RP500’s effects sending an unprocessed signal out all of the outputs. Pressing and holding the Bypass footswitch accesses the RP500’s chromatic tuner. The Displays will provide feedback for the tuning function (see page 2 for more info on using the Tuner).
3. Edit Up/Down Buttons
These buttons navigate up and down the rows of the matrix for editing presets.
4. Effects Matrix
The matrix provides information regarding the current preset and parameter edit functions. In Pedalboard and Preset modes, the LEDs running down the left side of the Matrix provide a visual indication of which effects are in use for the selected preset.While editing a preset, the LEDs light individually to indicate which Effect row is selected for editing.
5. Displays
The RP500 has two sets of displays. The 8 character alpha-numeric display shows preset names, bank names, and effects names while editing. The 2 character numeric display shows preset numbers and effects parameters while editing and shows the note being tuned when the Tuner is enabled.
6. Knobs 1-6 (From left to right)
These six knobs perform various functions, depending on which mode is currently active and what (if anything) is being edited.The functions are listed below:
Tone Library (Knob 1)
1.In Pedalboard and Preset modes, this knob selects from a library of preset amp tones.
2.When editing a preset, this knob changes the Amp or Effect for the selected row and
4

pressing the knob will turn the effect row on or off. When editing an Effect row, press this knob to turn the effect on or off. When editing the Amp/Cabinet row, pressing this knob will switch between editing the amp or the cabinet.
3.When the Expression row is selected, this knob selects the Expression, LFO 1, LFO 2, and Wah parameter links, and pressing this knob has the same effect as turning it.
Effects Library (Knob 2)
1.In Pedalboard and Preset modes, this knob selects from a library of preset effect chains.
2.When editing a preset, this knob modifies the parameter listed in the column directly above it for the selected Effect row.
3.When the Expression row is selected, this knob selects which parameter is assigned to the Expression Pedal, LFO1or LFO2.
Effects Level (Knob 3)
1.In Pedalboard and Preset modes, this knob adjusts the overall level of post amp effects (Chorus/FX, Delay, and Reverb).
2.When editing a preset, this knob modifies the parameter listed in the column directly above it for the selected Effect row.
3.When the Expression row is selected, this knob selects the heel (minimum) value for the parameter or Wah linked to the Expression Pedal.
Amp Gain (Knob 4)
1.In Pedalboard and Preset modes, this knob adjusts the Amp Gain (distortion) for the selected Amp model.
2.When editing a preset, this knob modifies the parameter listed in the column directly above it for the selected Effect row. This knob also is used to adjust the RP/USB mix when the RP500 is connected to a computer and using recording software. Just select the Wah row to adjust this parameter when USB is connected to the RP500.
3.When the Expression row is selected, this knob selects the toe (maximum) value for the parameter or Wah linked to the Expression Pedal.
Amp Level (Knob 5)
1.In Pedalboard and Preset modes, this knob adjusts the Amp Level (volume) of the selected Amp model.
2.When editing a preset, this knob modifies the parameter listed in the column directly above it for the selected Effect row. This knob is also used to adjust the USB Record Level when the RP500 is connected to a computer and using recording software. Just select the Wah row to adjust this parameter when USB is connected to the RP500.
3.When the Expression row is selected, this knob selects the LFO waveform. LFO 1or LFO 2 must first be selected with Knob 1 for this parameter to be available.
MasterVolume (Knob 6)
1.In Pedalboard and Preset modes, this knob adjusts the output level of the RP500.
2.When editing a preset, this knob modifies the parameter listed in the column directly above it for the selected Effect row.
3.When the Expression row is selected, this knob sets the LFO speed. LFO 1 or LFO 2 must first be selected with Knob 1 for this parameter to be available.
7.System Buttons
There are three system buttons:AMP/CABINET BYPASS, PEDALBOARD, and STORE.
•AMP/CABINET BYPASS –When this button is lit, the internal amplifiers and cabinets are bypassed in all RP500 presets
•PEDALBOARD –When this button is lit, the 5 numbered footswitches turn the effects labeled above them on and off. When this button is not lit, these footswitches select the five presets in the active bank.
•STORE – Press this button to begin the store/copy procedure.
5

8. Up/Down Footswitches
These Up/Down footswitches select preset banks or they select individual presets when Pedalboard mode is active.
9. Expression Pedal
The Expression Pedal provides real-time control of the RP500’s Volume,Wah, or any assigned effect parameter.Almost every parameter is available for Expression Pedal control.The Expression Pedal also turns on and controls the Wah effect when you apply extra pressure to the toe.
10. 1-5 / Effects Footswitches
In Preset Mode, these 5 footswitches select between 5 different presets in the active bank. The footswitch LED will light to indicate which preset is active. In Pedalboard mode, these footswitches are used to turn Compressor, Distortion, Chorus/FX, Delay, and Reverb effects on and off. Effects that are on will have their footswitch LED lit.
6
Rear Panel
1 2 |
3 |
4 56 |
7 |
8 9 |
1. Input
High impedance 1/4” instrument input.
2.Amp/Mixer Switch
This switch optimizes the 1/4” Line Outputs for connecting to either a guitar amp system or directly into the inputs of a mixer.
3. 1/4” Line Outputs
These 1/4” outputs can be plugged into a guitar amplifier or into inputs of a mixer or recording device. The front panel Master Level controls the level of these outputs.
4. Headphone Output
Connect headphones here. Output optimized for use with headphones having 60 Ohms of impedance or less.
5. CD/MP3 Input
Connect the headphone output of an MP3 or CD player using a stereo 1/8” cable to this 1/8” stereo TRS jack for rehearsing with your favorite pre-recorded material. Adjust the output level of your playback device and the RP500’s Master Level knob for the proper volume balance.
6. Ground Lift Switch
This switch lifts pin 1 from the XLR Mixer Outputs from all ground references. This may be necessary to help solve troublesome ground loops that can cause hum in the system, especially when both XLR and 1/4” outputs are used with a mixer and a guitar amplifier.
7. XLR Mixer Outputs
The XLR outputs are designed for connecting to a recording device or mixing console. These outputs always have speaker compensation active as they are intended to be sent into full a range audio system.
8. USB Jack
The USB jack connects the RP500 to a computer and provides two purposes. First it is used to provide communication between the RP500 and the X-Edit editor librarian software. Second, it is used to stream four channels of audio (2 up / 2 back) to and from the computer when using the RP500 to record with the included Cubase LE4 recording software. Refer to the RP500 Software Installation Guide and Cubase LE4 online documentation on proper setup for this use.
9.AC Jack
The AC Jack allows you to connect a Digitech recommended power supply for supplying AC power to the unit.
7
 Loading...