


Owner's
IMPORTANT SAFETY INSTRUCTIONS |
Pour la version française de ce manuel aller à digitech.com
WARNING FOR YOUR PROTECTION
READ THE FOLLOWING:
KEEP THESE INSTRUCTIONS
HEED ALL WARNINGS
FOLLOW ALL INSTRUCTIONS
THE APPARATUS SHALL NOT BE EXPOSED TO DRIPPING OR SPLASHING LIQUID AND NO OBJECT FILLED WITH LIQUID, SUCH AS VASES, SHALL BE PLACED ON THE APPARATUS
CLEAN ONLY WITH A DRY CLOTH.
FOR INDOOR USE ONLY.
DO NOT BLOCK ANY OF THE VENTILATION OPENINGS. INSTALL IN ACCORDANCE WITH THE MANUFACTURER’S INSTRUCTIONS.
DO NOT INSTALL NEAR ANY HEAT SOURCES SUCH AS RADIATORS, HEAT REGISTERS, STOVES, OR OTHER APPARATUS (INCLUDING AMPLIFIERS) THAT PRODUCE HEAT.
ONLY USE ATTACHMENTS/ACCESSORIES SPECIFIED BY THE MANUFACTURER.
UNPLUG THIS APPARATUS DURING LIGHTNING STORMS OR WHEN UNUSED FOR LONG PERIODS OF TIME.
Do not defeat the safety purpose of the polarized or grounding-type plug. A polarized plug has two blades with one wider than the other. A grounding type plug has two blades and a third grounding prong. The wide blade or third prong are provided for your safety. If the provided plug does not fit your outlet, consult an electrician for replacement of the obsolete outlet.
Protect the power cord from being walked on or pinched particularly at plugs, convenience receptacles, and the point where they exit from the apparatus.
Refer all servicing to to qualified service personnel. Servicing is required when the apparatus has been damaged in any way, such as power-supply cord or plug is damaged, liquid has been spilled or objects have fallen into the apparatus, the apparatus has been exposed to rain or moisture, does not operate normally, or has been dropped.
MAINS DISCONNECT: The plug shall remain readily operable. For rackmount or installation where plug is not accessible, an all-pole mains switch with a contact separation of at least 3 mm in each pole shall be incorporated into the electrical installation of the rack or building.
If connected to 240V supply, a suitable CSA/UL certified power cord shall be used for this supply.
The symbols shown above are internationally accepted symbols that warn of potential hazards with electrical products. The lightning flash with arrowpoint in an equilateral triangle means that there are dangerous voltages present within the unit. The exclamation point in an equilateral triangle indicates that it is necessary for the user to refer to the owner’s manual.
These symbols warn that there are no user serviceable parts inside the unit. Do not open the unit. Do not attempt to service the unit yourself. Refer all servicing to qualified personnel. Opening the chassis for any reason will void the manufacturer’s warranty. Do not get the unit wet. If liquid is spilled on the unit, shut it off immediately and take it to a dealer for service. Disconnect the unit during storms to prevent damage.
The |
following is indicative |
of |
low |
altitude use; do not use |
this |
product above 2000m.
ELECTROMAGNETIC COMPATIBILITY
This device complies with part 15 of the FCC Rules and the Product Specifications noted on the Declaration of Conformity. Operation is subject to the following two conditions:
•this device may not cause harmful interference, and
•this device must accept any interference received, including interference that may cause undesired operation.
Operation of this unit within significant electromagnetic fields should be avoided.
• use only shielded interconnecting cables.
IMPORTANT
 SAFETY INSTRUCTIONS
Pour la version française de ce manuel aller à digitech.com
DECLARATION OF CONFORMITY
Manufacturer’s Name: |
DigiTech |
Manufacturer’s Address: |
10653 South River Front Parkway |
|
Suite 300 |
|
South Jordan, Utah 84095, USA |
declares that the product: |
|
Product name: |
Vocalist Live Harmony |
Product option: |
all (requires Class II power |
|
adapter that conforms to the |
|
requirements of EN60065, |
|
EN60742, or equivalent.) |
conforms to the following Product Specifications: |
|
Safety: |
IEC 60065 -01+Amd 1 |
EMC: |
EN 55022:2006 |
|
EN 55024:1998 |
|
FCC Part 15 |
Supplementary Information:
The product herewith complies with the requirements of the:
Low Voltage Directive 2006/95/EC EMC Directive 2004/108/EC. RoHS Directive 2002/95/EC WEEE Directive 2002/96/EC
EC Regulation 278/2009
With regard to Directive 2005/32/EC and EC Regulation 1275/2008 of 17 December 2008, this product is designed, produced, and classified as
Professional Audio Equipment and thus is exempt from this Directive.
Rex C. Reed
Director, Engineering
Signal Processing
10653 South River Front Parkway
Suite 300
South Jordan, Utah 84095, USA
Date: March 7, 2013
European Contact: Your local DigiTech Sales and Service Office or
Harman Signal Processing
10653 South River Front Parkway
Suite 300
South Jordan, Utah 84095, USA
Ph: (801) 566-8800
Fax: (801) 568-7583
If you want to dispose this product, do not mix it with general household waste. There is a separate collection system for used electronic products in accordance with legislation that requires proper treatment, recovery and recycling.
Private household in the 25 member states of the EU, in Switzerland and Norway may return their used electronic products free of charge to designated collection facilities or to a retailer (if you purchase a similar new one).
For Countries not mentioned above, please contact your local authorities for a correct method of disposal.
By doing so you will ensure that your disposed product undergoes the necessary treatment, recovery and recycling and thus prevent potential negative effects on the environment and human health.

Warranty & Registration
We at DigiTech® are very proud of our products and back-up each one we sell with the following warranty:
1.Please register online at www.digitech.com within ten days of purchase to validate this warranty. This warranty is valid only in the United States.
2.DigiTech warrants this product, when purchased new from an authorized U.S. DigiTech dealer and used solely within the U.S., to be free from defects in materials and workmanship under normal use and service.This warranty is valid to the original purchaser only and is non-transferable.
3.DigiTech liability under this warranty is limited to repairing or replacing defective materials that show evidence of defect, provided the product is returned to DigiTech WITH RETURN
AUTHORIZATION, where all parts and labor will be covered up to a period of one year.A Return Authorization number may be obtained from DigiTech by telephone.The company shall not be liable for any consequential damage as a result of the product’s use in any circuit or assembly.
4.Proof-of-purchase is considered to be the responsibility of the consumer.A copy of the original purchase receipt must be provided for any warranty service.
5.DigiTech reserves the right to make changes in design, or make additions to, or improvements upon this product without incurring any obligation to install the same on products previously manufactured.
6.The consumer forfeits the benefits of this warranty if the product’s main assembly is opened and tampered with by anyone other than a certified DigiTech technician or,if the product is used with
AC voltages outside of the range suggested by the manufacturer.
7.The foregoing is in lieu of all other warranties, expressed or implied, and DigiTech neither assumes nor authorizes any person to assume any obligation or liability in connection with the sale of this product. In no event shall DigiTech or its dealers be liable for special or consequential damages or from any delay in the performance of this warranty due to causes beyond their control.
NOTE: The information contained in this manual is subject to change at any time without notification.
Some information contained in this manual may also be inaccurate due to undocumented changes in the product since this version of the manual was completed.The information contained in this version of the owner’s manual supersedes all previous versions.
Service/Contact Information
If you require technical support, contact DigiTech Technical Support. Be prepared to accurately describe the problem. Know the serial number of your device – this is printed on a sticker attached to the chassis.
Before you return a product to the factory for service, we recommend you refer to this manual. Make sure you have correctly followed installation steps and operation procedures. For further technical assistance or service, please visit our support page at digitech.com. If you need to return a product to the factory for service,you MUST first contactTechnical Support to obtain a ReturnAuthorization Number.
No returned products will be accepted at the factory without a Return Authorization Number.
Please refer to the warranty information,which extends to the first end-user.After expiration of the warranty, a reasonable charge will be made for parts, labor, and packing if you choose to use the factory service facility. In all cases, you are responsible for transportation charges to the factory. DigiTech will pay return shipping if the unit is still under warranty.
Use the original packing material if it is available. Mark the package with the name of the shipper and with these words in red: DELICATE INSTRUMENT, FRAGILE! Insure the package properly. Ship prepaid, not collect. Do not ship parcel post.
Owner's Manual

Table of Contents
Overview 1
Introduction 1 musIQ® & Live Adapt™ 2 Features 3 Included Items 3
User Interface & Connectors 4
Top Panel 4 Rear Panel 8
Connection Diagrams 10
Cable Diagrams 10 Solo-Acoustic Guitar Application 11 Band-Electric Guitar Application 12 Practice Application 13
Operating The Live Harmony 14
Gold Channel Effects 14 Vocal Effects 16 Guitar Effects 17 Effects Bypass 18 Anti-Feedback 18 Sound Check 19 Live Adapt™ 20 Looper 23 Guitar Tuner 25 Presets 26 Preset A/B Parts 28 Set Lists 29 FS3X Footswitch Control 31 Volume/Expression Pedal Control 32
System Setup 33
Out Pad 33
A/B Footswitch Configuration 34 48 V Phantom Power 35 Stereo 35 GTR XLR LVL 36 GTR Sensitivity 36 Preset Load 37 Loop Undo 38 EP (Expression Pedal) Type 39 Aux In Configuration 40 EP Parameter, Min, & Max 41 Factory Reset 43
Owner's Manual
The Effects & Parameters 44
Gold Channel 45 Warmth 46 Compressor 47 Pitch Correction 48 Ambience 49 EQ 50 De-Esser 51 Noise Gate 52 Low Cut Filter 53 Harmony 1 & 2 54 Double 57 Pitch FX 59 Distortion/Filter 62 Modulation 64 Delay 66 Reverb 69 Guitar 71
Preset Librarian Software 73
System Requirements & Download 73 Firmware Updates 73
Preset List 74
Technical Information 75
Block Diagram 75 Specifications 76
Overview
Introduction
Thank you for choosing the Vocalist® Live Harmony by DigiTech®.The Live Harmony is a feature-packed vocal harmony and effects processor. It incorporates a highquality mic preamp, two-part harmony generation, studio-grade vocal effects, pitch correction, dbx® Advanced Feedback Suppression, the latest musIQ® technology with Live Adapt™, a built-in phrase looper, and much, much more.This combination of features and sound quality provide professional, studio quality effects and intelligent harmony generation for vocalists performing live.
The Live Harmony begins with a global channel strip processing chain, referred to as the “Gold Channel” effects.This global set of 8 effects is used across all presets, providing the sonic foundation for your vocal sound.The Gold Channel effects comprise:Warmth, Compression, Pitch Correction, Lexicon® Ambience, 3-Band EQ, De-Essing, Noise Gating, and Low Cut.
The harmony section offers full control over two voices of next-generation harmony, making it possible to fine-tune the level, gender, pan, and harmony type of each voice. In addition, the Vocalist Live Harmony includes the most important effects for enhancing a vocal performance, including: Lexicon Reverbs, Delays, Doubling, as well as various Pitch, Filter/Distortion, and Modulation effects.All
effects are easily enabled and edited thanks to dedicated buttons, a full graphics LCD display, and four soft knobs.
One of the most significant features of the Live Harmony is Live Adapt™. Live Adapt uses the internal analysis microphone or Aux In jack to provide automatic, real-time effect tempo adjustment, smart gating of non-vocal signals (internal mic only), and intelligent pitch and harmony generation using the detected key of the music.
For the guitarist who wants to travel light, the Vocalist Live Harmony includes a guitar input for mixing your guitar signal to the Live Harmony's outputs and/or for generating the harmony and pitch key.You can even apply built-in guitar effects, including: flanger, vibrato, chorus,reverb and more. Or just use the guitar input for vocal harmony and pitch key generation and use the Guitar Thru jack to send your guitar signal out to your own personal guitar rig.
Three rugged footswitches provide preset A/B part selection, preset navigation, global effects bypass, and hands-free control of the built-in phrase looper.
The rear panel boasts all the necessary connections for the performing singer, including a USB port for firmware updates and preset management using the free
Vocalist Live Librarian software for Mac® and PC.
With a quick-access user interface, two-part harmony generation, a plethora of studio-quality effects, dbx Advanced Feedback Suppression, and state-of-the-art processing technologies, the Live Harmony gives you the tools you need to take center stage with confidence.
1 |
Owner's Manual |

musIQ® & Live Adapt™
musIQ is a revolutionary chord detection technology that analyzes the audio in real time and determines what notes are being played, while the musIQ harmony engine is capable of interpreting this note data along with the pitch of the singer to determine the most musically correct harmony notes to generate.
The Live Harmony’s Live Adapt feature uses musIQ to provide even further functionality by adapting the noise gate threshold, the pitch correction and pitch effect key, and the modulation and delay effect tempo settings.With musIQ & Live Adapt, the Live Harmony can adapt to changes in your music, creating a truly dynamic performance.
Owner's Manual |
2 |

Features
•Microphone Preamp w/+48V Phantom Power
•Channel Strip Style Processing w/Pitch Correction, Compression, Lexicon® Ambience, & More
•High-Quality, Customizable Two-Part Vocal Harmony Generation
•Studio-Grade Vocal Effects, Including: Lexicon® Reverbs, Delays, Doubling, Pitch Shifting, Modulation, & Distortion/Filter Effects
•dbx® Advanced Feedback Suppression
•Latest musIQ® Technology & Internal Analysis Mic
•Live Adapt™ for Real-Time Adaptive Control of Noise Gating, Pitch/Harmony Key, & Effect Tempo
•Sound Check for Easy Auditioning & Setup of Effects
•Guitar Input for Classic MusIQ Harmony & Pitch Generation & Optionally Mixing the Guitar Signal to the Live Harmony's Outputs
•Built-In Guitar Tuner
•Selectable Guitar Effect + Reverb
•Guitar Thru Jack for Sending the Unprocessed Guitar Signal to Your Own Guitar Rig
•70 Second Mono Phrase Looper (35 Seconds w/Undo)
•99 User & 99 Factory Presets
•24-bit/44.1kHz Audio Quality
•Easy-To-Read Backlit LCD Display
•USB Port for Firmware Updates & Preset Management
•Vocalist Live Librarian Preset Management Software for Mac & PC
Included Items
•Vocalist Live Harmony Processor
•Power Supply
•Quick Start
The utmost care was taken while manufacturing your Live Harmony. Everything should be included and in perfect working order. If anything is missing or damaged, please contact your dealer at once.
3 |
Owner's Manual |

User Interface & Connectors
Top Panel
1 |
2 |
3 |
4 5 |
|
N |
Y 2 |
|
19 |
HARMO |
6 |
|
|
|
||
18 |
|
|
7 |
|
|
|
17 |
ONYLEVEL |
|
HARM |
16


 15
15
14
VOICE
1
VO
ICE
2
KEY/SCALE |
8 |


 9
9
 10 11
10 11
12
13
1.Gold Channel Button
Pressing this button turns the Gold Channel effects on and off; the effects are on when the button is lit.The Gold Channel effects provide the sonic foundation for your vocal sound and are used as the front end for all presets. Press and hold this button to edit Gold Channel settings using the DATA encoder [7] and Edit knobs [11]. Select one of the Gold Channel
"types" (several pre-configured Gold Channel setups) to get started then modify the settings to taste (see "Gold Channel Effects" on page 14).
2.Harmony 1 & 2 Buttons
These buttons turn each Harmony voice on or off when pressed.When each button is lit, the corresponding voice is enabled. Press and hold each of these buttons to edit the corresponding voice’s settings.
Owner's Manual |
4 |
3.Vocal Effect Buttons
These buttons turn each corresponding Vocal effect on and off. Pressing and holding each button will enter the menu for editing the selected effect's settings (see "Vocal Effects" on page 16).
4.Live Adapt Mic
This internal analysis microphone listens to the music being played in the room and adjusts settings in the Live Harmony automatically. It is used to adjust tempo for delay and modulation effects, adjust the key for generated harmonies and pitch correction/pitch effects, and adjust the noise gate threshold.
NOTE: Whenever the Aux In jack is connected to an audio source, it will be used for Live Adapt features instead of the internal microphone.When a connection is made to the Guitar In jack, the guitar signal will be used to determine the key/scale to follow for harmony generation and pitch effects based on the chord progression played. See "Live Adapt™" on page 20 for further information.
5.Guitar Effect Button
This button turns the Guitar effects on and off.The Guitar effects give you two simultaneous effects to apply to your guitar signal: one allows you
to select one of the available modulation effects and the other is a fixed reverb with a mix level control. Use these effects when connecting your guitar straight to the PA system through the Live Harmony's XLR or Line/ Headphone outputs.The Guitar effects only process the signal present at the Guitar In jack. Pressing and holding this button will display the Guitar effect's settings in the LCD display, where they can be modified using the DATA encoder [7] and Edit knobs [11].
NOTE: The Guitar effect is passed to the XLR and 1/4" Line/Heaphone outputs only. It is not passed to the Guitar Thru jack, as this jack is intended to be used when connecting to your own personal outboard guitar effects and/or guitar amplifier (see "Guitar Effects" on page 17).
6.Vocal Signal LED
This LED lights when the mic input signal is detected.This LED will light green when a signal is present, orange when approaching the A/D limiting point, and red when limiting occurs. Good practice is to set the microphone Input Gain knob so the Signal LED lights green regularly, lights orange occasionally, but never lights red.
NOTE: The Signal LED may also light red if the outputs clip due to the added gain from multiple enabled effects. If such a condition is
encountered, simply lower the Input Gain knob until the Signal LED no longer indicates clipping.
5 |
Owner's Manual |
7.DATA Encoder
This encoder is used to navigate menus and edit certain parameters. Pressing this encoder selects different pages within the Gold Channel and System menus.
8.Store Button
When pressed, this button initiates the preset store and copy functions. When a preset is edited, this button will light, indicating a change has been made to the preset’s stored settings.
9.System Button
Pressing this button enters the System menu, where you can edit Live
Harmony global system settings for configuring the Live Harmony for your application. Pressing the DATA Encoder [7] will navigate through the system menus.
10.Sound Check Button
This button enables and disables the Sound Check feature. Sound Check lets you record a vocal loop which can then be used for auditioning and editing effect parameters (see "Sound Check" on page 19).
11.Edit Knobs
These four knobs are used to edit the various effect and system parameters.They correspond to the available on-screen parameters as shown in the illustration to the right.
Gold Channel TYPE
1/3 (Push) |
Standard |
|
|
WARMTH COMP |
CORRECT AMBNCE |
|
35 |
HARMONYLE |
KEY/SCALE |
Edit 1 |
Edit 2 |
Edit 3 |
Edit 4 |
Knob |
Knob |
Knob |
Knob |
From the Preset screen, these knobs provide quick access to overall harmony level, voice 1 and voice 2 harmony intervals, and the key/ scale setting.
Harmony
musIQ Adapt
AMOUNT |
VOICING |
VOICING |
KEY |
HARMONYLE
KEY/SC
A
LE
Edit 1 |
Edit 2 |
Edit 3 |
Edit 4 |
Knob |
Knob |
Knob |
Knob |
12.A/B Footswitch
The Live Harmony lets you store two parts per preset:“A” and “B”.Vocal effects can be independently enabled or disabled in each part and the A/B footswitch toggles between these two parts.This feature can be helpful for applying effects within a song without having to switch between presets, such as enabling delays or distortion effects on certain words or vocal phrases.This A/B footswitch can be programmed in the System menu
for toggle, momentary, or automatic operation (see "A/B Footswitch
Configuration" on page 34 for more information).
13.UP Footswitch
This footswitch selects the next preset up. Pressing and holding this footswitch for 1 second will bypass all Vocal effects (Gold Channel effects
Owner's Manual |
6 |

will not be affected).This "Vocal Effects Bypass" feature allows you to bypass all Vocal effects quickly, such as when talking to the audience between songs. Pressing and holding this footswitch for 2 seconds will access the built-in Guitar Tuner and mute the Live Harmony outputs while the tuner is active
(see "Guitar Tuner" on page 25).
14.DOWN Footswitch
This footswitch selects the next preset down. Pressing and holding this footswitch for 2 seconds enters Loop mode, where you can record loops using the built-in Phrase Looper (see "Looper" on page 23).
15.Anti-Feedback Button
Pressing this button enables and disables dbx Advanced Feedback Suppression (AFS).When the button is lit,AFS is enabled (see
"Anti-Feedback" on page 18).
16.Live Adapt Button
Pressing this button globally enables and disables the Live Adapt feature. When the button is lit, Live Adapt is enabled. Pressing and holding this button enters the Live Adapt menu, where each of the separate Live Adapt functions can be enabled or disabled (see "Live Adapt™" on page 20).
17.Set List Button
Pressing this button enters Set List mode. Set Lists create a sequenced list of up to twenty presets, making it easy to step through only the presets you want to use during a performance. Up to five Set Lists can be created.
Pressing this button multiple times cycles through the available Set Lists. When the last Set List is selected, pressing this button again will exit Set List mode and return to Preset mode (see "Set Lists" on page 29).
18.LCD Display
This easy-to-read backlit LCD display provides the visual feedback necessary for operating the Live Harmony.
19.Guitar Signal LED
This LED lights when the guitar input signal is detected.This LED will light green when a signal is present, orange when approaching the A/D limiting point, and red when limiting occurs. Good practice is to set the GTR SENSITIVITY setting in the System menu so the Guitar LED lights green regularly, lights orange occasionally, but never lights red.
7 |
Owner's Manual |
Rear Panel
|
11 |
|
1 |
10 |
|
2 |
||
|
3 |
4 |
5 6 |
7 |
8 |
9 |
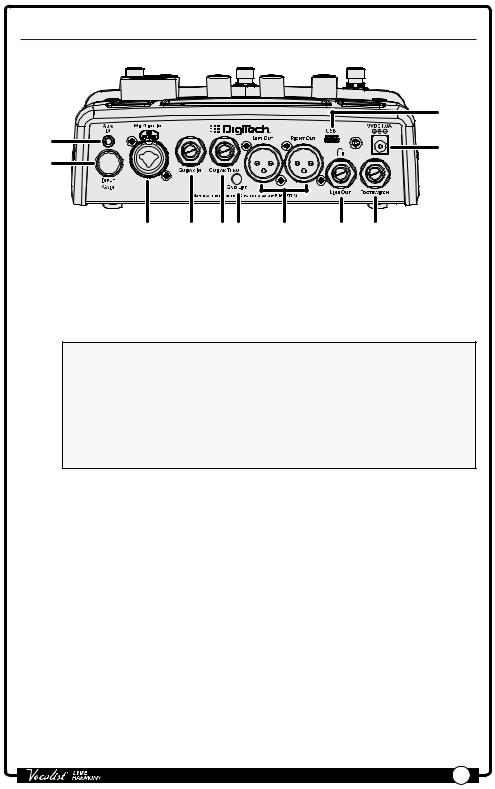
1.Aux In Jack
Connect a portable music player or the outputs of a mixer to this stereo 1/8" jack.Audio from an external device plugged into this jack can be used either for Live Adapt and musIQ analysis or the audio can be mixed in with the vocal signal at the line and XLR outputs.
NOTE: Whenever a device is connected to the Aux In jack, it will be used for Live Adapt features instead of the internal microphone. For harmony and pitch adaptive functions, priority is first given to the Guitar In jack
if a connection is present. Second priority is given to the Aux In jack if a connection is present. If no connection is made to either the Guitar In or Aux In jacks, the internal mic will be used to gather the data for pitch and harmony generation. See "Live Adapt™" on page 20 for further information.
2.Input Gain Knob
This knob controls the input gain of the Mic/Line In jack.
3.Mic/Line In Jack
This combination jack accepts a microphone or line-level signal. Connect a microphone using an XLR connection to use the Live Harmony's internal mic preamp. +48 Volt phantom power can be enabled in the System menu for condenser microphones which require it. Connect using a 1/4" balanced TRS connection when connecting the line output of an external mic preamp to the Live Harmony.
4.Guitar In Jack
Connect your guitar to this 1/4", unbalanced TS jack.The guitar signal will be used by musIQ for harmony generation instead of the internal analysis mic or Aux In jack. Use the GTR SENSITIVITY and GTR XLR LVL parameters found in the System menu to adjust your guitar input and output levels. See
"GTR Sensitivity" on page 36 and "GTR XLR LVL" on page 36 for further information on these parameters.
Owner's Manual |
8 |
5.Guitar Thru Jack
The guitar signal received at the Guitar In jack is passed through this 1/4", unbalanced TS jack and can connect to other guitar effects or the input of an amplifier. The Guitar effects built into the Live Harmony are not passed out this output.
NOTE: TheVocalist Live Harmony needs to be the first device in any guitar effects chain.
6.Ground Lift Switch
This switch can be used to eliminate most hum and noise caused by ground loops created when connecting the Live Harmony to both a PA system via the XLR outputs and a guitar amp using the Guitar Thru jack.
7.Left/Right Out Jacks
These balanced XLR outputs provide either a mono or stereo mix of your lead vocal, harmony voices and effects, and guitar signal with effects. The signal level coming from these outputs could be described as a “hot” mic-level signal. It should be compatible with both the mic input of a mixer
(with the mixer input trim turned down somewhat) and with a line input on the mixer (with the mixer trim set higher). See "Stereo" on page 35 for information on configuring the Live Harmony outputs for mono or stereo operation.
8.Headphone/Line Out Jack
This is a 1/4" stereo TRS output and can be used for headphones or for connecting to the line-level inputs of another device.This output carries the same mix that is presented at the XLR outputs.When the outputs are configured for mono operation,both left and right channels will be mono-summed and stereo imaging will be lost.
9.Footswitch Jack
Plug an optional DigiTech FS3X Footswitch to this jack for full-time control of the Live Harmony’s built-in Phrase Looper.You can also connect a volume or expression pedal to this jack for continuous control of various vocal effect parameters. For more information, see "FS3X Footswitch Control" on page 31 and "Volume/Expression Pedal Control" on page 32.
10.Power Jack
Connect only the included power supply to this jack.The Live Harmony can only be powered using the included external adapter.
11.USB Port
Connect a Mini USB cable from this port to your computer to use the Vocalist Live Librarian software (available for Mac and PC) for preset management and firmware updates.
9 |
Owner's Manual |
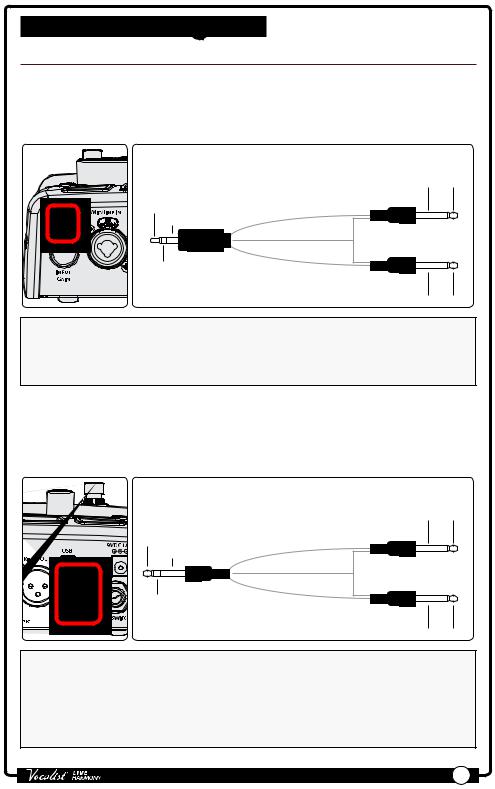
Connection Diagrams
Cable Diagrams
Stereo Connection to Live Harmony Aux In
Use a cable like the one shown below when connecting a stereo 1/4" feed to the Live Harmony's Aux In jack.
1/8" Stereo TRS to Dual 1/4" TS Cable
Ground |
Left + |
|
Left |
Left |
Channel |
Channel (+) |
Left + |
|
Ground |
|
|
Ground |
|
Right |
|
Channel |
Right |
Right + |
Channel (+) |
|
Ground Right +
NOTE: You can also use the above cable when connecting a mono signal to the Aux In jack – such as when connecting an aux send or direct output from the mixing console. Simply connect only one of the 1/4" TS plugs to the desired output then leave the other disconnected.
Stereo Connection from Live Harmony Line Out
Use a cable like the one shown below to connect the Live Harmony's 1/4" Headphone/Line Output to the 1/4" line inputs of another device.
1/4" Stereo TRS to Dual 1/4" TS Cable
Ground |
Left + |
|
Left |
Left |
Channel |
Channel (+) |
Left + |
|
|
Ground |
|
|
Ground |
|
Right |
|
Channel |
Right |
Right + |
Channel (+) |
|
Ground Right +
NOTE: Connecting a mono TS cable to the 1/4" stereo Headphone/Line Output jack is not recommended. If you require a single mono feed from the 1/4" stereo Headphone/Line Output, it is recommended that you use a stereo cable as shown above and use only one of the TS plugs, leaving the other disconnected.You will then need to turn STEREO mode off in the System menu. See "Stereo" on page 35 for more information on changing the STEREO parameter.
Owner's Manual |
10 |
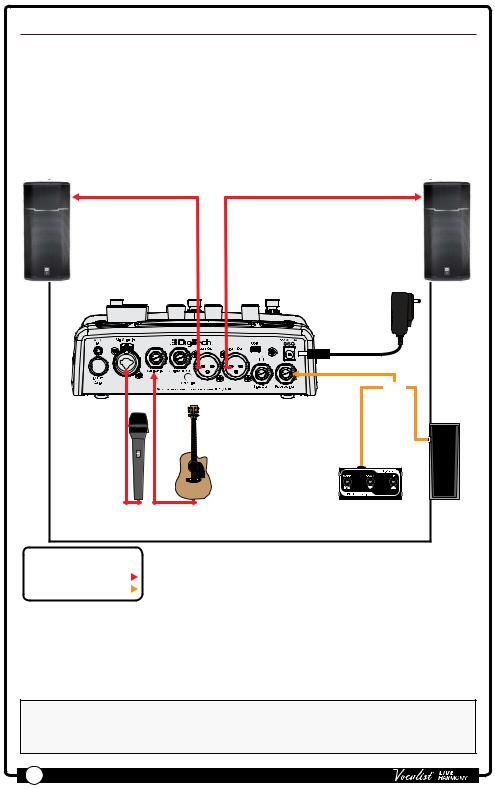
Solo-Acoustic Guitar Application
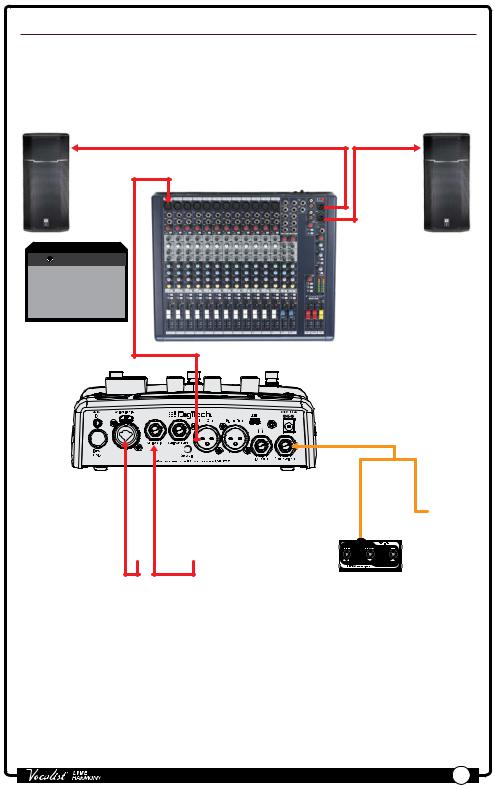
Often with an acoustic guitar it is convenient to provide a single output to the PA. The Vocalist Live Harmony allows you to mix the guitar with the vocals and send the guitar/vocal mix to the PA via the XLR Outputs.This allows you total control of your sound from on-stage.The Vocalist Live Harmony also provides the ability to add chorus and reverb to your guitar signal to fill out the sound.For a solo act it is no longer necessary to carry a mixer to the gig.To balance the guitar level with the vocals, adjust the GTR XLR LVL on page 2/6 in the System menu, see "GTR XLR LVL" on page 36 for further information.
Mic or Line |
|
Mic or Line |
Input |
|
Input |
|
|
Harman |
|
|
Power Supply |
|
|
or |
Microphone |
Guitar |
DigiTech FS3X Footswitch or |
|
|
Volume/Expression Pedal |
LEGEND |
|
|
Omit For Mono 
Optional 
NOTE: By default the Live Harmony is configured for stereo operation.To configure the Live Harmony for mono operation you must turn off the STEREO option in the System menu, see "Stereo" on page 35 for further information.
11 |
Owner's Manual |
Band-Electric Guitar Application
This setup is ideal for the electric guitarist who wants the benefit of musIQ chord recognition but plays through an amp and doesn't want the guitar mixed with the vocals at the XLR outputs.To prevent the guitar signal from being fed directly to the PA, adjust the GTR XLR LVL to 0 on page 2/6 in the System menu, see "GTR XLR LVL" on page 36 for further information.
Mic or Line
Input(s)
Guitar Effects
and/or Amp
Microphone Guitar
LEGEND
Omit For Mono 
Optional 
Harman
Power Supply
or
DigiTech FS3X Footswitch or Volume/Expression Pedal
NOTE: By default the Live Harmony is configured for stereo operation.To configure the Live Harmony for mono operation you must turn off the STEREO option in the System menu, see "Stereo" on page 35 for further information.
Owner's Manual |
12 |
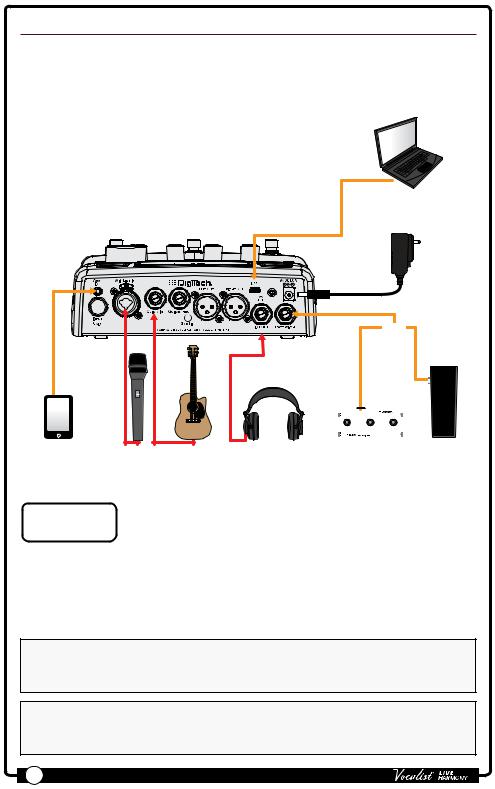
Practice Application
This setup is ideal for practicing your skills, working on new material, or preparing for the gig. Connecting a portable music player lets you practice along with pre-recorded music. Connect a computer to backup your presets and set lists or graphically configure set lists for your next gig.
Computer w/Vocalist Live
Librarian Software
Harman
Power Supply
or
|
|
|
|
|
|
|
|
|
|
|
|
|
|
|
|
|
|
|
|
|
|
|
|
|
|
|
|
|
|
|
|
|
|
|
|
|
|
|
|
Portable Music |
Microphone Guitar |
Headphones |
DigiTech FS3X Footswitch or |
||||||
Player |
|
|
Volume/Expression Pedal |
||||||
LEGEND
Optional 
NOTE: In order to monitor the portable music player out of the Headphone/
Line Out jack in this application, you must configure the Aux In jack for "Mix" operation, see "Aux In Configuration" on page 40 for further information.
NOTE: The headphone output level can be adjusted using the OUT PAD parameter in the System menu, see "Out Pad" on page 33 for more information.
13 |
Owner's Manual |
Operating The Live Harmony
This section of the manual describes how to navigate and use the various features of the Live Harmony.
Gold Channel Effects
The "Gold Channel" effect processing section is the first effect module in the signal chain and provides channel strip style processing.The Gold Channel is comprised of the following 8 effects:Tube Warmth, Compressor, Pitch Correction,Ambience, EQ, De-Esser, Gate, and Low Cut.These effects provide the sonic foundation for your vocal sound and are used as the front end on all presets.
To globally bypass/enable the Gold Channel effects:
1.Press the <Gold Channel> button.When the Gold Channel button is lit, the Gold Channel effects are enabled.When the button is not lit, these effects are bypassed.
To edit Gold Channel settings:
1.Press and hold the <Gold Channel> button.The <Gold Channel> button will begin flashing and the LCD display will now display the Gold Channel effect parameters.
2.Start singing into the microphone or use the Sound Check feature (see "Sound Check" on page 19 for further information).Turn the <DATA> encoder to select a Gold ChannelTYPE.Think of these "Types" as preconfigured setups of
Gold Channel parameters. Once you've selected the Gold Channel TYPE which is close to the sound you are after, you can fine tune the settings by turning the corresponding <Edit> knobs.
3.Press the <DATA> encoder to navigate the various pages within the Gold Channel menu and use the corresponding <Edit> knobs to make any further parameter adjustments.
4.When finished editing, press the <Gold Channel> button to exit.
NOTE: Changes to Gold Channel effect parameters do not need to be stored to a preset, since these effects are global and independent of presets.
Any changes made to Gold Channel Types are automatically remembered.This lets you setup different custom channel strip settings and easily switch between them.You can always revert back to the factory default settings for any of the Gold Channel types if necessary.
Owner's Manual |
14 |

To reset a Gold Channel Type back to its factory default settings:
1.Press and hold the <Gold Channel> button.The <Gold Channel> button will begin flashing and the LCD display will now display the Gold Channel effect parameters.
2.Turn the <DATA> encoder until you have selected the TYPE you wish to reset. If the selectedTYPE has been modified from the default settings,the display will read "TYPE-MODIFIED".
3.Press the <DATA> encoder as many times as it takes to get to page 3 of 3 (3/3) in the Gold Channel menu. Once you are on page 3, you will see the RESET parameter in the bottom right-hand corner of the LCD display.
4.Turn the <Edit 4> knob to initiate the reset procedure.
5.A prompt will be displayed, allowing you to confirm or cancel the operation. Turn the <Edit 3> knob to select "Yes" and confirm the type reset procedure.
Turn the <Edit 2> knob to select "No" and cancel the operation.
15 |
Owner's Manual |
Vocal Effects
The Vocal effects processing section comes after the Gold Channel effects and is comprised of the following 6 effect modules: Harmony 1, Harmony 2, Doubler, FX
(pitch, modulation,and distortion/filter effects), Delay, and Reverb. Unlike the Gold
Channel effects,Vocal effect settings are independently stored to each preset.
To bypass/enable a Vocal effect module:
1.Press the corresponding effect button (e.g., <Harmony 1>, <Double>, <FX>, etc.).When the effect button is lit, the corresponding effect is enabled. When the effect button is not lit, the corresponding effect is bypassed.
2.If you wish to store the Vocal effect’s enabled or bypassed state, press the <Store> button and perform the preset storing procedure. See "Presets" on page 26 for further information on storing user presets.
To edit Vocal effect settings:
1.Press and hold the effect button for the effect which you would like to edit (e.g., <Harmony 1>, <Double>, <FX>, etc.).The effect button will begin flashing and the LCD display will now display the selected effect’s parameters.
2.Start singing into the microphone or use the Sound Check feature (see "Sound Check" on page 19 for further information).
3.Turn the <DATA> encoder to audition and select the desired effect TYPE (or the desired VOICING if adjusting one of the two harmonies).
4.Turn the corresponding <Edit> knobs to refine the various parameters until the desired effect is achieved.
5.When finished, press the flashing effect button to exit the effect's edit menu.
6.To store the changes, press the <Store> button and perform the preset storing procedure. See "Presets" on page 26 for further information on storing user presets.
Owner's Manual |
16 |

Guitar Effects
The Live Harmony features separate effects that can be used for a guitar plugged into the Guitar In jack. Guitar effects are only available when you mix your guitar signal directly to the XLR and Line/Headphone outputs along with your vocals.
The effects do not come out the Guitar Thru jack. Like the Vocal effects, the Guitar effects settings are independently stored to each preset.
To bypass/enable the Guitar effect module:
1.Press the <Guitar> button.When the button is lit, the Guitar effects are enabled.When the button is not lit, the Guitar effects are bypassed.
2.If you wish to store the newly enabled or bypassed state, press the <Store> button and perform the preset storing procedure. See "Presets" on page 26 for further information on storing user presets.
To edit Guitar effect settings:
1.Press and hold the <Guitar> button for approximately 2 seconds.The button will begin flashing and the LCD display will now display the Guitar effect’s parameters.
2.Start strumming your guitar or use the Sound Check feature (see "Sound Check" on page 19 for further information).
3.Turn the <DATA> encoder to audition and select the desired MOD TYPE.
4.Turn the <Edit 1>, <Edit 2>, and <Edit 3> knobs to refine the various parameters until the desired effect is achieved.
5.Turn the <Edit 4> knob to adjust how much of the guitar reverb effect will be applied to your guitar signal.
6.When finished, press the <Guitar> button to exit the Guitar menu.
7.To store the changes, press the <Store> button and perform the preset storing procedure. See "Presets" on page 26 for further information on storing user presets.
17 |
Owner's Manual |

Effects Bypass
During performance there will be times when you want to bypass all effects when speaking to the audience between songs.The Live Harmony has a global Effects Bypass which will bypass all Vocal and Guitar effects within the currently loaded preset. Effects Bypass only bypasses specific Gold Channel effects (i.e., Pitch Correct,
Ambience, and Noise Gate).
To bypass/enable all Vocal effects:
1.Press and hold the <Up> footswitch until the LED above the footswitch lights and the display reads,“EFFECTS BYPASSED”.
2.Press any footswitch or effect button to exit the Effects Bypass function and re-enable the Vocal effects.
Anti-Feedback
The Live Harmony uses dbx AFS® (Advanced Feedback Suppression) to actively monitor and kill feedback before it becomes a problem. In live situations where feedback is possible, enable AFS by simply pressing the <Anti-Feedback> button – the button will turn green, indicating the Anti-Feedback feature is active.
The Anti-Feedback button has three color coded states to let you know it’s working, they are:
•Green LED
Indicates the AFS feature is enabled.
•Amber LED
Indicates AFS is actively notching feedback frequencies.
•Red LED
Indicates allAFS filters have been set.When all filters have been set and a new feedback frequency occurs,AFS will release the first setAFS filter in order to place it at the new feedback frequency location.AFS filters can be cleared by simply pressing the <ANTI-FEEDBACK> button twice (once to disable
Anti-Feedback and again to re-enable it).AFS filters are also cleared when the
Live Harmony is power cycled.
Owner's Manual |
18 |
Sound Check
If you've ever tried adjusting vocal effects while singing then you know that it can be difficult to properly judge the changes due to the fact that you can hear your own voice inside your head.The Sound Check feature resolves this issue by allowing you to record a vocal loop (pre-effects) that you can then playback through the Gold
Channel andVocal effects.This provides an easy way to audition and fine-tune all effect settings without having to sing into the microphone while making adjustments. If you have your guitar connected to the Guitar In jack and wish to use the built-in Guitar effects, you can also select to record your guitar using the Sound Check feature, so you can dial in your guitar effects using the same easy method.
To use the Sound Check feature:
1.Press the <Sound Check> button.The display will read “RECORD PHRASE (LEFT FOOTSWITCH)” and the <Down> footswitch LED will begin flashing.
2.Turn the Record Guitar feature on or off by turning the <Edit 2> knob.
3.Press the flashing <Down> footswitch to begin recording.The display will read “RECORDING”.
4.When you are finished recording, press the <Down> footswitch again to stop recording and begin playback of the Sound Check loop.
5.Proceed with editing effects as outlined in the section, "Vocal Effects" on page 16.
6.When you have finished making edits,press the <Sound Check> button to exit and disable the Sound Check feature.
7.Store the preset to retain the changes. See "Presets" on page 26 for further information on storing user presets.
NOTE: A loop recorded using Sound Check will be erased when the Sound Check feature is exited or when the power is disconnected.
19 |
Owner's Manual |
Live Adapt™
Live Adapt analyzes your music using the internal microphone or Aux In jack then dynamically adjusts the noise gate threshold (internal mic only), pitch and harmony key, and delay/modulation effect tempo.When a guitar is connected to the Guitar In jack, the guitar signal is analyzed for setting the proper key for harmonies and pitch effects based on the chord progression played.The below table shows where each Live Adapt option will analyze the signal from depending on the connections made to the Vocalist Live Harmony.
|
No connection |
Connection made |
Connection made |
Connections |
|
|
made to Aux In or |
made to Aux In & |
|||
|
to Aux In jack |
to Guitar In jack |
|||
|
Guitar In jack |
Guitar In jacks |
|||
|
|
|
|||
Adaptive |
Internal Mic |
Feature Disabled |
Internal Mic |
Feature Disabled |
|
Gate |
|||||
|
|
|
|
||
Adaptive |
Internal Mic |
Aux In |
Guitar In |
Guitar In |
|
Pitch |
|||||
|
|
|
|
||
Adaptive |
Internal Mic |
Aux In |
Guitar In |
Guitar In |
|
Harmony |
|||||
|
|
|
|
||
Adaptive |
Internal Mic |
Aux In |
Internal Mic |
Aux In |
|
Tempo |
|||||
|
|
|
|
The Live Adapt options can be enabled and disabled independently in the Live Adapt menu and then turned on and off globally with the Live Adapt button.When the Live Adapt button is lit, any enabled Live Adapt options will be active. Following is a description of each of the options available in the Live Adapt menu.
GATE
This parameter affects the noise gate located in the Gold Channel.This option has two settings:
•Preset
With this option selected, the gate threshold will not adapt and will be set according to the "GATE" parameter setting in the Gold Channel menu.
•Adapt
With this option selected, the audio analyzed by the internal microphone is used in combination with the vocal microphone signal to modify the gate threshold from its baseline “GATE” parameter setting in the Gold Channel menu.When adaptive gate is enabled, the Live Harmony detects when the
dominant sound source is not close to the microphone, and more aggressively gates the signal to reduce the amount of background noise leaking through the vocal mic.As soon as the Live Harmony detects that someone is singing into the vocal microphone, the gate is moved back to its baseline level to prevent cutting out lower level vocal sounds.
One common problem with vocal processors occurs when a singer is playing an acoustic guitar while using vocal effects, such as harmony or modulation. When the singer stops singing but continues playing, the sound of the guitar can leak through the vocal mic resulting in an unintended processed guitar sound. Setting the gate high enough to prevent this can unfortunately result in
Owner's Manual |
20 |
 Loading...