


 Loading...
OWNER’S MANUAL
WARRANTY
We at DigiTech® are very proud of our products and back-up each one we sell with the following warranty:
1.Please register online at digitech.com within ten days of purchase to validate this warranty. This warranty is valid only in the United States.
2.DigiTech warrants this product, when purchased new from an authorized U.S. DigiTech dealer and used solely within the U.S., to be free from defects in materials and workmanship under normal use and service. This warranty is valid to the original purchaser only and is non-transferable.
3.DigiTech liability under this warranty is limited to repairing or replacing defective materials that show evidence of defect, provided the product is returned to DigiTech WITH RETURN AUTHORIZATION, where all parts and labor will be covered up to a period of one year (this warranty is extended to a period of six years when the product has been properly registered through our website). A Return Authorization number may be obtained by contacting DigiTech. The company shall not be liable for any consequential damage as a result of the product’s use in any circuit or assembly.
4.Proof-of-purchase is considered to be the responsibility of the consumer. A copy of the original purchase receipt must be provided for any warranty service.
5.DigiTech reserves the right to make changes in design, or make additions to, or improvements upon this product without incurring any obligation to install the same on products previously manufactured.
6.The consumer forfeits the benefits of this warranty if the product’s main assembly is opened and tampered with by anyone other than a certified DigiTech technician or, if the product is used with AC voltages outside of the range suggested by the manufacturer.
7.The foregoing is in lieu of all other warranties, expressed or implied, and DigiTech neither assumes nor authorizes any person to assume any obligation or liability in connection with the sale of this product. In no event shall DigiTech or its dealers be liable for special or consequential damages or from any delay in the performance of this warranty due to causes beyond their control.
NOTE: The information contained in this manual is subject to change at any time without notification. Some information contained in this manual may also be inaccurate due to undocumented changes in the product since this version of the manual was completed. The information contained in this version of the owner’s manual supersedes all previous versions.
TECHNICAL SUPPORT & SERVICE
If you require technical support, contact DigiTech Technical Support. Be prepared to accurately describe the problem. Know the serial number of your device — this is printed on a sticker attached to the chassis. If you have not already taken the time to register your product, please do so now at digitech.com.
Before you return a product to the factory for service, we recommend you refer to this manual. Make sure you have correctly followed installation steps and operating procedures. For further technical assistance or service, please contact our Technical Support Department at (801) 566-8800 or visit digitech.com. If you need to return a product to the factory for service, you MUST first contact Technical Support to obtain a Return Authorization Number.
NO RETURNED PRODUCTS WILL BE ACCEPTED AT THE FACTORY WITHOUT A RETURN AUTHORIZATION NUMBER.
Please refer to the Warranty information, which extends to the first end-user. After expiration of the warranty, a reasonable charge will be made for parts, labor, and packing if you choose to use the factory service facility. In all cases, you are responsible for transportation charges to the factory. If the product is still under warranty, DigiTech will pay the return shipping.
Use the original packing material if it is available. Mark the package with the name of the shipper and with these words in red: DELICATE INSTRUMENT, FRAGILE! Insure the package properly. Ship prepaid, not collect. Do not ship parcel post.
TABLE OF CONTENTS
Introduction 1
Features 2
Quick Start 3
microSD Card Information 4
Supported microSD Cards 4 What’s Stored To The microSD Card 4 Changing The microSD Card 4 Accessing The microSD Card 4
Connectors & User Interface 5
Connectors 5
User Interface 7
Making Connections/Applying Power 12
Connection Diagrams 13
Amplifier Setup 13
Mixer Setup 13
Amplifier + Mixer Setup 14
Headphone Setup 14
Output Jack Operation 15
Using Guitar Effects 16
Using The Built-In Guitar Effects 16 Using External Effects Connected To The FX Loop 16
Teaching The Band & Working With Song Parts 17
Teaching The TRIO+ Band 17 Clearing The TRIO+ Band 19 Playing/Switching Between Song Parts 19 Programming Song Part Intensities 20 Programming A Song Sequence 21
Recording Loops & Overdubs 22
Recording Loops With The Backing Band 22 Recording Loops Without The Backing Band 23 Recording Overdubs 24 Undoing/Redoing The Last Recorded Loop/Overdub 25 Clearing Loops 25 Recording Loops To An Entire Song Sequence 26
Using Alternate Time & Adjusting Song Tempo 27
Using Alternate Time 27 Adjusting Song Tempo 27
Advanced Features 28
Enabling A Drum Stick Count-In 28 Starting A Song With A Count-In 28 Recording A Loop With The Band Using A Count-In 28 Providing Hints To The TRIO+ When Teaching 29 Pre-Selecting A Style 29
Matching Tempo To A Previous Song Part Using The Metronome 29
Tempo Interpretation Using The ALT TIME Button 30
Managing Songs 31
Storing Songs 31
Creating A New Song 31
Loading A Song 31
Clearing A Song 31
Using An FS3X Footswitch 32 The Genres & Styles 33
TRIO Manager Software/Firmware Updates 57
Specifications 58
INTRODUCTION
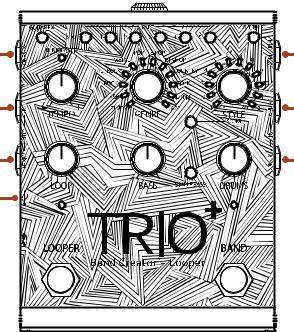
Thanks for choosing the DigiTech® TRIO+ Band Creator™ + Looper pedal. The TRIO+ is a simple-to-use guitar pedal that listens to the way you play and automatically generates bass and drum parts that match your song. Just plug your guitar into the TRIO+, press the BAND footswitch to teach the TRIO+ your chords and rhythm, then press the BAND footswitch again to start playing with your own personal band! Bass and drum levels can be adjusted for the perfect mix using the BASS and DRUMS knobs. The SIMPLE BASS button lets you select between 3 bass line modes for busy or simple bass lines.
Press the LOOPER footswitch to record a loop along with an unlimited number of overdubs. Loop playback level can be controlled using the LOOP knob. Loops can be recorded by themselves, operating just like a traditional looper, or along with the band. Apply the built-in effects to your guitar signal by enabling the GUITAR FX button, and/or connect your favorite effects to the FX SEND and FX RETURN jacks.
The TRIO+ provides 12 music genres to choose from including: Blues, R&B, Rock, Alternative Rock, Metal, Pop, Electronic Pop, Hip-Hop, Country, Folk, Latin, and Jazz. 12 song styles are available for each genre and can be selected using the STYLE knob, including selection between 3/4 and 4/4 time signatures. Multi-colored LEDs around the STYLE knob indicate which styles best match your song.
The TRIO+ can learn up to 5 different song parts, perfect for creating an intro, verse, chorus, bridge, and outro. Song parts can be recalled on-the-fly as the song plays back or pre-programmed as a sequence for automated playback. An optional DigiTech FS3X Footswitch can be connected to the CONTROL IN jack for additional handsfree control with 3 modes of operation to select from.
The tempo of songs can be varied continuously using the TEMPO knob. The ALT TIME button can be used to quickly try out different interpretations of the song whenever half or double time alternatives are available. Each song part can be programmed for normal or high intensity, making it possible to increase the impact of your chorus or bridge.
Auto-sensing outputs automatically adapt to optimize the audio for your application. Connect the AMP output to your guitar amplifier if using one. Connect the MIXER output to a mixer if no guitar amplifier is being used and the TRIO+ will automatically apply a guitar speaker cabinet emulator to the guitar signal, making it sound as if you were playing through a guitar amp/cabinet. When connected to both the MIXER and AMPLIFIER outputs, the guitar signal will be fed to the AMP output and the bass and drums will be fed to the MIXER output. There’s also a headphone output with dedicated level control, so you can practice or write songs whenever, wherever inspiration strikes.
Up to 12 songs along with loops can be stored to the included microSD card. Need to create more songs? No problem. Just insert a new microSD card and you're ready to start teaching the band your new songs. To manage all your songs and loops on a computer, download the free TRIO Manager software from digitech.com, available for Windows® and Mac®.
1
FEATURES
•12 Music Genres To Choose From
•12 Styles Selectable Per Genre
•Can Learn Up To 5 Different Parts Per Song
•Programmable Song Part Intensities For Creating Song Dynamics
•Programmable Song Part Sequencer
•3 Bass Line Modes
•Built-in Looper With Unlimited Overdubs & 1 Layer Of Undo/Redo
•Adjustable Tempo With Audiolastic™ Time Stretching & Quick Selection Of Alternate Time Interpretation
•Independently Adjustable Level Controls For Bass, Drums, & Loops
•Built-In Guitar Effects Designed For Each Genre
•Amp & Mixer Outputs
•FX Loop For Connecting External Effect Pedals
•1/8" (3.5 mm) Mini Headphone Output With Headphone Level Control
•Up To 12 Songs With Loops Can Be Stored To A microSD Card (Included)
•Additional Hands-Free Control Available Using An Optional DigiTech FS3X Footswitch
•Dual Soft Touch Vacuum Switches
•Rugged Design
•Included Power Adapter
2
QUICK START
To get up and running quickly with the TRIO+, see the TRIO+ Quick Start Guide that was included in the box or visit http://digitech.com/en-US/products/trio-plus#documentation.
3

MICROSD CARD INFORMATION
The TRIO+ autosaves your work onto the microSD card so you don’t need to worry about remembering to save parts and songs. To ensure that you don’t unexpectedly lose data, always stop the TRIO+ playback and wait at least 5 seconds without making changes to your songs before ejecting the microSD card or removing power to the pedal.
Supported microSD Cards
The TRIO+ supports microSD cards that meet the following specifications:
•microSDHC
•8 GB–32 GB
•Class 10
What’s Stored To The microSD Card
The microSD card stores the following information:
•Recorded Loops
•Song Info
•User Preferences (including FS3X footswitch configuration)
See 'Specifications' on page 58 for information on the maximum loop recording time.
Changing The microSD Card
To change the microSD card:
1.If any changes have been made to a part or song, wait at least 5 seconds before removing the card.
2.Press the card in with your thumb then slowly release. The card will partially eject and all 5 PART buttons will flash amber, indicating that the TRIO+ does not have a valid microSD card inserted.
3.Grasp the card with your fingers and pull it out, noting the orientation of the card.
4.Insert the replacement card using the same orientation noted in the previous step. Press the card all the way in then release. The card will lock into place and the 5 PART buttons will flash amber sequentially for about 5 seconds, then the card will be ready for use. When a valid card is detected, the STYLE LEDs will circle green and the last active song used for that card will be loaded.
NOTE: If an SD card is not detected by the TRIO+, all PART buttons will flash amber. If an incompatible SD card is inserted or if there is an error when reading the card, all PART buttons will flash red.
WARNING! When a microSD card is inserted into the TRIO+ for the first time, it will be formatted for the TRIO+ and overwritten. Any existing data on the microSD card will be lost.
Accessing The microSD Card
The song and loop data on the microSD card is stored in a highly optimized format that is not directly accessible from a computer and must be accessed using the TRIO Manager software. See 'TRIO Manager Software/ Firmware Updates' on page 57 for more information.
4
CONNECTORS & USER INTERFACE
Connectors
1 |
2 |
3 |
4 |
5 |
6 |
7 |
|
1.FX SEND Jack
Connect this output to the input of an external guitar effect stomp box or pedalboard. See 'Using External Effects Connected To The FX Loop' on page 16 for more information.
2.FX RETURN Jack
Connect the output of an external guitar effect stomp box or pedalboard to this input. See 'Using External Effects Connected To The FX Loop' on page 16 for more information.
3.AMP OUT Jack
Connect this output to the input of a guitar amplifier. Note that the output jacks are auto-sensing and output functionality will change depending on which outputs are connected. See 'Output Jack Operation' on page 15 for more information.
4.GUITAR IN Jack
Connect your guitar to this jack. The guitar signal fed to this jack should be unprocessed. If using external effects, they should be connected to the FX SEND and RETURN jacks.
5.MIXER OUT Jack
Connect this output to the line input of a mixer. Note that the output jacks are auto-sensing and output functionality will change depending on which outputs are connected. See 'Output Jack Operation' on page 15 for more information.
6.CONTROL IN Jack
Connect an optional DigiTech FS3X Footswitch to this jack for additional hands-free control. See 'Using An FS3X Footswitch' on page 32 for more information.
7.USB Port
This Mini USB port is used for updating the TRIO+'s firmware and connecting to the free TRIO Manager Software. See 'TRIO Manager Software/Firmware Updates' on page 57 for more information.
5
8 9 10
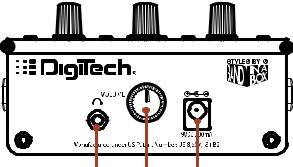
8.HEADPHONE OUT Jack
Connect a pair of headphones to this 1/8”(3.5 mm) mini jack. This output is optimized for headphones having an impedance of 60 Ohms or less. Note that the output jacks are auto-sensing and the AMP and MIXER outputs will be muted when a plug is connected to the HEADPHONE OUT jack. See 'Output Jack Operation' on page 15 for more information.
9.VOLUME Knob
Adjusts the volume of the headphone output.
10.POWER Input Jack
Connect only the included Harman power adapter to this jack. See 'Specifications' on page 58 for power adapter information.
6

User Interface |
1 |
2 |
3 |
|
4 |
5 |
|
6 |
7 |
|
8 |
9 |
|
10 |
11 |
|
12 |
13 |
|
|
14 |
|
15 |
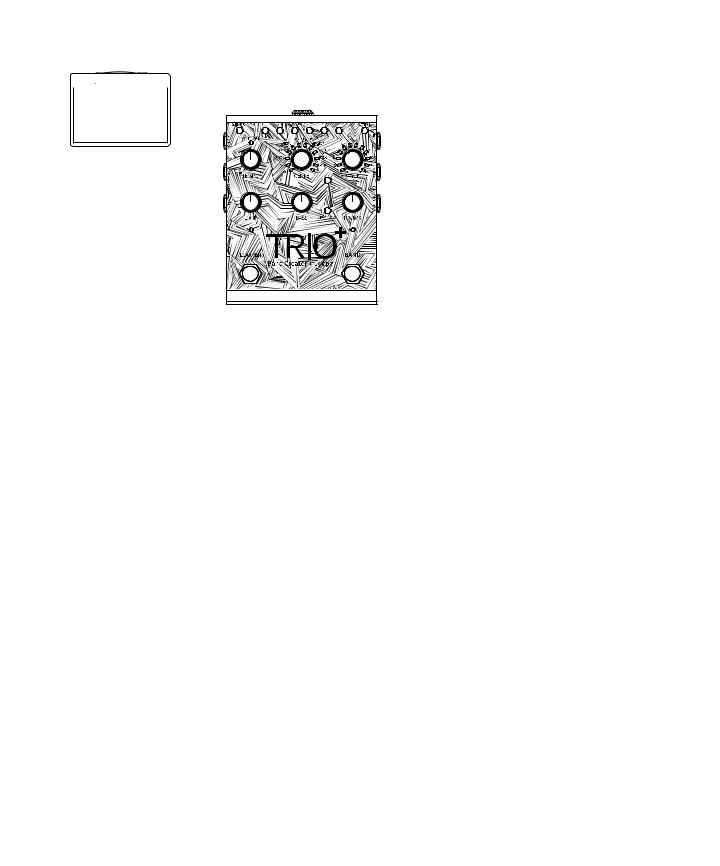
1.SEQUENCE Button
Press this button to program the song sequence. Once a sequence is programmed, pressing this button will turn Sequence mode on or off. For more information on programming a song sequence, see 'Programming A Song Sequence' on page 21.
2.PART Buttons
The TRIO+ can learn up to 5 different song parts (for example, an intro, verse, chorus, bridge, and outro). The PART 1-5 buttons are used to select between these 5 parts. The PART buttons have 7 states, they are:
•Off — The part has not been learned and is not selected.
•Dim Green — The part has been learned and is not selected.
•Bright Green — The part is selected.
•Dim Red — The part has been learned, is programmed for high intensity, and is not selected.
•Bright Red — The part has been learned, is programmed for high intensity, and is selected.
•Dim Amber — A loop has been recorded to the part with no backing band and the part is not selected.
•Bright Amber — A loop has been recorded to the part with no backing band and the part is selected.
See 'Teaching The Band & Working With Song Parts' on page 17 for more information on song parts.
3.GUITAR FX Button
Press this button to apply the built-in effects to your guitar signal. See 'Using The Built-In Guitar Effects' on page 16 for more information.
4.ALT TIME Button
Pressing this button selects an alternate interpretation of the selected song part's tempo — usually this is either double or half the current tempo since this can be ambiguous. If the TRIO+ can't find a suitable tempo and number of bars by halving or doubling, the alternate time will remain the same as the original timing. See 'Using Alternate Time' on page 27 for more information on using the Alternate Time feature.
7
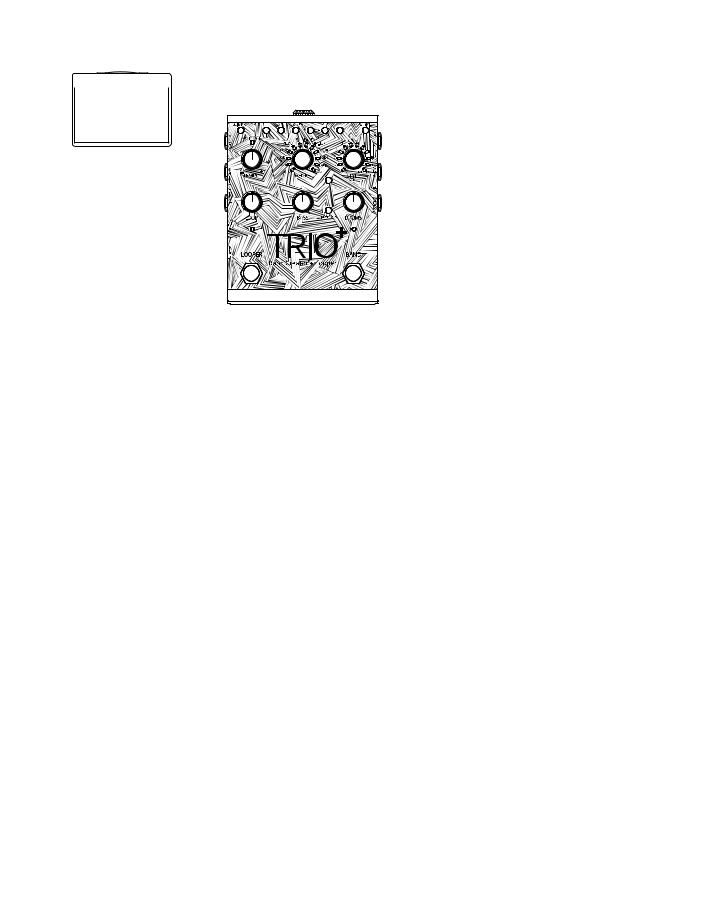
5.TEMPO Knob & AUDIOLASTIC™ LED
The TEMPO knob adjusts the TRIO+'s global playback tempo and was designed to adjust the tempo of a song after it is complete. See 'Adjusting Song Tempo' on page 27 for more information on adjusting the tempo of songs.
NOTE: The AUDIOLASTIC LED must be off to record into the looper. See 'Adjusting Song Tempo' on page 27 for more information.
6.STYLE Knob
Selects between the various styles available for each genre. Once a song part has been learned by the TRIO+, the multi-colored LEDs surrounding the STYLE knob will light to indicate which selections are the best match for the part — based on the selected genre — and the style that best matches the part will be automatically selected. Note that there is also a way to "tell" the TRIO+ that you want a certain style prior to teaching it a part — see 'Pre-Selecting A Style' on page 29 for more information.
The STYLE LED which is brightest indicates the current selection. There are 2 possible colored states for each LED, they are:
•Green — Indicates a style which matches both time signature and feel (straight or swing).
•Amber — Indicates a style which matches the time signature of your song, but has a different feel.
For all genres, styles 1-9 are in 4/4 and styles 10-12 are in 3/4. If the TRIO+ detects that you played in 4/4, then the 4/4 LEDs will be lit green or amber and the 3/4 LEDs will be off. You can still select 3/4 options by turning the knob to select a 3/4 style at which point the 3/4 LEDs will light and the 4/4 LEDs will go off. The same will happen in reverse if the TRIO+ detects that you played in 3/4.
The first time you teach the TRIO+ a progression it will choose the best style for your chord progression based on the genre that is selected. It doesn't matter which genre you use when teaching the TRIO+ a song. You can always switch between genres and styles at any time to hear a different groove or feel based on your original song idea. See 'The Genres & Styles' on page 33 for more information on the available styles.
7.GENRE Knob
Selects the genre type for the selected song part. Genres can be selected before or after teaching the TRIO+ your song parts, so you're free to experiment and change genres at any time. Genre selection is retained when you select a new part to teach the TRIO+ or when starting a new song. Genre selection can be made independently for each song part.
As you select genres, the LEDs around the STYLE knob will update to identify which styles are best suited for your song part based on the genre selected. When a genre is selected for the first time, after the TRIO+ learns your song, the TRIO+ will automatically choose from one of the styles shown in green that best match your playing. See 'The Genres & Styles' on page 33 for more information on the available genres.
8.SONG Button
Press this button to access song selection. See 'Managing Songs' on page 31 for more information on loading, clearing, and creating new songs.
8
9.LOOP Knob
Adjusts the level of your recorded loop and overdubs in the mix. When set to the 12 o'clock position, loop playback level will match the guitar input level (unity gain).
10.DRUMS Knob
Adjusts the level of the drums in the mix.
11.BASS Knob
Adjusts the level of the bass in the mix.
12.SIMPLE BASS Button
Enabling this button will select a simpler bass line. This button has 3 states, they are:
•Off — The TRIO+ will play an active bass line that fits with the detected chords (this is the default setting).
•Green — The TRIO+ will play a simplified bass line, playing only the root notes of each chord.
•Red — The TRIO+ will play an even simpler bass line, playing only the first root note of each bar and sustaining it until the next bar.
13.microSD Card Slot
A compatible microSD card (included) must be properly installed in this slot for the TRIO+ to operate. If a compatible microSD card is not detected, all PART buttons will flash amber. See 'microSD Card Information' on page 4 for further information on microSD card installation and compatibility.
9
14.LOOPER Footswitch & LED
Press this footswitch to record loops and overdubs. For more information on using the looper, see
'Recording Loops & Overdubs' on page 22.
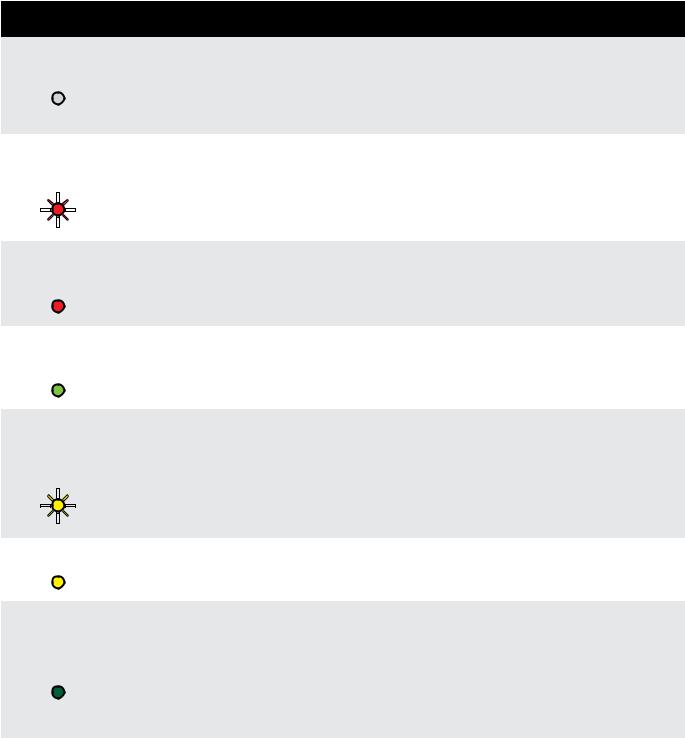
The LOOPER LED indicates the status of the looper for the selected song part. The following table describes the available states of the LOOPER LED.
LOOPER LED |
State |
Description |
||||||
|
|
|
|
|
|
|
|
|
|
Off |
Loop |
No loop has been recorded for the selected part and the looper is |
|||||
|
not armed for recording. Press the LOOPER footswitch to arm the |
|||||||
|
Hasn't Been |
|||||||
|
|
|
|
|
|
looper for recording — note that the AUDIOLASTIC™ LED must be |
||
|
|
|
|
|
|
Recorded |
||
|
|
|
|
|
|
off to record loops. |
||
|
|
|
|
|
|
|
||
|
|
|
|
|
|
|
|
|
Rapidly |
Looper |
The looper is armed for recording and recording will begin when |
||||||
Flashing Red |
||||||||
Armed & |
you start playing (when the looper is armed from a stopped state) |
|||||||
|
|
|
|
|
|
|||
|
|
|
|
|
|
Ready To |
or when the song part returns to the start (when the looper is |
|
|
|
|
|
|
|
|||
|
|
|
|
|
|
|||
|
|
|
|
|
|
Record |
armed during band playback). |
|
|
|
|
|
|
|
|||
|
|
|
|
|
|
|||
|
|
|
|
|
|
|
|
|
Solid Bright |
Recording |
|
||||||
|
Red |
The looper is recording what you are playing. |
||||||
|
Loop |
|||||||
|
|
|
|
|
|
|
||
|
|
|
|
|
|
|
|
|
Solid Bright |
|
A loop has been recorded for the selected part and is playing back. |
||||||
Green |
Playing Loop |
|||||||
Press the LOOPER footswitch to record overdubs. |
||||||||
|
|
|
|
|
|
|
||
|
|
|
|
|
|
|
|
|
Rapidly |
Looper |
|
||||||
Flashing |
|
|||||||
Amber |
Armed For |
Playback is stopped, the looper is armed for overdub recording, and |
||||||
|
|
|
|
|
|
Overdub |
recording will begin when you start playing. |
|
|
|
|
|
|
|
|||
|
|
|
|
|
|
Recording |
|
|
|
|
|
|
|
|
|
||
|
|
|
|
|
|
|
||
|
|
|
|
|
|
|
|
|
|
|
|
|
|
|
|
|
|
Solid Amber |
Recording |
The looper is recording an overdub. Press the LOOPER footswitch to |
||||||
|
|
|
|
|
|
Overdub |
stop overdub recording. |
|
|
|
|
|
|
|
|
|
|
|
|
|
|
|
|
|
A loop has been recorded, but looper and band playback is |
|
Solid Dim |
Loop |
stopped. Press the BAND footswitch to start band and loop |
||||||
Recorded |
playback. Press the LOOPER footswitch to arm overdub recording. |
|||||||
Green |
||||||||
& Playback |
Hold the LOOPER footswitch for 2 seconds to clear the loop. |
|||||||
|
|
|
|
|
|
|||
|
|
|
|
|
|
Stopped |
Immediately hold the LOOPER footswitch again for 2 seconds to |
|
|
|
|
|
|
|
|
restore the cleared loop. |
|
|
|
|
|
|
|
|
|
|
10
15.BAND Footswitch & LED
Pressing this footswitch changes the TRIO+'s state. It is used to teach the band, start and stop band and loop playback, and clear the band. See 'Teaching The TRIO+ Band' on page 17 for more information.
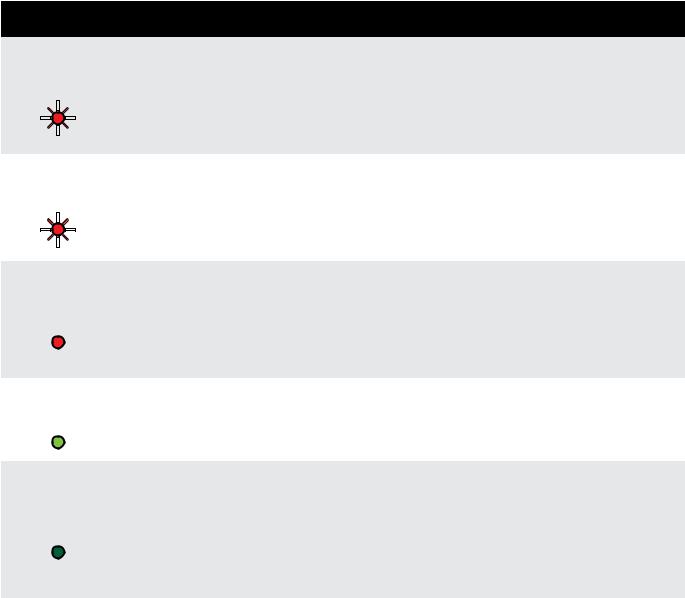
The BAND LED indicates the status of the band for the selected song part. The following table describes the available states of the BAND LED.
BAND LED |
State |
Description |
||||||
|
|
|
|
|
|
|
|
|
Slowly |
|
The selected song part has not yet been learned by the TRIO+. Press |
||||||
Flashing Red |
Band Hasn't |
the BAND footswitch to arm the TRIO+ for learning. Note that the |
||||||
|
|
|
|
|
|
TRIO+ cannot learn a song part if a loop has already been recorded |
||
|
|
|
|
|
|
Learned Part |
||
|
|
|
|
|
|
|||
|
|
|
|
|
|
with no backing band. In this case, the loop must first be cleared |
||
|
|
|
|
|
|
|||
|
|
|
|
|
|
|
||
|
|
|
|
|
|
|
before the TRIO+ will be able to learn the part. |
|
|
|
|
|
|
|
|
||
|
|
|
|
|
|
|
|
|
Rapidly |
Band Armed |
|
||||||
Flashing Red |
The TRIO+ is armed and waiting for you to start playing so it can |
|||||||
|
|
|
|
|
|
& Ready To |
||
|
|
|
|
|
|
learn your song part. |
||
|
|
|
|
|
|
|||
|
|
|
|
|
|
Learn |
||
|
|
|
|
|
|
|||
|
|
|
|
|
|
|
||
|
|
|
|
|
|
|
||
|
|
|
|
|
|
|
|
|
|
|
|
|
|
|
|
|
|
Solid Bright |
|
The TRIO+ is currently learning the song and you should be playing |
||||||
Band |
to teach the TRIO+ the chords and timing. Pressing the BAND |
|||||||
|
Red |
footswitch will stop the learning phase and begin band playback. In |
||||||
|
Learning |
|||||||
|
|
|
|
|
|
the event you make a mistake, holding the BAND footswitch for 2 |
||
|
|
|
|
|
|
|
||
|
|
|
|
|
|
|
seconds will quickly clear the learned part so you can try again. |
|
|
|
|
|
|
|
|
|
|
Solid Bright |
|
The TRIO+ is playing the song. Pressing the BAND footswitch will |
||||||
Green |
Band Playing |
stop band playback. Holding the BAND footswitch for 2 seconds |
||||||
|
|
|
|
|
|
|
will queue up the next learned part for automatic playback. |
|
|
|
|
|
|
|
|
|
|
|
|
|
|
|
|
|
The TRIO+ has learned the selected song part, but band and loop |
|
Solid Dim |
|
playback is stopped. Press the BAND footswitch to start band and |
||||||
Band |
loop playback. Or, while stopped, hold the BAND footswitch for 2 |
|||||||
Green |
||||||||
Stopped |
seconds to clear the selected part and loop. Immediately hold the |
|||||||
|
|
|
|
|
|
|||
|
|
|
|
|
|
|
BAND footswitch again for 2 seconds to restore the cleared part |
|
|
|
|
|
|
|
|
and loop. |
|
|
|
|
|
|
|
|
|
|
11
MAKING CONNECTIONS/APPLYING POWER
To connect the TRIO+ pedal:
1.Turn down the guitar amp or headphone volume. If connecting to a mixer, turn down the gain/trim control and lower the fader on the channel you’re connecting to.
2.Make all connections to the TRIO+ as shown in 'Connection Diagrams' on page 13.
3.Connect the included Harman power adapter to the TRIO+ POWER input connector then connect the other end to an available AC outlet and wait for the TRIO+ to boot.
4.Turn your guitar volume all the way up then strum and gradually increase the guitar amp or headphone volume until the desired level is achieved. If using a mixer, set the channel fader to unity (0) then raise the gain/trim control for the desired level.
12
CONNECTION DIAGRAMS
Amplifier Setup
Harman |
|
|
PS0913DC (9VDC) |
|
|
Power Adapter |
Guitar Effects |
|
IN |
||
|
||
OUT |
IN |
|
OUT |
IN |
|
Amp |
OUT |
IN |
|
|
|
||
|
OUT |
IN |
TRS CABLE |
|
|
|
FS3X Footswitch |
Use only unbalanced TS instrument cables for audio connections. |
Optional |
|
NOTE: When only the AMP OUT jack is used, an inverse cabinet emulation is added to the bass and drums signal. See 'Output Jack Operation' on page 15 for more information.
Mixer Setup
Harman |
|
PS0913DC (9VDC) |
|
Power Adapter |
Guitar Effects |
|
OUT 


 IN
IN
|
IN |
OUT |
IN |
IN |
Mixer |
OUT 

 IN
IN
TRS CABLE |
FS3X Footswitch
|
|
|
|
|
|
|
|
|
|
|
|
|
|
|
|
|
|
|
|
|
|
|
Use only unbalanced TS instrument cables for audio connections. |
Optional |
|
|
|
|
|
|
|
|
|
|
|
|
|
|
|
|
|
|
|
|
|
|
|
||
|
|
|
|
|
|
|
|
|
|
|
|
|
|
|
|
|
|
|
|
|
|
|
||
|
|
|
|
|
|
|
|
|
|
|
|
|
|
|
|
|
|
|
|
|
|
|
||
|
|
|
|
|
|
|
|
|
|
|
|
|
|
|
|
|
|
|
|
|
|
|
||
|
|
|
|
|
|
|
|
|
|
|
|
|
|
|
|
|
|
|
|
|
|
|
|
NOTE: When only the MIXER OUT jack is used, speaker cabinet emulation is added to the guitar signal. See
'Output Jack Operation' on page 15 for more information.
13
Amplifier + Mixer Setup
Harman |
|
|
PS0913DC (9VDC) |
|
|
Power Adapter |
Guitar Effects |
|
IN |
||
|
||
OUT |
IN |
|
|
OUT |
IN |
|
|
Amp |
OUT |
IN |
|
|
|
|
||
|
|
OUT |
IN |
TRS CABLE |
IN |
Mixer |
|
|
|
|
|
|
|
FS3X Footswitch |
|
|
|
|
|
|
|
|
|
|
|
|
|
|
|
|
|
|
|
|
|
|
|
Use only unbalanced TS instrument cables for audio connections. |
Optional |
|
|
|
|
|
|
|
|
|
|
|
|
|
|
|
|
|
|
|
|
|
|
|
||
|
|
|
|
|
|
|
|
|
|
|
|
|
|
|
|
|
|
|
|
|
|
|
||
|
|
|
|
|
|
|
|
|
|
|
|
|
|
|
|
|
|
|
|
|
|
|
||
|
|
|
|
|
|
|
|
|
|
|
|
|
|
|
|
|
|
|
|
|
|
|
||
|
|
|
|
|
|
|
|
|
|
|
|
|
|
|
|
|
|
|
|
|
|
|
||
|
|
|
|
|
|
|
|
|
|
|
|
|
|
|
|
|
|
|
|
|
|
|
|
NOTE: When connected to both the MIXER and AMP OUT jacks, the guitar signal will be fed to the AMP output and the bass and drum parts will be fed to the MIXER output. See 'Output Jack Operation' on page 15 for more information.
Headphone Setup
Harman |
Headphones |
PS0913DC (9VDC) |
|
Power Adapter |
Guitar Effects |
|
OUT 

 IN
IN
OUT 


 IN
IN
IN |
|
IN |
TRS CABLE |
|
FS3X Footswitch |
Use only unbalanced TS instrument cables for audio connections. |
Optional |
|
NOTE: When the HEADPHONE OUT jack is used, AMP and MIXER outputs will be muted. The signal present in the headphones will be stereo and speaker cabinet emulation will be applied to the guitar signal. See
'Output Jack Operation' on page 15 for more information.
14
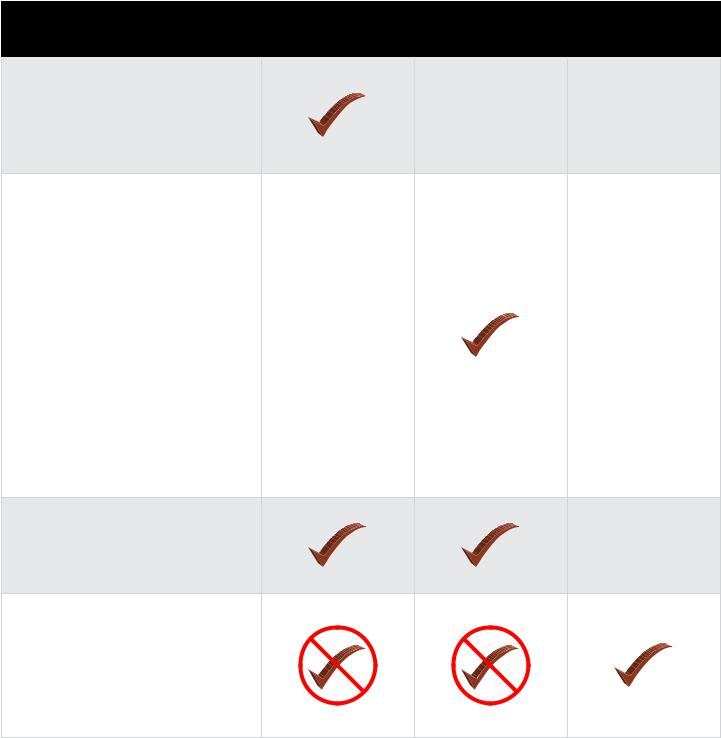
OUTPUT JACK OPERATION
The output jacks have an auto-sensing feature which allows the TRIO+ to automatically optimize the outputs for the application. The chart below describes how the TRIO+ will operate depending on which outputs are connected.
Operation |
MIXER OUT |
AMP OUT |
HEADPHONE OUT |
Description |
Connected |
Connected |
Connected |
|
|
|
|
Speaker cabinet emulation will be applied to the guitar signal,
including loops, and a mono mix of the bass, drums, and guitar will be sent to the MIXER OUT jack.
A mono mix of the bass, drums, and guitar signal will be sent to the AMP OUT jack. Complimentary equalization will be applied to the drum and bass parts to make them sound better when played back through a guitar speaker cabinet.
NOTE: When using your guitar amp to play the drums and bass from the TRIO+, set the amp to run as cleanly as possible in order to avoid distorting the backing band. The drums and bass are pre-EQ'd to sound best through a clean amp with "flat" EQ settings.
The guitar signal, including loops, will be fed to the AMP OUT jack only. The mix of bass and drums will be sent to the MIXER OUT jack.
Speaker cabinet emulation will be applied to the guitar signal.
A stereo mix of the bass, drums, and guitar will be sent to the HEADPHONE OUT jack. The MIXER and AMP outputs will be muted.
15

USING GUITAR EFFECTS
The TRIO+ provides two ways to add effects to your guitar signal: you can use the built-in effects and/or connect your favorite outboard effects to the FX Loop. Whichever way you decide to work, the effects will be applied to your guitar signal when playing or while recording loops and overdubs. The TRIO+ will "listen" to the clean guitar signal at the GUITAR IN jack when learning your songs, so you don't have to worry about disabling effects when teaching the TRIO+.
Using The Built-In Guitar Effects
The TRIO+'s built-in effects can be turned on or off using the GUITAR FX button. The button has 3 states, they are:
•LED Off — The built-in guitar effects are disabled.
•LED Green — Indicates that a rhythm guitar effect will be applied to your guitar signal.
•LED Red — Indicates that a lead guitar effect will be applied to your guitar signal.
NOTE: Effect types are dependent on the genre selected.
Using External Effects Connected To The FX Loop
External guitar effects can be connected to the FX SEND and FX RETURN jacks. Any externally-connected effects should be connected to these jacks rather than the TRIO+'s GUITAR IN jack. This allows the external effects to be used without affecting TRIO+ operation.
See 'Connection Diagrams' on page 13 to see an example of external effects connected to these jacks.
16
Loading...