


Modeling

 Guitar Processor
User’s
Manual

Manufacturer’s Name: |
DigiTech |
Manufacturer’s Address: |
8760 S. Sandy Parkway |
|
Sandy, Utah 84070, USA |
declares that the product: |
|
Product name: |
RP350 |
Product option: |
all (requires Class II power adapter that conforms to the requirements of |
EN60065, |
EN60065, EN60742, or equivalent.) |
conforms to the following Product Specifications: |
|
Safety: |
IEC 60065 (1998) |
EMC: |
EN 55013 (2001 + A1) |
|
EN 55020 (1998) |
Supplementary Information:
The product herewith complies with the requirements of the Low Voltage Directive 72/23/EEC and the EMC Directive 89/336/EEC as amended by Directive 93/68/EEC.
|
Vice-President of Engineering-MI |
|
8760 S. Sandy Parkway |
|
Sandy, Utah 84070, USA |
|
Date: September 27, 2006 |
European Contact: |
Your local DigiTech / Johnson Sales and Service Office or |
|
Harman Music Group |
|
8760 South Sandy Parkway |
|
Sandy, Utah 84070 USA |
|
Ph: (801) 568-8800 |
|
Fax: (801) 568-7583 |

Table of Contents |
|
Section One - Introduction |
|
Getting Acquainted.......................................................... |
1 |
Included Items................................................................... |
1 |
About the RP350.............................................................. |
1 |
Performance Mode........................................................ |
1 |
Bypass Mode................................................................... |
1 |
Tuner Mode..................................................................... |
1 |
Tone Library (Knob 1).................................................. |
2 |
Effects Library (Knob 2)............................................... |
2 |
Effects Level (Knob 3).................................................. |
2 |
Amp Gain (Knob 4)....................................................... |
2 |
Amp Level (Knob 5)...................................................... |
2 |
Master Level (Knob 6).................................................. |
2 |
X-EditTM Editor/Librarian............................................. |
2 |
Presets.............................................................................. |
2 |
Create Your Sound in Three Easy Steps...................... |
3 |
A Guided Tour of the RP350......................................... |
4 |
Front Panel...................................................................... |
4 |
Rear Panel....................................................................... |
7 |
Getting Started................................................................. |
8 |
Making Connections........................................................ |
8 |
Mono Operation - Amplifier....................................... |
8 |
Stereo Operation.......................................................... |
8 |
Applying Power............................................................... |
10 |
Section Two - Editing Functions |
|
Editing/Creating Presets................................................ |
11 |
Storing/Copying/Naming a Preset............................... |
12 |
Section Three - Models and Parameters
About the Models.......................................................... |
13 |
Model Definitions........................................................... |
13 |
Pickup................................................................................ |
13 |
Wah................................................................................... |
13 |
Compressor..................................................................... |
14 |
Distortion......................................................................... |
14 |
Amplifier........................................................................... |
16 |
Cabinet.............................................................................. |
17 |
EQ...................................................................................... |
17 |
Noise Gate/Auto Swell................................................. |
18 |
Chorus/FX........................................................................ |
18 |
Chorus............................................................................ |
18 |
Flanger............................................................................ |
19 |
Phaser............................................................................. |
19 |
Vibrato............................................................................ |
19 |
Rotary Speaker............................................................. |
20 |
VibroPan......................................................................... |
20 |
Unicord Uni-VibeTM..................................................... |
20 |
Tremolo/Panner............................................................ |
21 |
Envelope Filter.............................................................. |
21 |
AutoYaTM......................................................................... |
21 |
YaYa™............................................................................. |
21 |
SynthTalkTM.................................................................... |
22 |
Step Filter...................................................................... |
22 |
DOD FX25................................................................... |
22 |
DigiTech Whammy™.................................................. |
23 |
Pitch Shift....................................................................... |
23 |
Detune........................................................................... |
23 |
Intelligent Pitch Shifting (IPS).................................... |
24 |
Boss® OC-2 Octaver.................................................. |
24 |
Delay.................................................................................. |
24 |
Reverb............................................................................... |
25 |
Section Four - Other Functions |
|
Drum Machine................................................................ |
26 |
Aux Input.......................................................................... |
26 |
Learn-A-LickTM Mode.................................................... |
26 |
Using Learn-A-Lick......................................................... |
27 |
Expression Pedal............................................................. |
27 |
LFOs.................................................................................. |
27 |
Factory Reset.................................................................. |
28 |
Expression Pedal Calibration....................................... |
28 |
Section Five - Appendix |
|
Specifications................................................................... |
29 |
Expression Pedal - Assignable Parameters............... |
30 |
Tone LIbrary.................................................................... |
31 |
Effects Library................................................................. |
31 |
Preset List........................................................................ |
32 |

Warranty
We at DigiTech® are very proud of our products and back up each one we sell with the following warranty:
1.The warranty registration card must be mailed within ten days after purchase date to validate this warranty.
2.DigiTech warrants this product, when used solely within the U.S., to be free from defects in materials and workmanship under normal use and service.
3.DigiTech liability under this warranty is limited to repairing or replacing defective materials that show evidence of defect, provided the product is returned to DigiTech WITH RETURN AUTHORIZATION, where all parts and labor will be covered up to a period of one year.A Return Authorization number may be obtained from DigiTech by telephone.The company shall not be liable for any consequential damage as a result of the product’s use in any circuit or assembly.
4.Proof-of-purchase is considered to be the burden of the consumer.
5.DigiTech reserves the right to make changes in design, or make additions to, or improvements upon this product without incurring any obligation to install the same on products previously manufactured.
6.The consumer forfeits the benefits of this warranty if the product’s main assembly is opened and tampered with by anyone other than a certified DigiTech technician or, if the product is used with AC voltages outside of the range suggested by the manufacturer.
7.The foregoing is in lieu of all other warranties, expressed or implied, and DigiTech neither assumes nor authorizes any person to assume any obligation or liability in connection with the sale of this product. In no event shall DigiTech or its dealers be liable for special or consequential damages or from any delay in the performance of this warranty due to causes beyond their control.
NOTE:The information contained in this manual is subject to change at any time without notification. Some information contained in this manual may also be inaccurate due to undocumented changes in the product or operating system since this version of the manual was completed.The information contained in this version of the owner’s manual supersedes all previous versions.
Disclaimer:AutoYa, DigiTech, DOD, Death Metal, Johnson Amplification, Grunge, Lexicon, Multi Chorus, Whammy, and YaYa are trademarks of Harman International Industries, Inc. Other product names modeled in this product are trademarks of their respective companies that do not endorse and are not associated or
affiliated with DigiTech or Harman International Industries, Inc.They are trademarks of other manufacturers and were used merely to identify products whose sounds were reviewed in the creation of this product.

Section 1 - Introduction
Getting Acquainted
Congratulations on your purchase of the RP350. You now have an incredibly advanced modeling guitar processor that can keep up with your creative impulses and even increase them. Armed with DigiTech®’s patented AudioDNA2® custom audio DSP chip, the RP350 gives you a huge selection of tones and effects, right at your fingertips.When you easily dial up a tone or effect from the Tone Library or the Effects Library, you’ll appreciate the accuracy in each model, and the dynamic interaction in each tone. Add USB support for computer recording and a built-in drum machine, and you have the RP350: the key to unlock your creative potential.
Included Items
Before you get started, please make sure that the following items have been included:
•RP350
•PS0913B Power Supply
•Warranty Card
The utmost care was taken while your RP350 was being manufactured. Everything should be included and in perfect working order. If anything is missing, contact the factory at once. Please help us become acquainted with you and your needs by sending us your completed warranty card or registering online at www.digitech.com. It is your safeguard should a problem arise with your RP350.
About the RP350
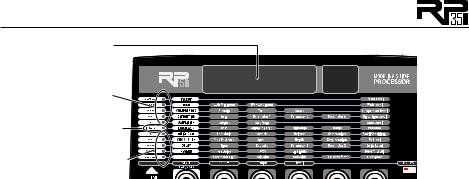
Performance Mode
When you first apply power to the RP350, it powers up in Performance mode. Performance mode provides access to all of the presets within the RP350 via the Up and Down Footswitches. The Amp A/B Footswitch toggles between two amp channels for the selected preset. Knob 1 selects a tone from the Tone Library, Knob 2 selects an effects chain from the Effects Library, Knob 3 adjusts the Effects Level, and Knob 4 adjusts the Amp Gain, Knob 5 adjusts the Amp Level, and Knob 6 adjusts the Master Level (volume).
Bypass Mode
The RP350 presets can be bypassed via a true analog bypass circuit for a clean, unprocessed guitar signal. To bypass the RP350, press the Up and Down Footswitches simultaneously. The Display reads Bypass indicating the preset is bypassed. Press either the Up or Down Footswitch to exit Bypass and return the RP350 to the last preset used.
Tuner Mode
The Tuner in the RP350 allows you to quickly tune or check the tuning on your guitar. Enter Tuner mode by pressing and holding the Up and Down Footswitches simultaneously for 2 seconds. The Display briefly shows tuner indicating that you are in Tuner mode. To begin tuning, play a note on your guitar (a harmonic at the 12th fret usually works best). The Display shows the note being played.The Matrix LEDs indicate whether you are sharp or flat. The top 5 red LEDs indicate the note is sharp and should be tuned down. The bottom 5 red LEDs indicate the note is flat and should be tuned up. The center green LED indicates the note is in tune. The output is muted in Tuner mode. The Expression Pedal controls the guitar volume while tuning. Exit tuner mode by pressing any Footswitch.
Display shows |
|
note played |
|
Top LEDs indicate |
|
note is sharp |
|
Green LED indicates |
|
note is in tune |
|
Bottom LEDs indicate |
EXPRESSION |
note is flat |
|
In Tuner mode, you can change your tuning reference. The default factory setting is A=440 Hz
(displayed as A=440). Rotating Knob 1 selects, alternate dropped tunings and tuning references. Alternate tunings are A = A , A = G, A = G and tuning references A=427 - A=453. The display
window briefly flashes the current tuning reference.
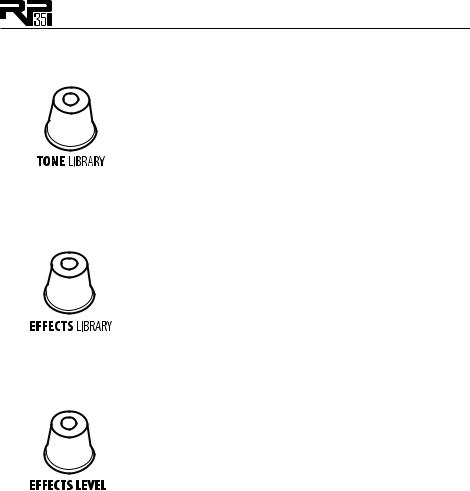
Tone Library (Knob 1)
In Performance mode, this knob selects a variety of genre-based amp tone defaults ranging from Blues to Metal to Country. Behind the scenes, the Compressor, Distortion, Amp/Cabinet model, EQ, and Noise Gate are configured to create a specified tone with a single click of this knob. You can further refine the sound by editing the preset (see Editing/Creating Presets on page 11). Changing between different Tone Library defaults does not change the Chorus/FX, Delay or Reverb, letting you experiment with different amp styles quickly in the context of the current effect chain.
Effects Library (Knob 2)
In Performance mode, this knob selects a variety of post-amplifier model effect chains (Chorus, Chorus + Delay, Delay + Reverb, etc.).You can further refine the sound by editing the preset (see Editing/Creating Presets on page 11). Changing between different Effects Library defaults does not change the Compressor, Distortion, Amp/Cabinet model, EQ, and Noise Gate settings, letting you experiment with different effect chains quickly in the context of the current amp tone.
Effects Level (Knob 3)
In Performance mode, this knob changes the relative level of the post-amp effects (Chorus/FX, Delay, and Reverb). This can be thought of as an effects mix control, where turning this knob clockwise increases the level of these effects and turning it counter-clockwise decreases the level of these effects.
Amp Gain (Knob 4)
This knob adjusts the Gain (distortion) for the selected Amp model (not available for Acoustic).
Amp Level (Knob 5)
This knob adjusts the Level (volume) of the selected Amp model.
Master Level (Knob 6)
This knob controls the overall output volume of all of the RP350’s presets.
X-EditTM Editor/Librarian
You can edit your RP350 with your computer, using the X-EditTM Editor/Librarian. Download X- EditTM, USB drivers, and documentation from www.digitech.com.
Presets
Presets are named and numbered locations of programmed sounds which reside in the RP350. Presets are recalled with the Footswitches. The active effects in each preset are indicated by lighted LEDs in the Effect Matrix. The RP350 comes with 70 User presets (U1-U70) and 70 Factory presets (F1-F70). The User presets are locations where your creations may be stored. The Factory presets do not allow you to store any changes to them. From the factory, the 70 User presets are exact duplicates of the 70 Factory presets. This allows you to create your own presets without losing the sounds that came with the RP350.
Create Your Sound in Three Easy Steps
1.
2.
Tone Library
Select one of 30 different tones from rock, metal, blues, country, and more. The tones consist of a combination of Compressor, Distortion Stompbox, Amplifier/Cabinet, EQ, and Noise Gate.
For a complete list of available tones, see page 31.
Effects Library
Select one of 30 diffferent effects chains. The effects consist of a combination of Chorus/FX, Delay, and Reverb.
For a complete list of available effects chains, see page 31.
3. |
Effects Level |
|
Adjust the overall level of the post-amp effects to your liking. |
... Rock on!
To make further edits, refer to page 11.
To store the preset, refer to page 12.
SectionTwo - Editing Functions
Editing/Creating Presets
The RP350 is designed to make preset editing and creation easy and intuitive. When creating your own sound, you must first start with an existing preset. Note that the preset you begin with doesn’t have to be in the memory location you intend to have it reside, since you can store it to any User preset location during the store procedure.
The easiest way to start is by using the Tone Library and Effects Library knobs. The Tone Library knob will let you select from a variety of pre-programmed amp/distortion tones (see page 31) based on different musical styles. The Effects Library knob will then let you select from a palette of effects chains (see page 31), from simple delays to full multi-effect signals with modulation, delay and reverb. Use the Effects Level Knob to increase or decrease the overall Chorus/FX, Delay and Reverb levels if desired. Using these three controls should get you close to a sound you are after. From there you can then use the Edit buttons to navigate through the individual effects for some fine tune edits.
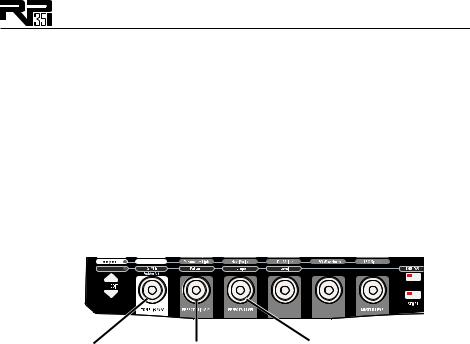
EXPRESSION
AMP GAIN |
AMP LEVEL |
1. Select a tone |
2. Select an effect |
3. Adjust the |
with the |
or effects chain with the |
effects level with the |
Tone Library knob |
Effects Library knob |
Effects Level knob |
To edit and create a preset:
1.Use the Up and Down Footswitches to select the preset you wish to edit.
2.If you find a preset close to what you want, you can begin editing the effect parameters by pressing the Edit Up/Down buttons and selecting the Effect row you want to edit.
3.If you are trying to find something different from the existing presets, begin by using the Tone Library, Effects Library and Effects Level knobs to get close to a sound you want.
4.Press the Edit Up/Down buttons to begin selecting the individual Effects rows to edit their parameters.
5.To bypass or enable an Effect row, press the Tone Library knob.
6.Use the Knobs 2-6 to modify the effects’ parameter settings.
7.When editing the Amp Model and EQ rows, use the Amp A/B Footswitch to select between the two amp channels. You can then edit each channel’s Amp Model, Cabinet Model, Amp Gain,Amp Level, and EQ settings independently.
Note: Anytime a stored value within a preset is changed, the Store button LED lights up. This indicates that you need to store the changes. Changing presets, or turning the power off before storing any changes, erases any changes made and the RP350 will revert to the stored values for the preset.
11

Storing/Copying/Naming a Preset
Once the preset has been modified to your liking, you may store your settings to any of the 70 User preset locations (presets U1-U70). The following steps outline the procedure for storing changes to a preset or copying a preset to a different location:
1.Press the Store button once. The Store button LED blinks and the first character in the Display flashes, indicating that you can now name your custom creation.
2.Use Knob 1 to select the alpha-numeric character and Knob 2 to select the next character location.
EXPRESSION
1.Press Store; characters in Display flash individually
AMP GAIN |
AMP LEVEL |
|
|
|
|
2.Use Knobs to name Preset
3.Once the desired name is shown in the display, press the Store button again to enter the second stage of the storing process. The red Display begins to flash.
4.Select the User preset location where your new sound will reside using the Up and Down
Footswitches. The displays show the preset name and User preset number about to be overwritten.
EXPRESSION
|
|
|
|
|
|
|
|
|
|
|
|
|
|
|
|
|
|
|
|
|
AMP GAIN |
|
AMP LEVEL |
|||||||||||||||||||
|
|
|
|
|
|
|
|
|
|
|
|
|
|
|
|
|
|
|
|
|
|
|
|
|
|
|
|
|
|
|
|
|
|
|
|
|
|
|
|
|
|
|
|
|
|
|
|
|
|
|
|
|
|
|
|
|
|
|
|
|
|
|
|
|
|
|
|
|
|
|
|
|
|
|
|
|
|
|
|
|
|
|
|
|
|
|
|
|
|
|
|
|
|
|
|
|
|
|
|
|
|
|
|
|
|
|
|
|
|
|
|
|
|
|
|
|
|
|
|
|
|
|
|
|
|
|
|
|
|
|
|
|
|
|
|
|
|
|
|
|
|
|
|
|
|
|
|
|
|
|
|
|
|
|
|
|
|
|
|
|
|
|
|
|
|
|
|
|
|
|
|
|
|
|
|
|
|
|
|
|
|
|
|
|
|
|
|
|
|
|
|
|
|
|
|
|
|
|
|
|
|
|
|
|
|
|
|
|
|
|
|
|
|
|
|
|
|
|
|
|
|
|
|
|
|
|
|
|
|
|
|
|
|
|
|
|
|
|
|
|
|
|
|
|
|
|
|
|
|
|
|
|
|
|
|
|
|
|
|
|
|
|
|
|
|
|
|
|
|
|
|
|
|
|
|
|
|
|
|
|
|
|
|
|
|
|
|
|
|
|
|
|
|
|
|
|
|
|
|
|
3.Press Store again; Preset number flashes
4.Select destination with Footswitches
5.Press the Store button again to save the changes.
The procedure for copying one preset to another preset location is the same. Use the Footswitches to select the preset that you want to copy, then follow steps 1-4 for storing a preset as described above. Press either Edit button at any time to abort the Store procedure.
12

SectionThree - Models and Parameters
About the Models
The RP350 can be thought of as several different “virtual” amplifiers and individual, high-tech stompboxes in a single programmable package. With stompboxes, the order in which they are connected affects the overall sound. The RP350 has placed the Amp and Effect models in an order for optimum results. The following diagram shows the order in which they are connected.
Pickup |
Wah |
Compressor |
Chorus/FX |
Distortion |
Amp |
EQ |
Cabinet |
|
Simulator |
(Pre) |
Modeling |
|
Model |
||||
|
|
|
|
|
||||
|
Noise Gate |
Volume |
Chorus/FX |
Delay |
Reverb |
Volume |
|
|
|
Pedal Pre |
(Post) |
Pedal Post |
|||||
|
|
|
|
|||||
Model Definitions
Each Amp and Effect model within the RP350 can be programmed to suit your personal taste and application. Understanding how these components alter the sound, and how each parameter alters the effect, will help you achieve the sound you are looking for. The following overview of the RP350’s effects outlines what each effect and parameter does.
Pickup
The Pickup Simulator provides the thick tone of a humbucker pickup to a guitar with single coil pickups, or the bright, edgy sound of a single coil pickup to a guitar with a humbucker. This gives you the best of both worlds without having to change guitars during a performance.
Pickup Model - Knob 1 selects the Pickup model to be simulated. Values include:
SC>Hb (gives a single coil pickup the warm tone of a humbucker), and Hb>SC (gives a humbucker the unique sound of a single coil). Press this knob to turn Pickup modeling on and off.
USB/RP Mix (When connected to a computer via USB) - Knob 2 adjusts the output mix between the RP350 and playback from the computer. Ranges from USB 0 - USB RP
- RP 0.
USB Level (When connected to computer via USB) - Knob 3 adjusts the RP350’s recording level sent to the computer. Ranges from -12 to +24.
Preset Level - Knob 6 adjusts the preset’s level. Ranges from 0 to 99.
Wah
Wah is an effect controlled by an Expression Pedal making the guitar sound as if it’s saying “Wah.”
Wah Model - Knob 1 selects the Wah model. Values include: FULRNG (DigiTech® Full Range Wah sweeps the entire spectrum of audible frequencies), CRYwah (Cry Wah is a
traditional sounding Wah), and clyde(based on a Vox® Clyde McCoyTM Wah). Press this knob to turn Wah models on and off.
Wah Minimum - Knob 2 adjusts the Wah Pedal Minimum. Ranges from 0 (toe up) to 99 (toe down).
Wah Maximum - Knob 3 adjusts the Wah Pedal Maximum. Ranges from 0 (toe up) to 99 (toe down).
Wah Level - Knob 6 adjusts the Wah Level. Ranges from 0dB to +12dB.
13
 Loading...