


Warranty
We at DigiTech® are very proud of our products and back up each one we sell with the following warranty:
1.The warranty registration card must be mailed within ten days after purchase date to validate this warranty, or you can register via our website (www.digitech.com).
2. DigiTech warrants this product, when used solely within the U.S., to be free from defects in materials and workmanship under normal use and service.
3. DigiTech liability under this warranty is limited to repairing or replacing defective materials that show evidence of defect, provided the product is returned to DigiTech WITH RETURN AUTHORIZATION, where all parts and labor will be covered up to a period of one year (this warranty is extended to a period of six years when the product has been properly registered by mail or through our website). A Return Authorization number may be obtained from DigiTech by
telephone. The company shall not be liable for any consequential damage as a result of the product’s use in any circuit or assembly.
4. Proof-of-purchase is considered to be the burden of the consumer.
5. DigiTech reserves the right to make changes in design, or make additions to, or improvements upon this product without incurring any obligation to install the same on products previously manufactured.
6. The consumer forfeits the benefits of this warranty if the product’s main assembly is opened and tampered with by anyone other than a certified DigiTech technician or, if the product is used with AC voltages outside of the range suggested by the manufacturer.
7. The foregoing is in lieu of all other warranties, expressed or implied, and DigiTech neither assumes nor authorizes any person to assume any obligation or liability in connection with the sale of this product. In no event shall DigiTech or its dealers be liable for special or consequential damages or from any delay in the performance of this warranty due to causes beyond their control.
NOTE: The information contained in this manual is subject to change at any time without notification. Some information contained in this manual may also be inaccurate due to undocumented changes in the product or operating system since this version of the manual was completed. The information contained in this version of the owner’s manual supersedes all previous versions.

Table of Contents |
|
Thank You............................................................................................................... |
3 |
Quick Start.............................................................................................................. |
4 |
Guided Tour - Front Panel...................................................................................... |
8 |
Guided Tour - Rear Panel....................................................................................... |
12 |
Making Connections............................................................................................... |
14 |
Recording an Instrument or Vocal/Acoustic Phrase............................................... |
16 |
Recording with the Aux Input................................................................................ |
17 |
Recording Overdubs............................................................................................... |
19 |
Undo, Redo, and Clear........................................................................................... |
21 |
Undo an Overdub........................................................................................... |
21 |
Redo an Overdub............................................................................................ |
21 |
Clear Overdubs/Unsaved Phrases................................................................... |
21 |
Storing/Copying Phrases........................................................................................ |
22 |
Store Changes to a Loop................................................................................. |
22 |
Copy a Loop to a Different Memory Location............................................... |
22 |
Setting a Loop Tempo for Recording..................................................................... |
23 |
Auto Record Mode................................................................................................. |
24 |
Stop Modes............................................................................................................. |
25 |
Changing Loop Tempo........................................................................................... |
26 |
Loop / Single Phrases............................................................................................. |
27 |
Time Signature........................................................................................................ |
28 |
Rhythm Type.......................................................................................................... |
29 |
USB File Transfer................................................................................................... |
30 |
Exchange Files Between Your Computer and the JamMan®.......................... |
30 |
Deleting Phrases..................................................................................................... |
32 |
Erasing All Loops / Formatting the CompactFlash® Card...................................... |
33 |
Erase Loops.................................................................................................... |
33 |
Format a CompactFlash Card......................................................................... |
33 |
Unformatted Cards......................................................................................... |
34 |
Optional FS3X Footswitch..................................................................................... |
35 |
Multiple Loop Playback Using the FS3X.............................................................. |
36 |
CompactFlash Capacity.......................................................................................... |
37 |
Specifications.......................................................................................................... |
38 |
1
2

ThankYou
Congratulations and special thanks from DigiTech® for choosing the DigiTech JamMan® Looper/Phrase Sampler.
The DigiTech JamMan Looper/Phrase Sampler is designed for the performing vocalist and musician. By using CompactFlash™ memory, the JamMan is capable of creating seamless loops with virtually infinite overdub capability. Input audio can be from an instrument, microphone or line level audio source. Up to 99 loops can be stored on a CompactFlash card (.wav format) which can be transferred to a PC for archiving. An optional three-button footswitch can be connected for remote loop access and auto-record functions. Record your own loops and overdub them on the fly, in the studio, or onstage.
And when using an optional 2GB CompactFlash card, you can record hours of loops and samples, instead of just minutes. Connect to a computer via the
JamMan’s USB port and transfer loops to your hard drive. Load up the JamMan with a drum track, bass line, vocal and solo harmonies . . . it becomes a band in a box. Slow down or speed up any song without changing pitch.With the DigiTech JamMan in your bag of tricks, the possibilities are literally endless.
Included Items
JamMan
CompactFlash card (128 MB)
Power Supply
This Manual
Registration Card
3

Quick Start
1. Get Connected
or
or
Before powering up your JamMan®:
a.Make Connections
1.Connect a guitar or bass to the INSTRUMENT INPUT jack and/or a mic to MIC INPUT on the JamMan’s rear panel.
2.Connect the JamMan’s OUTPUT to the input of an amplifier, a channel of a mixer, or to headphones.
b.Connect the Power Supply
1.Start with your amplifier and the JamMan turned off or the mixer faders at their minimum position.
2.Turn the LOOP LEVEL, RHYTHM LEVEL, Mic level, and inst level knobs all the way down on the JamMan.
3.Connect the PS-0913B power supply to the POWER jack on the JamMan.
4.Connect the other end of the PS-0913B power supply to an AC outlet.
5.Turn your amplifier on and turn up its volume to a normal playing level or bring up the mixer’s faders to a nominal level.
c.Insert the CompactFlash® Card
Insert the included CompactFlash® card into the CompactFlash card slot (if it isn’t already inserted).
4

Quick Start
2. Select an Empty Loop
Rotate the SELECT knob until the Loop LED and the Single LED are off.
Turn the SELECT knob...
...until these LEDs are off.
3. Select the Record Mode
Press the RECORD MODE button repeatedly until the INST/MIC LED lights.
Press the RECORD MODE button...
...until the INST/MIC LED lights
5
Quick Start
4. Adjust the Recording Level
Play your guitar (or sing into the mic) at the level you will be recording. Adjust the Inst level (or Mic Level) knob until the Peak LED occasionally flickers on the loudest notes. Set the loop level and rhythm level knobs to the 9 o’clock position.
Set the LOOP LEVEL and RHYTHM LEVEL knobs to 9 o’clock
Play (or sing) and adjust the INST LEVEL (or MIC LEVEL) knob...
...until the PEAK LED lights only occasionally
5. Start Recording
Press the REC/Play/overdub (left) footswitch to start recording. While recording, the Record LED remains lit.
Press the REC/PLAY/OVERDUB |
While recording, the |
||||||
(left) footswitch. |
Record LED is lit solid. |
||||||
|
|
|
|
|
|
|
|
|
|
|
|
|
|
|
|
|
|
|
|
|
|
|
|
|
|
|
|
|
|
|
|
|
|
|
|
|
|
|
|
6
Quick Start
6. Stop Recording, Start Playback
Press the rec/play/overdub (left) footswitch while recording to stop recording and start playing back from the beginning. The Play LED lights. Adjust the loop level and rhythm level knobs as needed.
Press the REC/PLAY/OVERDUB
(left) footswitch while recording The PLAY to stop recording and start playback. LED is lit.
Adjust the LOOP LEVEL and RHYTHM LEVEL knobs as necessary.
7. Stop Playback/Store the Loop
Press the stop/tempo (right) footswitch to stop playback, then press the Store button twice to store the loop.
First press the STOP/TEMPO (right) footswitch to
stop playback.
Then press the 

 STORE button twice
to store the loop.
7

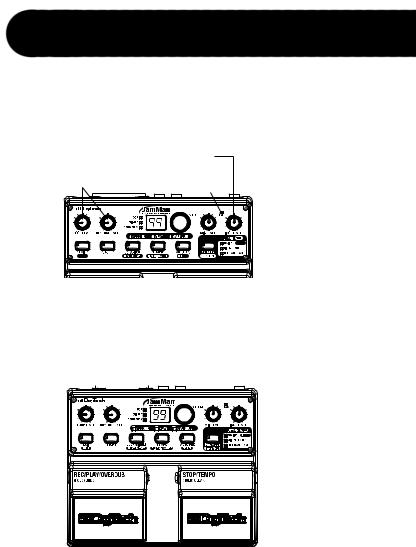
GuidedTour - Front Panel
1 2 3
18
17 |
16 |
15 |
4 |
5 |
6 |
7 |
8 |
9 |
10 |
11 |
12 |
14 |
13 |
1. Loop Level Knob
Controls playback level of recorded loops.
2. Rhythm Level Knob
Controls the level of the rhythm guide track.
3. Loop/Single/Card Busy LEDs
Loop
Lights when a repeating Loop resides in the selected memory location.
8

GuidedTour - Front Panel
Single
Lights when a Single playback phrase resides in the selected memory location.
Card Busy
Lights when there is read/write activity on the CompactFlash® card. The card should not be removed when the card busy LED is lit.
4. Display
Displays which loop memory location is selected. It also shows information during store/copy procedures, during Time Signature and Rhythm Type setup, USB connection, and file deletion/card formatting procedures.
5. Select Knob
Used for selecting different loops on the CompactFlash card and making selections when in other modes (such as Time Signature and Rhythm Type).
6. Mic Level Knob
Controls the input signal from the XLR mic input jack.
7. Peak LED
Lights when the Instrument, Mic, or Aux Input signals are too loud. Adjust the Inst Level or Mic Level knobs so this LED lights only occasionally. If the Aux input is being used, adjust the output level of the audio source.
8. Inst Level Knob
Controls the input signal from the 1/4” Inst. Input jack.
9. Record Mode/Stop Mode LEDs
Indicate which Record Mode or Stop Mode is selected.
9

GuidedTour - Front Panel
10. Record Mode (Stop Mode) Button
Press this button to select the inputs that are to be recorded: Inst/Mic or Aux Input with options of Minus Center and/or Full Range Amp (indicated by the LEDs next to the button).
Press this button while the  button is lit to select one of two Stop Modes: Stop or Finish (indicated by the LEDs next to the button). For more information about Stop Modes, see page 25.
11.Auto Record (Delete) Button
Press this button to enable Auto Record. When Auto Record is enabled, recording begins automatically when you begin your performance.
Press this button while the  button is lit to delete the contents of the current memory location. For more information about the Delete function, see page 32.
12.Tempo (Time Signature) Button
Press this button to set or change the loop tempo. If tempo for an existing loop is changed, the loop plays back at the new tempo without any change of pitch. See pages 23 and 26 for more information about Tempo.
Press this button while the  button is lit to change the Time Signature. For more information about Time Signatures, see page 28.
Note:Time Signature can only be changed for a memory location that has no phrase recorded in it.
13. Stop/Tempo Footswitch
Stops recording, playback and overdubbing of the phrase. It can be used like the Tempo button (#12) to set the tempo before recording a loop. Press and hold this footswitch for two seconds to clear all unstored audio in a loop.
10
 Loading...