


If you have questions or comments, contact us. Pour toute question ou tout commentaire, nous contacter.
Si tiene dudas o comentarios, contáctenos.
1-800-4-DEWALT • www.dewalt.com
INSTRUCTION MANUAL
GUIDE D'UTILISATION MANUAL DE INSTRUCCIONES
INSTRUCTIVO DE OPERACIÓN, CENTROS DE SERVICIO Y PÓLIZA DE GARANTÍA. ADVERTENCIA: LÉASE ESTE INSTRUCTIVO ANTES DE USAR EL PRODUCTO.
DW030
Laser Distance Measurer (LDM) Appareil de mesure laser (AML) Láser para medir distancia (LDM)

Definitions: Safety Guidelines
The definitions below describe the level of severity for each signal word. Please read the manual and pay attention to these symbols.
 DANGER: Indicates an imminently hazardous situation which, if not avoided, will result in death or serious injury.
  WARNING: Indicates a potentially hazardous situation which, if not avoided, could result in death or serious injury.
 CAUTION: Indicates a potentially hazardous situation which, if not avoided, may result in minor or moderate injury.
NOTICE: Used without the safety alert symbol indicates a potentially hazardous situation which, if not avoided, may result in property damage.
IF YOU HAVE ANY QUESTIONS OR COMMENTS ABOUT THIS OR ANY DEWALT TOOL, CALL US TOLL FREE AT:
1-800-4-DEWALT (1-800-433-9258).
WARNING! Read and understand all instructions.
Failure to follow all instructions listed below may result
in electric shock, fire and/or serious personal injury.
SAVE THESE INSTRUCTIONS
Safety Instructions for Lasers
•Use the laser only with the specifically designated batteries.
Use of any other batteries may create a risk of fire.
•Store idle laser out of reach of children and other untrained persons. Lasers are dangerous in the hands of untrained users.
1
•Use only accessories that are recommended by the manufacturer for your model. Accessories that may be suitable for one laser, may create a risk of injury when used on another laser.
•Laser service MUST be performed only by qualified repair personnel. Repairs, service or maintenance performed by unqualified personnel may result in injury. To locate your nearest DEWALT service center call 1-800-4-DEWALT (1-800- 433-9258) or go to http://www.dewalt.com on the Internet.
•Do not use optical tools such as a telescope or transit to view the laser beam. Serious eye injury may result from staring at the beam.
•Do not place the laser in a position which may cause anyone to intentionally or unintentionally stare into the laser beam. Serious eye injury may result from staring at the beam. Whenever possible, laser beam should be well above or well below eye level.
•Do not position the laser near a reflective surface which may reflect the laser beam toward anyone’s eyes. Serious eye injury could result.
•Turn the laser off when it is not in use. Leaving the laser on increases the risk of staring into the laser beam.
•Do not operate the laser around children or allow children to operate the laser. Serious eye injury may result.
•Do not remove or deface warning labels. If labels are removed user or others may inadvertently expose themselves to laser radiation.
•Do not open the device by using tools, such as but not limited to, screwdrivers, etc.
•Always post a laser warning sign in work areas where lasers are located.
English
English
 WARNING: Use of controls or adjustments or performance of procedures other than those specified herein may result in hazardous radiation exposure.
 WARNING! DO NOT DISASSEMBLE THE DEVICE. There are no user serviceable parts inside. Disassembling this device will void all warranties on the product. Do not modify the product in any way. Modifying the tool may result in hazardous laser radiation exposure.
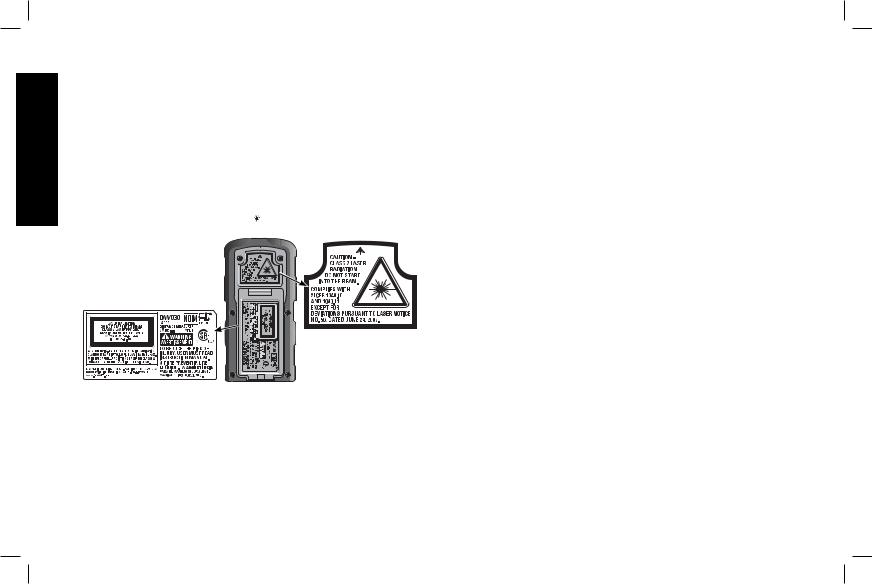
• The label on your tool may include the following symbols.
VDC ...... |
volts, direct current |
nm..... wavelength in nanometers |
mW ..... |
milliwatts |
... laser warning symbol |
FIG. 1
•For your convenience and safety, the following labels are on your laser (Fig. 1).
CAUTION: CLASS 2 LASER RADIATION. DO NOT STARE INTO THE BEAM.
Laser Information
The DW030 is listed as a CLASS 2 LASER PRODUCT and complies with the applicable requirement of title 21 of the Code of Federal Regulations set forth by: the Department of Health, Education, and Welfare; the Food and Drug Administration; the Center for Devices and Radiological Health.
These devices comply with Part 15 of the FCC Rules. Operation is subject to the following two conditions: (1) this device may not cause harmful interference, and (2) this device must accept any interference received, including interference that may cause undesired operation.
NOTE: This equipment has been tested and found to comply with the limits for a Class B digital device, pursuant to Part 15 of the FCC Rules. These limits are designed to provide reasonable protection against harmful interference in a residential installation. This equipment generates, uses and can radiate radio frequency energy and, if not installed and used in accordance with the instructions, may cause harmful interference to radio communications. However, there is no guarantee that interference will not occur in a particular installation. If this equipment does cause harmful interference to radio and television reception, which can be determined by turning the equipment off and on, the user is encouraged to try to correct the interference by one or more of the following measures:
•Reorient or relocate the receiving antenna.
•Increase the separation between the equipment and receiver.
•Consult the dealer or an experienced radio/TV technician for help.
These Class B digital devices comply with Canadian ICES-003.
2

SPECIFICATIONS
Laser Power |
< 1 mw, CLASS 2 LASER |
|
PRODUCT |
Range [at 70°F (22°C)] |
1'–100' (300 mm–30 m) |
Accuracy [at 70°F (22°C)] |
± 1/8" (3 mm) |
Power Source |
two AAA (LR03) size batteries |
Battery Voltage |
2 x 1.5 VDC |
Storage Temperature |
20°F to 160°F (–7°C to 70°C) |
INTENDED OPERATING CONDITIONS |
|
Environmental |
Indoor and Outdoor |
|
Water resistant |
Temperature |
20°F to 120°F (–7°C to 50°C) |
Relative Humidity |
≤ 85% |
Air Quality |
Pollution Degree 3 |
Altitude |
≤ 11,500' (3,500 m) |
|
|
LASER OPERATION
•To extend battery life per charge, turn the laser off when it is not in use.
•To ensure the accuracy of your work, check the laser calibration often. Refer to Field Calibration Check under
Laser Maintenance.
•Before attempting to use the laser, make sure the device does not show any defects and is in proper working order.
•Extreme temperature changes can cause movement or shifting of building structures, metal tripods, equipment, etc., which can effect accuracy. Check your accuracy often while working.
•If the device is dropped or has suffers a sharp blow, have the unit checked by a qualified service center before using the laser.
3
Important Safety Instructions for Batteries
 WARNING: Batteries can explode, or leak, and can cause injury or fire. To reduce this risk:
•Carefully follow all instructions and warnings on the battery label and package.
•Always insert batteries correctly with regard to polarity (+ and –), marked on the battery and the equipment.
•Do not short battery terminals.
•Do not charge batteries.
•Do not mix old and new batteries. Replace all of them at the same time with new batteries of the same brand and type.
•Remove dead batteries immediately and dispose of per local codes.
•Do not dispose of batteries in fire.
•Keep batteries out of reach of children.
•Remove batteries if the device will not be used for several months.
SAVE THESE INSTRUCTIONS
FOR FUTURE USE
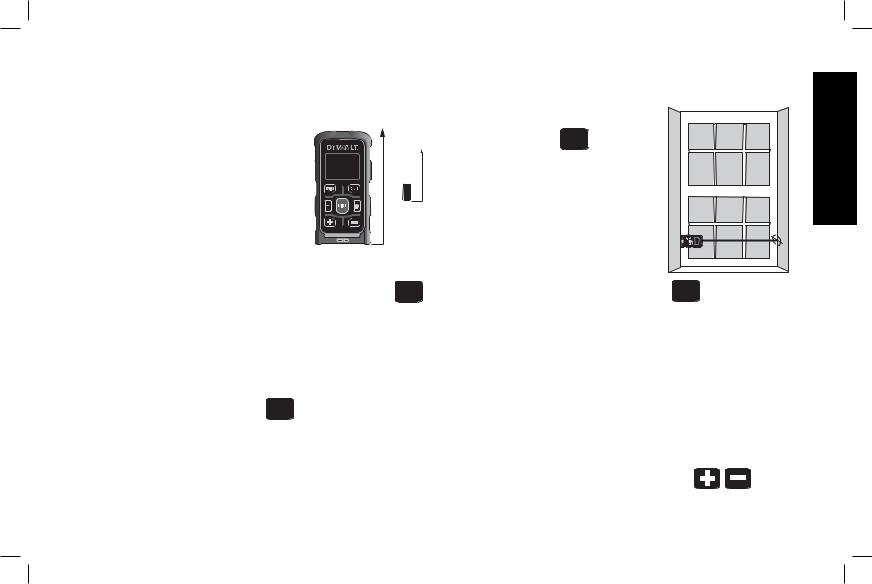
Installing and Removing Battery (Fig. 2)
NOTE: This Laser Distance Measurer (LDM) is powered by two AAA (LR03) size 1.5 VDC batteries.
INSTALLING THE BATTERY PACK
1. Lift up the battery compartment cover (A) as shown in Figure 2.
English

 A
A
FIG. 2
English
2.Insert two AAA (LR03) size batteries into the compartment, placing the batteries according to + and – icons on the inside of the compartment.
NOTE: When the battery icon flashes in the LCD display, replace battery with 2 fresh AAA (LR03) batteries.
COMPONENTS (Fig. 2, 3)
A. Battery compartment cover |
G. UNITS button |
B. Laser emitter |
H. Area button |
C. Receiver lens |
I. Volume button |
D. LCD display |
J. Subtract button |
E. DIST (ON) button |
K. Addition button |
F. C/OFF button |
|
Laser Display
L. Laser indicator |
R. |
Units indicator |
M. Measuring plane indicator |
S. |
Main reading line (lower) |
N.Area/Volume indicator
O.Battery indicator
P.Additional reading line (upper)
Q.Units with fraction/exponents
FIG. 3 |
B |
|
|
|
C |
|
|
|
|
|
|
|
|
L |
|
|
|
N |
O |
|
D |
|
|
G |
F |
|
P |
|
|
Q |
|
|
|
|
|
H |
I |
|
|
|
E |
M |
Q |
K |
|
||
|
|
R |
|
|
J |
|
|
|
|
|
|
|
|
|
S |
Attachment of Wrist Strap (Fig. 4)
 FIG. 4
4
OPERATION
 CAUTION: To reduce the risk of personal injury or property damage and to ensure consistent, high-quality readings, control
measurements should |
be |
FIG. 5 |
||
performed |
periodically |
and |
||
|
||||
before and |
after important |
|
||
measurements. Refer to |
Field |
|
||
Calibration Check under Laser |
|
|||
Maintenance. |
|
|
||
IMPORTANT NOTE: All measurements are relative to the base of the LDM.
Laser Control
Panel
TO TURN THE LASER DISTANCE MEASURER (LDM) ON DIST (FIG. 2, 3)
1.Insert two AAA size battery as previously directed. Be sure that the battery door (A) is securely latched.
2.Press DIST (ON) to power the LDM. A red laser dot will illuminate where the LDM is pointed.
NOTE: Battery icon appears when the LDM is turned on and displays until a measurement is taken.
TO TURN THE LASER DISTANCE C/OFF
MEASURER (LDM) OFF
Press and hold the C/OFF button (F) until the LDM turns off.
AUTOMATIC SHUT DOWN
The LDM will automatically shut down if no button is pressed for 3 minutes.
5
TO CLEAR A MEASUREMENT
Press the C/OFF button (F) once to clear the last measurement.
Measurements |
FIG. 6 |
SINGLE DISTANCE DIST MEASURING
(FIG. 6)
1.Press the DIST (ON) button
(E) once to turn the LDM on.
2.Aim the LDM at the desired target.
3.Press the DIST (ON) button
(E) once to record the measurement in the LCD display (D).
CONTINUOUS DISTANCE MEASURING DIST (FIG. 6)
1.Press the DIST (ON) button (E) once to turn the LDM on.
2.Aim the LDM at the desired target.
3.Press and hold the DIST (ON) button (E) for three seconds to activate Continuous Distance Measuring mode. Move the LDM to measure desired distance. The letters 'trc' (tracking) will flash on the LCD display.
NOTE: When the LDM is in Continuous Distance Measuring mode, the laser indicator (L) turns on steady.
4.Press the DIST (ON) button (E) once to stop continuous measuring.
Functions
TO ADD OR SUBTRACT MEASUREMENTS
1. Turn the LDM on.
English
English
2.Aim the LDM at the desired target.
3.Press the DIST (ON) button (E) once to measure the first distance.
4.Press the + or – button (K, J) to activate the add or subtract function. The + or – will show in the display.
5.Press the DIST (ON) button again to add or subtract the second measurement. The calculated results show in the main reading line. The second measurement will show in the additional reading line.
TO SELECT UNITS OF MEASURE UNITS (FIG. 3)
The LDM switches to the next unit of measure each time the button is pressed.
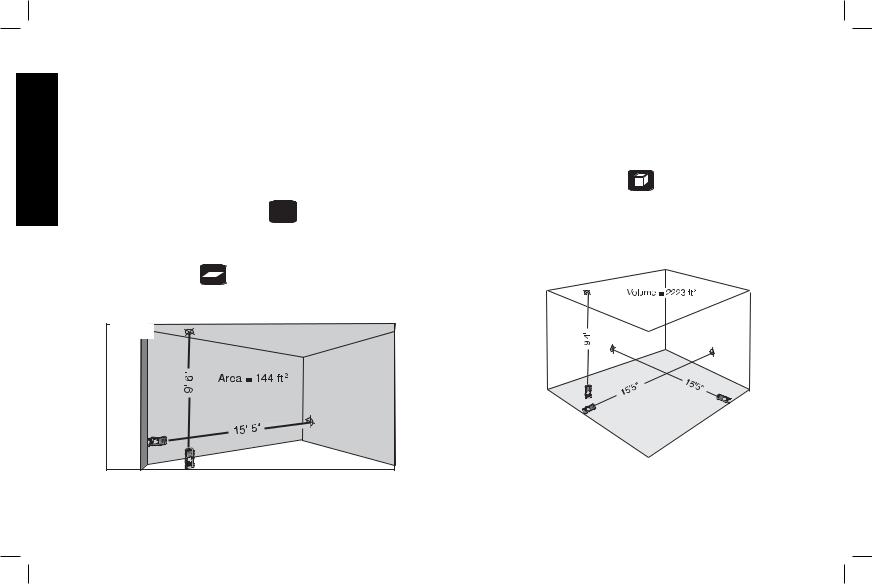
TO MEASURE AREA (FIG. 7)
1.Turn the LDM on.
2.Press the area measure button (I). The area icon will display.
FIG. 7 |
3.Aim the LDM at the first desired target, as shown. Press the DIST (ON) button (E) once to record the first distance.
6
4.Aim the LDM at the second desired target and press the DIST (ON) button (E) once to record the second distance.
5.The calculated area is displayed in the main reading line (S). The second measurement is displayed in the additional reading line (P).
NOTE: The final measurement is displayed as square feet or square meters.
TO MEASURE ROOM VOLUME (FIG. 8)
1.Turn the LDM on.
2.Press the volume measure button (H). The volume icon will display.
3.Aim the LDM at the first desired target, as shown. Press the DIST (ON) button (E) once to record the first distance.
FIG. 8
4.Aim the LDM at the second desired target and press the DIST (ON) button (E) once to record the second distance.
5.Aim the LDM at the third desired target and press the DIST (ON) button (E) once to record the third distance.
6.The calculated volume is displayed in the main reading line (S). The third measurement is displayed in the additional reading line (P).
NOTE: The final measurement is displayed as cubic feet or cubic meters.
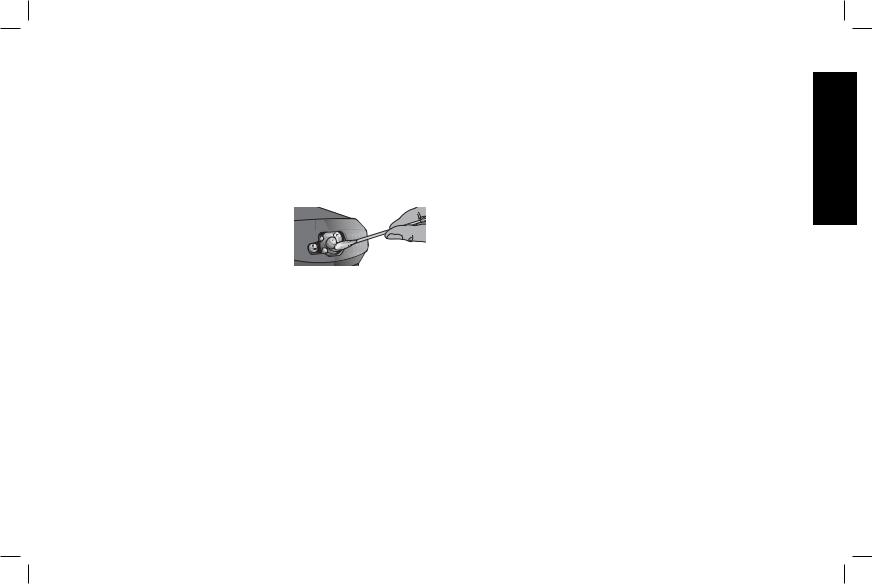
LASER MAINTENANCE
•Under some conditions, the lens of FIG. 9 the laser emitter and the receiver
may collect some dirt or debris. This will affect beam quality and operating range. The lens should be cleaned
with a cotton swab moistened with water as shown in Figure 9.
 WARNING: DO NOT turn the LDM on while cleaning the lens. Serious eye injury may result from staring at the beam.
•The housing can be cleaned with a wet lint-free cloth such as a cotton cloth. USE WATER ONLY — DO NOT use cleansers or solvents. Allow the LDM to air dry before storing.
•To maintain the accuracy of your readings, perform control measurements periodically. Refer to Field Calibration
Check.
•If your LDM requires repair, contact your local DEWALT service center.
•When the LDM is not in use, store it in the pouch provided.
•Do not store your LDM in the pouch if it is wet. Dry exterior parts with a soft, dry cloth and allow the LDM to air dry.
•Do not store your LDM at temperatures below 20˚F (–7˚C) or above 160˚F (70˚C).
 CAUTION: Never use solvents or other harsh chemicals for cleaning the non-metallic parts of the laser. These chemicals may
7
weaken the materials used in these parts. Use a cloth dampened only with water and mild soap. Never let any liquid get inside the unit; never immerse any part of the unit into a liquid. Never use compressed air to clean the laser.
Field Calibration Check
Measure a known distance [within a 10–30' (3–10 m) range] with the LDM to confirm that the LDM is functioning properly.
Troubleshooting
If measurement conditions do not permit an accurate measurement, an error code will appear on the LCD display. For an error code description refer to the following table.
Code |
Description |
Correction |
|
|
|
204 |
Calculation error |
Repeat the measurement |
|
|
|
252 |
LDM too hot |
Let the LDM cool down |
|
|
|
253 |
LDM too cold |
Warm the LDM up |
|
|
|
255 |
Weak signal |
Change the target |
|
|
surface (e.g., put white paper |
|
|
on glass door) |
|
|
|
256 |
Incorrect reading |
Change the target |
|
|
surface (e.g., put white |
|
|
paper on glass door) |
|
|
|
257 |
Too much |
Shadow the |
|
background light |
target area |
|
|
|
258 |
Outside of range |
Stay within the working range |
|
|
|
260 |
Laser beam |
Repeat the |
|
interrupted |
measurement |
|
|
|
English

English
Laser Accessories
Recommended accessories for use with your LDM are available at extra cost from your local service center.
 WARNING: Since accessories, other than those offered by DEWALT, have not been tested with this product, use of such accessories with this tool could be hazardous. To reduce the risk of injury, only DEWALT, recommended accessories should be used with this product.
If you need assistance in locating any accessory, please contact DEWALT Industrial Tool Co., 701 East Joppa Road, Baltimore, MD 21286, call 1-800-4-DEWALT (1-800-433-9258) or visit our website www.dewalt.com.
 DANGER: TO REDUCE THE RISK OF SERIOUS PERSONAL INJURY, NEVER STARE DIRECTLY INTO THE LASER BEAM, WITH OR WITHOUT SAFETY GLASSES.
Repairs
IMPORTANT: Disassembling the LDM will void all warranty on the product.
To assure product SAFETY and RELIABILITY, repairs, maintenance and adjustments should be performed by a DEWALT factory service center, a DEWALT authorized service center or other qualified service personnel. Always use identical replacement parts.
Three Year Limited Warranty
DEWALT will repair, without charge, any defects due to faulty materials or workmanship for three years from the date of purchase. This warranty does not cover part failure due to normal wear or tool abuse. For further detail of warranty coverage and warranty repair information, visit www.dewalt.com or call 1-800-4-DEWALT (1-800- 433-9258). This warranty does not apply to accessories or damage
caused where repairs have been made or attempted by others. This warranty gives you specific legal rights and you may have other rights which vary in certain states or provinces.
In addition to the warranty, DEWALT tools are covered by our:
1 YEAR FREE SERVICE
DEWALT will maintain the tool and replace worn parts caused by normal use, for free, any time during the first year after purchase.
90 DAY MONEY BACK GUARANTEE
If you are not completely satisfied with the performance of your DEWALT Power Tool, Laser, or Nailer for any reason, you can return it within 90 days from the date of purchase with a receipt for a full refund – no questions asked.
LATIN AMERICA: This warranty does not apply to products sold in Latin America. For products sold in Latin America, see country specific warranty information contained either in the packaging, call the local company or see website for warranty information.
FREE WARNING LABEL REPLACEMENT: If your warning labels (Fig. 1) become illegible or are missing, call 1-800-4-DEWALT (1-800-433-9258) for a free replacement.
8
 Loading...