


|
|
|
INSTRUCTIVO DE OPERACIÓN, CENTROS DE SERVICIO Y INSTRUCTION MANUAL PÓLIZA DE GARANTÍA. ADVERTENCIA: LÉASE ESTE GUIDE D’UTILISATION INSTRUCTIVO ANTES DE USAR EL PRODUCTO. |
|
|
|
|
|
|
If you have questions or comments, contact us. Pour toute question ou tout commentaire, nous contacter. Si tiene dudas o comentarios, contáctenos. |
1-800-4-DEWALT • www.dewalt.com |
|
MANUAL DE INSTRUCCIONES |
|
|
|
|
DW089 3 Beam Line Laser Laser à triple rayon Láser de 3 rayos lineales |
|
|
|
|
|
|
|
|
|||
|
|
|
|
|
|
|
|||
|
DEWALT Industrial Tool Co., 701 Joppa Road, Baltimore, MD 21286 |
||||||||
|
(DEC10) |
Part No. N096898 DW089 |
Copyright © 2010 DEWALT |
||||||
The following are trademarks for one or more DEWALT power tools: the yellow and black color scheme, the “D” shaped air intake grill, the array of pyramids on the handgrip, the kit box configuration, and the array of lozenge-shaped humps on the surface of the tool.
Definitions: Safety Guidelines
The definitions below describe the level of severity for each signal word. Please read the manual and pay attention to these symbols.
 DANGER: Indicates an imminently hazardous situation which, if not avoided, will result in death or serious injury.
 WARNING: Indicates a potentially hazardous situation which, if not avoided, could result in death or serious injury.
 CAUTION: Indicates a potentially hazardous situation which, if not avoided, may result in minor or moderate injury.
NOTICE: Indicates a practice not related to personal injury which, if not avoided, may result in property damage.
IF YOU HAVE ANY QUESTIONS OR COMMENTS ABOUT THIS OR ANY DEWALT TOOL, CALL US TOLL FREE AT: 1-800-4-DEWALT (1-800-433-9258).
Safety Instructions for Lasers
WARNING! Read all safety warnings and all instructions. Failure to follow the warnings and instructions may result in electric shock, fire and/or serious injury.
SAVE THESE INSTRUCTIONS
 WARNING! Laser radiation exposure. Do not disassemble or modify the laser level. There are no user serviceable parts inside. Serious eye injury could result.
 WARNING: Hazardous radiation. Use of controls or adjustments or performance of procedures other than those specified herein may result in hazardous radiation exposure.
•Do not operate the laser in explosive atmospheres, such as in the presence of flammable liquids, gases, or dust. Power tools create sparks which may ignite the dust or fumes.
•Use the laser only with the specifically designated batteries. Use of any other batteries may create a risk of fire.
•Store idle laser out of reach of children and other untrained persons. Lasers are dangerous in the hands of untrained users.
•Use only accessories that are recommended by the manufacturer for your model.
Accessories that may be suitable for one laser, may create a risk of injury when used on another laser.
•Tool service must be performed only by qualified repair personnel. Service or maintenance performed by unqualified personnel may result in injury. To locate your nearest DEWALT service center call 1-800-4-DEWALT (1-800-433-9258) or go to www.dewalt.com on the Internet.
•Do not use optical tools such as a telescope or transit to view the laser beam.
Serious eye injury could result.
•Do not place the laser in a position which may cause anyone to intentionally or unintentionally stare into the laser beam. Serious eye injury could result.
•Do not position the laser near a reflective surface which may reflect the laser beam toward anyone’s eyes. Serious eye injury could result.
•Turn the laser off when it is not in use. Leaving the laser on increases the risk of staring into the laser beam.
•Do not modify the laser in any way. Modifying the tool may result in hazardous laser radiation exposure.
•Do not operate the laser around children or allow children to operate the laser.
Serious eye injury may result.
•Do not remove or deface warning labels. If labels are removed user or others may inadvertently expose themselves to radiation.
•Position the laser securely on a level surface. Damage to the laser or serious injury could result if the laser falls.
 CAUTION: Use of controls or adjustments or performance of procedures other than those specified herein may result in hazardous radiation exposure.
 WARNING! DO NOT DISASSEMBLE THE LASER. There are no user serviceable parts inside. Disassembling the laser will void all warranties on the product. Do not modify the product in any way. Modifying the tool may result in hazardous laser radiation exposure.
 WARNING: Avoid prolonged contact with dust from power sanding, sawing, grinding, drilling, and other construction activities. Wear protective clothing and wash exposed areas with soap and water. Allowing dust to get into your mouth, eyes, or lay on the skin may promote absorption of harmful chemicals.
• The label on your tool may include the following symbols.
V............................. |
volts |
mW......................... |
milliwatts |
................ |
laser warning symbol |
nm .......................... |
wavelength in nanometers |
II ............................. |
Class 2 Laser |
IIIa........................... |
Class 3a Laser |
WARNING LABELS
For your convenience and safety, the following labels are on your laser.
 WARNING: TO REDUCE THE RISK OF INJURY, USER MUST READ INSTRUCTION MANUAL. USE AA SIZE BATTERIES.
 WARNING: LASER RADIATION. DO NOT STARE INTO BEAM. CLASS 2 LASER PRODUCT.
AVOID EXPOSURE. LASER RADIATION IS EMITTED FROM THESE APERTURES.
FIG. 1
Laser Information
The DW089 3 Beam Line Laser is a Class 2 laser product and complies with 21 CFR 1040.10 and 1040.11 except for deviations pursuant to laser notice No. 50, dated June 24, 2007.
INTRODUCTION
The DW089 laser is a self-leveling laser tool that can be used for horizontal (level) and vertical (plumb) alignment projects.
General Safety Rules For Battery Operated Tools
WARNING! Read and understand all instructions. Failure to follow all instructions listed below may result in electric shock, fire and/or serious personal injury.
WORK AREA SAFETY
•Keep work area clean and well lit. Cluttered or dark areas invite accidents.
•Do not operate power tools in explosive atmospheres, such as in the presence of flammable liquids, gases or dust. Power tools create sparks which may ignite the dust or fumes.
•Keep children and bystanders away while operating a power tool. Distractions can cause you to lose control.
ELECTRICAL SAFETY
•Use battery operated tool only with the specifically designed batteries. Use of any other batteries may create a risk of fire.
Battery
This tool is powered by four 1.5V AA size batteries.
To install batteries:
1.Lift up the battery compartment cover (A) as shown in Figure 2.
2.Insert four fresh AA batteries in the compartment, placing the batteries according to (+) and
(–) on the inside of the battery door.
 WARNING: Batteries can explode, or leak, and can cause injury or fire. To reduce this risk:
•Carefully follow all instructions and warnings on the battery label and package.
•Always insert batteries correctly with regard to polarity (+ and –), marked on the battery and the equipment.
•Do not short battery terminals.
•Do not charge batteries.
•Do not mix old and new batteries. Replace all of them at the same time with new batteries of the same brand and type.
•Remove dead batteries immediately and dispose of per local codes.
•Do not dispose of batteries in fire.
•Keep batteries out of reach of children.
•Remove batteries if the device will not be used for several months.
PERSONAL SAFETY
•Stay alert, watch what you are doing and use common sense when operating a power tool. Do not use a power tool while you are tired or under the influence of drugs, alcohol or medication. A moment of inattention while operating power tools may result in serious personal injury.
•Use personal protective equipment. Always wear eye protection. Protective equipment such as dust mask, non-skid safety shoes, hard hat, or hearing protection used for appropriate conditions will reduce personal injuries.
•Do not overreach. Keep proper footing and balance at all times. This enables better control of the power tool in unexpected situations.
•Dress properly. Do not wear loose clothing or jewelry. Keep your hair, clothing and gloves away from moving parts. Loose clothes, jewelry or long hair can be caught in moving parts.
POWER TOOL USE AND CARE
•Do not use the power tool if the switch does not turn it on and off. Any power tool that cannot be controlled with the switch is dangerous and must be repaired.
•Store idle power tools out of the reach of children and do not allow persons unfamiliar with the power tool or these instructions to operate the power tool.
Power tools are dangerous in the hands of untrained users.
•Maintain power tools. Check for misalignment or binding of moving parts, breakage of parts and any other condition that may affect the power tool’s operation. If damaged, have the power tool repaired before use. Many accidents are caused by poorly maintained power tools.
•Use the power tool, accessories and tool bits, etc. in accordance with these instructions, taking into account the working conditions and the work to be performed. Use of the power tool for operations different from those intended could result in a hazardous situation.
SERVICE
•Have your power tool serviced by a qualified repair person using only identical replacement parts. This will ensure that the safety of the power tool is maintained.
To locate your nearest DEWALT service center call 1-800-4-DEWALT (1-800-433-9258) or go to www.dewalt.com on the Internet.
Operating Tips
•Use only new, high-quality, name brand batteries for best results.
•Ensure batteries are in good working condition. If the low battery red indicator light is flashing, the batteries need replacement.
•To extend battery life, turn laser off when not working with or marking the beam.
•To ensure the accuracy of your work, check often to make sure your laser is calibrated. See
Field Calibration Check.
•Before attempting to use the laser, make sure it is positioned securely, on a smooth, flat surface.
•Always mark the center of the beam created by the laser.
•Extreme temperature changes may cause movement of internal parts that can affect accuracy. Check your accuracy often while working. See Field Calibration Check.
•If the laser has been dropped, check to make sure your laser is still calibrated. See Field Calibration Check.
LOW BATTERY INDICATION
The DW089 laser is equipped with a red indicator light (B), as shown in Figure 2. The red indicator light is located to the left of the on/off buttons (C, D, E).
A flashing red indicator light indicates that the batteries are low and need to be replaced. The laser may continue to operate for a short time while the batteries continue to drain, but the beam(s) will quickly dim. After fresh batteries are installed and the laser is turned on again, the laser beam(s) will return to full brightness and the red indicator light will stay off. (A flashing laser beam is not caused by low batteries; see Out of Tilt Range Indicator.)
COMPONENTS (Fig. 2)
 WARNING: Never modify the power tool or any part of it. Damage or personal injury could
result. |
|
A. Battery compartment cover |
F. Magnetic pivot bracket |
B. Red indicator light |
G. Keyhole slot |
C. ON/OFF button: horizontal laser line |
H. Fine adjustment knob |
D. ON/OFF button: vertical laser line |
I. 1/4" x 20 female thread |
E. ON/OFF button: side vertical laser line |
|
OPERATION
To Turn the Laser On and Off (Fig. 2)
With the laser off, place it on a flat surface. This model has three ON/OFF buttons, one for a horizontal laser line (C), one for a vertical laser line (D) and one for a side vertical laser line (E). Each laser line is powered on by pressing its ON/OFF button. The laser lines can be powered one at a time or at the same time. Pressing the ON/OFF buttons again turns the laser lines off.

Using the Laser
The beams are level or plumb as long as the calibration has been checked (see Field Calibration Check) and the laser beam is not flashing (see Out of Tilt Range Indicator).
OUT OF TILT RANGE INDICATOR (FIG. 3)
The DW089 laser is designed to self-level. If the laser has been tilted so much that it cannot level itself (average >4° tilt), it will flash the laser beam. The flashing beam indicates the tilt range has been exceeded and IS NOT LEVEL (OR PLUMB) AND SHOULD NOT BE USED FOR DETERMINING OR MARKING LEVEL (OR PLUMB). Try repositioning the laser on a more level surface.
SLOPING THE LASER
If the DW089 laser is tilted beyond 15° out of level, its laser beams will stay on longer between flashes to make it easier to do angled work.
USING THE PIVOT BRACKET (FIG. 2)
 WARNING: Position the laser and/or wall mount on a stable surface. Serious personal injury or damage to the laser may result if the laser falls.
The DW089 laser has a magnetic pivot bracket (F) permanently attached to the unit. This bracket allows the unit to be mounted to any upright surface made of steel or iron. Common examples of suitable surfaces include steel framing studs, steel door frames and structural steel beams. The bracket also has a keyhole slot (G) allowing the unit to be hung from a nail or screw on any kind of surface.
USING THE LASER WITH THE WALL MOUNT (FIG. 4)
The laser wall mount (J) offers more mounting options for the DW089 laser. The wall mount has a clamp (K) at one end which can be fixed to a wall angle for acoustic ceiling installation. At each end of the wall mount is a screw hole (L), allowing the wall mount to be attached to any surface with a nail or screw.
Once the wall mount is secured, its steel plate provides a surface to which the magnetic pivot bracket (F) can be attached. The position of the laser can then be fine-tuned by sliding the magnetic pivot bracket up or down on the wall mount.
ALIGNING THE VERTICAL BEAM – FINE ADJUST (FIG. 5)
The fine adjustment knob (H) on the top of the DW089 is for lining up the vertical beams. Place the DW089 on a flat surface and turn the knob to the right to move the beam to the right or to the left to move the beam to the left.
Rotating the fine adjustment knob adjusts the entire internal mechanism, maintaining the 90° angle between the two vertical beams.
LEVELING THE LASER
As long as the DW089 laser is properly calibrated, the laser is self-leveling. Each laser is calibrated at the factory to find level as long as it is positioned on a flat surface within average ± 4° of level. No manual adjustments are required.
MAINTENANCE
•To maintain the accuracy of your work, check the laser often to make sure it is properly calibrated. See Field Calibration Check.
•Calibration checks and other maintenance repairs may be performed by DEWALT service centers.
•When not in use, store the laser in the kit box provided. Do not store your laser at temperatures below -5°F (-20°C) or above 140°F (60°C).
•Do not store your laser in the kit box if the laser is wet. The laser should be dried first with a soft dry cloth.
Cleaning
Exterior plastic parts may be cleaned with a damp cloth. Although these parts are solvent resistant, NEVER use solvents. Use a soft, dry cloth to remove moisture from the tool before storage.
Field Calibration Check
CHECKING ACCURACY – HORIZONTAL BEAM, SCAN DIRECTION (FIG. 6)
Checking the horizontal scan calibration of the laser requires two walls 30' (9m) apart. It is important to conduct a calibration check using a distance no shorter than the distance of the applications for which the tool will be used.
1.Attach the laser to a wall using its pivot bracket, with the laser facing straight ahead toward the opposing wall (0 degree position).
2.Turn on the laser’s horizontal beam and mark the beam position on the opposing wall directly across from the laser. Always mark the center of the beam’s thickness.
3.Pivot the laser to the extreme left (-90 degree position) and mark the beam position on the opposing wall.
4.Pivot the laser to the extreme right (+90 degree position) and mark the beam position on the opposing wall.
5.Measure the vertical distance between the lowest mark (A) and the highest mark (B). If the measurement is greater than the values shown below, the laser must be serviced at an authorized service center.
Distance |
Allowable Distance |
Between Walls |
Between Marks |
30' (9.0m) |
1/8" (3.0mm) |
40' (12.0m) |
5/32" (4.0mm) |
50' (15.0m) |
7/32" (5.0mm) |
|
|
CHECKING ACCURACY – HORIZONTAL BEAM, PITCH DIRECTION (FIG. 7)
Checking the horizontal pitch calibration of the laser requires a single wall at least 30' (9m) long. It is important to conduct a calibration check using a distance no shorter than the distance of the applications for which the tool will be used.
1.Attach the laser to one end of a wall using its pivot bracket.
2.Turn on the laser’s horizontal beam and pivot the laser toward the opposite end of the wall and approximately parallel to the adjacent wall.
3.Mark the center of the beam at two locations (C, D) at least 30' (9m) apart.
4.Reposition the laser to the opposite end of the wall.
5.Turn on the laser’s horizontal beam and pivot the laser back toward the first end of the wall and approximately parallel to the adjacent wall.
6.Adjust the height of the laser so that the center of the beam is aligned with the nearest mark (D).
7.Mark the center of the beam (E) directly above or below the farthest mark (C).
8.Measure the distance between these two marks (C, E). If the measurement is greater than the values shown below, the laser must be serviced at an authorized service center.
Distance |
Allowable Distance |
Between Walls |
Between Marks |
30' (9.0m) |
1/4" (6.0mm) |
40' (12.0m) |
5/16" (8.0mm) |
50' (15.0m) |
13/32" (10.0mm) |
|
|
CHECKING ACCURACY – VERTICAL BEAMS (FIG. 8)
Checking the vertical (plumb) calibration of the laser can be most accurately done when there is a substantial amount of vertical height available, ideally 30' (9m), with one person on the floor positioning the laser and another person near a ceiling to mark the position of the beam. It is important to conduct a calibration check using a distance no shorter than the distance of the applications for which the tool will be used.
1.Place the laser on the floor and turn on both vertical beams.
2.Mark the position where the beams cross on the floor (F) and also on the ceiling (G). Always mark the center of the beams’ thickness.
3.Rotate the laser 180 degrees, and reposition it so the beam crossing is exactly on the original mark (F) on the floor.
4.Mark the position where the beams cross on the ceiling (H).
5.Measure the distance between the two ceiling marks (G, H). If the measurement is greater than the values shown below, the laser must be serviced at an authorized service center.
Ceiling |
Allowable Distance |
Height |
Between Marks |
8' (2.5m) |
1/16" (1.5mm) |
10' (3.0m) |
3/32" (2.0mm) |
14' (4.0m) |
1/8" (2.5mm) |
20' (6.0m) |
5/32" (4.0mm) |
30' (9.0m) |
1/4" (6.0mm) |
|
|
CHECKING 90º ACCURACY BETWEEN VERTICAL BEAMS (FIG. 9)
Checking 90º accuracy requires an open floor area at least 33' x 18' (10m x 5m). Refer to Figure 9 for the position of the DW089 at each step and for the location of the marks made at each step. Always mark the center of the beams’ thickness.
1.Set up the laser in one corner of the floor and turn on the forward vertical beam.
2.Mark the center of the beam at three locations (A, B and C) on the floor along the laser line. Mark B should be at the midpoint of the laser line.
3.Move the laser to mark B and turn on both vertical beams.
FIG. 2 |
|
|
G |
F |
A |
|
||
|
|
H |
B |
|
I |
|
|
|
D |
|
|
C |
|
(–) |
|
A |
|
|
|
|
E |
|
(+) |
|
|
(+) |
A, I |
|
(–) |
|
|
FIG. 3
 >4°
>4°
AVERAGE
EN MOYENNE
PROMEDIO
FIG. 4 |
|
J |
FIG. 5 |
|
F |
H |
|
|
|
||
|
|
|
 K
K
 L
L
FIG. 6 |
Step 5 / Étape 5 / Paso 5 |
||||||||
|
|
||||||||
|
|
|
|
|
|
|
b |
|
|
|
|
|
a |
|
|
|
Step 4 |
||
|
|
Step 3 |
|
|
|
||||
|
|
|
|
|
|
Étape 4 |
|||
|
|
Étape 3 |
|
|
|
|
|
|
|
|
|
|
|
|
|
|
|
Paso 4 |
|
|
|
|
|
|
|
|
|||
|
|
Paso 3 |
|
|
|
|
|
|
|
|
|
|
|
|
|
|
|
|
|
|
|
|
|
|
|
|
|
|
|
Step 2 |
Step 3 |
Étape 2 |
Étape 3 |
Paso 2 |
Paso 3 |
-90˚ |
90˚ |
|
Step 1 / Étape 1 / Paso 1 |
FIG. 7 |
|
|
|
|
|
30' (9m) |
|
Step 1, 2 |
|
|
|
Étape 1, 2 |
c |
d |
|
Paso 1, 2 |
|||
Step 3 / Étape 3 / Paso 3 |
Step 3 / Étape 3 / Paso 3 |
||
|
|
|
Steps 4, 5 |
|
|
Étapes 4, 5 |
|
c |
Pasos 4, 5 |
Step 8 |
|
|
Étape 8 |
|
|
Paso 8 |
e |
d |
|
||
|
Step 7 / Étape 7 / Paso 7 |
Step 6 / Étape 6 / Paso 6 |
FIG. 8
Step 5 / Étape 5 / Paso 5
Step 2 |
|
|
Étape 2 |
|
|
Paso 2 |
g |
|
g |
||
|
h
Step 4 / Étape 4 / Paso 4
Step 1 Étape 1 Paso 1
Step 3 Étape 3 Paso 3
f |
f |
|
Step 2 Étape 2 Paso 2
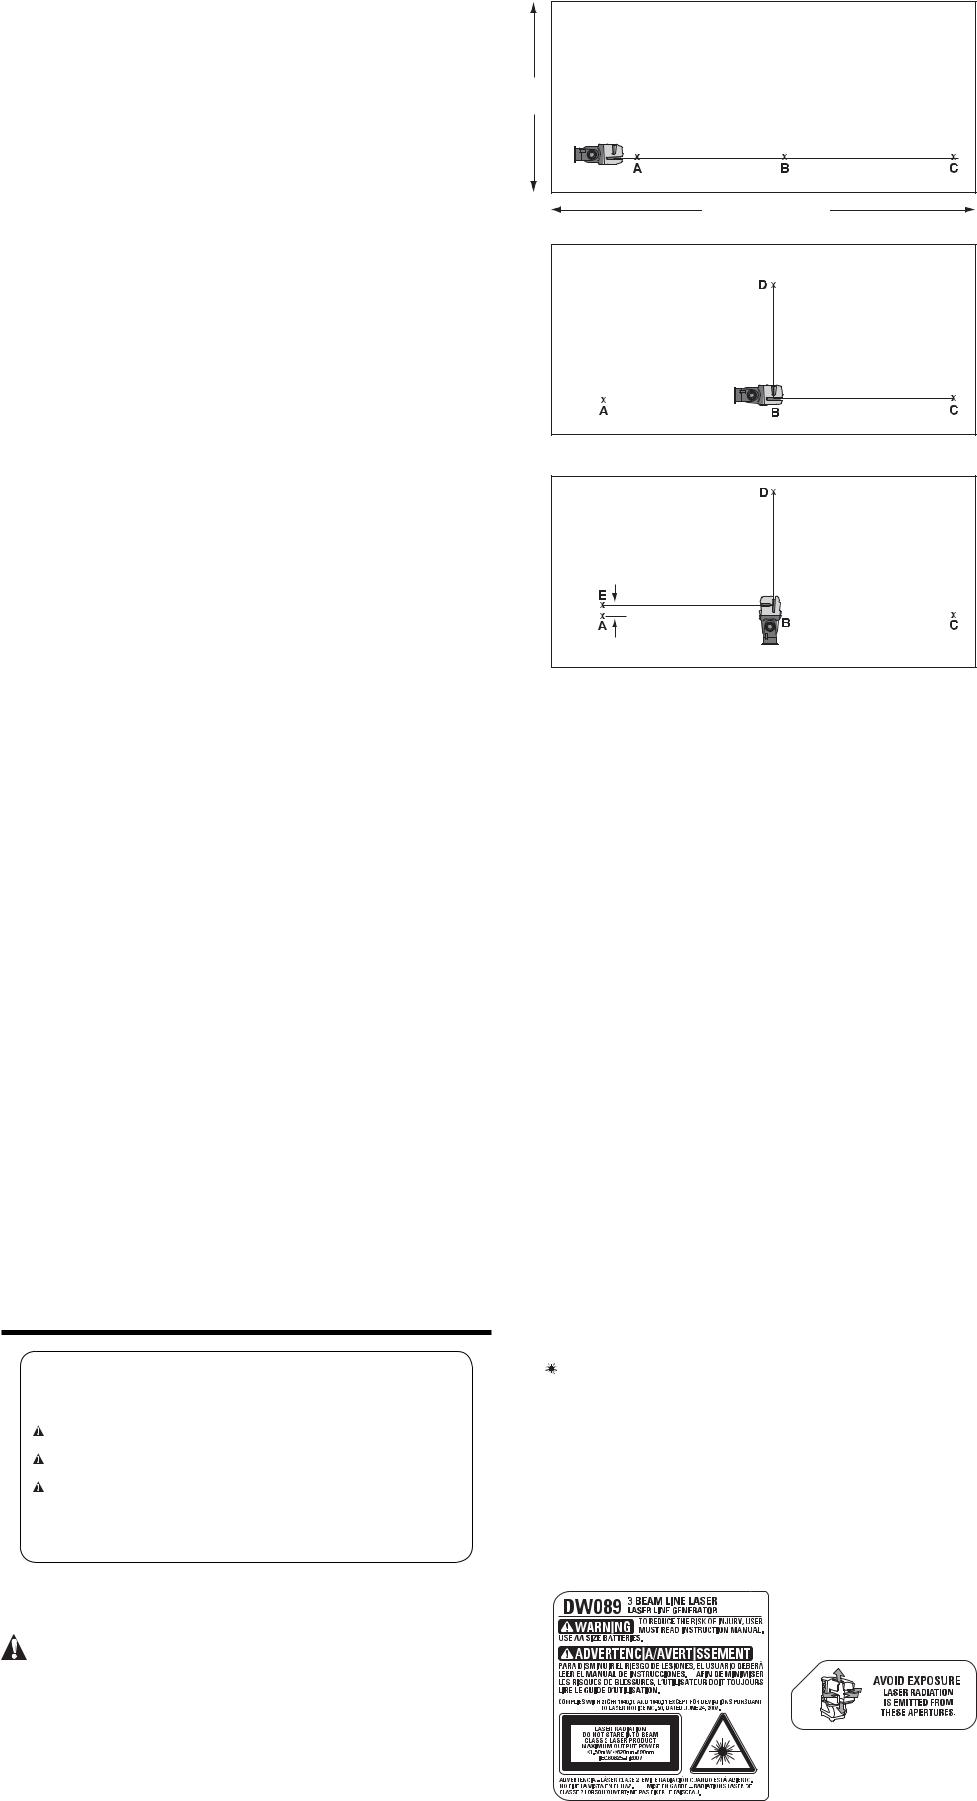
4.Position the beam crossing precisely at mark B, with the forward beam aligned with mark C.
5.Mark a location (D) along the side vertical beam at least 18' (5m) away from the unit.
6.Rotate the laser over mark B so that the forward vertical beam now passes through mark D.
7.Mark the location (E) where the side vertical beam passes by mark A.
8.Measure the distance between marks A and E. If the measurement is greater than the values shown below, the laser must be serviced at an authorized service center.
Distance |
Allowable Distance |
from A to B |
Between Marks |
14' (4.0m) |
5/32" (3.5mm) |
17' (5.0m) |
3/16" (4.5mm) |
20' (6.0m) |
7/32" (5.5mm) |
23' (7.0m) |
1/4" (6.0mm) |
|
|
Troubleshooting
THE LASER DOES NOT TURN ON
•Make sure batteries are installed according to (+) and (–) on the inside of the battery door.
•Make sure the batteries are in proper working condition. If in doubt, try installing new batteries.
•Make sure that the battery contacts are clean and free of rust or corrosion. Be sure to keep the laser level dry and use only new, high-quality, name-brand batteries to reduce the chance of battery leakage.
•If the laser unit is heated above 122°F (50°C), the unit will not turn on. If the laser has been stored in extremely hot temperatures, allow it to cool. The laser level will not be damaged by pressing the on/off button before cooling to its proper operating temperature.
THE LASER BEAMS FLASH
The DW089 is designed to self-level up to an average of 4° in all directions when positioned as shown in Figure 3. If the laser is tilted so much that the internal mechanism cannot level itself, it will flash the laser beams – the tilt range has been exceeded. THE FLASHING BEAMS CREATED BY THE LASER ARE NOT LEVEL OR PLUMB AND SHOULD NOT BE USED FOR DETERMINING OR MARKING LEVEL OR PLUMB. Try repositioning the laser on a more level surface.
THE LASER BEAMS WILL NOT STOP MOVING
The DW089 is a precision instrument. Therefore, if the laser is not positioned on a stable (and motionless) surface, the laser will continue to try to find level. If the beam will not stop moving, try placing the laser on a more stable surface. Also, try to make sure that the surface is relatively flat, so that the laser is stable.
Accessories
 WARNING: Since accessories, other than those offered by DEWALT, have not been tested with this product, use of such accessories with this tool could be hazardous. To reduce the risk of injury, only DEWALT recommended accessories should be used with this product.
USING THE LASER WITH ACCESSORIES (FIG. 2, INSET)
The laser is equipped with a 1/4" x 20 female thread (I) on the bottom of the unit. This thread is to accommodate current or future DEWALT accessories. Only use DEWALT accessories specified for use with this product. Follow the directions included with the accessory.
Recommended accessories for use with your tool are available at extra cost from your local dealer or authorized service center. If you need assistance in locating any accessory, please contact DEWALT Industrial Tool Co., 701 East Joppa Road, Baltimore, MD 21286, call 1-800-4-DEWALT (1-800-433-9258) or visit our website: www.dewalt.com.
Service and Repairs
NOTE: Disassembling the laser level will void all warranties on the product.
To assure product SAFETY and RELIABILITY, repairs, maintenance and adjustment should be performed by authorized service centers. Service or maintenance performed by unqualified personnel may result in a risk of injury. To locate your nearest DEWALT service center call 1-800-4-DEWALT (1-800-433-9258) or go to www.dewalt.com on the Internet.
|
SPECIFICATIONS |
|
|
Light source |
3 semiconductor laser diodes |
|
|
Laser wavelength |
620–690nm visible |
|
|
Laser power |
<1.50mW (each beam) CLASS 2 LASER PRODUCT |
|
|
Beam divergence |
0.24 mrad full angle |
|
|
Working range |
±50' (15m) |
|
|
Accuracy (plumb) |
±1/8" per 30' (±3mm per 9m) |
|
|
Accuracy (level) |
±1/8" per 30' (±3mm per 9m) |
|
|
Indicators |
Flashing indicator: battery low |
|
|
|
Flashing laser beams: tilt range exceeded |
|
|
Power source |
4 AA (1.5V) size batteries (6V DC) |
|
|
Operating temperature |
14°F to 122°F (-10°C to 50°C) |
|
|
Storage temperature |
-5°F to 140°F (-20°C to 60°C) |
|
|
Environmental |
Water resistant |
|
|
Three Year Limited Warranty
DEWALT will repair, without charge, any defects due to faulty materials or workmanship for three years from the date of purchase. This warranty does not cover part failure due to normal wear or tool abuse. For further detail of warranty coverage and warranty repair information, visit www.dewalt.com or call 1-800-4-DEWALT (1-800-433-9258). This warranty does not apply to accessories or damage caused where repairs have been made or attempted by others. This warranty gives you specific legal rights and you may have other rights which vary in certain states or provinces.
In addition to the warranty, DEWALT tools are covered by our:
1 YEAR FREE SERVICE
DEWALT will maintain the tool and replace worn parts caused by normal use, for free, any time during the first year after purchase.
90 DAY MONEY BACK GUARANTEE
If you are not completely satisfied with the performance of your DEWALT Power Tool, Laser, or Nailer for any reason, you can return it within 90 days from the date of purchase with a receipt for a full refund – no questions asked.
LATIN AMERICA: This warranty does not apply to products sold in Latin America. For products sold in Latin America, see country specific warranty information contained either in the packaging, call the local company or see website for warranty information.
FREE WARNING LABEL REPLACEMENT: If your warning labels (Fig. 1) become illegible or are missing, call 1-800-4-DEWALT (1-800-433-9258) for a free replacement.
Définitions : lignes directrices en matière de sécurité
Les définitions ci-dessous décrivent le niveau de danger pour chaque mot-indicateur employé. Lire le mode d’emploi et porter une attention particulière à ces symboles.
 DANGER : indique une situation dangereuse imminente qui, si elle n’est pas évitée, entraînera la mort ou des blessures graves.
 AVERTISSEMENT: indique une situation potentiellement dangereuse qui, si elle n’est pas évitée, pourrait entraîner la mort ou des blessures graves.
 ATTENTION: indique une situation potentiellement dangereuse qui, si elle n’est pas évitée, pourrait entraîner des blessures légères ou modérées.
AVIS : indique une pratique ne posant aucun risque de dommages corporels mais qui par contre, si rien n’est fait pour l’éviter, pourrait poser des risques de dommages matériels.
SI VOUS AVEZ DES QUESTIONS OU VOUS VOULEZ NOUS FAIRE PART DE VOS COMMENTAIRES CONCERNANT CET OUTIL OU TOUT AUTRE OUTIL DEWALT, COMPOSEZ SANS FRAIS LE : 1 800 433-9258 (1-800-4-DEWALT).
Consignes de sécurité importantes pour lasers
AVERTISSEMENT : Lire toutes les directives et consignes de sécurité. Tout manquement aux directives et consignes pose des risques de chocs électriques, d’incendie et/ou de blessures graves.
CONSERVER CES DIRECTIVES
 AVERTISSEMENT : exposition à des radiations laser. Ne pas démonter ou modifier le niveau laser. Il ne comporte à l’intérieur aucune pièce réparable par l’utilisateur. De sérieuses lésions oculaires pourraient en résulter.
 AVERTISSEMENT : radiation dangereuse. Toute utilisation des commandes ou exécution des procédures ou tout réglage non conforme aux spécifications inclues dans les présentes pose des risques d’exposition à des radiations laser dangereuses.
•Ne pas utiliser le laser dans une atmosphère explosive, comme en présence de liquide, de gaz ou de poussière inflammable. Les outils électriques peuvent engendrer des étincelles qui pourraient enflammer toute émanation ou poussière environnante.
FIG. 9
STEPS 1–2
18' |
(5m) |
33' (10m) |
STEPS 3–5
STEPS 6–8
•N’utiliser que des piles spécialement conçues pour les lasers ; l’usage de tout autre type de pile pourrait entraîner des risques d’incendie.
•Lorsqu’on n’utilise pas le laser, le ranger hors de la portée des enfants ou des personnes non qualifiées ; les lasers sont dangereux entre les mains de personnes inexpérimentées.
•N’utiliser que les accessoires recommandés par le fabricant pour le modèle concerné ; un accessoire destiné à un laser particulier peut devenir dangereux lorsqu’il est utilisé avec un autre.
•L’outil doit être entretenu par le personnel qualifié seulement ; tout entretien effectué par une personne non qualifiée pourrait entraîner des risques de blessure. Pour trouver le centre de service DEWALT le plus proche, appeler le 1-800-4-DEWALT (1-800-433-9258) ou se rendre sur le site Internet www.dewalt.com.
•Ne pas utiliser un dispositif optique, tel qu’un télescope ou une lunette de passage, pour examiner le faisceau laser afin d’éviter de blesser grièvement les yeux.
•Ne pas mettre le laser dans une position qui pourrait encourager une personne à regarder directement le faisceau laser, volontairement ou involontairement, car cela pourrait blesser grièvement les yeux.
•Ne pas disposer le laser à proximité d’une surface réfléchissante qui pourrait refléter le faisceau laser dans les yeux d’un individu. Des lésions oculaires graves pourraient en résulter.
•Mettre le laser hors tension après chaque utilisation, car un laser laissé sous tension augmente les risques que quelqu’un regarde directement le faisceau laser.
•Ne modifier le laser en aucune façon. Le fait de modifier l’outil pose des risques d’exposition à des radiations laser dangereuses.
•Ne pas utiliser le laser en présence d’un enfant, ni autoriser les enfants à utiliser le laser afin d’éviter les blessures graves aux yeux.
•Ne pas retirer ou abîmer les étiquettes d’avertissement. Des étiquettes manquantes pourraient faire que des individus soient exposés involontairement à des radiations.
•S’assurer de bien déposer le laser sur une surface de niveau afin de l’empêcher de tomber et de s’endommager ou de blesser l’utilisateur.
 ATTENTION : toute utilisation de commandes ou réglages ou exécution des procédures non conformes aux spécifications incluses dans ce document comporte des risques d’exposition à des radiations laser dangereuses.
 AVERTISSEMENT! NE PAS DÉMONTER LE LASER. Il ne comporte à l’intérieur aucune pièce réparable par l’utilisateur. Le fait de démonter le laser annule toute garantie inhérente à ce produit. Ne modifier ce produit en aucune façon. Le fait de modifier cet outil comporte des risques d’irradiation laser dangereuse.
 AVERTISSEMENT : éviter le contact prolongé avec la poussière provenant du ponçage, du sciage, du meulage et du forage mécanique ainsi que d’autres activités de construction. Porter des vêtements de protection et laver les parties exposées au savon et à l’eau. La poussière qui pourrait pénétrer dans la bouche et les yeux ou se déposer sur la peau peut favoriser l’absorption de produits chimiques nocifs.
• L’étiquette apposée sur l’outil peut afficher les symboles suivants :
V............................. |
volts |
mW......................... |
milliwatts |
................ |
symbole d’avertissement laser |
nm .......................... |
longueur d’onde exprimée en nanomètres |
II ............................. |
Laser de classe 2 |
IIIa........................... |
Laser de classe 3a |
ÉTIQUETTES D’AVERTISSEMENT
Pour des raisons de fonctionnalité et de sécurité, les étiquettes suivantes figurent sur votre laser.
 AVERTISSEMENT : POUR RÉDUIRE TOUT RISQUE DE DOMMAGES CORPORELS, L’UTILISATEUR DOIT LIRE LE MANUEL DE L’UTILISATEUR. UTILISER DES PILES AA.
 AVERTISSEMENT: EXPOSITION À DES RADIATIONS LASER. NE PAS FIXER LE FAISCEAU DES YEUX. APPAREIL LASER DE CLASSE 2.
SE PROTÉGER CONTRE TOUTE EXPOSITION. DES RADIATIONS LASER SONT ÉMISES PAR CES OUVERTURES.
FIG. 1
 Loading...