

Page 1

Get Started
This short guide is not intended
to explain
all the functions
of the appliance.
Please read all the
owner’s instruction booklet
before use.
Video available on
www.youtube.com/delonghiusa
ECAM23260
Page 2
WELCOME
Introducing the exclusive world of espresso through the global leaders,
De’Longhi. Based in Treviso, Italy, we grew up appreciating the taste and
aroma of a good cup of coffee.
The De’Longhi “bean to cup” machine delivers freshly brewed espresso in just
one touch. Enjoy your favorite cappuccino, latte or your favorite beverage in
your home. Design your own espresso experience and share it with the people
you care for most.
Discover the unique story of design, passion and technology which made
De’Longhi the world leader in the creation of espresso machines.
Tips for Perfect Espresso
1. Use freshly roasted espresso beans (avoid flavored beans).
2. Store coffee beans in a cool, dark and dry container.
Vacuum sealed if possible.
3. Pre-heat your espresso and cappuccino cups using the cup warmer
storage on the top of the machine.
4. Set the water temperature according to your needs.
5. For an extra creamy espresso lower the spouts to bring them as close
to the cup/cups as possible.
2
Page 3
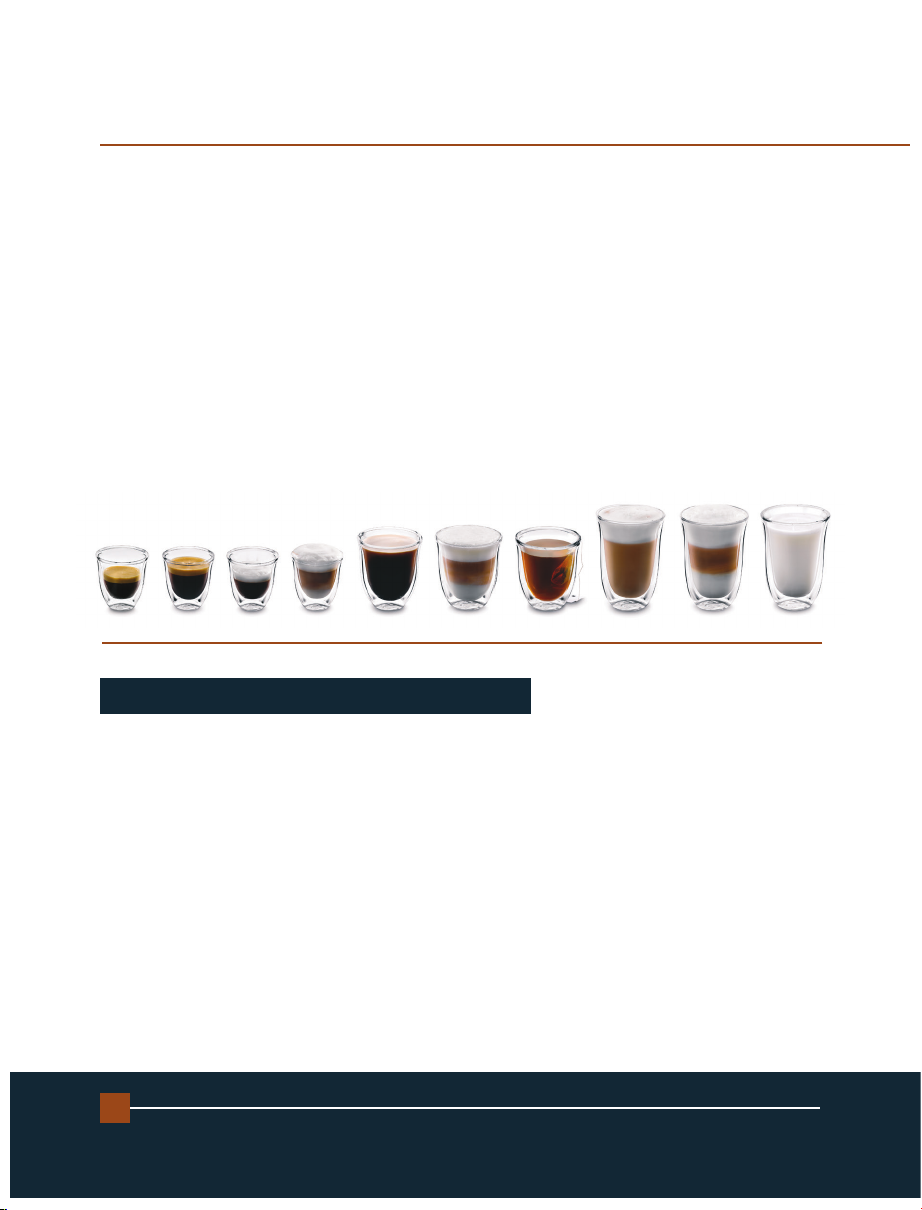
ESPRESSO DRINKS
Espresso
A small 1 or 2 oz. shot of
pressure brewed espresso using
approximately 1 Tbsp. of finely
ground coffee.
Cappuccino
A single espresso shot topped
with equal parts steamed and
frothed milk (in a ratio of 1:1:1)
served in a 4 to 6 ounce cup.
Café Latte
A double espresso shot topped
with steamed milk to fill; a ratio of
2:1 of milk to espresso is typical.
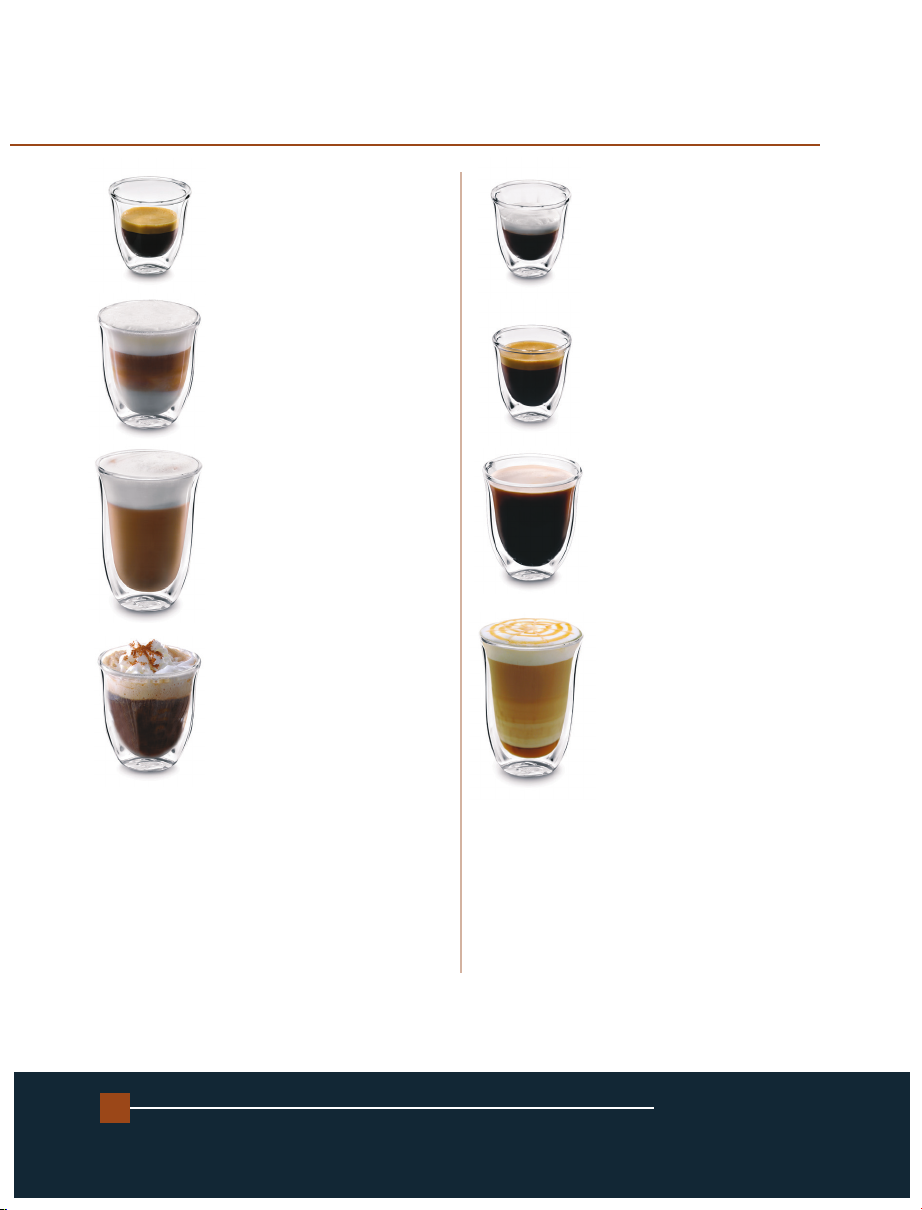
Caffee’ Mocha
This drink is based on layers of
chocolate, milk, espresso and
cream. Pour ingredients in a
glass, prepare hot, frothed milk,
let it cool. Pour the chocolate
sauce into a different glass,
carefully pour the milk. Slowly
add the
espresso. Top off with
whipped cream and
chocolate flakes.
Ingredients: 1 oz. of espresso coffee
4 oz. of hot milk
1 – 2 tablespoons of cold
chocolate sauce
Whipped cream
Chocolate flakes
garnish with
Italian Macchiato
A single or double espresso
topped with a dollop of heated
milk and served in a traditional
espresso cup.
Espresso Lungo
From 3 oz. up to 4 oz. of
brewed espresso using finely
ground coffee.
Americano
1
/3 of espresso lungo and
2
/3 of hot water.
Caramel Macchiato
A tasty variation of latte macchiato
with the addition of caramel syrup
Pour the caramel syrup down the
inside of the glass. Pour
first the cold milk and then the
whisked hot milk into the glass.
Add the milk foam. Prepare the
espresso and pour it into the glass.
Add a dollop of milk foam.
Ingredients: 1 oz. of espresso coffee
1 oz. of cold milk
5 oz. of hot milk
Caramel syrup
... more recipes at: coffeemakers.delonghi.us/coffee- recipes-0
3
ECAM23260
Page 4

IMPORTANT SAFEGUARDS
When using electrical appliances, basic safety precautions should always be followed, including the following:
• Read all instructions.
• Do not touch hot surfaces. Use handles and knobs.
• To protect against fire, electrical shock and personal injury, do not immerse cord, plug or
appliance in water or other liquid.
• Never allow the appliance to be used by children.
• Unplug from the outlet when not in use and before cleaning. Allow to cool before fitting or
taking off parts and before cleaning the appliance.
• Do not operate with a damaged cord or plug. Do not operate after the appliance malfunctions or has been damaged in any manner. Return the appliance to the nearest authorized
service facility for examination, repair or adjustment.
• The use of accessory attachments or spare parts not recommended by the appliance manufacturer may result in fire, electrical shock or personal injury.
• Do not use outdoors.
• Do not let the cord hang over the edge of the table or counter or touch hot surfaces.
• Do not place on or near a hot gas or electrical burner or in a heated oven.
• Plug cord into the wall outlet. To disconnect, turn any control to “off” then remove plug from
wall outlet.
• Do not use the appliance for anything other than the intended use. This appliance is to be
utilized for domestic use only.
Any other use is to be considered improper and therefore dangerous.
WARNING: To reduce the risk of fire or electric shock, do not remove the
cover. No user serviceable parts inside. Repair should be done by authorized service personnel only!
SAVE THESE INSTRUCTIONS
THIS PRODUCT IS FOR HOUSEHOLD USE ONLY
4
Page 5
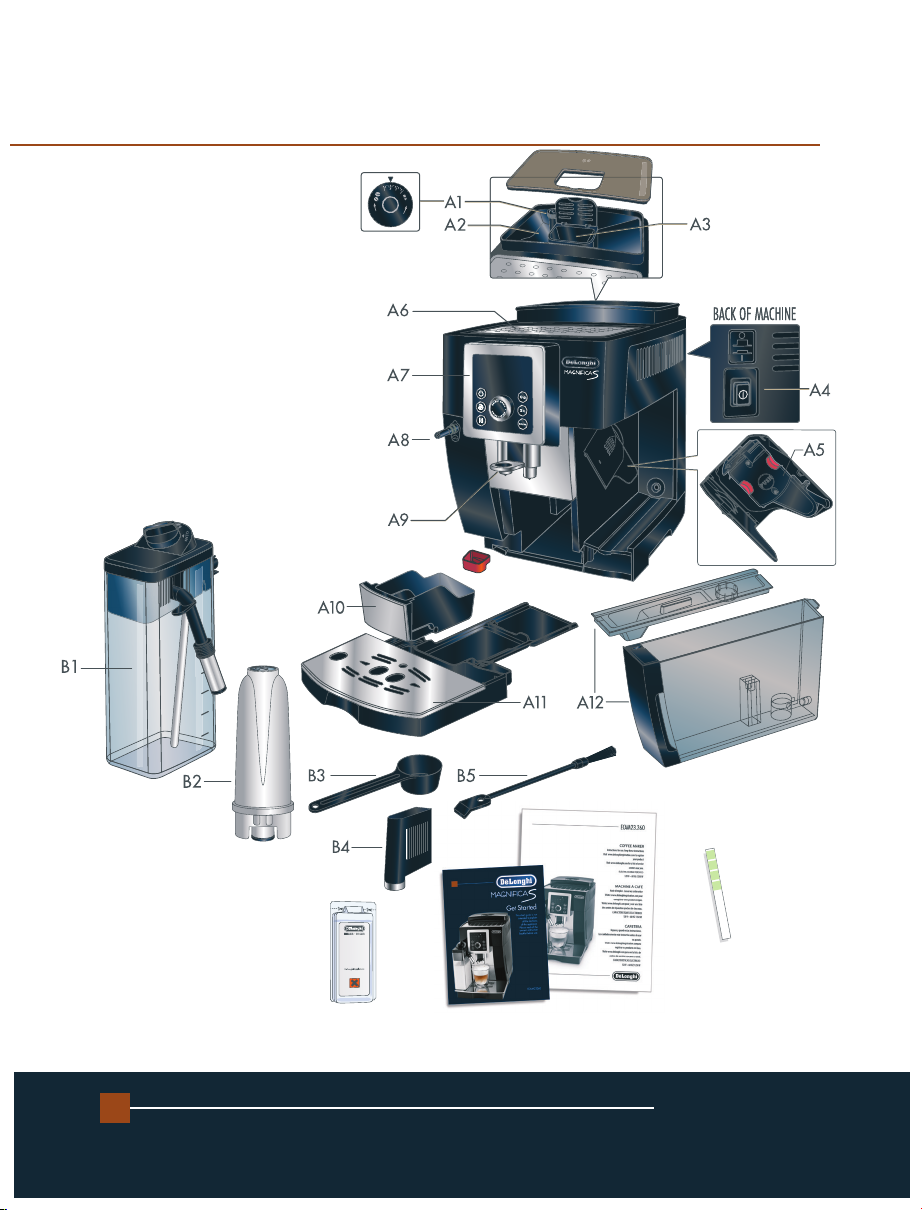
A1. Grinding adjustment dial
A2. Beans container
A3. Pre-ground coffee funnel
A4. Main switch
A5. Infuser
A6. Cup warmer shelf
A7. Control panel
A8. Hot water and steam nozzle
A9. Coffee spout
(adjustable height)
A10. Coffee grounds container
A11. Cup tray
A12. Water tank with lid
IN THE BOX
B1. I.F.D. (Instant Frothing
Dispenser) Carafe
B2.
Water filter
B3. Measuring scoop
B4. Hot water spout
B5. Cleaning brush
5
Natural Descaler
100 ml / 3.4 oz.
“Total
Hardness
Test”
Indicator
Get Started & Owner’s
Instructions Booklets
ECAM23260
Page 6

MACHINE SET UP
1
Plug into outlet
4
Fill coffee beans
6
2
Push ON main
switch, located on
back of machine.
5
7
3
Remove
and fill
water tank,
then
replace.
Insert water
spout and place
a container
underneath.
Press OK Button.
The machine will prime.
A little water will be
released by the hot water
spout. The machine will then
switch it off automatically.
6
Press ON/OFF button
to turn ON machine.
Machine is
now ready
to work!
Page 7

BREWING ESPRESSO Using Coffee Beans
1 2
Press the button repeatedly to set the
desired strength of your coffee, increasing
the quantity of coffee beans that the
machine grinds.
3A 4A 5A
1
CUP
4B 5B3B
2
CUPS
7
Turn the dial to set the desired length of your
coffee, from short to long, following the
display indications.
ECAM23260
Page 8

BREWING ESPRESSO Using Pre-Ground Espresso*
x2
1 2
Please, be sure that the machine is on
Hold coffee taste button for 3 seconds till
the pre-ground icon is displayed.
while pouring the pre-ground coffee.
*Use only one scoop full of coffee.
3
6 7
4 5
Turn the dial to set the desired
length of your coffee, from
short to long, following the
display indications.
8
Page 9

BREWING CAPPUCCINO or LATTE
I
f Water Spout is in, please remove it.
1 2
3
Fill milk container and insert where water spout was.
Adjust length of milk spout.
4
7
Tip for the BEST
CAPPUCCINO
Refer to previous
section Brewing
Espresso for
selecting the
coffee strenght.
:
5 6
8
Use Skim or 2% Milk at Refrigerator Temperature
(about 41°F/5°C)
Set the dial to
Turn dial to
Select your
beverage
between
cappuccino
or latte
macchiato.
9
Clean the milk frother,
turning the dial to
CLEAN position. Follow
the manual instructions.
9
ECAM23260
Page 10

DELIVERING HOT WATER
Delivering hot water
1.
Make sure the hot
water spout is
attached correctly
2.
Place a container
under the spout
(as close as
possible to avoid
splashes).
3.
Turn dial till
icon is displayed.
4.
Press BREW
button. The
machine delivers
8.8 oz./260 ml
of hot water, then
delivery stops
automatically. To interrupt delivery
of hot water manually, press the BREW
button again.
Important! Danger of burns.
Never leave the machine unsupervised while
delivering hot water or steam. The spout becomes
hot during delivery. Hold by the handle only.
10
Page 11

Measuring Water Hardness
1. Remove the “total hardness test” indicator paper attached to the instructional
manual from its pack.
2. Immerse the paper completely in a glass of water for one second.
3. Remove the paper from the water and shake lightly. After about a minute,
1, 2,3, or 4 red squares form, depending on the hardness of the water.
Each square corresponds to one level.
1 2
TEST YOUR WATER
With the machine on, hold
button for 6 seconds.
3
11
Press OK
button to
confirm
selection.
Choosing the water hardness
is very important to set the
correct frequency of the
descaling cycles.
Keeping the machine clean
will improve its performance
and prolong the life of the
machine.
Turn dial to
select level of
water hardness
according to
indicator paper.
ECAM23260
Page 12

WATER FILTER
Installing the filter
1. Remove the filter from packaging
and rinse the filter with about half
a liter of tap water.
2.
Turn the date indicator disk (A)
until the next 2 months of use
are displayed.
3.
To activate the filter, put it
under tap water until water
overflows the side openings
for more than 1 minute (min.
500 ml) (B).
4. Remove the water tank from
the appliance and fill with
water.
5. Insert the filter in the water
tank and immerse it completely
for ten or so seconds, sloping
it to enable the air bubbles to escape (C).
6. Insert the filter in the filter housing (D) and
press as far as it will go.
7. Close the tank with the lid (E), then place
the tank in the machine.
8.
Place a container with a
minimum capacity of 3.4
oz./ 100 ml under the cappuccino maker
9.
Turn dial till icon is
displayed.
10.
Press BREW button. Hot
water will be delivered.
11.
Repeat step 9 till you have a
regular flow of hot water.
(E).
A B C D E
Please note! The filter lasts about two
left unused with
12
the filter installed, it will last a maximum
months if the appliance is used normally.
of three weeks.
If the coffee maker is
Page 13

DESCALING
A
Descale the machine when the
light
flashes on the display.
1. Turn the machine on.
2. Completely empty the water tank (A) and
remove the water filter (if present). Empty
the drip tray (B) and grounds container,
then put back in the appliance.
3. Pour the descaler and water into the tank,
according to the manual instructions.
Illustrations (C) and (D) will then apply.
4. Place an empty container with a minimum
capacity of 50 oz./1.5 liters under the hot
water spout (E).
5. Press the
6. Press BREW button twice.
program starts and the descaler l
comes out of the
button.
The
water spout. The descale
descaling
iquid
program automatically performs a series of
rinses and pauses to remove limescale
deposits from inside the machine.
about 20 minutes,
the , and lights
After
come on.
Important! Danger of Burns
Hot water containing acid flows from
the spout. Avoid contact with splashes
of water.
7. The appliance is now ready for rinsing
through with clean water. Extract the
water tank, empty, rinse under running
water, fill with clean water up to the
MAX level, insert the filter (if removed
previously) and put the water tank back
in the machine.
8. Empty the container used to collect the
descaler solution and replace it empty
under the water spout.
9.
Press the button to start the first rinsing.
Hot water flows out of the water spout.
10. When the water tank is completely
empty, the , and lights come
on.
11. Extract the water tank, empty, rinse under
running water, fill with clean water up to
the MAX level, and put the water tank
back in the machine.
12.
Press the
ing.
button to start the second rins-
Hot water flows out of both spouts.
13. Fill the water tank and the appliance is
ready for use.
A
Important!
• Descaler contains acids which may irritate the skin and eyes. It is vital to respect the manufacturer’s safety warnings
given on the descaler pack and
and eyes. You should use De’Longhi descaler only. Using unsuitable descaler and/or performing descaling incorrectly
may result in faults not covered by the manufacturer’s guarantee.
B
the warnings relating to the procedure to follow in the
13
C
D
event of contact with the skin
E
B
ECAM23260
Page 14

ACCESSORIES
Enjoy our full line of drinkware:
an exclusive line of Espresso, Cappuccino and Latte glasses.
Care Kit Line
Experience the De’Longhi Care Kit Line to improve the performance
of your fully automatic machine.
EcoDecalk
Coffee Care Kit
... to learn more about the De’Longhi accessories visit: delonghi.com
14
EcoDecalk mini
Water Filter
Milk Clean
Page 15

15
ECAM23260
Page 16

www.delonghi.com
like us: DeLonghi North America – follow us @DeLonghiNA
5713225861/01.15
 Loading...