


DCSD5711N-PS(GB) 2005.12.8 5:7 PM ˘ ` 1 mac001 1200DPI 100LPI
Owner’s Manual
ENGLISH
DVD-VIDEO PLAYER
DV4TS05
P/N : 97P95600N0-G8
DCSD5711N-PS(GB) 2005.12.8 5:7 PM ˘ ` 1 mac001 1200DPI 100LPI
IMPORTANT SAFEGUARDS
CAUTION
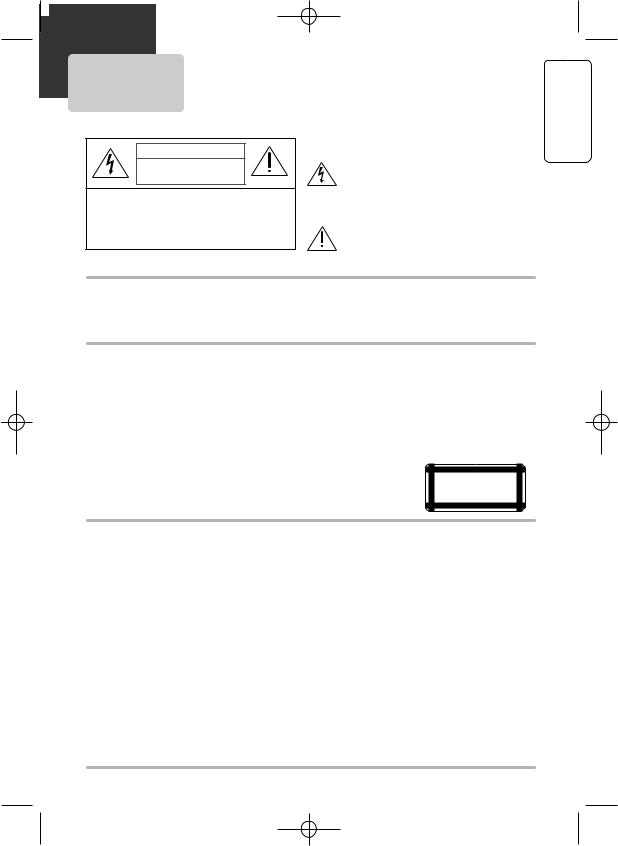
RISK OF ELECTRIC SHOCK
DO NOT OPEN
CAUTION: TO REDUCE THE RISK OF ELECTRIC SHOCK, DO NOT REMOVE COVER (OR BACK). NO USER-SERVICEABLE PARTS INSIDE. REFER SERVICING TO QUALIFIED SERVICE PERSONNEL.
The lightning flash with arrowhead symbol, within an equilateral triangle, is intended to alert the user to the presence of uninsulated “dangerous voltage” within the product’s enclosure that may be of sufficient magnitude to constitute a risk of electric shock.
The exclamation point within an equilateral triangle is intended to alert the user to the presence of important operating and servicing instructions in the literature accompanying the appliance.
WARNING TO REDUCE THE RISK OF FIRE OR ELECTRIC SHOCK, DO NOT EXPOSE THIS APPLIANCE TO RAIN OR MOISTURE.
CAUTION TO PREVENT ELECTRIC SHOCK, MATCH WIDE BLADE OF PLUG TO WIDE SLOT, FULLY INSERT.
IMPORTANT FOR LASER PRODUCTS
LASER This Digital Video Disc Player employs a Laser System. To ensure proper use of this product please read this owner’s manual carefully and retain for future reference. Should the unit require maintenance, contact an authorized service location - see service procedure.
Use of control adjustments or the performance of procedures other than those specified may result in hazardous radiation exposure.
To prevent direct exposure to the laser beam, do not try to open the enclosure. Visible laser radiation when open and interlocks defeated.
DO NOT STARE INTO THE BEAM.
DANGER Visible laser radiation when open and interlock failed or defeated. Avoid direct exposure to beam.
CAUTION Do not open the top cover. There are no user serviceable parts inside the Unit; leave all servicing to qualified service personnel.
FCC NOTICE: This equipment has been tested and found to comply with the limits for a Class B digital device, pursuant to part 15 of the FCC Rule. These limits are designed to provide reasonable protection against harmful interference in a residential installation. This equipment generates, uses and can radiate radio frequency energy and if not installed and used in accordance with the instructions, may cause harmful interference to radio communications. However, there is no guarantee that interference will not occur in a particular installation. If this equipment does cause harmful interference to radio or television reception; which can be determined by turning the equipment off and on, the user is encouraged to try to correct the interference by one or more of the following measures:
•Reorient or relocate the receiving antenna.
•Increase the separation between the equipment and receiver.
•Connect the equipment to an outlet on a circuit different from that to which the receiver is connected.
•Consult the dealer or an experience radio/TV technical for help.
This device complies with part 15 of the FCC Rules. Operation is subject to the following two conditions: (1) This device may not cause harmful interference, and (2) This device must accept any interference received, including interference that may cause undesired operation.
1
INFORMATION PRODUCT
DCSD5711N-PS(GB) 2005.12.8 5:7 PM ˘ ` 2 mac001 1200DPI 100LPI
IMPORTANT SAFEGUARDS
CAUTION Any changes or modification in construction of this device which are not expressly approved by the party responsible for compliance could void the user’s authority to operate the equipment.
This product incorporates copyright protection technology that is protected by U.S. patents and other intellectual property rights. Use of this copyright protection technology must be authorized by Macrovision, and is intended for home and other limited viewing uses only unless otherwise authorized by Macrovision. Reverse engineering or disassembly is prohibited.
For DVD Players with 525p, but not 625p, progressive scan output:
CONSUMERS SHOULD NOTE THAT NOT ALL HIGH DEFINITION TELEVISION SETS ARE FULLY COMPATIBLE WITH THIS PRODUCT AND MAY CAUSE ARTIFACTS TO BE DISPLAYED IN THE PICTURE. IN CASE OF 525 PROGRESSIVE SCAN PICTURE PROBLEMS, IT IS RECOMMENDED THAT THE USER SWITCH THE CONNECTION TO THE ‘STANDARD DEFINITION’ OUTPUT. IF THERE ARE QUESTIONS REGARDING OUR TV SET COMPATIBILITY WITH THIS MODEL 525p DVD PLAYER, PLEASE CONTACT OUR CUSTOMER SERVICE CENTER.
2

DCSD5711N-PS(GB) 2005.12.8 5:7 PM ˘ ` 3 mac001 1200DPI 100LPI
This set has been designed and manufactured to assure personal safety. Improper use can result in electric shock or fire hazard. The safeguards incorporated in this unit will protect you if you observe the following procedures for installation, use and servicing. This unit is fully transistorized and does not contain any parts that can be repaired by the user.
1Read Instructions
All the safety and operating instructions should be read before the unit is operated.
2Retain Instructions
The safety and operating instructions should be retained for future reference.
3Heed Warnings
All warnings on the unit and in the operating instructions should be adhered to.
4Follow Instructions
All operating and use instructions should be followed.
5Cleaning
Unplug this unit from the wall outlet before cleaning. Do not use liquid cleaners or aerosol cleaners. Use a damp cloth for cleaning.
6Attachments
Do not use attachments unless recommended by the unit’s manufacturer as they may cause hazards.
7Water and Moisture
Do not use this unit near waterfor example, near a bath tub, wash bowl, kitchen sink or laundry tub, in a wet basement, or near a swimming pool and the like. Caution : Maintain electrical safety. Powerline operated equipment or accessories connected to this unit should bear the UL listing mark or CSA certification mark on the accessory itself and should not be modified so as to defeat the safety features. This will help avoid any potential hazard from electrical shock or fire. If in doubt, contact qualified service personnel.
8Accessories
Do not place this unit on an unstable cart, stand, tripod, bracket, or table. The unit may fall, causing serious injury to a child or adult as well as serious damage to the unit. Use this unit only with a cart, stand, tripod, bracket, or table recommended by the manufacturer.
8A A unit and cart combination should be moved with care. Quick stops,
excessive force, and uneven surfaces may cause the unit and cart
combination to overturn.
9 Ventilation
Slots and openings in the
IMPORTANT SAFEGUARDS
case are provided for ventilation to ensure reliable operation of the unit and to protect it from overheating. These openings must not be blocked or covered. These openings must not be blocked by placing the unit on a bed, sofa, rug, or other similar surface. This unit should never be placed near or over a radiator or heat radiator. This unit should not be placed in a built-in installation such as a bookcase or rack unless proper ventilation is provided or the manufacturer’s instructions have been adhered to.
10 Power Sources
This unit should be operated only from the type of power source indicated on the marking label. If you are not sure of the type of power supply to your home, consult your dealer or local power company. For units intended to operate from battery power, or other sources, refer to the operating instructions.
11 Grounding or Polarization
This unit is equipped with a polarized alternating -current line plug (a plug having one blade wider than the other). This plug will fit into the power outlet only one way. This is a safety feature. If you are unable to insert the plug fully into the outlet, try reversing the plug. If the plug still fails to fit, contact your electrician to replace your obsolete outlet. To prevent electric shock, do not use this polarized plug with an extension cord, receptacle, or other outlet unless the blades can be fully inserted without blade exposure. If you need an extension cord, use a polarized cord.
12 Power-Cord Protection
Power-supply cords should be routed so that they are not likely to be walked on or pinched by items placed upon or against them, paying particular attention to cords at plugs, convenience receptacles, and the point where they exit from the unit.
Note to CATV system installer
This reminder is provided to call the CATV system installer’s attention to Section 820-40 of the NEC which provides guidelines for proper grounding and, in particular, specifies that the cable ground shall be connected to the grounding system of the building, as close to the point of cable entry as practical.
13 Outdoor Antenna Grounding
If an outside antenna or cable system is connected to the product, be sure the antenna or cable system is grounded so as to provide some protection against voltage surges and built-up static charges. Section 810 of the National Electrical Code, ANSI/NFPA No. 701984 (Section 54 of Canadian Electrical Code, Part 1) provides information with respect to proper grounding of the mast and supporting structure, grounding of the lead-in wire to an
3
INFORMATION PRODUCT

DCSD5711N-PS(GB) 2005.12.8 5:7 PM ˘ ` 4 mac001 1200DPI 100LPI
antenna-discharge unit, connection to grounding electrodes, and requirements for the grounding electrode. See example as shown.
EXAMPLE OF ANTENNA
GROUNDING ANTENNA LEAD
IN WIRE
GROUND CLAMP |
|
|
|
ANTENNA DISCHARGE UNIT |
|
|
(NEC SECTION 810-20) |
|
ELECTRIC |
GROUNDING CONDUCTORS |
|
(NEC SECTION 810-21) |
||
SERVICE |
||
EQUIPMENT |
|

 GROUND CLAMPS
|
POWER SERVICE GROUNDING |
|
ELECTRODE SYSTEM |
NEC - NATIONAL ELECTRICAL CODE |
(NEC ART 250 PART H) |
14 Power Lines
An outside antenna system should not be located in the vicinity of overhead power lines, other electric light or power circuits, or where it can fall into such power lines or circuits. When installing an outside antenna system, extreme care should be taken to keep from touching or approaching such power lines or circuits as contact with them might be fatal. Installing an outdoor antenna can be hazardous and should be left to a professional antenna installer.
15Lightning
For added protection for this unit during a lightning storm, or when it is left unattended and unused for long periods of time, unplug it from the wall outlet and disconnect the antenna or cable system. This will prevent damage to the unit due to lightning and power line surges.
16Disc Tray
Keep your fingers well clear of the disc as it is closing. It may cause serious personal injury.
17Overloading
Do not overload wall outlets or extension cords as this can result in a risk of fire or electric shock.
18Object and Liquid Entry
Never push objects of any kind into this unit through openings as they may touch dangerous voltage points or “short-out” parts that could result in a fire or electric shock. Never spill liquid of any kind on the unit.
19Burden
Do not place a heavy object on or step on the product. The object may fall, causing serious personal injury and serious damage to the product.
20Disc
Do not use a cracked, deformed or repaired disc. These discs are easily broken and may cause serious personal injury and product malfunction.
21Servicing
Do not attempt to service this unit yourself as
4
IMPORTANT SAFEGUARDS
opening or removing covers may expose you to dangerous voltage or other hazards. Refer all servicing to qualified service personnel.
22 Damage Requiring Service
Unplug this unit from the wall outlet and refer servicing to qualified service personnel under the following conditions.
A When the power-supply cord or plug is damaged.
B If liquid has been spilled, or objects have fallen into the unit.
C If the unit has been exposed to rain or water.
D If the unit does not operate normally by following the operating instructions. Adjust only those controls that are covered by the operating instructions. Improper adjustment of other controls may result in damage and will often require extensive work by a qualified technician to restore the unit to its normal operation.
E If the unit has been dropped or the cabinet has been damaged.
F When the unit exhibits a distinct change in performance-this indicates a need for service.
23 Replacement Parts
When replacement parts are required, have the service technician verify that the replacements he uses have the same safety characteristics as the original parts. Use of replacements specified by the unit manufacturer can prevent fire, electric shock, or other hazards.
24 Safety Check
Upon completion of any service or repairs to this unit, ask the service technician to perform safety checks recommended by the manufacturer to determine that the unit is in safe operating condition.
25 Wall or Ceiling Mounting
The product should be mounted to a wall or ceiling only as recommended by the manufacturer.
26Heat
The product should be situated away from heat sources such as radiators, heat registers, stoves, or other products (including amplifiers) that produce heat.

DCSD5711N-PS(GB) 2005.12.8 5:7 PM ˘ ` 5 mac001 1200DPI 100LPI
CONTENTS
1. PRODUCT INFORMATION
Important Safeguards ...................... |
1 |
Contents ....................................... |
5 |
Features... .................................... |
6 |
Read Carefully Before Using ............. |
7 |
Identification of Controls .................. |
8 |
Remote Control ............................ |
11 |
5. DVD OPERATION |
|
Playing a Desired Scene ................. |
35 |
Disc mode, Disc menu & Scan mode 39 |
|
Zoom, Multi Angle and Auto Play |
.... 40 |
About MP3, JPEG discs . ............... |
41 |
2. INSTALLATION |
|
Connecting to a TV ........................ |
13 |
Connecting a Cable Box ................. |
14 |
Connecting Other Video Equipment .. |
15 |
Connecting to a Stereo Receiver ..... |
16 |
Connecting to a Dolby Digital decoder or |
|
DTS decoder................................ |
17 |
6. DVD FEATURE SETUP |
|
DVD LANGUAGE Setup................... |
43 |
VIDEO Setup ................................. |
45 |
AUDIO Setup................................ |
46 |
Others Setup ............................... |
47 |
INFORMATION PRODUCT
3. BASIC OPERATION |
|
7. HELP |
|
|
|
|
|
|
|
Output Select ............................... |
18 |
About DVD ................................... |
49 |
|
DVD Playback .............................. |
19 |
About VCR and Videotape .............. |
51 |
|
VCR Playback .............................. |
21 |
Troubleshooting (DVD) ................... |
52 |
|
Clock Set .................................... |
22 |
Troubleshooting (VCR) .................... |
53 |
|
|
|
Specifications ............................... |
55 |
|
4. VCR OPERATION |
|
Memorizing TV Channels .............. |
23 |
Recording .................................... |
25 |
Timer Recording ......................... |
27 |
Watching and Recording Cable TV .. |
30 |
Using Advanced VCR Features ........ |
31 |
5

DCSD5711N-PS(GB) 2005.12.8 5:7 PM ˘ ` 6 mac001 1200DPI 100LPI
FEATURES...
•DVD, VCD, MP3 on CD-R/RW, and VHS playback
•Watch DVD and Record TV at the same time
•Multi-function remote control (VCR, DVD)
•Video Index Search System (VISS)
•Multi-channel Television Sound (MTS) playback/record
•High Quality 6-Head Hi-Fi Sound
•One Touch Recording (OTR)
•Progressive Scan
•MP3 playback
•Graphical On Screen Display (OSD)
•Screensaver function (DVD)
•High bit / high sampling with 27MHz / 10bit video encoder
•High bit / high sampling with 96KHz / 24bit audio D/A converter
•Coaxial digital audio output (PCM, Dolby Digital, dts)
•Built-in Dolby Digital decoder (DVD)
•Analog audio 2-channel output for DOWNMIX (x1)
•Composite video out (x1)
•Slow Forward playback
•Fast Forward / Reverse playback
•DVD Title, Chapter and Time Search, and CD/VCD Track and Time Search
•Adjustable TV Aspect Ratio
•Repeat playback
•A-B Repeat (DVD)
•English, French and Spanish OSD
•Parental Lock (DVD)
•Multi Angle function (DVD)
This function allows you to choose the viewing angle of scenes which were shot from a number of different angles. (The number of angles available depends on the disc.)
•Zoom function (DVD/VCD)
6
DCSD5711N-PS(GB) 2005.12.8 5:7 PM ˘ ` 7 mac001 1200DPI 100LPI
READ CAREFULLY BEFORE USING
Please read carefully before using this DVD player.
Placement and handling
•The picture and sound of a nearby TV, VCR, or radio may be distorted during playback. In this case, position the unit away from the TV, VCR, or radio, or turn off the unit after removing the disc.
•Do not use volatile liquids, such as insecticide spray, near the unit. Do not leave rubber or plastic products in contact with the unit for a long period of time. They will leave marks on the surface.
When Not in Use
•When the unit is not in use, be sure to remove the disc or tape and turn off the power.
•If you do not use the unit for a long period of time, remove the remote control batteries to prevent leakage.
Moving
•The original shipping carton and packing materials come in handy. For maximum protection, re-pack the unit as it was originally packaged at the factory.
•Remember to eject any videotape or disc.
Cleaning
Copyright
•It is forbidden by law to copy, broadcast, show, broadcast via cable, play in public, or rent copyrighted material without permission.
Tape and Disc Handling
•To prevent damage to the unit, do not use moldy, stained, scratched or otherwise damaged tapes or discs.
•Condensation may be present on your videotape. Allow the tape to dry completely before using it.
•After playing, store discs and tapes in their cases to prevent damage.
•Do not expose discs or tapes to high temperatures, humidity, mold, direct sunlight, dirt, dust or strong magnetic materials.
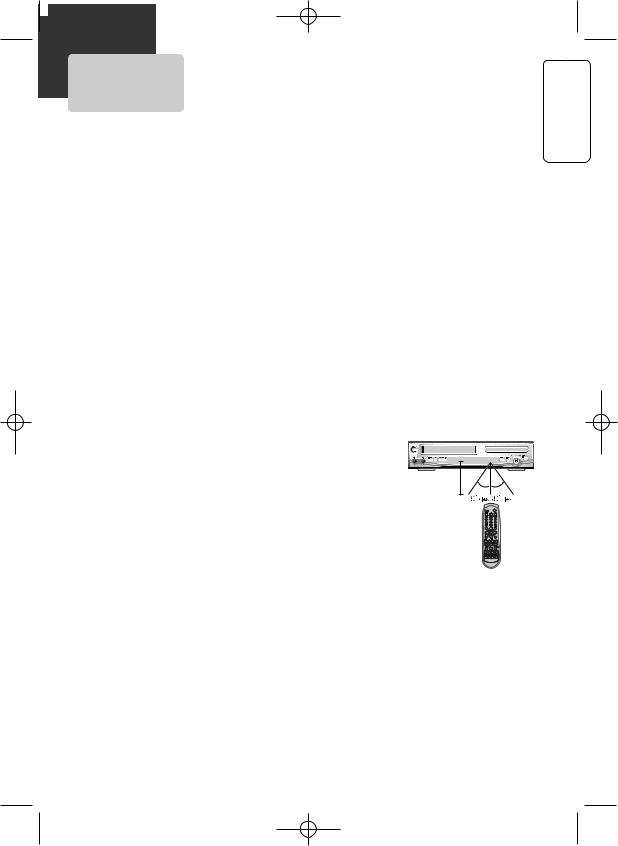
Using the Remote Control
•Operate remote control within 23 ft. (7m) of the unit.
•Do not press two buttons at the same time.
•Do not store in a dusty or humid location.
23' (7m)
•Use a soft, dry cloth. If the surfaces are extremely dirty, use a soft cloth lightly moistened with a mild detergent solution. Do not use strong solvents such as alcohol, benzine, or thinner, as these might damage the surface of the unit.
Maintenance
•This is a high precision video device. For optimal performance, we recommend regular inspection and maintenance every 1,000 hours by qualified service personnel. Contact your dealer or nearest service center.
Antenna Orientation
•Antennas are subject to changes in direction or damage due to wind and rain. For best results, contact your nearest service center about proper orientation and/or replacement.
INFORMATION PRODUCT
7
DCSD5711N-PS(GB) 2005.12.8 5:7 PM ˘ ` 8 mac001 1200DPI 100LPI
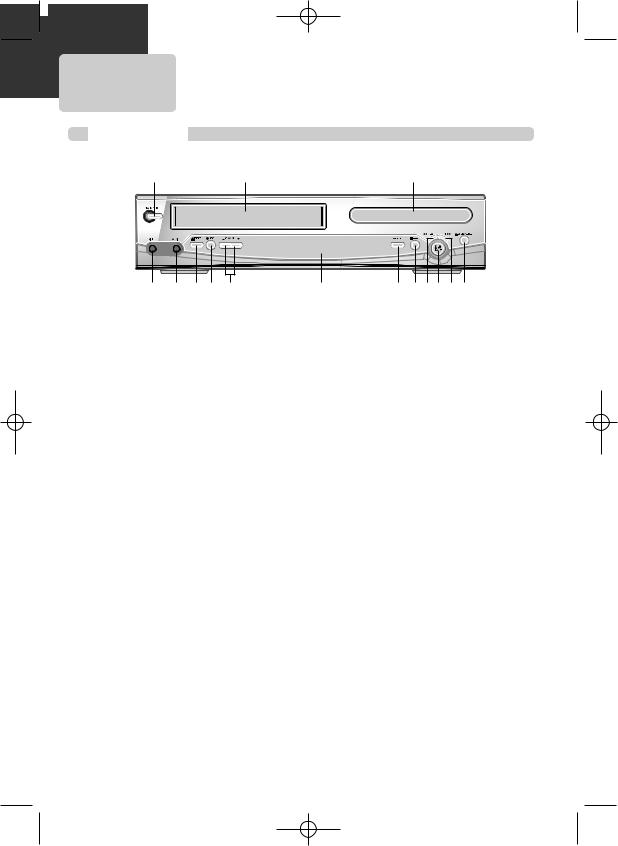
IDENTIFICATION OF CONTROLS
Front Panel
! |
@ |
# |
$ % ^ & * |
( |
) 12345 |
! Power button |
) SELECT button |
|
Use to power the device on/off if AC power supply is connected.
@ Use to insert videotape
# Disc tray
$ Video input jack % Audio input jack ^ VCR Eject button & Record button
* Channel DOWN/UP buttons
(Operation Display Window
Displays the status of device. For more information, see “Operation Display Window” on the next page.
Use to change DVD mode to VCR mode, and vice versa.
1 Stop button
Use to stop playing.
2 Rewind button
Use to rewind videotape or skip to the previous chapter of a disc.
3 PLAY/PAUSE button
Use to start and pause playback of videotape or disc.
4 Fast Forward button
Use to fast forward videotape or skip to the next chapter of a disc.
5 DVD Open/Close button
DCSD5711N-PS(GB) 2005.12.8 5:7 PM ˘ ` 9 mac001 1200DPI 100LPI
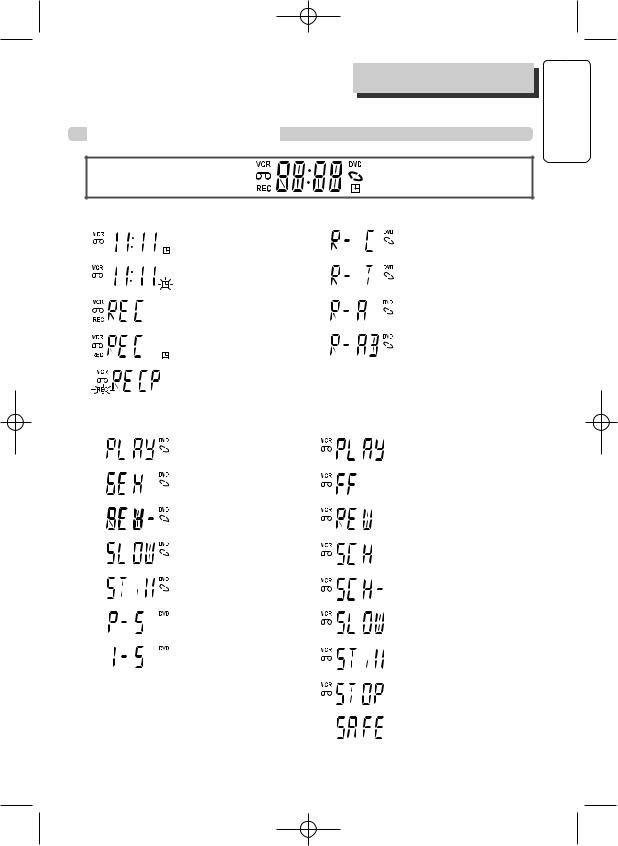
Operation Display Window
IDENTIFICATION OF CONTROLS
INFORMATION PRODUCT
- RECORDING MODE - |
- REPEAT MODE - |
||
|
Timer Recording on |
|
Repeat one chapter |
|
|
||
|
Standby |
|
|
|
|
|
|
|
Timer Recording Error |
|
Repeat all chapters |
|
|
||
|
Recording in Progress |
|
Repeat a defined period |
|
|
||
|
|
||
|
|
from A |
|
|
|
|
|
|
Timer Recording in |
|
Repeat a defined period |
|
|
||
|
Progress |
|
from A to B |
|
Recording Pause |
|
|
|
|
|
|
|
|
|
|
- DVD OPERATION - |
- VCR OPERATION - |
|||||
|
|
|
|
DVD playback |
|
VCR playback |
|
|
|
|
|
||
|
|
|
|
Fast playback |
|
Fast forward |
|
|
|
|
|
||
|
|
|
|
|
||
|
|
|
|
Fast reverse playback |
|
Rewinding |
|
|
|
|
|
||
|
|
|
|
|
||
|
|
|
|
Slow playback |
|
Fast playback (CUE) |
|
|
|
|
|
||
|
|
|
|
|
||
|
|
|
|
Still picture |
|
Fast reverse playback |
|
|
|
|
|
||
|
|
|
|
|
||
|
|
|
|
|
(REVIEW) |
|
|
|
|
|
|
|
|
|
|
|
|
Progressive Scan mode |
|
Slow playback |
|
|
|
|
|
||
|
|
|
|
Interlaced Scan mode |
|
Still picture |
|
|
|
|
|
||
|
|
|
|
|
||
|
|
|
|
|
|
Stop |
|
|
|
|
|
|
|
|
|
|
|
|
|
|
|
|
|
|
|
|
Child Lock |
|
|
|
|
|
|
|
|
|
|
|
|
|
|
|
|
|
|
|
|
|
DCSD5711N-PS(GB) 2005.12.8 5:7 PM ˘ ` 10 mac001 1200DPI 100LPI
Rear Panel
! |
IDENTIFICATION OF CONTROLS
# $ % ^& *
!Power Cord
Connect to wall outlet.
@Digital Output (COAXIAL) Jack
Connect to digital receiver/ amplifier or digital audio decoder.
# AUDIO Out Jack
$ COMPONENT Video Out Jack
@(
^A/V Output Jack
& A/V Input Jack
* Connection to Antenna/Cable ( Connection to TV
For best picture quality, connect the unit to TV or monitor with COMPONENT(480i) input.
% S-Video Output Jack
Accessories
Remote Control |
2 Batteries |
RF Cable |
Audio/Video Cable |
Owner’s Manual/ |
|
Warranty |
|||||
|
|
|
|
• To purchase accessories or additional parts, contact your nearest dealer or service center.
10

DCSD5711N-PS(GB) 2005.12.8 5:7 PM ˘ ` 11 mac001 1200DPI 100LPI
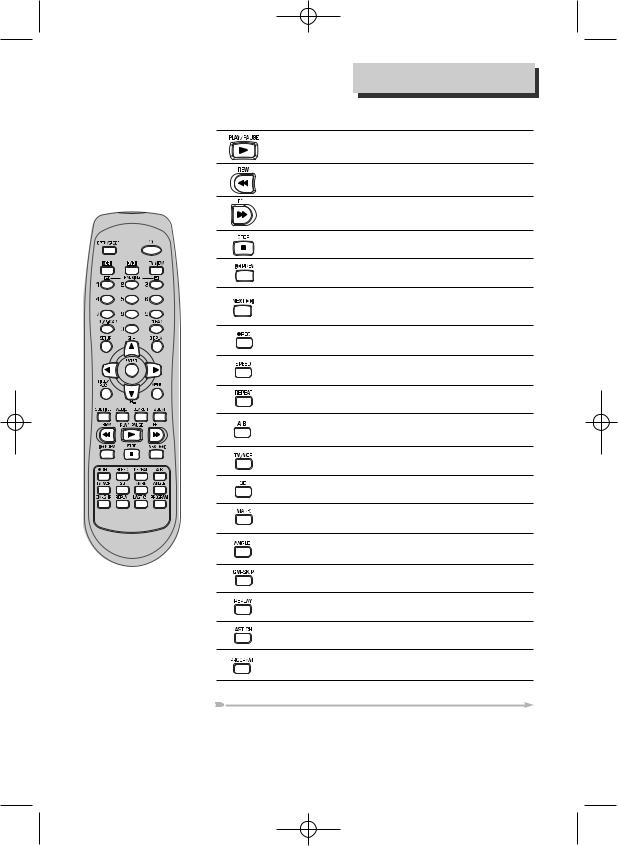
REMOTE CONTROL
Switches the DVD+VCR on or off.
[DVD] Opens/closes the disc tray, [VCR] Ejects a tape
Changes to VCR mode.
Changes to DVD mode.
[VCR] Selects the devices connected to the Audio/Video sockets (RF, AV1, AV2).
[VCR] Manually reduces of streaks or picture "jitter".
Number entry
[DVD] Activates Progressive Scan button, [VCR] Number 100 button
Navigate through the menus., [VCR] Channel Up/Down button
Confirms a menu selection.
[DVD] Removes any menu or display from the screen.
[VCR] Resets the time counter to 0:00:00. Also clears onscreen menu item entries when setting the time and date or timer recordings.
[DVD, VCR] Shows the status displays.
[DVD, VCR] Displays or exits the SETUP menu.
[DVD] Displays the title menu when playing a DVD. Activates PBC mode when playing a VCD.
[DVD] Accesses the disc menu during play (if there is one).
[DVD] Selects a desired language for the subtitle.
[VCR] Selects a desired audio
[DVD] Activates Chapter/Title/Time SEARCH
[DVD] Activates the Zoom function
11
INFORMATION PRODUCT
DCSD5711N-PS(GB) 2005.12.8 5:7 PM ˘ ` 12 mac001 1200DPI 100LPI
REMOTE CONTROL
Starts playing a disc or a tape.
Pauses playback or recording modes.
Starts fast reverse, reverses accelerated play or reverses slow motion
Starts fast forward, forward accelerated play or forward slow motion
Stops play, accelerated search, slow motion or recording.
[DVD] Skips back to previous chapter or track in playback mode
[DVD] Skips forward to next chapter or track in playback mode, advances one frame in pause mode
[VCR] Advances one frame in pause mode
[VCR] Starts record mode on tapes with the safety tab intact. Press this repeatedly to set a recording duration for OTR.
[VCR] Overrides the default recording speed (either SP or SLP).
[DVD] Repeats a Title, Chapter, Disc, One, Directory or Random playback.
[DVD] Allows selection of a section and will play it repeatedly.
[DVD, VCR] Switches between TV and VCR
Unavailable
[DVD] Stores bookmarks in memory to be viewed (listened to) again
[DVD] Accesses multiple camera angles if any were added to the disc when it was created.
[VCR] Commercial Skip skips forward 30 seconds
[VCR] Replays previous 15 seconds
[VCR] Go to Last Channel button
[VCR] TIMER RECORDING button, [DVD] PROGRAM Playback button
Child Lock!!!
Press [√] button on the remote control for about 8 seconds. All front panel and remote control buttons are now locked, and the Lock indicator (“ 
 ”) will be displayed on window display. To release child lock, press [√] button again for about 8 seconds.
12
DCSD5711N-PS(GB) 2005.12.8 5:7 PM ˘ ` 13 mac001 1200DPI 100LPI
CONNECTING TO A TV
The default RF Output channel is CH3. If Channel 3 is used by a TV station, you must change it to Channel 4. See "To Set Output Channel" on page 25.
Various methods of connecting your TV
|
|
Rear Panel of DVD+VCR |
|
ANT INPUT |
Method 1 |
|
|
|
|
A/V INPUT |
|
|
AUDIO |
Method 2 |
|
|
|
|
VIDEO |
|
Rear Panel of TV |
COMPONENT INPUT |
Outside Antenna or |
|
Wall Antenna Outlet |
|
|
|
|
|
|
Method 3 |
|
S-VIDEO INPUT |
Method 4 |
|
S-VIDEO |
|
|
|
Method 1
Unplug the RF cable from the “ANT. IN” Jack on the rear panel of the TV. Plug this cable into the “ANT. IN” jack on the rear panel of the DVD+VCR. Connect the “RF OUT” jack on the DVD+VCR to the “ANT. IN” jack on the TV with another RF cable.
If your cable system provides all your channels, connect an RF Cable from the OUT jack of the Cable Box to the "IN From Antenna" jack on the DVD+VCR unit.
Method 2 : Connecting to a TV equipped with audio/video in jacks
Use the supplied audio/video cable to connect the Video Out jack on the DVD+VCR to the Video In jack on your TV. Connect the Audio Out jack on the DVD+VCR to the Audio In jack on the TV. Match the color of the cable to the color of the jack.
Method 3 : Connecting to a TV equipped with component video in jacks
Connect component video cables (not supplied) from the Component Video Out jacks on the DVD+VCR to the Component Video In jacks on the TV. If you do not receive a clear picture using the Component Video Pr, Pb, Y jacks, try connecting to the Cr, Cb, Y jacks instead. The component video connection only works in DVD playback mode.
To use the VCR or view TV channels, you still need to connect the RF cable or the audio/video cables.
Method 4 : Connecting to a TV equipped with S-Video in jacks
Connect an S-Video cable (not supplied) between the S-Video Out jack on the DVD+VCR to the S-Video In jack on the TV. The S-Video connection only works in DVD playback mode. To use the VCR or view TV channels, you still need to connect the RF cable or the audio/video cables.
 • VHF: TV channels 2~13, UHF: TV channels 14~69, CATV: Cable TV
13
INSTALLATION INFORMATION PRODUCT
DCSD5711N-PS(GB) 2005.12.8 5:7 PM ˘ ` 14 mac001 1200DPI 100LPI
CONNECTING A CABLE BOX
How to connect
Cable Box/ |
Rear Panel of DVD+VCR Rear Panel of TV |
Satellite Receiver |
|
Cable Antenna |
INPUT 1 INPUT 2 |
IN |
|
RF Cable |
|
OUT |
ANT IN |
|
RF Cable
AUDIO/VIDEO Cable
1 Connect the RF cable from the cable wall outlet to the RF In jack on your Cable Box.
2 Connect a second RF cable from the RF Out jack on the Cable Box to the IN (FROM ANT.) jack on the back panel of the DVD+VCR.
3 Connect the supplied RF cable from the OUT (TO TV) jack on the back panel of the DVD+VCR to your television’s Antenna In jack. Or for improved picture and sound quality, connect an audio/video cable from the Audio/Video Out jacks on the DVD+VCR to the Audio/Video In jacks on your TV.
4 Connect the DVD+VCR power cord to a standard wall outlet.
5 Power on the DVD+VCR, TV, and Cable Box.
6
How to watch regular TV and record Cable TV
1 Set the Channel Select switch on your cable Box to CH 3. If Channel 3 is used by a local TV station, you must change it to Channel 4.
2 Select the channel to be recorded on the Cable Box.
3 Press the [REC ●] button on the DVD+VCR.
4 To watch regular TV while you record from cable, press the [TV/VCR] button on the DVD+VCR and select the desired channel on your TV. Because of the nature of cable boxes, you cannot watch one Cable TV channel and record another at the same time.
14

DCSD5711N-PS(GB) 2005.12.8 5:7 PM ˘ ` 15 mac001 1200DPI 100LPI
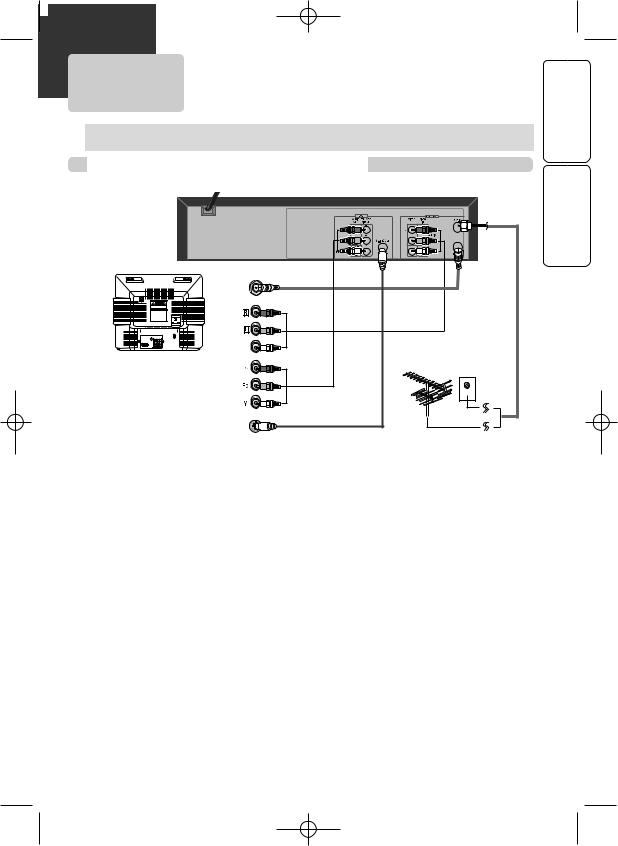
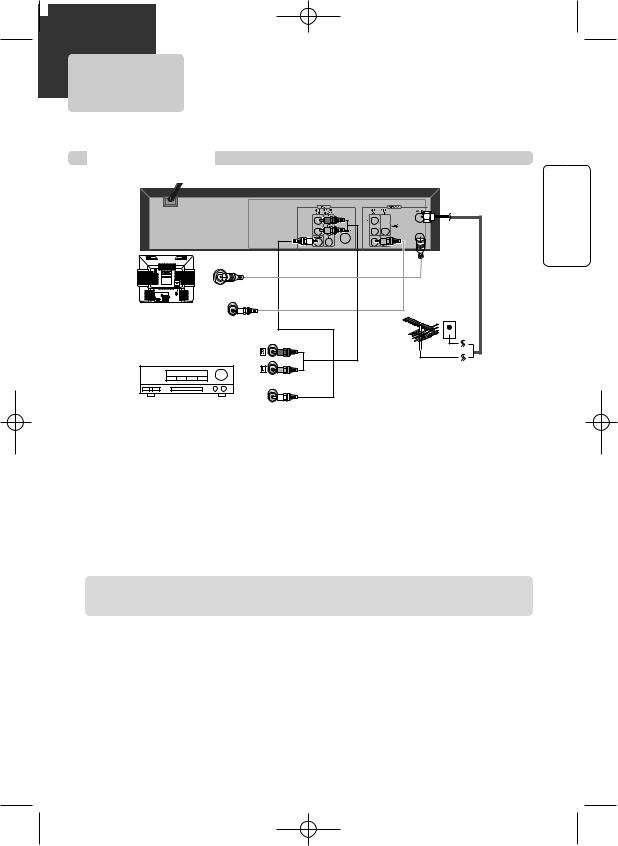
CONNECTING OTHER VIDEO EQUIPMENT
You can connect a wide variety of audio/video equipment to your DVD+VCR, including an additional VCR, Laser Disc Player, DVD Player, Camcorder, Satellite Receiver, or Video Game. Because these devices use all of connections, they are described together.
How to Connect
ANT INPUT
RF Cable
Playback VCR, |
A/V OUTPUT |
|
Camcorder, |
|
|
|
|
|
Satellite Receiver |
AUDIO |
|
|
|
|
... |
VIDEO |
AUDIO/VIDEO Cable |
... |
|
|
... |
|
|
1 Connect audio/video cables from the Audio/Video Out jack on your other video equipment to the Audio/Video In jack on rear panel (or front panel) of DVD+VCR.
2 Connect an RF cable from the “ANT. IN” jack on a TV or satellite receiver to the “RF.OUT” jack on the DVD+VCR.
3 To record other video equipment with the DVD+VCR, insert a tape with the record safety tab intact into DVD+VCR and follow the instructions for recording on page 26.
How to Copy (Edit) Tape with Other Video Equipment
1 Turn on the DVD+VCR.
2 Press [TV VIEW] and set the DVD+VCR to display “Video 1” or “Video 2” on TV screen.
3 Press [PLAY] on the other video equipment.
4 Press [REC ●] on the DVD+VCR when you want to record from the other video equipment.
5 Press [Pause] on the DVD+VCR to prevent recording a scene you do not want.
(Caution) Recording is stopped automatically after 5 minutes in Pause mode. Press the [REC ●] button again if you want to resume recording.
INSTALLATION
15
DCSD5711N-PS(GB) 2005.12.8 5:7 PM ˘ ` 16 mac001 1200DPI 100LPI
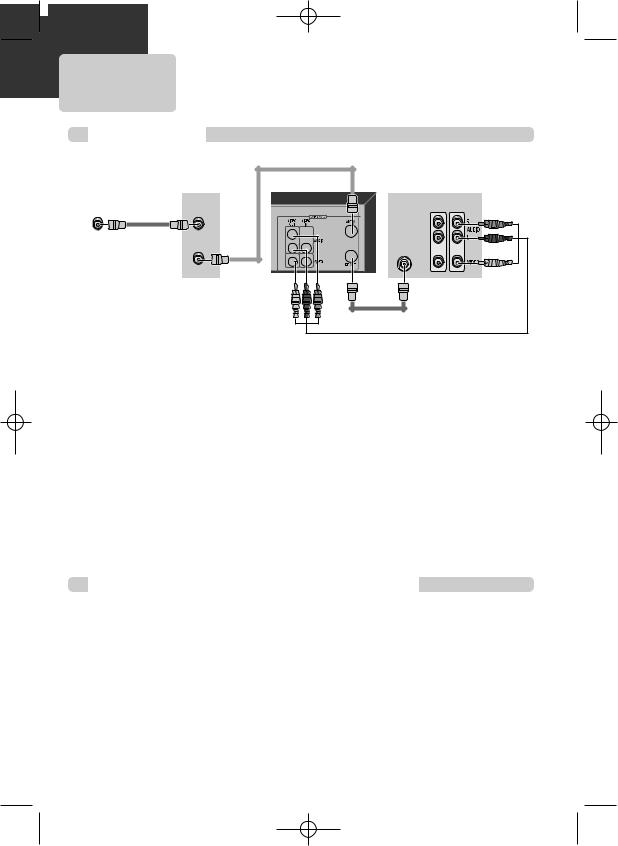
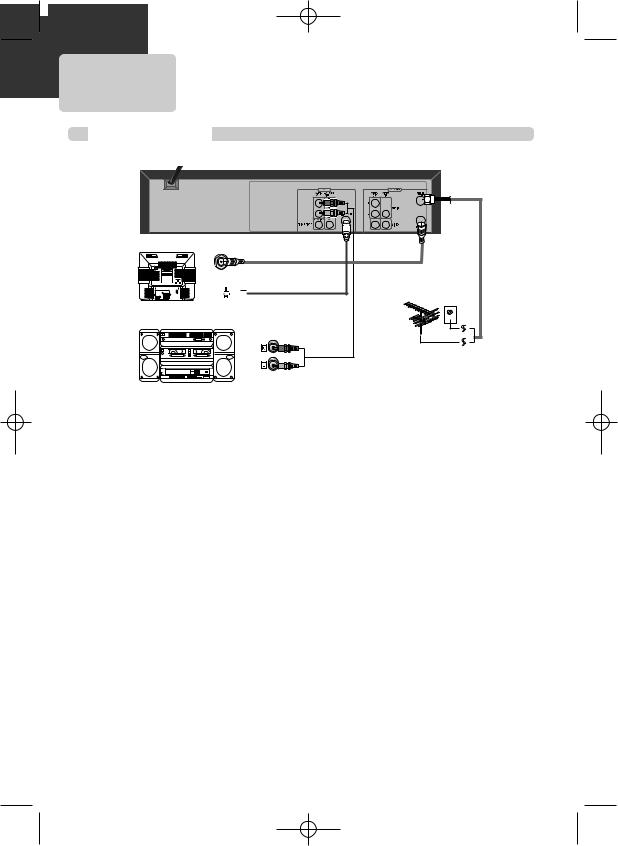
CONNECTING TO A STEREO RECEIVER
How to Connect
ANT INPUT


 S-VIDEO INPUT
S-VIDEO

AUDIO INPUT
AUDIO
1 Connect audio/video cables from the AUDIO OUT jack on the rear panel of the DVD+VCR to the In jack of the stereo receiver.
2 On the stereo's control panel, select the “External Input” that you connected to the DVD+VCR.
3 Turn on the stereo receiver and start playback of a DVD disc or Hi-Fi videotape. You should hear sound from the speakers connected to your stereo receiver.
16
DCSD5711N-PS(GB) 2005.12.8 5:7 PM ˘ ` 17 mac001 1200DPI 100LPI
CONNECTING TO A DOLBY DIGITAL
DECODER OR DTS DECODER
How to Connect |
|
|
INSTALLATION |
ANT INPUT |
|
VIDEO INPUT |
|
VIDEO |
|
Home Theater |
AUDIO INPUT |
Receiver with Dolby |
|
Digital decoding |
AUDIO |
|
DIGITALAUDIO INPUT |
|
COAXIAL |
If you are playing a DVD disc that has a soundtrack in 5.1 channel Dolby Digital Surround, or DTS surround formats, the DVD+VCR outputs a Dolby Digital or DTS data stream from its COAXIAL DIGITAL AUDIO OUT jack. By hooking the DVD+VCR up to a Dolby Digital or DTS decoder, you can enjoy high-quality surround sound.
1 Connect a coaxial digital audio cable (not included) from the DIGITAL AUDIO OUT jack on the DVD+VCR to the Digital Audio In jack on the decoder.
2 Connect the TV as explained on page 14, for playback and recording of videotapes.
 Not all DVD discs have these soundtrack formats.
Manufactured under license from Dolby Laboratories.
“Dolby” and the double-D symbol are trademarks of Dolby Laboratories.
17
 Loading...