


CXT395
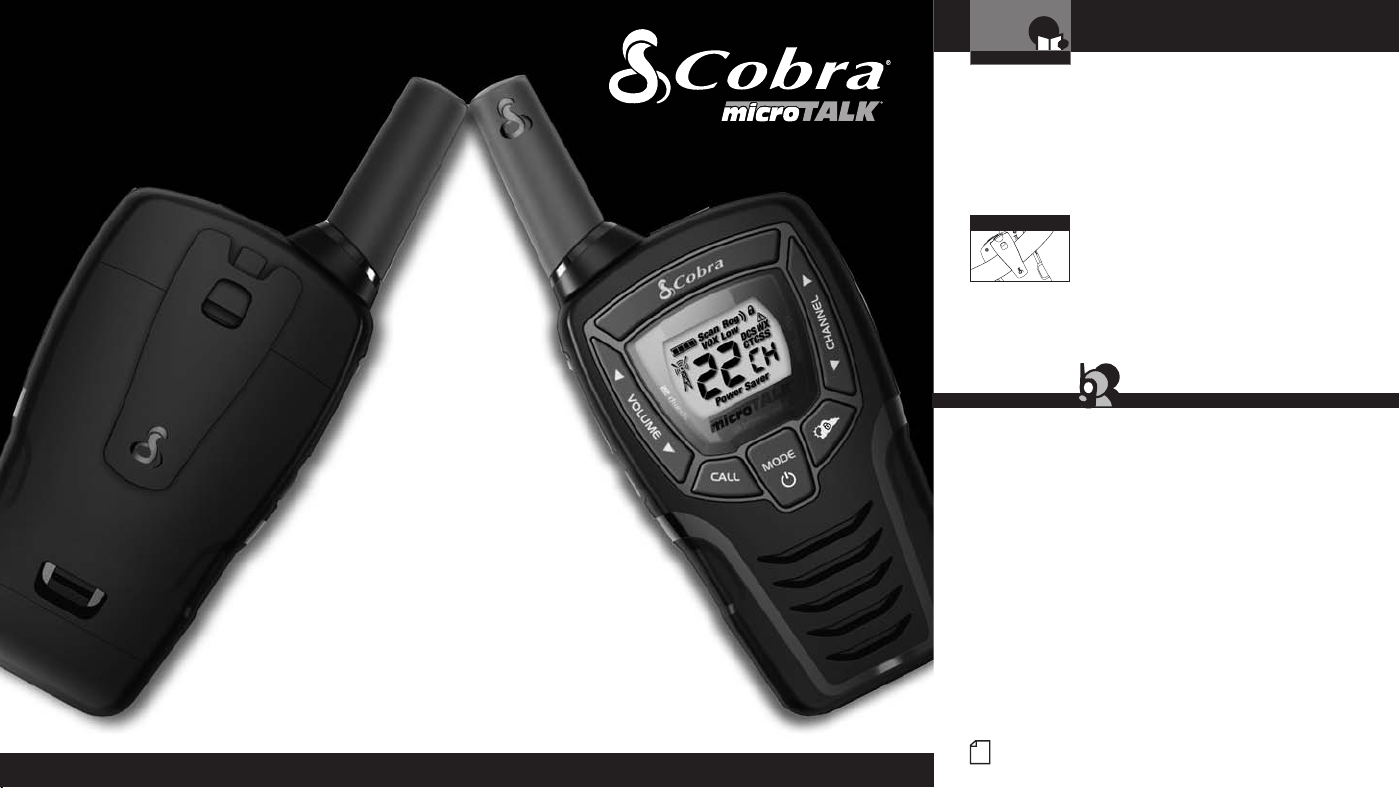
Owner’s Manual
Introduction
Staying in touch with your family and friends is
convenient and easy when using your microTALK
radio. Some of the many uses you will discover include:
Communicating with others while hiking, biking, and working; keeping
track of family and friends at a crowded public event; checking with
travel companions in another car; talking with neighbors; arranging
meeting spots with others while shopping at the mall.
Making Life Easier and Safer
®
Nothing Comes Close to a Cobra
Belt Clip
Customer Assistance
Secure your microTALK
radio while on the go.
Carrying your microTALK
when using the belt clip or optional wrist strap.
The belt clip easily attaches to your belt, purse,
or backpack.
®
®
radio with you is easy
For Assistance in the U.S.A.
In this user’s manual, you should find all the information you need to
operate your microTALK
reading this manual, Cobra Electronics offers the following customer
assistance services:
Automated Help Desk
English only. 24 hours a day, 7 days a week 773-889-3087 (phone).
Customer Assistance Operators
English and Spanish. 8:00 a.m. to 5:30 p.m. Central Time,
Monday through Friday (except holidays) 773-889-3087 (phone).
Questions
English and Spanish. Faxes can be received at 773-622-2269 (fax).
Technical Assistance
English only. www.cobra.com (on-line: Frequently Asked Questions).
For more information or to
order any of our products,
please visit our website:
www.cobra.com
®
TWO-WAY RADIO MODEL
CXT395
Nothing Comes Close to a Cobra
®
Printed in China
Part No. 480-858-P
English
Version D
English and Spanish. productinfo
For Assistance Outside the U.S.A.
Contact Your Local Dealer
A1
®
radio. If you require further assistance after
@cobra.com (e-mail).
©2012 Cobra Electronics Corporation
6500 West Cortland Street
Chicago, Illinois 60707 USA
www.cobra.com
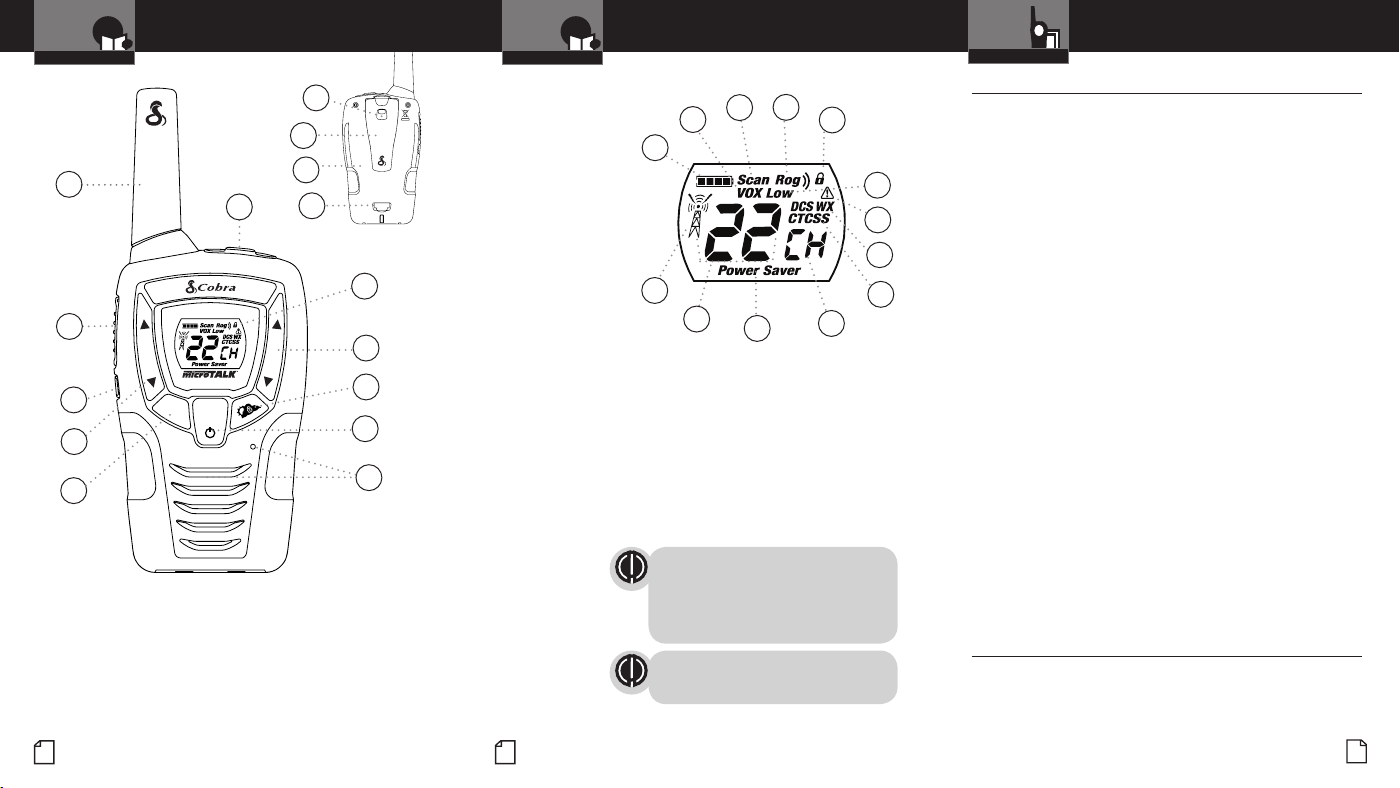
Product Features
Introduction
Product Features
1
10
9
VOLUME
CALL
8
11
1. Antenna
2. External Speaker/
Microphone/Charge Jack
3. Mode/Power Button
4. Weather/Lock Button
5. Channel Up/Down
Buttons
6. Backlit LCD Display
A2
12
13
14
2
MODE
15
CHANNEL
7. Speaker/Microphone
8. Volume Up/Down Buttons
9. Light/Max Range Button
10. Talk Button
11. Call Button
12. Wrist Strap Connection
13. Belt Clip
14. Battery Compartment
15. Battery Door Latch
Warranty and Trademark
Introduction
Features
• 22 Channels
Seven shared
with FRS/GMRS,
seven FRS only,
eight GMRS only.
• 10 Channel
Weather Radio
• Weather Alert
• 121 Privacy Codes
(38 CTCSS codes/
6
5
4
3
7
83 DCS codes)
• Hands-Free Operation
(VOX)
• Scan
Channels,
privacy codes
• Backlit LCD Display
• Call Alert
Five selectable
tones
• Button Lock
• Speaker/
Microphone/
Charge Jack
• Roger Beep
Selectable On/Off
• Battery/Power Saver
• Keystroke Tones
• Battery Level
Indicator
• Auto Squelch
• Maximum
Range Extender
A3
Product Features
Backlit LCD Display
3
2
1
13
12
11
1. Battery Level Indicator
2. VOX Icon
3. Scan Icon
4. Roger Beep Icon
5. Lock Icon
6. Low Power Icon
7. DCS/CTCSS Icons
8. Weather Icon
9. Weather Alert Icon
10. DCS/CTCSS Privacy Code Numbers
11. Power Saver Icon
12. Channel Numbers
13. Receive/Transmit Icon
Important FCC Licensing Information
This radio operates on General Mobile Radio
Service (GMRS) frequencies which require a
Federal Communications Commission (FCC)
license. See page 19 for licensing and other
related information.
Maximum range may vary and is based on
unobstructed line-of-sight communication
under ideal conditions.
4
5
6
9
8
7
10
Warranty
Limited One-Year Warranty on Radio(s)
For Products Purchased in the U.S.A.
Cobra Electronics Corporation warrants that its Cobra microTALK
and the component parts thereof, will be free of defects in workmanship and
materials for a period of one year from the date of first consumer purchase. This
warranty may be enforced by the first consumer purchaser, provided that the
product is utilized within the U.S.A.
Cobra will, without charge, repair or replace, at its option, defective microTALK
radios, products or component parts upon delivery to the Cobra Factory Service
department, accompanied by proof of the date of first consumer purchase, such
as a duplicated copy of a sales receipt.
You must pay any initial shipping charges required to ship the product for
warranty service, but the return charges will be at Cobra’s expense,
if the product is repaired or replaced under warranty. This warranty gives you
specific legal rights, and you may also have other rights which may vary from
state to state.
Exclusions: This limited warranty does not apply: 1) To any product
damaged by accident; 2) In the event of misuse or abuse of the product or
as a result of unauthorized alterations or repairs; 3) If the serial number has
been altered, defaced, or removed; 4) If the owner of the product resides
outside the U.S.A.
All implied warranties, including warranties of merchantability and fitness for
a particular purpose are limited in duration to the length of this warranty. Cobra
shall not be liable for any incidental, consequential or other damages; including,
without limitation, damages resulting from loss of use or cost of installation.
Some states do not allow limitations on how long an implied warranty lasts
and/or do not allow the exclusion or limitation of incidental or consequential
damages, so the above limitations may not apply to you.
For Products Purchased Outside the U.S.A.
Please contact your local dealer for warranty information.
90-Day Warranty on Rechargeable Batteries
For products purchased in the U.S.A. and Canada.
Trademark Acknowledgement
®
, microTALK®, Nothing Comes Close to a Cobra®, VibrAlert®
Cobra
and the snake design are registered trademarks of Cobra Electronics
Corporation, USA. Cobra Electronics Corporation™ is a trademark
of Cobra Electronics Corporation, USA.
Acknowledgement
Nothing Comes Close to a Cobra
®
radios
•
®
•
®
17
Introduction
Caring for Your microTALK® Radio
Your microTALK
if cared for properly. Handle the radio gently. Keep the radio away from
dust. Never put the radio in water or in a damp place. Avoid exposure to
extreme temperatures.
Operation Customer Assistance Warranty
®
radio will give you years of trouble-free service
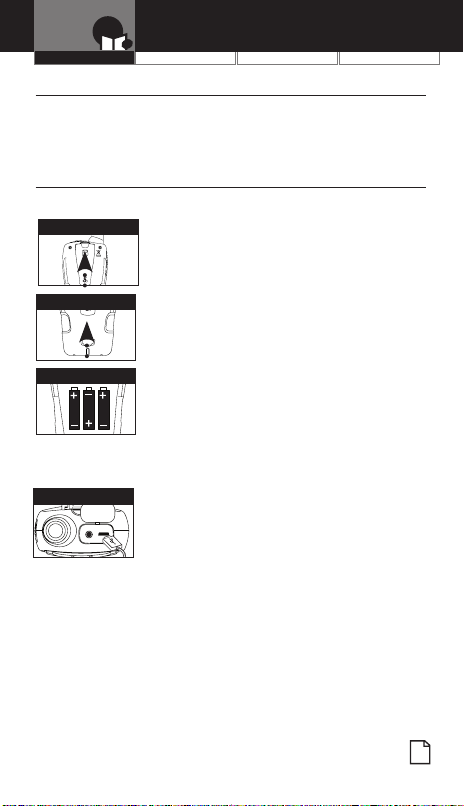
Installing Batteries
To install or replace batteries:
Remove Belt Clip
Pull Up Lock Latch
Insert Batteries
1. Remove belt clip by releasing belt clip
latch and sliding clip up.
2. Pull up on the battery door latch to remove the
battery compartment cover.
3. Insert the supplied three AA rechargeable
batteries or non-rechargeable alkaline batteries.
Position batteries according to polarity markings.
4. Replace battery compartment cover and
belt clip.
• Do not attempt to charge alkaline batteries.
• Do not mix old and new batteries.
• Do not mix alkaline, standard (carbon-zinc), or
rechargeable (Ni-Cd, Ni-MH, etc.) batteries.
•
•
Radio Charger Jack
To charge batteries in radio:
1. Check to see that the batteries have been
inserted properly.
2. Insert the cable into the charge jack located at
the top of the radio.
3. Plug the cable into USB-compatible power port.
Use only the supplied rechargeable batteries and charger for recharging
your Cobra microTALK radio.
Cobra recommends your radio is turned off while being charged.
Non-rechargeable alkaline batteries can also be used in your radio.
Nothing Comes Close to a Cobra
®
1
Operation
VOLUME
CHANNEL
VOLUME
CALL
MODE
CHANNEL
Using Your Radio
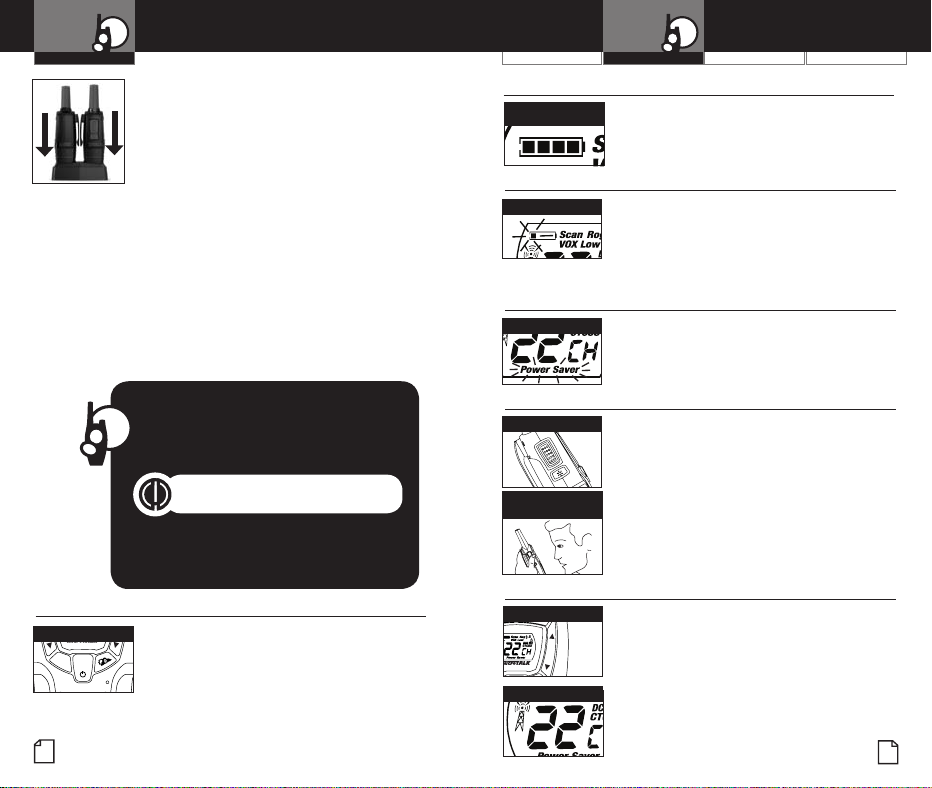
For charging microTALK radio(s) in desktop charger:
1. Insert radio(s) into desktop charger as shown.
2. Insert the micro-USB cable into jack on back
of charger.
3. Plug the cable into USB-compatible power port.
For pluggable equipment, the socket-outlet shall
be installed near the equipment and shall be easily
If charging light is not on, check position of radio. Radio should be
upright. The charge indicator light will stay on as long as the radio is in
the charging well, and the light will go off when the charging is complete.
Note: To charge a single radio, you can bypass the desktop charger and
simply insert the micro-USB’s connector directly into the charge jack
located on the top of the radio.
accessible.
The radio will display flashing battery icon while charging.
Cobra recommends your radio be turned off while being charged.
Non-rechargeable alkaline batteries can also be used in your radio.
Quick Start
1. Press and hold the Mode/Power button
to turn on your radio.
2. Press the Channel Up or Channel Down
button to select a channel.
Both radios must be tuned to the same
channel/privacy code to communicate.
3. Press and hold the Talk button while
speaking into the microphone.
4. When finished talking, release the Talk
button and listen for a response.
Turning on Your microTALK® Radio
Press and hold the Mode/Power button until you hear
a series of audible tones indicating the radio is on.
Your microTALK
ready to receive transmissions. The radio is always
in Standby mode except when the Talk, Call or
Mode/Power buttons are pressed.
®
radio is now in Standby mode,
Mode/Power
CALL
MODE
2
Operation
Battery Status Indicator
Battery Charge
Status
The battery charge status is shown on the display.
Four bars indicates fully charged.
Battery Low
Battery Low
When battery power is low, the final bar in the Battery
Low icon will blink and an audible tone will sound twice
before the radio shuts off. Your batteries should be
replaced or recharged, if using rechargeable batteries.
The radio will display flashing battery icon while
charging.
Auto Battery Save
Battery Save Mode
If there are no transmissions within 10 seconds, the radio
will automatically switch to Battery Save mode and the
Power Saver icon will flash in the display. This will not
affect the radio’s ability to receive incoming transmissions.
Communicating with Another Person
Talk Button
Two Inches (5 cm)
from Mouth
1. Press and hold the Talk button.
2. With the microphone about two inches (5 cm) from
your mouth, speak in a normal voice.
3. Release the Talk button when you are
finished talking and listen for a response.
You cannot receive incoming calls while pressing
the Talk button.
Note: both radios must be tuned to the same
channel to communicate.
To Select a Channel
•
Channel Button
CHANNEL
Channel Number
With the radio on, select any of the 22 channels by
pressing the Channel Up or Channel Down button.
Note: both radios must be tuned to the same
channel to communicate.
Channels 1 through 7 are shared with FRS/ GMRS.
Channels 8 through 14 are FRS only. Channels 15
through 22 are GMRS only. See page 14 for
FRS/GMRS frequency allocations and compatibility
charts.
Customer Assistance WarrantyIntroduction
Nothing Comes Close to a Cobra
•
•
•
•
•
®
3
 Loading...