


 HH38 WX ST
Operating Instructions
for your Cobra HH 38 WX ST
Citizens Band
2-Way Handheld
CB Radio
Lock
PwrSaver DW
Func
CB/WX CH9/19
Scan
“Ingenious Products for Easier Communication.”
|
|
The CB Story |
|
|
|
|
|
The Citizens Band lies between the shortwave |
|
|
broadcast and 10-meter Amateur radio bands, |
1 |
|
and was established by law in 1949. The Class D |
|
||
|
||
|
two-way communications service was opened in |
|
|
|
1959. (CB also includes a Class A citizens band |
|
|
and Class C remote control frequencies.) |
|
|
FCC Regulations |
|
|
FCC regulations permit only “transmissions” |
|
|
(one party to another) rather than “broadcasts” |
|
|
(to a wide audience). Thus, advertising is not |
|
|
allowed on CB Channels because that is |
|
|
“broadcasting.” |
2
FCC Warnings
3
4
5
All transmitter adjustments other than those supplied by the manufacturer as front panel operating controls, must be made by, or under the supervision of, the holder of an FCC-issued general Radio-Telephone Operator’s License.
Replacement or substitution of transistors, regular diodes or other parts of a unique nature, with parts other than those recommended by Cobra, may cause violation of the technical regulations of Part 95 of the FCC Rules, or violation of Type Acceptance requirements of Part 2 of the Rules.
You should read and understand Part 95 (included with this unit) of the FCC Rules and Regulations, before operating your Cobra radio, even though the FCC no longer requires you to obtain an operator’s license.
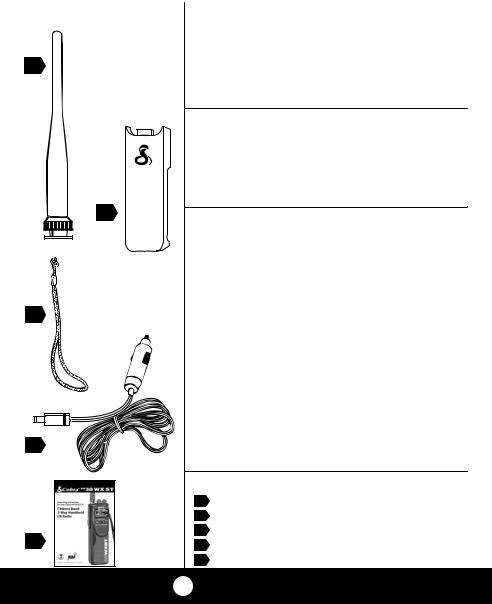
What’s Included with Your HH 38 WX ST
1.High Efficiency Antenna
2.Removable Belt Clip
3.Wrist Strap
4.12 Volt Cigarette Lighter Plug
5.Operating Manual
A1
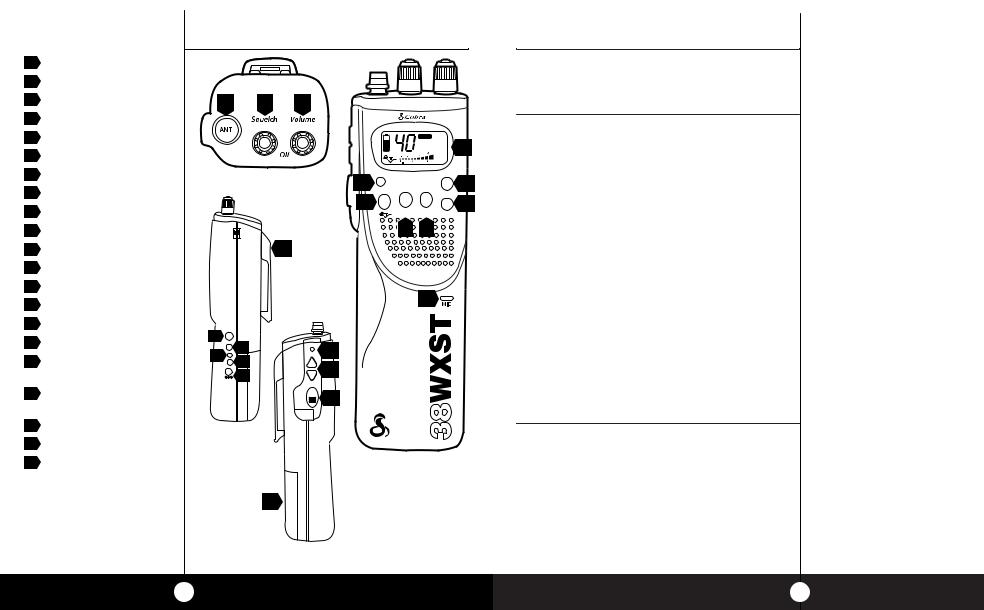
Controls and Indicators |
Our Thanks to You |
|
|
1.BNC AntennaConnector
2.Squelch Control
3.On/Off Volume Control
4.Removable Belt Clip
5.External Speaker Jack
6.External Microphone Jack
7.Charge LED
8.NiCD Battery Charge Jack
9.DC Power Jack
10.Light Key
11. Channel Up/Down Keys
12. PTT (Push To Talk ) Key
13. Battery Chamber
14. LCD Display Panel
15. Lock Key
16. SoundTracker® Key
17. CB/WX Weather Key and
HI/LO Power Key
18.Instant Channel 9 & 19 and Dual Watch Key
19.Function Key
20.Channel Scan
21.Microphone
1 2 3
|
|
4 |
SPK |
|
|
5 |
|
|
MIC |
6 |
LIGHT |
7 |
8 |
CH |
|
|
|
DC13.8V |
9 |
|
|
|
PTT |
13
FUNC
|
PWR SAVE WX |
14 |
|
|
SCAN DW EMG |
||
|
SIGNAL |
||
|
POWER |
|
|
15 Lock |
Pwr Saver DW |
Func |
19 |
16 |
|
|
|
CB/WX CH9/19 |
Scan |
20 |
|
|
|
||
|
|
|
|
17 18
21
10
11
12
Thank you for purchasing the Cobra HH 38 WX ST handheld CB. Properly used, this Cobra product will give you many years of reliable service.
SoundTracker®
“Cuts noise coming in...strengthens signals going out.”
This Patent pending technology dramatically improves transmission and reception of CB signals.
The revolutionary SoundTracker® System reconfigures the transmission signal which allows it to be transferred more efficiently through cluttered airwaves.
At the same time, it significantly reduces the amount of static on all incoming CB signals.
The end result is a cleaner, clearer sounding reception of signals and a more powerful transmission which dramatically improves CB communications.
Customer Support
Should you encounter any problems with the product or not understand its many features, please refer to this owner’s manual. If, after referring to the manual, you still need help, call Cobra Customer Service at 773.889.3087.
bra Customer Service
operators are available -F 8:00 am - 6:00 pm CST at:
.889.3087
Technical Assistance 24 hours a day, seven
a week. E-mail questions productinfo@cobra.com
obra on the World Wide Web: equently Asked Questions
can be found on-line at:
.cobra.com
A2 |
A3 |

How to Use Your Cobra HH 38 WX ST
Contents |
|
Features .......................................................................... |
1 |
The CB Story ................................................................. |
A1 |
FCC Regulations |
|
Included Accessories |
|
Controls & Indicators................................................ |
A2 |
Our Thanks to You...................................................... |
A3 |
SoundTracker® System |
|
Customer Support |
|
Operating Your HH 38 WX ST |
|
Antenna ....................................................................... |
2 |
Battery Installation................................................... |
3 |
Belt Clip ........................................................................ |
3 |
Turning on Your CB .................................................. |
4 |
Setting Squelch......................................................... |
4 |
Selecting a Channel................................................. |
6 |
LCD Display................................................................. |
7 |
Transmit/Receive ...................................................... |
8 |
One Touch Channel 9 & 19 ................................... |
10 |
All Channel Scan ....................................................... |
11 |
Dual Watch.................................................................. |
12 |
Weather Channels .................................................... |
14 |
Power High/Low ....................................................... |
16 |
Battery Capacity Level ............................................ |
18 |
SoundTracker® System ........................................... |
19 |
Lighted Display ......................................................... |
23 |
Lock Key ....................................................................... |
24 |
In Vehicle Use............................................................. |
25 |
How Your CB Can Serve You .................................. |
26 |
A Few Rules You Should Know............................ |
26 |
Weather Channel Messages ................................. |
27 |
Channel 9 Emergency Messages........................ |
28 |
CB 10 Codes ............................................................... |
30 |
Frequency Ranges ..................................................... |
32 |
HH 38 WX ST Specifications .................................. |
33 |
Warranty Information .............................................. |
34 |
Optional Accessories ................................................ |
35 |
Order Form .................................................................... |
36 |
If You Think You Need Service............. |
Back Cover |
Features of This Product
•40 CB Channels
•10 Weather Channels
•Full Feature LCD Display
•Dual Channel Watch
•Full Channel Scan
•Battery Level Meter
•External Speaker/ Microphone Jack
•Instant Channel 9 & 19
•High/Low Power Saver Switch
•BNC Antenna Connector
•Lock Key
1
Operation |
Operation |
|
|
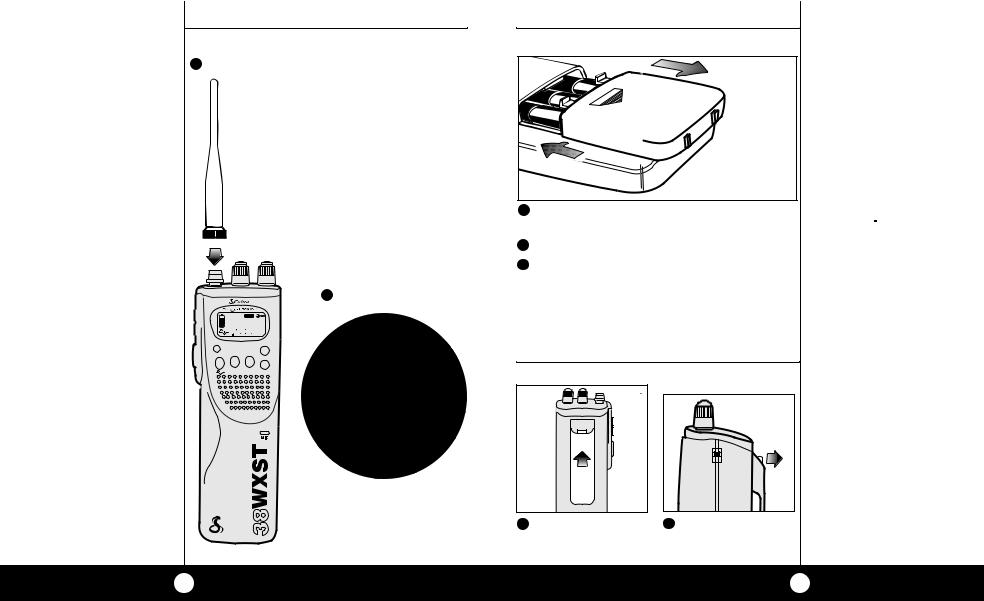
Attach Antenna
Note
To increase range as a portable, use CA41 telescopic loaded long range antenna. (See Accessory Page 35).
Attach Antenna |
Install Batteries |
1
Press and hold down on arrow and slide
|
|
|
|
1 |
chamber cover. Press down on |
|
|
|
|
|
arrow and slide. |
|
|
|
|
2 Install batteries by polarity markings. |
|
|
|
|
|
3 |
Replace cover. |
|
|
|
|
|
NiCD rechargeable batteries |
|
|
|
|
2 Turn clockwise. 1⁄4 turn. |
should be charged a minimum |
|
|
FUNC |
|
|
of 12 hours with a CA-45C |
|
|
PWR SAVE WX |
|
charger. |
|
|
|
SIGNAL |
|
||
|
|
SCAN DW EMG |
|
|
|
|
|
POWER |
|
|
|
Lock |
Pwr Saver |
DW |
|
|
|
40 |
Func |
|
|
||
|
|
|
|
|
|
|
CB/WX |
CH9/19 |
Scan |
Attach Belt Clip |
|
1 Slide belt clip up on |
2 |
|
clip, |
rails of base until |
|
lift tab out |
slide |
tab locks. |
|
belt clip down |
|
2
Battery
Installation
Note
Ignoring polarity markings (+/-) can cause damage to both the unit and the batteries.
The HH 38 WX ST requires 9“AA”alkaline or NiCD batteries (not included with the unit).
When batteries are low or need charging the  BATTERY icon will flash on the LCD display. Replace alkaline batteries or recharge NiCD batteries.
NiCD rechargeable batteries should be charged a minimum of 12 hours with a CA-45C charger.
NiCD rechargeables should have a rating of 1.2 vdc,750 Mah.
Attach Belt Clip
Note
Clip slides up to attach and slides down to remove.

Operation
Turning On |
Turning On |
|
Rotate ON - OFF Volume Control clockwise. |
Note
When you turn on the
HH 38 WX ST , a series of tones will be heard and the icons will briefly appear on the LCD display.
LCD lights on for 5 seconds.
Squelch Volume
Off
Setting Squelch Setting Squelch
Squelch is the “control gate” for incoming signals.
Gate closed
STRONG SIGNALS |
|
|
|
|
|
|
Squelch Volume |
Squelch Volume |
|
MEDIUM SIGNALS |
D |
|
|
|
|
E |
Off |
Off |
|
|
L O S |
|||
WEAK SIGNALS |
1 |
2 |
||
C |
||||
|
||||
|
louder than normal. |
closes the “gate”, |
||
|
E |
|||
|
T |
|
allowing no |
|
|
A |
|
||
|
|
incoming signals. |
||
|
G |
|
Operation
|
|
Gate open |
|
|
STRONG SIGNALS |
|
Squelch Volume |
|
|
|
MEDIUM SIGNALS |
|
Off |
|
|
|
WEAK SIGNALS |
2 |
ounterclockwise opens the |
|
|
“gate” and all signals enter. |
NOISE |
O P E N
G A T E
Gate set to Desired
Squelch Setting (DSS)
Squelch Volume
STRONG SIGNALS
Off
MEDIUM SIGNALS
3To achieve the Desired Squelch Setting (DSS),
turn the Squelch control  counterclockwise until you hear noise. Now turn the control clockwise just until the noise stops. This is the DSS setting.
WEAK SIGNALS
NOISE
G AT E
5

Operation |
Operation |
|
|
Select Channel |
Select Channel |
|
1 |
2 |
3 For lower Channel, |
push UP arrow key. |
push DOWN |
|
arrow key. |
Note
For quick advance, push and hold arrow key(s).
LIGHT |
LIGHT |
LIGHT |
|
CH |
CH |
|
|
or |
|
PTT |
PTT |
|
Note
When switching from one channel to another, squelch will need to be reset. See Setting Squelch on pages 4 and 5.
LCD Display |
|
|
|
|
|
|
|
|
|
|
LCD Display |
||||||||
All needed information is displayed on LCD |
|
|
|||||||||||||||||
display panel. |
|
|
|
|
|
|
|
|
|
|
|
|
|||||||
|
|
|
|
|
|
|
|
|
|
|
|
|
|
|
|
|
|||
|
|
|
|
|
|
|
|
FUNC Function Key |
|
|
|
|
Lock Key |
||||||
|
|
|
|
|
|
|
|
|
Indicator |
|
|
|
PWR SAVE Battery Save Indicator |
||||||
|
|
|
|
|
|
|
|
|
|
|
|
|
|
|
|
|
WX |
Weather Mode Indicator |
|
|
|
|
|
|
|
|
|
|
|
|
|
|
|
|
|
|
SCAN |
Scan Mode Indicator |
|
|
|
|
|
|
|
|
|
|
|
|
|
|
|
|
|
|
DW |
Dual Watch Indicator |
|
|
2 Digit Channel |
|
|
|
|
|
|
|
|
|
|
||||||||
|
|
|
|
|
|
|
|
|
|
|
EMG |
Emergency Channel 9 |
|||||||
|
Display |
|
|
|
|
|
|
|
|
|
|
|
|||||||
|
|
|
|
|
|
|
|
|
|
|
|
|
|
|
|||||
|
|
|
|
|
|
|
|
|
|
|
|
|
|
|
|
|
|
|
|
|
|
|
|
|
|
|
|
|
|
|
|
|
|
|
|
|
|
|
|
|
|
|
|
Battery Capacity |
|
|
|
|
|
|
|
FUNC |
|
|
|||||
|
|
|
|
|
|
|
|
|
|
|
|
|
|
|
|
||||
|
|
|
|
Level Indicator |
|
|
|
40 |
SCAN DW EMG |
|
|
||||||||
|
|
|
|
|
|
|
|||||||||||||
|
|
|
|
|
|
|
|
|
|
|
SIGNAL |
|
|
||||||
|
|
|
|
|
|
|
|
|
|
|
|
|
|
|
|
|
POWER |
|
|
|
|
|
|
|
|
|
|
|
|
|
|
|
|
|
|
|
|
|
|
|
|
|
|
|
|
|
|
|
|
|
|
|
|
|
|
|
|
|
|
SoundTracker
System™ icon SIGNAL
Incoming Strength of
Signal Meter
POWER
Outgoing Transmission
Power Meter
6 |
7 |
 Loading...