


Citizen JY8035-04E User Manual
1
Table of Contents
1. Your Watch ................................................................................................. 9
2. Before Use ................................................................................................ 12
• Checking the Reference Position......................................................... 14
3. Basic Watch Operations.......................................................................... 16
Radio Signal Reception
4. Radio Signal Reception ........................................................................... 18
5. Poor Reception Areas.............................................................................. 23
6. Display during Reception........................................................................ 24
7. Confirming Reception Status.................................................................. 26
8. Reception Area Guidelines...................................................................... 28
9. World City Display.................................................................................... 34
10. Charge Level Display............................................................................... 40
English

2 3
Operations in Each Mode
11. Changing Mode ........................................................................................ 42
12. Using Home Time and World Time......................................................... 44
13. Using Daylight Saving Time.................................................................... 46
14. Setting the Time (TME) ............................................................................ 48
15. Setting the Calendar (CAL)...................................................................... 52
16. Using the Timer (TMR)............................................................................. 56
17. Using the Chronograph (CHR)................................................................ 60
18. Using the World Time Setting (WT-S)..................................................... 62
19. Using the World Time Alarm (AL-1 and 2) ............................................. 66
20. Using the Receive Setting (RX-S)........................................................... 68
21. LED Lights ................................................................................................ 72
22. Resetting Your Watch.............................................................................. 72
23. Adjusting the Reference Position........................................................... 74
Using the Slide Rule Bezel............................................................................ 78
Solar Power
24. Solar Power Function .............................................................................. 92
25. Characteristics of the Solar Powered Watch......................................... 94
A. Power Saving Function....................................................................... 96
B. Insufficient Charge Warning Function............................................... 98
C. Overcharging Prevention Function.................................................... 99
D. Guide to Charging Time.................................................................... 100
E. Handling Your Solar Powered Watch............................................... 102
Troubleshooting
Radio Signal Reception Function......................................................... 104
Eco-Drive................................................................................................. 108
Precautions................................................................................................... 110
26. Specifications......................................................................................... 116

4 5
Congratulations and Thank You for your selection of a CITIZEN Eco-Drive watch.
To get the most out of your purchase, please be sure to read this manual and keep it
on hand for reference.
Once fully charged by exposure to light, your watch will give you years of
enjoyment and reliability.
Notice
All repairs performed on this watch are to be performed at the CITIZEN.
When desiring to have your watch repaired or inspected, please contact the Citizen
Service Center either directly or through the store where you purchased your watch.
Please use this watch after it has been sufficiently
charged by exposure to light.
If the second hand of the watch is moving at two-second intervals, this indicates the
watch is insufficiently charged. To ensure proper operation, the watch should be fully
charged by placing the watch under direct sunlight for about eight (8) hours. We
recommend the watch keep a high charge level to ensure optimum operation.
Charge your watch as indicated in “Guide to Charging Time” (p. 100).
6 7
Note: To assist in the explanation, all parts of the digital display are shown in the illustration.
Part Names (2): Digital Displays
[Digital display 2] [Digital display 1]
World city name
Morning: A
Afternoon: P
Chronograph
measurement mark
Timer measurement mark
Alarm setting mark
Daylight saving time setting
mark
Home city name
Insufficient charge
warning mark
World city time
Hour/minute/second
• The illustrations shown in this manual may differ from the actual watch you have purchased.
Part Names (1)
Charge level indicator/
radio wave reception
indicator
Home time hour hand
Digital display 2
(Displays the home
city)
Home time second
hand
Mode hand
UTC hour hand
UTC minute hand
Home time minute hand
Button (B)
24-hour hand
Crown
Button (A)
Digital display 1
(Displays world city/
world time)
Crown for turning
the outside scale
WW
1. Your Watch
World Time Eco-Drive Radio Controlled Watch
<Radio Signal Reception Function>
This watch is a radio controlled watch, which receives the standard time radio waves that are
broadcast from radio wave transmitters in four regions, Japan, the USA, Europe (Germany) and
China, and uses these waves to automatically correct the time and date. (p. 18)
i Automatic reception: The watch will automatically receive the radio wave up to three
times a day, at 2 a.m., 3 a.m. and 4 a.m., and adjust the time and date accordingly.
The 4 a.m. automatic reception can be changed to any time of the day.
i On demand reception: The radio wave can be received at any time of the day to adjust
the time and date.
In the event that a radio signal cannot be received, the watch can be manually set and will
operate keeping time within +/- 15 seconds per month.
8 9
Part Names (3): Radio Wave Reception Display
NO: Signal reception failed RX: Reception standby H, M, L: Reception level/
reception status
Modes where reception is
possible: CAL, TME and
RX-S
JPN : JJY (Japan)
USA : WWVB (USA)
EUR : DCF77 (Germany)
CHN: BPC (China)

10 11
Important Points Regarding Radio Wave Reception
There are two methods to receive radio signals during normal operation, Automatic and
On Demand.
The internal unidirectional antenna may be weakened by geography or building
structures, which may require the user to place the watch near a window.
When receiving radio waves:
* Remove the watch from your wrist
* Face the 9:00 position of the watch towards a window
* Place the watch on a stable surface
* Do not move the watch during this process. Movement of the watch may cause
incomplete reception. During radio reception, the second hand of the watch moves in
reception level.
* When reception is complete, the watch will return to movement at one-second
intervals.
Reception can take from about 2 minutes to a maximum of 15 minutes.
<World Time Function>
i UTC (Coordinated Universal Time), the time and date of 43 cities (or regions) from around
the world and one city (any can be set) can be displayed and easily called up. It is
convenient when traveling overseas on business or vacation.
Daylight saving time can also be set. (p. 46)
<Solar Power Function>
This is a multi-functional Eco-Drive watch, which is equipped with a solar power function for
powering the watch by converting light energy into electric energy.
i Charge level display function: This function displays the charge level in four grades, to
give an approximate indication of how much the secondary battery is charged. (p. 40)
i Power saving function: The watch is equipped with two power saving functions.
If the watch face is not exposed to light for 30 minutes or longer, all the LCD display
sections turn off (Power saving 1). If the watch face is then not exposed to light for one
week or longer, the hands are stopped in order to minimize the watch’s power consumption
(Power saving 2). (p. 96)
12 13
Check the
reception status.
• Pull out the crown to
position 1.
• Turn the crown to
align the mode hand
with TME.
• Return the crown to
the normal position.
• Press the lower right
button (A) at the
4:00 position.
(p. 26)
The second
hand indicates
a reception
status of H, M
or L
The second
hand indicates
a reception
status of NO
Refer to “On Demand
Reception” (p. 20) to
perform the radio wave
reception.
Your watch is
correctly receiving
the standard time
radio wave.
It is ready to use.
If you are unable to
receive radio waves,
please inquire to the
Citizen Service Center.
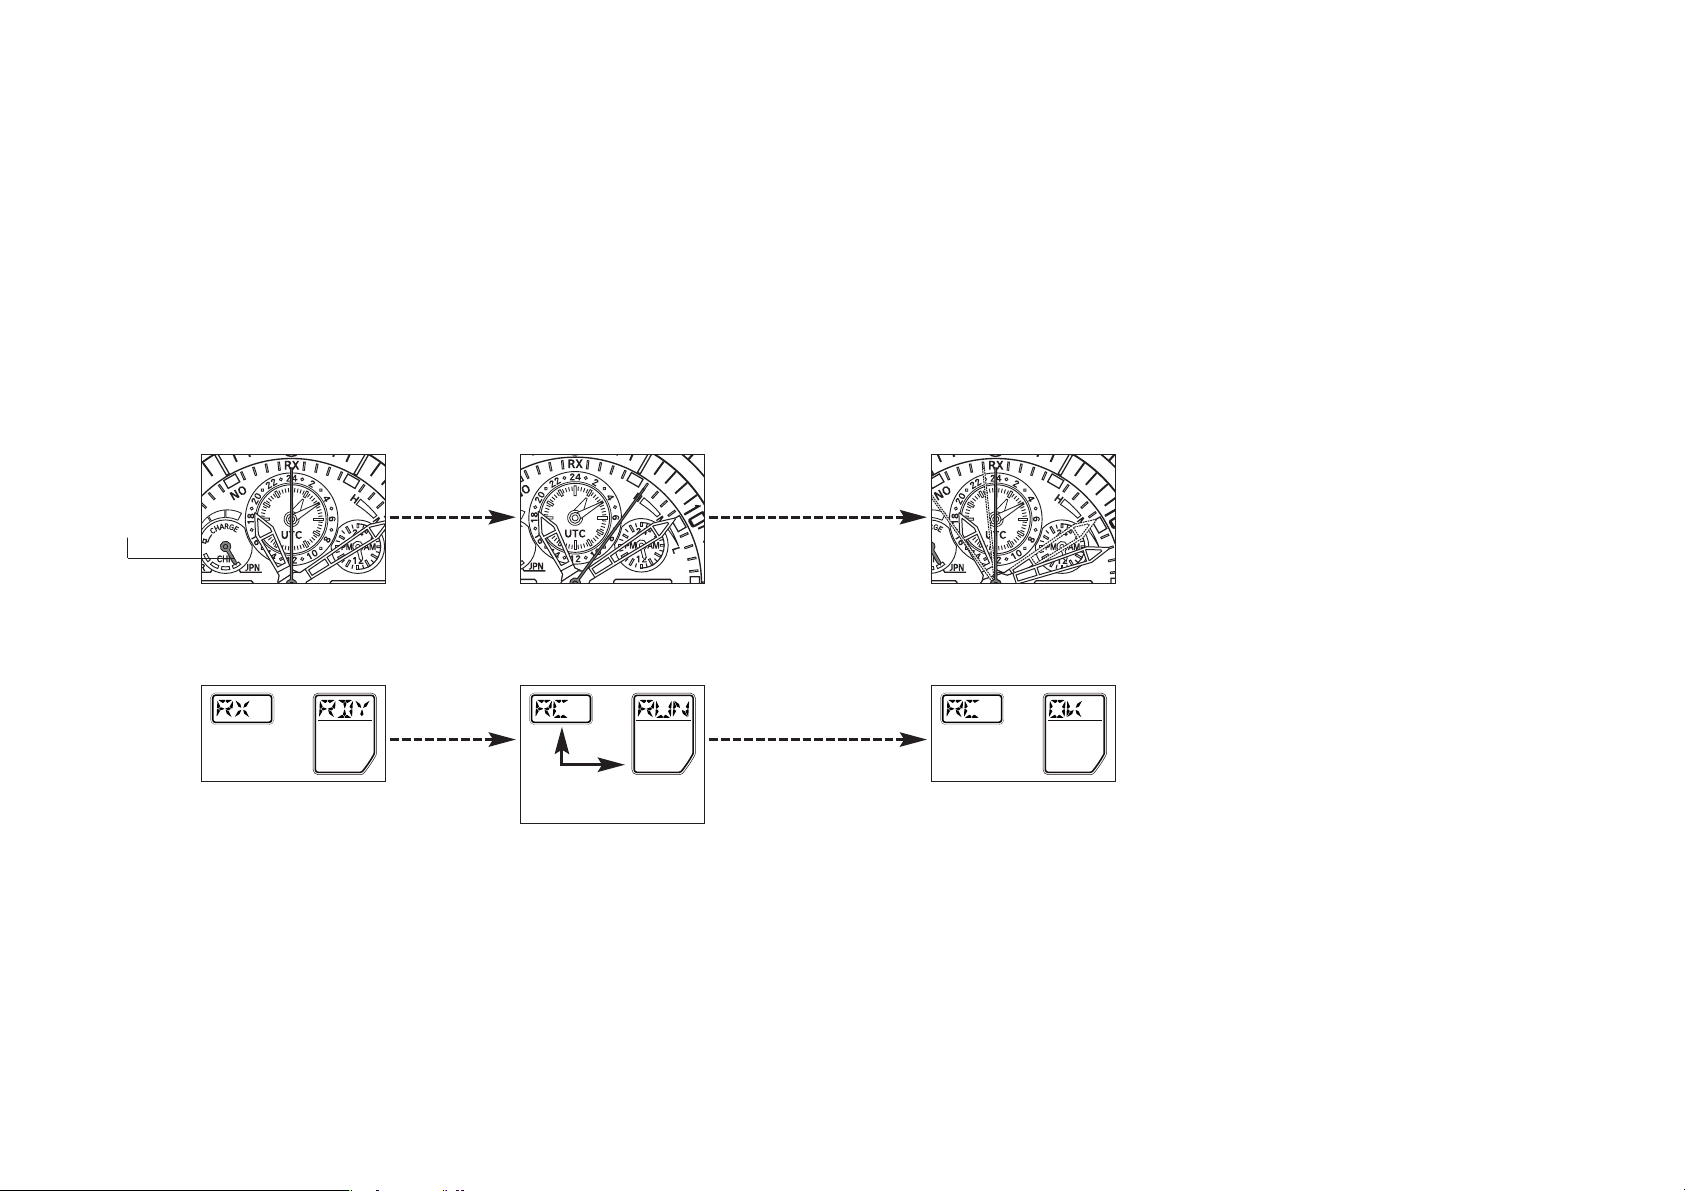
WW
2. Before Use
[Insufficient charging]
Charge level
indicator
[Fully charged]
Check the movement of
the second hand.
The second hand is
moving at 2-second
intervals or is stopped.
The second hand is
moving at 1-second
intervals.
Charge the watch
sufficiently by placing it in
direct sunlight as indicated
in “Guide to Charging
Time” (p. 100).
NO: Signal
reception failed
RX: Reception
standby
Reception level/
reception status
H: High
M: Middle
L: Low
Crown
Button (A)
Mode hand
14 15
1. Pull the crown out to position 1 and turn to align
the mode hand with CHR (chronograph mode).
2. Pull out the crown to position 2.
• The hands will move rapidly, stopping at the
reference position recorded in the watch
memory.
Correct reference positions
Charge level indicator: CHN
UTC hour and minute hands: 12:00
Hour, minute and second hands: 12:00:00
24-hour hand: 12:00
3. If the reference position is correct, the check is
now complete. Press the crown back into its
normal position.
• If a position is incorrect, refer to step 3 and later
in “Adjusting the Reference Position” and adjust
it to the correct position. (p. 74)
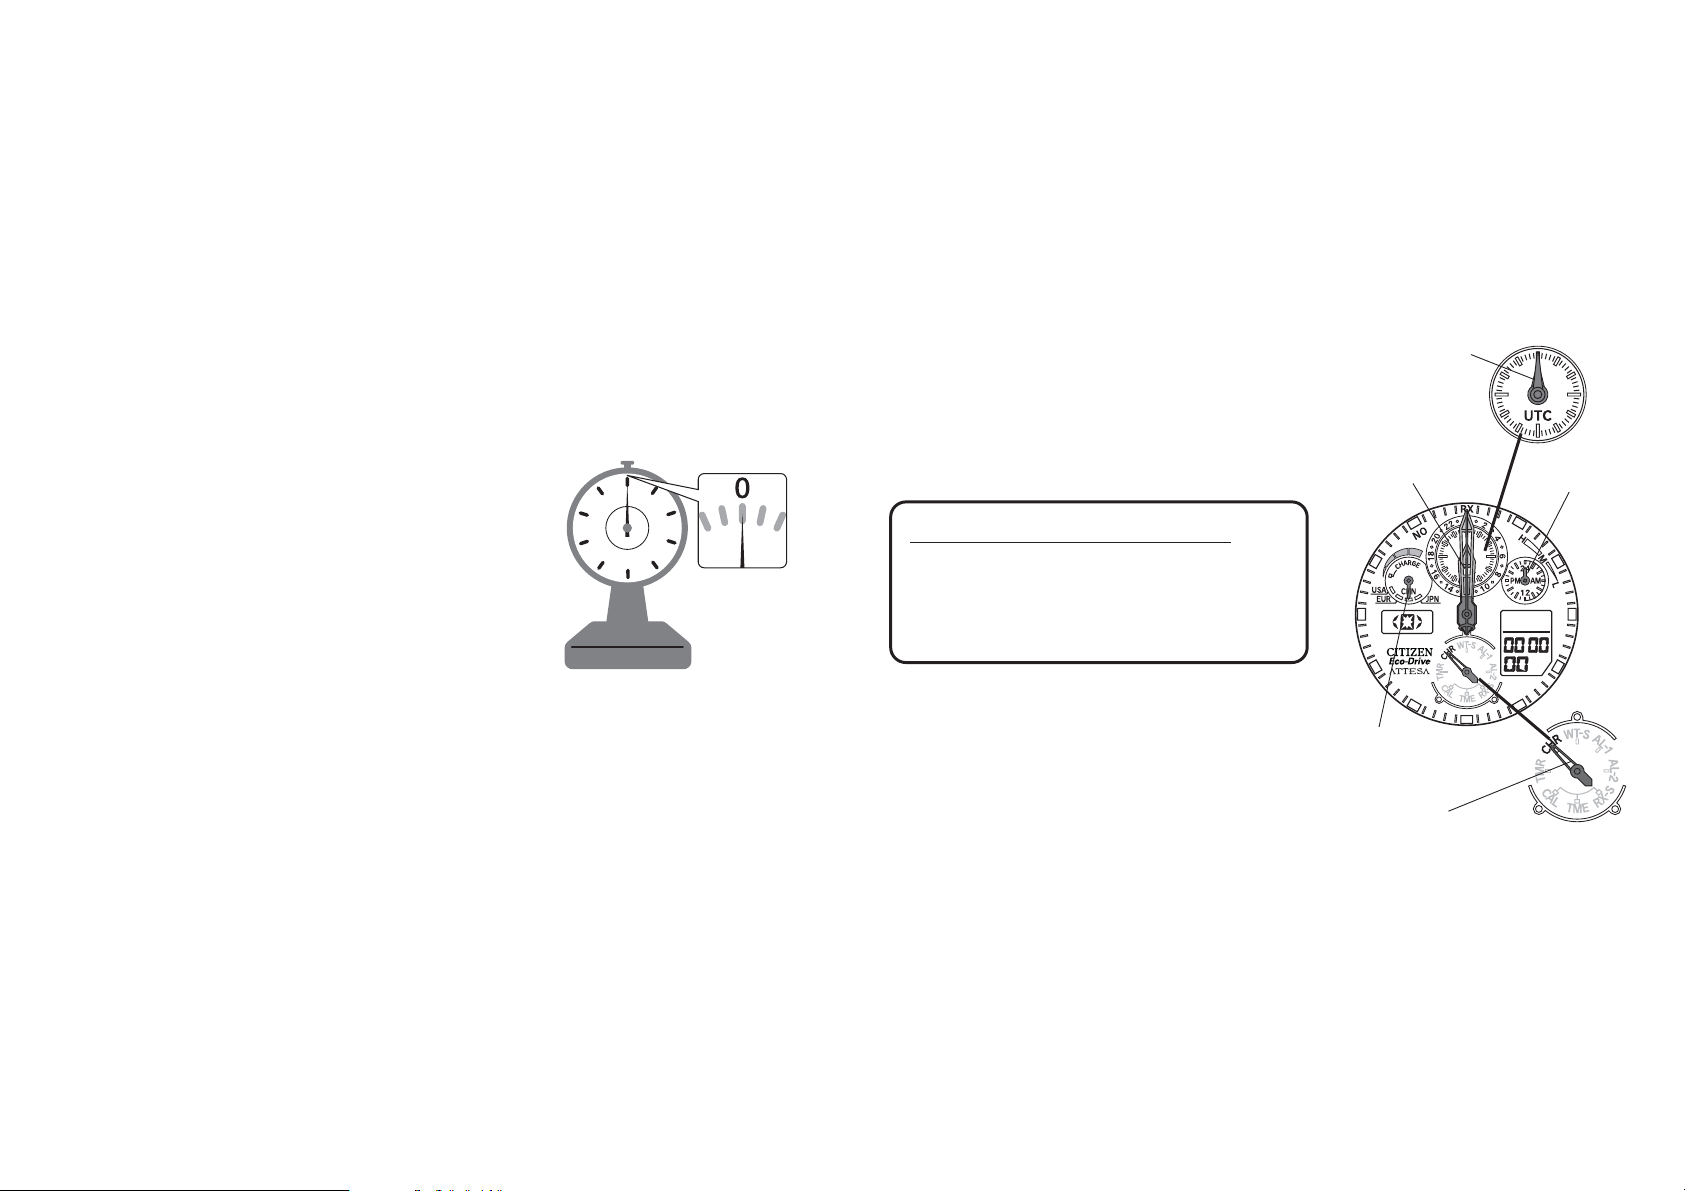
[Checking the Reference Position]
Before using the watch, confirm that the hands are aligned with
“0”, similar to when setting weighing scales
i The reference position may become misaligned when
the watch is exposed to strong magnetism, static
electricity or impacts. Even if radio waves are received,
the correct time will not be indicated unless the watch
hands are aligned to the correct reference position.
Check that the hands are properly aligned with “0”.
Examples of magnetic products that can affect
the watch.
• Health products (for example, medical necklaces and waist
bands that have magnetic fields)
• Refrigerators (magnetic part of the door)
• Electromagnetic cookers
• Bags (with magnet fasteners)
• Mobile phones (speaker part)
Keep the watch away from items similar to those above.
Hour, minute
and second
hands
UTC hour and
minute hands
24-hour
hand
Charge level
indicator
Mode hand
16 17
3.
Set the home time.
If the home time is correct,
(1) Set the time manually (p. 48)
(2) Set the time by receiving the radio
wave (p. 20)
Caution:
If the home city is set to a city that
is outside the reception area, the
radio wave cannot be received.
Set the time manually.
4.
Set digital display 1.
The world time or date can be
displayed on digital display 1.
Also, the mode can be switched
in order to use the alarm, timer
or chronograph. (p. 42)
gotostep4
WW
3. Basic Watch Operations
* The watch receives the radio wave from the radio wave transmitter located in the
home city’s region.
1.
Check the
charge level.
(p. 40)
2.
Set the home city.
If the city in which you are
situated is displayed in
digital display 2,
(1) Pull out the crown to
position 1 and turn to align
the mode hand with TME.
(2) With the crown pulled out to
position 1, press button (A)
or (B) to call up the home
city in digital display 1.
(3) Press button (A) and button
(B) at the same time to
display the home city in
digital display 2.
gotostep3
Home time
hour hand
Home time
minute hand
Digital display 1
Home time second hand
Home city
(Digital display 2)
Button (A)
Button (B)
Crown
18 19
Automatic reception
• It is not necessary to operate buttons during automatic reception.
• The watch will automatically receive the radio wave every day at 2
a.m., 3 a.m. and 4 a.m.
• The 4 a.m. reception can be changed to any time of the day. (p. 68oo71)
• Reception can be set to OFF. (p. 68oo71)
<Receiving the radio signals>
1. Remove the watch from your wrist and place on
a stable surface in a location, such as near a
window, from which radio waves can be easily
received, pointing the 9:00 side (reception
antenna position) in the direction of the radio
wave transmitter.
2. The watch will automatically receive the radio
wave every day at 2 a.m.
WW
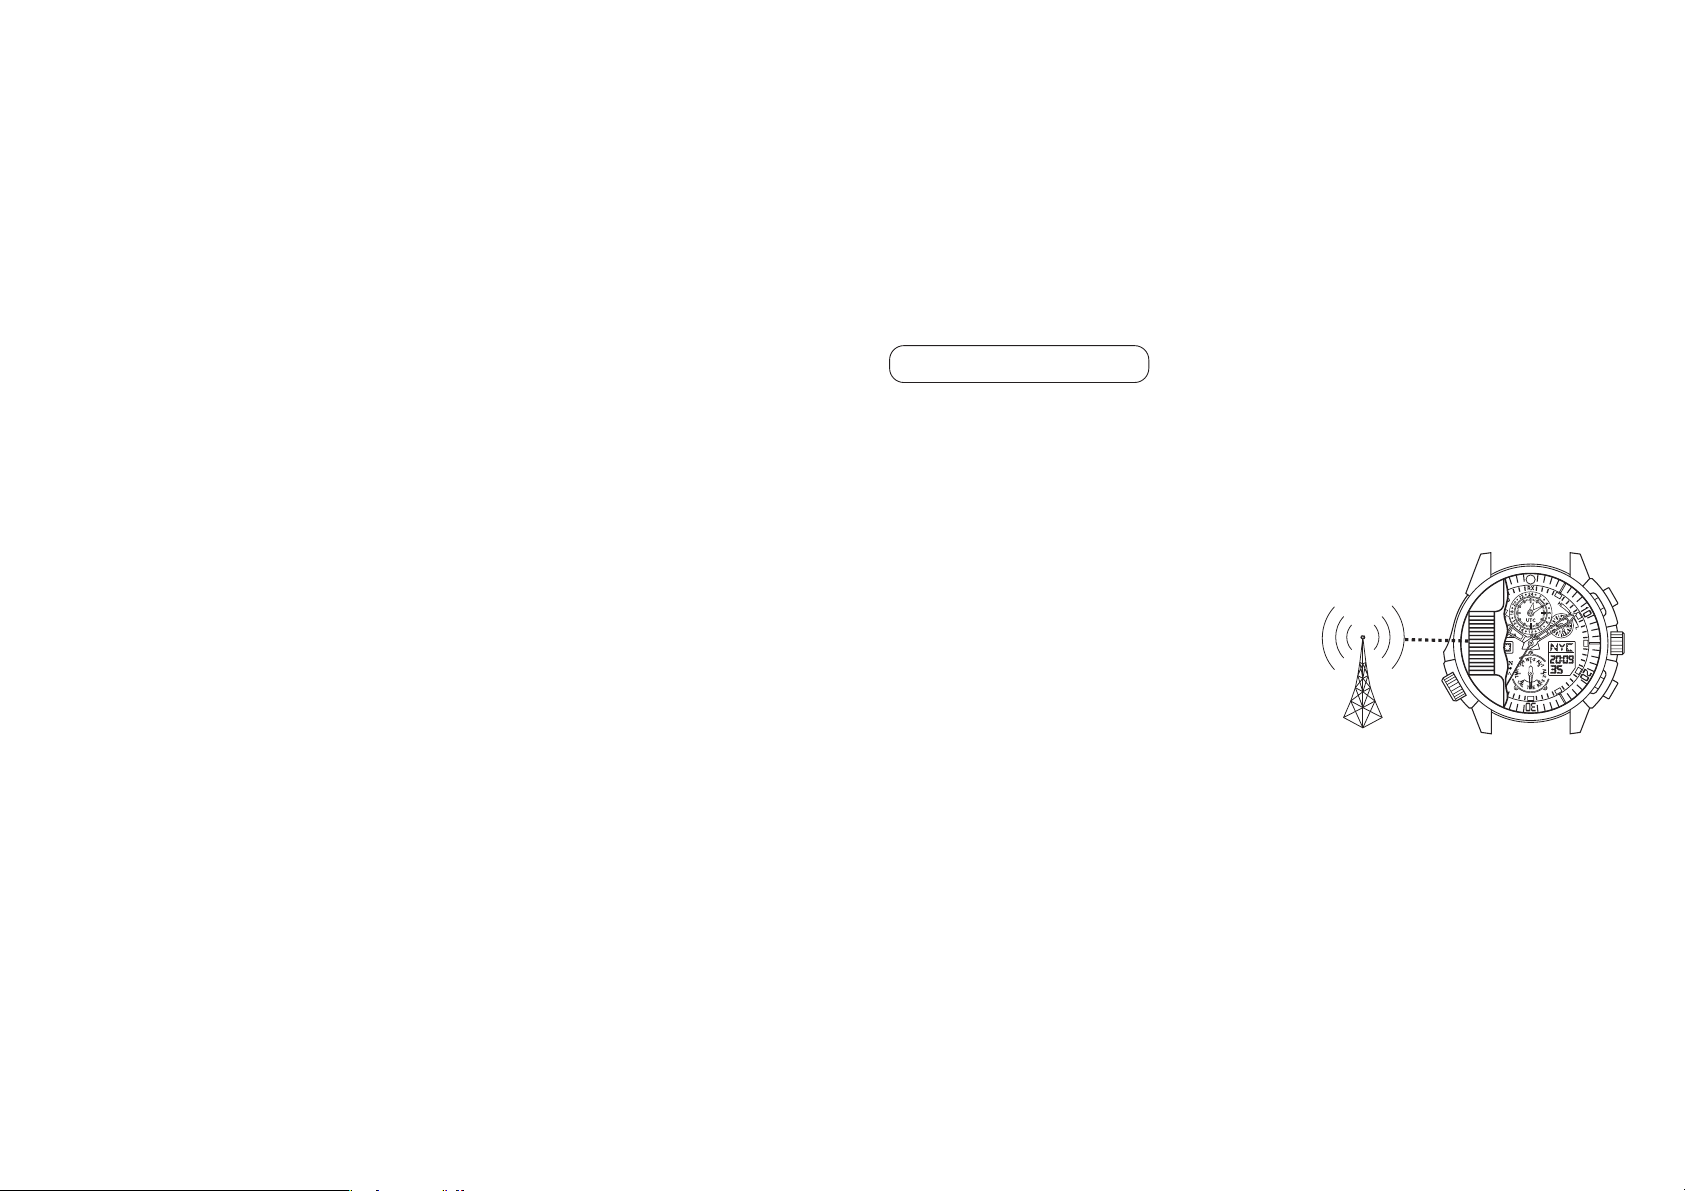
4. Radio Signal Reception
Three types of radio signal reception are possible: automatic reception, on demand
reception and recovery automatic reception.
There are three modes where reception is possible: time (TME), calendar (CAL) and
receive set (RX-S). The watch cannot receive signals in any other mode.
Display the home city in digital display 2 when receiving the radio wave.
• Reception is not possible unless the crown is in the normal position.
• If the home city is “UTC”, reception is not possible.
• Reception is not possible during chronograph or timer measurement.
• The reception level may change depending on the surrounding environment. While
referring to reception level (H, M or L), change the watch location, direction and angle
to try to receive the radio wave.
• When the watch is receiving the radio wave, as a general rule, all of the hands will
stop. To check the time, hold the lower right button (A) for 2 seconds to cancel radio
wave reception. The hands will then return to the current time.
• Even while the radio wave is being received, the second hand will continue to rotate to
align the minute hand with the current time. This shortens the time it takes to set the
correct time.
An antenna for receiving the radio
signals is located inside the watch
(on the 9:00 position).

20 21
Recovery Automatic Reception (Automatic Reception)
• If the watch stops due to insufficient charging, expose the watch to
sunlight to recharge it. When the watch is recharged sufficiently, it will
automatically receive the radio wave once.
* Regularly charge your radio controlled watch so it does not become insufficiently
charged.
The radio wave reception can be checked with “Confirming
Reception Status”. (p. 26)
On Demand Reception (Manual Reception)
• Signals can be received at any time.
<Receiving the radio signals>
1. Pull the crown out to position 1 and turn to align the
mode hand with the CAL, TME or RX-S position.
2. Return the crown to the normal position.
3. Remove the watch from your wrist and place on a
stable surface near a window where the radio signal
can be easily received.
4. Point the 9:00 side of the watch in the direction of the radio wave transmitter, and hold
down the lower right button (A) for more than 2 seconds. Release when the
confirmation tone sounds and the second hand stops at RX. The second hand will then
move to H, M or L, and reception will begin.
* Do not move the watch during reception.
5. When the radio wave has been properly received, the second hand will automatically
move from H, M or L to the time that was received, all the hands will be corrected,
and the second hand will return to 1-second interval movement.
* Reception can take a maximum of 15 minutes.
[Mode hand position
when receiving]
22 23
WW
5. Poor Reception Areas
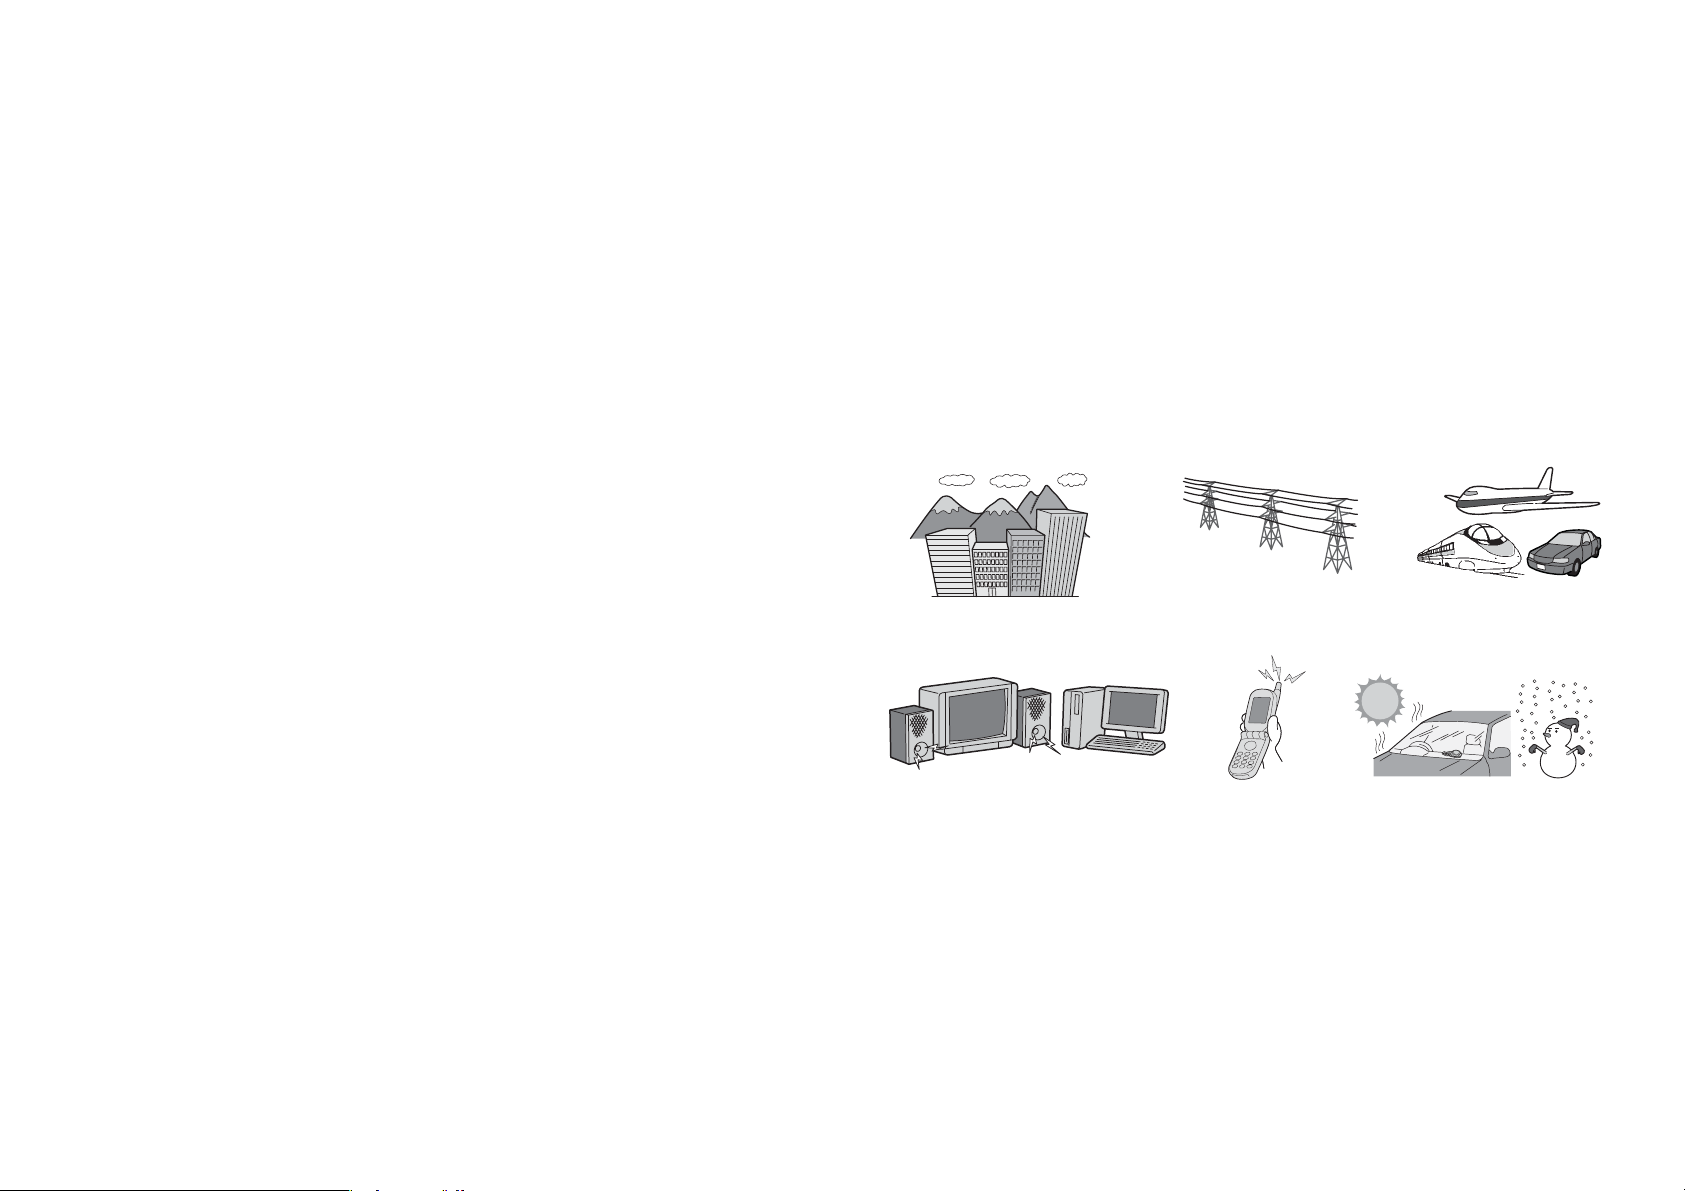
It may not be possible to receive radio waves under environmental conditions where reception
is difficult or in areas susceptible to radio noise, such as those shown in the illustrations below.
While referring to the reception level display, try to find a location with better reception.
j Extremely hot or cold locationsj Near cellular
phones that are
in use
j Inside vehicles, including
cars, trains and aero planes
j Near TVs, refrigerators,
computers, fax machines and other
home electronics or appliances
j Inside reinforced concrete
buildings or underground
j Near high-tension electrical
lines, railway overhead wires
or communication facilities
<Storing Your Radio Controlled Watch>
If the watch has received insufficient light for charging or has been kept in a dark
location for an extended period of time (one week or more), the Power Save Feature of
the watch is activated and the hands of the watch stop. Even though the watch will not
show movement, the correct time is kept in memory. When the watch is in the Power
Save mode, it will continue to keep the correct time internally. In some instances,
“Automatic Reception” may not be successful due to a weak signal reception. When
resuming use of the watch after the power save mode has been activated for an extended
period of time, you can cancel the Power Save function by placing the watch in light
sufficient for charging and performing the “On Demand” reception process to correctly
set the time and date. (Refer to page 96 for information on the Power Save Function.)
24 25
<Time required for reception>
Reception can take from about 2 minutes to a
maximum of 15 minutes, depending on factors such
as the weather or noise. If the radio wave reception
fails, the watch may return immediately to the
normal display.
[Caution] During reception, the second hand may
rotate once and show the reception level
again.
Do not move the watch until the second
hand has returned to 1-second interval
movement.
WW
6. Display during Reception
[During reception standby]
j Second hand moves to RX and
stops.
The radio wave reception
indicator points to the received
transmitter.
[Digital display]
[Second hand display]
Off Off
j If the reception fails, RC and
NO are displayed.
Repeatedly switches
between on and off
j The second hand moves from
RX to reception level H, M or L
and reception starts.
j When the reception is
successful, the second hand
will return to 1-second interval
movement and the other hands
will be automatically corrected.
[Receiving signal]
[Reception completed]
Radio wave
reception
indicator
26 27
Reception status
Signal reception failed
Radio wave reception environment was very
good
Radio wave reception environment was good
Radio wave reception environment was not very
good
Reception
level
NO
H
M
L
* The time display may shift slightly depending on the reception environment and
internal watch processing even if radio waves are properly received.
* H, M and L indicate the reception status and are not connected to the performance of
the watch.
• If NO is indicated, find a location or direction where the reception is better and
perform on demand reception again. (p. 20)
WW
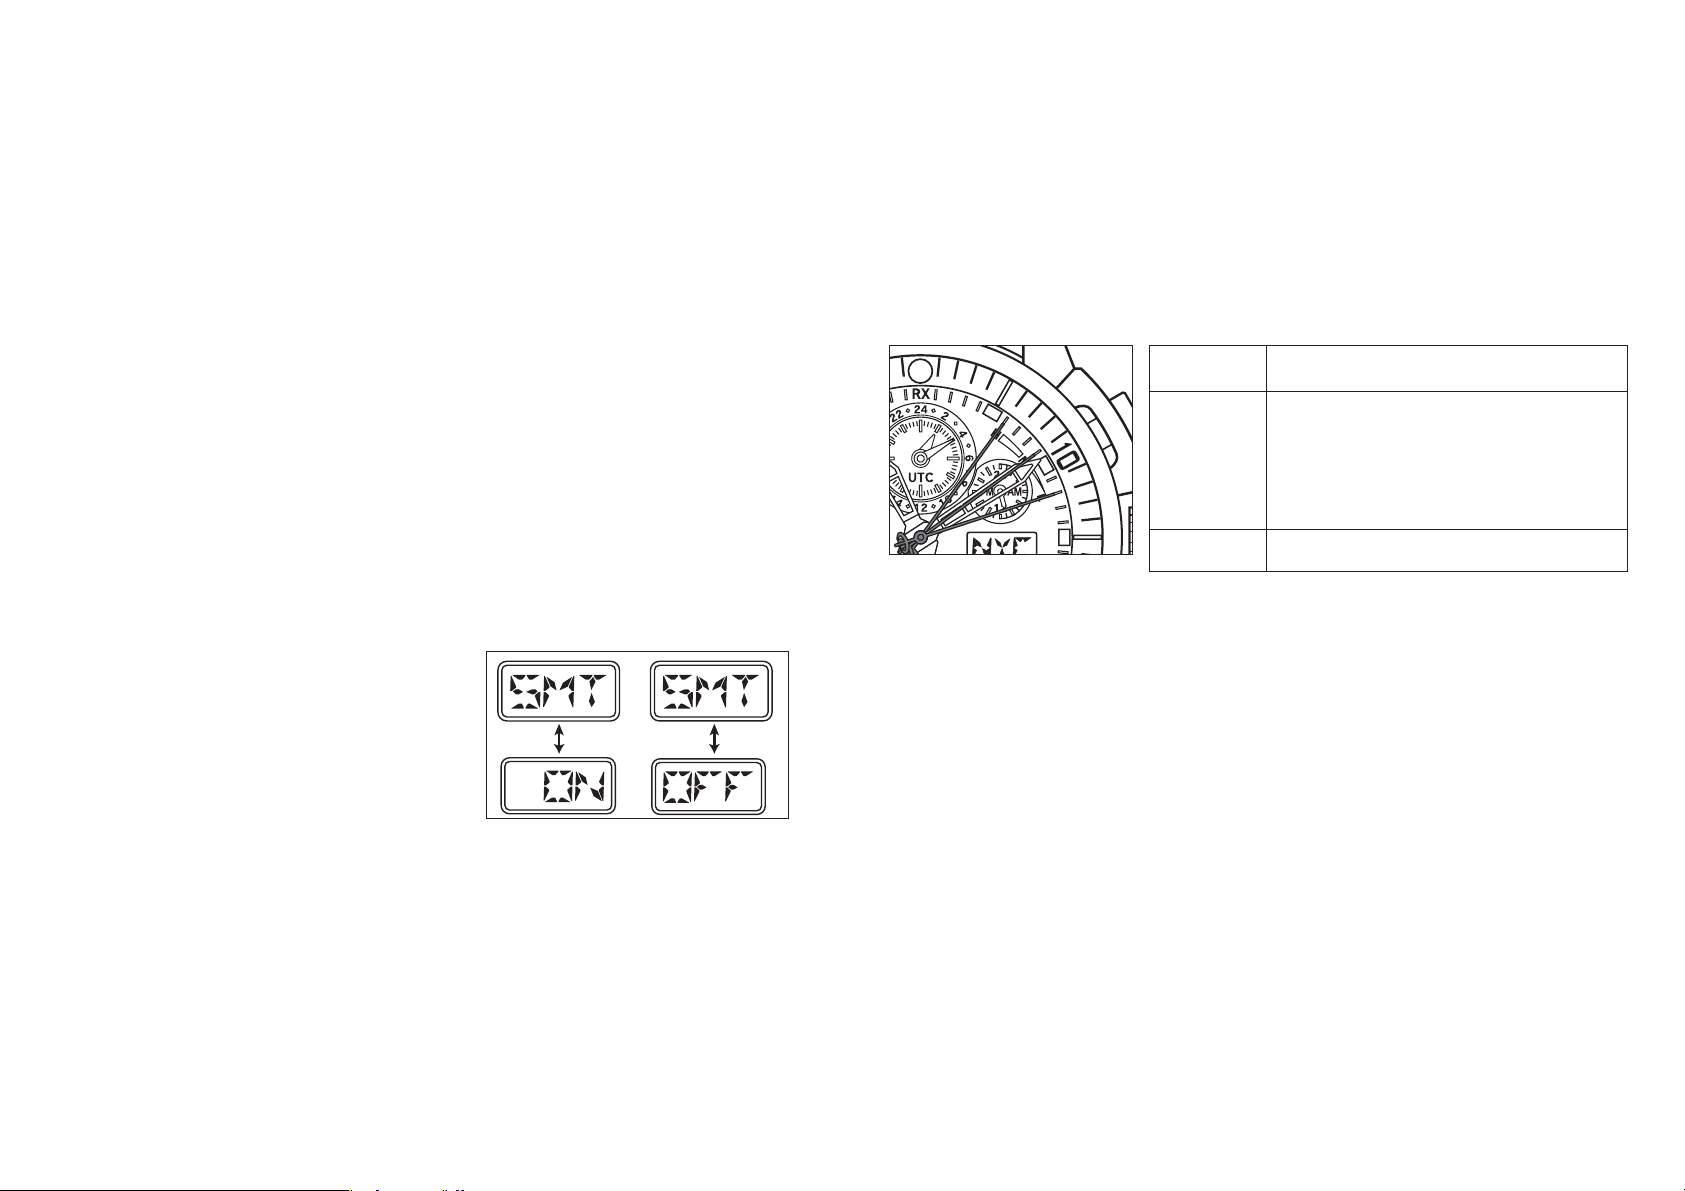
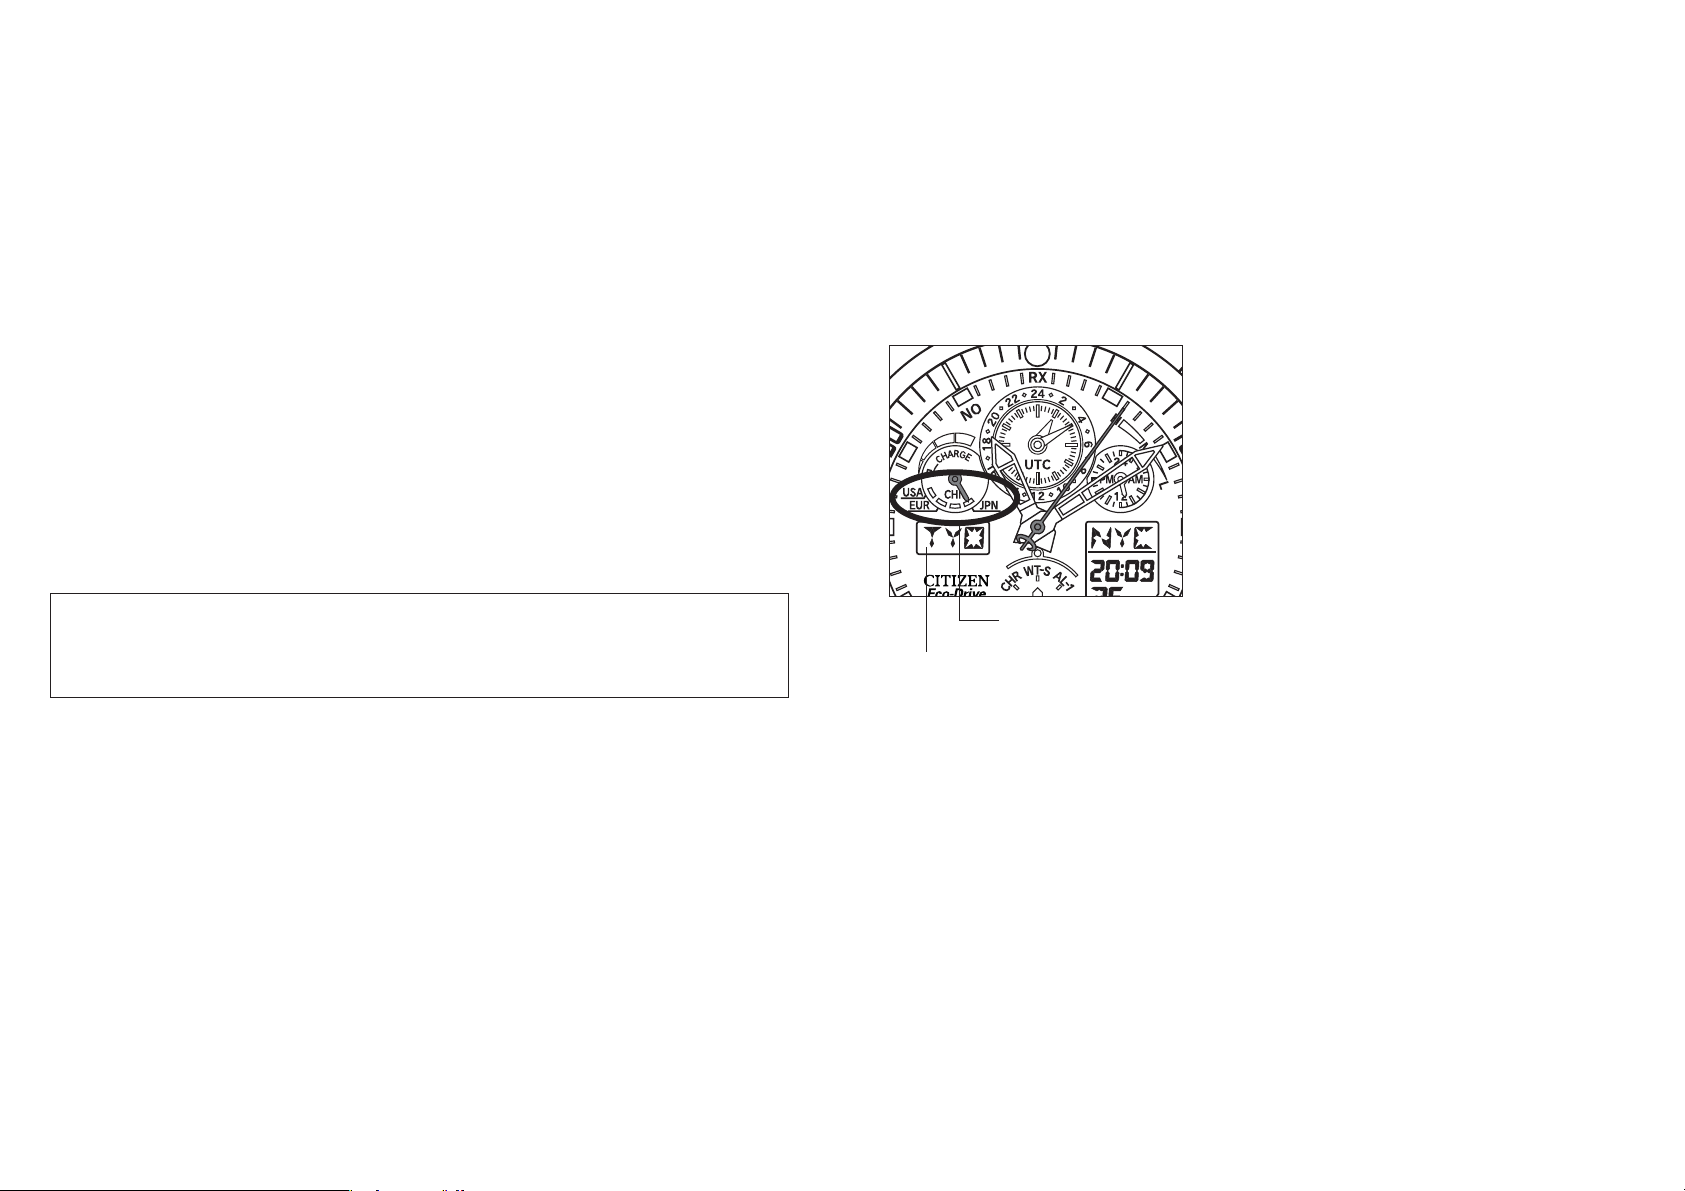
7. Confirming Reception Status
• The result of the radio wave reception can be confirmed.
• The daylight saving time setting status of the home city can be confirmed.
1. Pull the crown out to position 1 and set the mode to TME, CAL or RX-S.
2. Press the crown back into its normal position and press the lower right button (A)
once to confirm the reception status. The second hand will move to H, M, L or NO.
• The daylight saving time setting status for the home time is displayed on digital
display 2 (flashes alternately between SMT and ON or OFF).
• The radio wave reception indicator points to
JPN, EUR, USA or CHN.
3. Press the lower right button (A) once.
• The watch returns to the normal time display
(1-second interval movement).
• It also returns automatically to normal
display if there are no operations for 10
seconds.
[Digital display 2]
USA
EUR
CHN
JPN
28 29
WW
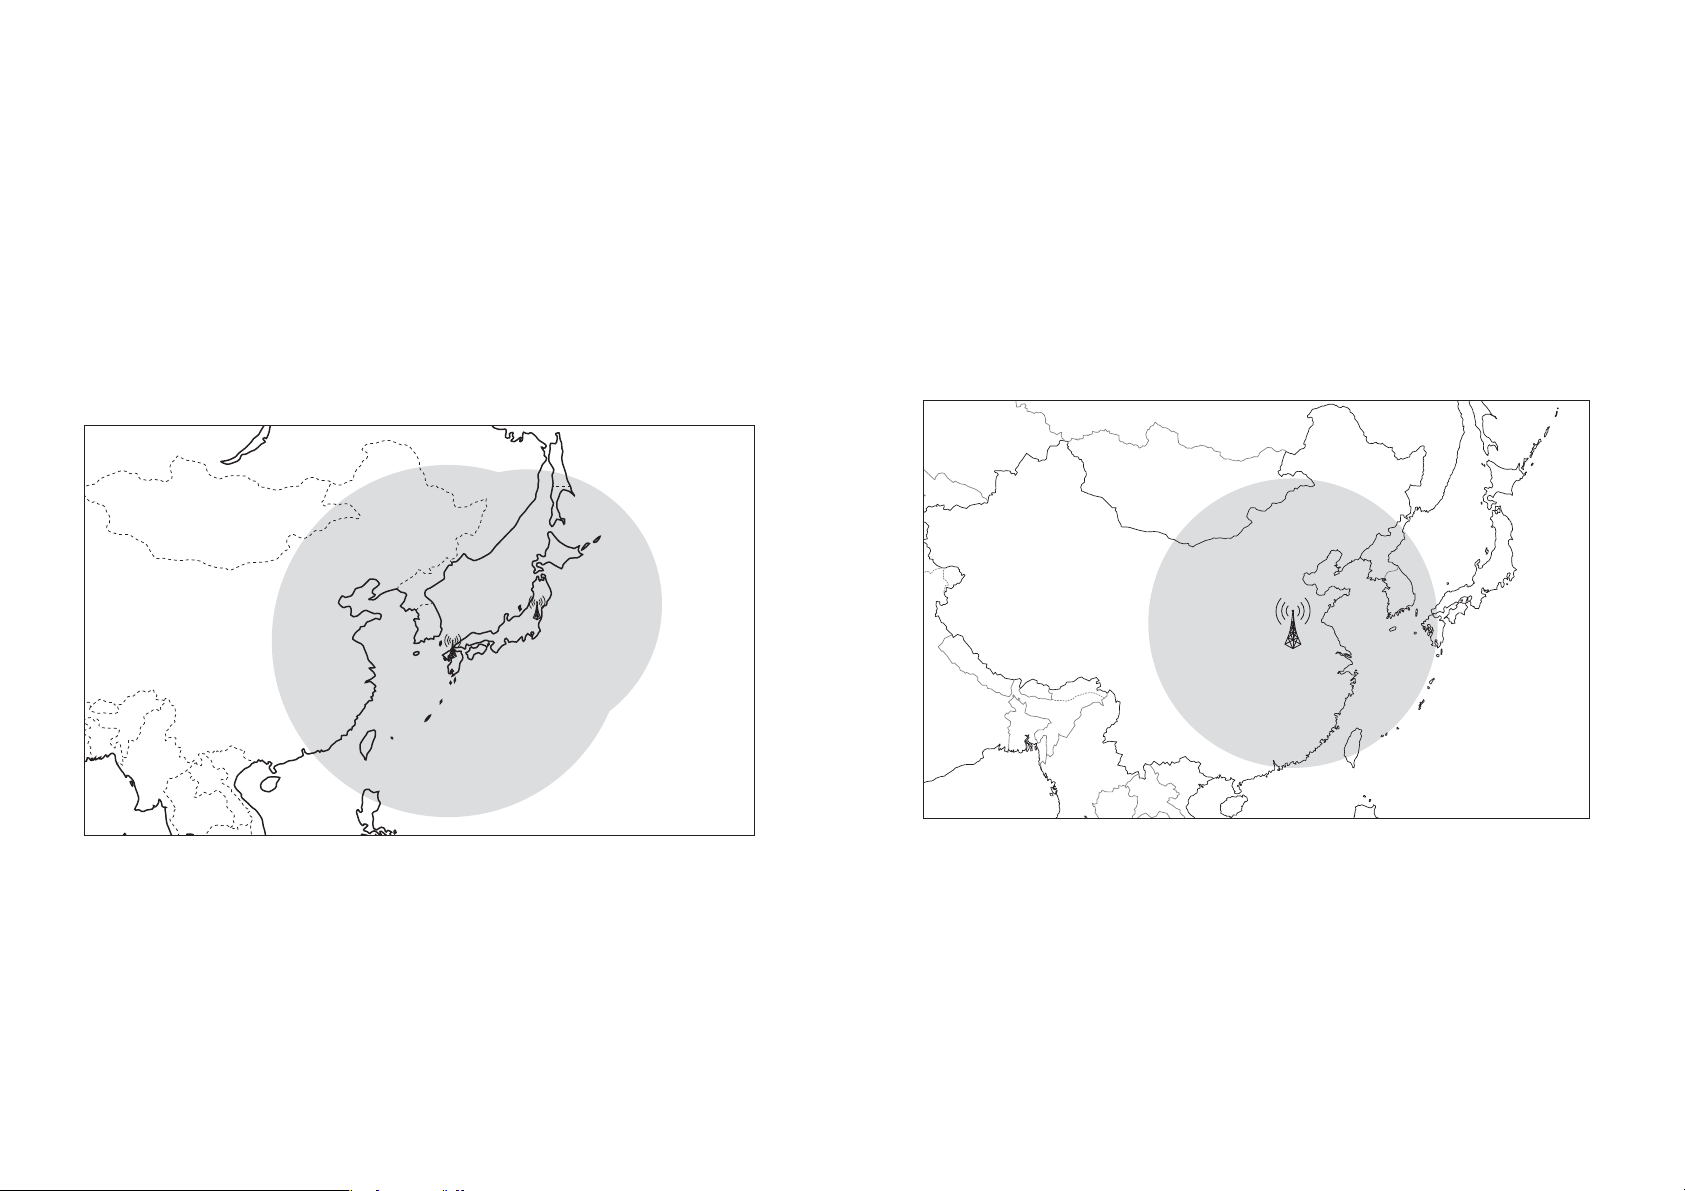
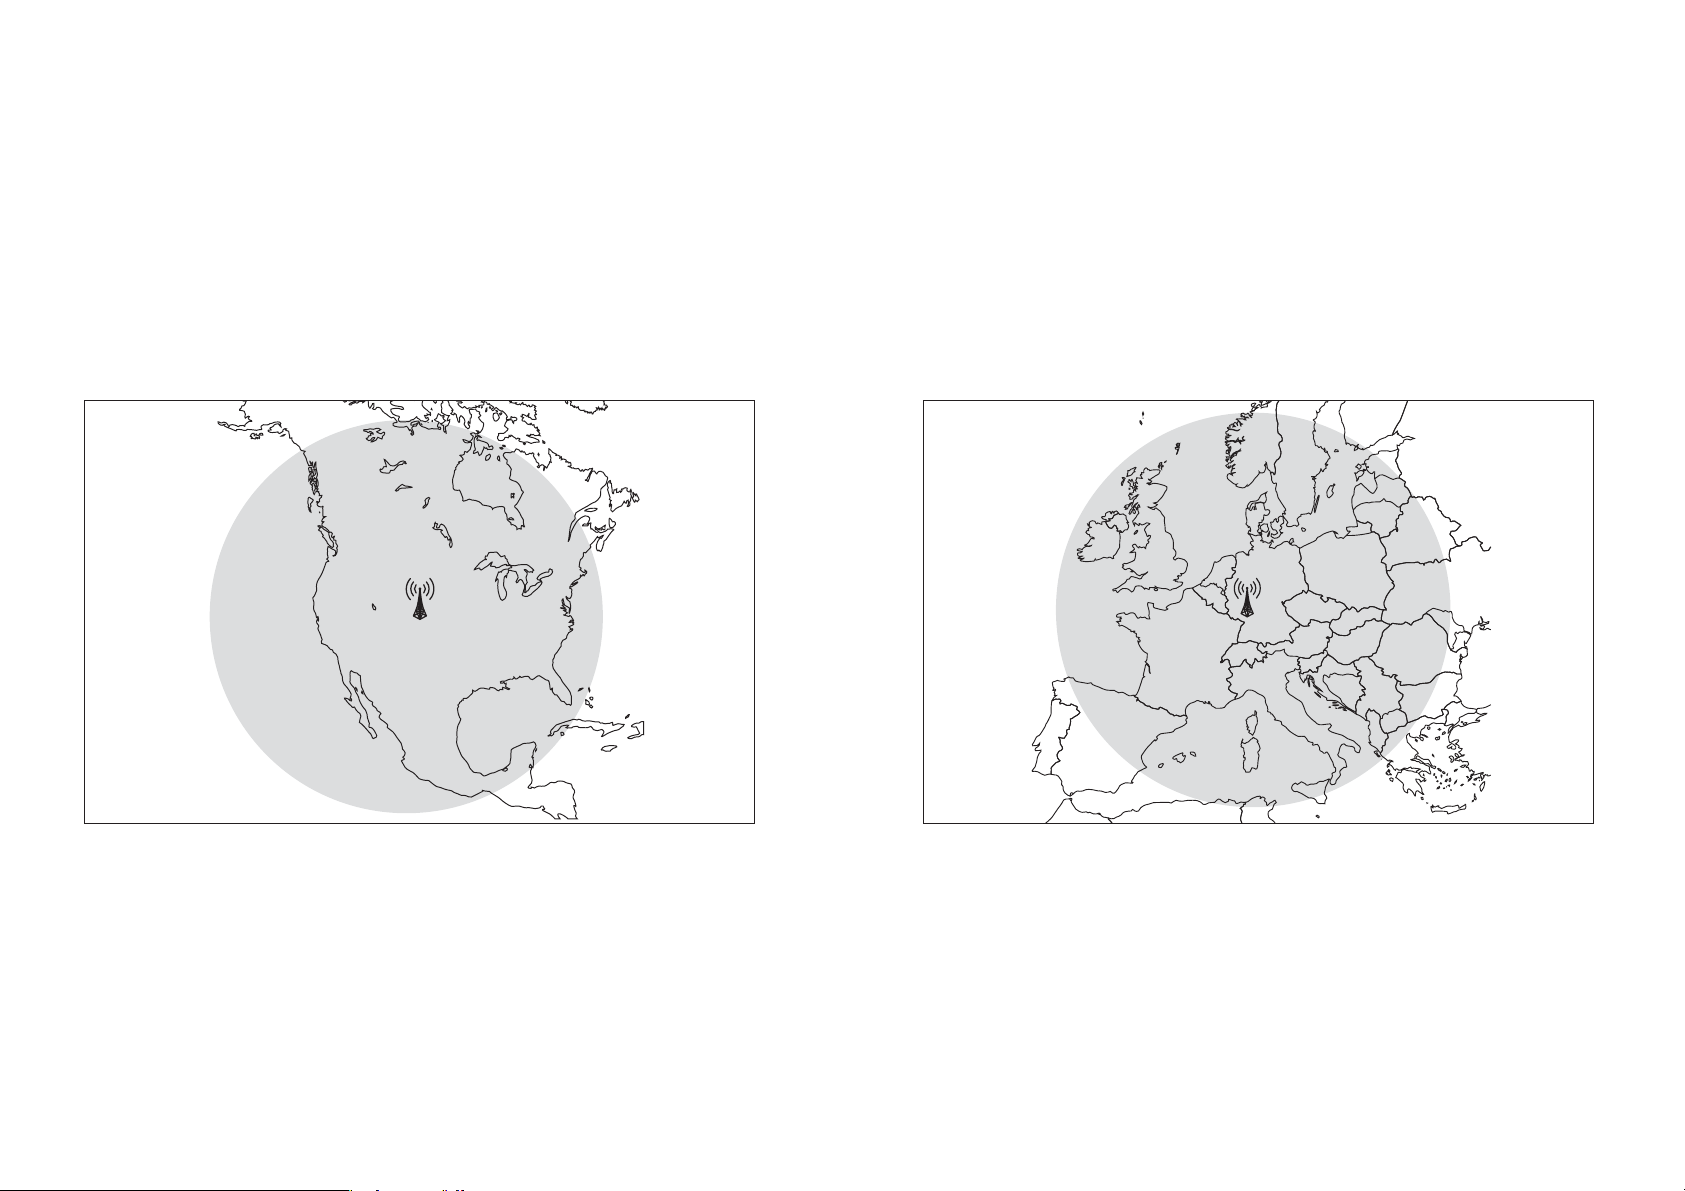
8. Reception Area Guidelines
This watch can receive standard time radio waves broadcast from Japan (two
transmitters), the USA, Europe (Germany) and China.
The standard time radio wave to be received can be changed by selecting the city in
another region.
The maps show the approximate reception areas. However, note that the radio wave
condition could change due to factors including the weather (such as lightning) and
changes in the season or sunrise/sunset time.
The reception area on the map is only guideline, and it may be difficult to receive the
radio signal even within the areas indicated on the map.
Standard time
radio signal
Transmitter Frequency
JJY
Japan
WWVB
USA
DCF77
Germany
BPC
China
Ohtakadoya-yama Standard Time Transmitter
(Fukushima Transmitter)
Hagane-yama Standard Time Transmitter
(Kyushu Transmitter)
Fort Collins Transmitter, Denver, Colorado
Mainflingen Transmitter, Southeast Frankfurt
Shangqiu Transmitter, Henan
The standard time radio wave used by this radio controlled watch may be interrupted
occasionally due to special circumstances at the radio wave transmitter.
Even if reception of the standard time radio wave has failed, the watch will continue to
be accurate to within ±15 seconds per month.
40 kHz
60 kHz
60 kHz
77.5 kHz
68.5 kHz
3130
JPN: JJY (Japan) Automatically selects one of the two transmitters
Fukushima Transmitter: Radius of approximately 1,500 km from the transmitter
Kyushu Transmitter: Radius of approximately 2,000 km from the transmitter
CHN: BPC (China) Shangqiu, Henan: Radius of approximately 1,500 km from
the transmitter
3332
EUR: DCF77 (Germany) Mainflingen: Radius of approximately 1,500 km from
the transmitter
USA: WWVB (USA) Fort Collins: Radius of approximately 3,000 km from the
transmitter
3534
[Cities and the standard time radio
wave assignment]
• The received standard time radio waves shown
in “Table of UTC Time Differences” are
assigned one of the following four radio wave
transmitters, in accordance with the home city
in digital display 2.
[Standard time radio wave
assignment]
JPN : JJY (Japan)
USA : WWVB (USA)
EUR : DCF77 (Germany)
CHN : BPC (China)
• Radio wave transmitters are assigned even for countries and regions outside the
reception area.
• For regions that are assigned Japan’s standard time radio wave (JJY), either the
Fukushima transmitter or Kyushu transmitter is selected automatically for reception,
whichever is easier to receive.
Radio signal transmitter
Digital display 2
WW
9. World City Display
UTC (Coordinated Universal Time) and 43 cities (or regions) are registered in this watch
in advance, and it is also possible to register one additional city. The time of each city
can be called up and displayed.
• Press the upper right button (B) while the crown is in position 1 during TME mode or
CAL mode to display in sequence from the top left to bottom right the city names
shown in “Table of UTC Time Differences” (p. 36), and press the lower right button
(A) to display the city names in sequence from the bottom right to top left.
UTC: Coordinated Universal Time
This is the time of an atomic clock that is used as the global standard (= international atomic time).
It uses leap seconds to correct deviations in time systems that are based on the rotation of the Earth
(universal time).
 Loading...