


1
English
You can view explanations of the operation of this watch by accessing the Citizen web
site and viewing the “Service & Support.”
URL: http://www.citizenwatch.jp/
The combination watch
of the analog and digital
display
World time alarm—sounds
at the time of the selected
city (
→ page 26)
Solar-powered—no need
for battery replacement
(→ page 9)
Chronograph function—
can display split time
(→ page 30)
World time—easy to see
the time and calendar
of 30 cities all over the
world (
→ page 14)
Timer function—can be
set for up to 99 minutes
(→ page 32)
Features
U200_EN_final.indd 1 08.4.24 3:05:55 PM

2
3
English
Contents
Before use ......................................4
Part names .............................................4
Checking the battery ............................
5
Charging the battery ...................6
Charging the battery .............................6
When the battery becomes short of
power—Insufficient charge warning
function ..................................................
7
Charging time ........................................
8
Eco-Drive ...............................................
9
Power saving function ...............10
Changing the mode ...................
12
World time function ...................
14
Selecting the city .................................14
The table of city names .......................
16
Setting the time ..........................18
Setting the time of
the digital section [TME] ....................
18
Setting the time of
the analog section ...............................
22
Setting the calendar [CAL] ........ 24
Perpetual calendar ..............................24
Using the alarm [AL1]/[AL2] .....26
Setting the alarm ................................. 26
Activating/deactivating the alarm ....
29
Using the chronograph [CHR]
...30
Using the timer [TMR] ................
32
Troubleshooting .........................
34
• The hands do not work properly
• The digital displays seem unusual
• Others
Resetting the watch ...................36
The initial settings .............................. 37
Precautions .................................. 38
Maintenance ................................
45
Specifications ..............................
46
U200_EN_final.indd 2-3 08.4.24 3:05:58 PM
4
5
English
7 Checking the battery
Confirm the movement of the second hand to check the battery.
The second hand is moving at
2-second intervals or has stopped.
Charge the battery. (
→ page 6)
The second hand is moving at
1-second intervals.
Adjust the time and calendar
.
• Setting the time (
→ page 18)
• Setting the calendar (
→ page 24)
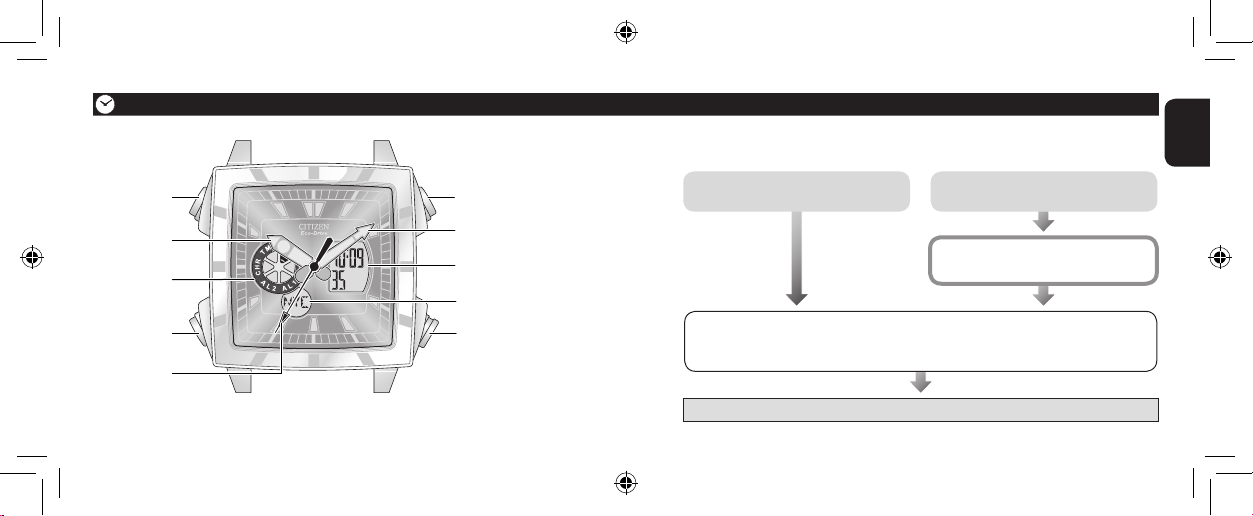
7 Part names
Mode indicator
Before use
Button B
Button
A
Hour hand
Crown
Minute hand
Button
M
Second hand
Digital display A
Digital display B
The illustrations in this instruction manual may differ from the actual appearance of
your watch.
Start using the watch!
U200_EN_final.indd 4-5 08.4.24 3:06:00 PM

6
7
English
While the function is activated...
You cannot use any mode other than
[TME]
. (→ page 12)
The settings of the other modes are initialized. (
→
page 37)
The mode automatically changes to
[TME]
as the function is
activated.
7 Charging the battery
This watch has a battery which is charged by exposing the dial to light such as direct
sunlight or fluorescent lamps.
To obtain the best performance
• Expose the dial to direct sunlight for several hours at least once a month.
• After taking off the watch, put it where the dial is exposed to bright light, such as
by a window.
• Before storing the watch in a dark place for an extended period of time, fully charge
the battery.
When the watch is covered with long sleeves, for example, the battery may not be charged
sufficiently. Try to keep the watch exposed to light even when wearing the watch.
Charging the battery
Do not charge the battery at a high temperature (about 50˚C/122˚F or higher).
7 When the battery becomes short of power—Insufficient charge
warning function
• After the battery is charged for a while, the second hand will
move normally.
• If you have not charged the battery for four days or more since
the warning movement began, the battery will run out and the
watch will stop.
When the battery becomes short of power, the second hand moves once every two
seconds—insufficient charge warning function. Charge the battery by exposing the
dial to light.
The two-second
interval movement
U200_EN_final.indd 6-7 08.4.24 3:06:04 PM

8
9
English
7 Charging time
Below are the approximate values for when exposing the dial to light continuously.
Use the table below only as a reference.
Charging the battery
This watch has the “Eco-Drive” system, which
converts light into electrical energy using the
solar cell beneath the dial. The system makes
you free from care of battery replacement and
is environment-friendly as no battery disposal is
required.
<After the battery is fully charged—Overcharge
prevention function>
After the battery is fully charged, charging automatically
stops to prevent overcharging, which may damage
the battery, or affect the accuracy, functions, and
performance of the watch.
Eco-Drive
Illuminance
(Lx)
Environment Charging time
to work for one
day (approx.)
Charging time to start
working normally when the
battery is empty (approx.)
Time for charging fully
when the battery is
empty (approx.)
500 Interior lighting
4 hours — —
1,000 60-70 cm (24-28 in.) under
a fluorescent lamp (30 W)
2 hours — —
3,000 20 cm (8 in.) under a
fluorescent lamp (30 W)
45 minutes
7.5 hours —
10,000 Under cloudy weather
12 minutes 2.5 hours 80 hours
100,000 Under direct sunlight in
summer
3 minutes 50 minutes
16 hours
Battery duration after fully charging (without further
charging)
About 8 months
U200_EN_final.indd 8-9 08.4.24 3:06:07 PM

10
11
English
When the watch is not exposed to light for more than 30 minutes, all digital displays
are automatically turned off to save the battery power. (Power saving function)
While the function is activated...
• All digital displays are turned off.
• All hands keep moving.
Crown
To cancel the function
Expose the dial to light or press any button.
All hands stop moving.
<When leaving the watch unused for an extended period of time>
Pull out the crown to position
1. All hands stop moving and the battery power is
saved further.
Button B Button A
Button
M
Power saving function
U200_EN_final.indd 10-11 08.4.24 3:06:11 PM
12
13
English
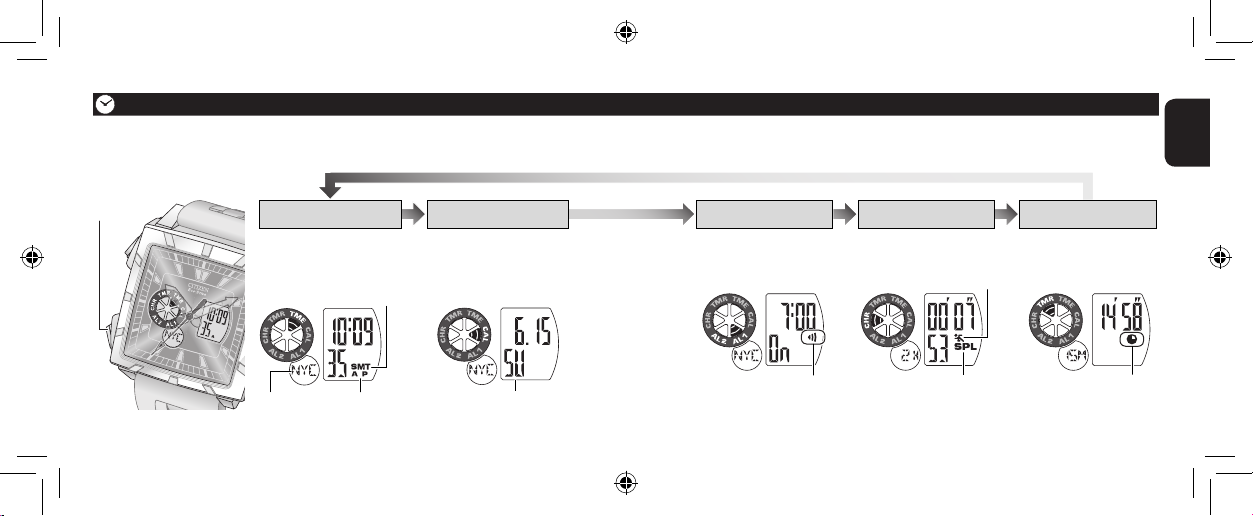
Day of the week
[TMR][CHR][AL1]/[AL2]
[TME]
[CAL]
Changing the mode
AM/PM indicator
Daylight saving time indicator
City name
• Displays the calendar.
• Set the calendar.
(
→ page 24)
Set the alarm.
(→ page 26)
Use the chronograph.
(→ page 30)
Set the timer.
(→ page 32)
• Displays the time.
• Set the time.
(
→ page 18)
Button M
The digital section of this watch has 6 modes.
To change the mode, press button M repeatedly.
Alarm indicator
Split time indicator
Measurement indicator
Timer indicator
U200_EN_final.indd 12-13 08.4.24 3:06:24 PM

14
15
English
* UTC (Coordinated Universal Time)
This is the standard time around the world maintained by international agreement.
The way of selecting the city is different from above when setting the alarm
([AL1]/[AL2]). (→ page 26)
On the world time function
• After setting the time/calendar for
one of the cities, those of the other
cities are also set automatically.
•
The world time function does not affect
the analog section of this watch.
You can select one of 30 cities all over the world + UTC (Coordinated Universal
Time)
* and display its time/calendar.
7 Selecting the city
World time function
Select a city name as required when...
– setting the time/calendar
– checking the time/calendar
– setting the alarm
Button B Button A
Button
M
1. Press button M repeatedly to change the
mode to [TME] or [CAL].
2. Press button A or button B repeatedly to
select a city name on digital display B.
• Refer to “The table of city names” (→ page 16) for
the selectable cities.
The time or calendar of the selected city is diplayed
on digital display A
.
Mode indicator
Digital display A
Digital display B
U200_EN_final.indd 14-15 08.4.24 3:06:32 PM

16
17
English
7 The table of city names
City
code
City name
Time
difference
City
code
City name
Time
difference
City
code
City name
Time
difference
City
code
City name
Time
difference
UTC
Coordinated
Universal Time
±0
KHI Karachi +5 ADL Adelaide +9.5 MEX Mexico City
–6
LON London
DEL Delhi +5.5 SYD Sydney +10 CHI Chicago
PAR Paris
+1
DAC Dhaka
+6 NOU Noumea +11 NYC New York
–5
ROM Rome BKK Bangkok +7 AKL Auckland +12 YMQ Montreal
CAI Cairo
+2 SIN Singapore
+8
HNL Honolulu –10 SCL Santiago –4
MOW Moscow +3 HKG Hong kong ANC Anchorage –9 BUE Buenos Aires
–3
THR Tehran +3.5 BJS Beijing LAX Los Angeles –8 RIO Rio de Janeiro
DXB
Dubai +4 TYO Tokyo +9 DEN Denver –7
World time function
The period of daylight saving time, time difference and city names may change
depending on the situation of each country.
U200_EN_final.indd 16-17 08.4.24 3:06:38 PM

18
19
English
See page 22 to set the time of the
analog section of this watch.
1. Press button M
repeatedly to change the
mode to [TME].
2. Press button A or B
repeatedly to select a
city.
• Select the city of your
present location or the nearest one.
3. Press and hold button B until the daylight saving time
indicator ( ) starts flashing.
You can adjust the time now.
4. Set daylight saving time
(1) Press button A to select ON or OFF (OF).
(2) Press button B to confirm the selection and go to the
next step.
• The daylight saving time indicator ( ) appears and the
time advances by 1 hour if you have selected ON.
Daylight saving time is the institution which put time forward 1 hour for a certain
period in summer.
• The setting is for each city and does not affect the time of the other cities.
• You cannot set
daylight saving time
when UTC is selected in step 2.
Setting the time
7 Setting the time of the digital section [TME]
Button B Button A
Button
M
Continued on the next page
U200_EN_final.indd 18-19 08.4.24 3:06:42 PM

20
21
English
6. Select 12-hour clock or 24-hour clock
(1) Press button A to select 12-hour clock (12H) or 24-
hour clock (24H).
• If you select 12H, in the morning the AM indicator ( ),
and in the afternoon the PM indicator (
) appears.
(2) Press button B to confirm the selection.
The time setting finishes and the time is displayed.
Interrupting the time setting
Press button M.
• The time setting is also interrupted in about 2 minutes without any operation.
Adjustment before pressing button M is effective even when you interrupt the setting.
5. Set the second/minute/hour
(1) Press button A
repeatedly to set the
flashing digit.
• Press button A when
the time tone tells 0 seconds to
set second digit.
• The digit changes continuously
if you press and hold button
A
when setting the minute/hour.
(2) Press button B to confirm
the selection and set the next
digit.
You can go to step 6 after setting
hour digit.
Setting the time
Button B Button A
Button
M
U200_EN_final.indd 20-21 08.4.24 3:06:56 PM

22
23
English
See page 18 to set the time of the
digital section of this watch.
2. Turn the crown to the left or right to
adjust the time.
3. Push in the crown to position 0 on
the time tone on a radio, TV, etc.
The time setting finishes. All hands start
to move.
7 Setting the time of the analog section
Setting the time
Hour hand
Crown
Minute
hand
Second hand
1. Pull out the crown to position 1
when the second hand points to
the 0 second position.
All hands stop moving. You can adjust
the time of the analog section now.
U200_EN_final.indd 22-23 08.4.24 3:07:05 PM

24
25
English
The date is automatically adjusted until December 31, 2099. So you do not
need to correct it at the end of each month.
Perpetual calendar
Setting the calendar [CAL]
Button B
Button
A
Button
M
1. Press button M repeatedly
to change the mode to
[CAL].
2. Press button A or B
repeatedly to select a city.
• Select the city of your
present location or the nearest one.
3. Press and hold button B
until the digit of month
starts flashing.
You can adjust the calendar
now.
4. Set the month/day/year
(1) Press button A repeatedly to set the flashing digit.
• The digit changes continuously if you press and hold
button
A.
(2) Press button B to confirm the selection and set the next item.
When year is set, the calendar setting finishes.
• Day of the week is displayed automatically in conjunction
with date.
5. Press button M repeatedly to change the mode to [TME].
Interrupting the calendar setting
Press button M.
• The calendar setting is also interrupted in about 2 minutes without any operation.
Adjustment before pressing button M is effective even when you interrupt the setting.
U200_EN_final.indd 24-25 08.4.24 3:07:19 PM
26
27
English
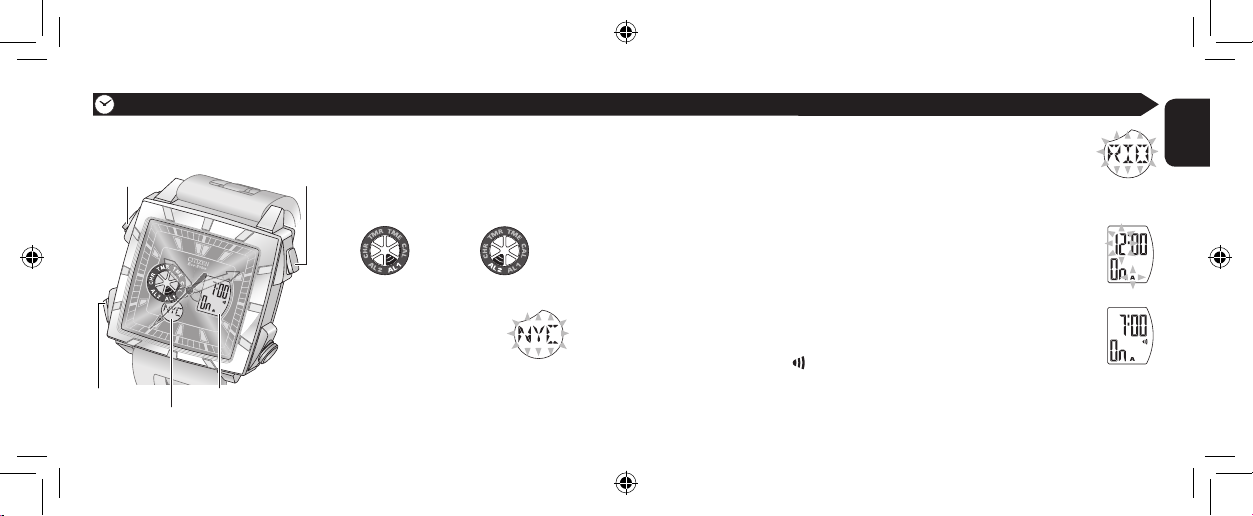
3. Select the city
(1) Press button A repeatedly to select a city.
•
City names change continuously if you press and hold button A.
(2) Press button B to confirm the selection and go to the next step.
4. Adjust the time of alarm (hour/minute)
(1) Press button A repeatedly to set the flashing digit.
• The digit changes continuously if you press and hold
button
A.
(2) Press button B to confirm the selection and set the
next digit.
When minute is set, the alarm setting finishes and the alarm
indicator (
) appears.
5. Press button M repeatedly to change the mode to [TME].
or
1. Press button M repeatedly to
change the mode to [AL1] or
[AL2].
The current alarm setting is shown on
digital display
A and B.
2. Press and hold button B
until a city name starts
flashing.
You can adjust the alarm now. The alarm
switches ON automatically.
The way of setting the alarm are common to [AL1] and [AL2].
7 Setting the alarm
Using the alarm [AL1]/[AL2]
Button B Button A
Button
M
Digital display A
Digital display B
U200_EN_final.indd 26-27 08.4.24 3:07:35 PM
28
29
English
Using the alarm [AL1]/[AL2]
Button B Button A
Button
M
Digital display A
Digital display B
Interrupting the alarm setting
Press button M.
• The setting is interrupted in about
2 minutes without any operation.
Adjustment before pressing button
M
is effective even when you interrupt the
setting.
When the on time comes
The alarm tone sounds for 15 seconds.
• To stop the alarm tone, press any button.
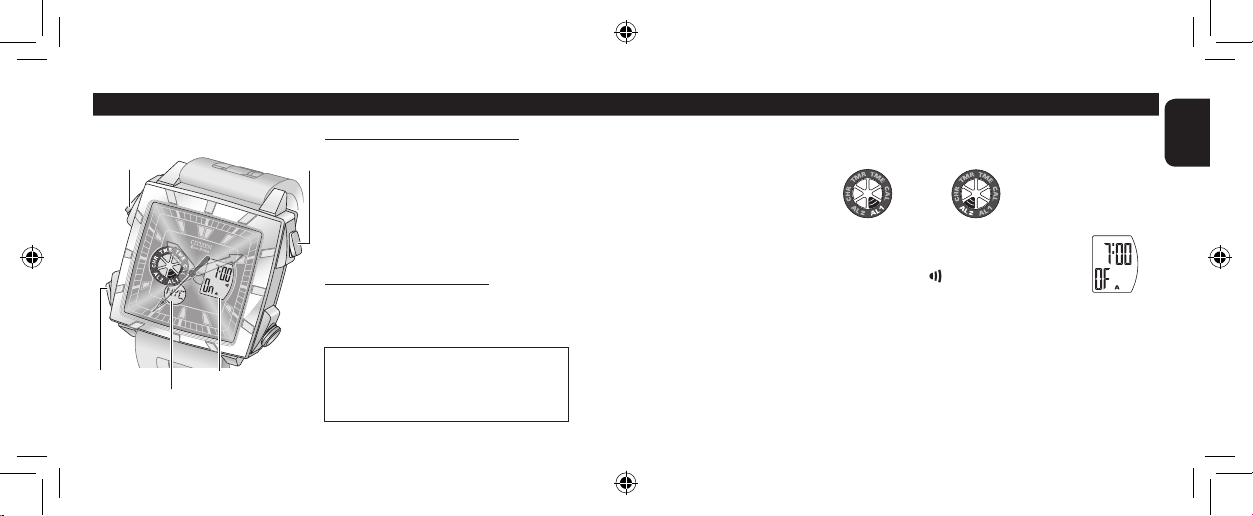
7 Activating/deactivating the alarm
1. Press button M repeatedly to change the mode to [AL1] or [AL2].
The current alarm setting is shown on digital display A and B.
2. Press button A to select ON or OFF (OF).
• If you select ON, the alarm indicator ( ) appears.
3. Press button M repeatedly to change the mode to [TME].
<To check the alarm tone>
The alarm tone is different between
[AL1] and [AL2]. You can hear (check) the tones
by pressing and holding button
A in these modes.
• Release button
A to stop the tone.
• Checking the alarm tone activates/deactivates the alarm.
or
[AL1] and [AL2] will automatically
change to [TME] in about 2 minutes
without any operation after entering
these modes.
U200_EN_final.indd 28-29 08.4.24 3:07:43 PM

30
31
English
You can measure times up to 23 hours 59 minutes 59 seconds 99, per 1/100 seconds.
1. Press button M
repeatedly to change the
mode to [CHR].
2. Press button A to start measurement.
The measurement indicator ( ) appears.
• Each time you press button
A, the measurement starts or stops.
• Press button
B to display a split time for 10 seconds. While a split time is
displayed, the split time indicator (
) flashes.
•
The measured time of the hour digit is displayed on
digital display B
.
3. Press button A to stop the measurement.
The measurement indicator ( )/split time indicator ( ) will disappear.
4. Press button B to reset the measurement time.
5. Press button M repeatedly to change the mode to [TME].
On measurement
• When the measured time passes
over 24 hours 00 minutes 00 seconds
00, the measurement stops and the
measured time is reset.
•
Measurement continues even if
[CHR]
is
changed to another mode.
Using the chronograph [CHR]
Button B Button A
Button
M
Digital display B
U200_EN_final.indd 30-31 08.4.24 3:07:59 PM

32
33
English
3. Press button A to start countdown.
The timer indicator ( ) appears.
• Each time you press button
A, the countdown starts or stops.
• To restart the count from the set time, press button
B while the timer
is running.
• To reset the timer, press button
B while the timer is stopped.
4. Press button M to change the mode to [TME].
When the set time has passed
The time-up tone sounds for 5 seconds and the timer finishes.
The timer indicator (
) disappears.
• To stop the time-up tone, press any button.
The timer continues even if [TMR] is changed to another mode.
Using the timer [TMR]
You can set the countdown timer from 1 minute up to 99 minutes per 1 minute.
1. Press button M
repeatedly to change the
mode to [TMR].
The last timer setting starts
flashing and you can adjust the timer.
2. Press button B
repeatedly to set the time.
• If you press and hold
button
B, the figure
changes continuously.
Button B Button A
Button
M
Digital display B
U200_EN_final.indd 32-33 08.4.24 3:08:14 PM

3434
35
English
35
English
Troubleshooting
If you have a problem with your watch, check the table below.
Symptoms Remedies Page
The hands do not work properly
The second hand moves only
once every 2 seconds.
Charge the battery.
7
All hands stop moving.
Push in the crown to position
0.
23
Charge the battery.
6
The digital displays seem unusual
All indication on the displays
are turned off as you take the
watch out of the case.
The power saving function is
activated. Cancel the function.
10
The measurement indicator
( ) has not disappeared.
Stop the measurement of the
chronograph.
30
Symptoms Remedies Page
Others
The alarm tone does not
sound.
Activate the alarm.
29
Confirm and correct the alarm
setting.
26
The movement or indication is
not normal.
Reset the watch.
If the watch still does not work
properly, contact the Citizen Service
Center or the store where you
purchased your watch.
36
The watch does not work
properly even if you have
tried the remedies stated in
“Troubleshooting” (pages 34
and 35).
The watch does not move even
if the battery is fully charged.
(→ page 8)
Contact the Citizen Service Center
or the store where you purchased
your watch.
–
U200_EN_final.indd 34-35 08.4.24 3:08:20 PM

36
37
English
Resetting the watch
The watch may not work properly if it is affected by static electricity or shock. In this
case, reset the watch.
3. Push in the crown to position 0.
The watch is reset. The confirmation tone sounds and all digital display
indications are canceled.
• The resetting will be also effective in about 2 minutes without any operation.
After resetting, adjust the time (
→ pages 18−23) and calendar (→ page 24).
7 The initial settings
[TME]
AM12 : 00 : 00 / Daylight saving time : OFF (OF
)/
Display style : 12-hour clock (
12H) / City code : UTC
[CAL] January 1, 2008 / Tuesday / City code : UTC
[AL1][AL2] AM12:00 / Alarm : OFF (
OF) / City code : UTC
[CHR]
0 : 00 : 00 : 00
[TMR] 99 minutes
Crown
Caution
After resetting the watch, all settings are
initialized. (
→
page 37)
1.
Pull out the crown to position 1.
All the hands stop moving.
2. Press buttons A, B and M
simultaneously.
All digital display indications light up.
Button B Button A
Button
M
U200_EN_final.indd 36-37 08.4.24 3:08:23 PM

38
39
English
Examples of use
Indication
Specifications
Minor exposure
to water (washing
face, rain, etc.)
Moderate exposure
to water (washing,
kitchen work,
swimming, etc.)
Marine sports
(skin diving)
Scuba diving
(with an air tank)
Operation of the
crown when the
watch is wet
Dial Case (case back)
WATER RESIST(ANT) or
no indication
WATER RESIST(ANT)
Water-resistant to 3
atmospheres
OK NO NO NO NO
WR 50 or WATER
RESIST 50
WATER RESIST(ANT) 5bar
Water-resistant to 5
atmospheres
OK OK NO NO NO
WR 100/200 or WATER
RESIST 100/200
WATER RESIST(ANT) 10bar/20bar
Water-resistant to 10 or 20
atmospheres
OK OK OK NO NO
The unit “bar” is roughly equal to 1 atmosphere.
*
“WATER RESIST(ANT) xx bar” may also be indicated as “W.R. xx bar.”
WARNINGS
Water-resistance performance
Before use, confirm the water-resistance level of your watch indicated on the dial and
case.
Precautions
Continued on the next page
U200_EN_final.indd 38-39 08.4.24 3:08:27 PM

40
41
English
Precautions
• If water has penetrated the watch, or if the inside of the glass is fogged up and does
not become clear in a day, take the watch to your dealer or Citizen Service Center
for repair. Leaving the watch in such a state will rust the internal parts and cause
malfunction.
• If seawater penetrates the watch, place the watch in a box or plastic bag and
immediately take it in for repair. Otherwise, the pressure inside the watch will
increase, and parts (glass, crown, buttons, etc.) may come off.
• If the watch is used in seawater, rinse with fresh water afterward and wipe with a
dry cloth.
Keep your watch clean
• Keep your watch clean to prevent rust or dirt building up on the watch. They may
stain your clothes.
• Wipe off dirt on the leather band with a soft and dry cloth to prevent it from
discoloring.
• Water-resistance for daily use (up to 3 atmospheres):
This type of watch is resistant to minor exposure to water. For example, you may
wear the watch while washing your face; however, it is not designed to be used
underwater.
• Upgraded water-resistance for daily use (up to 5 atmospheres):
This type of watch is resistant to moderate exposure to water. You may wear the
watch while swimming; however, it is not designed to be used for skin diving.
• Upgraded water-resistance for daily use (up to 10/20 atmospheres):
This type of watch may be used for skin diving; however, it is not designed to be
used for scuba or saturated diving using helium gas.
• Be sure to use the watch with the crown pressed in fully (normal position) to ensure
the water resistance. If the crown of your watch is the screw down crown, be sure to
tighten it completely.
• Do not operate the crown or buttons when the watch is wet.
U200_EN_final.indd 40-41 08.4.24 3:08:28 PM

42
43
English
Precautions
Continued on the next page
To avoid injury
• DO NOT wear the watch where the temperature becomes extremely high—such as
in a sauna. Otherwise the watch may become hot and cause skin burn.
To avoid malfunction
• DO NOT use the watch where the temperature is lower or higher than the
operation temperature specified in the instruction manual. Doing so may cause the
watch to malfunction or stop.
• DO NOT place the watch nearby any materials generating a strong magnetic field
such as:
– magnetic health equipment such as a magnetic necklace
– a magnetic latch of a refrigerator door
– a magnetic clasp on a handbag
– speakers of a mobile phone
– electromagnetic cooking devices
They may interfere with the movement of the stepping motors in the watch and
timekeeping becomes inaccurate.
WARNINGS
Handling the secondary battery
• Do not remove the battery. When it is required, keep the battery out of the reach of
children to prevent them from swallowing it.
• If the battery is swallowed, consult a doctor and seek medical treatment.
CAUTIONS
Cautions about charging
• Excessively high temperature at charging battery may cause discoloration and
deformation of the exterior, and malfunction of the movement.
• Do not charge the battery at a high temperature (about 50˚C/122˚F or higher).
Examples:
– charging the battery by light such as an incandescent lamp or halogen lamp
– charging the battery where the temperature becomes extremely high—such as on
the dashboard
U200_EN_final.indd 42-43 08.4.24 3:08:28 PM

44
45
English
Precautions
Daily maintenance
• Rotate the crown while it is pressed in (position 0) and press the buttons
periodically so that they will not be rusty.
• Wipe off dirt, perspiration, and water from the case and glass with a soft cloth.
• To clean a metal, plastic, or rubber watchband, wash away dirt with water. Use a
soft brush to remove dust and dirt stuck in the gaps in a metal band.
• Do not use solvents (thinner, benzine, etc.), as they may damage the finish.
Periodical inspections
Your watch needs an inspection once every two or three years for safety and longer
usage. To keep your watch water-resistant, the packing needs to be replaced regularly.
Other parts need to be inspected and replaced if necessary.
Ask for genuine Citizen parts upon replacement.
Maintenance
• DO NOT place the watch nearby household appliances generating static electricity.
Timekeeping may become inaccurate if the watch is exposed to such strong static
electricity as that which is emitted from a TV screen.
• DO NOT apply any strong shock, for example, by dropping it onto a hard floor.
• Avoid using the watch where it may be exposed to chemicals or corrosive gases.
If solvents, such as thinners or benzine, or substances containing such solvents
come into contact with the watch, discoloration, melting, cracking, etc. may occur.
The case, band, or other parts may become discolored if the watch comes into
contact with mercury, such as that used in thermometers.
U200_EN_final.indd 44-45 08.4.24 3:08:30 PM

46
47
English
Specifications
Model U20*
Type Combination solar-powered watch
Timekeeping
accuracy
Within ±15 seconds per month on average (when
worn at normal temperatures between +5˚C/41˚F and
+35˚C/95˚F)
Operating
temperature range
0˚C/32˚F to +50˚C/122˚F
Display functions Analog section:
• Time: Hours, minutes, seconds
Digital section:
• Time: Hours, minutes, seconds (12-hour/24-hour)
• Calender: Year, Month, Date, Day of the week
• City code
Battery duration
without recharging
Fully charged to empty: Approx. 8 months
Two seconds interval movement to stopping: Approx. 4 days
Battery Secondary battery, 1pc.
Additional
functions
• Power saving function (battery saving mode)
• Overcharge prevention function
• Insufficient charge warning function
• World time function
• Daylight saving time ON/OFF
• Perpetual calendar (until December 31, 2099)
• Alarm [AL1]/[AL2]
• Chronograph
• Timer
Specifications are subject to change without prior notice.
U200_EN_final.indd 46-47 08.4.24 3:08:30 PM

48
U200_EN_final.indd 48 08.4.24 3:08:30 PM
 Loading...