

Citizen CT-E351 Service Manual
LINE THERMAL PRINTER
MODEL CT-E351
User’s Manual
Mode d’emploi
Benutzerhandbuch
Manuale dell’utente
Manual de Usuario

WEEE MARK
If you want to dispose of this product, do not mix it with general household waste. There is a
En
separate collection systems for used electronics products in accordance with legislation under the
WEEE Directive (Directive 2002/96/EC) and is effective only within European Union.
Wenn Sie dieses Produkt entsorgen wollen, dann tun Sie dies bitte nicht zusammen mit dem
Ge
Haushaltsmüll. Es gibt im Rahmen der WEEE-Direktive innerhalb der Europäischen Union
(Direktive 2002/96/EC) gesetzliche Bestimmungen für separate Sammelsysteme für gebrauchte
elektronische Geräte und Produkte.
Si vous souhaitez vous débarrasser de cet appareil, ne le mettez pas à la poubelle avec vos
Fr
Ge
ordures ménagères. Il existe un système de récupération distinct pour les vieux appareils électroniques conformément à la législation WEEE sur le recyclage des déchets des équipements
électriques et électroniques (Directive 2002/96/EC) qui est uniquement valable dans les pays de
l’Union européenne.
Les appareils et les machines électriques et électroniques contiennent souvent des matières
dangereuses pour l’homme et l’environnement si vous les utilisez et vous vous en débarrassez de
façon inappropriée.
Si desea deshacerse de este producto, no lo mezcle con residuos domésticos de carácter general.
Fr
Ge
Sp
Existe un sistema de recogida selectiva de aparatos electrónicos usados, según establece la legislación prevista por la Directiva 2002/96/CE sobre residuos de aparatos eléctricos y electrónicos
(RAEE), vigente únicamente en la Unión Europea.
Se desiderate gettare via questo prodotto, non mescolatelo ai riuti generici di casa. Esiste un
It
Fr
Ge
Sp
sistema di raccolta separato per i prodotti elettronici usati in conformità alla legislazione RAEE
(Direttiva 2002/96/CE), valida solo all’interno dell’Unione Europea.
Deponeer dit product niet bij het gewone huishoudelijk afval wanneer u het wilt verwijderen. Er
It
Fr
Du
Ge
Sp
bestaat ingevolge de WEEE-richtlijn (Richtlijn 2002/96/EG) een speciaal wettelijk voorgeschreven
verzamelsysteem voor gebruikte elektronische producten, welk alleen geldt binnen de Europese
Unie.
Hvis du vil skille dig af med dette produkt, må du ikke smide det ud sammen med dit almindelige
It
Fr
Du
Da
Ge
Sp
husholdningsaffald. Der ndes et separat indsamlingssystem for udtjente elektroniske produkter
i overensstemmelse med lovgivningen under WEEE-direktivet (direktiv 2002/96/EC), som kun er
gældende i den Europæiske Union.
Se quiser deitar fora este produto, não o misture com o lixo comum. De acordo com a legislação
It
Por
Fr
Du
Da
Ge
Sp
que decorre da Directiva REEE – Resíduos de Equipamentos Eléctricos e Electrónicos (2002/ 96/
CE), existe um sistema de recolha separado para os equipamentos electrónicos fora de uso, em
vigor apenas na União Europeia.
Jeżeli zamierzasz pozbyć się tego produktu, nie wyrzucaj go razem ze zwykłymi domowymi
It
Por
Fr
Du
Pol
Da
Ge
Sp
odpadkami. Według dyrektywy WEEE (Dyrektywa 2002/96/EC) obowiązującej w Unii Europejskiej
dla używanych produktów elektronicznych należy stosować oddzielne sposoby utylizacji.
——
2

Compliance Statement for European Users
CE marking shows conformity to the following criteria and provisions:
Low Voltage Directive (2014/35/EU), EMC Directive (2014/30/EU), and RoHS directive (2011/65/EU)
Full text of the EU declaration of conformity is available at the following internet
address:
http://www.citizen-systems.co.jp/english/support/download/printer/others/eu_doc/
IMPORTANT: This equipment generates, uses, and can radiate radio frequencyenergy and if not installed and used in accordance with the instruction manual,
maycause interference to radio communications. It has been tested and found to
complywith the limits for a Class A computing device pursuant to Subpart J of Part
15 of FCCRules, which are designed to provide reasonable protection against such
interferencewhen operated in a commercial environment. Operation of this equipment in aresidential area is likely to cause interference, in which case the user at
his ownexpense will be required to take whatever measures may be necessary to
correct theinterference.
CAUTION: Use shielded cable for this equipment.
Sicherheitshinweis
Die Steckdose zum Anschluß dieses Druckers muß nahe dem Gerät angebracht
und leicht zugänglich sein.
For Uses in Canada
This Class A Information Technology Equipment (ITE) complies with Canadian CAN
ICES-3(A)/NMB-3(A).
This Information Technology Equipment (ITE) does not exceed the Class A limits
for radio noise emissions from digital apparatus set out in the Radio Interference
Regulations of the Canadian Department of Communications.
Pour L’utilisateurs Canadiens
Cet Equipements informatiques (EI) de la classe A est conforme a la norme CAN
ICES-3(A)/NMB-3(A) du Canada.
Le present Equipements informatiques (EI) n’emet pas de bruite radio electriques
depassant les limites applicables aux appareils numeriques de la classe A prescrites dans le Reglement sur le brouillage radioelectrique edicte par le ministere
des Communications du Canada.
——
3

ENGLISH
——
4

GENERAL PRECAUTIONS
Before using this product, be sure to read through this manual. After having read
this manual, keep it in a safe, readily accessible place for future reference.
The information contained herein is subject to change without prior notice.
Reproduction or transfer of part or all of this document in any means is prohib-
ited without permission from Citizen Systems.
Note that Citizen Systems is not responsible for any operation results regardless
of omissions, errors, or misprints in this manual.
Note that Citizen Systems is not responsible for any trouble caused as a result
of using options or consumables that are not specied in this manual.
Except explained elsewhere in this manual, do not attempt to service, disas-
semble, or repair this product.
Note that Citizen Systems is not responsible for any damage attributable to
incorrect operation/handling or improper operating environments that are not
specied in this manual.
Data is basically for temporary use and not stored for an extended period of time
or permanently. Please note that Citizen Systems is not responsible for damage
or lost prot resulting from the loss of data caused by accidents, repairs, tests or
other occurrences.
If you nd omissions, errors, or have questions, please contact your Citizen
Systems dealer.
If you nd any pages missing or out of order, contact your Citizen Systems
dealer for a replacement.
EPSON and ESC/POS are registered trademarks of Seiko Epson Corporation.
QR Code is a registered trademark of DENSO WAVE INCORPORATED.
Ethernet is a registered trademark of Fuji Xerox Corporation.
CITIZEN is a registered trademark of Citizen Watch Co., Ltd.
All other trademarks are the property of their respective owners.
Citizen Systems use these trademarks in accordance with the license of relevant
owners.
Copyright© CITIZEN SYSTEMS JAPAN CO., LTD. 2017
——
5
SAFETY PRECAUTIONS
Before using this product for the rst time, carefully read these SAFETY PRECAUTIONS. Improper handling may result in accidents (re, electric shock or injury).
In order to prevent injury to operators, third parties, or damage to property, special
warning symbols are used in the User’s Manual to indicate important items to be
strictly observed.
After having read this Manual, keep it in a safe, readily accessible place for future
reference.
Some of the descriptions contained in this manual may not be relevant to some
printer models.
The following describes the degree of hazard and damage that could occur if the
printer is improperly operated by ignoring the instructions indicated by the warning
symbols. Be sure to read this information carefully.
...WHICH SHOULD BE STRICTLY OBSERVED
WARNING
Neglecting precautions indicated by this symbol may result in fatal or serious injury.
CAUTION
Neglecting precautions indicated by this symbol may result in injury or damage to property.
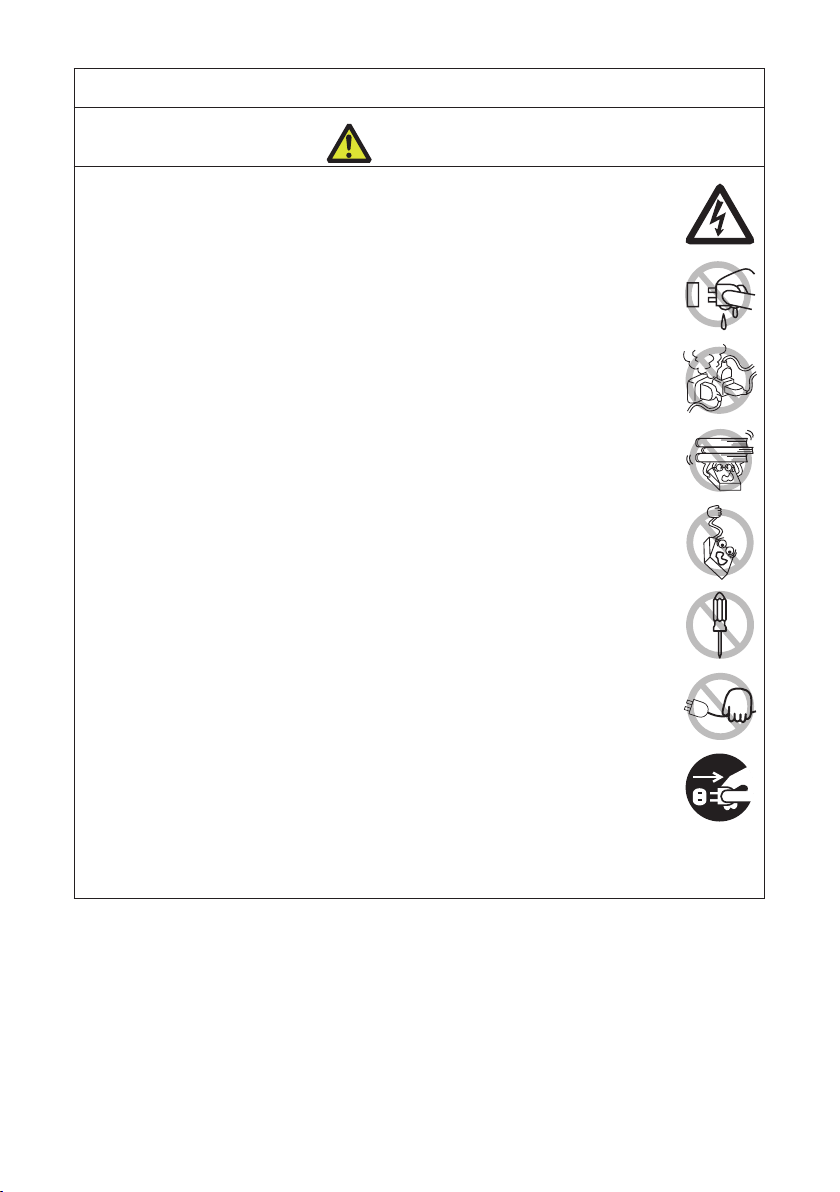
This symbol is used to alert your attention to important items.
This symbol is used to alert you to the danger of electric shock or electrostatic damage.
This symbol denotes a request to unplug the printer from the wall outlet.
This symbol is used to indicate that the power supply must be grounded.
This symbol is used to indicate useful information, such as procedures, instructions or the like.
This symbol is used to indicate prohibited actions.
——
6
PRECAUTIONS ON PRINTER INSTALLATION
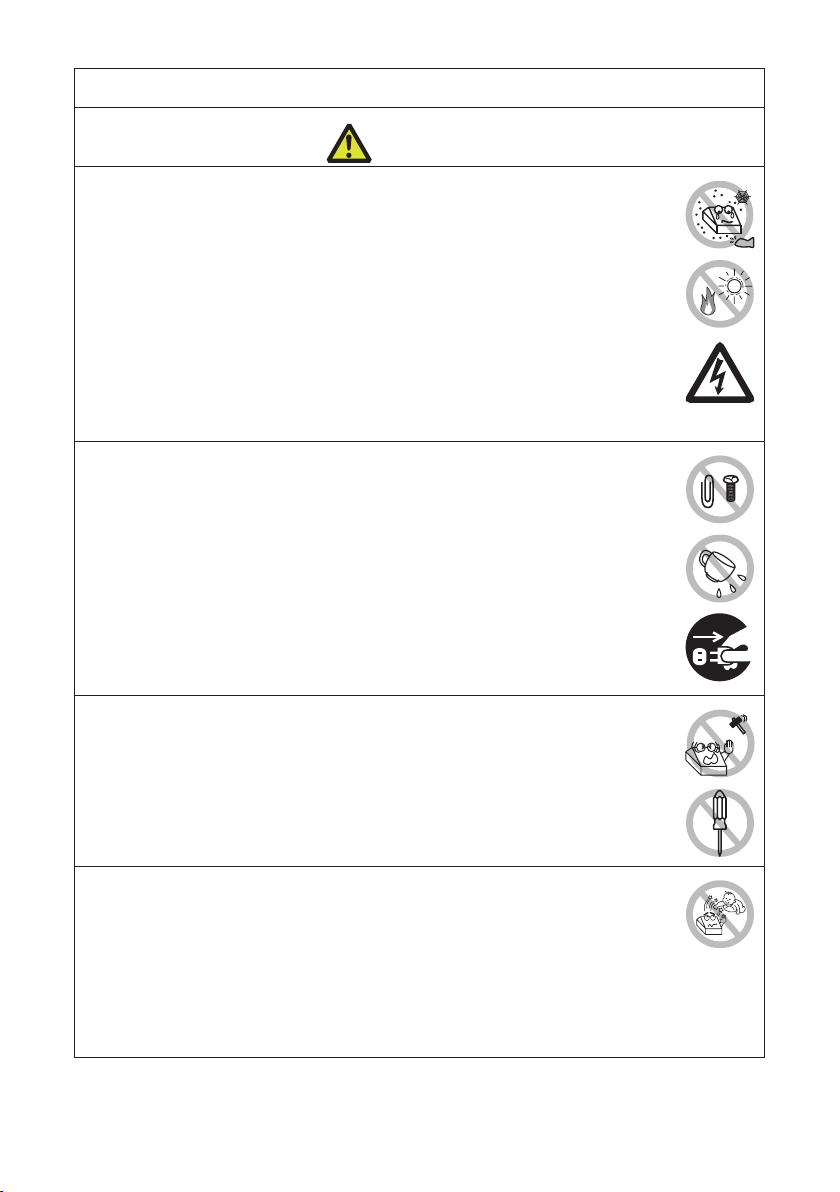
WARNING
Do not use or store this product in a place where it will be exposed to:
* Flames or moist air.
* Direct sunlight.
* Hot airow or radiation from a heating device.
* Salty air or corrosive gases.
* Ill-ventilated atmosphere.
* Chemical reactions in a laboratory.
* Airborne oil, steel particles, or dust.
* Static electricity or strong magnetic elds.
These locations create the risk of printer damage, as well as product fail-
ure, overheating, emission of smoke, re, or electric shock.
They can also result in re or electric shocks and so should always be
avoided.
Do not drop any foreign object nor spill liquid into the printer. Do not place
any object on the printer either.
Do not drop any metallic object such as paper clips, pins or screws into the
printer.
Do not place a ower vase, pot, or anything containing water on the print-
er.
Do not spill coffee, soft drinks, or any other liquid into the printer.
Do not spray insecticide or any other chemical liquid over the printer.
Dropping a metallic foreign object into the printer, may cause printer fail-
ure, re, or electric shock.
Should it occur, immediately turn the printer off, unplug it from the supply
outlet, and call your local Citizen Systems dealer.
Do not handle the printer in the following ways:
Do not subject the printer to strong impacts or hard jolts (e.g., being stepped on,
dropped or struck).
Never attempt to disassemble or modify the printer.
These actions create the risk of printer damage, as well as product failure,
overheating, emission of smoke, re, or electric shock.
They can also result in re or electric shocks and so should always be
avoided.
This device is not appropriate to be used where a child may be present.
Install, store, or use the device where it cannot be reached by a child.
Electric appliances could cause an unexpected injury or accident if they
are handled or used improperly.
Keep the power cord and signal cables out of the reach of children. Also
children should not be allowed to gain access to any internal part of the
printer.
The plastic bag the printer came in must be disposed of properly or kept
away from children. Wearing it over the head may lead to suffocation.
——
7
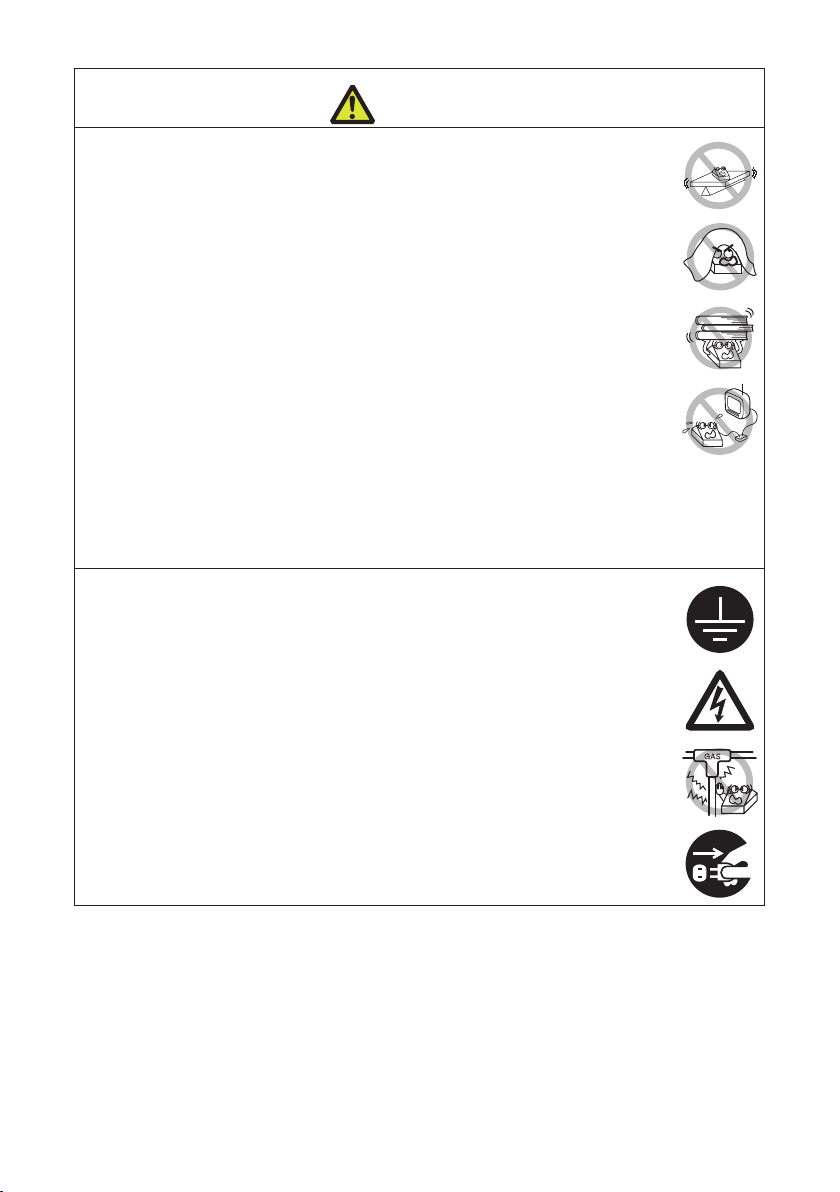
CAUTION
Do not use the printer under the following conditions.
Avoid locations subject to vibration or instability.
Avoid locations where the printer is not level.
The printer may fall and cause an injury.
The quality of printing may deteriorate.
Do not obstruct the printer’s air vents.
Do not place anything on the printer.
Do not cover or wrap the printer in cloth or blankets.
Doing so could cause heat to build up and deform the case or start a re.
Avoid using the printer near a radio or TV set or from supplying it from the same
electric outlet as these appliances.
Avoid using the printer interconnected with a cable or cord that has no protection
against noise.
(For interconnections, use shielded or a twisted pair of cables and ferrite cores,
or other anti-noise devices.)
Avoid using the printer with a device that is a strong source of noise.
The printer may have an adverse effect on nearby radio or TV transmis-
sions. There may also be cases when nearby electrical appliances adverse-
ly inuence the printer, causing data errors or malfunction.
Installed in any orientation other than those specied.
Malfunction, failure, or electric shock may result.
Connect the printer to a ground.
Electric leakage may cause an electric shock.
Do not connect the printer’s ground to any of the following:
* Gas piping
A gas explosion could result.
* Telephone line ground
* Lightning rod
If lightning strikes a large surge of current may cause re or shock.
* Water pipes
Plastic water pipes should not be used for grounding. (Those approved by a
Waterworks Department may be used.)
Before connecting or disconnecting the grounding lead to or from the
printer, always unplug it from the electric outlet.
——
8
PRECAUTIONS IN HANDLING THE PRINTER
WARNING
Please observe the following precautions for power source and power cord:
Do not plug or unplug the power cord with a wet hand.
Use the printer only at the specied supply voltage and frequency.
Use only the specied AC adapter with the printer.
Use only the power cord that comes with the printer, and never use the supplied
power cord with another device.
Check to make sure that the supply outlet from which the printer is powered has
a sufcient capacity.
Do not supply the printer from a power strip or current tap shared with other ap-
pliances.
Do not plug the power cord into an electric outlet with dust or debris left on the
plug.
Do not use a deformed or damaged power cord.
Do not move the printer while its power is on.
Neglecting to handle it properly may result in printer failure, emission of
smoke, re, or electric shock.
An overload may cause the power cord to overheat, catch re, or the circuit
breaker to trip.
Do not allow anything to rest on the power cord. Do not place the printer where
the power cord may be stepped on.
Do not subject the power cord to severe bending, twisting, or pulling. Do not
carry the product while it is in this state either.
Do not attempt to modify the power cord unnecessarily.
Do not place the power cord near any heating device.
Neglecting these cautions may cause wires or insulation to break, which
could result in electric leakage, electric shock, or printer failure.
If the power cord sustains damage, contact your Citizen Systems dealer.
Do not leave things around the electric outlet.
Supply power to the printer from a convenient electric outlet, readily accessible in
an emergency.
Pull the plug to immediately shut it down in an emergency.
Insert the power plug fully into the outlet.
If the printer will not be used for a long time, disconnect it from its electric outlet.
Hold the plug and connector when plugging or unplugging the power cord or
signal cable after turning off the printer and the appliance connected to it.
——
9
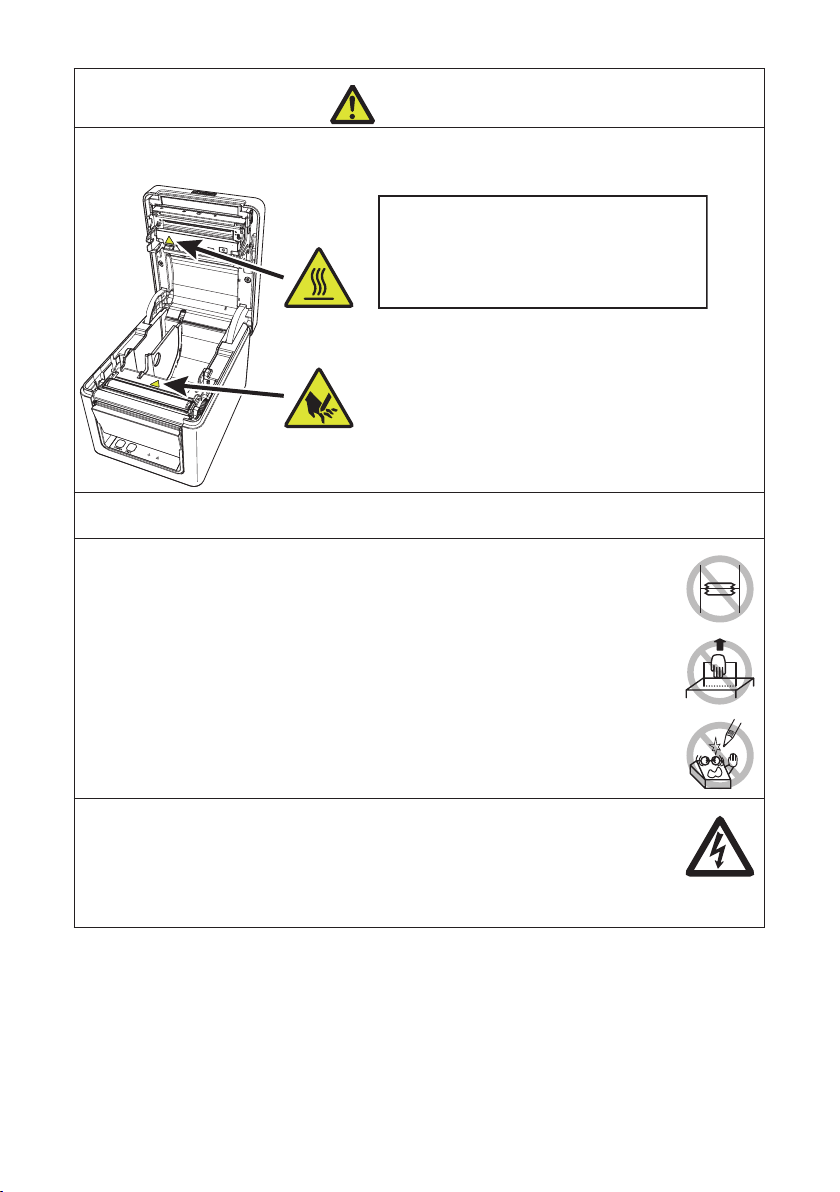
CAUTION
Caution label is attached in the position shown in the following gure. Carefully read the
handling precautions before using the printer.
These labels indicate that the head
becomes hot, so touching it may
cause burns, and touching the auto
cutter when opening the paper cover
may cause cuts on hands.
Do not transport this printer with the paper roll inside.
Printer failure or damage may occur.
To prevent possible malfunction or failure observe the following.
Do not open the paper cover during printing.
Avoid operating the printer without paper properly loaded.
Avoid the use of paper not complying with specications.
May result in poor print quality.
Avoid using torn pieces of paper or paper spliced with plastic adhesive tape.
Avoid forcibly pulling already loaded paper by hand.
Avoid using a sharp pointed device to operate panel buttons.
Be sure to rmly insert the cable plugs into their mating sockets.
A cross connection may damage the printer’s internal electronics or the
host system’s hardware.
Only use the printer with devices that have designated solenoid specications for
the cash drawer interface connector.
Neglecting this caution may result in malfunction or failure.
——
10
To prevent injury and printer failures from worsening, observe the following:
Do not touch the printing surface of the thermal head.
Do not touch any of the moving parts (e.g., paper cutter, gears, active electric
parts) while the printer is working.
In case of trouble do not attempt to repair the printer. Ask Citizen Systems ser-
vice for repair.
Be careful that the covers do not pinch your hands or ngers.
Be careful of the sharp edges on the printer. Do not allow them to injure you or
damage property.
May result in electric shock, burn, or injury.
If the printer emits smoke, an odd smell, or unusual noise while
printing, immediately abort the current print session and
unplug the printer from the electric outlet.
DAILY MAINTENANCE
Observe the following precautions for daily maintenance.
When cleaning the printer, always turn it off and unplug it from the electric outlet.
Use a soft, dry cloth for cleaning the surface of the printer case.
For severe stains, use a soft cloth slightly dampened with water.
Never use organic cleaning solvent such as alcohol, paint thinner, trichloroethylene, benzene, or ketone. Never use a chemically processed cleaning cloth.
To remove paper dust, use a soft brush.
CAUTION
The thermal head is at a dangerously high temperature immediately after
printing.
Allow it to cool off before starting maintenance work.
——
11

THE TABLE OF CONTENTS
1. GENERAL OUTLINE .....................................................................13
1.1 Features ............................................................................................13
1.2 Unpacking .........................................................................................14
1.3 Model Classication ..........................................................................15
1.4 Basic Specications ..........................................................................15
2. EXPLANATION OF PRINTER PARTS ...........................................17
2.1 Printer Appearance ...........................................................................17
2.2 Inside the Paper Cover ...................................................................... 19
2.3 Other Built-in Functions ..................................................................... 20
3. SETUP ............................................................................................22
3.1 Connecting the AC Power Cord ......................................................... 22
3.2 Connecting Interface Cables .............................................................23
3.3 Ethernet (LAN) Interface ...................................................................24
3.4 Connecting the Cash Drawer ............................................................27
3.5 Precautions for Installing the Printer .................................................29
3.6 Loading Paper ...................................................................................30
3.7 58-mm Width Roll Paper Partition ..................................................... 32
3.8 Setting the Long Life Printing (LLP) Function .................................... 33
3.9 Precautions for Creating Applications and Practical Operations .......34
3.10 Download Site for Various Electronic Files ...................................... 34
4. MAINTENANCE AND TROUBLESHOOTING ...............................35
4.1 Periodic Cleaning ..............................................................................35
4.2 Clearing a Cutter Error ...................................................................... 36
4.3 Self Test ............................................................................................. 37
4.4 Hexadecimal Dump Printing .............................................................. 38
4.5 Error Indications ................................................................................39
4.6 Paper Jams .......................................................................................41
4.7 Precautions for Performing Printing for Which
Printing Speed Changes ...................................................................41
5. OTHER ...........................................................................................42
5.1 External Views and Dimensions ........................................................42
5.2 Printing Paper .................................................................................... 43
5.3 Manual Setting of Memory Switches ................................................. 44
——
12

1. GENERAL OUTLINE
The CT-E351 line thermal printer series is designed for use with a broad array of terminal equipment including data, POS, and kitchen terminals.
These printers have extensive features so they can be used in a wide range of applications.
1.1 Features
High-speed printing at up to 250 mm/sec possible
Stylish design
Compact size with the lowest possible height
The front paper eject structure enables use where the height is restricted
Compliant with IPX1 for drip-proof capabilities *
Support for paper widths of 80 mm and 58 mm
High-speed cutter employed
Long Life Printing (LLP) function to increase the head life available
Dual interfaces (USB + serial / Ethernet + USB)
Built-in drawer kick interface
USB-linked power OFF function available
Paper saving function available
Support for the JIS X0213 third and fourth level Kanji character sets
Support for the simplied and traditional Chinese character sets and Hangul char-
acter set
Various customizations using the memory switches possible
User created characters and logos can be saved in the user memory
Support for barcodes including 2D barcodes
*: The product has been checked to determine that vertically falling drops of water will
have no harmful effect, but the product is not guaranteed to be completely
drip-proof.
13
——
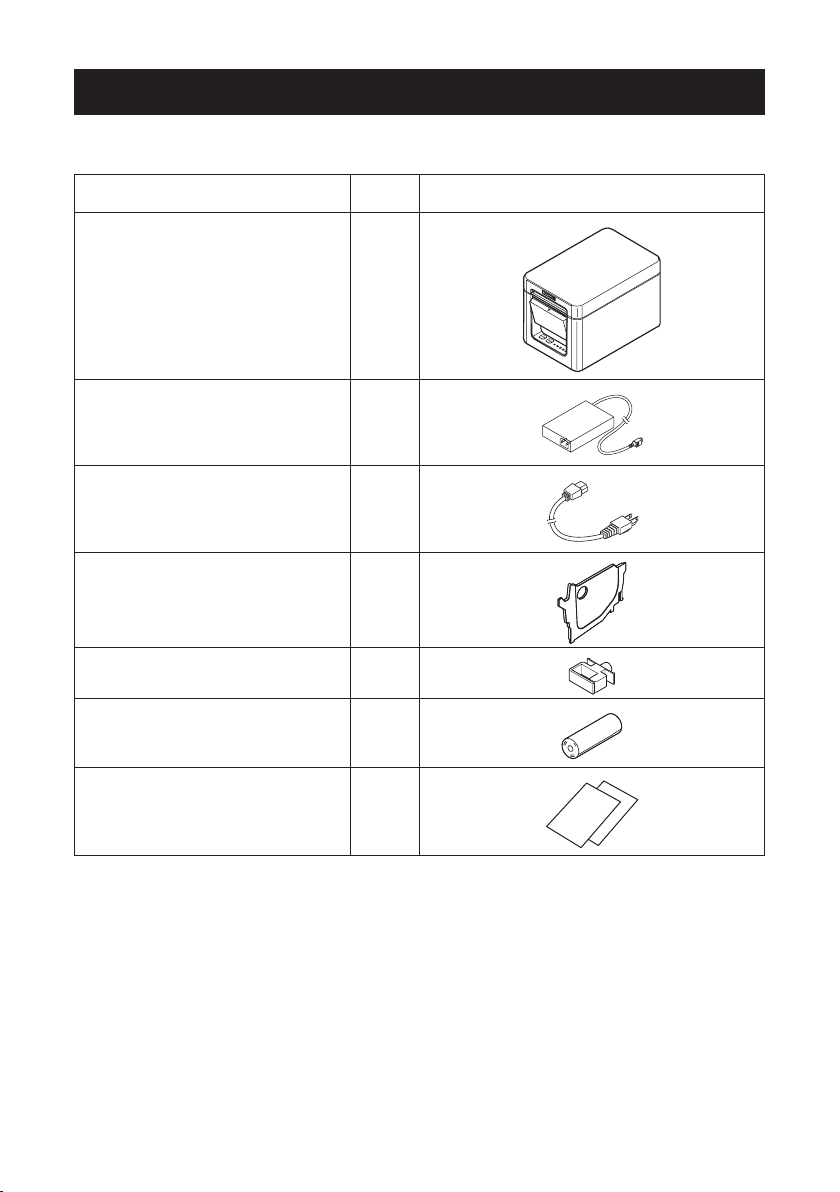
1.2 Unpacking
Make sure the following items are included with your printer.
NAME
Printer 1
AC Adapter (37AD5) 1
AC power cord 1
Partition 1
Cable clamp 1
QUAN-
TITY
ILLUSTRATION
Sample paper roll 1 roll
Quick Start Guide 2
14
——
1.3 Model Classication
34
Model numbers indicate printer features according to the following system.
CT - E351 RS E - BK
12
1. Model name
2. Interface
RS: USB + serial
ET: Ethernet+USB
3. Market
U: North America
E: Europe
4. Body case color
WH: Pure white
BK: Black
Contact us in advance for special combinations, some of which may not be available.
1.4 Basic Specications
Item Specications
Model CT-E351
Print method Line thermal dot print method
Print widths 72 mm/576 dots, 68.25 mm/546 dots, 64 mm/512 dots, 52.5 mm/420 dots, 48.75
Dot density 8 × 8 dots/mm (203 dpi)
Print Speed 250 mm/sec (maximum speed, print density level 100%, 2000 dot lines/sec)
Number of print col-
umns *1
Character size *2 Font A:1.50×3.00 mm, Font B:1.13×3.00 mm, Font C:1.00×2.00 mm
Character type Alphanumeric characters, international characters, PC437/850/852/857/858/860/863
User memory 384 KB (capable of storing user-dened characters and logos)
Bar code types UPC-A/E, JAN(EAN) 13 digits/8 digits, ITF, CODE39, CODE128, CODABAR(NW-7),
m/390 dots, 48 mm/384 dots, 45 mm/360 dots, factory default 72 mm
Font Maximum number of characters
Font A 36 12 × 24
Font B 48 9 × 24
Font C 54 8 × 16
/864/865/866, WPC1252, Katakana, ThaiCode 11/18 (1Pass/3Pass), TCVN-3,
Kanji (JIS rst, second, third, and fourth level), Kana, extended characters,
JIS X0213, GB18030, BIG5, KS Hangul, EUC Hangul
CODE93, PDF417, QR Code, GS1-DataBar
(columns) / 54 mm
——
15
Dot conguration
(dots)
Item Specications
Line spacing 4.25 mm (1/6 inch) (Variable by command)
Paper roll Roll paper: 80 mm x max. ø83 mm
Interface
Cash drawer kick-out Supports 2 cash drawers
Input buffer 4 K bytes/45 bytes
Supply voltage DC 24 V ±5%
Power consumption
AC Adapter
(37AD5)
Weight Approximately 1.3 kg
Outside dimensions 125 (W) × 165 (D) × 108 (H) mm
Operating temperature
and humidity
Storage temperature
and humidity
Reliability Print head life: 150 km, 300 million pulses (room temperature, room humidity, speci-
Safety standard *3 UL, C-UL, FCC Class A, CE Marking
Paper thickness: 53 to 85 μm (paper roll inner diameter 12 mm / outer diameter
18 mm)
USB + serial / Ethernet + USB
Approximately 2.0 A (average), approximately 0.1 A (standby)
Rated input: AC 100 to 240 V, 50/60 Hz, 150 VA
Rated output: DC 24 V, 2.1 A
5 to 45°C, 10 to 90% RH (no condensation)
-20 to 60°C, 10 to 90% RH (no condensation)
ed recommended paper, specied paper thickness), Auto cutter life: 1.5 million cuts
(3-inch), 1 million cuts (2-inch) (room temperature, room humidity, specied recommended paper, specied paper thickness)
Notes:
*1: The number of printable columns is selected using a memory switch.
The numbers of columns noted in this table refer to typical models. The number of
columns varies depending on specications.
*2: Characters appear small because the dimensions include a blank area surrounding
each character.
*3: This standard applies when our AC Adapter (37AD5) is used.
16
——
2. EXPLANATION OF PRINTER PARTS
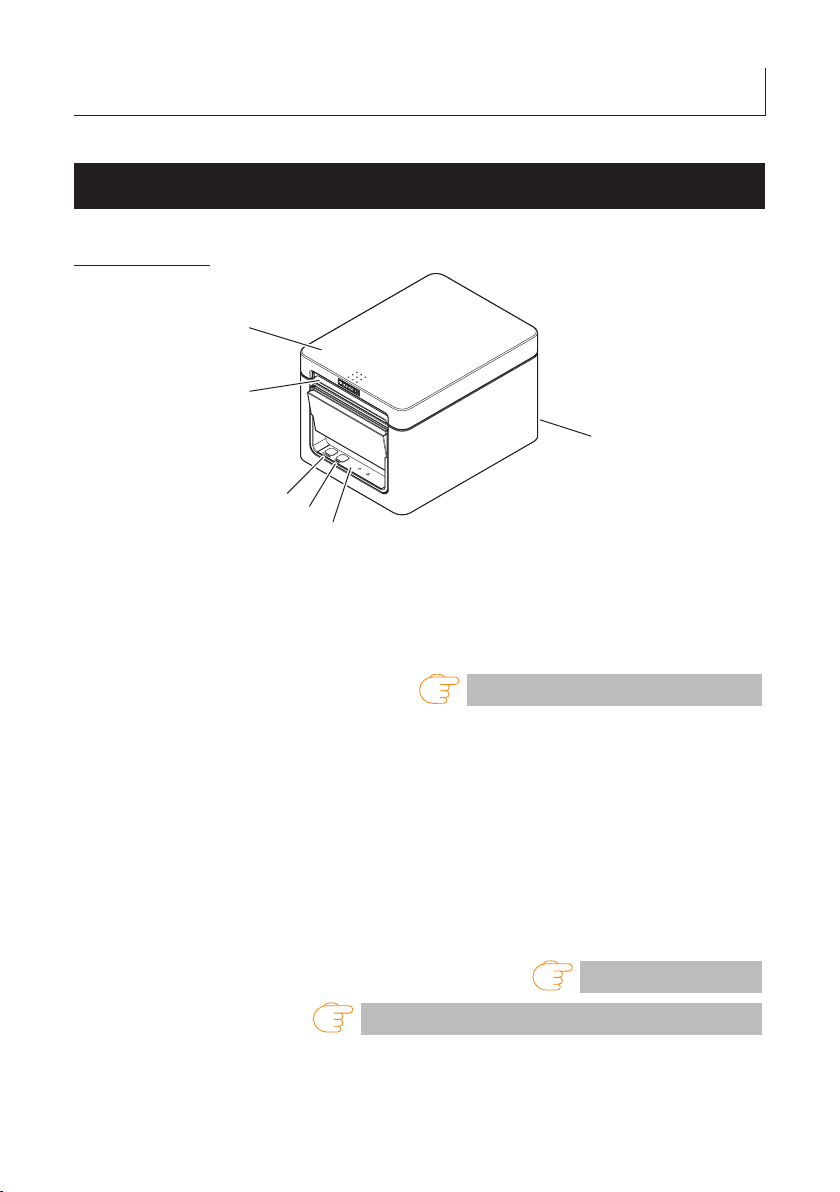
1
2
5
6
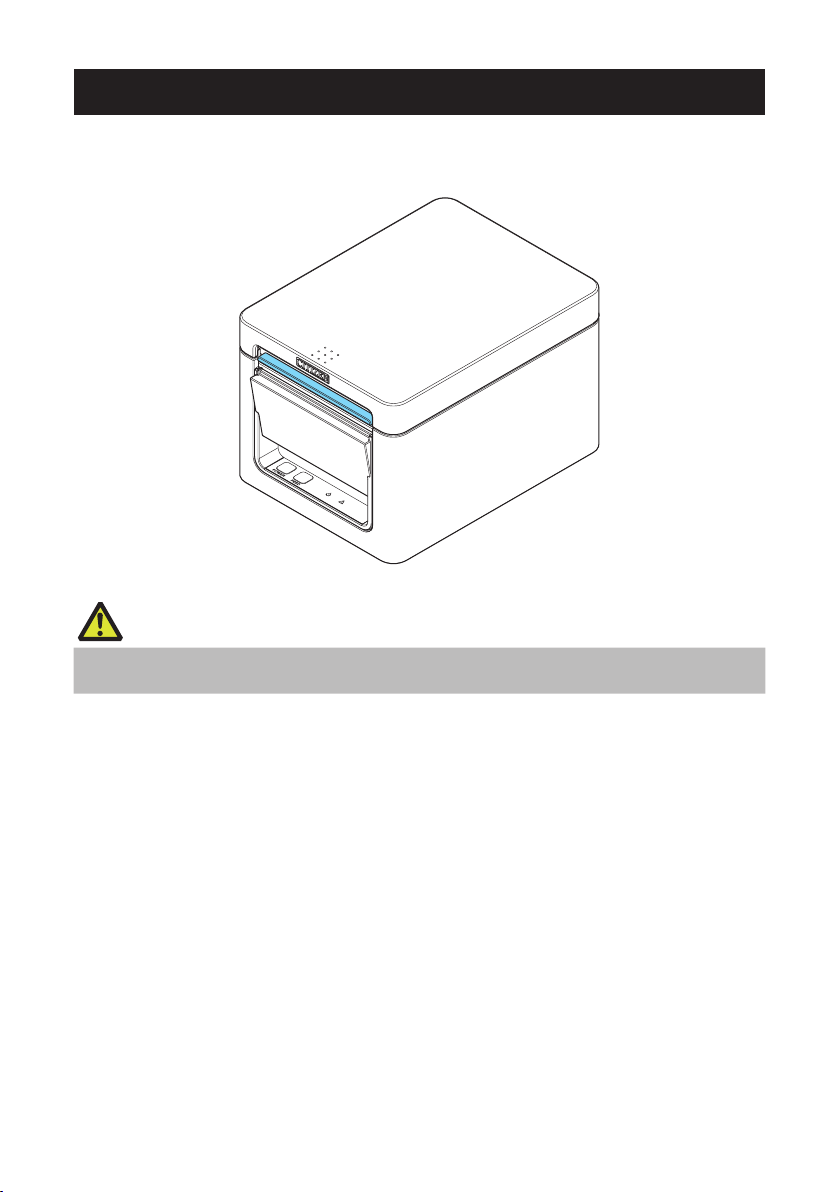
2.1 Printer Appearance
Names of parts
3
4
1. Paper cover
Open to load paper.
Also open to clear a cutter error.
* The paper cover cannot be used for manual cutting.
Refer to 4.2 Clearing a Cutter Error
2. Cover open lever
Use to open the paper cover.
3. POWER button
Hold down two or three seconds to switch power on or off.
4. FEED button
Press this button to feed paper.
In case of a cutter error, press the FEED button with the paper cover closed after
removing the cause.
The printer enters the mode for setting memory switches and running self test.
5. Operation panel
6. Rear connectors
Refer to 5.3 Manual Setting of Memory Switches
——
17
Refer to 4.3 Self Test
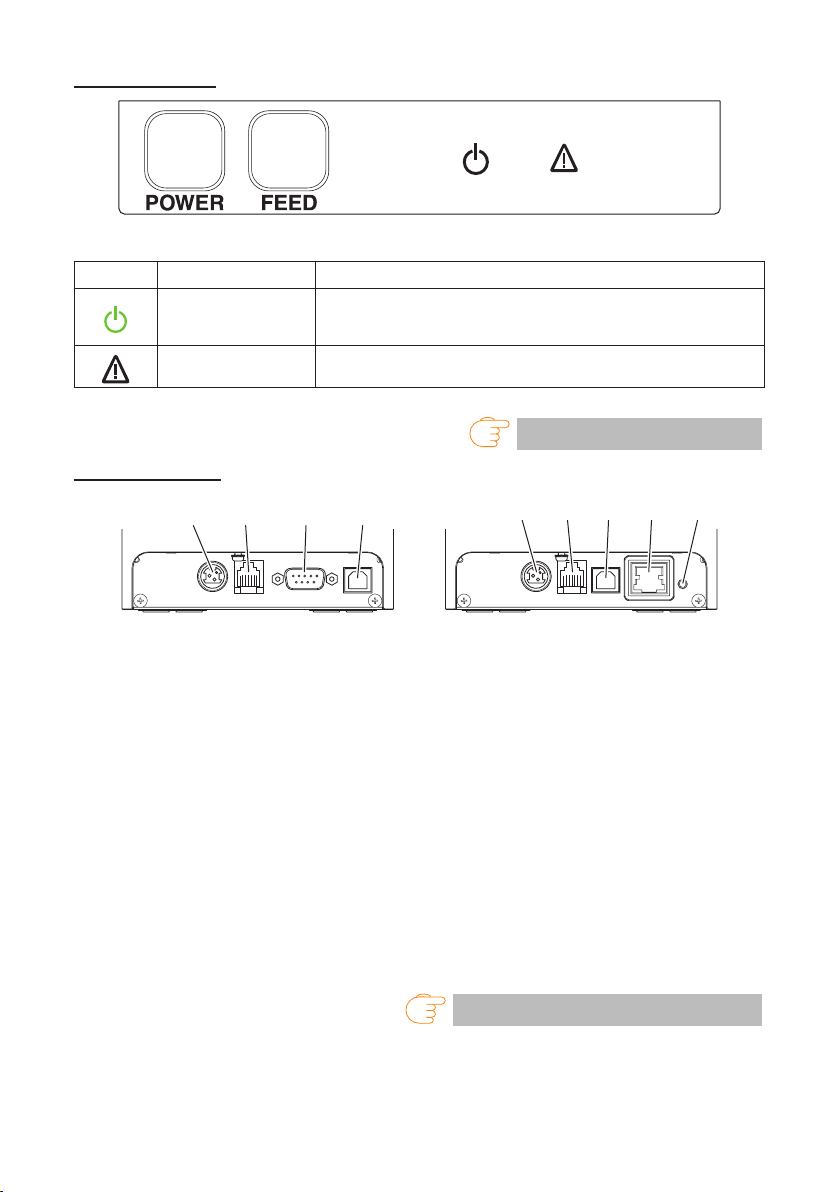
Operation panel
1423
USB + serial
45 623
Ethernet + USB
Two LEDs and two keys are placed on the operation panel.
LED name Description
POWER LED
ERROR LED
Turns on when the power is turned on and turns off when the power is
turned off.
Flashes when a memory error occurs and when data is being received.
Flashes when the print head is hot, when the paper cover is open,
when a cutter error occurs, and so on.
Refer to 4.5 Error Indications
Rear connectors
1. Serial connector (serial, USB, etc.)
Connect to the interface cable.
2. Cash drawer kick-out connector
Connect to the cable from the cash drawer.
3. Power connector
Connect to the AC adapter cable.
4. USB connector
5. Ethernet connector
6. Panel button
The current conguration information can be printed.
For details, refer to “Ethernet (LAN) Interface” in Section 3.3.
Refer to 3.3 Ethernet (LAN) Interface
——
18
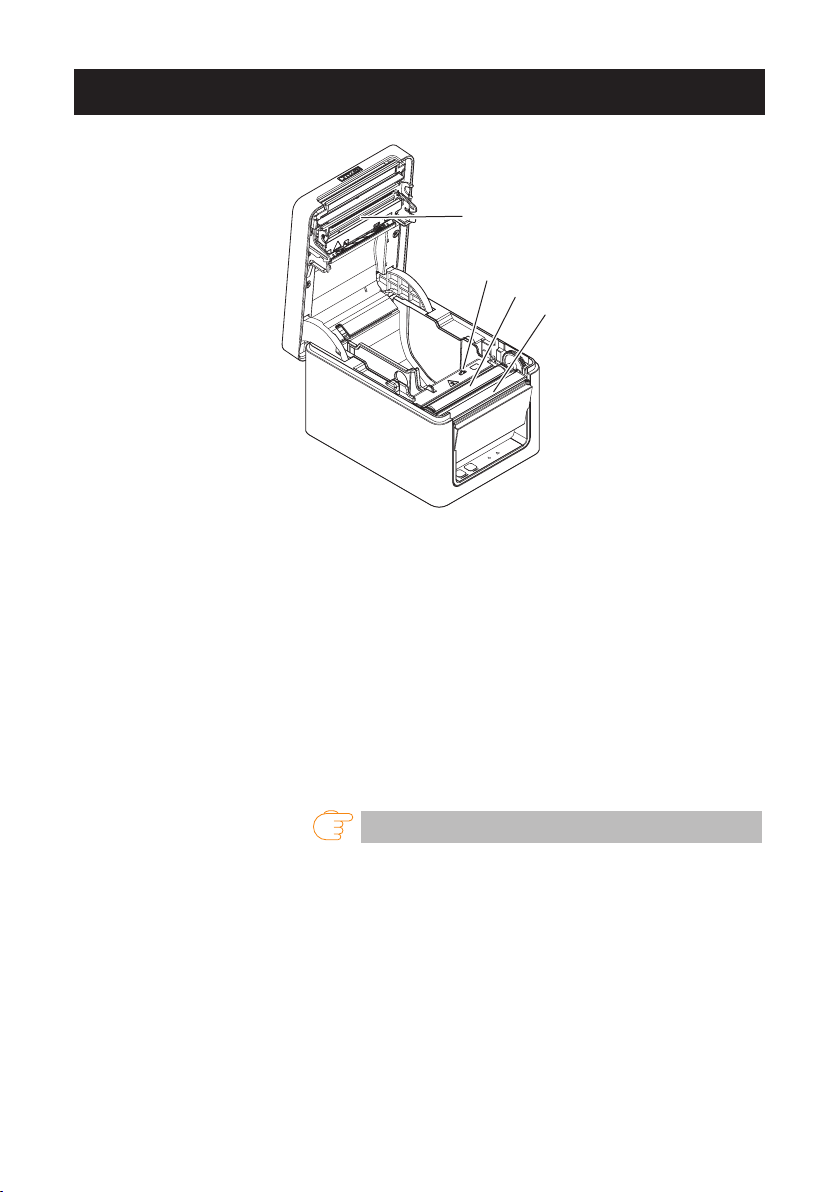
2.2 Inside the Paper Cover
4
1
2
3
1. Print head (thermal)
Prints characters and graphic data on paper (paper rolls).
2. Paper end (PE) sensor
Detects when there is no paper. Printing stops when this sensor detects there is no
paper.
3. Platen
Feeds the paper.
Do not remove the platen except to do maintenance.
4. Auto cutter
Cuts the paper.
Refer to 5.3 Manual Setting of Memory Switches
——
19

2.3 Other Built-in Functions
Buzzer
Buzzes when errors occur or when operations or command operations are
performed.
Refer to 4.5 Error Indications
User memory
You can save user-dened logo and character data in this memory. Data remains
stored in this memory even if the printer is turned off. For information on how to
save data, refer to the Command Reference.
Memory switch
Setting of various kinds of functions can be stored in memory. Settings remain
stored in the memory even if the printer is turned off.
USB-linked power OFF (When MSW6-3 of memory switch is set to ON)
When the printer is connected to PC by USB, the printer becomes the state of USBlinked power OFF after 3 seconds when PC power off or USB connection lost.
This mode is canceled when the PC is turned back on or when a USB connection is
established.
CAUTION
Since the POWER LED is unlit when the state of USB-linked power OFF, it cannot be identi-
ed from the power OFF.
Pressing the POWER button while the state of USB-linked power OFF turns on power nor-
mally.
Paper saving functions
Memory switches MSW8-3 through MSW8-4 can be used to congure the settings
below, which save paper.
Top margin suppression
The printer back feeds the paper before printing which reduces the blank space
at the top edge of the paper.
The back feed amount can be specied.
Line gap reduce
Automatically compresses the linefeed amount between lines. The compression
ratio can be specied.
——
20

CAUTION
Remove the partially cut paper before performing back feed for starting printing.
The cut paper may be torn off in the next printing process, which may cause a problem.
Auto side shift (MSW8-6)
This function dissipates heat load during frequent heat generation by a vertical
ruled line or other specic head heating element.
If no data is received within 15 seconds after each cut or print, the print position is
automatically slid N* dots to the right. The original print position is returned to at the
next slide timing.
* N is the MSW8-6 setting value.
CAUTION
If the right margin is too narrow, this may result in some print characters being cut off.
This function is disabled under initial settings.
To enable this function, use MSW8-6 to specify an appropriate value for the maximum slide
amount.
21
——
3. SETUP
5
2
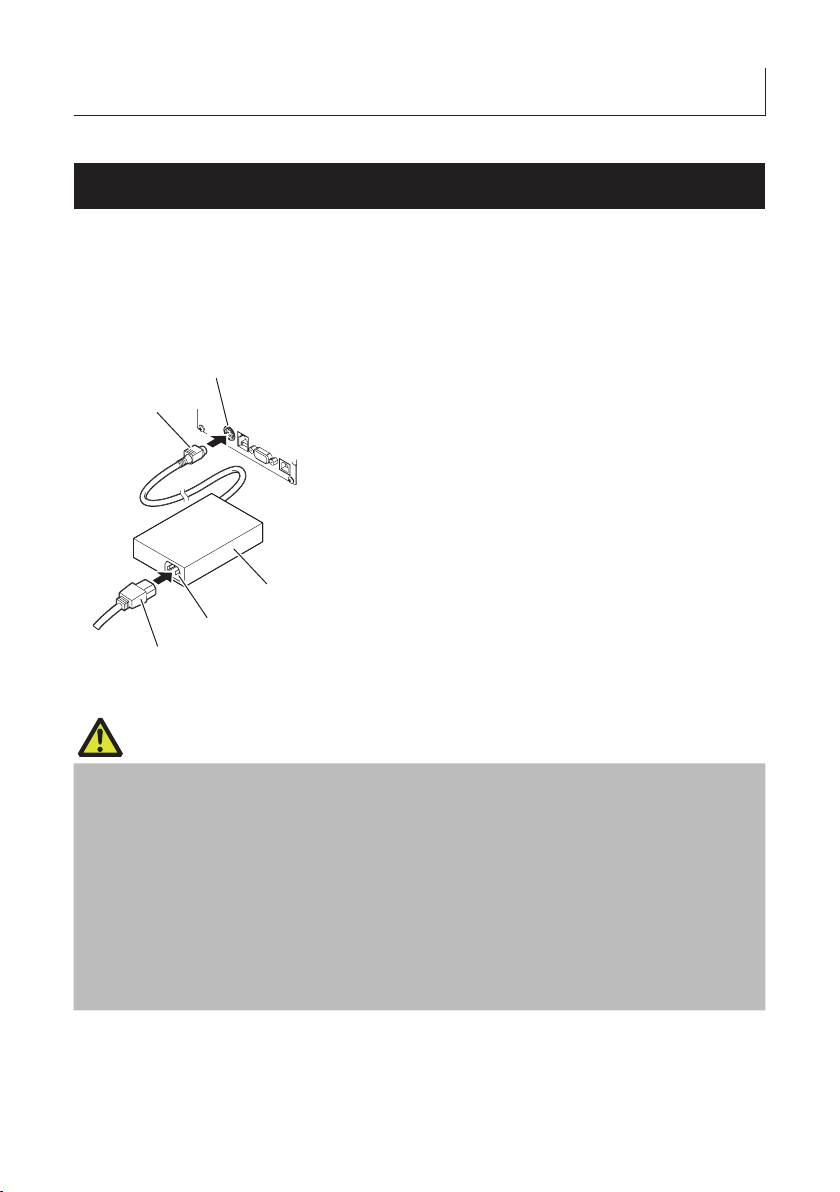
3.1 Connecting the AC Power Cord
1. Turn off the power.
2. Connect the power connector to the AC adapter cable connector.
Next, connect the AC power cord to the AC inlet, and insert the plug into an electric
outlet.
1
1. Cable connector
2. Power connector
3. AC adapter
4. AC inlet
5. AC power cord
3
4
CAUTION
Use only the specied AC adapter.
Always hold the AC adapter’s cable connector by the connector when removing or inserting it.
Use an AC power source that does not also supply power to equipment that generates elec-
tromagnetic noise.
Pulling on the AC power cord may damage it, cause a re, electric shock, or break a wire.
If a lightning storm is approaching, unplug the AC power cord from the electric outlet. A light-
ning strike may cause a re or electric shock.
Keep the AC power cord away from heat generating appliances. The insulation on the AC
power cord may melt and cause a re or electric shock.
If the printer is not going to be used for a long time, unplug the AC power cord from the elec-
tric outlet.
Place the AC power cord so that people do not trip on it.
——
22
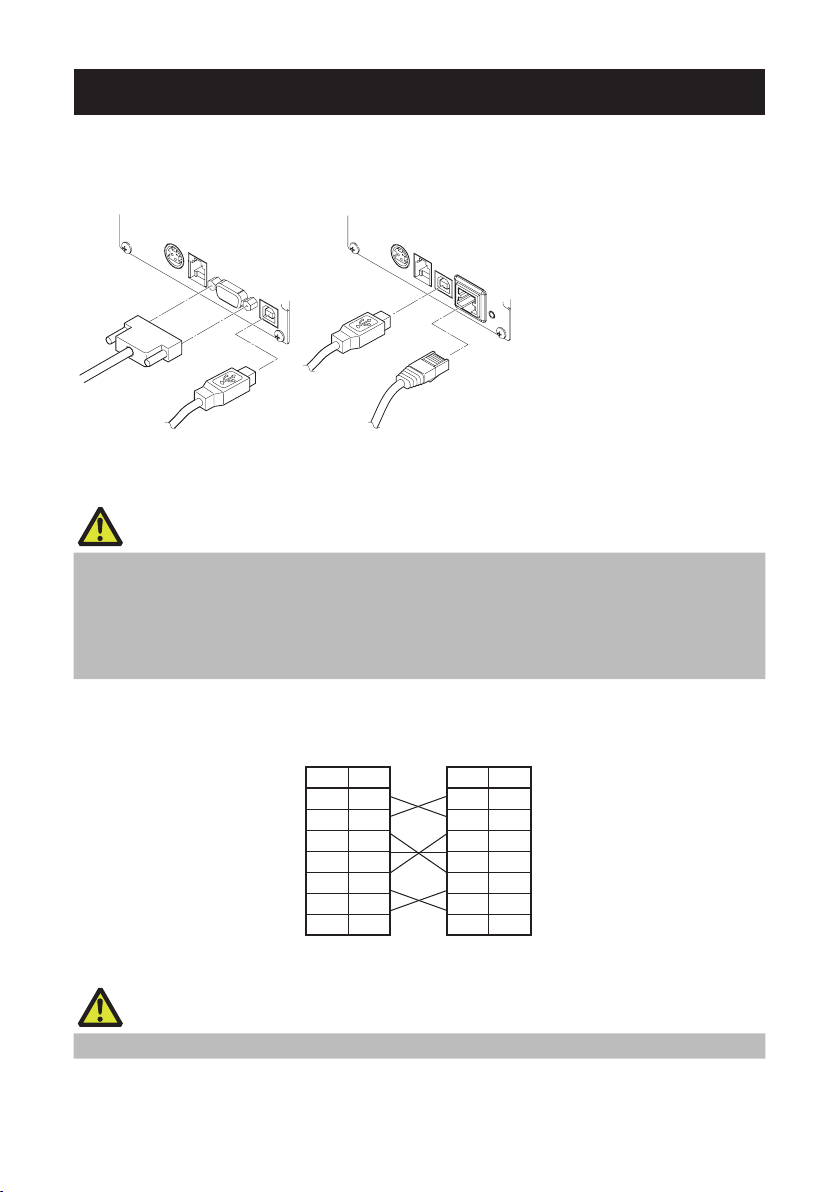
3.2 Connecting Interface Cables
33
44
55
66
1. Turn off the power.
2. Orient the interface cable correctly and insert it into the interface connector.
USB + serial Ethernet + USB
CAUTION
When disconnecting the cable, always hold the connector.
Be careful not to insert the USB cable into the cash drawer kick-out connector.
To connect more than one printer to a single computer by USB, you must change the serial
number of the USB interface.
Hold the connector of the LAN cable perpendicular and straight when connecting or discon-
necting it. Doing it at an angle may cause the connector to misconnect.
Use a serial cable with the connection layout shown below.
9-pin (female) - 9-pin (female) cable
Signal
PinPin
RXD2 2RXD
TXD
DTR
SG
DSR
RTS7 7RTS
CTS8 8CTS
Signal
TXD
DTR
SG
DSR
CAUTION
Place the interface cable so that people do not trip on it.
23
——
retnirPCP

3.3 Ethernet (LAN) Interface
Panel button
1 2
The following describes an overview of the Ethernet (LAN) interface.
For details on this function, refer to a separate manual.
Note that the Ethernet (LAN) interface is not available in the USB + serial model.
Panel button operation
The function of the panel button is as follows.
Printing network setup information
Press the panel button.
Returning to factory settings
Hold down the panel button. A buzzer* will sound and then hold down the panel
button again within 3 seconds. It returns network settings to its factory settings.
* Depending on settings, the buzzer may not sound.
CAUTION
The board will automatically restart after this operation is complete.
If settings are congured to obtain an IP address from a DHCP server automatically, the new
IP address may be different from the previous one.
LED Functions
The tables below explain how to interpret LED indications.
——
24
1. Network transmission speed
Transmission speed LED (green)
100 Mbps Lit
10 Mbps/Not connected Unlit
2. Network status
Status LED (yellow)
Connected Lit
Not connected Unlit
Data transmission in
progress
Flashing
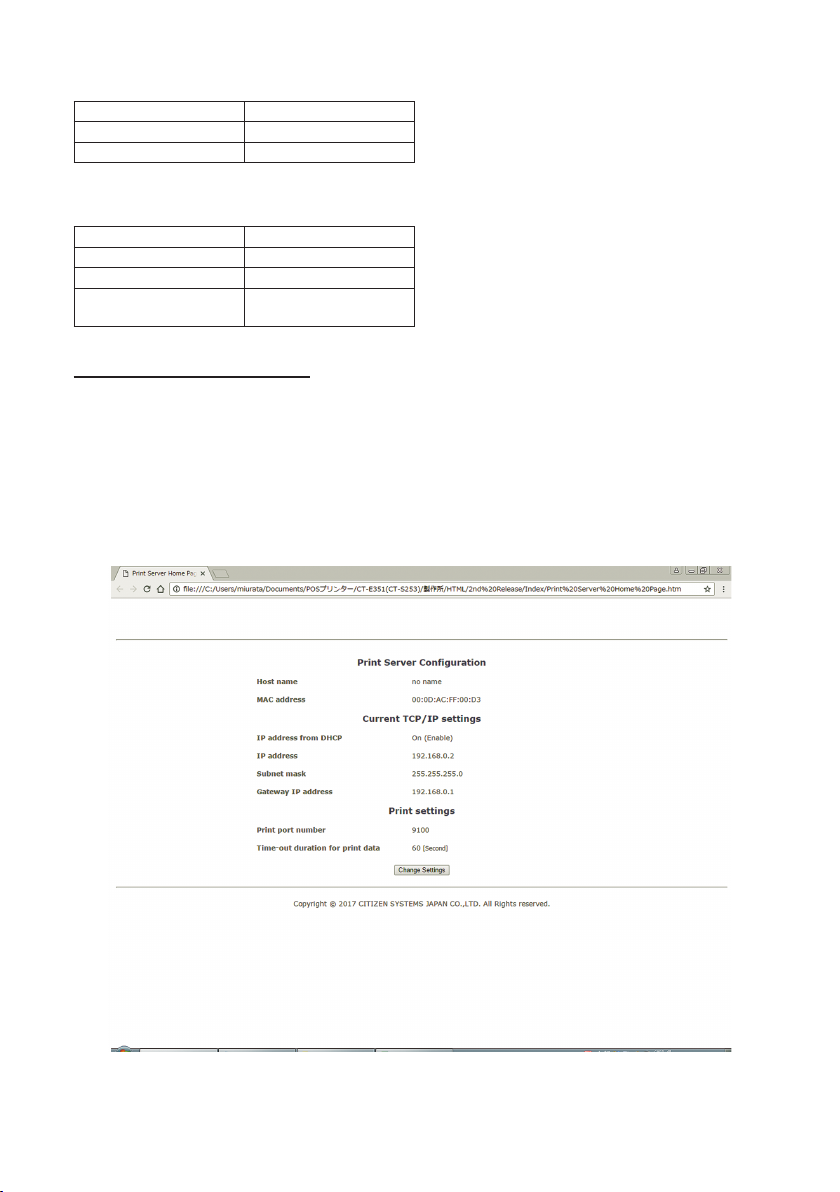
Changing network settings
You can use a web browser to access a special settings page to check and change
board settings.
Access the special settings page
1. Use a web browser to access the URL of the special settings page. Enter the IP address assigned to the printer as the part of URL. (Example: For an IP address of
169.254.1.10, input: http://169.254.1.10.)
2. This displays the page to display the current status.
25
——
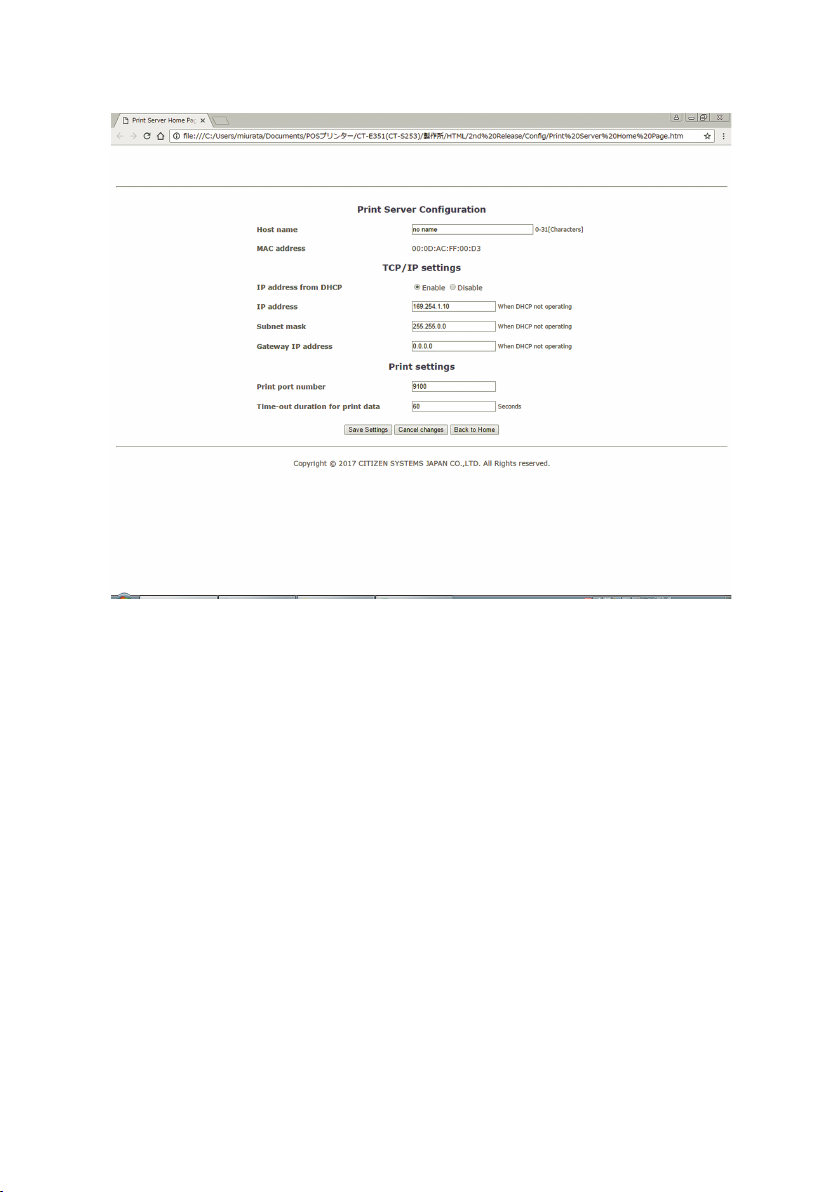
3. Press the [Change Settings] button to enter the following Change Settings screen. For
details, refer to a separate manual.
26
——
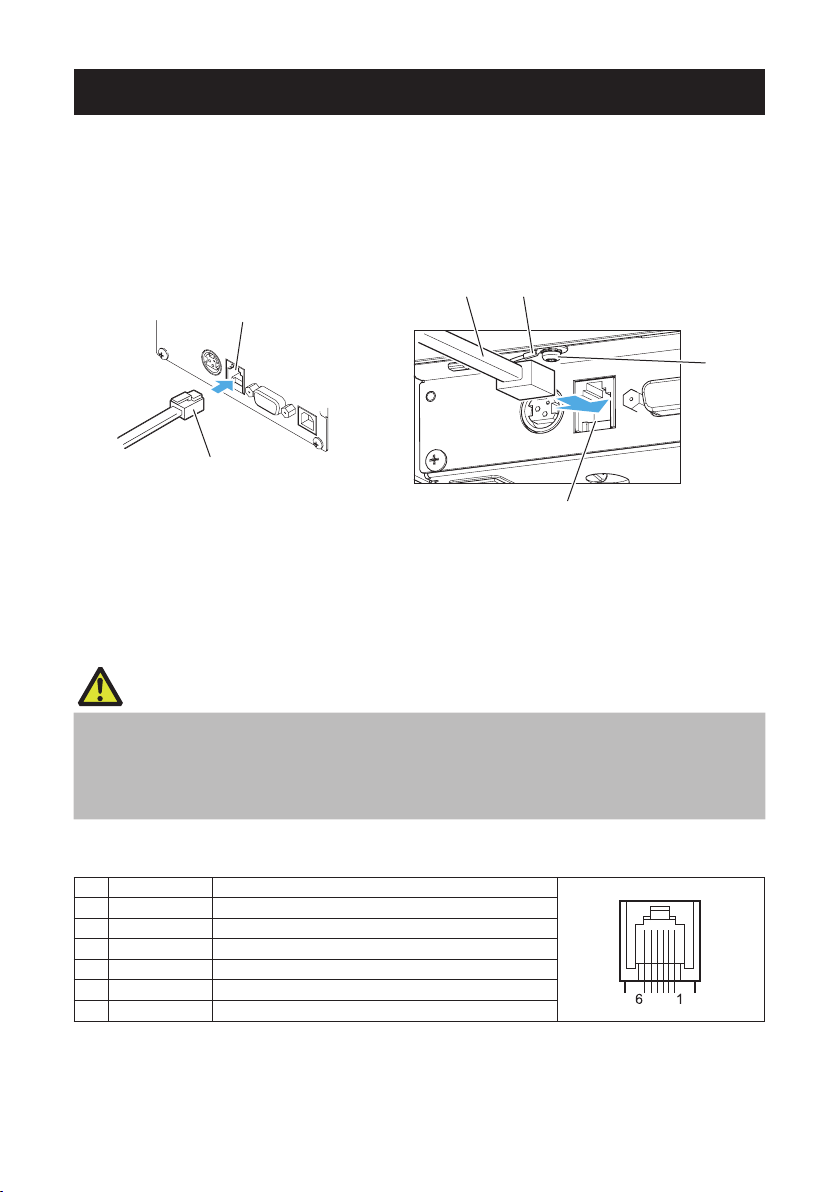
3.4 Connecting the Cash Drawer
1
23
4
1. Turn off the power.
2. Conrm the orientation of the cash drawer kick-out cable connector and connect it to
the cash drawer kick-out connector at the back of the printer.
3. Remove the screw for the ground wire.
4. Screw the cash drawer’s ground wire to the body of the printer.
1
2
1. Cash drawer kick-out connector
2. Cash drawer kick-out cable connector
3. Ground wire
4. Screw for ground wire
CAUTION
Connect only the cash drawer kick-out cable to this connector. (Do not connect a telephone
line.)
Signals cannot be output from the cash drawer kick-out connector while printing.
Hold the connector of the drawer kick cable perpendicular and straight when connecting or
disconnecting it. Doing it at an angle may cause the connector to misconnect.
(1) Connector pin conguration
No. Signal Function
1 FG Frame ground
2 DRAWER1 Cash drawer 1 drive signal
3 DRSW Cash drawer switch input
4 VDR Cash drawer drive power supply
5 DRAWER2 Cash drawer 2 drive signal
6 GND Signal ground (common ground on circuits)
Connector used:TM5RJ3-66 (Hirose) or equivalent
Applicable connector: TM3P-66P (Hirose) or equivalent
——
27
(2) Electric characteristics
1) Drive voltage: 24 VDC
2) Drive current: Approx. 1 A max. (not to exceed 510 ms.)
3) DRSW signal: Signal levels: “L” = 0 to 0.5 V, “H” = 3 to 5 V
(3) DRSW signal
Status can be tested by commands.
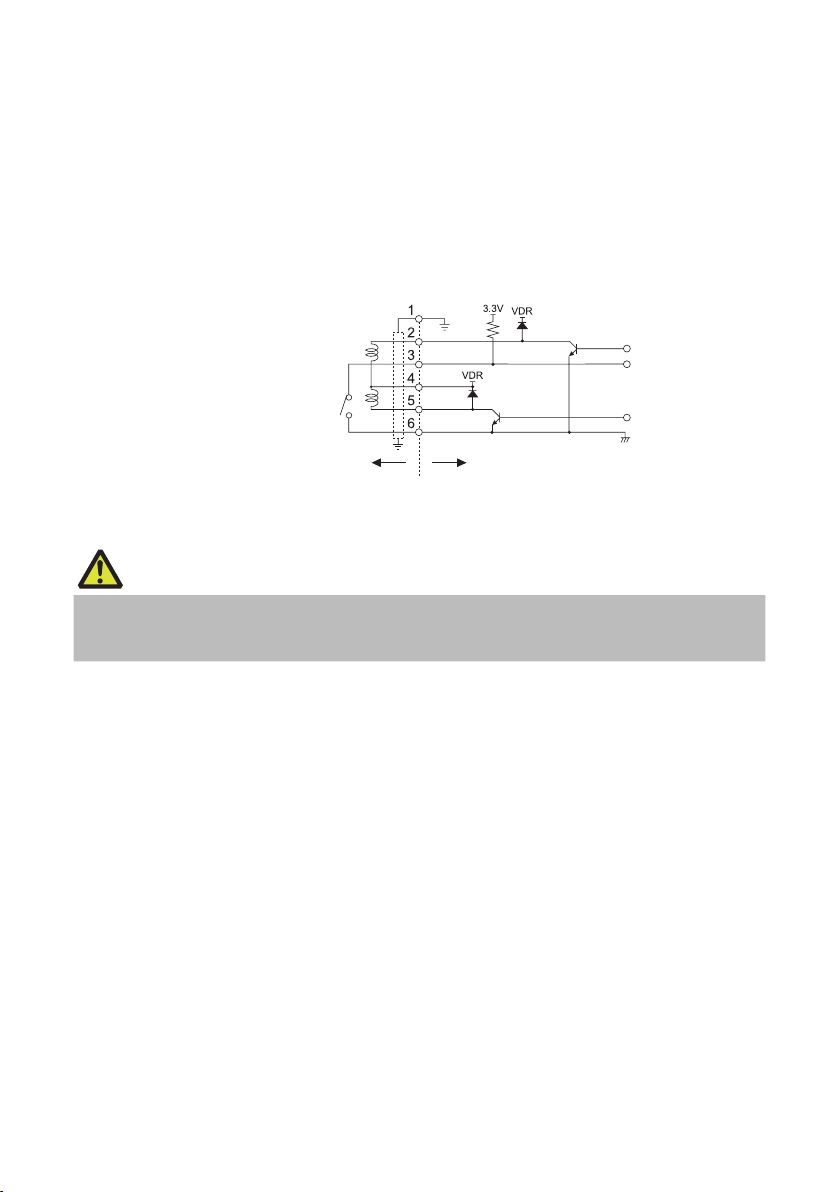
(4) Drive circuit
Cash drawer kick-out connector
Shielded
Cash drawer open/
close switch
Cash drawer Printer
CAUTION
Cash drawers 1 and 2 cannot be operated at the same time.
The solenoid used for the cash drawer should be 24 Ω or more. Do not allow the electric cur-
rent to exceed 1 A. Excessive current could damage or burn out the circuits.
28
——
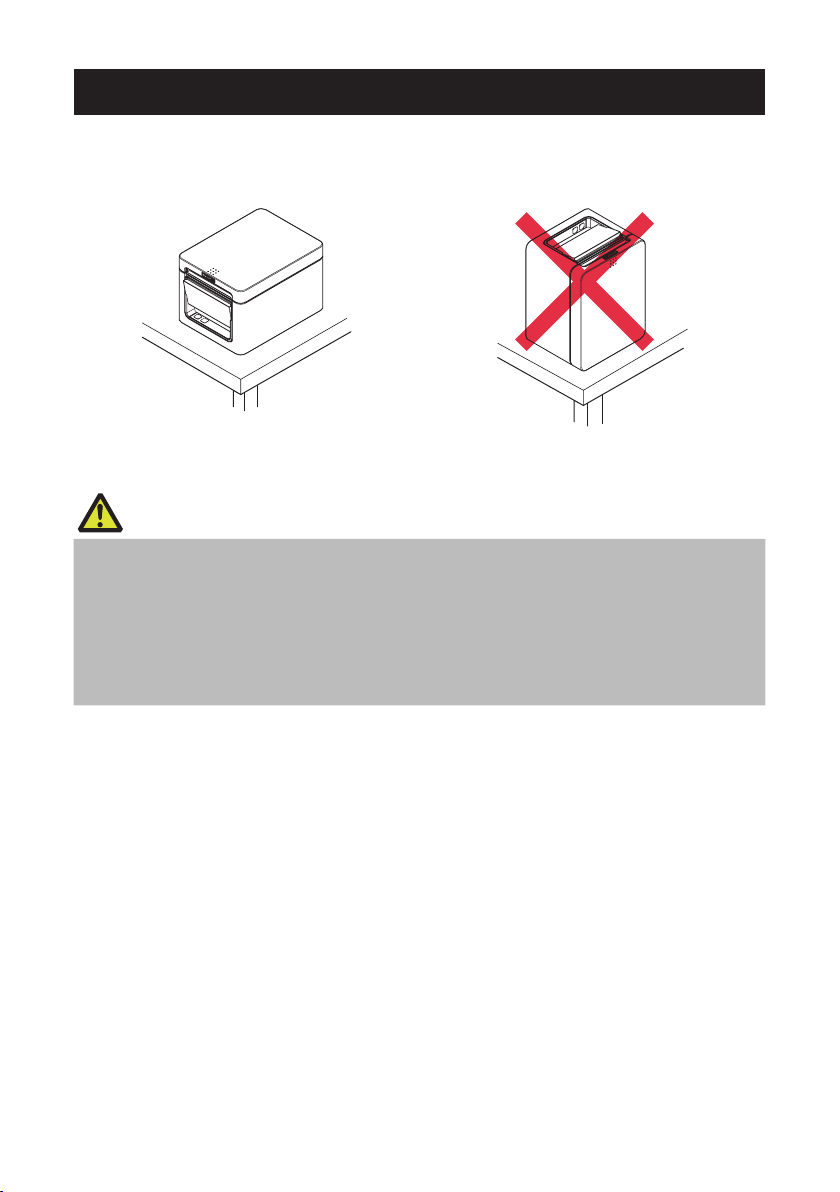
3.5 Precautions for Installing the Printer
This printer can only be positioned horizontally. It cannot be positioned vertically or on
a wall.
Horizontal position Vertical position
CAUTION
Do not use the printer under the following conditions.
Avoid locations subject to vibration or instability.
Locations that are very dirty or dusty.
Avoid locations where the printer is not level.
The printer may fall and cause an injury.
The quality of printing may deteriorate.
Oriented other than as specied.
Malfunction, failure, or electric shock may result.
29
——
3.6 Loading Paper
1. Turn on the power.
2. Flip up the cover open lever to open the paper cover.
CAUTION
When pressing up on the lever, take care that you do not pinch your ngers in the gap above the
top of the lever.
3. Load the paper roll so that the printable side of the paper is facing up, as shown by
arrow A.
4. Pull a few centimeters of paper straight out in the direction of arrow B.
5. Close the paper cover until you hear a click. Paper is fed and cut automatically (by the
factory setting).
——
30
 Loading...