


Getting Started Guía de inicio Para Começar
Démarrage
Руководство по началу работы
Посібник для початку роботи
ءدبلا ليلد
Read Safety and Important Information
\addendum\ first.
Lea primero Información de seguridad e información importante \apéndice\.
Leia Informações Importantes e Sobre Segurança \adendo\ primeiro.
Lire Sécurité et informations importantes
\addendum\ en premier.
В первую очередь прочтите раздел Информация о безопасности и важные сведения\приложение\.
Спершу прочитайте розділ Інформація щодо безпеки й важливі відомості \додаток\.
.ًلاوأ )قحلملاب( ةماهلا تامولعملاو ناملأا تامولعم أرقا

1
2
|
Installing the Printer................................................................................. |
page 1 |
|
Instalación de la impresora................................................................... |
página 1 |
|
Instalando a impressora........................................................................ |
página 1 |
|
Installation de l'imprimante....................................................................... |
page 1 |
|
Установка принтера.................................................................................. |
стр. 1 |
|
Установлення принтера................................................................... |
сторінка 1 |
|
1 ةحفص.................................................................................................. |
ةعباطلا بيكرت |
|
|
|
|
|
|
|
Connecting with Computer and Smartphone/Tablet................................. |
page 4 |
|
|
Conexión con el ordenador y con el teléfono inteligente o la tableta.... |
página 4 |
|
|
Conectando a um computador e smartphone/tablet............................. |
página 4 |
|
|
Connexion avec un ordinateur et un smartphone ou une tablette........... |
page 4 |
|
|
Подключение к компьютеру и смартфону или планшету...................... |
стр. 4 |
|
|
Підключення до комп’ютера та смартфона або планшета........... |
сторінка 4 |
|
|
4 ةحفص |
..........................................................يحوللا زاهجلا/يكذلا فتاهلاو رتويبمكلاب ليصوتلا |
|
|
|
|
|
|
|
|
|
How to Hold Printer Cómo sujetar la impresora
Como segurar a impressora Manipulation de l'imprimante
Как держать принтер Як тримати принтер
ةعباطلا لمح ةيفيك
Explanatory Movies |
Películas explicativas |
Filmes explicativos |
Vidéos explicatives |
Информационные видеоролики |
Довідкові відео |
ةيحيضوت ملافأ |
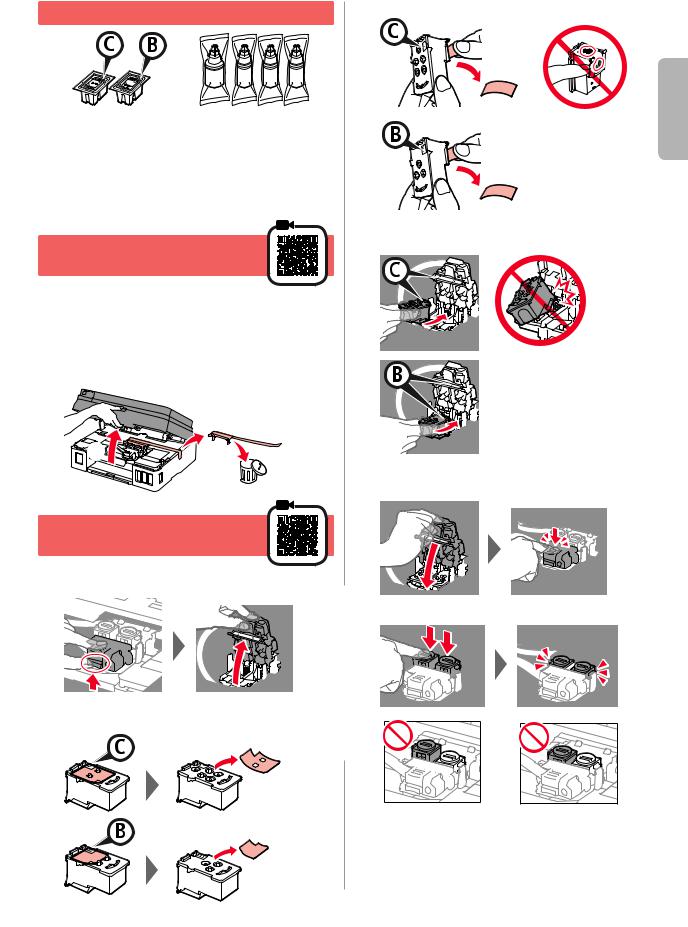
1. Checking Included Items
□ Cartridge |
□ Ink bottle |
□Power cord
□Modular cable
□Setup CD-ROM for Windows PC
□Safety and Important Information
□Getting Started \this manual\
2. Removing Packing
Materials
1 |
Remove the packing materials \such as orange |
|
2 |
tape\ from outside the printer. |
|
a Open the scanning unit / cover. |
||
|
b Remove the orange tape and the protective |
|
|
material and discard them. |
|
|
a |
b |
3. Installing the Cartridge
1 Open the cartridge locking cover.
2 |
Take out each cartridge from the package and |
|
remove the label. |
3 Remove the protective tape.
Do not touch. |
ENGLISH |
|
4 |
Insert the C \color\ cartridge on the left and the B |
|
\black\ cartridge on the right. |
Do not bump it against the surrounding parts.
5 |
Close the cartridge locking cover and push it |
|
down. |
6 Press down both joint buttons completely.
1
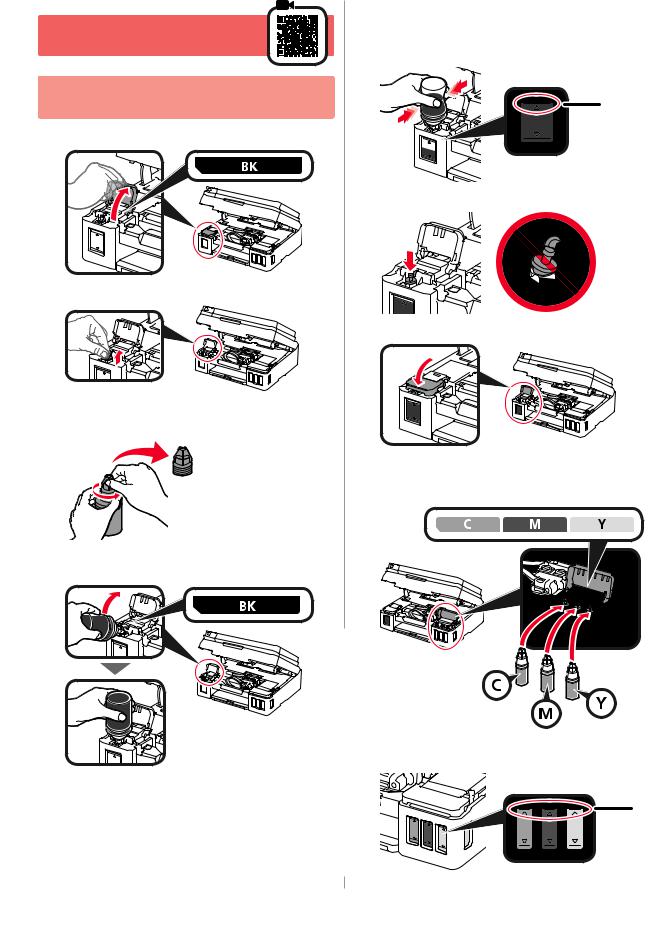
4. Pouring Ink
This product requires careful handling of ink. Ink may splatter when the ink tanks are filled with ink. If ink gets on your clothes or belongings, it may not come off.
1 Open the ink tank cover.
2 Grab and remove the tank cap of the ink tank.
3 |
Hold the ink bottle upright and remove the bottle |
|
cap. |
4 |
Insert the nozzle of the ink bottle into the inlet and |
|
stand the ink bottle upside down. |
5 Pour all ink into the ink tank.
Confirm that the ink has been filled to the upper limit line \A\.
\A\
6 Replace the tank cap securely.
7 Close the ink tank cover.
8 |
Repeat steps 1 to 7 to pour all ink into the |
|
corresponding ink tanks on the right according to |
the label.
Confirm that the ink has been filled to the upper limit line \A\.
\A\
2
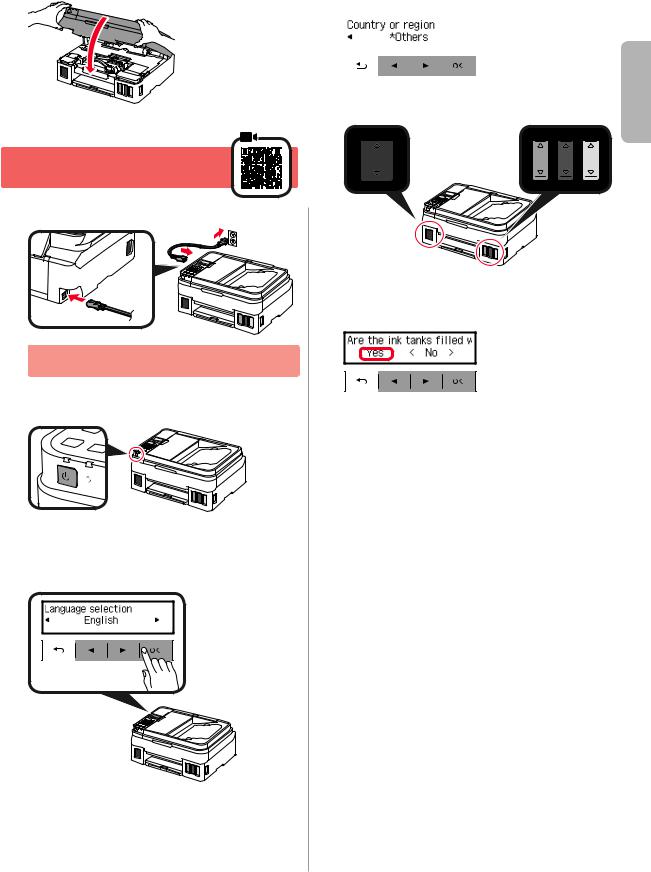
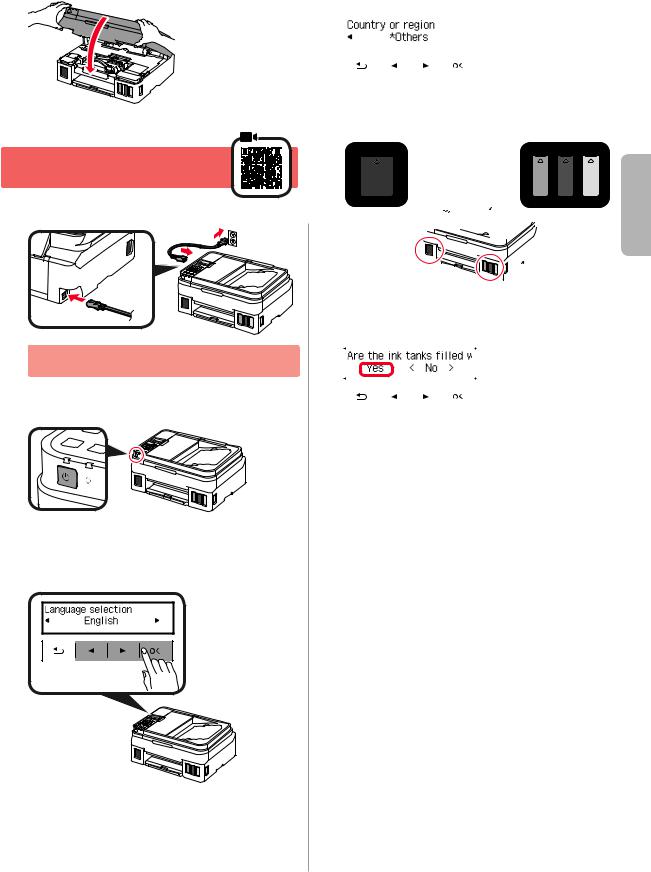
9 Close the scanning unit / cover. |
4 |
If the following screen appears, select your country |
|
|
or region, and then press the OK button. |
5 Confirm that all the ink tanks have ink in them.
5. Turning on Printer
ENGLISH
1
2
Connect the power cord.
|
6 |
Select Yes with the [ and ] buttons, and then |
Back |
|
press the OK button. |
Do not connect any cables except the power cord yet.
Press the ON button.
3 |
When the following screen appears, use the [ |
|
and ] buttons to select a language, and then |
press the OK button.
3
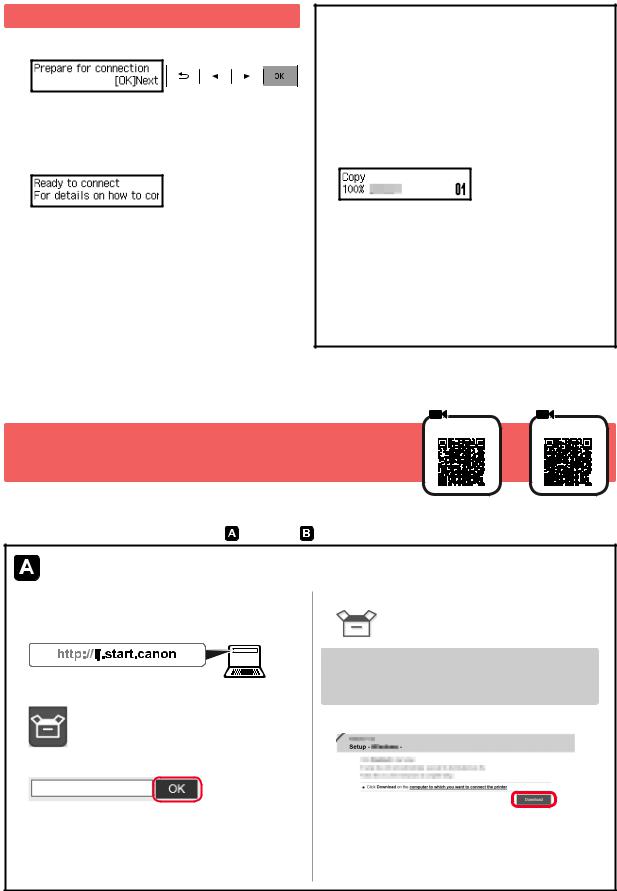
6. Preparing for Connection
1 Press the OK button.
Preparing the ink starts.
This takes about 5 to 6 minutes. Proceed to the next step.
2 Check that the following screen appears.
From here on, proceed to a step according to how you use the printer.
•To use the printer by connecting only to a computer or both to a computer and smartphone

 "7-A. Connecting to Computer"
•To use the printer by connecting only to a smartphone

 "7-B. Connecting to Smartphone" on page 6
7-A. Connecting to Computer
To use the printer without connecting to a computer or smartphone
a Press the Stop button on the printer.
b In the connection method selection screen, use the [ and ] buttons to select Do not connect, and then press the OK button.
c Use the [ and ] buttons to select Yes, and then press the OK button.
d Wait until the following screen appears.
The setup is now complete.
Windows macOS
You need a connection setup for each computer. Proceed with the setup from step 1 for each computer.
1 Start the setup file for either method |
or method . |
Downloading from the Internet
a Open a web browser \  etc.\ on your computer.
b Input the following URL and access the Canon website.
c Select Set Up.
d Input the model name of your printer and click OK.
You can select a model name from the list.
e Click Setup.
The procedures for Windows and macOS are shown below. If you are using a computer with an OS other than Windows or macOS, such as a Chrome OS, do the setup according to the on-screen instructions.
f Click Download and download the setup file.
g Execute the downloaded file.
Proceed to step  on the next page to continue.
4
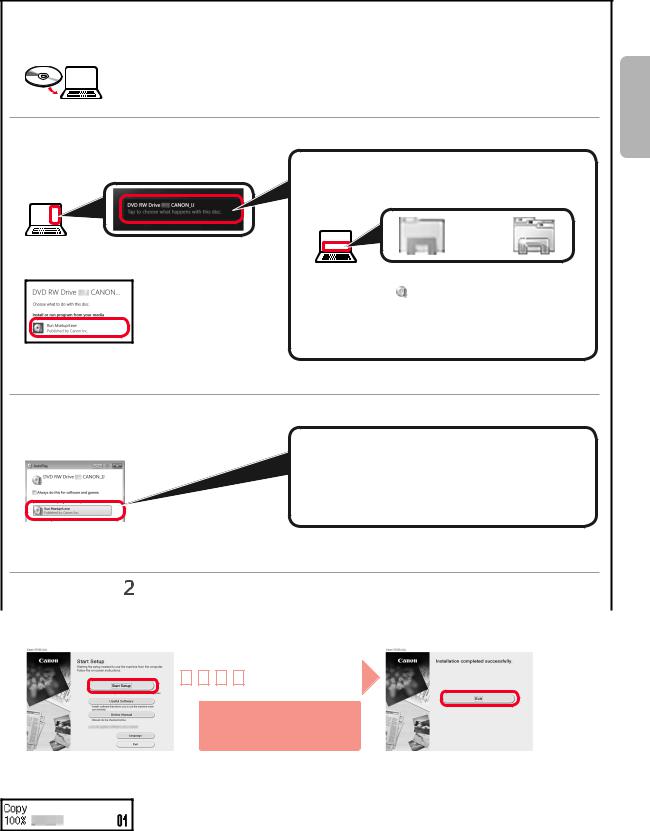
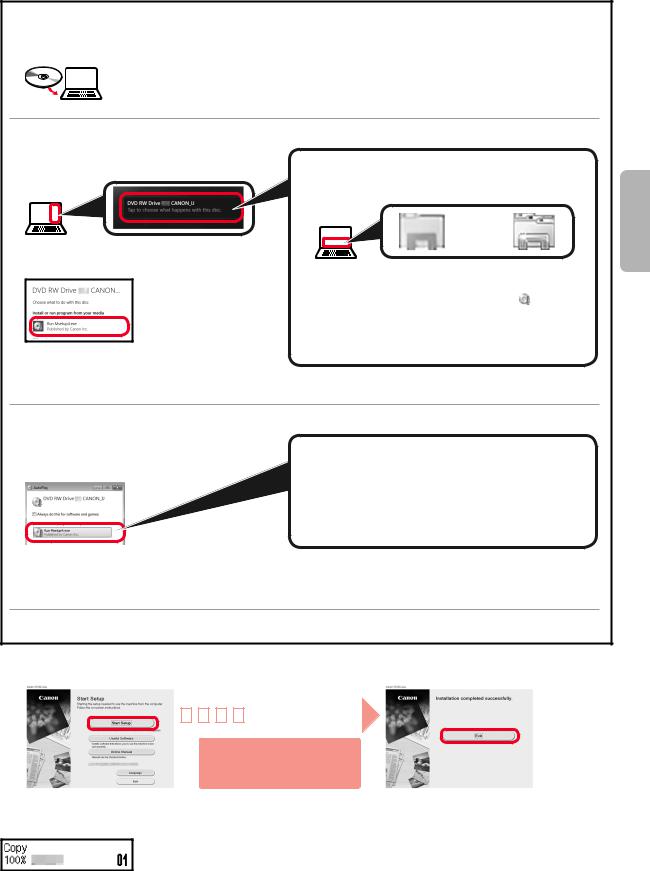
 Using Setup CD-ROM (Windows Only) a Load the Setup CD-ROM in your computer.
■■When using Windows 10 or Windows 8.1:
b When the following message appears on the right side of your computer screen, click it.
c If the following screen appears, click Run Msetup4.exe.
d If the User Account Control dialog box appears, click Yes.
When This Message Does Not Appear \or Has Disappeared\
1. Click File Explorer on the taskbar.
or
2. Click This PC on the left side of the opened window.
3. Double-click the CD-ROM icon on the right side of the window.
If the contents of the CD-ROM appear, double-click
Msetup4.exe.
4. Proceed to step d.
■■When using Windows 7:
b When the AutoPlay screen appears, click Run Msetup4.exe.
c If the User Account Control dialog box appears, click Continue.
When AutoPlay Screen Does Not Appear
1.Click Computer from the start menu.
2.Double-click the  CD-ROM icon on the right side of the opened window.
If the contents of the CD-ROM appear, double-click
Msetup4.exe.
Proceed to step |
to continue. |
||||||||||
|
|
|
|
|
|
|
|
|
|
|
|
2 Click Start Setup. |
|
|
|
|
|
|
|
|
|
|
If the following screen appears, click Exit. |
|
|
|
|
|
|
|
|
|
|
|
|
Follow the on-screen instructions to proceed with the setup.
The setup is complete when the following screen appears on the printer's screen. You can print from your computer.
ENGLISH
5
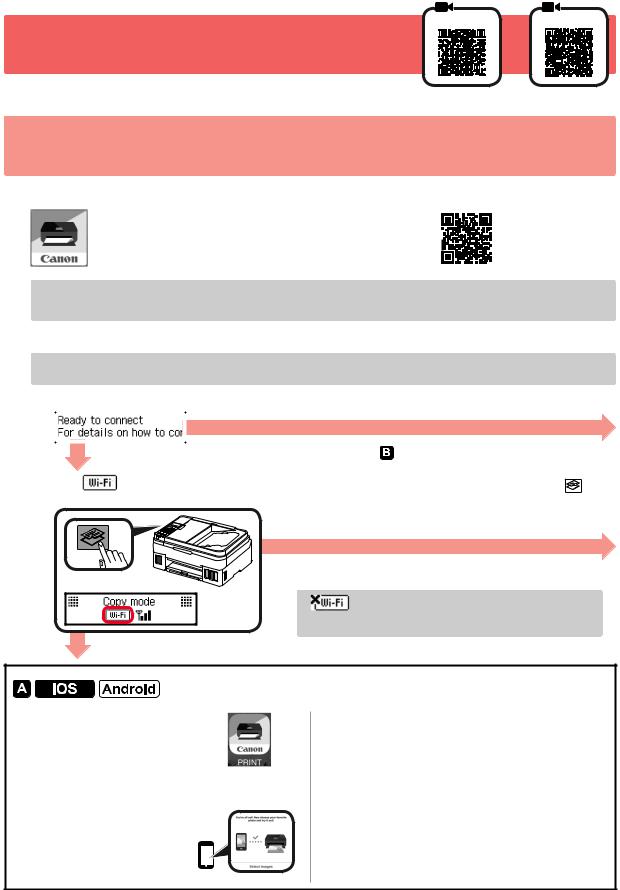
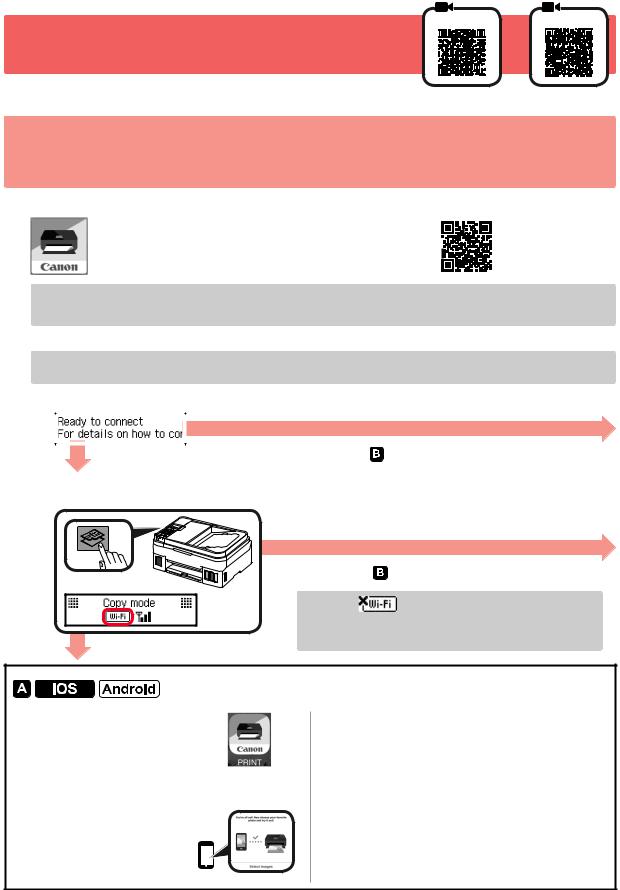
7-B. Connecting to Smartphone
iOS Android
You need a connection setup for each smartphone. Proceed with the setup from step 1 for each smartphone.
Preparation
•Turn on Wi-Fi on your smartphone.
•If you have a wireless router, connect your smartphone to the wireless router you want to connect to the printer.
* For operations, refer to manuals of your smartphone and the wireless router or contact those manufacturers.
1
2
Install the application software Canon PRINT Inkjet/SELPHY in your smartphone.
 : Search "Canon PRINT" in App Store.


 : Search "Canon PRINT" in Google Play.
Or access the Canon website by scanning the QR code.
*You may not connect your smartphone to the Internet wirelessly during connecting the printer to the smartphone directly. In that case, you may be charged depending on the contract with your service provider.
*Up to 5 devices can be connected to the printer via wireless LAN connection directly.
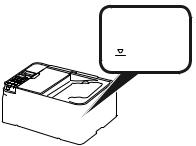
Check the display on the printer.
The screen turns off when no operation is made for about 10 minutes. Press one of the buttons on the operation panel \except for the ON button\ to display the screen.
a Does the following screen appear?
|
|
|
|
|
|
|
|
|
|
|
|
|
|
|
|
|
|
|
|
No |
|
|
Yes \Proceed to .\ |
b Does |
\the printer is connected to the network\ appear on the screen displayed by pressing the |
||||
Copy button?
Yes
No \Proceed to .\
.\
If appears, the printer cannot communicate by wireless LAN connection. For details, access "http://ij.start. canon" to see Frequently Asked Questions.
a Tap the installed application software.
b Follow the on-screen instructions to register the printer.
c Make sure that the right screen appears.
The connection with your smartphone is now complete. You can print from your smartphone.
To print photos, load photo paper. Proceed to "Loading Paper" on page 8.
6
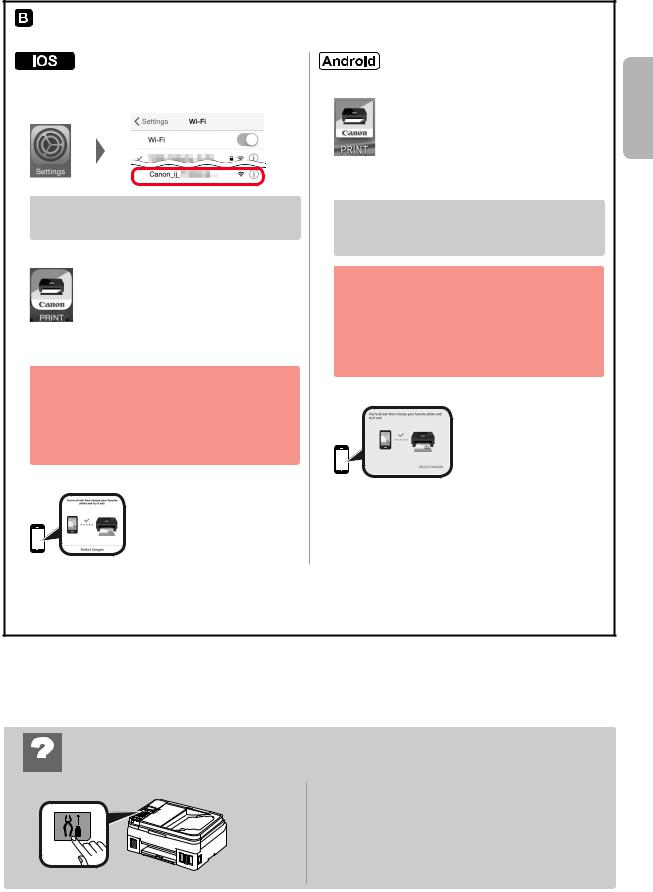
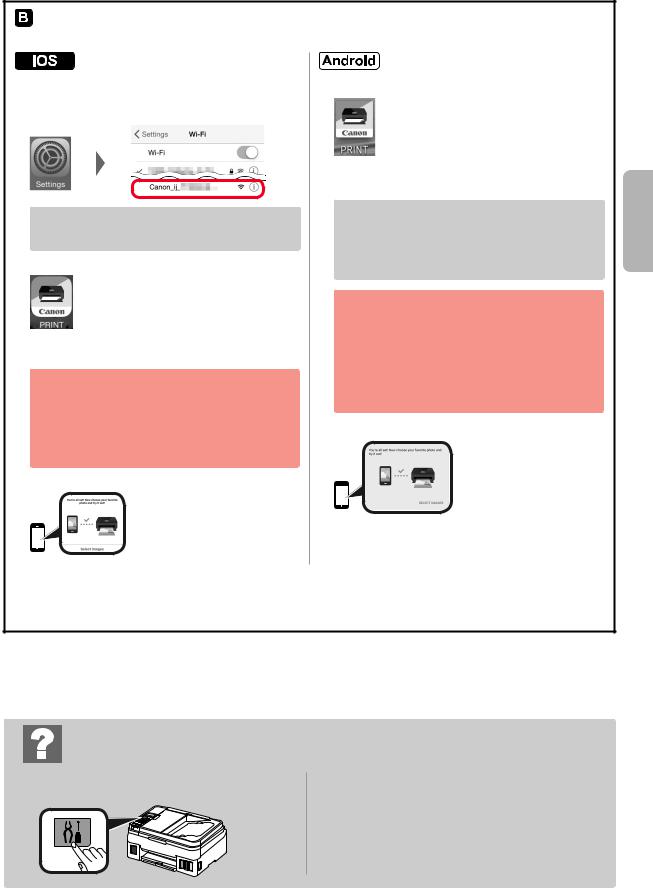
Procedures below vary depending on iOS or Android. Select your operating system and proceed to its procedure.
a Tap Settings on your smartphone's home screen, and tap Canon_ij_XXXX in the Wi-Fi settings.
If Canon_ij_XXXX does not appear on the list, see "Troubleshooting" below to operate the printer, and then repeat step a.
b Tap the installed application software.
c Follow the on-screen instructions to register the printer.
Follow the on-screen instructions to proceed with the setup.
If you select Auto Select Conn. Method (recommended) on the connection method selecting screen, the appropriate connection method is selected automatically depending on your environment.
d Make sure that the following screen appears.
a Tap the installed application software.
b Follow the on-screen instructions to register the printer.
If a message saying "Printer is not registered. Perform printer setup?" does not appear, see "Troubleshooting" below to operate the printer, and then wait for a while until the message appears.
Follow the on-screen instructions to proceed with the setup.
•The appropriate connection method is selected depending on your environment.
•If two printer names appear on the Register Printer screen as shown below, select A. A\ G4010 series \xxx.xxx.xxx.xxx\
B\ Direct-xxxx-G4010series
c Make sure that the following screen appears.
The connection with your smartphone is now complete. You can print from your smartphone.
To print photos, load photo paper. Proceed to "Loading Paper" on page 8.
ENGLISH
Troubleshooting
 Printer is not found from your smartphone. a Press the Setup button on the printer.
b Use the [ and ] buttons to select Wireless LAN setup > Easy WL connect, and then press the
OK button.
c Return to the operation of your smartphone.
7

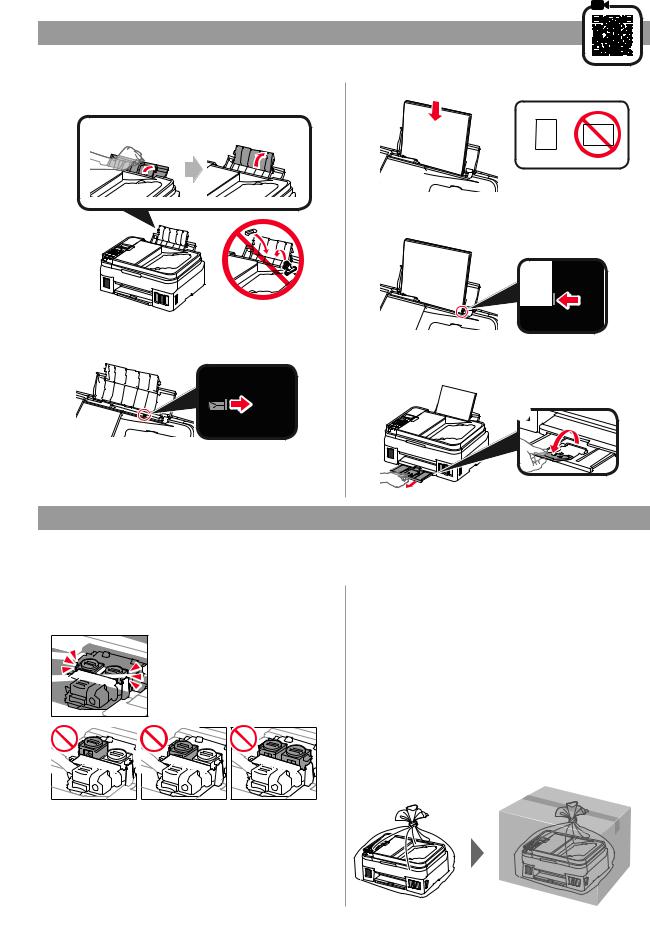
Loading Paper
1 |
Open the paper support and the paper support |
|
extension. |
2 Slide the right paper guide to the end.
Transporting Your Printer
3 Load paper with the print side facing up.
4 |
Slide the right paper guide to align it with the |
|
side of the paper stack. |
5 a Pull out the paper output tray. |
b Open the output tray extension. |
b |
a |
When relocating the printer, make sure of the following. Refer to the Online Manual for details.
Check that both joint buttons are pressed down completely to avoid ink leaks.
Pack the printer in a plastic bag in case ink leaks.
•Pack the printer in a sturdy box so that it is placed with its bottom facing down, using sufficient protective material to ensure safe transport.
•Do not tilt the printer. Ink may leak.
•Please handle with care and ensure the box remains flat and NOT turned upside down or on its side, as the printer may be damaged and ink in the printer may leak.
•When a shipping agent is handling transport of the printer, have its box marked "THIS SIDE UP" to keep the printer with its bottom facing down. Mark also with "FRAGILE" or "HANDLE WITH CARE".
8
1. Comprobación de los elementos suministrados
□ Cartucho |
□ Frasco de tinta |
□Cable de alimentación
□Cable modular
□CD-ROM de instalación para Windows PC
□Información de seguridad e información importante
□Guía de inicio \este manual\
2. Retirar los materiales de protección
1 |
Retire los materiales de empaquetado \como |
|
2 |
la cinta naranja\ del exterior de la impresora. |
|
a Abra la cubierta/unidad de escaneado. |
||
|
b Retire la cinta naranja y el material de |
|
|
protección y deséchelos. |
|
|
a |
b |
3. Instalar el cartucho
1 Abra la tapa de bloqueo del cartucho.
2 Saque cada cartucho del paquete y retire la etiqueta.
3 Retire la cinta protectora.
No tocar.
4 y el cartucho B \negro\ en la parte derecha. |
ESPAÑOL |
Inserte el cartucho C \color\ en la parte izquierda |
|
No golpear contra los objetos de alrededor.
5 |
Cierre la tapa de bloqueo del cartucho y presione |
|
hacia abajo. |
6 |
Presione hacia abajo ambos botones de unión |
|
completamente. |
1

4. Verter la tinta
Este producto un tratamiento cuidadoso de la tinta, ya que puede salpicar cuando se rellenan de tinta los depósitos de tinta. Es posible que las manchas de tinta no salgan de la ropa u otras pertenencias.
1 Abra la cubierta del depósito de tinta.
2 |
Agarre y retire la tapa del depósito del depósito |
|
de tinta. |
3 |
Sujete el frasco de tinta hacia arriba y retire |
|
la tapa del frasco. |
4 |
Inserte el inyector del frasco de tinta en la entrada |
|
y coloque el frasco de tinta boca abajo. |
5 Vierta toda la tinta en el depósito de tinta.
Confirme que se ha llenado la tinta hasta la línea de límite superior \A\.
\A\
6 Vuelva a colocar firmemente la tapa del depósito.
7 Cierre la cubierta del depósito de tinta.
8 |
Repita los pasos del 1 al 7 para verter toda la tinta |
|
en los depósitos de tinta correspondientes de la |
derecha según la etiqueta.
Confirme que se ha llenado la tinta hasta la línea de límite superior \A\.
\A\
2
9 Cierre la cubierta/unidad de escaneado.
5. Encender la impresora
1 Conecte el cable de alimentación.
Atrás
No conecte ningún cable excepto el de alimentación.
2 Pulse el botón ACTIVADO (ON).
3 |
Si aparece la siguiente pantalla, use los |
|
botones [ y ] para seleccionar el idioma |
y pulse el botón OK.
4 |
Si aparece la siguiente pantalla, seleccione su |
|||
|
país o región y, a continuación, pulse el botón OK. |
|||
|
|
|
|
|
|
|
|
|
|
5 |
Confirme que todos los depósitos de tinta |
|
contengan tinta. |


 ESPAÑOL
6 |
Seleccione Sí (Yes) con los botones [ y ] y, |
|||||
|
|
a continuación, pulse el botón OK. |
||||
|
|
|
|
|
|
|
|
|
|
|
|
|
|
|
|
|
|
|
|
|
|
|
|
|
|
|
|
3

6. Preparación para la conexión
1 Pulse el botón OK.
Preparando la inicialización de tinta.
Este proceso tardará de 5 a 6 minutos en completarse. Continúe en el siguiente paso.
2 Compruebe que aparezca la siguiente pantalla.
A partir de aquí, continúe en el paso que corresponda según su uso de la impresora.
•Para usar la impresora conectándola solo
a un ordenador o tanto a un ordenador como a un teléfono inteligente

 "7-A. Conexión a un ordenador"
•Para usar la impresora conectándola solo a un teléfono inteligente

 "7-B. Conexión con un teléfono inteligente" en la página 6
7-A. Conectar a un ordenador
Para usar la impresora sin conectarla a un ordenador o teléfono inteligente
a Pulse el botón Parar (Stop) de la impresora.
b En la pantalla de selección del método de conexión, use los botones [ y ] para seleccionar No conectar (Do not connect), y pulse el botón OK.
c Use los botones [ y ] para seleccionar Sí (Yes), y a continuación pulse el botón OK.
d Espere hasta que aparezca la siguiente pantalla.
Ha finalizado la configuración.
Windows macOS
Necesita una configuración de conexión para cada ordenador. Siga con la configuración a partir del paso 1para cada ordenador.
1 Inicie el archivo de configuración del método |
o el método . |
Descarga de Internet
a Abra un navegador web \  , etc.\ en su ordenador.
b Escriba la URL siguiente y acceda al sitio web de Canon.
c Seleccione Configurar.
d Escriba el nombre del modelo de su impresora y haga clic en Aceptar.
Puede seleccionar un nombre de modelo de la lista.
e Haga clic en Configuración.
Abajo se indican los procedimientos para Windows y macOS. Si utiliza un ordenador con un sistema operativo diferente a Windows o macOS, como por
ejemplo Chrome OS, realice la configuración siguiendo las instrucciones que parecen en la pantalla.
f Haga clic en Descargar y descargue el archivo de instalación.
g Ejecute el archivo descargado.
Vaya al paso  en la página siguiente para continuar.
4
 Uso del CD-ROM de instalación (solo para Windows) a Cargue el CD-ROM de instalación en su ordenador.
■■Si utiliza Windows 10 o Windows 8.1:
bCuando se muestre el mensaje siguiente en el lado derecho de la pantalla del ordenador, haga clic en él.
c Si aparece la siguiente pantalla, haga clic en
Ejecutar Msetup4.exe (Run Msetup4.exe).
d Si se muestra el cuadro de diálogo Control de cuentas de usuario (User Account Control), haga clic en Sí (Yes).
Si este mensaje no se muestra \o ya no aparece\
1.Haga clic en el Explorador de archivos (File Explorer) de la barra de tareas.
o
2.Haga clic en Este equipo (This PC) en la parte izquierda de la ventana que se abra.
3. Haga doble clic en el icono del CD-ROM que se encuentra en el margen derecho de la ventana. Si aparece el contenido del CD-ROM, haga doble clic en Msetup4.exe.
4. Continúe en el paso d.
■■Si utiliza Windows 7:
b Cuando se muestre la pantalla Reproducción automática (AutoPlay), haga clic en Ejecutar Msetup4.exe (Run Msetup4.exe).
c Si se muestra el cuadro de diálogo Control de cuentas de usuario (User Account Control), haga clic en Continuar (Continue).
Si no se muestra la pantalla Reproducción automática
(AutoPlay)
1.Haga clic en Equipo (Computer) en el menú de inicio.
2.Haga doble clic en el icono del CD-ROM que se encuentra en el margen derecho de la ventana abierta. Si aparece el contenido del CD-ROM, haga doble clic en Msetup4.exe.
Vaya al paso  para continuar.
2 Haga clic en Iniciar configuración (Start Setup). |
Si aparece la siguiente pantalla, haga clic |
|||||||||
|
|
|
|
|
|
|
|
|
|
en Salir (Exit). |
|
|
|
|
|
|
|
|
|
|
|
|
|
|
|
|
|
|
|
|
|
|
Siga las instrucciones en pantalla para continuar con la configuración.
La instalación se habrá finalizado cuando aparezca la siguiente pantalla en la pantalla de la impresora. Ahora puede imprimir desde su ordenador.
ESPAÑOL
5
7-B. Conexión con un teléfono inteligente
iOS Android
Necesita una configuración de conexión para cada teléfono inteligente. Siga con la configuración a partir del paso 1para cada teléfono inteligente.
Preparativos
•Active la Wi-Fi en su teléfono inteligente.
•Si dispone de un router inalámbrico, conecte su teléfono inteligente al router inalámbrico para conectar con la impresora.
*Por cuestiones del funcionamiento, consulte los manuales de su teléfono inteligente y del router inalámbrico o póngase en contacto con los fabricantes.
1
2
Instale el software de la aplicación Canon PRINT Inkjet/SELPHY en su teléfono inteligente.
 : Buscar "Canon PRINT" en App Store.


 : Buscar "Canon PRINT" en Google Play.
O acceda al sitio web de Canon escaneando el código QR.
*No puede conectar su teléfono inteligente a Internet de formanalámbrica mientras la impresora se conecta al teléfono inteligente directamente. Si lo hace, es posible que se realice un cargo en su cuenta, según el contrato que tenga con el proveedor del servicio.
*Se pueden conectar un máximo de 5 dispositivos directamente a la impresora mediante la conexión LAN inalámbrica.
Compruebe la pantalla en la impresora.
La pantalla se desactiva cuando no se realiza ninguna operación durante aproximadamente 10 minutos. Para mostrar la pantalla, pulse cualquier botón en el panel de control \excepto el botón ACTIVADO (ON)\.
a ¿Aparece la siguiente pantalla?
|
|
|
|
|
|
|
|
|
|
|
|
|
No |
|
Sí \continúe a .\ |
b¿Aparece el mensaje  \la impresora está conectada a la red\ en la pantalla que aparece cuando se pulsa el botón
 COPIA (Copy)?
|
No \continúe a |
.\ |
|
Si aparece |
, a impresora no puede comunicarse |
|
mediante una conexión inalámbrica LAN. Para obtener |
|
|
más información, consulte "http://ij.start.canon" para ver |
|
Sí |
las Preguntas más frecuentes. |
|
a Puntee el software de la aplicación instalado.
b Siga las instrucciones en pantalla para registrar la impresora.
c Asegúrese de que aparezca la pantalla de la derecha.
Se ha completado la conexión con su teléfono inteligente. Ya puede imprimir desde su teléfono inteligente.
Para imprimir fotos, cargue papel fotográfico. Vaya a la sección "Carga del papel" en la página 8.
6
Los procedimientos que se indican a continuación pueden variar en función del iOS o Android. Seleccione su sistema operativo y sigua el procedimiento indicado.
a Toque Ajustes (Settings) en la pantalla de inicio de su teléfono inteligente y después toque Canon_ij_XXXX en los ajustes de Wi-Fi.
Si Canon_ij_XXXX no aparece en la lista, consulte la sección "Solución de problemas" a continuación para hacer funcionar la impresora y repita el paso a.
b Puntee el software de la aplicación instalado.
c Siga las instrucciones en pantalla para registrar la impresora.
Siga las instrucciones en pantalla para continuar con la configuración.
Si seleccionó Selec. autom. método con.
(recomendado) (Auto Select Conn. Method (recommended)) en la pantalla de selección del método de conexión, se seleccionará el método de conexión adecuado según su ambiente.
d Asegúrese de que aparezca la siguiente pantalla.
a Puntee el software de la aplicación instalado.
b Siga las instrucciones en pantalla para registrar la impresora.
Si no aparece el siguiente mensaje: "Impresora no registrada. ¿Realizar preparación de impresora? (Printer is not registered. Perform printer setup?)", consulte "Solución de problemas" para poner en funcionamiento la impresora y espere unos minutos hasta que aparezca el mensaje.
Siga las instrucciones en pantalla para continuar con la configuración.
•El método de conexión adecuado se elige en función de su ambiente.
•Si aparecen dos nombres de impresora en la pantalla Registrar impresora (Register Printer) como se muestra a continuación, seleccione A. A\ G4010 series \xxx.xxx.xxx.xxx\
B\ Direct-xxxx-G4010series
c Asegúrese de que aparezca la siguiente pantalla.
Se ha completado la conexión con su teléfono inteligente. Ya puede imprimir desde su teléfono inteligente.
Para imprimir fotos, cargue papel fotográfico. Vaya a la sección "Carga del papel" en la página 8.
Solución de problemas
No se ha encontrado la impresora desde su teléfono inteligente.
a Pulse el botón Configuración (Setup) |
b Use los botones [ y ] para seleccionar |
de la impresora. |
Config. LAN inalám. (Wireless LAN setup) > |
|
Conex. inalám. fácil (Easy WL connect), |
|
y a continuación pulse el botón OK. |
|
c Regrese a la operación de su teléfono inteligente. |
ESPAÑOL
7
Carga del papel
1 |
Abra el soporte del papel y la extensión del |
|
soporte del papel. |
2 Deslice la guía del papel derecha hacia el final.
Transporte de la impresora
3 Cargue papel con la cara imprimible hacia arriba.
4 |
Deslice la guía del papel derecha para alinearla |
|
con el lado de la pila de papel. |
5 a Extraiga la bandeja de salida del papel. |
b Abra la extensión de la bandeja de salida. |
b |
a |
Cuando vaya a transportar la impresora, asegúrese de lo siguiente. Consulte el Manual en línea para obtener más información.
Compruebe que ambos botones de unión se hayan presionado hacia abajo completamente para evitar derrames de tinta.
Embale la impresora en una bolsa de plástico por si hay derrames de tinta.
•Embale la impresora en una caja resistente y de modo que no quede boca abajo. Utilice suficiente material de protección para garantizar un transporte seguro.
•No incline la impresora. De lo contrario, es posible que la tinta se derrame.
•Manipule con cuidado y asegúrese de que la caja permanece en una superficie plana y que NO se coloca boca abajo o de lado, ya que la impresora podría dañarse y la tinta de la impresora, derramarse.
•Cuando se ocupe del transporte de la impresora una empresa de mensajería, marque la caja con "ESTE LADO ARRIBA" para mantener la impresora con la parte inferior abajo. Márquela también con "FRÁGIL" o "MANEJAR CON CUIDADO".
8
 Loading...