


iP2800 series
Online Manual
Read Me First Useful Functions Available on the Printer Overview of the Printer
English
Contents
Read Me First. . . . . . . . . . . . . . . . . . . . . . . . . . . . . . . . . . . . . . . . . . . . . . . . . . . . 4 How to Use the Online Manual. . . . . . . . . . . . . . . . . . . . . . . . . . . . . . . . . . . . . . . 5 Trademarks and Licenses. . . . . . . . . . . . . . . . . . . . . . . . . . . . . . . . . . . . . . . . . . . 6 Search Tips. . . . . . . . . . . . . . . . . . . . . . . . . . . . . . . . . . . . . . . . . . . . . . . . . . . . . . 7 Notes on Operation Explanations. . . . . . . . . . . . . . . . . . . . . . . . . . . . . . . . . . . . . 9 Useful Functions Available on the Printer. . . . . . . . . . . . . . . . . . . . . . . . . . . . . . 10
Useful Functions Available from Applications and the Main Unit. . . . . . . . . . . . . . . . . . . . 11
Overview of the Printer. . . . . . . . . . . . . . . . . . . . . . . . . . . . . . . . . . . . . . . . . . . . 14
Safety Guide. . . . . . . . . . . . . . . . . . . . . . . . . . . . . . . . . . . . . . . . . . . . . . . . . . . . . . . . . . . . 15
Safety Precautions. . . . . . . . . . . . . . . . . . . . . . . . . . . . . . . . . . . . . . . . . . . . . . . . . . . . . . . . . . . . . . . . . . 16
Regulatory and Safety Information. . . . . . . . . . . . . . . . . . . . . . . . . . . . . . . . . . . . . . . . . . . . . . . . . . . . . 17
Main Components and Basic Operations. . . . . . . . . . . . . . . . . . . . . . . . . . . . . . . . . . . . . . 20
Main Components. . . . . . . . . . . . . . . . . . . . . . . . . . . . . . . . . . . . . . . . . . . . . . . . . . . . . . . . . . . . . . . . . . 21
Front View. . . . . . . . . . . . . . . . . . . . . . . . . . . . . . . . . . . . . . . . . . . . . . . . . . . . . . . . . . . . . . . . . . . . 22
Rear View. . . . . . . . . . . . . . . . . . . . . . . . . . . . . . . . . . . . . . . . . . . . . . . . . . . . . . . . . . . . . . . . . . . . 24
Inside View. . . . . . . . . . . . . . . . . . . . . . . . . . . . . . . . . . . . . . . . . . . . . . . . . . . . . . . . . . . . . . . . . . . 25
About the Power Supply of the Printer. . . . . . . . . . . . . . . . . . . . . . . . . . . . . . . . . . . . . . . . . . . . . . . . . . . 26
Confirming that the Power Is On. . . . . . . . . . . . . . . . . . . . . . . . . . . . . . . . . . . . . . . . . . . . . . . . . . . 27 Turning the Printer On and Off. . . . . . . . . . . . . . . . . . . . . . . . . . . . . . . . . . . . . . . . . . . . . . . . . . . . 28 Notice for the Power Plug/Power Cord. . . . . . . . . . . . . . . . . . . . . . . . . . . . . . . . . . . . . . . . . . . . . . 30 Notice for Unplugging the Power Cord. . . . . . . . . . . . . . . . . . . . . . . . . . . . . . . . . . . . . . . . . . . . . . 31
Loading Paper. . . . . . . . . . . . . . . . . . . . . . . . . . . . . . . . . . . . . . . . . . . . . . . . . . . . . . . . . . 32
Loading Paper. . . . . . . . . . . . . . . . . . . . . . . . . . . . . . . . . . . . . . . . . . . . . . . . . . . . . . . . . . . . . . . . . . . . . 33
Loading Plain Paper / Photo Paper. . . . . . . . . . . . . . . . . . . . . . . . . . . . . . . . . . . . . . . . . . . . . . . . . 34 Loading Envelopes. . . . . . . . . . . . . . . . . . . . . . . . . . . . . . . . . . . . . . . . . . . . . . . . . . . . . . . . . . . . . 37 Media Types You Can Use. . . . . . . . . . . . . . . . . . . . . . . . . . . . . . . . . . . . . . . . . . . . . . . . . . . . . . . 40
Paper Load Limit. . . . . . . . . . . . . . . . . . . . . . . . . . . . . . . . . . . . . . . . . . . . . . . . . . . . . . . . . . . 42
Media Types You Cannot Use. . . . . . . . . . . . . . . . . . . . . . . . . . . . . . . . . . . . . . . . . . . . . . . . . . . . . 43
Printing Area. . . . . . . . . . . . . . . . . . . . . . . . . . . . . . . . . . . . . . . . . . . . . . . . . . . . . . . . . . . . . . . . . . 44
Printing Area. . . . . . . . . . . . . . . . . . . . . . . . . . . . . . . . . . . . . . . . . . . . . . . . . . . . . . . . . . . . . . 45 Other Sizes than Letter, Legal, Envelopes. . . . . . . . . . . . . . . . . . . . . . . . . . . . . . . . . . . . . . . 46 Letter, Legal. . . . . . . . . . . . . . . . . . . . . . . . . . . . . . . . . . . . . . . . . . . . . . . . . . . . . . . . . . . . . . . 47 Envelopes. . . . . . . . . . . . . . . . . . . . . . . . . . . . . . . . . . . . . . . . . . . . . . . . . . . . . . . . . . . . . . . . 48
Replacing a FINE Cartridge. . . . . . . . . . . . . . . . . . . . . . . . . . . . . . . . . . . . . . . . . . . . . . . . 49
Replacing a FINE Cartridge. . . . . . . . . . . . . . . . . . . . . . . . . . . . . . . . . . . . . . . . . . . . . . . . . . . . . . . . . . . 50
Maintenance. . . . . . . . . . . . . . . . . . . . . . . . . . . . . . . . . . . . . . . . . . . . . . . . . . . . . . . . . . . . 56
When Printing Becomes Faint or Colors Are Incorrect. . . . . . . . . . . . . . . . . . . . . . . . . . . . . . . . . . . . . . 57
Maintenance Procedure. . . . . . . . . . . . . . . . . . . . . . . . . . . . . . . . . . . . . . . . . . . . . . . . . . . . . . . . . . 58
Printing the Nozzle Check Pattern. . . . . . . . . . . . . . . . . . . . . . . . . . . . . . . . . . . . . . . . . . . . . . . . . . 60
Examining the Nozzle Check Pattern. . . . . . . . . . . . . . . . . . . . . . . . . . . . . . . . . . . . . . . . . . . . . . . 61
Cleaning the Print Head. . . . . . . . . . . . . . . . . . . . . . . . . . . . . . . . . . . . . . . . . . . . . . . . . . . . . . . . . . 62
Performing Maintenance from a Computer. . . . . . . . . . . . . . . . . . . . . . . . . . . . . . . . . . . . . . . . . . . . . . . 63
Cleaning the Print Heads from Your Computer. . . . . . . . . . . . . . . . . . . . . . . . . . . . . . . . . . . . . . . . 64 Cleaning the Paper Feed Rollers from Your Computer. . . . . . . . . . . . . . . . . . . . . . . . . . . . . . . . . . 66 Aligning the Print Head Position from Your Computer. . . . . . . . . . . . . . . . . . . . . . . . . . . . . . . . . . . 67 Use Your Computer to Print a Nozzle Check Pattern. . . . . . . . . . . . . . . . . . . . . . . . . . . . . . . . . . . 70 Cleaning Inside the Printer. . . . . . . . . . . . . . . . . . . . . . . . . . . . . . . . . . . . . . . . . . . . . . . . . . . . . . . 71
Cleaning the Printer. . . . . . . . . . . . . . . . . . . . . . . . . . . . . . . . . . . . . . . . . . . . . . . . . . . . . . . . . . . . . . . . . 72
Cleaning the Exterior of the Printer. . . . . . . . . . . . . . . . . . . . . . . . . . . . . . . . . . . . . . . . . . . . . . . . . 73 Cleaning the Paper Feed Roller. . . . . . . . . . . . . . . . . . . . . . . . . . . . . . . . . . . . . . . . . . . . . . . . . . . 74 Cleaning the Inside of the Printer (Bottom Plate Cleaning). . . . . . . . . . . . . . . . . . . . . . . . . . . . . . . 75
Changing the Printer Settings. . . . . . . . . . . . . . . . . . . . . . . . . . . . . . . . . . . . . . . . . . . . . . . 77
Changing Printer Settings from Your Computer. . . . . . . . . . . . . . . . . . . . . . . . . . . . . . . . . . . . . . . . . . . 78
Changing the Print Options. . . . . . . . . . . . . . . . . . . . . . . . . . . . . . . . . . . . . . . . . . . . . . . . . . . . . . . 79 Registering a Frequently Used Printing Profile. . . . . . . . . . . . . . . . . . . . . . . . . . . . . . . . . . . . . . . . 80 Setting the Ink Cartridge to be Used. . . . . . . . . . . . . . . . . . . . . . . . . . . . . . . . . . . . . . . . . . . . . . . . 82 Managing the Printer Power. . . . . . . . . . . . . . . . . . . . . . . . . . . . . . . . . . . . . . . . . . . . . . . . . . . . . . 83 Reducing the Printer Noise. . . . . . . . . . . . . . . . . . . . . . . . . . . . . . . . . . . . . . . . . . . . . . . . . . . . . . . 85 Changing the Printer Operation Mode. . . . . . . . . . . . . . . . . . . . . . . . . . . . . . . . . . . . . . . . . . . . . . . 87
Tips for Ensuring Optimal Printing Quality. . . . . . . . . . . . . . . . . . . . . . . . . . . . . . . . . . . . . 88
Useful Information about Ink. . . . . . . . . . . . . . . . . . . . . . . . . . . . . . . . . . . . . . . . . . . . . . . . . . . . . . . . . . 89 Key Points to Successful Printing. . . . . . . . . . . . . . . . . . . . . . . . . . . . . . . . . . . . . . . . . . . . . . . . . . . . . . 90 Be Sure to Make Paper Settings after Loading Paper. . . . . . . . . . . . . . . . . . . . . . . . . . . . . . . . . . . . . . . 91 Storing Printed Images. . . . . . . . . . . . . . . . . . . . . . . . . . . . . . . . . . . . . . . . . . . . . . . . . . . . . . . . . . . . . . 92 Printer Handling Precautions. . . . . . . . . . . . . . . . . . . . . . . . . . . . . . . . . . . . . . . . . . . . . . . . . . . . . . . . . . 93 Key to Enjoying Consistent Printing Quality. . . . . . . . . . . . . . . . . . . . . . . . . . . . . . . . . . . . . . . . . . . . . . . 94 Precautions for Safe Transport of the Printer. . . . . . . . . . . . . . . . . . . . . . . . . . . . . . . . . . . . . . . . . . . . . 95
Legal Limitations on Use of Your Product and Use of Images. . . . . . . . . . . . . . . . . . . . . . 96 Specifications. . . . . . . . . . . . . . . . . . . . . . . . . . . . . . . . . . . . . . . . . . . . . . . . . . . . . . . . . . . 97

Read Me First
Notes on Online Manual Usage
How to Print
Notes on Online Manual Usage
•Reproduction, diversion or copying of any text, photo or image published in the Online Manual (hereinafter referred to as "this guide"), in whole or in part, is prohibited.
•In principle, Canon shall change or delete the contents of this guide without prior notice to customers. In addition, Canon may suspend or stop the disclosure of this guide due to unavoidable reasons. Canon shall not be liable for any damage suffered by customers as a result of changes in or deletion of information in this guide, or suspension/stoppage of disclosure of this guide.
•Although the contents of this guide have been prepared with utmost care, please contact the service center if you find any incorrect or missing information.
•In principle, the descriptions in this guide are based on the product at the time of its initial sale.
•This guide does not disclose the manuals of all the products sold by Canon. See the manual supplied with the product when using a product that is not described in this guide.
How to Print
Use the print function of your Web browser to print this guide.
To set to print background colors and images, follow the steps below.
 Note
Note
•In Windows 8, print in the desktop version.
•In Internet Explorer 9 or 10
1.Select  (Tools) > Print > Page setup....
2.Select the Print Background Colors and Images checkbox.
•In Internet Explorer 8
1.Press the Alt key to display the menus.
Alternatively, from Tools, select Toolbars > Menu Bar to display the menus.
2.Select Page Setup... from the File menu.
3.Select the Print Background Colors and Images checkbox.
•In Mozilla Firefox
1.Press the Alt key to display the menus.
Alternatively, click Firefox, then select Menu Bar from the right arrow of Options to display the menus.
2.Select Page Setup... from the File menu.
3.Select the Print Background (colors & images) checkbox in Format & Options.
4

How to Use the Online Manual
Symbols Used in This Document
 Warning
Instructions that, if ignored, could result in death or serious personal injury caused by incorrect operation of the equipment. These must be observed for safe operation.
 Caution
Instructions that, if ignored, could result in personal injury or material damage caused by incorrect operation of the equipment. These must be observed for safe operation.
 Important
Instructions including important information. To avoid damage and injury or improper use of the product, be sure to read these indications.
 Note
Note
Instructions including notes for operation and additional explanations.
 Basic
Basic
Instructions explaining basic operations of your product.
 Note
Note
• Icons may vary depending on your product.
Touch-enabled Device Users
For touch actions, you need to replace "right-click" in this document with the action set on the operating system. For example, if the action is set to "press and hold" on your operating system, replace "right-click" with "press and hold."
5

Trademarks and Licenses
•Microsoft is a registered trademark of Microsoft Corporation.
•Windows is a trademark or registered trademark of Microsoft Corporation in the U.S. and/or other countries.
•Windows Vista is a trademark or registered trademark of Microsoft Corporation in the U.S. and/or other countries.
•Internet Explorer is a trademark or registered trademark of Microsoft Corporation in the U.S. and/or other countries.
•Mac, Mac OS, AirPort, Safari, Bonjour, iPad, iPhone and iPod touch are trademarks of Apple Inc., registered in the U.S. and other countries. AirPrint and the AirPrint logo are trademarks of Apple Inc.
•IOS is a trademark or registered trademark of Cisco in the U.S. and other countries and is used under license.
•Google Cloud Print, Google Chrome, Android, Google Play and Picasa are either registered trademarks or trademarks of Google Inc.
•Adobe, Photoshop, Photoshop Elements, Lightroom, Adobe RGB and Adobe RGB (1998) are either registered trademarks or trademarks of Adobe Systems Incorporated in the United States and/or other countries.
•Photo Rag is a trademark of Hahnemühle FineArt GmbH.
•Bluetooth is a trademark of Bluetooth SIG, Inc., U.S.A. and licensed to Canon Inc.
 Note
Note
• The formal name of Windows Vista is Microsoft Windows Vista operating system.
6
Enter keywords in the search window and click  (Search).
You can search for target pages in this guide.
Entry example: "(your product's model name) load paper", "(your product's model name) 1000"
Search Tips
You can search for target pages by entering keywords in the search window.
 Note
Note
•The displayed screen may vary.
•Searching for Functions
Enter your product's model name and a keyword for the function you want to learn about
Example: When you want to learn how to load paper
Enter "(your product's model name) load paper" in the search window and perform a search
•Troubleshooting Errors
Enter your product's model name and a support code
Example: When the following error screen appears
Enter "(your product's model name) 1000" in the search window and perform a search
7

 Note
Note
•The displayed screen varies depending on your product.
•Searching for Application Functions
Enter your application's name and a keyword for the function you want to learn about
Example: When you want to learn how to print collages with My Image Garden Enter "My Image Garden collage" in the search window and perform a search
•Searching for Reference Pages
Enter your model name and a reference page title*
* You can find reference pages more easily by entering the function name as well.
Example: When you want to browse the page referred to by the following sentence on a scanning procedure page
Refer to "Color Settings Tab" for your model from Home of the Online Manual for details.
Enter "(your product's model name) scan Color Settings Tab" in the search window and perform a search
8
Notes on Operation Explanations
In this guide, most of the operations are described based on the windows displayed when Windows 8 operating system (called Windows 8 below) is used.
9

Useful Functions Available on the Printer
The following useful functions are available on the printer.
Enjoy pleasant photography experience by utilizing various functions.
 Useful Functions Available from Applications and the Main Unit
You can create items such as collages easily or download delightful printing materials, and print them.
10
Useful Functions Available from Applications and the Main Unit
On the printer, the following useful functions are available from applications and the main unit.
•Print Photos Easily
•Download Content Materials
Print Photos Easily Using an Application
Organize Images Easily
In My Image Garden, you can register the names of people and events to photos.
You can organize photos easily as you can display them not only by folder but also by calendar, event, and person. This also allows you to find the target photos easily when you search for them later on.
<Calendar View>
<People View>
Display Recommended Items in Slide Shows
Based on the information registered to photos, Quick Menu automatically selects the photos on your computer and creates recommended items such as collages and cards. The created items appear in slide shows.
11
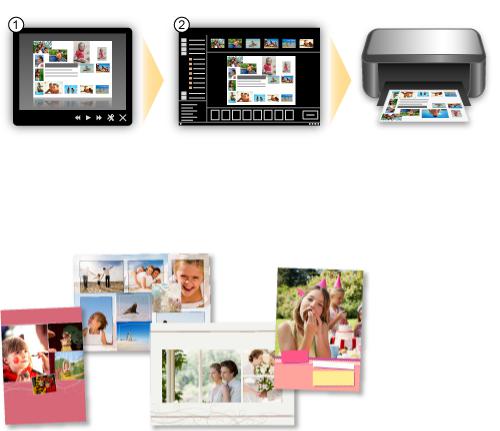
If there is an item you like, you can easily print it in just two steps.
1.In Image Display of Quick Menu, select the item you want to print.
2.Print the item with My Image Garden.
Place Photos Automatically
Delightful items are created easily as the selected photos are placed automatically according to the theme.
Other Various Functions
My Image Garden has many other useful functions.
Refer to "What You Can Do with My Image Garden" for details.
Download a Variety of Content Materials
CREATIVE PARK
A "printing materials site" where you can download all the printing materials for free.
Various types of content such as seasonal cards and paper crafts that can be made by assembling paper parts are provided.
It is easily accessible from Quick Menu.
CREATIVE PARK PREMIUM
A service where customers using models that support PREMIUM Contents can download exclusive printing materials.
PREMIUM Contents can be downloaded easily via My Image Garden. Downloaded PREMIUM Contents can be printed directly with My Image Garden.
To download PREMIUM Contents, make sure that genuine Canon ink tanks/ink cartridges are installed for all colors on a supported printer.
12

 Note
Note
•The designs of PREMIUM Contents provided in this page are subject to change without prior notice.
13

Overview of the Printer
 Safety Guide
Safety Precautions
Regulatory and Safety Information
 Main Components and Basic Operations
Main Components
About the Power Supply of the Printer
 Loading Paper
Loading Paper
 Replacing a FINE Cartridge
Replacing a FINE Cartridge
Checking the Ink Status from Your Computer
 Maintenance
When Printing Becomes Faint or Colors Are Incorrect
Performing Maintenance from a Computer
Cleaning the Printer
 Changing the Printer Settings
Changing Printer Settings from Your Computer
 Tips for Ensuring Optimal Printing Quality
Useful Information about Ink
Key Points to Successful Printing
Be Sure to Make Paper Settings after Loading Paper
Storing Printed Images
Printer Handling Precautions
Key to Enjoying Consistent Printing Quality
Precautions for Safe Transport of the Printer
 Legal Limitations on Use of Your Product and Use of Images
 Specifications
14
Safety Guide
 Safety Precautions
 Regulatory and Safety Information
15
Safety Precautions
Choosing a location
•Do not install the machine in a location that is unstable or subject to excessive vibration.
•Do not install the machine in locations that are very humid or dusty, in direct sunlight, outdoors, or close to a heating source.
To avoid the risk of fire or electric shocks, use the machine under the operating environment specified in the On-screen Manual.
•Do not place the machine on a thick rug or carpet.
•Do not place the machine with its back attached to the wall.
Power supply
•Ensure that the area around the power outlet is kept clear at all times so you can easily unplug the power cord if necessary.
•Never remove the plug by pulling on the cord.
Pulling the cord may damage the power cord, leading to possible fire or electrical shock.
•Do not use an extension lead/cord.
Working around the machine
•Never put your hands or fingers in the machine while it is printing.
•When moving the machine, carry the machine at both ends. In case the machine weighs more than 14 kg, it is recommended to have two people lifting the machine. Accidental dropping of the machine causes injury. For the machine's weight, refer to the On-screen Manual.
•Do not place any object on the machine. Especially do not place metal objects (paper clips, staples, etc.) or containers of flammable solvents (alcohol, thinners, etc.) on top of the machine.
•Do not transport or use the machine on a slant, vertically or upside-down, as the ink may leak and damage the machine.
Working around the machine (For the multifunction printer)
•When loading a thick book on the Platen Glass, do not press hard on the Document Cover. The Platen Glass may break and cause injury.
Print Heads/ink tanks and FINE Cartridges
•Keep ink tanks out of the reach of children. In case ink* is accidentally licked or swallowed, rinse out mouth or give one or two glasses of water to drink. If irritation or discomfort occurs, obtain medical advice immediately.
* Clear Ink contains nitrate salts (For models containing Clear Ink).
•In case ink gets in contact with eyes, rinse with water immediately. In case ink gets in contact with skin, wash with soap and water immediately. If irritation to eyes or skin persists, obtain medical advice immediately.
•Never touch the electrical contacts on a Print Head or FINE Cartridges after printing. The metal parts may be very hot and could cause burns.
•Do not throw ink tanks and FINE Cartridges into fire.
•Do not attempt to disassemble or modify the Print Head, ink tanks, and FINE Cartridges.
16

Regulatory and Safety Information
About the disposal of the battery (For models containing lithium battery)
Dispose of used batteries according to the local regulations.
Users in the U.S.A.
FCC Notice (U.S.A. Only)
For 120V, 60Hz model
Model Number: K10389/K10392/K10399
This device complies with Part 15 of the FCC Rules. Operation is subject to the following two conditions:
(1) This device may not cause harmful interference, and (2) this device must accept any interference received, including interference that may cause undesired operation.
Note: This equipment has been tested and found to comply with the limits for a Class B digital device, pursuant to Part 15 of the FCC Rules. These limits are designed to provide reasonable protection against harmful interference in a residential installation. This equipment generates, uses and can radiate radio frequency energy and, if not installed and used in accordance with the instructions, may cause harmful interference to radio communications.
However, there is no guarantee that interference will not occur in a particular installation. If this equipment does cause harmful interference to radio or television reception, which can be determined by turning the equipment off and on, the user is encouraged to try to correct the interference by one or more of the following measures:
•Reorient or relocate the receiving antenna.
•Increase the separation between the equipment and receiver.
•Connect the equipment into an outlet on a circuit different from that to which the receiver is connected.
•Consult the dealer or an experienced radio/TV technician for help.
Use of a shielded cable is required to comply with Class B limits in Subpart B of Part 15 of the FCC Rules.
Do not make any changes or modifications to the equipment unless otherwise specified in the manual. If such changes or modifications should be made, you could be required to stop operation of the equipment.
Canon U.S.A., Inc.
One Canon Park Melville, New York 11747 1-800-652-2666
European Union (and EEA) only.
This symbol indicates that this product is not to be disposed of with your household waste, according to the WEEE Directive (2002/96/EC) and your national law. This product should be handed over to a designated collection point, e.g., on an authorized one-for-one basis when you buy a new similar product or to an authorized collection site for recycling waste electrical and electronic equipment (EEE). Improper handling of this type of waste could have a possible negative impact on the environment and human health due to potentially hazardous substances that are generally associated with EEE. At the same time,
17

your cooperation in the correct disposal of this product will contribute to the effective usage of natural resources. For more information about where you can drop off your waste equipment for recycling, please contact your local city office, waste authority, approved WEEE scheme or your household waste disposal service. For more information regarding return and recycling of WEEE products, please visit www.canoneurope.com/environment.
(EEA: Norway, Iceland and Liechtenstein)
India only.
This product is not to be disposed of with your household waste, according to the e-waste (Management and Handling) Rules, 2011.
This product should be handed over to a designated collection point, e.g., to an authorized collection site for recycling waste electrical and electronic equipment (EEE). Improper handling of this type of waste could have a possible negative impact on the environment and human health due to potentially hazardous substances that are generally associated with EEE. At the same time, your cooperation in the correct disposal of this product will contribute to the effective usage of natural resources. For more information regarding return and recycling of WEEE products, please visit http://www.canon.co.in/environment/.
Also, this product complies with the "India E-waste Rule 2011" and prohibits use of lead, mercury, hexavalent chromium, polybrominated biphenyls or polybrominated diphenyl ethers in concentrations exceeding 0.1 % by weight and 0.01 % by weight for Cadmium, except for the exemptions set in Schedule II of the Rule.
Environmental Information
Reducing your environmental impact while saving money
Power Consumption and Activation Time
The amount of electricity a device consumes depends on the way the device is used. This product is designed and set in a way to allow you to reduce your electricity costs. After the last print it switches to Ready Mode. In this mode it can print again immediately if required. If the product is not used for a time, the device switches to its Power Save Mode. The devices consume less power (Watt) in these modes. If you wish to set a longer Activation Time or would like to completely deactivate the Power Save Mode, please consider that this device may then only switch to a lower energy level after a longer period of time or not at all.
Canon does not recommend extending the Activation Times from the optimum ones set as default.
Energy Star®
The Energy Star® programme is a voluntary scheme to promote the development and purchase of energy efficient models, which help to minimise environmental impact.
Products which meet the stringent requirements of the Energy Star® programme for both environmental benefits and the amount of energy consumption will carry the Energy Star® logo accordingly.
18

Paper types
This product can be used to print on both recycled and virgin paper (certified to an environmental stewardship scheme), which complies with EN12281 or a similar quality standard. In addition it can support printing on media down to a weight of 64g/m2, lighter paper means less resources used and a lower environmental footprint for your printing needs.
19
Main Components and Basic Operations
 Main Components
 About the Power Supply of the Printer
20
Main Components
 Front View
 Rear View
 Inside View
21

Front View
(1) paper support
Open to load paper in the rear tray.
(2) paper guide
Align with the left side of the paper stack.
(3) rear tray
Load paper here. Two or more sheets of the same size and type of paper can be loaded at the same time, and fed automatically one sheet at a time.
Loading Plain Paper / Photo Paper
Loading Envelopes
(4) cover
Open to replace the FINE cartridge or remove jammed paper inside the printer.
(5) paper output tray
Printed paper is ejected. Pull out it before printing.
(6) output tray extension
Extend to support ejected paper. Extend it when printing.
22

* All lamps are shown lit in the above figure for explanatory purposes.
(7) ON/RESUME button
Press to turn the power on or off. You can cancel a print job in progress. You can also press this button to release from printer error status or to select a maintenance function.
(8) POWER lamp
This lamp lights green after flashing when the power is turned on.
 Note
Note
•You can check the status of the printer by the POWER and Alarm lamps.
•POWER lamp is off: The power is off.
•POWER lamp lights green: The printer is ready to print.
•POWER lamp flashes green: The printer is getting ready to print, or printing is in progress.
•Alarm lamp flashes orange: An error has occurred and the printer is not ready to print.
•POWER lamp flashes green and Alarm lamp flashes orange alternately: An error that requires contacting the service center may have occurred.
If an Error Occurs
(9) Alarm lamp
This lamp lights or flashes orange when an error occurs.
23

Rear View
(1) power cord connector
Plug in the supplied power cord.
(2) USB port
Plug in the USB cable to connect the printer with a computer.
 Important
•Do not touch the metal casing.
•Do not plug in or unplug the USB cable while printing.
24

Inside View
(1) FINE cartridge (ink cartridges)
A replaceable cartridge that integrates print head and ink tank.
(2)FINE cartridge holder
Install the FINE cartridge.
The color FINE cartridge should be installed into the left slot and the black FINE cartridge should be installed into the right slot.
 Note
Note
• For details on replacing a FINE cartridge, see Replacing a FINE Cartridge.
 Important
•The area around the parts (A) may be splattered with ink. This does not affect the performance of the printer.
•Do not touch the parts (A). The printer may not print properly if you touch them.
25
About the Power Supply of the Printer
 Confirming that the Power Is On
 Turning the Printer On and Off
 Notice for the Power Plug/Power Cord
 Notice for Unplugging the Power Cord
26

Confirming that the Power Is On
The POWER lamp is lit green when the printer is turned on.
 Note
Note
• It may take a while for the printer to start printing immediately after you turn on the printer.
27
Turning the Printer On and Off
Turning on the printer
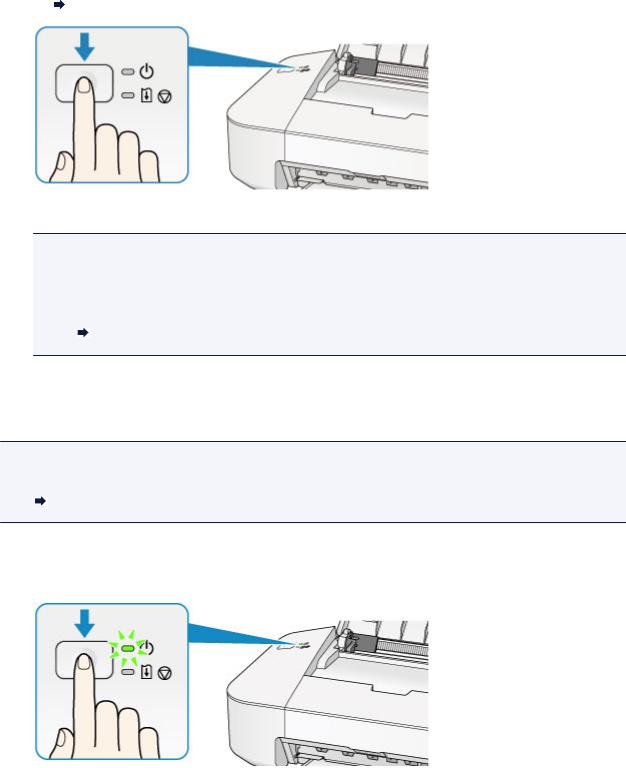
1. Press the ON/RESUME button to turn on the printer.
The POWER lamp flashes and then remains lit green.
Confirming that the Power Is On
 Note
Note
•It may take a while for the printer to start printing immediately after you turn on the printer.
•If the Alarm lamp lights up or flashes orange, see If an Error Occurs.
•You can set the printer to automatically turn on when a print operation is performed from a computer. This feature is set to off by default.
Managing the Printer Power
Turning off the printer
 Note
Note
•When the paper jam error or paper out error has occurred, you cannot turn the printer off even if you press the ON/RESUME button on the printer. Dismiss the error, then turn off the printer.
If an Error Occurs
1. Press the ON/RESUME button to turn off the printer.
When the POWER lamp stops flashing, the printer is turned off.
28

 Important
•When you unplug the power cord after turning off the printer, be sure to confirm that the POWER lamp is off.
 Note
Note
•You can set the printer to automatically turn off when no print jobs are sent to the printer for a certain interval. This is the default setting.
Managing the Printer Power
29

Notice for the Power Plug/Power Cord
Unplug the power cord once a month to confirm that the power plug/power cord does not have anything unusual described below.
•The power plug/power cord is hot.
•The power plug/power cord is rusty.
•The power plug/power cord is bent.
•The power plug/power cord is worn.
•The power plug/power cord is split.
 Caution
•If you find anything unusual with the power plug/power cord described above, unplug the power cord and call for service. Using the printer with one of the unusual conditions above may cause a fire or an electric shock.
30
 Loading...