


 Loading...
Quick
Operation
Guide
This guide describes the basic operations of each function and introduces several of the machine's most useful functions. To learn more about the functions described in this guide, see the e-Manual. After you finish reading this guide, store it in a safe place for future reference.
Using the Control Panel/
Placing Originals
Customizing
the Main Menu
Registering
Frequently Used Setting
Combinations
Checking the Job Status/
Machine Status
Copying Documents
Sending Faxes
Sending Scanned Data
Registering
New Addresses
Storing Data
in USB Memory
Using Data Stored
in USB Memory
Digitizing Documents
Finishing Documents
Printing
from a Computer
Printing with the Multi-
Purpose Tray
Operating the Machine
from a Computer
 Using the Control Panel
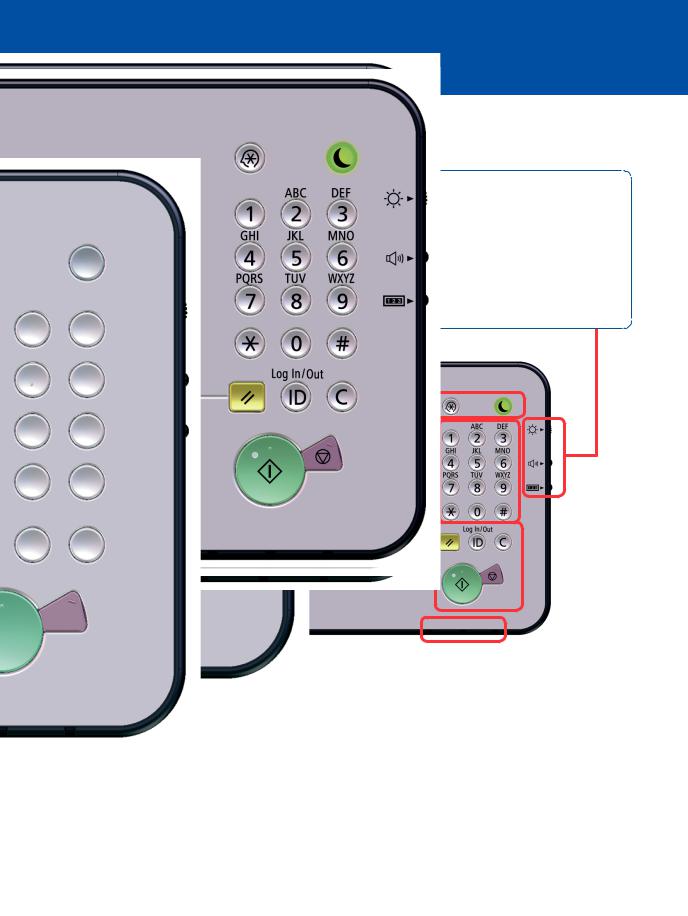
The machine is operated and configured in the control panel. By learning more about the various names and functions available on the machine, you can use the machine more efficiently.
Settings/Registration Key |
Brightness Adjustment Dial |
Press this key to configure the machine's settings and to register items on the machine.
Use this dial to adjust the brightness of the touch panel display.
Energy Saver Key |
Volume Settings Key |
You can set the machine to enter sleep mode when you do not use the machine for a while. When you want to use the machine again, press this key to cancel the sleep mode.
Press this key to adjust the volume of the alarm when sending or receiving a fax.
Counter Check Key
Press this key to display the total number of copies and prints output with the machine.
|
|
|
|
|
Touch Panel |
|
Display |
|
|
|
|
|
|
|
|||
|
|
|
|
|
|
|||
|
|
|
|
|
|
|||
|
|
|
|
|
|
|||
|
|
|
|
|
|
|||
|
|
|
|
|
By using the touch panel, you can select |
|||
Edit Pen |
||||||||
|
functions such as copy and print, and configure |
|||||||
The pen used to operate the control |
|
the settings of the machine. |
||||||
panel is stored here. |
|
If the desired function is not displayed, try |
||||||
|
|
|
|
|
||||
|
|
|
|
|
pressing [Show All]. |
|||
|
|
|
|
|
|
|
|
|
Main Menu
Press this button to display the Main Menu.
Quick Menu
Press this button to display the Quick Menu buttons that you have registered to perform frequently used setting combinations.
Shortcut
Press these buttons to switch the display to another function without returning to the Main Menu.
Status Monitor/Cancel
You can use this key to confirm the job status, such as print, send, and receive jobs. You can also use this key to pause or cancel a print job.
Indicator Lights
These lights indicate the status of the machine. They flash when a job is being processed or an error has occurred, are lit when the machine's main power is On, and are dark when the machine's main power is Off.
2

 Placing Originals
There are two ways to place originals on the machine. You can either place them on the platen glass, or use the feeder. When you want to copy/scan multiple documents at once, place the originals in the feeder. When copying/scanning originals that cannot be placed in the feeder (books, a single page of a stapled document, etc.), place the original directly on the platen glass.
Platen Glass 

1 |
2 |
3 |
With the side of the original you want to scan face down, align the top edge of your original with the back edge of the platen glass (by the arrow in the top left corner).
Feeder 

1 2
Numeric Keys
Use these keys when entering numeric values, such as when entering fax numbers or the number of copies.
Start Key
Press this key to start copying or scanning.
Stop Key
Press this key to stop a copy/scan job currently in progress.
Place the originals in the feeder with the side that you want to scan face up.
Reset Key
Press this key to restore the standard settings of the machine.
ID (Log In/Out) Key
Press this key to log in/out when using the login service.
Clear Key
Press this key to clear entered values or characters.
3
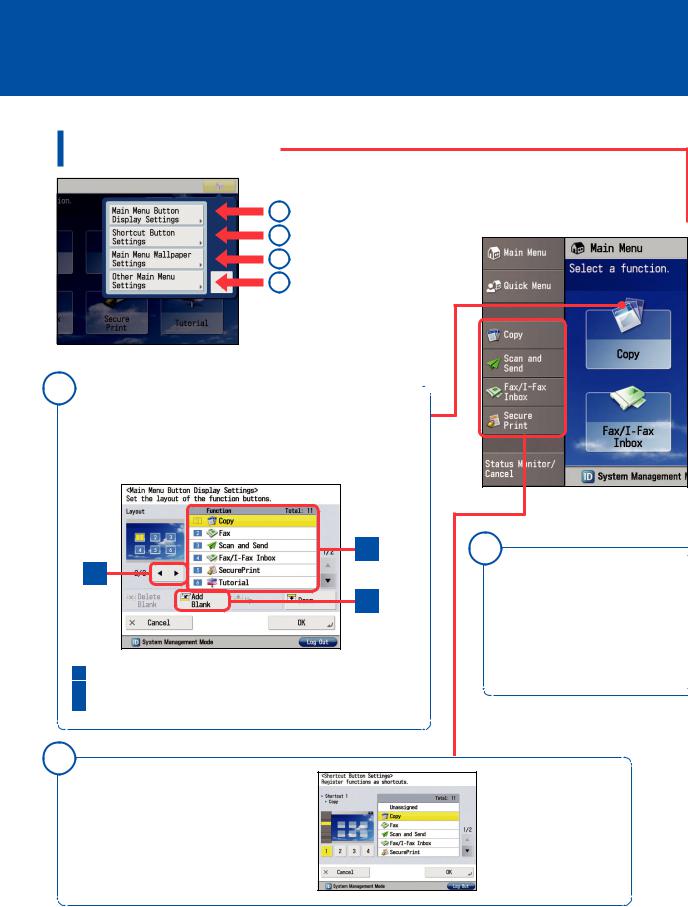
 Customizing the Main Menu
Selecting a Function
1
2
3
4
1

Changing the Function Key Layout
You can set to display/hide each function key, and place frequently used function keys in easy to access positions. You can also change the number of keys displayed on a single screen.
B
A
C
AEnables you to select the number of buttons and the layout.
BEnables you to select the order to display the function keys.
CEnables you to place a blank space on the Main Menu screen.
2
Registering a Function Key Shortcut Button
Since shortcut buttons are always displayed on the left side of the touch panel display even when the function is switched, you can switch the function without returning to the Main Menu screen.
3
Changing the Background of the Main Menu Screen
You can select from five types of backgrounds.
To delete a shortcut button that has been set, select [Unassigned] on the setting screen.
4
The first screen displayed after logging in to the machine is called the Main Menu screen. It includes buttons that lead to the various functions (function keys). The Main Menu screen can be freely customized by changing the number, layout, and background of the function keys and displaying a button for switching the language, etc.
 Press This Button at First
4

Other Main Menu Settings
A
B
C
A Switching the Language
If you need to frequently switch the language, you can place a shortcut button for switching the language on the top of the screen.
C Displaying all the function keys
If the function you want to use is not displayed on the Main Menu screen, press [Show All]. The hidden function keys are displayed.
BDisplaying a shortcut to Settings/ Registration
You can place a shortcut button for an item that can be
set from (Settings/Registration), such as automatic density correction or paper drawer settings. This enables
a setting to be quickly displayed without selecting it from (Settings/Registration).
5

Registering Frequently Used Setting Combinations
Various Quick Menu Functions
Quick Menu Button |
Press This Button at First |
By registering a combination of settings as a Quick Menu button, you can perform |
|
a series of settings with only one-touch. You can also add a send destination to |
|
the setting combination, thus helping prevent mistakes when sending. |
|
|
|
|
|
|
|
|
|
|
|
|
|
|
|
|
|
|
|
|
|
|
Send the scanned image in Compact |
||
Scan two-sided original. |
|
|
PDF format via e-mail. |
||||
Name of the Button
Comment for the Button
How to Register Settings Set in a Function Screen as a Quick Menu Button
1 |
2 |
Specify the settings that you want to register →press
 →[Register to Quick Menu].
*When in the E-mail Send screen.
Confirm the settings →press [Next] →select the operation that will be performed when you press the registered button →press [Next].
6

You can register combinations of frequently used settings as a single item in the Quick Menu. By adding the login function to the combination, you can register different Quick Menu Buttons for each user, customizing the Quick Menu for each user's needs.
Personal/Shared Button
When logging in through Single Sign On-H, you can register a Personal button. Settings registered under the Shared button are available to all users. You can add your individual setting combinations under the Personal button, and settings you want to share with coworkers under the Shared button.
Customizing the Quick Menu Screen
You can customize how a button's number, size, order, and background appear in the Quick Menu screen, just like with the Main Menu screen.
3 |
4 |
Select the button to register →press [Next].
Enter the Quick Menu button name, and a comment if necessary →press [OK].
7
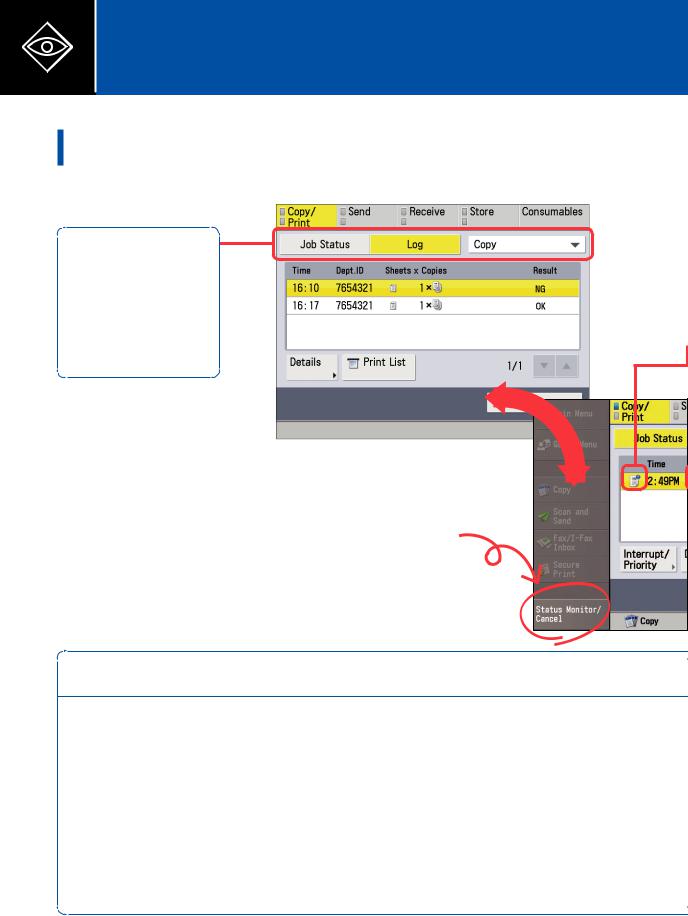
Checking the Job Status/Machine Status
Log Screen
The Log screen displays a list of jobs that have been executed.
To switch between the Job Status screen and the Log screen, press the tab at the top of this screen. You can also switch the job type, such as copy jobs and send/received jobs.
Ch a n g
e
Press This Button at First
Job Status Screen
The Job Status screen displays a list of jobs that are currently being executed.
Operations that can be performed on jobs being executed or the job history
To cancel a job or change the job priority, select a job and press a button under the job (log) list.
■■Interrupt/Priority (for Copy/Print Jobs)
Changes the priority of copy and print jobs.
■■Details
Displays detailed information for the selected job. A three digit number starting with a "#" indicates the status when an error has occurred.
■■Cancel
Cancels the selected job.
■■Print List (for Send Jobs)
Press [Print List] when you have trouble sending faxes, etc. The transmission status up until the current time is printed.
■■Specify as Send Dest. (for Send Log)
Enables you to reuse a destination. If you select a destination in the send history and press [Specify as Send Dest.], you can send fax and scan data to that destination.
8
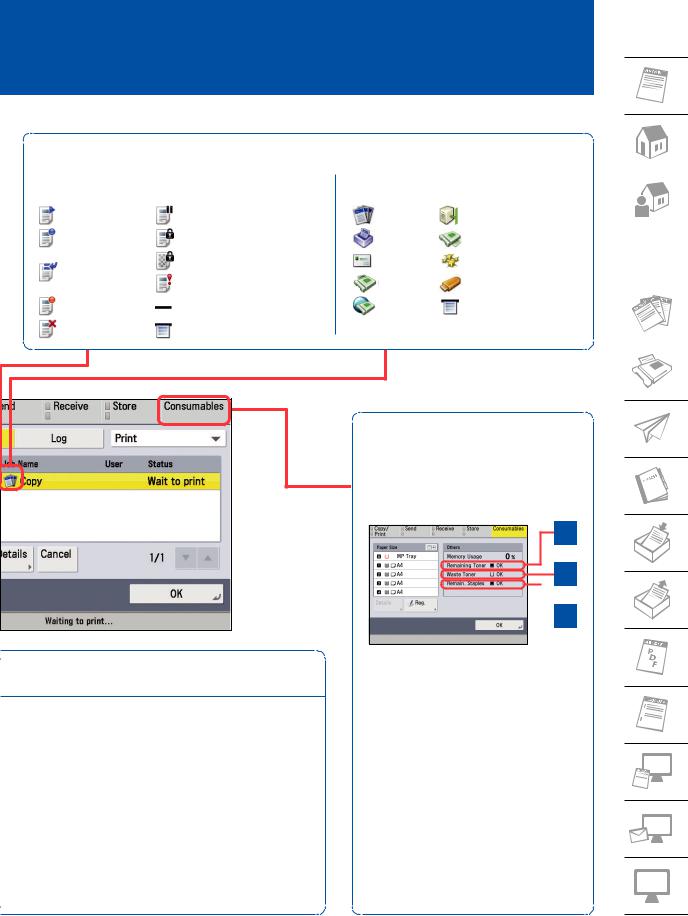
You can check the status of jobs being executed or a log of jobs that have been executed from the Status Monitor/Cancel screen. On this screen, you can change the priority of jobs and set a destination from the past send history. You can also check the status of consumables.
The status of jobs being executed or the job history can be checked with the following icons.
Job Status |
|
Job Types |
|
|
Executing |
Paused/Need Paper |
Copy Job |
Send Job |
|
Waiting |
Secure Print |
Print Job |
Received Job |
|
|
||||
Interrupt/Priority |
Encrypted Secure Print |
Send Job |
Network Job |
|
Printing |
Sent |
Fax Job |
Memory Media Job |
|
|
||||
Error |
Before Output |
I-Fax Job |
Report Print Job |
|
Cancelling |
After Output |
|
|
|
|
|
|
|
|
■■Register Destination (for Send Log)
If you select a destination in the send history and press [Register Destination], you can register that destination to the address book.
■■Check I-Fax RX (for Receive Jobs/Log)
Enables you to check whether any new I-faxes have been received.
Checking the status of consumables
Press [Consumables] to display the status of consumables such as paper and toner.
A
B
 C
C
A |
Remaining amount of toner |
|
OK: 100% to 11% |
|
Low: 10% to 1% |
|
Empty: 0% |
B |
Amount of waste toner |
|
OK: 0% to 79% |
|
Near Full: 80% to 99% |
|
Full: 100% |
C |
Remaining amount of staples |
|
OK: 100% to 26% |
|
Low: 25% to 1% |
|
Empty: 0% |
9

 Copying Documents
How to Copy Documents |
|
1 |
2 |
|
Specify the copy |
|
functions as |
P.3 |
necessary. |
|
Various Copy Functions
Enlarging or Reducing
You can copy from one paper size to another, such as from A4 to A5 (preset zoom), or change the zoom ratio manually by entering an enlargement/ reduction ratio. You can press [1:1] to cancel the set zoom ratio.
Caution Regarding Original
Orientation
When setting page numbers or margins, take care with the orientation of the original.
Select the button for an icon displayed on the touch panel display in accordance with the actual orientation of the original you have placed.
When using functions where the orientation of the original is important, buttons for selecting the orientation are displayed on the setting screen.
Option Screen Functions
The Option screen contains convenient copy functions, like copying double-sided originals, such as driver's licenses or ID cards, to a single sheet of paper, etc. Other convenient Option screen functions are described in "Finishing Documents," on p. 24.
10
Loading...