


the Oracle‰ Touch
Instruction Book - BES990

 Contents
2 Breville recommends safety first
7 Components
9Oracle Touch Features
10Assembly
11Functions
17 |
Tips |
19 |
Care & Cleaning |
23 |
Troubleshooting |
27 |
French |
BREVILLE RECOMMENDS SAFETY FIRST
At Breville we are very safety conscious. We design and manufacture consumer products with the safety of you, our valued customer, foremost in mind. In addition we ask that you exercise a degree of care when using any electrical appliance and adhere to the following precautions.
IMPORTANT 

 SAFEGUARDS
READ ALL INSTRUCTIONS BEFORE USE AND SAVE FOR FUTURE REFERENCE
•Carefully read all instructions before operating and save for future reference.
•Do not touch hot surfaces. Use handles or knobs as advised in this instruction book.
•To protect against fire, electric shock and injury to persons do not immerse the power cord, plug, or appliance itself in water or other liquids.
•Close supervision is necessary when any appliance is used by or near children.
2
•If the appliance is to be:
-left unattended
-cleaned
-moved
-assembled or
-stored
Always switch off the appliance by pressing the POWER button to off and unplug from the power outlet.
•Always allow the appliance to cool before cleaning, moving or storing.
•It is recommended to regularly inspect the appliance and power cord. Do not use the appliance if there is damage to the power cord or plug, or after the appliance malfunctions or has been damaged in any way.
Immediately stop use and call Breville Consumer Support.
•The use of accessory attachments not recommended by Breville may result in fire, electric shock or injury to persons.
•Do not let the power cord hang over the edge of a table or counter-top, or touch hot surfaces.
•Do not place the appliance near the edge of a table or counter-top. Ensure the surface is level, clean and free of water and other substances.
•Do not place the appliance on or near a hot gas or electric burner. Do not place it in, or allow it to come in contact with a heated oven.
•This appliance is recommended for household use only. Do not use this appliance for anything other than its intended use. Do not use outdoors. Do not use in moving vehicles or boats.
3
SPECIFIC INSTRUCTIONS FOR BES990
•It is recommended to plug the espresso machine into a properly grounded and dedicated circuit, separate from other electrical appliances.
•Avoid contact with moving parts.
•Check bean hopper for presence of foreign objects before using.
•Use only cold water in the water tank. Do not use any other liquids. Do not use highly filtered, demineralized or distilled water as this may affect the taste of the coffee and how the espresso machine operates.
•Ensure the portafilter is firmly inserted and secured into the group head before starting an
extraction. Never remove the portafilter during the extraction process.
•Use caution after milk texturing as the auto purge function will purge hot steam when the steam wand is lowered.
•Caution must be used during descaling as hot steam may be released. Before descaling, turn off the machine, allow to cool for at least 1 hour
and ensure the drip tray is empty and fully inserted. For instructions, refer
to 'Descale', page 22.
•Do not attempt to open or service the espresso machine.
•For any maintenance other than cleaning, call Breville Consumer Support or visit a Breville Authorized Servicer.
4
SPECIFIC INSTRUCTIONS FOR WATER FILTER
•Filter cartridge should be kept out of reach of children.
•Store filter cartridges in a dry place in the original packaging.
•Protect cartridges from heat and direct sunlight.
•Do not use damaged filter cartridges.
•Do not open filter cartridges.
•If you are absent for a prolonged period of time, empty the water tank and replace the cartridge.
SHORT CORD
INSTRUCTIONS
Your Breville appliance is fitted with a short power cord to reduce personal injury or property damage resulting from pulling, tripping or becoming entangled with a longer cord. Longer detachable power cords or extension cords are available and may be used if care is exercised. If an extension cord is used,
(1) the marked electrical rating of the cord set or extension cord should be at least as great as the electrical rating of the appliance, (2) the cord should be arranged so that it will not drape over the counter-top or table where it can be pulled on by children or tripped over unintentionally and
(3) the extension cord must include a 3-prong grounding plug.
5
BREVILLE ASSIST® PLUG
Your Breville appliance comes with a unique Assist® Plug, conveniently designed with a finger hole to ease removal from the power outlet.
CSA DUTY CYCLE MARKING
The Canadian Standards Authority requires any appliances capable of drawing over 1500W to be marked with a ‘duty cycle’ in minutes. For the BES990, this ‘duty cycle’ represents the maximum time for which the appliance will draw over 1500W during any 2 hour period of
use. It does not indicate the appliance is unsafe for continuous use or is required to be switched off at certain intervals during normal use.
FOR HOUSEHOLD USE ONLY SAVE THESE INSTRUCTIONS
6

 Components
A 

 I
I
B
C D
E |
|
F |
J |
G |
K |
|
L |
|
M |
H |
|
|
N |
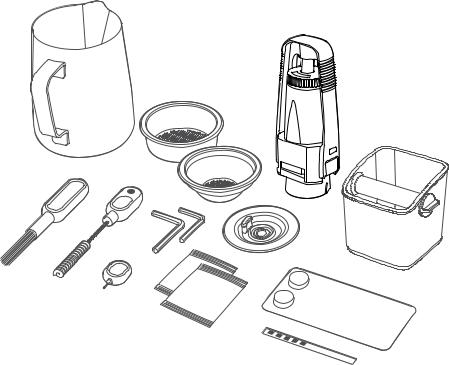
A.Integrated conical burr grinder with removable ½lb bean hopper
B.Top-fill 84 fl.oz (2.5L) removable water tank with integrated water filter and backlit level indicator
C.Grind size dial
adjust grind size to suit your coffee beans
D.Touch screen control panel
displays current settings and provides touch interface
E.Grind outlet
with auto grind, dose & tamp function
F.Heated 58mm group head with embedded element
G.58mm full stainless steel portafilter
H.Drop down swivel foot
lifts the machine upwards for easy maneuverability
I.Heated cup warming tray
J.Cool touch steam wand
with integrated temperature sensor for automatic frothing
K.Dedicated hot water outlet delivers hot water for Americano and pre-heating cups
L.Descale access point
M.Tool storage tray
houses accessories when not in use
N.Removable drip tray with Empty Me! indicator
7
A
B
C
F
E
I
ACCESSORIES
A.Stainless steel milk jug
B.2 cup filter basket
C.1 cup filter basket
D.Water filter holder with filter
E.Cleaning disc
F.Mini grinds bin
G.Grinder burr brush
8
H.Grind outlet brush & tamp removal magnet
I.Cleaning tool for steam wand tip
J.Two allen keys
K.Steam wand cleaning powder
L.Water hardness test strip
M.Espresso cleaning tablets

Oracle Touch
Features
COLOR TOUCH SCREEN CONTROL PANEL
Swipe & Select from the drinks menu. Adjust your coffee strength, milk texture or milk temperature, then save it as your personal favorite.
HANDS FREE AUTOMATIC GRIND, DOSE & TAMP
Automatically grinds, doses and tamps the required amount of coffee, mess free.
GRIND SIZE DIAL
Adjustable grind settings from fine to coarse for optimal espresso extraction.
STAINLESS STEEL CONICAL BURRS
Maximize ground coffee surface area for a full espresso flavor.
AUTOMATIC HANDS FREE MILK TEXTURING
Automatically textures milk to the selected temperature and style from silky smooth latté to creamy cappuccino. Automatic purge removes residual milk from the steam wand when returned to the downward position.
SIMULTANEOUS COFFEE & STEAM
Two stainless steel boilers each dedicated to espresso and steam for simultaneous milk texturing and espresso extraction.
PRECISION CONTROL
Electronic PID Temperature Control
Electronic temperature control delivers precise water temperature for optimum espresso flavor.
Actively Heated Group Head
Commercial size 58mm group head with embedded element for thermal stability during extraction.
Regulated Extraction Pressure
Over pressure valve (OPV) limits maximum pressure for optimal espresso flavor.
Low Pressure Pre-Infusion
Gradually increases water pressure to gently expand grinds for an even extraction.
Dual Pumps
Dedicated Italian made espresso and steam boiler pumps.
Programmable Shot Temperature
Adjust water temperature to achieve optimal espresso flavor depending on coffee origin and degree of roast.
ADDITIONAL FEATURES
Auto Start
Switches machine on at a specified time.
Auto Off
Switches machine off after a specified time from 0.5 to 8 hours.
9
 Assembly
BEFORE FIRST USE
Machine Preparation
Remove and discard all labels and packaging materials attached to your espresso machine. Ensure you have removed all parts and accessories before discarding the packaging.
Remove the plastic bag containing the water filter and water filter holder. Clean parts and accessories (water tank, portafilter, filter basket, jug) using warm water and a gentle dish washing liquid. Rinse well then dry thoroughly.
 TIP
TIP
To easily manoeuvre your machine, use the drop down swivel foot located under the drip tray. When turned to UNLOCK, the swivel foot drops down & lifts the machine upwards, making it easier to access the removable water tank or reposition the machine to another location.
INSTALLING THE WATER FILTER
•Remove the water filter and water filter holder from the plastic bag.
•Soak the filter in cold water for 5 minutes.
•Wash the filter holder with cold water.
•Set the reminder for next month of replacement. We recommend to replace the filter after 3 months.
•Insert the filter into the two parts of the filter holder.
•To install the assembled filter holder into the water tank, align the base of the filter holder with the adapter inside the water tank.
Push down to lock into place.
•Fill the water tank with cold water before sliding back into position at the back of the machine and locking into place.
 NOTE
NOTE
Replacing the water filter after three months or 10.6 USgal / 40L will reduce the need to descale the machine. Filter can be purchased at Breville webpage.
 NOTE
NOTE
DO NOT use highly filtered, demineralised or distilled water in this machine. This may affect the taste of the coffee.
10
 Functions
FIRST USE
1.Press POWER button to turn the machine on.
2.Follow the instructions on screen to guide you through first use setup.
3.After completing setup, the machine will tell that it is ready to use.
Your Oracle is now ready to use
Select the guide to find out more about your Oracle Touch or  to exit and proceed to your drink selection
Guide
The machine is now in STANDBY mode.
4.Touch "Guide" and the machine will guide
you step by step to make your first coffee. Touch the and go to the Drinks Menu or <to repeat the Setup. To repeat the Guide at any time, go to Settings Menu.
 NOTE
NOTE
If your water hardness is either 4 or 5 when tested, we strongly recommend you change to an alternate water source.
Filtered, bottled spring or mineral water will extend both the life of your built-in filter and descale intervals as well as superior taste.
Please ensure to test the water hardness of the alternative water source you've chosen and input into the machine accordingly. Avoid using overly filtered water, like RO water unless some mineral content is being added back to the final water. Never use distilled water, or water with no or low mineral content as this will affect both the taste and the functioning of your machine.
GRINDING OPERATION
Insert bean hopper into position on-top of the machine. Turn dial to lock into place.
Fill hopper with fresh beans.
TIP
We recommend quality 100% Arabica beans with a 'Roasted On' date stamped on the bag, not a 'Best Before' or 'Use By' date. Coffee beans are best consumed between 5–20 days after the 'Roasted On' date. Stale coffee may pour too quickly from the portafilter spouts and taste bitter and watery.
11
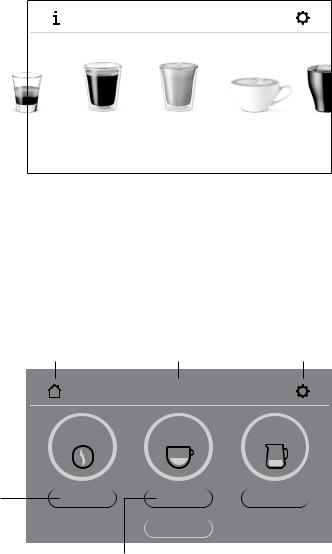
DRINK SELECTION
To enter Drinks Menu screen, touch the Home icon  . Swipe & select your drink. Touch the 'Help & Tip' icon
  to see Oracle Touch Guide.
Select your drink
esso |
Americano |
Latte |
Flat White |
Cappu |
 NOTE
NOTE
Please keep the touch screen dry and clean to ensure that the machine functions properly.
DRINK SCREEN
In this screen, you can adjust your drink by touching the oval shaped buttons. You cannot adjust the Grind Size by touching the button, use the dial on the side of the machine.
'Home' icon |
Drink chosen |
'Setting' icon |
Cappuccino
Grind size
Adjust using the dial on the side of the machine
Grind
65º |
08 |
|
Milk froth level |
|
|
||||
|
|
|
|
|
Brew setting: touch this button to scroll |
Milk temperature |
Espresso - single shot / double shot / |
|
custom extraction time |
|
Americano - small / medium / large |
|
12
SELECTING GRIND SIZE
We recommend you start at No. 30 and adjust as required to control espresso flow rate.
There are 45 grind size settings (No.1 – finest, No. 45 – coarsest) to enable you to select the right grind size for your coffee beans and achieve the perfect espresso extraction.
To select grind size, rotate the grind size dial counter-clockwise to increase grind coarseness or clockwise to increase grind fineness.
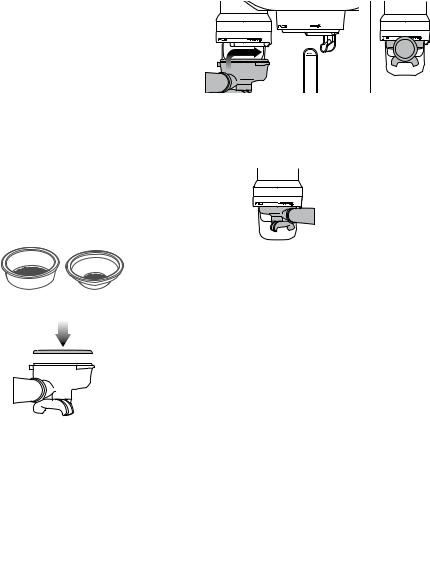
SELECTING YOUR FILTER BASKET
Insert the correct Filter Basket into the Portafilter for the number of coffees or strength you are making.
2 Cup |
|
|
|
1 Cup |
||
Filter Basket |
|
Filter Basket |
||||
|
|
|
|
|
|
|
|
|
|
|
|
|
|
|
|
|
|
|
|
|
|
|
|
|
|
|
|
Use the 1 Cup Filter Basket for making a single cup or a weaker tasting espresso.
Use the 2 Cup Filter Basket for making 2 cups or a stronger tasting espresso, usually for mugs or larger cups.
 NOTE
NOTE
When switching between the 1 Cup & 2 Cup Filter Baskets, you may need to adjust the grind size to fine tune your extraction.
AUTO GRIND DOSE & TAMP
Align portafilter handle with the INSERT position on the grind outlet. Lift to insert portafilter into the grind outlet and rotate to the center position.
GROUP HEAD
GRIND OUTLET |
GRIND OUTLET |
CENTER
POSITION
To start the auto grind, dose & tamp function, touch the Grind button on the display. Grinding will commence.
When the auto grind, dose & tamp function is complete, rotate the portafilter handle to the INSERT position and lower to remove.
ESPRESSO EXTRACTION
Align portafilter handle with the INSERT position on the group head. Lift to insert portafilter into the group head and rotate towards the LOCK TIGHT position until resistance is felt.
Touch the 'Brew' button on the display to start extraction. You can switch between single shot, double shot or Custom by touching the 'Single', 'Double' or Custom button. The duration times are preset, but can be customized.
MANUAL OVERRIDE
Press and hold the 'Brew' button (approx 2secs) to enter manual extraction mode. Touch the Brew button to start the extraction, touch the Brew button to stop the extraction.
13

TEXTURING MILK
Different brands and types of milk and milk alternatives will texture differently. You may need to adjust the froth level accordingly.
Start with fresh cold milk. Fill milk jug to below the spout position. Lift steam wand and insert into milk jug. Lower steam wand, ensuring it is fully down. The milk jug should rest on the drip tray and milk should cover the steam wand seal.
MAX
MIN
MILK MUST
COVER THIS
SEAL
To start, touch the 'Milk' button. The screen will display the temperature of the milk as it heats. Milk texturing will stop automatically when the selected milk temperature is reached. Lift steam wand to remove milk jug. Wipe the wand & tip with a clean damp cloth. Lower steam wand to the down position and the wand will automatically purge.
 NOTE
NOTE
Prior to texturing milk, it is recommended to momentarily purge the steam wand by first touching the 'Milk' button. Touching the button again will stop steam delivery.
MANUAL MILK TEXTURING
Auto milk texturing and auto shut-off are disabled during manual milk texturing mode.
Lift the steam wand. Press and hold the 'Milk'
Button (approx 2secs) to enter manual mode. Start frothing by touching the button.
When desired temperature is reached, touch the Milk Button to stop.
Wipe the wand & tip with a clean damp cloth.
Lower steam wand to the down position and the wand will automatically purge.
 CAUTION: BURN HAZARD
Pressurized steam can still be released, even after machine has been switched off.
Children must always be supervised.
AMERICANO
There are 3 preset Americano settings – small, medium and large.
Grind dose & tamp your porta-filter & insert
into the group head. Position your cup underneath the porta-filter spouts & the hot water spout. Espresso will be extracted first, the hot water is delivered automatically after the espresso.
PRESET |
AMOUNT |
CUP SIZE |
BREWED |
|
|
Small |
Approx. 6oz / 180ml |
|
|
Medium |
Approx. 8oz / 240ml |
|
|
Large |
Approx. 12oz / 360ml |
The brewed amounts are approximate only. Actual amounts may vary due to the coffee bean roast, blend and freshness as well as the selected grind size. These factors affect extraction rate and shot volume.
14
HOT WATER
The HOT WATER function can be used to preheat cups or add hot water manually.
To start & stop hot water, touch 'Hot Water' on the screen.
Hot water limit is approximately 90 seconds. Depending on the size of your cup, you may need to touch the 'Hot Water' button to stop pouring.
 NOTE
NOTE
You cannot run hot water and extract espresso at the same time.
ADDING NEW DRINK
Touch 'Add New' in the menu screen to create a customized drink. You can adjust parameters based on a standard style and
save your own.
+
Add New
Alternatively, after manually adjusting parameters touch the small icon to save the current setting.
SETTINGS
To enter settings menu, touch the icon on the upper right on the screen.
Quick Start Guide
Machine will guide you on screen, step by step to make an actual coffee.
Auto Start
Auto Start is optional. It allows you to program the specific time when the machine will automatically turn on.
Time and Date
Time and Date is optional. You can set time and date.
Clean Cycle
The Cleaning Cycle cleans the shower screen and back-flushes the group head.
A pop-up message will let you know when it is time for cleaning.
Descale Cycle
Descaling prevents excess mineral and scale build-up. A pop-up message will let you know when it is time for descaling.
Brew Temperature
It allows you to adjust the recommended extraction temperature.
Default Milk Temperature
It allows you to adjust default temperature on all milk base drinks.
Water Hardness
It is to test water to set how often you need to descale the machine.
Auto Off
This function sets how long the machine will stay turned on before it automatically turns off.
Screen Brightness
You can adjust brightness of your touch screen.
Work Light Brightness
You can adjust brightness of your work light.
Sound Volume
You can adjust volume for alerts and reminders.
Demo Mode
It is for on-screen Oracle Touch demonstration sequence.
Factory Reset
Use this function to reset all programmable values back to the factory settings and delete all custom drinks.
15
TRANSPORTING AND STORING
We recommend draining both boilers completely before transporting the machine or storing for an extended period of time. Refer to the Descale section for the step by step instructions.
This procedure is also intended as an anti-freeze measure in the event the machine is exposed to extreme cold temperatures.
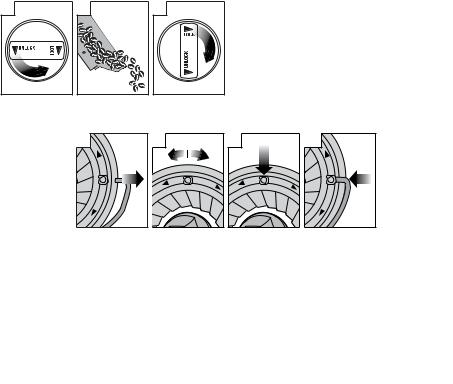
ADJUSTING CONICAL BURRS
Some types of coffee may require a wider grind range to achieve an ideal extraction or brew. A feature of the built-in grinder is the ability to extend this range with an adjustable upper burr. We recommend making only one adjustment at a time.
1 |
2 |
3 |
4 |
Unlock hopper Remove beans Replace & lock Run grinder until empty hopper
5 |
Unlock & remove hopper
6 |
F |
|
|
I |
|
N |
|
E |
|
C |
|
O |
|
A |
|
R |
S |
|
E |
|
Remove upper |
Remove wire |
burr |
handle from |
|
both sides of |
|
the burr |
8 |
|
|
INE |
CO |
|
F |
AR |
|
|
|
SE |
9 |
|
|
|
|
E |
|
C |
OA |
|
FIN |
|
|
||
|
6 |
|
|
RS |
5 |
|
7 |
E |
|
4 |
|
|
|
8 |
Move adjustable |
Align the |
top burr, |
number with |
1 number, |
the handle |
coarser or finer |
opening |
F |
|
|
I |
|
N |
|
E |
|
C |
|
O |
|
A |
|
R |
S |
|
E |
|
Insert wire handle from both sides of the burr
11 |
Push upper burr firmly into position
13
Lock upper burr Insert hopper
14 |
Lock hopper
16

 Tips
Tips
PRE-HEATING
Heating your cup or glass
A warm cup will help maintain the coffee’s optimal temperature. Pre-heat your cup by rinsing with hot water from the hot water outlet and place on the cup warming tray.
Heating the portafilter and filter basket
A cold portafilter and filter basket can reduce the extraction temperature enough to
significantly affect the quality of your espresso. Always ensure the portafilter and filter basket are pre-heated with hot water from the hot water outlet before initial use.
 NOTE
NOTE
Always wipe the filter basket and portafilter dry before dosing with ground coffee as moisture can encourage ‘channeling’ where water bypasses the ground coffee during extraction.
THE GRIND
When grinding coffee beans for espresso, the grind size should be fine but not too fine. The grind size will affect the rate at which the water flows through the ground coffee in the filter basket and the taste of the espresso.
If the grind is too fine (looks like powder and feels like flour when rubbed between fingers), the water will not flow through the coffee even when under pressure. The resulting espresso will be OVER-EXTRACTED, dark in color and bitter in flavor.
If the grind is too coarse the water will flow through the ground coffee in the filter basket too quickly. The resulting espresso will be UNDER-EXTRACTED, lacking in color and flavor.
AUTOMATIC GRINDING,
DOSING & TAMPING
•Ensure hopper is filled with fresh coffee beans. Never put pre-ground coffee in the hopper.
•After automatic grinding, dosing & tamping, wipe any excess coffee from the rim of the filter basket to ensure a proper seal in the group head is achieved.
•To adjust tamping height, please use the allen key provided. Pull the tamping fan down from the grind outlet, and then loosen the fan coupling inside by rotating it counterclockwise. You can adjust the length of the coupling by loosening the fastener with the allen key and rotating the coupling to the desired length.
PURGING THE GROUP HEAD
Before placing the portafilter into the group head, run a short flow of water through the group head by touching the 'Brew' button.
Allow water to flow for 5 seconds, then touch the 'Brewing' button again to stop the flow of water. This will purge any ground coffee
residue from the group head and stabilize the water temperature prior to extraction.
EXTRACTING ESPRESSO
•As a guide, the espresso will start to flow within 8-12 seconds (this includes preinfusion time) and should be the consistency of warm dripping honey.
•If the espresso starts to flow before
8 seconds, the grind is too coarse. This is an UNDER-EXTRACTED shot. Adjust the grind size slightly finer.
•If the espresso starts to flow after 12 seconds, then the grind is too fine. This is an OVEREXTRACTED shot. Adjust the grind size slightly coarser.
A great espresso is about achieving the perfect balance between sweetness, acidity and bitterness.
17
 Loading...