


the Dose Control™
Instruction Book - BCG400SIL
Breville Consumer Support
USA |
|
Canada |
|
|||||
Mail: |
Breville USA |
Mail: |
Breville Canada |
|||||
|
19400 S. Western Ave |
|
|
|
|
|
|
3595 boulevard Côte-Vertu, |
|
Torrance CA |
|
|
|
|
|
|
Saint-Laurent, Québec |
|
90501-1119 |
|
|
|
|
|
|
H4R 1R2 |
Phone: |
1-866-273-8455 |
Phone: |
1-855-683-3535 |
|||||
|
1-866-BREVILLE |
|
|
|
|
|
|
|
Email: |
askus@brevilleusa.com |
Email: |
askus@breville.ca |
|||||
Web: |
www.brevilleusa.com |
Web: |
www.breville.ca |
|||||
|
|
|
|
|
|
|
|
|
|
|
|
|
|
|
|
|
|
|
|
|
|
|
|
|
|
|
Breville is a registered trademark of Breville Pty. Ltd. A.B.N. 98 000 092 928. Copyright Breville Pty. Ltd. 2015.
Due to continued product improvement, the products illustrated/photographed in this booklet may vary slightly from the actual product.
BCG400SIL USC A15

 Contents
1 Breville recommends safety first
5 Components
7 Functions
11Care & Cleaning
12Coffee making tips
13Troubleshooting
IMPORTANT
SAFEGUARDS
At Breville we are very safety conscious. We design and manufacture consumer products with the safety of you, our valued customer, foremost in mind. In addition we ask that you exercise a degree of care when using any electrical appliance and adhere to the following precautions.
BREVILLE RECOMMENDS SAFETY FIRST
READ ALL INSTRUCTIONS BEFORE USE AND SAVE FOR FUTURE REFERENCE
1
•Remove and discard all packaging materials before first use.
•Close adult supervision is necessary when this appliance is used by or near children.
•To protect against electrical shock, do not immerse the power plug, power cord or motor base in water or any other liquid.
•Always use the appliance on a dry, level surface.
•Do not use the appliance near the edge of a countertop or table. Ensure the surface is level, clean and free of water and other substances.
•Do not place the appliance on or near a hot gas or electric burner, or where it could touch any other source of heat.
•Fully unwind the power cord before use. Do not allow the cord to hang over the edge of a countertop or to become knotted.
•Unplug from outlet when not in use, before putting on or taking off parts, and before cleaning.
•Always ensure the appliance is completely assembled before connecting to the power outlet and operating. Follow the instructions provided in this book.
•Avoid contact with moving parts.
•Check the Bean Hopper for presence of foreign objects before using.
•Do not operate this appliance for longer than 2 minutes
at a time as this can cause overheating. Allow to cool for at least 2 minutes after each use. Allow the appliance to cool down 20 minutes after long operation.
•If the appliance is to be: left unattended, cleaned, moved, assembled or stored, always switch the unit OFF and unplug the cord from the power outlet.
•This appliance is for household use only. Do not use in any type of moving vehicles.
Do not use the appliance outdoors, or for anything other than its intended use. Misuse can cause injury.
•The use of attachments not sold or recommended by Breville may cause fire, electric shock or injury.
•It is recommended to regularly inspect the appliance and power cord. Do not use the appliance if there is damage to the power cord or plug, or after the appliance malfunctions or has been damaged in any way. Immediately stop use and call Breville Consumer Support.
BREVILLE ASSIST® PLUG
Your Breville appliance comes
with a unique Assist® Plug, conveniently designed with a finger hole to ease removal from the power outlet.
SHORT CORD
INSTRUCTIONS
Your Breville appliance is fitted with a short power supply cord to reduce personal injury or property damage resulting from pulling, tripping or becoming entangled with a longer cord. If an extension cord is used,
(1)the marked electrical rating of the cord set or extension cord should be at least as great as the electrical rating of the appliance,
(2)the cord should be arranged so that it will not drape over the countertop or table-top where it can be pulled on by children or tripped over unintentionally and (3) the extension cord must include a 3-prong grounding
plug. 2
CALIFORNIA PROPOSITION 65:
(Applicable to California residents only).
This product contains chemicals known to the State of California to cause cancer, birth defects or other reproductive harm.
FOR HOUSEHOLD USE ONLY SAVE THESE INSTRUCTIONS
3 |
4 |

 Components
A
B
C
D
E
F
K
G 
 J H
J H 
I
A.Bean Hopper Lid
B.Bean Hopper
3/4lb removable bean hopper for easy cleaning.
C.Hardened Stainless Steel Conical Burrs
Maximize consistency of particle size for full flavor potential.
D.Grind Size Collar
60 grind settings, from Espresso to French Press.
E.START|CANCEL Button
Starts and cancels operation.
F.Grind Outlet
G.50mm razor blade
H.Grind Tray
Catches grind overflow. Removable for easy cleaning and accessing the Razor™ Dose Trimming Tool.
NOT SHOWN Grinding Chamber
Minimises static before dispensing.
Automatic Thermal Safety Shut Off
Protects motor from overheating.
ACCESSORIES
I.Adjustable Razor™ Dose Trimming Tool
J.Portafilter Cradle 50-54mm
K.Portafilter Cradle 58mm
5 |
6 |
|
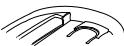
Press down the hopper firmly and turn |
||
Functions |
clockwise into position. |
||
|
|
|
|
|
|
|
|
|
|
|
|
GRINDER OVERVIEW
Your Dose Control™ uses hardened stainless steel Conical Burrs and can grind whole bean coffee suitable for a range of brewing methods, from the finest setting for Espresso to the coarsest setting for French
Press. You can grind directly into a Portafilter, Container or Drip Coffee filter basket.
Within each brew method, Espresso, Percolator, Drip or French Press, there is a range of grind size settings; the grind settings will differ between each brew method. This is due to each method requiring different grind sizes for optimum extraction. Experiment with different grind size settings by rotating the GRIND SIZE COLLAR to achieve the brew that best suits your taste.
BEFORE FIRST USE
Before first use, remove and safely discard all promotional labels and packing materials attached to your Breville product. Wash hopper, cradles and cleaning brush in warm
soapy water and dry thoroughly. Wipe exterior of grinder with a soft damp cloth and dry thoroughly. Place grinder on flat level surface and plug power cord into a 120V outlet.
ASSEMBLING YOUR BREVILLE DOSE CONTROL™
Bean Hopper
Rotate the Grind Size Collar to setting 60. Align tabs on the base of the bean hopper and insert hopper into position.
Fill with fresh coffee beans and secure lid on top of bean hopper.
The bean hopper can be removed by:
1.Rotating the Grind Size Collar to setting 60.
2.Holding the Grind Size Collar in one hand and turn the Hopper anti-clockwise to remove.
 NOTE
NOTE
Removing the hopper lid to hold the hopper can facilitate removing the hopper.
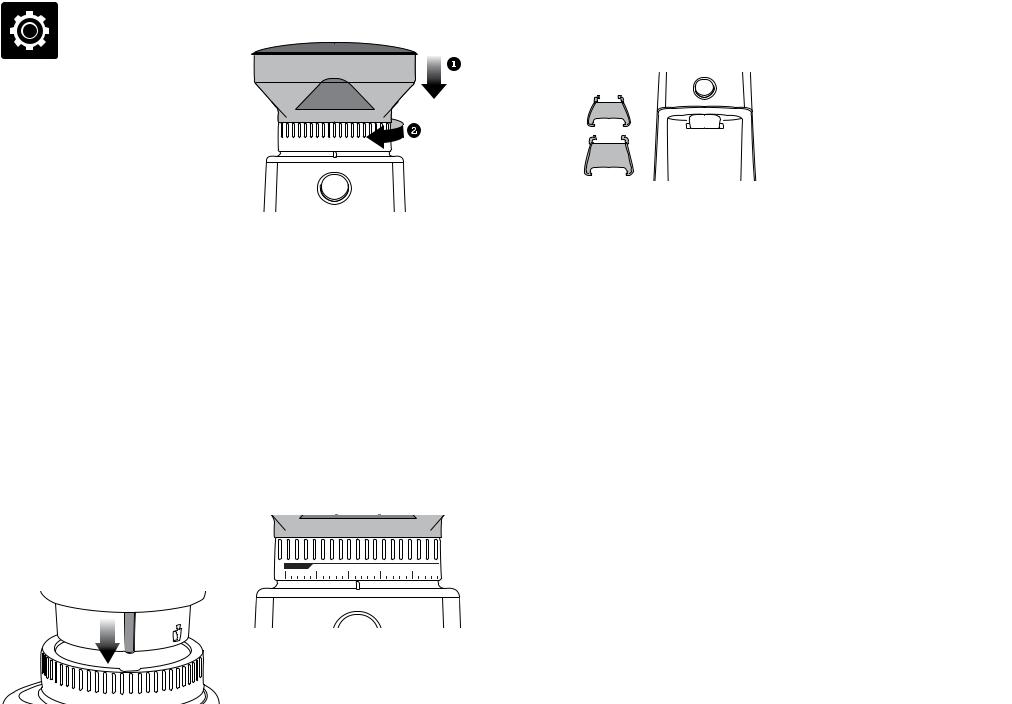
GRINDING FOR ESPRESSO COFFEE
Use single wall filter baskets when grinding fresh coffee beans. Use the finer 1–25 settings in the ESPRESSO range.
ESPRESSO
0 |
5 |
10 |
15 |
20 |
FINE
Step 1:
Insert the appropriate Portafilter Cradle size. Insert your portafilter into the cradle.
CRADLES
50-54mm
 PUSH
PUSH 
58mm
Step 2:
Grind Amount
Press the START|CANCEL button to start grinding operation. Once you have the right amount of ground coffee in your portafilter, press the START|CANCEL button again
to stop operation. It’s normal for the correct amount of coffee to appear overfilled in your portafilter. Untamped coffee is approximately three times the volume of tamped coffee.
Step 3:
Tamping the Ground Coffee
After dosing the Portafilter with freshly ground coffee, tamp down with between 30-40lbs or 15-20kg of pressure. The amount of pressure is not as important as consistent pressure every time.
Step 4:
Trimming the Dose
The adjustable Razor™ Dose Trimming Tool allows you to trim the puck to the right level for a consistent extraction.
Select the correct width blade of the Razor™ to match the diameter of your filter basket.
The Razor™ has three blades of varying widths: 58mm, 54mm and 50mm. The 58mm and 54mm are already fitted within the Razor™ body. The 50mm is separate.
54mm |
50mm |
|
ADDITIONAL BLADE
If you require the 50mm blade, turn the Adjustable Dial past #1 until the 54mm blade is fully extended and able to be pulled from the body.
54mm
 NOTE
NOTE
The Adjustable Dial may feel tight as you continue to wind it towards the end of its travel.
Insert the 50mm blade into the body. Wind the Adjustable Dial until the blade is
retracted past #4. Press the 50mm and 58mm blades at the same time, towards the center of the body until a “click” sound can be heard.
APPLY PRESSURE AT BOTH ENDS
50mm
'CLICK'
Adjust the Razor™ to the setting in the table below for your Breville espresso machine. This is a starting point for your dose height.
7 |
8 |
 Loading...