


BCI600XL
the Smart Scoop™ Ice Cream Machine
Instruction Booklet - Livret d’instructions
BCI600XL
BCI600XL_IB_E12_FA.indd 2 7/02/12 2:58 PM

CONGRATULATIONS
on the purchase of your new
™
Breville Smart Scoop
Ice Cream Machine
NOTE
Do not store the ice cream machine on any other
side other than upright and level on its support
feet. This is important for the compressor.
BCI600XL_IB_E12_FA.indd 2 7/02/12 2:58 PM

CONTENTS
4 Breville Recommends Safety First
6 Know your Breville Smart Scoop
Ice Cream Machine
10 Operating your Breville
Smart Scoop™ Ice Cream Machine
18 Tips for Better Ice Cream Making
21 The Vital Ingredients
23 Care & Cleaning
27 Troubleshooting
30 Recipes
42 French
™
3
BCI600XL_IB_E12_FA.indd 3 7/02/12 2:58 PM

BREVILLE RECOMMENDS SAFETY FIRST
At Breville we are very safety conscious. We design and manufacture consumer products with
the safety of you, our valued customer, foremost in mind. In addition we ask that you exercise
a degree of care when using any electrical appliance and adhere to the following precautions.
IMPORTANT SAFEGUARDS
When using electrical appliances, basic
safety precautions should always be
followed, including the following:
• Carefully read all instructions before
operation and save for future reference.
• Remove and safely discard any
packaging material and promotional
labels before using the Breville Smart
TM
Scoop
for the first time.
• To eliminate a choking hazard for young
children, remove and safely discard the
protective cover fitted to the power plug
of this appliance.
• Do not place the ice cream machine
near the edge of the counter top or
table during operation. Ensure the
surface is level, clean and free of liquid
or other substances. Vibration during
the churning process may cause the
machine to move slightly.
• Do not place this appliance on or near
a hot gas or electric burner, or where it
could touch a heated oven. Position the
appliance at a minimum distance of
6 inches away from walls. To ensure
proper ventilation.
• Always operate the ice cream machine
on a stable surface.
• Do not operate the ice cream machine
on a sink drain board.
• Always ensure the ice cream machine is
properly assembled before connecting to
a power outlet and operating. Follow the
instructions provided in this book.
• The ice cream machine is not intended
to be operated by means of an external
timer or separate remote control system.
• Do not cover the air vents when the ice
cream machine is in use.
• Do not place any ingredients directly
into the ice cream chamber. Place
ingredients into the ice cream bowl only.
• Ensure ice cream chamber is clean, dry,
and free of debris before each use.
• Do not place fingers or hands inside the
ice cream machine during operation.
Avoid contact with moving parts.
• Ensure the ice cream machine is turned
off and then unplugged from the power
outlet when not in use and before
cleaning.
• Do not leave the lid off the ice cream
machine for extended periods of time.
• Keep the inside and outside of the
appliance clean. Follow the cleaning
instructions provided in this book.
• Do not use any other accessories other
than those provided with the Breville
Smart Scoop
TM
IMPORTANT SAFEGUARDS FOR
ALL ELECTRICAL APPLIANCES
• Unwind the power cord fully before use.
• To protect against electrical shock, do
not immerse power cord, power plug or
appliance in water or any other liquid.
• Do not let the power cord hang over the
edge of the counter top or table, touch
hot surfaces or become knotted.
4
BCI600XL_IB_E12_FA.indd 4 7/02/12 2:58 PM

BREVILLE RECOMMENDS SAFETY FIRST
• The appliance is not intended for use
by persons (including children) with
reduced physical, sensory or mental
capabilities, or lack of experience and
knowledge, unless they have been given
supervision or instruction concerning
the use of the appliance by a person
responsible for their safety.
• Children should be supervised to ensure
that they do not play with the appliance.
• It is recommended to regularly
inspect the appliance. Do not use the
appliance if the power cord, power
plug or appliance becomes damaged in
anyway. Return the entire appliance to
the nearest authorized Breville Service
Center for examination and/or repair.
• Any maintenance, other than cleaning,
should be performed at an authorized
Breville Service Center.
• This appliance is for household use only.
Do not use this appliance for anything
other than its intended use. Do not use
in moving vehicles or boats. Do not use
outdoors. Misuse may cause injuries.
• This appliance is equipped with a
power cord having a grounding wire
with a grounding plug. The appliance
must be grounded using a 3-hole
properly grounded outlet. In the event
of an electrical short circuit, grounding
reduces the risk of electrical shock.
• If the power outlet is a standard
2-prong wall outlet, it is your personal
responsibility and obligation to have
it replaced with a properly grounded
3-prong wall outlet.
• Do not, under any circumstances, cut or
remove the third (ground) prong from
the power cord or use an adapter.
BREVILLE ASSIST™ PLUG
Your Breville appliance comes with a unique
Assist™ Plug, conveniently designed with
a finger hole in the power plug for easy
and safe removal from the wall outlet. For
safety reasons it is recommended you
plug your Breville appliance directly into
its own electrical outlet on a dedicated
circuit separate from other appliances. If
the electric circuit is overloaded with other
appliances, your appliance may not function
properly. Use in conjunction with a power
strip or extension cord is not recommended.
SHORT CORD INSTRUCTIONS
Your Breville appliance is fitted with a short
power supply cord as a safety precaution to
prevent personal injury or property damage
resulting from pulling, tripping or becoming
entangled with a longer cord. Do not allow
children to use or be near this appliance
without close adult supervision. Longer
detachable power supply cords or extension
cords are not recommended but may be
used if care is exercised. If an extension cord
is used, (1) the marked electrical rating of
the cord set or extension cord should be at
least as great as the electrical rating of the
appliance, (2) the cord should be arranged
so that it will not drape over the countertop
or tabletop where it can be pulled on by
children or tripped over unintentionally
and (3) the extension cord must include a
3-prong grounding plug.
FOR HOUSEHOLD USE ONLY
SAVE THESE INSTRUCTIONS
5
5
BCI600XL_IB_E12_FA.indd 5 7/02/12 2:58 PM

KNOW
your Breville Smart Scoop™ Ice Cream Machine
BCI600XL_IB_E12_FA.indd 6 7/02/12 2:58 PM

FEATURES OF YOUR BREVILLE SMART SCOOP ™ ICE CREAM MACHINE
Automatic Mode
Automatic mode churns and freezes
the ingredients to the selected/desired
consistency. Select one of the four different
settings: Sorbet, frozen yogurt, gelato or ice
cream. Machine will beep once when ready,
or selected music will play.
Manual Mode
The time to make ice cream can be manually
set for pre timed recipes.
Settings
The Breville Smart Scoop
TM
has four different
settings to choose from. Select one of the
following settings; sorbet, frozen yogurt,
gelato, or ice cream.
Pre-Cool
This function can be selected before either
manual or automatic mode is selected. It’s
a great way to pre-cool the machine. This
optional function will cool the machine to
approximately 14°F~ -22°F or -10°C~ -30°C
and usually takes about 5-10 minutes.
Keep Cool
Once the consistency of the dessert has
been achieved, using this function you
are able to keep dessert at a constant
temperature for up to 3 hours. When the
machine is in this function please note
that the compressor and motor will turn on
incrementally to test the consistency of the
dessert.
This function will automatically default to
on and LCD around button will illuminate
red when the Breville Smart Scoop
TM
is
powered on.
Child Lock
The Breville Smart Scoop
lock. Press and hold the HOLD
TM
features a child
for
2 seconds to set the child lock mode. To
exit this mode press HOLD
button for 2
seconds again.
Add Mix Ins
Mix ins such as chocolate chips, fresh fruit
and flavors can all be added easily through
the flip back lid. The ice cream machine will
beep and ADD MIX INS will flash to let
you know that it is time to add your favorite
condiments!
Sound
The ice cream machine features sound such
as an alert beep or music when the dessert
is ready. This alert can be a beep, mute, or
music tune.
• Turkey in the Straw
• The Entertainer
• Camptown Races
NOTE
During the KEEP COOL function
the paddle will only turn if needed to
maintain the selected consistency.
7
BCI600XL_IB_E12_FA.indd 7 7/02/12 2:58 PM
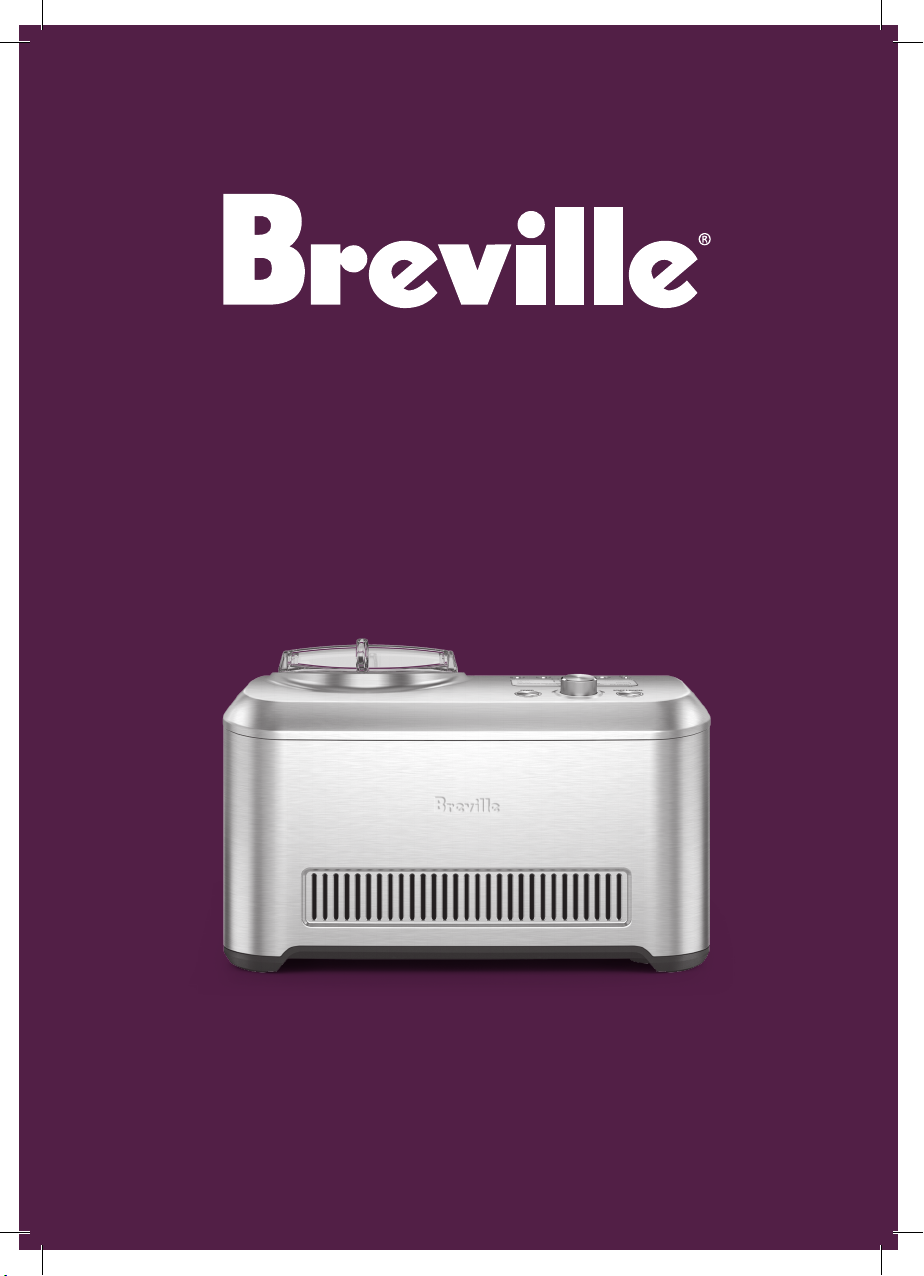
KNOW YOUR BREVILLE SMART SCOOP ™ ICE CREAM MACHINE
A B C G H I
N
D
C
A. Anodised ice cream bowl with handle
for easy removal. This 1.5 Quart bowl is
not dishwasher safe.
B. Paddle* used to scrape the sides of the
bowl and churn the ice cream.
Note: not to be stored in the freezer.
C. Lid* has a lift easy pull ring so half can
be opened to add mix-ins, chocolate
chips etc.
D. Stainless steel housing
E. POWER button will turn the ice cream
machine on or off.
F. START | PAUSE this will start the
machine compressor and churning.
G. Manual timer use to select time, from
5 minutes to 180 minutes.
H. Pre-cool function will pre-cool the
machine to approximately
14°F ~ -22°F to -10°C~ -30°C.
E J
I. Keep cool will keep dessert chilled and
churned for up to 3 hours.
J. Auto timer/Hardness selection dial will
scroll between the following settings:
sorbet, frozen yogurt, gelato, or ice
cream. Rotate the dial left for softer
textured desserts or right for harder
textured desserts.
K. TEMP
button allows you to toggle
between Fahrenheit and Celsius.
L. Sound
select between high, low,
musical tune or mute.
M. Handles for easy lifting.
N. Bowl chamber
* Dishwasher safe parts (top shelf only).
K
L
M
F
8
BCI600XL_IB_E12_FA.indd 8 7/02/12 2:58 PM
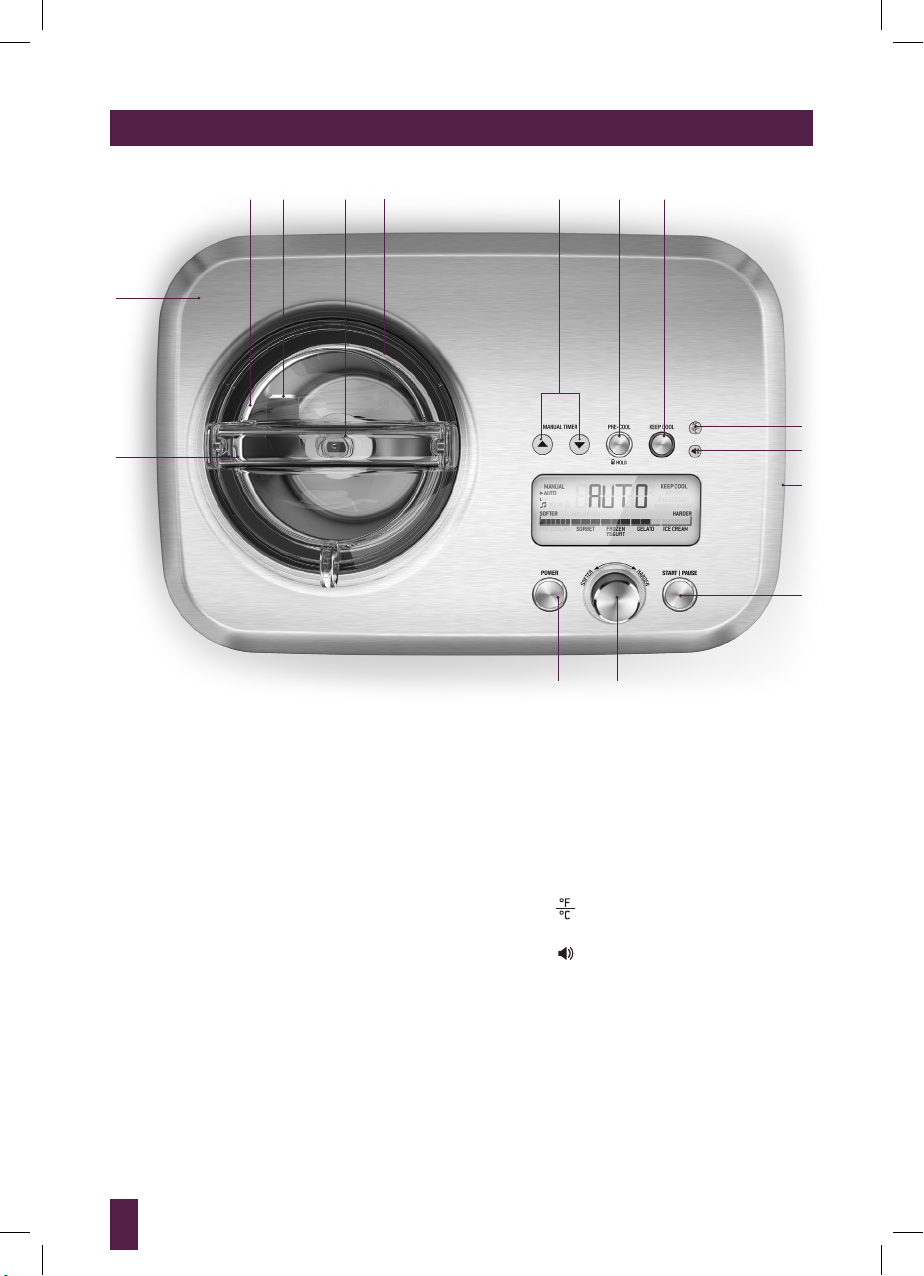
KNOW YOUR BREVILLE SMART SCOOP ™ ICE CREAM MACHINE
R
U
V
T PQ
S
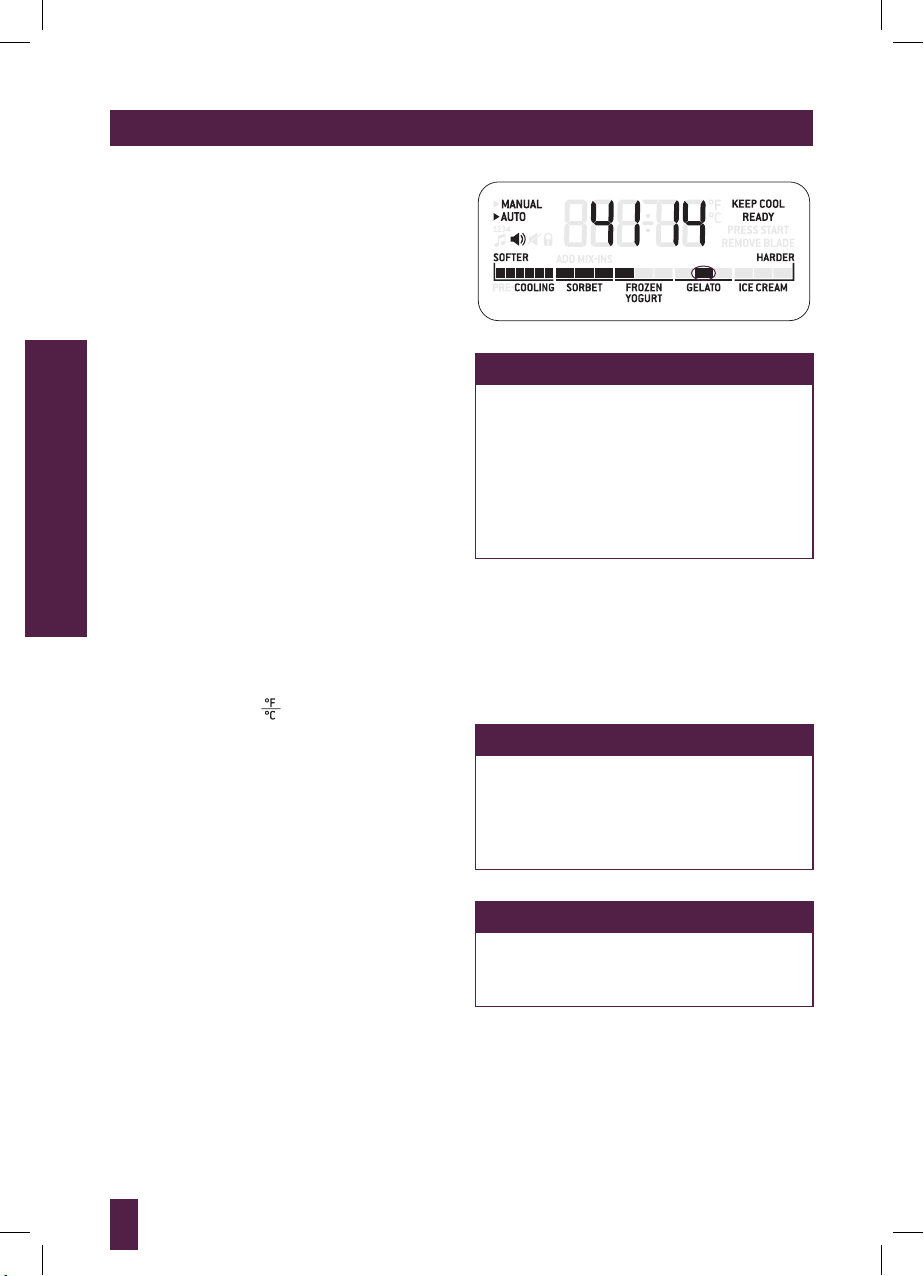
SMART SCOOP DISPLAY
O. LCD Control Display provides
information on function setting and
cooling progress.
P. Hardness selection bar
Q. Progress indicator bar
R. Keep Cool will keep the frozen dessert
chilled and churned for up to 3 hours.
S. Add mix-ins will flash to let you know
when it is time to add your favorite
mix-ins.
W
O
T. Pre-cooling indicates that the
compressor is on and cooling the
machine.
U. Press Start flashes when in the
PRE-COOL mode to advise that the
machine is chilled and ready to start
churning.
V. Remove blade indicates that the dessert
is finished and the blade can be removed
from the bowl.
X
Y
Z
ACCESSORIES
W. Anodised ice cream bowl
X. Spatula use to scrape the bowl
Y. Paddle
Z. Bottle brush for easy cleaning of
the paddle and bowl
9
BCI600XL_IB_E12_FA.indd 9 7/02/12 2:58 PM

OPERATING
your Breville Smart Scoop™ Ice Cream Machine –
Beginners Guide
BCI600XL_IB_E12_FA.indd 10 7/02/12 2:58 PM
OPERATING YOUR BREVILLE SMART SCOOP ™ ICE CREAM MACHINE
WARNING
The ice cream machine contains a
compressor that MUST remain upright
at all times. Do not store machine on
any other surface apart from its feet.
BEFORE FIRST USE
Machine preparation
Remove and discard all labeling and
packaging materials attached to your ice
cream machine. Ensure you have removed
all parts and accessories before discarding
the packaging.
Remove the lid, ice cream bowl and paddle
from the machine. Clean these parts and
accessories using warm soapy water and
rinse thoroughly. Ensure all parts are
completely dry before using the machine.
NOTE
Always place the paddle inside the
bowl before adding ingredients. This
ensures that the ingredients will not
spill into the ice cream chamber.
NOTE
There are 2 grooves in the bowl
chamber. Place the bowl so the handle
hinges sit within these grooves.
WARNING
To prevent damage to the compressor
and to ensure maximum performance,
place unit in upright position for 12
hours after transit.
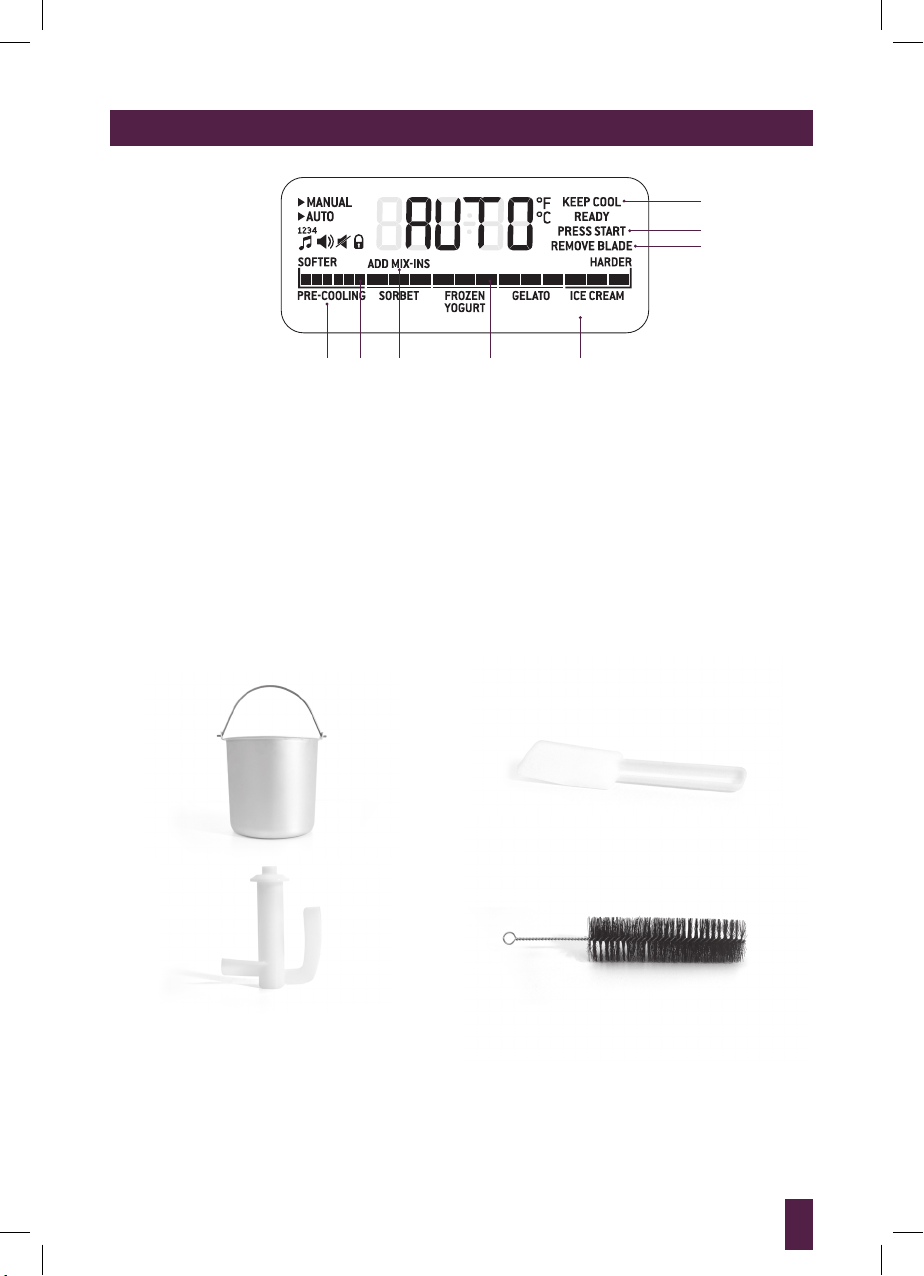
FIRST USE
Initial start up
• Place ingredients inside the bowl in
order of the recipe.
• Place ice cream bowl and paddle inside
the bowl chamber.
BCI600XL_IB_E12_FA.indd 11 7/02/12 2:58 PM
NOTE
Make sure the BOWL CHAMBER and
the exterior of the ice cream bowl are
completely dry before inserting the
ice cream bowl.
11

AUTOMATIC MODE
OPERATING YOUR BREVILLE SMART SCOOP ™ ICE CREAM MACHINE
• Lock lid into position by placing the
handle at the align arrow on the machine
at the 2 o’clock position and turning the
handle clockwise to the 3 o’clock position
and aligned to the lock graphic.
Note: The pull ring for lid should be at
the 6 o’clock position.
• Press the POWER button to turn the
machine on.
• Choose MANUAL mode or AUTO mode
by either using the hardness dial for
AUTO mode or the arrow
buttons
for MANUAL mode.
• For AUTO mode turn hardness dial to
the desired frozen dessert setting
(e.g. frozen yogurt).
Press the START | PAUSE button to
begin the churning process.
• For MANUAL mode press the arrow
up
or button to select MANUAL
mode.
• Using the same arrow buttons now
press up or down to select the time that
you require the machine to chill and
churn. The time is displayed on the LCD
display and will move in five (5) minute
increments up to 180 minutes.
• Press START | PAUSE button to begin
the process.
The PRE-COOL function can be selected
in either the AUTO or MANUAL mode.
This function will cool the machine to
approximately
14°F ~ -22°F/ -10°C ~ -30°C in 5-10 minutes.
If selected the surrounding button will
illuminate from white to red and ‘PRECOOLING’ will flash on the LCD screen.
Once the machine has reached optimum
temperature from pre-cooling the LCD
will illuminate READY and PRESS START
will flash on the LCD. The paddle will start
turning after 15 minutes has passed, but will
not start making the frozen dessert unless
the START|PAUSE button is pressed.
In this function the LCD screen will display
the temperature, ‘PRE-COOLING’ will flash,
to let you know that you are in this mode.
NOTE
The machine will NOT automatically
start churning. The START | PAUSE
button will have to be pressed to start
the churning process.
PRE-COOL will return to standby after
20 minutes or alternatively can be turned
off either by pressing PRE-COOL button
again or pressing the START | PAUSE
button which will override the PRE-COOL
mode.
NOTE
It is important that the paddle is
properly assembled onto the drive
shaft to ensure ingredients are mixed.
PRE-COOL FUNCTION
NOTE
PRE-COOL can only be operated in
the stand by mode and is not available
after the START | PAUSE button is
pressed.
12
BCI600XL_IB_E12_FA.indd 12 7/02/12 2:58 PM

OPERATING YOUR BREVILLE SMART SCOOP ™ ICE CREAM MACHINE
AUTOMATIC MODE
Start up
Unwind the power cord completely and
insert the power plug into a 110/120V
outlet.
Press the POWER button to turn the
machine on. The POWER button will
illuminate white. The LCD screen will
display the AUTO mode and the progress
and hardness selection bar. The arrow
should be pointed at the AUTO on the LCD
screen. To ensure the machine is in AUTO
mode turn the hardness dial to the right or
left.
HARDNESS SELECTION
To select the hardness you desire turn the
hardness dial left or right. Left being softer
frozen desserts such as sorbet and right
being harder desserts such as ice cream.
NOTE
When the machine is in this mode
the compressor and motor will
turn on incrementally to check the
consistency of the dessert.
Progress indicator highlighted
Hardness indicator highlighted
AUTOMATIC MODE
KEEP COOL IN AUTOMATIC MODE
The keep cool function will keep the frozen
dessert chilled and churned for up to 3
hours in total. A red light will illuminate
around the button and the LCD screen will
display KEEP COOL automatically as soon
as the machine is turned on. This function
works by churning the mixture to the
right hardness selected and once reached
the compressor will pulse on and off in
conjunction with the paddle.
Paddle will only turn if needed to maintain
the selected consistency.
BCI600XL_IB_E12_FA.indd 13 7/02/12 2:58 PM
ADDING THE INGREDIENTS AND
STARTING OPERATIONS
TIP
When using the ice cream machine
always insert the paddle before adding
ingredients into the bowl. Always
add ingredients into the bowl before
inserting into the clean and dry bowl
chamber.
13
OPERATING YOUR BREVILLE SMART SCOOP ™ ICE CREAM MACHINE
a) Ensure that the paddle and bowl, and
bowl chamber are clean.
b) Add ingredients to the ice cream bowl as
specified in the recipes. Wipe any spilled
ingredients from the rim of the bowl.
c) Insert the bowl into the bowl chamber
by pressing down firmly on the rim of
the bowl until it is securely in position.,
ensuring bowl handle hinges sit inside
grooves on the chamber. It is important
AUTOMATIC MODE
that the ice cream bowl is properly
assembled onto the drive shaft to ensure
that the paddle operates correctly.
d) Align the hole in the bottom of the
paddle with the drive shaft in the bowl.
Push down firmly and secure into place.
e) It is important that the paddle is properly
assembled onto the drive shaft to ensure
that ingredients are churned properly.
f) Place the lid onto the ice cream bowl.
It is not recommended to open the lid
during operation unless stated in the
recipe or if mix ins are required.
g) To change the temperature reading from
C to F press the
button.
h) Press volume button to select from high,
low, music or mute.
i) To start making the dessert press
START | PAUSE. Once you press
START | PAUSE all of the indicators
on the selection bar will disappear and
ONLY the selected dessert/consistency
indicator will remain. As the dessert
starts to freeze the indicators on the
selection bar will display and scroll up
the selection bar to the chosen dessert.
This may take up to 60 minutes before
indicators illuminate. The ice cream
machine should now start cooling and
churning to the desired setting. The
LCD screen will toggle between the
elapsed churning time and the current
temperature that the machine is chilling,
'KEEP COOL' and 'COOLING' will
illuminate. An indicator will sit above
the selected hardness setting.
NOTE
If the START | PAUSE button is
pressed during the cycle this will
pause the time. To resume the
process press the button again. If
you need to reset the timer press
and hold the START | PAUSE button
for 2 seconds and this will reset the
selection.
j) When the desired setting has been
reached the compressor and motor
will stop. READY will illuminate and
REMOVE BLADE will flash on the LCD
display. The chosen indicator will sound
to alert the user that the dessert is ready.
NOTE
The READY will illuminate and
REMOVE BLADE will flash for 10
minutes only, and then turn off. It can
also be turned off ahead off this time
by pressing any button or dial.
NOTE
It could take up to 60 minutes for
the indicators on the selection bar to
start moving up on the LCD display.
14
BCI600XL_IB_E12_FA.indd 14 7/02/12 2:58 PM

OPERATING YOUR BREVILLE SMART SCOOP ™ ICE CREAM MACHINE
MANUAL MODE
Start up
Unwind the power cord completely and
insert the power plug into a 110/120V
outlet.
Press the POWER button to turn the
machine on. An alert will sound and the
POWER button will illuminate white. The
LCD screen will display the AUTO mode
and selection bar. The ice cream machine
and LCD screen will always revert to the last
program or setting that was used.
Ensure the machine is in MANUAL mode by
pressing the MANUAL timer arrow
buttons. The time will be displayed and the
arrow should point to the MANUAL on the
left hand side of the screen.
To change the time that you wish to churn
and chill, press either one of the MANUAL
timer arrow keys. On average, ice cream will
need about 50 minutes to churn and chill.
This is just an estimate please refer to your
recipes for churning times.
HARDNESS SELECTION
This is not available in the manual mode.
ADDING THE INGREDIENTS AND
STARTING OPERATIONS
Once the previous functions have been
selected the ingredients can now be added.
a) Ensure that the paddle and bowl, and
bowl chamber are clean.
b) Insert the bowl into the dry, clean bowl
chamber by pressing down firmly on
the rim of the bowl until it is securely
in position. Ensure bowl handle hinges
sit inside grooves on the chamber. It
is important that the ice cream bowl
is properly assembled onto the drive
shaft to ensure that the paddle operates
correctly.
c) Align the hole in the bottom of the
paddle with the drive shaft in the bowl.
Push down firmly and secure into place.
d) It is important that the paddle is properly
assembled onto the drive shaft to ensure
that ingredients are churned properly.
ADDING THE INGREDIENTS
a) Add ingredients to the ice cream bowl as
specified in the recipes before inserting
bowl into the ice cream chamber. Wipe
any spilled ingredients from the rim of
the bowl.
b) Place the lid onto the ice cream bowl.
It is not recommended to open the lid
during operation unless stated in the
recipe of if mix-ins are required.
c) Ensure that the machine is in
MANUAL mode.
d) Set the time that you desire by pressing
the MANUAL buttons up or down
e) Press START | PAUSE button for the
ice cream making process to start. The
light around this button will illuminate
red to indicate that the button has been
selected and the machine has now
started the churning process.
f) When the desired time has been reached
the compressor and motor will stop.
READY will illuminate and REMOVE
BLADE will flash on the LCD display.
The selected tone will sound to alert the
user that the dessert is ready.
NOTE
The READY will illuminate and
REMOVE BLADE will flash for 10
minutes only, and then turn off. It can
also be turned off ahead off this time by
pressing any button or dial. 10 minutes
after the timer has elapsed, the screen
will revert back to original screen before
‘START | PAUSE’ was pressed.
.
MANUAL MODE
15
BCI600XL_IB_E12_FA.indd 15 7/02/12 2:58 PM

OPERATING YOUR BREVILLE SMART SCOOP ™ ICE CREAM MACHINE
NOTE
If the START | PAUSE button is
pressed during the cycle this will
pause the time. To resume the process
press the button again.
If you need to reset the timer press
and hold the START | PAUSE button
for 2 seconds and this will reset the
time.
g) The timer adjust can be done at
MANUAL MODE
any time.
KEEP COOL IN MANUAL MODE
The KEEP COOL function will keep the
frozen dessert chilled and churned for the
selected duration of machine operation. A
red light will illuminate around the button
and the LCD screen will display KEEP
COOL when this feature is selected. This
function works by churning the mixture
to the time selected and once reached
the compressor will pulse on and off in
conjunction with the paddle.
Paddle will only turn if needed to maintain
the selected consistency.
VOLUME FUNCTION
The Breville Smart Scoop™ features a
Volume/Tone selection which includes
music or a beep to indicate your frozen
dessert is ready. The volume will default to
high which can be adjusted to low or mute.
Your music selection includes:
• Turkey in the Straw
• The Entertainer
• Camptown Races
FACTORY DEFAULT SETTING
Press and hold the KEEP COOL button for 5
seconds. This will restore the machine back
to the original factory settings. This can
only be done in the stand by mode.
NOTE
When the machine is in this mode
the compressor and motor will turn
on if needed to maintain the selected
consistency.
16
BCI600XL_IB_E12_FA.indd 16 7/02/12 2:58 PM

NOTES
17
BCI600XL_IB_E12_FA.indd 17 7/02/12 2:58 PM

TIPS FOR BETTER ICE
CREAM MAKING
for your Breville Smart Scoop™ Ice Cream Machine
BCI600XL_IB_E12_FA.indd 18 7/02/12 2:58 PM

TIPS FOR BETTER ICE CREAM MAKING
TIPS FOR BETTER
ICE CREAM MAKING
• Note: time taken to make frozen desserts
can vary depending on the ambient
room temperature, temperature of the
ingredients and pre cooling the machine.
Note: the cooler the ingredients the
faster the ice cream process. As a
general guideline it takes around
50 minutes to make ice cream.
• When making crème anglaise and
recipes that require heating ingredients
its always a good idea to make this the
day before or cool ingredients for at least
4 hours prior to making ice cream.
• Always insert the bowl and paddle
into the bowl chamber before adding
ingredients.
• Ice cream recipes stated in this
instruction booklet use ingredients such
as cream, milk, eggs and sugar, these
ingredients can be substituted with
similar ingredients to suit taste or dietary
requirements. Note taste and flavors will
vary if using different ingredients.
• Due to aeration of ingredients do
not exceed 3½ cups of liquid
ingredients.
• Alcohol inhibits the freezing process. It’s
best to add alcohol towards the end of
the ice cream making process.
• The consistency of the frozen dessert
made is a spoonable mixture. Please note
that if you are serving in cones or on
plates that it’s best to place the ice cream
in the freezer for 2 hours prior to serving.
• When storing your frozen dessert in the
freezer, ensure that the container is air
tight and well sealed. This will prevent
ice crystals forming. Putting a plastic
film directly over the top of the frozen
dessert will also help with this.
• Frozen desserts can be stored for up to
2 weeks.
• If serving a dessert from the freezer
its best to let the dessert sit at room
temperature for 5-10 minutes prior
to serving.
TIPS FOR MAKING CRÈME
ANGLAISE (CUSTARD BASE)
• Traditionally creamy textured ice
cream is made from a crème anglaise,
custard base. Below are tips on
achieving the prefect crème anglaise
time after time.
• Make sure all ingredients are fresh.
• Eggs are best at room temperature for
making a custard base.
• Ensure that you measure all your
ingredients first and have them ready
for when you are starting to cook.
• Either use a wire whisk or electric hand
beater, beat eggs yolks and sugar until
they are light and creamy, and double
in size. For best results whip until the
mixture becomes pale yellow in color.
• Use a heavy bottom sauce pan when
cooking crème anglaise.
• When heating the milk you don’t want
to boil it. A good guide to know when to
remove the milk from the heat is when
little bubbles start to form around the
edge of the milk.
• It is best to now pour half of the heated
milk into the egg mixture while
whisking, then pour the mix back into
the original pot with the milk and
continue to stir with a wooden spoon
at the same time until the two are well
combined.
19
BCI600XL_IB_E12_FA.indd 19 7/02/12 2:58 PM

TIPS FOR BETTER ICE CREAM MAKING
• Ensure that the mixture is constantly
stirred with a wooden spoon until it
thickens and coats the back of the
spoon. To test using the back of the
spoon, coat the spoon in the crème
anglaise. Run your finger through the
mixture on the back of the spoon. If the
finger mark stays then the mixture is
thick enough.
• If the mixture separates or curdles then
heat is too high.
• Do not leave crème anglaise unattended
while cooking.
• Crème anglaise will take 5-15 minutes
to thicken depending on quantities etc.
• Always allow the mixture to cool to
room temperature before placing into
the fridge.
• To cool the mixture quickly it can be
put in a metal bowl and then into an ice
bath and stirred constantly until well
chilled.
20
BCI600XL_IB_E12_FA.indd 20 7/02/12 2:58 PM

THE VITAL
INGREDIENTS
for your Breville Smart Scoop™ Ice Cream Machine
BCI600XL_IB_E12_FA.indd 21 7/02/12 2:58 PM

PAGE HEADER.....
THE VITAL INGREDIENTS
INGREDIENTS
Home made ice cream is now easy to make
at home and with only kitchen ingredients
required to make a basic vanilla ice cream.
EGGS
All the recipes in this book were tested
using standard large eggs. The egg gives
ice cream volume, stabilizes and emulsifies
the mixture. The yolk of the egg contains
lecithin, which acts as an emulsifier to bond
with the fat globules.
NOTE
Avoid using older eggs, especially
if you are not cooking the mixture.
Pregnant women are not advised
to consume ice cream containing
raw eggs.
SUGAR
Granulated sugar was used in all the
recipes as it dissolves easily and to reduce
crystallization (when large ice crystals
form) from occurring.
As a general rule, when it comes to sugar
in ice cream, more sugar added will lower
the freezing point of the water inside the
mixture, which prevents your frozen dessert
from forming a large hard clump that is
difficult to scoop.
MILK
Whole milk was used for all milk based
recipes. Lower fat varieties can be
substituted but the same result will not be
achieved.
CREAM
Heavy cream was used in all the recipes,
creams that are thickened usually have
additives such as gelatine (of animal origin
to thicken and prolong the creams life).
The cream gives fattiness and a smoother
texture to the ice cream.
22
BCI600XL_IB_E12_FA.indd 22 7/02/12 2:58 PM

CARE & CLEANING
for your Breville Smart Scoop™ Ice Cream Machine
BCI600XL_IB_E12_FA.indd 23 7/02/12 2:58 PM

PAGE HEADER.....
CARE & CLEANING
Ensure that the ice cream machine is
turned off by pressing the POWER button.
The ice cream machine is off when the
‘START | PAUSE’ button ’s LCD light is
no longer illuminating red. Remove the
power plug from the power outlet. Allow
the ice cream machine compressor to cool
completely before disassembling and
cleaning.
CLEANING THE STAINLESS
STEEL HOUSING
1. Wipe the exterior of the stainless steel
housing and the LCD screen with a
soft damp cloth. A non-abrasive liquid
cleanser or mild spray solution may be
used to avoid build up of stains. Apply
the cleanser to the sponge, not the outer
surface or LCD screen, before cleaning.
Do not use a dry paper towel or cloth to
clean the LCD screen, or use an abrasive
cleanser or metal scouring pad to clean
any part of the ice cream machine as
these will scratch the surface.
NOTE
Never immerse the stainless steel
housing in water or place in the
dishwasher. Take care not to allow
water or cleaning fluids to seep under
the buttons or LCD screen on the
control panel.
CLEANING THE LID
The lid can be cleaned in warm soapy water,
using a soft sponge. Do not use an abrasive
cleanser or metal scouring pad as these
will scratch the surface. Let all surfaces dry
thoroughly prior to placing into the ice
cream machine.
CLEANING THE ICE CREAM BOWL
1. Fill the ice cream bowl up half way with
warm soapy water. A non-abrasive liquid
cleanser or mild spray solution may be
used. Allow to stand for 10-20 minutes.
NOTE
Ice Cream Bowl is NOT dishwasher
safe.
NOTE
To clean the ice cream chamber
ensure that the machine is at room
temperature. Wipe inside chamber
with a damp cloth and soapy water.
Once clean, dry thoroughly.
2. If over-spill of cream, milk, chocolate etc.
occurs in the interior chamber, carefully
remove them using a soft, damp cloth.
3. Let all surfaces dry thoroughly prior
to inserting the power plug into a
power outlet.
24
BCI600XL_IB_E12_FA.indd 24 7/02/12 2:58 PM
PAGE HEADER.....
CARE & CLEANING
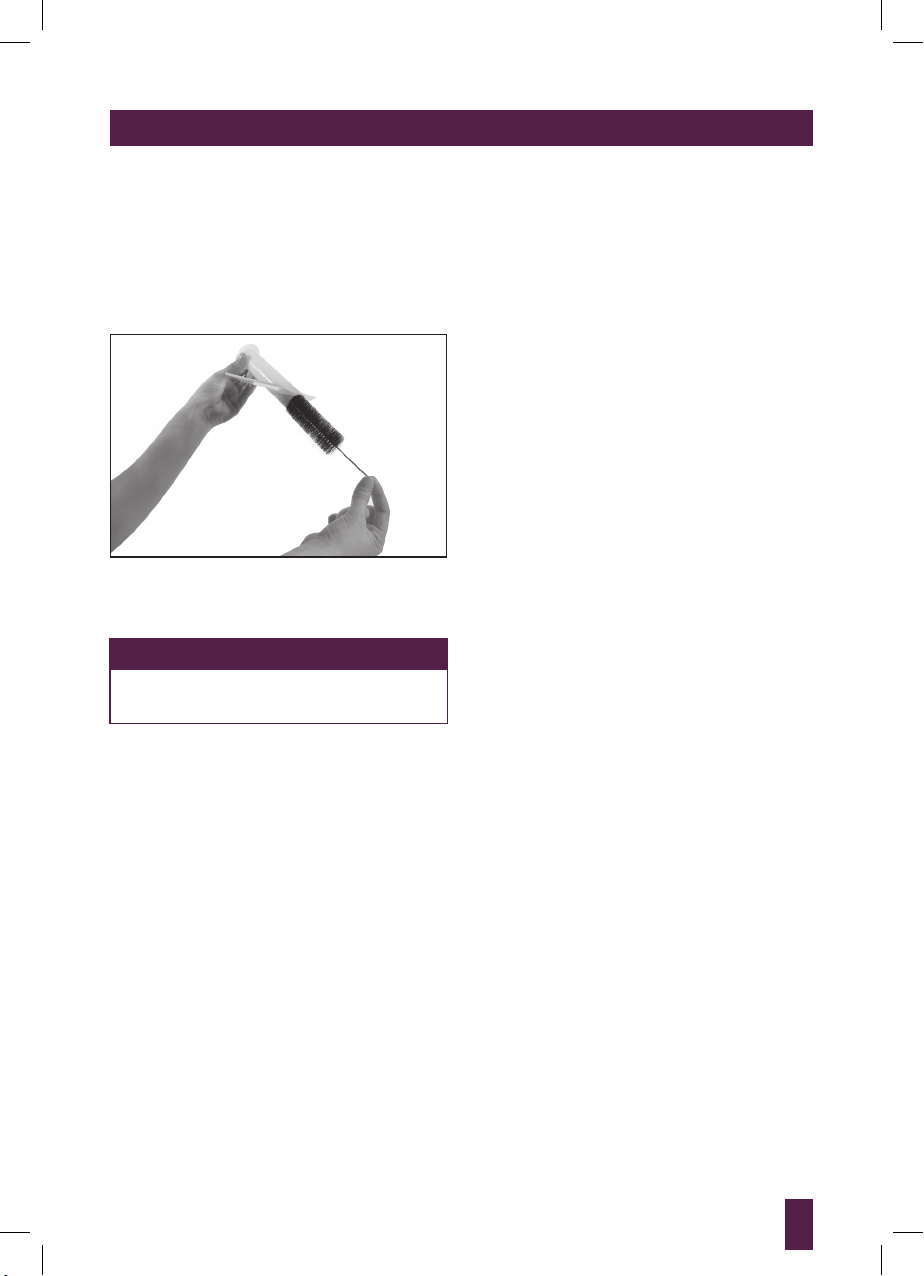
CLEANING THE PADDLE
1. Wash the paddle with warm soapy water.
Using the bottle brush supplied insert
this in the central part of the paddle
and spin while plunging in and out to
remove all residue.
2. Let all surfaces dry thoroughly before
reassembling the ice cream machine
NOTE
Paddle is dishwasher safe on the top
rack ONLY.
STORAGE
1. Ensure the ice cream machine is turned
OFF. Remove power plug from the
power outlet.
2. Ensure the ice cream machine and all
accessories are completely clean and dry.
3. Place the ice cream bowl and paddle into
the chamber.
4. Ensure the lid is on.
5. Store the appliance in an up right
position and level on it support legs.
Do not store anything on top of the ice
cream machine.
25
BCI600XL_IB_E12_FA.indd 25 7/02/12 2:58 PM

NOTES
26
BCI600XL_IB_E12_FA.indd 26 7/02/12 2:58 PM
 Loading...