


the Smart Oven™
Instruction Booklet
BOV800

CONGRATULATIONS
on the purchase of your new Breville Smart Oven™

Contents
4 Breville recommends safety first
7 Know your Breville Smart Oven™
10 Quick Start Guide
14Before first use
-Preparing the oven for use
-A note on cooking times
-A note on rack height positions
-A note on STANDBY mode
-A note on optional settings
22Operating your Breville Smart Oven™
-GRILL function
-TOAST function
-CRUMPET function
-BAKE function
-ROAST function
-PIZZA function
-COOKIES function
-REHEAT function
-WARM functions
44 Using the plate warming tray
46Care, cleaning and storage
-Cleaning the outer body and door
-Cleaning the interior
-Cleaning the crumb tray
-Cleaning the wire rack, roasting rack, and baking pan and pizza pan
-Storage
50 Troubleshooting
52 Recipes
3

Breville recommends safety first
At Breville we are very safety conscious. We design and manufacture consumer products with the safety of you, our valued customer, foremost in mind. In addition we ask that you exercise a degree of care when using any electrical appliance and adhere to the following precautions.
Important safeguards
Read all instructions BEFORE USE AND SAVE FOR FUTURE REFERENCE
•Carefully read all instructions before operating the Breville Smart Oven™ for the first time and save for future reference.
•Remove and safely discard any packing material, and promotional labels before using the Breville Smart Oven™ for the first time.
•To eliminate a choking hazard for young children, remove and safely discard the protective cover fitted to the power plug of this appliance.
•Do not place the Breville Smart Oven™ near the edge of a bench or table during operation. Ensure the surface is level, clean and free of water and other substances.
•Do not use the Breville Smart Oven™ On a sink drain board.
•Do not place this Breville Smart Oven™ on or near a hot gas or electric burner, or where it could touch another heated oven.
•Position the Breville Smart Oven™ at a minimum distance of 20cm away from walls, curtains, cloths and other heat sensitive materials when in use. This will allow for adequate air circulation and also help prevent the possibility of wall, curtains, and cloths discoloration due to radiated heat.
•A fire may occur if the oven is covered or touches flammable material, including curtains, draperies, walls, and the like when in operation.
•Caution should be taken when toasting and grilling high oil content foods, such as pine nuts and walnuts. They may catch fire. If this occurs, please keep the oven door closed and switch off and unplug oven until flame has extinguished.
•Always operate the Breville Smart Oven™ on a stable, heat resistant surface. Do not use on a cloth-covered surface, near curtains or other flammable materials.
•Do not place cardboard, plastic, paper, or other flammable materials into Breville Smart Oven™ .
•Regularly clean the crumb tray to discard crumbs. Ensure to turn OFF the oven, remove the power plug from the wall outlet and allow the oven to cool before pulling the crumb tray out.
•Always ensure the crumb tray is thoroughly dried after cleaning and is reinserted into position before operating the Breville Smart Oven™ .
•The temperature of accessible surfaces will be high when the appliance is in operation and also for some time after use.
•Always wear protective, insulated oven mitts when inserting, removing or handling items from the Breville Smart Oven™ when hot.
•Always use extreme caution when removing any of the accessories or disposing of hot grease. Allow the Breville Smart Oven™ to cool before handling.
•Do not place hands inside the Breville Smart Oven™ during operation.
•Do not leave the door standing open for extended periods of time when the Breville Smart Oven™ is turned ON.
•The glass of the Breville Smart Oven™ door has been specially treated to make it stronger, more durable and safer than ordinary glass, however it is not unbreakable. If struck extremely hard, it may break or weaken, and could at
a later time, shatter into many small pieces without apparent cause.
4

Breville recommends safety first
•Do not insert oversized foods into the Breville Smart Oven™ as they create risk of fire or electric shock.
•It is recommended to use only the Breville Smart Oven™ accessories with this oven. Do not store any materials other than the Breville Smart Oven™ accessories in the oven when not in use. When grilling, the grill rack must be inserted into the supplied enamel baking pan.
•Do not clean the interior of the Breville Smart Oven™ with metal scouring pads as pieces can break off the pad and touch electrical parts creating a risk of electric shock.
•Do not attempt to operate the Breville Smart Oven™ by any methods other than those described in this book.
•Always ensure the Breville Smart Oven™ is properly assembled before use. Follow the instructions provided in this book.
•The Breville Smart Oven™ is not intended to be operated by means of an external timer or separate remote control system.
•The top of the oven is very hot during and after operation. Do not store any item on top of the Breville Smart Oven™ when in use and when stored. The only exceptions are described on Page 45 - two layers of ceramic plates for warming, and the optional Cutting Board accessory provided by Breville for use in the ribbed section on top of the oven. If the ribbed section is used as a warming tray during operation, protective hot pads or insulated oven mitts should be used when removing heated items. Alternatively, allow the oven to cool down before handling.
•The Breville Smart Oven™ should not be left unattended at any time when in use.
•Caution should be exercised when using pans and dishes constructed of materials other than metal. If using ceramic or glass pans or dishes it is important that they are oven safe to prevent cracking.
•Do not touch hot surfaces. Appliance surfaces, including the door and outer surface of the oven are hot during and after operation. To prevent burns or personal injury, always use protective hot pads or insulated oven mitts, or use handles and knobs where available, when inserting, removing or handling items from the oven. Alternatively, allow the oven to cool down before handling.
•Metal utensils such as knives should not be inserted in the oven to remove food residue from the quartz tube elements. This can damage the elements as well as lead to electrocution.
•When the oven is not in use or when left unattended, disconnect the oven from the wall outlet.
•To turn OFF the oven, press the START/ CANCEL button on the control panel. The oven is OFF when the button surround red illumination goes out.
•To disconnect from the wall outlet, first turn OFF the oven, and then remove the power plug from the wall outlet.
•Extreme caution should be exercised when using lids in the oven, as pressure build up in a covered pan or dish may cause hot ingredients to expel or the dish to crack.
•The use of any accessory attachments not recommended by Breville may cause injuries.
•Do not use the toast function for purposes other than toasting foods
•Close supervision is necessary when the appliance is used by or near children.
•Always ensure the Breville Smart Oven™ has cooled, the start/cancel button is pressed and the button illumination goes out, the power is switched off at the power outlet and power cord is unplugged, if appliance is not in use, before cleaning, before attempting to move the appliance, disassembling, assembling and when storing the appliance.
•Keep the Breville Smart Oven™ clean. Follow the cleaning instructions provided in this booklet.
5

Breville recommends safety first
IMPORTANT SAFEGUARDS FOR ALL ELECTRICAL APPLIANCES
•Fully unwind the power cord before use.
•Do not let the power cord hang over the edge of a table or counter, or touch hot surfaces, or become knotted.
•To protect against electric shock do not immerse the oven, power cord or power plug in water or any other liquid.
•This appliance is not intended for use by persons (including children) with reduced physical, sensory or mental capabilities, or lack of experience and knowledge, unless they have been given supervision or instruction concerning use of the appliance by a person responsible for their safety.
•Children should be supervised to ensure that they do not play with the appliance.
•This appliance is recommended for household use only. To avoid a hazard do not use this appliance for anything other than its intended use. Do not use in moving vehicles or boats. Do not use outdoors. Misuse may cause injury.
•It is recommended to regularly inspect the appliance. Do not use the appliance if power cord, power plug or appliance becomes damaged in any way. Return the entire appliance to the nearest authorised Breville service center for examination and / or repair.
•Any maintenance, other than cleaning, should be performed at an authorised Breville Service Center.
•The installation of a residual current device (safety switch) is recommended to provide additional safety protection when using electrical appliances. It
is advisable that a safety switch with a rated residual operating current not exceeding 30mA be installed in the electrical circuit supplying the appliance. See your electrician for professional advice.
SAVE THESE INSTRUCTIONS
6

KNOW
your Breville Smart Oven™

KNOW YOUR Breville Smart Oven™
A |
D |
E |
|
|
|
|
F |
|
B |
G |
I |
C |
H |
|
|
|
|
|
|
L |
|
J |
K |
|
|
A.30cm (12” x 12”) enamel grill rack
B.30cm (12” x 12”) enamel baking pan
C.33cm (13”) non-stick pizza pan
D.Door handle
 WARNING
The outer surface of the oven, including the oven door, is hot during and after operation. Always use protective hot pads or insulated oven mitts when inserting, removing or handling items from the oven.
E. Ribbed plate warming tray
NOTE
Only place items in the ribbed section on top of the oven as described on Page 39.
The Breville Bamboo Cutting Board and Serving tray accessory for the top of the oven is available from Breville. Visit www.breville.com.au and refer to the Accessories Card enclosed for more information.
F.TOP RACK POSITION: Grill and Crumpet functions
G.MIDDLE RACK: Toast, Pizza and Cookie functions
NOTE
When the wire rack is inserted into this position, the Magnetic Auto-Eject Rack automatically ejects the wire rack halfway out of the oven when the oven door is opened. This is so your toasted items can be safely and easily removed. Always open the door slowly and in a controlled manner to prevent the wire rack from ejecting too quickly.
H.BOTTOM RACK POSITION: Bake, Roast, Reheat and Warm functions
I.Wire rack
J.Crumb tray
K.Ventilation slots
L.Breville Assist Plug™
8
KNOW YOUR Breville Smart Oven™
|
M |
O |
N |
|
R |
P |
|
|
S |
|
T |
Q |
|
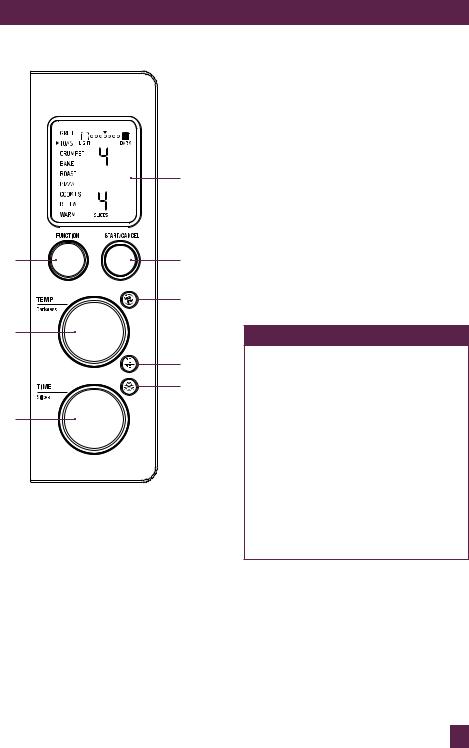
M.LCD screen: Blue Illumination changes to orange when cooking
N.Start/Cancel button
O.Function dial
P.Temperature dial/Toast and Crumpet browning control
Q.Time dial / Toast and Crumpet slice selection
R. Convection button
S. Temperature conversion button
T. Frozen foods button
NOTE
When the oven is plugged into a wall outlet, the oven alert will sound twice and the LCD screen will illuminate for 10 minutes before entering standby mode. Press the START/CANCEL button on the control panel to activate any of the functions.
The oven is ON (cooking) when the oven alert sounds, the button surround is illuminated red and the LCD screen turns orange. The oven is OFF when the START/CANCEL button is pressed a second time, the
button surround illumination goes out and LCD screen returns to blue.
 WARNING
Do not touch hot surfaces. The outer surface of the oven, including the oven door, is hot during and after operation. Allow the oven to cool down before handling.
9
QuickPAge header..... Start Guide
This Quick Start Guide is designed for first time use.
For safety and more information, refer to rest of the Instruction Booklet.
PREPARING THE OVEN
(A ONE-TIME PROCESS)
In order to remove any protective substances inside the oven, it is necessary to run the oven empty for 20 minutes.
1.Place the oven on a flat, dry surface. Ensure there is a minimum distance of 20cm of space on both sides of the
appliance, there are no items on top, and the crumb tray has been inserted.
2.Unwind the power cord completely and insert the power plug into a grounded wall outlet.
3.The oven alert will sound twice and the LCD screen will illuminate blue. The function options will appear with an indicator on the preset BAKE function.
4.Turn the FUNCTION dial to the right until the indicator reaches the PIZZA function. The LCD screen will indicate the preset PIZZA setting.
FUNCTION
DIAL
5.Press the START/CANCEL button. The oven alert will sound, the button surround will illuminate red and the LCD screen will turn orange.
6.The LCD screen will flash ‘PREHEATING’. Once the oven has reached the set temperature, the temperature alert will sound.
7.The timer will be displayed and automatically begin to count down in one minute increments.
8.At the end of the cooking cycle, the oven alert will sound three times and the START/CANCEL button surround will cease to illuminate.
9.The oven is now ready to use.
NOTE
When the oven is turned on for the first time, it may emit vapours. This is due to the protective substances inside the oven. It is safe and not detrimental to the performance of the oven.
OPERATING YOUR BREVILLE COMPACT SMART OVEN™
The Breville Smart Oven™ features Element IQ™ - a cooking technology that adjusts the power of the heating elements to cook food more evenly and quickly. Each of the oven’s functions are preset with our recommended settings, however we suggest experimenting with these depending on the recipe, amount of food and your personal taste.
1.Insert the wire rack into the recommended rack height position. These are conveniently printed on the right hand side of the oven door’s glass window. The wire rack should be positioned with the spokes facing upwards.
10
PAgeQUICKheaderSTART GUIDE.....
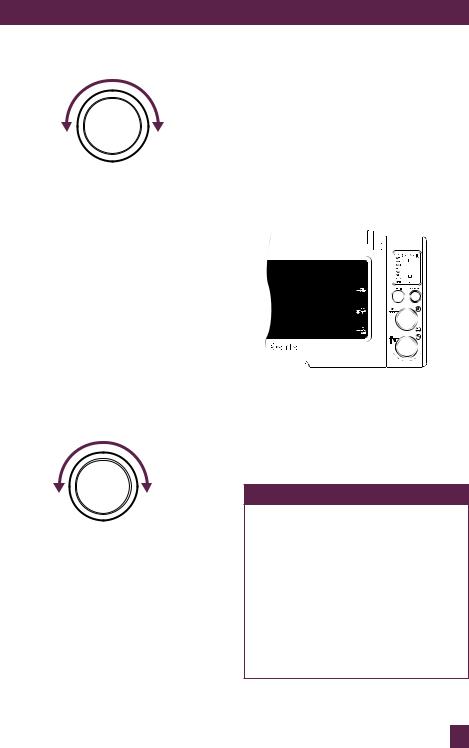
2.Turn the FUNCTION dial until the indicator on the LCD screen reaches the desired setting.
TEMPERATURE
DIAL
|
ROTATE |
REDUCE |
INCREASE |
TEMPERATURE |
TEMPERATURE |
3.The top figure on the LCD screen indicates the preset cooking temperature (or on the toast and crumpet function, the browning shade). Turn the TEMPERATURE dial to the left to reduce the temperature, or to the right to increase the temperature.
TIME
DIAL
on the toast and crumpet functions, the number of slices). Turn the TIME dial to the left to reduce the cooking time, or to the right to increase the cooking time.
5.Centre the food on the wire rack - either placing directly on the rack or positioned on the Breville baking pan and grill rack (see Page 25 of the Instruction Book for recommended cookware types and sizes).
NOTE
Some functions feature a preheating cycle. When the START/CANCEL button is pressed, the LCD screen will flash ‘PREHEATING’. Only place food inside the oven once the LCD screen no longer flashes ‘PREHEATING’ and the temperature alert has sounded.
6.Close the oven door.
7.Press the START/CANCEL button. The button surround will illuminate red and the oven alert will sound.
8.The timer will be displayed and begin to count down. The cooking temperature and time can be adjusted during the cooking cycle.
9.At the end of the cooking cycle, the oven alert will sound and the START/ CANCEL button surround will cease to illuminate.
|
ROTATE |
REDUCE |
INCREASE |
TIME |
TIME |
4.The bottom figure on the LCD screen indicates the preset cooking time (or
NOTE
The cooking cycle can be stopped at any time by pressing the START/ CANCEL button. This will cancel the cycle and the button surround illumination will go out.
11

PAgeQUICKheaderSTART GUIDE.....
OVEN FUNCTIONS
GRILL FUNCTION: Ideal for open sandwiches, small cuts of meat, poultry, fish, sausages and vegetables. Grilling can also be used to brown the tops of casseroles and gratins.
Rack Position: Top
Optional Settings:  TEMPERATURE CONVERSION button.
NOTE
There are three grilling temperature settings - HIGH, MEDIUM, LOW. This determines how quickly the tops of your food brown - depending on the food, quantity and your personal taste.
NOTE
When grilling, the Breville enamel grill rack must be inserted into the Breville baking pan. When assembled together, the grill rack is designed to drain grease and fats away from meats for healthier cooking. The baking pan collects these pan drippings and helps prevent spattering. Depending on the food being grilled, it may be necessary to turn food over half way through the cooking time to achieve even cooking and browning.
TOAST FUNCTION: Evenly toasts bread so it’s crisp and crunchy on the outside, while soft and moist on the inside.
Rack Position: Middle
Optional Settings:  FROZEN FOODS button.
NOTE
During the toasting cycle, condensation may form on the oven door and steam may be emitted. This is normal - caused by the moisture content of the bread. Freshly baked and frozen breads generally produce more condensation.
Crumpet FUNCTION: Crisps the insides of your crumpet while only lightly toasting the outside.
Rack Position: Top
Optional Settings:  FROZEN FOODS button.
NOTE
The up side of the crumpet must always face upwards towards the top heating elements - so the top side becomes crisp while the crust is only lightly toasted.
BAKE FUNCTION: Bakes cakes, muffins, brownies and pastries evenly throughout. Also is ideal for cooking pre-packaged frozen meals including lasagna and pies.
Rack Position: Bottom
Optional Settings:  CONVECTION button
  TEMPERATURE CONVERSION button
  FROZEN FOODS button
ROAST FUNCTION: Cooks a variety of meats and poultry that are tender and juicy inside and roasted to perfection outside.
Rack Position: Bottom
Optional Settings:  CONVECTION button
  TEMPERATURE CONVERSION button.
12

PAgeQUICKheaderSTART GUIDE.....
PIZZA FUNCTION: Melts and browns cheese and toppings, while crisping the pizza crust.
Rack Position: Middle
Optional Settings:  CONVECTION button
  TEMPERATURE CONVERSION button
  FROZEN FOODS button
NOTE
If cooking a frozen pizza, ensure to remove all packaging (including the metal foil pizza pan that may be provided) before placing the pizza in the oven. If cooking a fresh pizza or
using a pizza stone, see Page 31 of the Instruction Book.
COOKIE FUNCTION: Ideal for baking home made or commercially prepared cookies and ready-to-bake croissants, scones, biscuits and mini tarts or pies.
Rack Position: Middle
Optional Settings:  CONVECTION button
  TEMPERATURE CONVERSION button
  FROZEN FOODS button
REHEAT FUNCTION: Ideal for reheating leftovers without browning the top.
Rack Position: Bottom
Optional Settings:  CONVECTION button
  TEMPERATURE CONVERSION button
WARM FUNCTION: Maintains hot foods at the recommended temperature to prevent bacterial growth (70°C or above).
Rack Position: Bottom
Optional Settings:  CONVECTION button
  TEMPERATURE CONVERSION button.
13

BEFORE FIRST USE
of your Breville Smart Oven™
BEFORE FIRST USE
Preparing the oven for use
NOTE
In order to remove any protective substances inside the oven, it is necessary to run the oven empty for
20minutes.
1.Remove and safely discard any packing material, promotional labels and tape from the oven.
2.Remove the crumb tray, wire rack, grill rack, baking pan and pizza pan from the packaging. Wash them in warm, soapy water with a soft sponge, rinse and dry thoroughly. Insert the crumb tray into the oven.
3.Wipe the interior of the oven with a soft damp sponge. Dry thoroughly.
4.Place the oven on a flat, dry surface. Ensure there is a minimum distance of 20cm of space on both sides of the
appliance. Ensure there are no items on top of the oven.
5.Unwind the power cord completely and insert the power plug into a grounded wall outlet.
6.The oven alert will sound twice and the LCD screen will illuminate blue. The function options will appear with an indicator on the preset BAKE function.
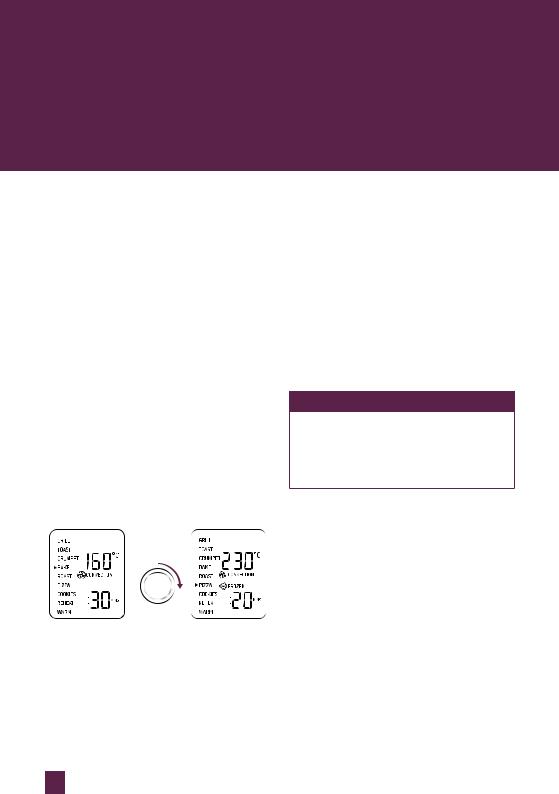
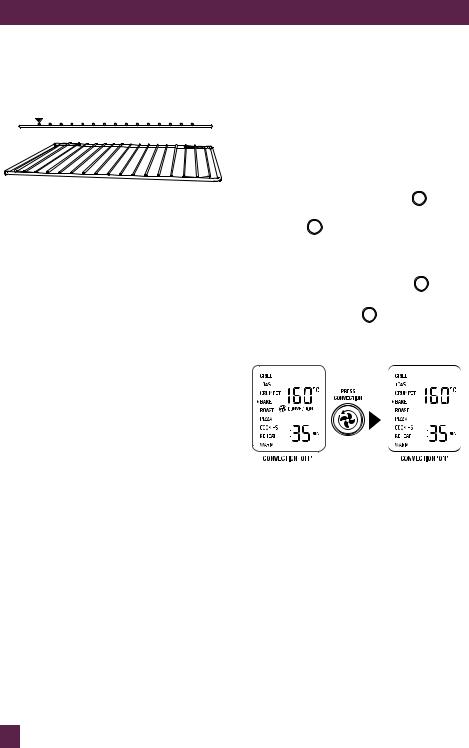
7.Turn the FUNCTION dial to the right until the indicator reaches the PIZZA function. The top figure on the LCD screen indicates the preset temperature of 210ºC. Turn the temperature dial clockwise
to 230ºC. Keep the preset time of 20 minutes. The preset  CONVECTION setting and preset
  FROZEN FOODS setting will also be displayed.
FUNCTION
DIAL
PIZZA DEFAULT |
PIZZA |
8.Press the START/CANCEL button to activate this setting. The button surround will illuminate red and the oven alert will sound.
9.The LCD screen will flash PREHEATING. Once the oven has reached the set temperature, the temperature alert will sound.
10.The timer will be displayed and automatically begin to count down in one minute increments.
NOTE
When the oven is turned on for the first time, it may emit vapors. This is due
to the protective substances inside the oven. It is safe and not detrimental to the performance of the oven.
11.At the end of the cooking cycle, the oven alert will sound three times and the START/CANCEL button surround will cease to illuminate.
12.The oven is now ready to use.
NOTE
The cooking cycle can be stopped at any time by pressing the START/CANCEL button. This will cancel the cycle, the button surround illumination will go out and LCD screen will change to blue.
15

BEFORE FIRST USE
A note on cooking times
The Smart Oven™ features Element IQ™
- a unique cooking technology that adjusts the power of the cooking elements for optimum results.
It is normal to notice the following occur during the cooking cycle:
•It is normal that during the GRILL function, the bottom set of elements turn off while the top set is heating at full power.
•It is normal that the ends of each heating element will glow more brightly than the middle of the element.
•It is normal that the elements switch on and off to maintain correct oven temperature.
This cooking technology allows foods to cook more evenly and quickly, significantly reducing cooking times.
The oven’s preset cooking temperatures and times may need to be changed depending on the recipe, the amount of food and your personal taste.
With prepackaged foods you may also need to change the preset temperatures and times to account for the speed of the oven.
Grill
High temperature top heat: melts and browns.
650W |
500W |
550W |
 OFF
OFF
OFF |
OFF |
1700W
Toast
Searing top and bottom heat: seals and crisps.
650W |
OFF |
550W |
 OFF
OFF
600W |
600W |
2400W
Bake
Even convection heating: cooks right through.
370W |
OFF |
310W |
 ON
ON
410W |
410W |
1500 W
We recommend experimenting with the temperature and time settings to produce the desired results.
The cooking temperature and time can be adjusted before or during the cooking cycle:
1.The cooking temperature is displayed as the top figure on the LCD screen.
a)Turn the TEMPERATURE dial to the left to reduce the temperature, or to the right to increase the temperature.
16
BEFORE FIRST USE
TEMPERATURE
DIAL
ROTATE
REDUCE |
INCREASE |
TEMPERATURE |
TEMPERATURE |
b)The cooking temperature can be adjusted in 5ºC increments, from 50ºC to a maximum of 230ºC (or in the Fahrenheit mode, 10ºF increments, from 120ºF to a maximum 450ºF).
2.In baking functions, the cooking time is displayed as the bottom figure on the LCD screen.
a)Turn the TIME dial to the left to reduce the cooking time, or to the right to increase the cooking time.
b)The cooking time can be adjusted in one minute increments up to 1 hour, and in 5 minute increments between 1 and 2 hours.
|
TIME |
|
DIAL |
|
ROTATE |
REDUCE |
INCREASE |
TIME |
TIME |
A note on rack height positions
Cooking results are significantly affected by the position of the wire rack as this determines how close the food is to the heating elements. We highly recommend following the rack height position for each function as printed on the right hand side of the oven door’s glass window. However, these are a guide only. Certain foods may require a different rack height position depending on the recipe, the amount and size of the food and your personal taste.
TOP
MIDDLE
BOTTOM
Top rack height position: GRILL and CRUMPET Functions.
Middle rack height position: TOAST, PIZZA and COOKIE Functions.
Bottom rack height position: BAKE, ROAST, REHEAT and WARM Functions.
NOTE
When the wire rack is inserted into the middle rack height position, the Magnetic Auto-Rack Eject automatically ejects the wire rack
halfway out of the oven when the oven door is opened. This is so your toasted items can be safely and easily removed.
Always open the door slowly and in a controlled manner when the wire rack is inserted into this rack height
position to prevent the wire rack from ejecting too quickly.
17
BEFORE FIRST USE
For optimum cooking results:
•The wire rack should always be inserted into the rack height position with the spokes facing upwards.
•Food should be positioned on the centre of the wire rack, grill rack, baking tray or pizza tray to let maximum airflow reach the food.
A note on stanDby mode
When the oven is plugged into a wall outlet and turned ON, the oven alert will sound twice and the LCD screen will illuminate for 10 minutes before entering standby mode. When in standby mode, the LCD screen will cease to illuminate, however all function options will still be visible.
To re-activate the oven out of standby mode, press the START/CANCEL button on the control panel, or turn any dial. The LCD screen will re-illuminate. Press the START/ CANCEL button to activate the oven.
The oven is ON (cooking) when the oven alert sounds and the button surround is illuminated red and the LCD screen turns orange. The oven is OFF when the START/ CANCEL button is pressed a second time and the button surround illumination goes out and the LCD screen turns blue.
A note on OPTIONAL SETTINGS
 Convection Button
Convection cooking uses fan assistance to circulate heated air around the food. This produces faster, more even, more energy efficient cooking.
Convection cooking is the default setting on the BAKE, ROAST, PIZZA, COOKIE and REHEAT functions. The setting
can be deselected by pressing the  CONVECTION button, or re-selected by pressing the
  CONVECTION button a second time.
Convection cooking is not the default setting on the WARM function, however it can be selected by pressing the  CONVECTION button.
The convection symbol  is displayed on the LCD screen whenever this setting is selected.
Convection cooking can reduce cooking times. Some foods may not be ideal for convection cooking – refer to the recipe section in this book. We recommend experimenting with the convection, temperature and time settings to produce the desired results.
For optimum results:
Use oven-proof baking dishes, roasting pans, pizza pans or cookie sheets with very low sides, and place on the centre of the wire rack to let maximum airflow reach the food.
For the same reason, do not cover foods with metal foil or any other type of lid or covering for maximum airflow.
18
BEFORE FIRST USE
Most recipes recommend reducing temperatures by 10ºC when using convection cooking. Always check the food 10 minutes before the suggested cooking time is complete to avoid overcooking.
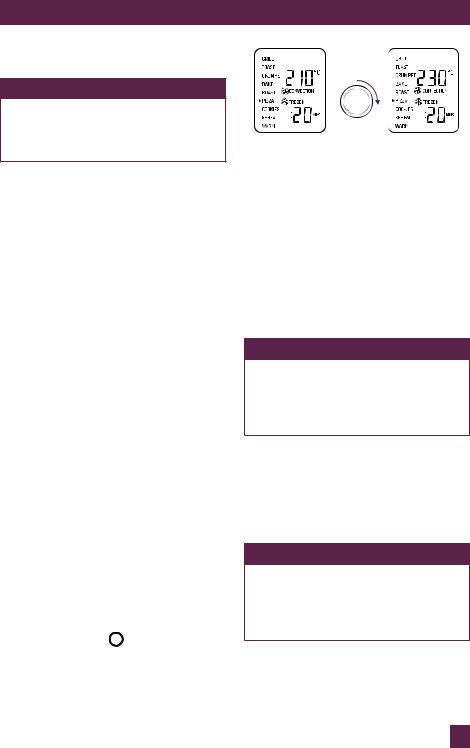
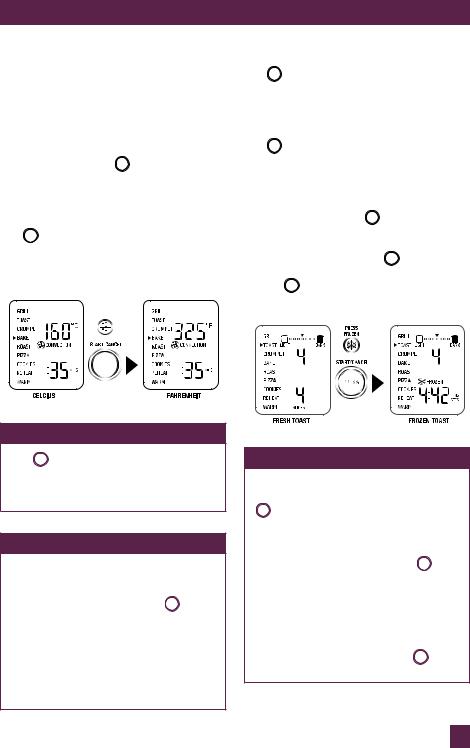
 Temperature Conversion Button
The temperature reading on the oven is preset to Celsius. Pressing the  TEMPERATURE CONVERSION button allows the Celsius temperature reading to be converted to Fahrenheit. The corresponding ‘C˚’ or ‘F ˚’ symbol is displayed on the LCD screen.
The  TEMPERATURE CONVERSION button may be selected when using the BAKE, GRILL, PIZZA, COOKIE, REHEAT and WARM functions.
PRESS
TEMPERATURE
NOTE
The  TEMPERATURE CONVERSION button can be used as an electronic temperature conversion tool, particularly convenient for international recipes.
NOTE
If you changed the default Celsius temperature reading to Fahrenheit, the setting will remain in the memory of the oven until the  TEMPERATURE CONVERSION button is pressed a second time or the oven is unplugged from the wall outlet. When the oven is plugged back into the wall outlet, the temperature reading will automatically return to the preset Celsius setting.
 Frozen Foods Button
The  FROZEN FOODS button adds the recommended, additional time required to defrost and then toast frozen bread or
CRUMPETS and cook frozen pizza or cookie dough.
The  FROZEN FOODS button may be selected when using the TOAST, CRUMPET, BAKE and COOKIE functions, and is the default setting on the PIZZA function.
On the TOAST, CRUMPET, BAKE and COOKIE functions, the  FROZEN FOODS button can be selected before or during the cycle. The setting can be de-selected by pressing the
  FROZEN
FOODS button a second time. The frozen symbol  is displayed on the LCD screen whenever this setting is selected.
NOTE
If you have selected the  FROZEN FOODS button and the frozen symbol
  is displayed on the LCD screen, the setting will remain in the memory of the oven and be activated for each subsequent TOAST/CRUMPET/ BAKE/COOKIE cycle until the
  FROZEN FOODS button is pressed a second time, or the oven is unplugged from the wall outlet. When the oven is plugged back into the wall outlet, the function will automatically return to the preset TOAST/CRUMPET/BAKE/ COOKIE function without the
  FROZEN FOODS setting.
19
BEFORE FIRST USE
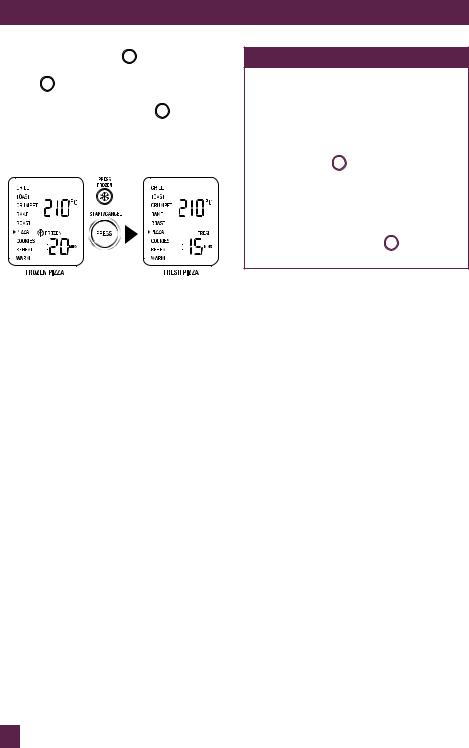
On the PIZZA function,  FROZEN FOODS is the default setting, and the frozen symbol
  is displayed on the LCD screen. When cooking fresh pizzas, the setting can be de-selected by pressing the
  FROZEN FOODS button.
The ‘FRESH’ symbol will be displayed on the LCD screen.
NOTE
If you have de-selected the  FROZEN FOODS setting and the ‘FRESH’ symbol is displayed on the LCD screen, the setting will remain in the memory of the oven and be activated for each subsequent PIZZA cycle until the
  FROZEN FOODS button is pressed a second time, or the oven is unplugged from the wall outlet. When the oven is plugged back into the wall outlet, the function will automatically return to the preset PIZZA function with the
  FROZEN FOODS setting.
20
21

OPERATING
your Breville Smart Oven™
OPERATING your Breville Smart Oven™ - grill
Grill FUNCTION
Elements
Top heating elements cycle on and off to regulate the correct temperature.
Recommended Rack Position
Top rack height position.
Optional Settings
The grill function is ideal for open sandwiches, small cuts of meat, poultry, fish, sausages and vegetables. Grilling can also be used to brown the tops of casseroles and gratins.
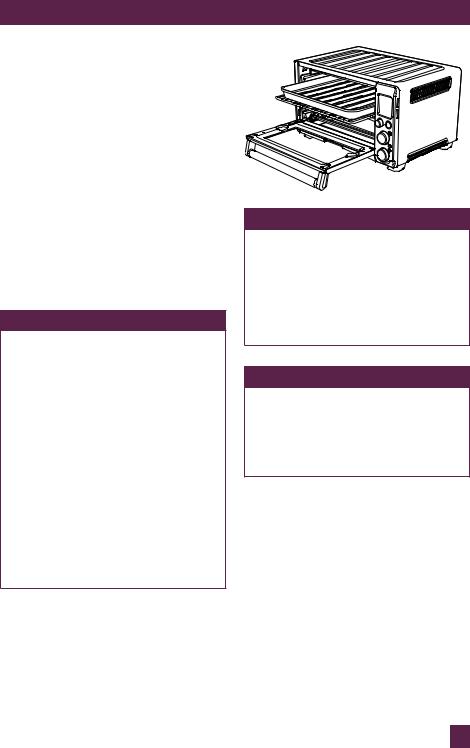
1.Insert the wire rack into the top rack height position. The wire rack should be positioned with the spokes facing upwards.
NOTE
We recommend using the top rack height position during the GRILL function. However this is a guide only. Certain foods may require the middle rack height position depending on the recipe, the amount and size of the food and your personal taste.
For example, the middle rack height position may be more appropriate for taller foods that may touch the heating elements, thicker foods such
as hamburger patties, marinated foods such chicken wings, or foods that require a gentle grill.
We recommend experimenting with the rack height position, as well as the temperature and time settings to produce the desired results.
2.Insert the Breville enamel grill rack into the enamel baking pan. Place food on the assembled grill rack or in an ovenproof dish, then place on the centre of the wire rack so air flows around the sides of the food.
NOTE
When grilling, the enamel grill rack must be inserted into the Breville enamel baking pan. When assembled together, the grill rack is designed to drain grease and fats away from meats for healthier cooking. The baking pan collects these pan drippings and helps prevent spattering.
NOTE
Caution should be exercised when using pans and dishes constructed of materials other than metal. If using ceramic or glass pans or dishes it is important that they are oven safe to prevent cracking.
3. Close the oven door.
 WARNING
Always ensure the oven door is completely Closed when using the grill function.
23

OPERATING your Breville Smart Oven™ - grill
4.Turn the FUNCTION dial until the indicator on the LCD screen reaches the GRILL function. The top figure on the LCD screen indicates the preset High Setting, while the bottom figure on the LCD screen indicates the preset time of ‘:10 MINS’.
5.The grilling temperature and time can be adjusted before or during the grilling cycle.
a)The grilling temperature is displayed as the top figure on the LCD screen. Turn the TEMPERATURE DIAL to adjust grilling to one of three preset settings Hi (High), Med (Medium), Lo (Low).
NOTE
The three preset grilling temperatures allow you to change the grilling speed – how quickly the tops of
your food brown - depending on the food to be grilled, quantity of food and your personal taste. While we suggest most foods should be grilled using the preset ‘HI’, we recommend experimenting with the grilling temperature and time settings to produce the desired results.
b)The grilling time is displayed as the bottom figure on the LCD screen. Turn the TIME dial to adjust the grilling time in one minute increments up to a maximum of 20 minutes.
Type/Cut |
Weight / |
Grilling |
|
thickness |
time |
|
|
|
Beef |
|
|
Sirloin |
(2.5cm) |
12-15 mins |
Hamburger |
(2.5cm) |
10-15 mins |
|
|
|
Pork |
|
|
Chops |
(2.5cm) 1” |
15 mins |
Ribs |
1 rack |
20 mins |
Bacon |
3 rashers |
10 mins |
|
|
|
Lamb |
|
|
Neck chops |
4 pieces |
15 mins |
Cutlets |
8 pieces |
10-12 mins |
|
|
|
Sausages |
|
|
Thin |
8 pieces |
8 mins |
Thick |
6 pieces |
12 mins |
|
|
|
Chicken |
|
|
Wings |
500g (1lb) |
12-15 mins |
Breast or |
|
|
Thigh |
250g (0.5lbs) |
15-20 mins |
|
|
|
Fish |
250g (0.5lbs) |
8 mins |
|
500g (1lb) |
8-10 mins |
|
|
|
Cheese Melt |
|
3-5 mins |
|
|
|
NOTE
Depending on the food being grilled, it may be necessary to turn food over half way through the cooking time to achieve even cooking and browning.
24
 Loading...