Breville BPR200 User Manual
Breville Fast Slow Cooker™
Instruction Booklet
BPR200

CONGRATULATIONS
On the purchase of your new Breville Fast Slow Cooker™

Contents
4 Breville recommends safety first
7Know Your Breville Fast Slow Cooker™
10 Quick Start Guide
12 Before first use
16Operating Your Breville Fast Slow Cooker™
22Pressure cooking guide & converting conventional recipes
38 Care and cleaning
42 Troubleshooting
44 Recipes
3

Breville recommends safety first
At Breville we are very safety conscious. We design and manufacture consumer products with the safety of you, our valued customer, foremost in mind. In addition we ask that you exercise a degree of care when using any electrical appliance and adhere to the following precautions.
Important safeguards
Read all instructions BEFORE USE AND SAVE FOR FUTURE REFERENCE
•Remove and safely discard any packaging material and promotional labels before using the Breville Fast Slow Cooker for the first time.
•To eliminate a choking hazard for young children, remove and safely discard the protective cover fitted to the power plug of this appliance.
•Do not immerse appliance base, power cord or plug in water or any other liquid.
•Always insert the connector end of the power cord into appliance inlet inserting power plug into power outlet
and switching on appliance. Ensure the appliance inlet is completely dry before inserting the connector end of the power cord.
•This appliance cooks under pressure. Improper use may result in injury. When using this appliance for any function other than sauté, ensure the lid is properly assembled and locked into position before use.
•Do not place Breville Fast Slow Cooker near the edge of a bench or table during operation. Ensure that the surface is level, clean and free of water and
other substances.
•Do not operate Breville Fast Slow Cooker on a sink drain board.
•Do not move Breville Fast Slow Cooker when in use.
•Do not place this appliance on or near a hot gas burner, electric element or where it could touch a heated oven. Position Breville Fast Slow Cooker at a minimum distance of 20cm away from walls and provide adequate space above and all sides for air circulation.
•Keep the Breville Fast Slow Cooker clear of walls, curtains and other heat or steam sensitive materials.
•Do not touch hot surfaces. Use handles on the sides of appliance and on lid. Use the button to release steam pressure.
•Always ensure Breville Fast Slow Cooker is properly assembled before use. Follow the instructions provided in this book.
•Before placing removable cooking bowl into stainless steel base ensure base of bowl and base of appliance is dry by wiping with a dry soft cloth.
•Do not place food or liquid directly into stainless steel base. Only removable cooking bowl is designed to contain food or liquid.
•Never operate Breville Fast Slow Cooker without food and liquid in the removable cooking bowl. Ensure removable cooking bowl is not below the '2' level mark or 1⁄3 full of food and/or liquid not filled over 2⁄3 full before switching on appliance. Always follow the maximum and minimum quantities of liquid stated in instructions and recipes.
4

Breville recommends safety first
•Do not exceed maximum fill level. Some foods expand during pressure cooking such as rice, died vegetables, do not fill removable cooking pan over ½ full. Over filling may cause a risk of clogging pressure release valve and pressure indicator valve and develop excess pressure.
•Do not use a damaged removable cooking bowl. Replace before using.
•Ensure that lid is properly closed before operating. (see step 4 page 19-20)
•Do not use Breville Fast Slow Cooker for other than it’s intended use. Do not attempt to operate Breville Fast Slow Cooker by any method other than those described in this book.
•Some foods to avoid when pressure cooking are; apple sauce, cranberries, pearl barley, oatmeal and other cereals, noodles and pasta, and rhubarb; these foods can foam, froth and splatter and clog the pressure release valve and pressure indicator valve.
•Removable cooking bowl can be extremely heavy when full of ingredients, care should be taken when lifting from Breville Fast Slow Cooker base.
•Always check pressure release valve and pressure indicator valve for clogging before use and clean if necessary. Check to make sure the pressure indicator rod moves freely from under the lid.
•Extreme caution must be used when appliance contains hot food and liquids and/or is under pressure. Improper use may result in injury. When using this appliance for any function except sauté, make sure the lid is properly locked before operating.
•Do not use the lid handle to carry appliance when in use and after use.
•Do not attempt to open Breville Fast Slow Cooker lid after pressure
cooking until all internal pressure has been released and is slightly cooled. If the lid will not turn to unlock, this indicates that appliance is still under pressure – do not force lid open. Any pressure remaining can be hazardous. See operating instructions for “steam release” directions in this instruction book. (see step 10-12 page 20)
•Always ensure that removable cooking bowl has cooled sufficiently before handling and use oven mitts as a precaution.
•The Breville Fast Slow Cooker is not intended to be operated by means of an external timer or separate remote control system.
•Do not place anything, other than lid, on top of Breville Fast Slow Cooker when assembled, when in use and when stored.
•Do not adjust the “Pressure Regulator” whilst in use.
•Use only recommended “Steam Release” to depressurize cooker after use. (see step 10-12 page 20)
•Do not use this appliance cooker for deep frying.
•Do not sauté or shallow fry under pressure.
•Always ensure there is enough liquid in removable cooking bowl when steaming. At least 4 cups (1 litre) of liquid is required when cooking under pressure or steaming.
•Always ensure START/CANCEL has been pressed to CANCEL, then turn the power off at the power outlet and remove power plug from the power outlet before attempting to move the appliance,
when appliance is not in use and before cleaning and storing.
5

Breville recommends safety first
•To protect against electric shock, do not immerse Breville Fast Slow Cooker base, power base, power cord or power plug in water or allow moisture to come in contact with these parts.
•Keep Breville Fast Slow Cooker clean. Follow the cleaning instructions provided in this book. (see page 38)
IMPORTANT SAFEGUARDS FOR ALL ELECTRICAL APPLIANCES
•Fully unwind the power cord before use.
•Do not let the power cord hang over the edge of a bench or table, touch hot surfaces or become knotted.
•To protect against electric shock do not immerse the power cord, power plug or appliance in water or any other liquid.
•The appliance is not intended for use by persons (including children) with reduced physical, sensory or mental capabilities, or lack of experience and knowledge, unless they have been given supervision or instruction concerning use of the appliance by a person responsible for their safety.
•Children should be supervised to ensure that they do not play with the appliance.
•It is recommended to regularly inspect the appliance. To avoid a hazard do not use the appliance if power cord, power plug or appliance becomes damaged in any way. Return the entire appliance to the nearest authorised Breville Service Centre for examination and/or repair.
•Any maintenance other than cleaning should be performed at an authorised Breville Service Centre.
•This appliance is for household use only. Do not use this appliance for anything other than its intended use. Do not use in moving vehicles or boats. Do not use outdoors. Misuse may cause injury.
•The installation of a residual current device (safety switch) is recommended to provide additional safety protection when using electrical appliances. It
is advisable that a safety switch with a rated residual operating current not exceeding 30mA be installed in the electrical circuit supplying the appliance. See your electrician for professional advice.
SAVE THESE INSTRUCTIONS
6

KNOW
your Breville Fast Slow Cooker™

KNOW YOUR BREVILLE FAST SLOW COOKER
B
C
A
I
D
J
E
F
K 
 L
L
M
G
H
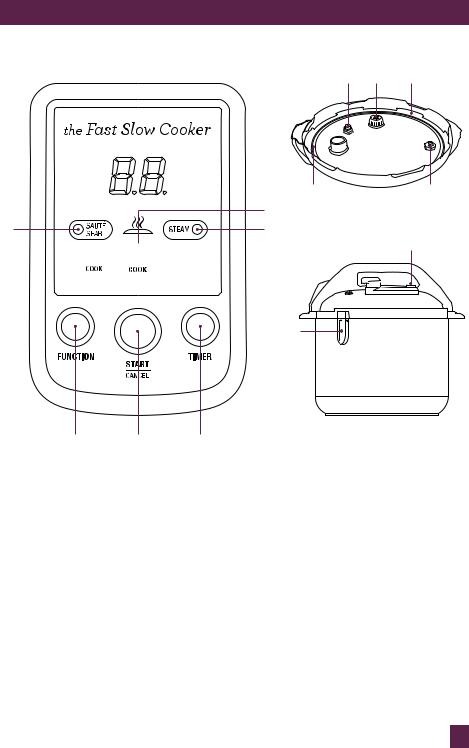
A.Lid Handle
B.Pressure Regulator/Release valve
Controls rate at which steam vents out of cooker and subsequently degree of pressure inside the cover.
C.Adjustable Pressure Control/Dial
Choose from Low, Medium or High.
D.Safety Locking Lid
Can not be opened whilst pressure cooking. Not dishwasher safe.
E.6 Litre Removable Non-stick Cooking bowl. Dishwasher Safe.
F.Cool Touch Handles
G.Brushed Stainless Steel Base & Lid
H.Removable Power Cord
For serving at table & easy storage.
Accessories
I.Stainless Steel Steaming Basket
Dishwasher safe.
J.Stainless Steel Trivet
Raises food out of liquid for roasting, steaming and pressure cook or slow cook settings.
K.Rice Duo Measuring Cup
L.Serving Spoon
M.Heat Resistant Spatula
To avoid scratching non stick surface of cooking bowl.
8
KNOW YOUR BREVILLE FAST SLOW COOKER
R S T
Q U
c)
a) |
d) |
 V b)
V b) 


 e)
e) 

W
N O P
Control Panel
N.Function button
Press to select desired cooking method.
Setting selection
a)SAUTE/SEAR Indicator Light Sear and brown meats plus saute onions and garlic, before pressure cooking or slow cooking.
b)SLOW COOK Indicator Light Select from 6 hours or 8 hours.
c)PRESSURE COOK Indicator Light
d)STEAM Indicator Light
e)WARM Indicator Light Automatic or manual.
O.Start/Cancel button
P.Timer button
Counts down remaining cooking time.
Q.Silicone Rubber Sealing Gasket
Dishwasher safe.
R.Pressure Safety Valve
S.Pressure Release Valve Cover
T.Gasket Holder
U.Pressure Indicator
Rod pops up once pressure is reached acting as a safety device.
V.Steam Release button
Press the button in short bursts until pressure indicator rod drops down, then the lid can be opened.
W.Steam Condensation Collector
Dishwasher safe.
9
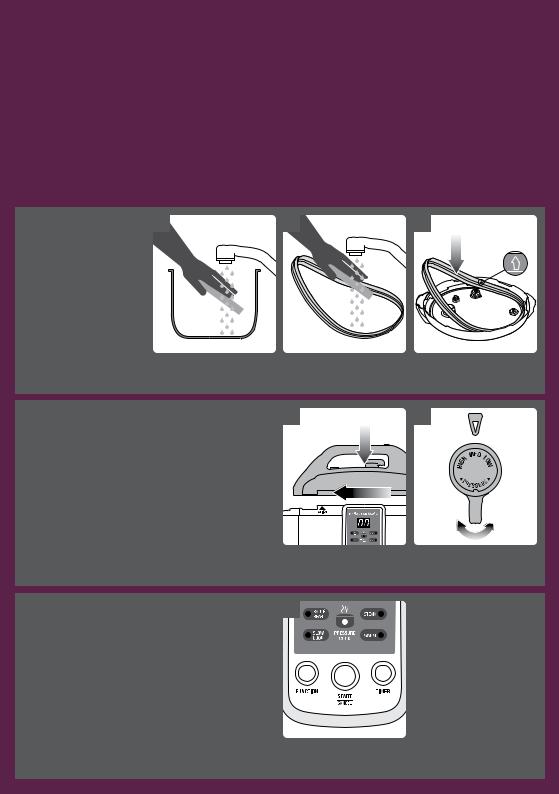
Quick Start Guide
This Quick Start Guide is designed for first time use.
For safety and more information, refer to your Instruction Booklet.
A
Before
First Use
Preparing the Fast Slow Cooker for use
Remove Lid. Wash non-stick |
Wash silicone rubber gasket. |
Return dry clean silicone rubber |
cooking bowl. |
|
gasket securely back to gasket |
|
|
holder. Ensure arrows are facing up. |
B
How to Pressure Cook
1
2
Place food to be cooked into removable cooking bowl with 1L minimum liquid.
Close and lock lid in a clockwise direction by aligning arrows.
Select Pressure setting using Pressure Control Dial on lid handle (Low, Medium, High).
Ensure Pressure Regulator Release Valve is turned to Pressure position.
Press FUNCTION button until the Pressure Cook indicator light flashes.
Press TIMER Button – select from 02 to 99 minutes.
Press START/CANCEL button to start Pressure Cooking – indicator light will stop flashing.

C
How to Sear
D
How to Slow Cook
Press FUNCTION button until |
Press TIMER Button – select from |
Press START/CANCEL button to |
SAUTÉ/SEAR function indicator |
02 to 99 minutes. |
start cooking – indicator light will |
light flashes. |
|
stop flashing. |
1
1
2
|
|
|
|
|
|
|
|
|
|
|
|
|
|
|
|
|
|
Press FUNCTION button until |
Press TIMER button and select |
||||||||||||
|
|
||||||||||||||
Close and lock lid in a clockwise |
|||||||||||||||
direction by aligning arrows. |
SLOW COOK indicator light flashes. |
either 6 or 8 hours. |
|||||||||||||
E
How
to Steam
Press START/CANCEL button to start SLOW COOKING – indicator light will stop flashing.
Place steaming basket on to trivet and position inside cooking bowl.
Repeat steps (1) to (3) in How To Pressure Cook. Place food into steaming basket.
Select FUNCTION button until STEAM function indicator light flashes.
Press TIMER Button – select from 02 to 99 minutes.
Press START/CANCEL button to start STEAMING – indicator light will stop flashing.
Australia
1300 139 798
New Zealand
0800 273 845
 HELP!
HELP!
Refer to the Instruction Book or Contact Customer Service.

BEFORE FIRST USE
of your Breville Fast Slow Cooker™
Before first use
Preparing the fast SLOW
COOKER for use
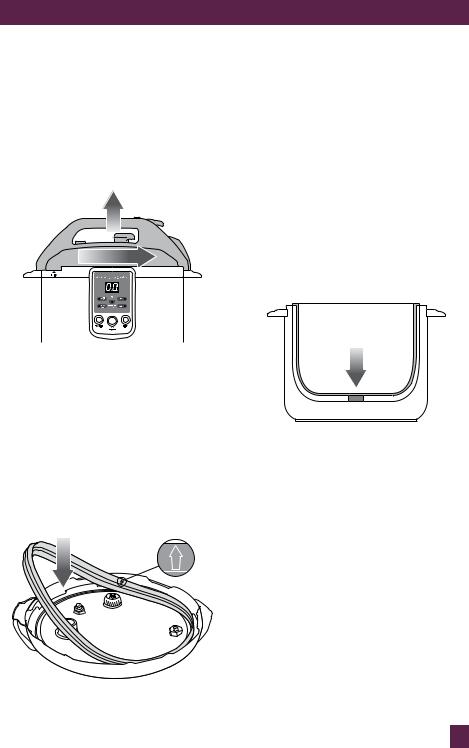
1.Before first use, remove all promotional labels and packing materials and discard in a safe place to avoid a choking hazard.
2.Remove the lid by taking hold of the handle, turning it counter clockwise and lifting the lid up and off the appliance.
2
1
3.Wash the removable cooking bowl, stainless steel lid and silicone rubber gasket in hot, soapy water, rinse and dry thoroughly. Wipe the inside and the outside of the stainless steel base with a soft, damp cloth, then dry thoroughly.
4.Attach the clean silicone rubber gasket securely back into the gasket holder using the indicated arrows as a guide. Ensure that the arrows is facing up when inserting into the lid.
 Warning:
If the silicone rubber gasket is not correctly fitted back into the gasket holder, the lid will not close and it will result appliance malfunction and stop the pressure cooker from operating.
5.Clean and dry the bottom of the removable cooking bowl as well as the temperature sensor, making sure
there are no unwanted materials on the surface. The removable cooking bowl must sit flat on the temperature sensor to ensure proper contact.
13

Before first use
DO’S
•Always thaw frozen meat and poultry before cooking.
•Use dry oven mitts when lifting the removable bowl after cooking.
•Always store Breville Fast Slow Cooker in a cool, dry place.
DONT’S
•Do not operate any of settings without removable cooking bowl in position.
•Do not cook with frozen meats or poultry.
•Do not remove stainless steel lid when using the Slow Cook setting
unnecessarily as this will result in major heat loss.
NEVER
•Place water or other liquids into the stainless steel base of Breville Fast Slow Cooker.
•Immerse base, cord, or plug of Breville Fast Slow Cooker in water or any other liquid.
•Touch hot surfaces with bare hands.
•Deep fry in Breville Fast Slow Cooker.
•To prevent aromas, moulds and odours, never store your Breville Fast Slow Cooker closed with lid locked in place. Follow the care and cleaning guidelines on page 36. Pack and store with lid resting upside down on removable cooking bowl in a well ventilated area.
14

hints and tips before pressure cooking & slow cooking
PREPARING MEAT AND POULTRY
Select cuts of meat suitable for slow cooking and pressure cooking and trim meat or poultry of any visible fat and excess skin. Excess fat will result in extra liquid being formed as it melts and cooks.
For casserole type recipes, cut meat into cubes, approximately 3-5cm.
Pressure Cooking and Slow cooking allows less tender cuts of meat to be used. Such as beef cheeks, pork shoulder, and veal shanks. The bones can be left on meat or poultry and this will help to keep meat tender during cooking and enrich flavour of finished dish.
Suitable meat cuts for pressure cooking and slow cooking
beef |
lamb |
veal |
pork |
|
|
|
|
Chuck, skirt, round |
Shanks, drumsticks |
Diced leg, shoulder/ |
Leg steaks, diced |
steak, boneless shin |
(frenched shanks), |
forequarter chops and |
belly, Diced shoulder, |
(Gravy) beef, bone-in- |
neck chops, boned out |
steaks, neck chops, |
Boneless loin chops |
shin (Osso Bucco). |
forequarter or shoulder. |
knuckle (osso bucco) |
|
|
|
|
|
PREPARING VEGETABLES
Vegetables should be cut into even-sized pieces to ensure more even cooking.
Frozen vegetables must be thawed before adding to other foods when cooking in the Breville Fast Slow Cooker
Peel vegetables when appropriate. Keep in mind that hard vegetables like potatoes and beetroots hold shape better when peel is left intact.
PREPARING DRIED PULSES (BEANS AND PEAS)
If time permits, soak pulses in ample water and cover for 6 to 8 hours or overnight. After soaking, drain and rinse. Place pulses in Breville Fast Slow Cooker and cover with water or stock at least 5cm above the level of pulses.
Onions, bay leaves and garlic can be added to flavour the pulses and broth. Do not add salt. Adding salt at the beginning may harden the skins of beans and peas and prevent proper cooking.
NOTE
Refer to cooking charts for cooking times.
 IMPORTANT
•Softer Pulses such as; mung beans, lima beans and butter beans are best cooked using LOW AND MEDIUM pressure
•When PRESSURE COOKING AND SLOW COOKING the resulting juices and liquids created by cooking may need to be evaporated and concentrated. We suggest that the SAUTE/SEAR function should be used for approx 5-10 minutes depending on amount of liquids required to be reduced.
15

OPERATING
your Breville Fast Slow Cooker™

A beginNer's guide to sautÉ and sear
SAUTEING AND SEARING
BEFORE PRESSURE COOKING & SLOW COOKING
Sautéing and Searing in Breville Fast Slow Cooker may take a little extra time and whilst not strictly necessary, the rewards are evident in the end result.
Saute and Sear setting keeps the heat stable, browning meat and caramelising vegetables. This seals in the moisture, tenderises and intensifies the flavour.
Hint and Tips
•Trim all visible fat from meat or poultry.
•If a recipe calls for browning meat, it may be browned using SAUTÉ/SEAR setting.
•If after cooking the liquid quantity is excessive, remove the lid and operate Breville Fast Slow Cooker on SAUTÉ/ SEAR setting for approximately 10-15 minutes or until the liquid reduces by the desired amount.
How to Sauté and Sear
1.Remove power cord, connect it to pressure cooker base and insert power cord to 230/240 volt power outlet. A single beep will sound and 0:0 will be displayed on LED display.
2.Click steam condensation collector into place.
3.Always ensure the lid is removed from pressure cooker before sautéing or searing.
4.Press Function Button until SAUTÉ/ SEAR indicator light flashes red.
5.Press TIMER button to increase time from 02 minutes to maximum 99 minutes. To fast advance time, press and hold TIMER button until desired time is displayed.
17

A beginner's guide to SAUTÉ AND SEAR
6.When desired cooking time is displayed, press START/CANCEL button. SAUTÉ/ SEAR indicator light will stop flashing and will illuminate a solid red. The count down timer will commence. Allow Breville Fast Slow Cooker to heat with the lid off for approximately 2-3 minutes before cooking.
7.Add a small amount of oil or butter to removable cooking bowl.
8.Place food to be sautéd/seared into cooking bowl. Depending on quantity of food, meat searing may need to be done in batches.
9.When finished sautéing or searing, select PRESSURE COOK or SLOW COOK by pressing FUNCTION button. (Refer to pressure cook or slow cook 'How to ' section on page 17-26 and page 29-31).
 IMPORTANT
•SAUTÉ/SEAR function will not work if lid is sealed and locked in position. An audible alarm will sound. “E3” error code will appear on LED display to signal the need to unlock or remove the lid.
•Stir food in removable cooking bowl, using heat resistant spatula supplied.
•Do not use metal utensils because they will scratch non stick coating on the removable cooking bowl.
•Do not heat removable cooking bowl when empty for more than 10 minutes as it may damage the cooking surface.
•Caution should be used when searing meats and sautéing in hot oil. Keep hands and face away from the removable cooking bowl especially when adding new
ingredients as hot oil may splatter.
18
A beginner's guide to pressure cooking
A Beginner’s Guide to
Pressure Cooking
Pressure cookers are back in the forefront again. These time savers are wonderful for cooking succulent roasts, flavoursome casseroles, delicious soups and even
desserts in a fraction of the time and energy they take by conventional methods.
Pressure Cooking is a method of cooking food in a small amount of liquid with a gasket sealed lid that retains steam inside and builds pressure. It is the increase in pressure that raises temperature of the liquid and steam inside to well above boiling point and therefore allows food to be cooked up to 70% faster.
This means less energy is consumed and you will enjoy substantial savings in both time and cost. Because pressure cooked foods require very little cooking
liquid, more vitamins, minerals, and other nutrients are retained and the natural flavours are enhanced.
How to Pressure Cook
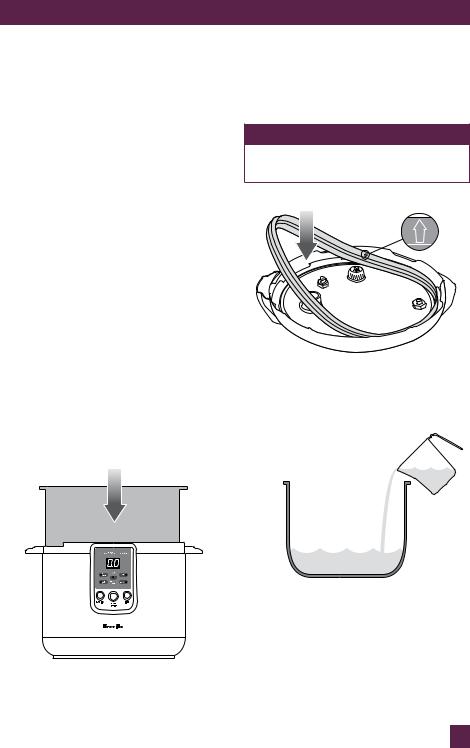
1.Place removable cooking bowl into stainless steel base.
2.Attach clean silicone rubber gasket securely into gasket holder using the indicated arrows as a guide. Ensure that the arrows are facing up when inserting into the lid.
NOTE
Fit silicone rubber sealing gasket into lid if not already in place.
3.Place food to be cooked in a 1 litre (4 cups) minimum liquid into removable cooking bowl.
1L
MINIMUM
19
HOW TO PRESSURE COOK
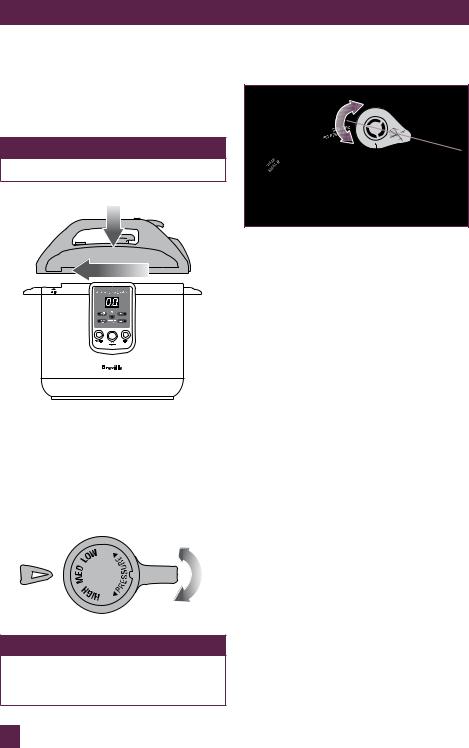
4.Close and lock lid by using the handle. Close lid in a clockwise direction by aligning “ALIGN” arrows. The Lid arrow should align with stainless steel base arrow until it locks into place and is in the CLOSE position.
NOTE
This should be effortless!
1
2
5.Select one of the following settings using the Pressure Control dial located on the handle:
−−Low (Low Pressure)
−−Medium (Moderate Pressure)
−−High (High Pressure)
NOTE
Refer to Pressure Cooking guide and recipes on page 22-28 and page 44-63 and recipes.
6.Ensure Pressure Regulator Release Valve is turned to PRESSURE position.
Pressure |
Pressure |
Release |
Safety |
Valve |
Valve |
The illustration above shows the correct Pressure Release Valve position.
You may need to adjust the Pressure Release Valve until it is in the correct position.
7.Press FUNCTION button until PRESSURE COOK indicator light flashes red.
8.To set TIMER; press TIMER button to increase cooking time. This will be illuminated on LED display from 02 minutes to maximum 99 minutes. To
fast advance time, press and hold down TIMER button. When desired cooking time is displayed, press START/ CANCEL button.
The function indicator light will stop flashing and will illuminate a solid red. Preheating will begin, control panel will continue to display selected cooking time. As selected pressure setting is achieved, there will be a slight hissing of steam from pressure regulator release
valve. After approximately 10 minutes, or more depending on the amount of liquid added to cooking bowl, selected cooking time will begin to count down in minutes and this is shown on LED display.
9.When LED displays “0” cooking has finished. Breville Fast Slow Cooker will sound 5 beeps.
20
 Loading...