


the Handy Stand Mixer™
Instruction Booklet
Suits all BHM600 models

CONGRATULATIONS
on the purchase of your new Breville Handy Stand Mixer™

Contents
4 Breville recommends safety first
7 Know your Handy Stand Mixer™
10Assembly and operation
of your Handy Stand Mixer™
Care, cleaning and storage
Measuring and weighing
Hints and tips
Recipes
3

Breville recommends safety first
At Breville we are very safety conscious. We design and manufacture consumer products with the safety of you, our valued customer, foremost in mind. In addition we ask that you exercise a degree of care when using any electrical appliance and adhere to the following precautions.
Important safe guards for your Breville Handy Stand Mixer™
Carefully read all instructions before operating the appliance and save for future reference.
•Carefully read all instructions before operating the Breville Handy Stand Mixer™ for the first time and save for future reference.
•Remove and safely discard any packaging material and promotional labels before using for the first time.
•To eliminate a choking hazard for young children, remove and safely discard the protective cover fitted to the power plug of this appliance.
•Do not place the bench mixer near the edge of the bench or table during operation. Ensure the surface is level, clean and free of water and other
substances. Vibration during operation may cause the appliance to move.
•Do not use the Breville Handy Stand Mixer™ on a sink drain board.
•Do not place the Breville Handy Stand Mixer™ on or near a hot gas or electric burner, or where it could touch a heated oven.
•Always ensure the Breville Handy Stand Mixer™ is completely assembled before operating. Follow the instructions provided in this booklet.
•Ensure the control switch is in the OFF position and the Breville Handy Stand Mixer™ is switched off at the power outlet and the power cord is unplugged
before attaching the beaters or dough hooks.
•Do not use attachments other than those provided with the Breville Handy Stand Mixer™. Use only the beaters and dough hooks supplied with this mixer.
•Do not operation this appliance continuously on heavy loads for more than 3 minutes. None of the recipes in this book are considered a heavy load.
•Handle the Breville Handy Stand Mixer™ and attachments with care. Never place your fingers inside the mixing bowl or near the beaters or dough hooks
during operation.
•Keep hands, hair, clothing as well as spatulas and other utensils away from moving beaters or dough hooks during operation.
•Should an object such as a spatula or spoon fall into the bowl while mixing, immediately turn the mixer stand control switch to the OFF position, turn the hand mixer control switch to the 'off' position, unplug at the power outlet and remove the object.
•Do not place hands in the mixing bowl unless the Handy Stand Mixer™ is disconnected from the power outlet. Ensure that the control switch are in the OFF position, the Breville Handy Stand Mixer™ is switched off and unplugged from the power outlet before removing the beaters and dough hooks.
•Ensure the motor, beaters or dough hook have completely stopped
before disassembling.
4

Breville recommends safety first
•Always remove the beaters or dough hooks from the Breville Handy Stand Mixer™ before cleaning.
•Care should be taken when removing food from the bowl by ensuring the motor and the beaters or dough hooks have completely stopped before disassembling. Ensure the control switch is in the OFF position; the appliance
is switched off at the power outlet and unplugged before unlocking the mixer motor head before moving it in the up right position. The beaters or dough hooks should be released from the mixer motor head before removing the mixed food from the mixer bowl and the beaters and dough hooks.
•Ensure the mixer motor head is locked into the horizontal (closed) position when not in use and before storing.
•Always ensure the Control Switch is in the OFF position, the power is switched off at the power outlet and the power cord is unplugged from the power outlet before attempting to move the appliance, before assembling or disassembling the mixer, when the mixer is not in use and before cleaning or storing.
•Do not move the Breville Handy Stand Mixer™ whilst in operation.
•The use of any accessory attachments not recommended by Breville may cause injuries.
•Do not leave the mixer unattended when in use.
•Do not place any part of the Breville Handy Stand Mixer™ except the spatula in the dishwasher.
•Keep the appliance clean. Follow the cleaning instructions provided in this book.
SAVE THESE INSTRUCTIONS
IMPORTANT SAFEGUARDS FOR ALL ELECTRICAL APPLIANCES
•Carefully read all instructions before operating the appliance and save for future reference.
•Remove and safely discard all packaging material and promotional labels before using the appliance for the first time.
•Fully unwind the power cord before use.
•Do not let the power cord hang over the edge of a bench or table, touch hot surfaces or become knotted.
•To protect against electric shock, do not immerse the power cord, power plug or appliance in water or any other liquid, unless it is recommended in the cleaning instructions.
•The appliance is not intended for use by persons (including children) with reduced physical, sensory or mental capabilities, or lack of experience and knowledge, unless they have been given supervision or instruction concerning use of the appliance, by a person responsible for their safety.
•Children should be supervised to ensure that they do not play with the appliance.
•It is recommended to inspect the appliance regularly. Do not use the appliance if the power supply cord, plug, connector or appliance becomes damaged in anyway. Return the entire appliance to the nearest authorised Breville Service Centre for examination and/or repair.
•Any maintenance other than cleaning should be performed at an authorised Breville Service Centre.
5

Breville recommends safety first
•This appliance is for household use only. Do not use this appliance for other than its intended use. Do not use in moving vehicles or boats. Do not use outdoors. Misuse may cause injury.
•The installation of a residual current device ( safety switch) is recommended to provide additional safety protection when using electrical appliances. It
is advisable that a safety switch with a rated residual operating current not exceeding 30mA be installed in the electrical circuit supplying the appliance. See your electrician for professional advice.
•Always turn the appliance to the OFF position, switch off at the power outlet and unplug at the power outlet when the appliance is not in use.
•Before cleaning, always turn the appliance to the OFF position, switch off at the power outlet, unplug at the power outlet and remove the power cord, if detachable, from the appliance and allow all parts to cool.
•Do not place this appliance on or near a hot source, such as hot plate, oven or heaters.
•Position the appliance at a minimum distance of 20cm away from walls, curtains and other heat or steam sensitive materials and provide adequate space above and on all sides for
air circulation.
 IMPORTANT
Ensure the control switch is in the OFF position, the mixer is switched off at the power outlet and unplugged from the power outlet before attaching the beaters or dough hooks.
SAVE THESE
INSTRUCTIONS
6

KNOW
your Breville Handy Stand Mixer™

KNOW YOUR BREVILLE Handy Stand Mixer™
F&L |
E G |
D
C
M
I
H
K
B
A
J
8

KNOW YOUR BREVILLE Handy Stand Mixer™
A.Handy Stand Mixer™
That is also a hand mixer. The compact hand mixer is great for light and easy jobs. The ultimate convenience.
B.Two motors
One motor that drivers the beaters and one motor that drives the mixer bowl, for better control and performance on any task, even under heavy loads.
C.12 speeds - LCD display
Shows you the speed 1-12 plus boost (12).
D.Timer – LCD display
Has a count up timer, which displays how long you have been mixing for.
E.Mixer Stand (Hand Mixer)
Easily remove the head for a convenient compact hand mixer.
F.Spring loaded, Soft touch tipped beaters
Safely scrape the bottom of the bowl for increased volume.
G.Beaters/dough hooks release button
H.Tilt back button
Allows the hand mixer to be tilted out of the mixer bowl.
I.Hand mixer release button.
J.Mixer stand
Bench mixer.
K.Motorised bowl
Spins the bowl against the beating action to get through even the thickest mix.
L.Twin beater action
Spring loaded, soft tipped to get you closer to the bowl.
M.Boost button
For a burst of power.
Accessories
Stainless steel
3.5L mixing bowl.
Dough Hooks
For kneading breads and pizza doughs.
ON/OFF control switch
On hand mixer.
Off/ Low/ High control switch
On mixer stand.
Spatula (not shown)
9

ASSEMBLY AND OPERATION
of your Breville Handy Stand Mixer™
assembly and operation
OPERATING YOUR BREVILLE
Handy Stand Mixer™
BEFORE FIRST USE
Machine Preparation
Remove and discard all labeling and packaging materials attached to your Handy Stand Mixer™. Ensure that you have removed all parts and accessories before discarding the packaging.
Clean parts and accessories using warm water and a gentle dish washing liquid and rinse well.
Ensure that the stainless steel bowl, dough hooks and beaters are washed in warm soapy water.
NOTE
When first using your Breville Handy Stand Mixer™ you may notice an odour coming from the motor. This is normal and will dissipate with use.
ASSEMBLING THE
Handy Stand Mixer™
1.Place the Handy Stand Mixer™ on a level dry surface such as a bench top. Ensure that both the hand mixer (mixer head) and the bowl motor dial is in the
off position.
2.Attach the mixer head to the mixer stand by aligning the two (2) pins in the top of the stand with the two (2) slots locate in the base of the hand mixer. Allow the hand mixer to slot into place. You will hear a locking noise which indicates that the hand mixer is in place.
NOTE
Make sure that the hand mixer is securely attached to the stand before using.
11

PAgeassemblyheaderand.....operation
ATTACHING THE BOWL
1.The stainless steel bowl can now be attached to the mixer stand. Place the bowl into the turntable and turning it to the LEFT until it locks into place. (Product graphic on the stand will show this).
ATTACHING THE BEATERS
1.Attach the beaters by pressing the tilt back button and lifting the hand mixer up until it stops.
2.Insert the beaters/dough hooks into the correct socket as shown on the front panel of the mixer head. The beaters should be inserted with a firm push until they click into place.
NOTE
It is important that the two beaters are fully inserted into their appropriate sockets or your Breville Handy Stand Mixer™ will not operate correctly.
ATTACHING THE DOUGH HOOKS
1.Attach the dough hooks by pressing the tilt back button and lifting the motor head until it stops.
2.Insert the dough hooks into the correct socket as shown on the underside of the mixer head. The dough hooks should be inserted with a firm push until they click into place.
NOTE
It is important that the two dough hooks are fully inserted into their appropriate sockets or your Breville Handy Stand Mixer™ will not operate correctly.
 CAUTION
Beaters/dough hooks must be inserted into the correct sockets as they are not interchangeable and incorrect insertion will result in damage.
12

PAgeassemblyheaderand.....operation
OPERATING YOUR BREVILLE
Handy Stand Mixer™
Twin beater Action
The Breville Handy Stand Mixer™ has 2 motors for superior and thorough mixing result. One motor controls and drives the beaters while the second motor drives the bowl in the opposite direction.
1.Ensure that the ON/OFF switch is set in the off position and that the motor head is securely attached to the mixer stand before using.
2.Insert the power cord into a 230/240V power outlet and switch the power on. Turn the mixer switch to the on position.
3.Press the tilt back button to lift the motor head.
4.Insert the stainless steel mixing bowl by placing it on the stand and rotating it in the clockwise direction to the
locking position.
5.Insert the beaters or dough hooks into the mixer head.
NOTE
There is a square and round beater. Please ensure that the right beater is inserted in the right slot, there is a
graphic on the mixer to indicate which beater goes in each slot. The round ended beater is inserted on the left hand side and the square ended beater is inserted on the right hand side.
6.Add ingredients to the mixing bowl supplied as listed in the recipe.
7.Press the tilt back button to lower the motor head down lowering in to the locking position.
13
PAgeassemblyheaderand.....operation
8.Commence mixing by pressing the
(+) speed button to the desired speed required. You will see the speed of the mixer on the LCD screen between the (+/-) speed buttons. Always begin mixing at a lower speed setting to prevent splattering. Increase to the speed suited to the mixing task. The speed setting can be adjusted during operation by pressing the (+) or (-) buttons. Use the mixing guide as
a reference.
9.To operate the motor base turn the dial to your desired setting. You can choose from OFF, Low or High.
10.Occasionally stop the mixer during operation and scrape any food mixture down the sides of the mixing bowl with a spatula.
11.When mixing is completed, press the (-) speed button until the LCD display “0” and switch the ON/OFF button to the OFF position.
12.Switch the appliance off at the power outlet and unplug the power cord.
13.Press the tilt back button and tilt motor head back on the mixer stand.
14.Remove the beaters/dough hooks by pressing the eject button on the front panel of the mixer head while grasping the shaft of the beaters.
The beaters/dough hooks will be released automatically. DO NOT try to pull the beaters/dough hooks out of the sockets. Use a spatula to remove mixture from the beaters/dough hooks.
USING THE HAND MIXING.
The hand mixer can be used on its own (not on the stand) for smaller quantities of ingredients or quick light tasks that need to be mixed. To use the hand mixer without the stand please follow the below instructions:
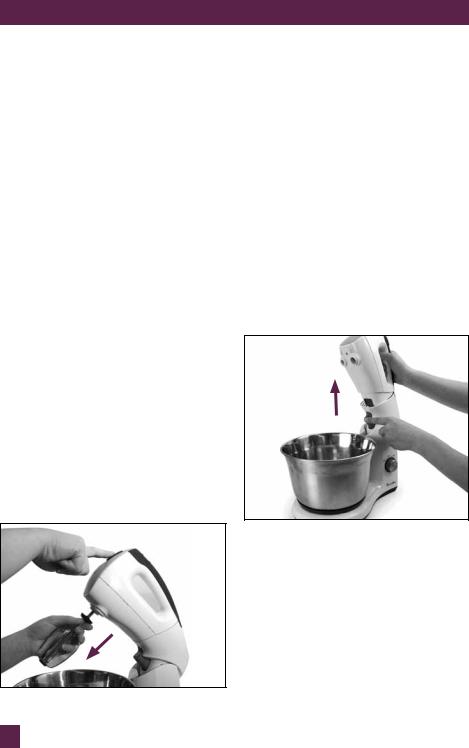
1.Press the tilt back button and tilt motor head back on the mixer stand.
2.On the inner side of the stand is a mixer head release button. Press this to remove the mixer head from the stand.
3.Ensure that the ON/OFF switch is set in the off position.
4.Add ingredients to the mixing bowl supplied as listed in the recipe.
5.Insert the power cord into a 230/240V power outlet and switch the power on.
6.Insert the beaters or dough hooks into the mixer head.
14
 Loading...