


BMO734XL

Breville Consumer Service Center
USA
Mail: Breville USA
19400 S. Western Ave
Torrance CA
90501-1119
Phone: 1-866-273-8455
1-866-BREVILLE
Email:
askus@brevilleusa.com
www.breville.com
Breville is a registered trademark of Breville Pty. Ltd. A.B.N. 98 000 092 928.
Due to continued product improvement, the products illustrated/photographed
in this booklet may vary slightly from the actual product.
Copyright Breville Pty. Ltd. 2013.
Canada
Mail: Breville Canada
2555, Avenue de l’Aviation
Pointe-Claire (Montreal)
Quebec H9P 2Z2
Phone:
1-855-683-3535
Email:
askus@breville.ca
BMO734XL - A13
the Quick Touch™
Instruction Booklet - Livret d’instructions
BMO734XL

CONGRATULATIONS
on the purchase of your Breville product
Register online for product support
and exclusive offers.
USA Consumers: www.brevilleusa.com
Canadian Consumers: www.breville.ca
*Registering is not a substitute for proof of purchase when submitting a Warranty Claim.
*

CONTENTS
4 Breville recommends safety first
12 Know your Breville product
14 Assembling your Breville product
17 Operating your Breville product
– Smart Cook setting 24
– Smart Reheat setting 32
– Smart Defrost setting 36
– A Bit More™ 39
– Shortcuts Panel 41
49 Hints & Tips
52 Care & Cleaning
54 Troubleshooting
3

BREvILLE RECOMMENdS SAfETy fIRST
WARNING
GROUNdING INSTRUCTIONS
• This appliance is equipped with a power
cord having a grounding wire with a
grounding plug. The appliance must
be grounded using a 3-hole properly
grounded outlet. In the event of an
electrical short circuit, grounding reduces
the risk of electric shock.
• Improper use of the grounding plug can
result in risk of electric shock.
• If the power outlet is a standard 2-prong
wall outlet, it is your personal responsibility
and obligation to have it replaced with a
properly grounded 3-prong wall outlet.
• Do not, under any circumstances, cut or
remove the third (ground) prong from the
power cord or use an adapter.
• Consult a qualified electrician if the
grounding instructions are not completely
understood, or if doubt exists as to whether
the appliance is properly grounded.
WARNING
If the door or door seals
are damaged, the oven
must not be operated
WARNING
Liquids and other foods
must not be heated
in sealed containers
since they are liable
to explode.
WARNING
Only allow children
to use the oven without
supervision when
adequate instructions
have been given so that
the child is able to use
the oven in a safe way
and understands the
hazards of improper
use.
until it has been
repaired by a trained
person.
9

BREvILLE RECOMMENdS SAfETy fIRST
WARNING
Do not attempt to
operate the oven with
the door open since
open-door operation
can result in harmful
exposure to microwave
energy. It is important
not to defeat or tamper
with the safety
interlocks.
WARNING
Do not place any object
between the oven front
face and the door or
allow soil or cleaner
residue to accumulate
on sealing surfaces.
WARNING
It is hazardous for
anyone other than an
Authorized Breville
Service Center to carry
out any service or
repair operation that
involves the removal
of a cover which gives
protection against
exposure to microwave
energy.
CAUTION
Surfaces may be hot
during and after use.
CAUTION
If the appliance is not
maintained in a good
state of cleanliness,
its surface could be
degraded and affect
the lifespan of the
product and lead to a
dangerous situation.
10

BREvILLE RECOMMENdS SAfETy fIRST
SPECIfICATIONS
POWER
SOURCE
POWER
CONSUMPTION
COOKING
POWER*
120V, 60Hz
1500W
1100W
OUTSIDE
DIMENSIONS
(W x D x H)
Overall
Oven Cavity
Dimensions
(W x D x H)
NET WEIGHT
OVEN
CAPACITY
20.5" x 18" x 12" (520mm
x 460mm x 312mm)
13" x 13" x 9" (335mm x
335mm x 228mm
Approx. 35lbs (15.9kg)
1.2 cu ft (34 Liters)
* IEC Test Procedure
These specifications may change
without notice.
11

KNOw
your Breville product
KNOw yOUR BREvILLE PROdUCT
A B C
D
E
F
G
H
I
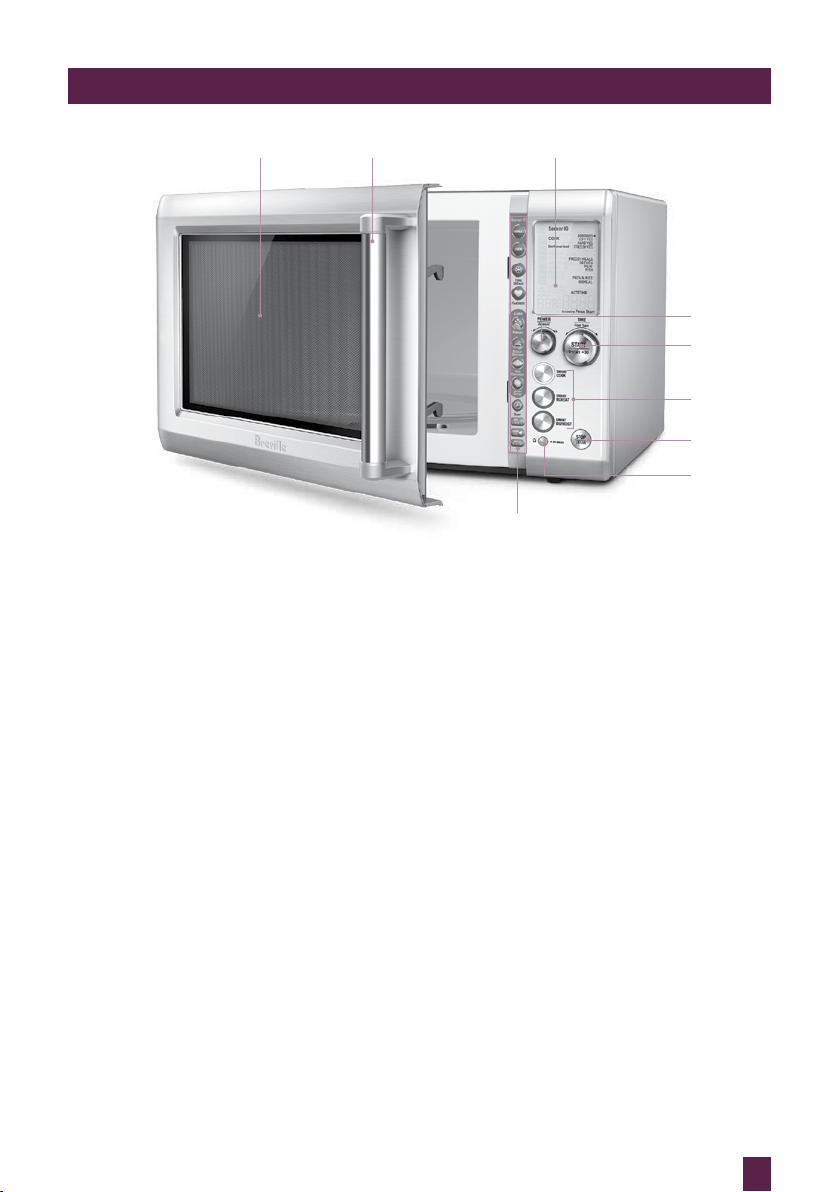
A. Viewing window
B. dooR HAndle
C. lARge lCd
D. AmoUnt diAl
Turn dial to adjust the power level,
weight & quantity that corresponds
with the food type selected.
E. +30 inStAnt StARt BUtton &
Food tYPe/ time diAl
Each press adds 30 second increments
at 100% power. Turn dial to select food type
or time.
F. SmARt Cook, ReHeAt & deFRoSt
BUttonS
Allows you to choose from a range of
common food types with predetermined
times and power levels for selected
weights.
G. StoP | CleAR BUtton
Press once to pause without cancelling the
program. Press twice to clear the display.
H. A Bit moRe™ BUtton & CHild loCk
Press once to add A BIT MORE™ time at
the end of the cooking cycle. Press and
hold for 3 seconds to set child lock.
I. SHoRtCUtS PAnel
Refer to operation section for
detailed explanation.
13

ASSEMBLING
your Breville product
ASSEMBLING yOUR BREvILLE PROdUCT
BEfORE fIRST USE
Before first use remove all promotional
stickers and packaging material. Carefully
unpack the microwave oven and keep all
the packing material until all the parts of the
microwave oven have been accounted for
and the appliance has been assembled. It is
recommended to keep all the packing material
in a safe place in case you wish to repack the
product for shipping or moving purposes.
To remove any dust that may have
accumulated during packing, wash the
turntable roller and glass turntable in warm
soapy water, rinse with clean water then dry
thoroughly. Wipe the interior and exterior of
the microwave oven with a soft, damp cloth
then dry thoroughly.
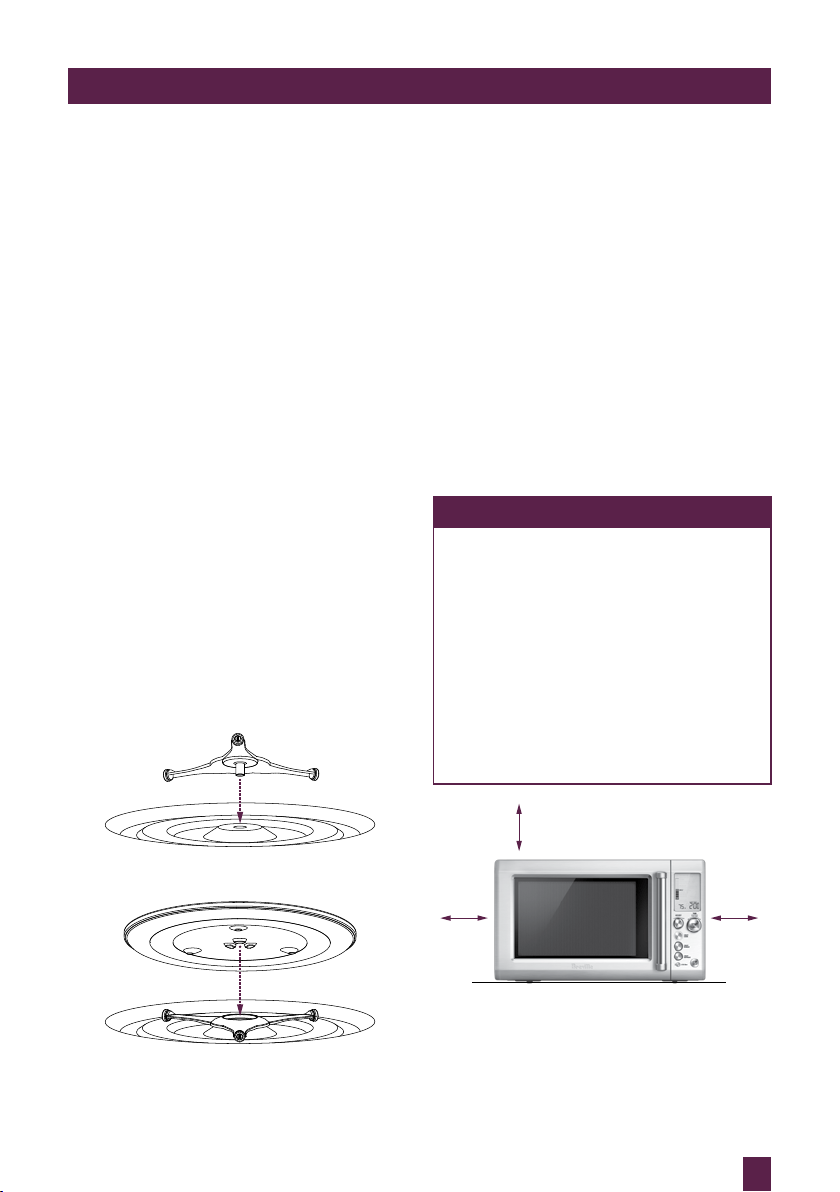
ASSEMBLING ThE GLASS
TURNTABLE ANd TURNING ON
ThE MICROwAvE OvEN
1. Insert the turntable roller into position in
the indented space in the oven cavity base.
2. Place the glass turntable on top of the
turntable roller, matching the indents of
turntable roller at the center area.
INSTALLATION
1. Select a level surface that provides
enough open space for the intake
and/or outlet vents. Blocking the intake
and/or outlet openings can damage
the microwave.
2. The rear surface of appliance should
be placed against a wall. A minimum
clearance of 8 inches (20cm) is required
between the microwave and any
adjacent walls.
3. Plug your microwave into a standard
household outlet. Be sure the voltage and
the frequency is the same as the voltage
and the frequency on the rating label.
NOTE
Leave a minimum clearance 12 inches
(30cm) above the microwave.
Do not remove the legs from the bottom
of the microwave.
Place the microwave as far away from
radios and TV as possible.
Operation of microwave may cause
interference to your radio or TV
reception.
The microwave must not be placed in a
cabinet.
8 inches
12 inches
8 inches
15

ASSEMBLING yOUR BREvILLE PROdUCT
WARNING
Do not install oven
over a range cooktop or
other heat-producing
appliances. If installed
near or over a heat
source, the oven could
be damaged and the
warranty would be void.
WARNING
Check the oven for
any damage, such as
misaligned or bent door,
damaged door seals
and sealing surface,
broken or loose door
WARNING
Do not immerse the
microwave oven, power
cord or plug in water or
any other liquid.
hinges and latches
and dents inside the
cavity or on the door.
If there is any damage,
do not operate the oven
and contact a Breville
Contact Center.
16

OPERATING
your Breville product
OPERATING yOUR BREvILLE PROdUCT
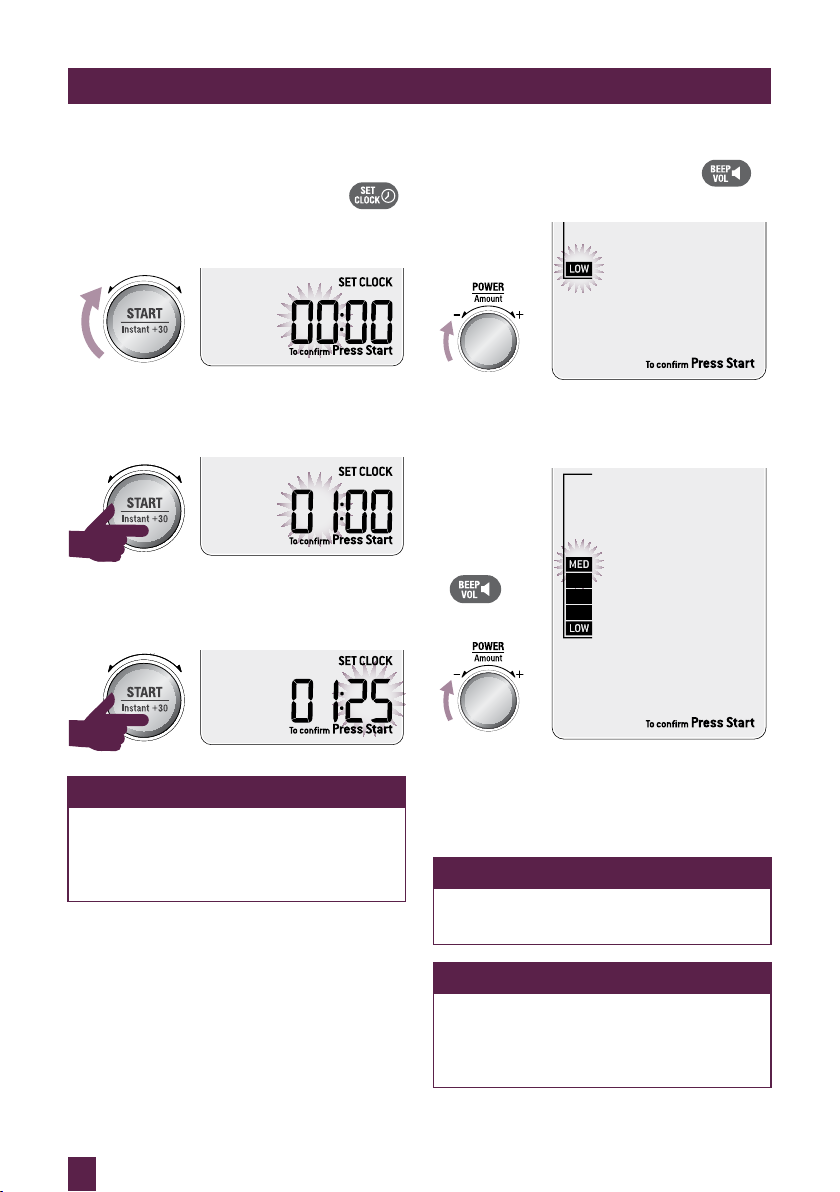
SETTING ThE CLOCK –
12 hOUR CLOCK dISPLAy
Press SET CLOCK on shortcuts panel.
The default time is 00:00. The highlighted
digits flash to show it can be adjusted.
Turn START dial to adjust hours and press
START button to confirm.
Minutes now flash to show they can be
adjusted. Turn START dial to adjust minutes
and press START button to confirm.
SETTING ThE BEEP vOLUME
Press BEEP VOL on shortcuts panel.
The default beep volumes is LOW.
Turn AMOUNT dial or press BEEP VOL
on shortcuts panel to toggle between LOW,
MEDIUM and HIGH beep volume.
x 1
OR
NOTE
If you forget to press START to confirm
hours or minutes, after 1 minute the
microwave will automatically confirm
your selection.
18
Continue turning the AMOUNT dial or
press BEEP VOL on shortcuts panel until
the desired volume is reached. Press START
button to confirm.
NOTE
Each position will sound the BEEP VOL
selected.
NOTE
If you forget to press START to
confirm BEEP VOL, after 1 minute
the microwave will automatically
confirm your selection.
OPERATING yOUR BREvILLE PROdUCT
STOP
CLEAR
STOP
CLEAR
A Bit More
PRESS & HOLD
FOR 3 SECONDS
x 1
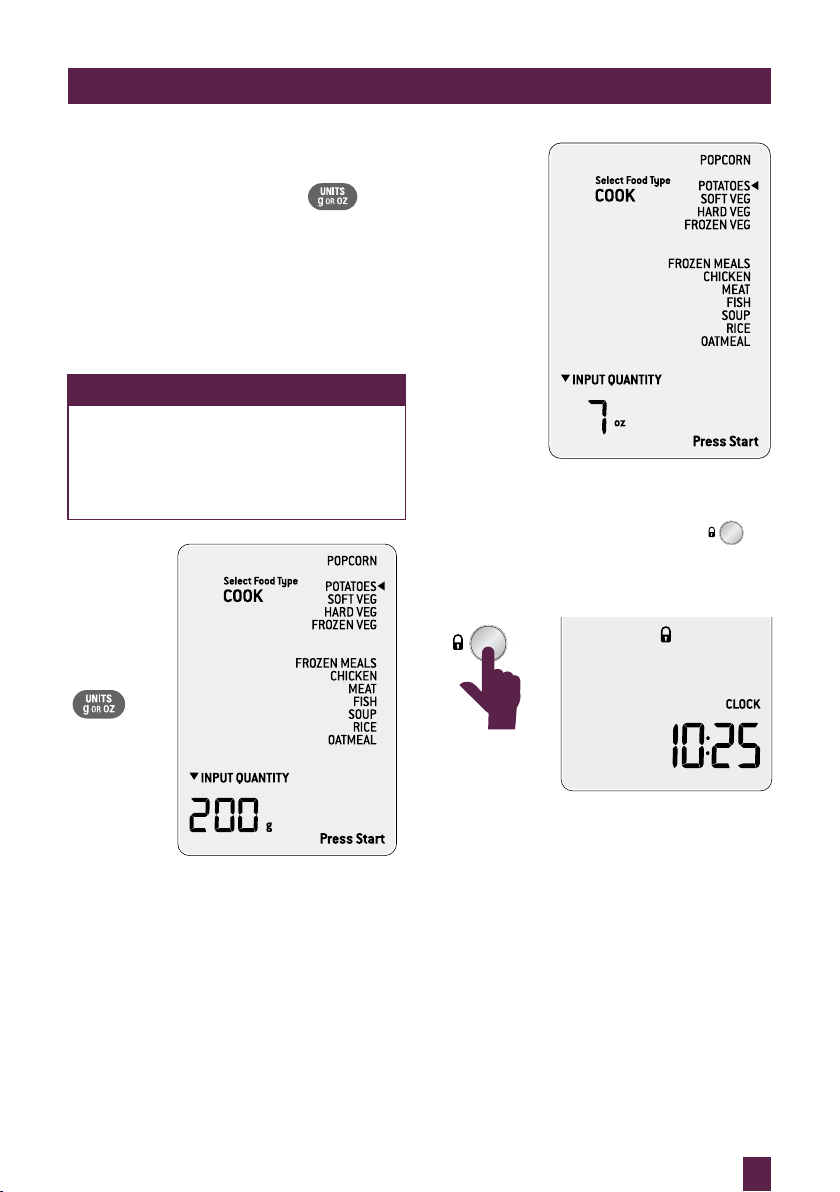
SETTING ThE UNIT wEIGhT
CONvERSION MEASURE
Press UNITS on shortcuts panel.
You can change from grams (g) to ounces
(oz). The default UNITS is grams (g). The
highlighted grams (g) will flash to show it
can be adjusted. Turn AMOUNT dial or press
UNITS on shortcuts panel to toggle between
grams (g) and ounces (oz). Press START
button to confirm.
NOTE
When weight is displayed on the
screen, as seen below in the SMART
COOK POTATOES setting. E.g. 200g
then pressing the UNITS on shortcuts
panel will convert it to 7 oz.
SETTING ChILd LOCK
Press and hold A BIT MORE™ button
for 3 seconds. The CHILD LOCK symbol will
be displayed on the LCD screen. The clock will
still be shown if the clock is turned ON.
A Bit More
To deselect CHILD LOCK press and hold
A BIT MORE™ button for 3 seconds.
The CHILD LOCK symbol will disappear
from the LCD screen and you will have full
functionality of your microwave.
19
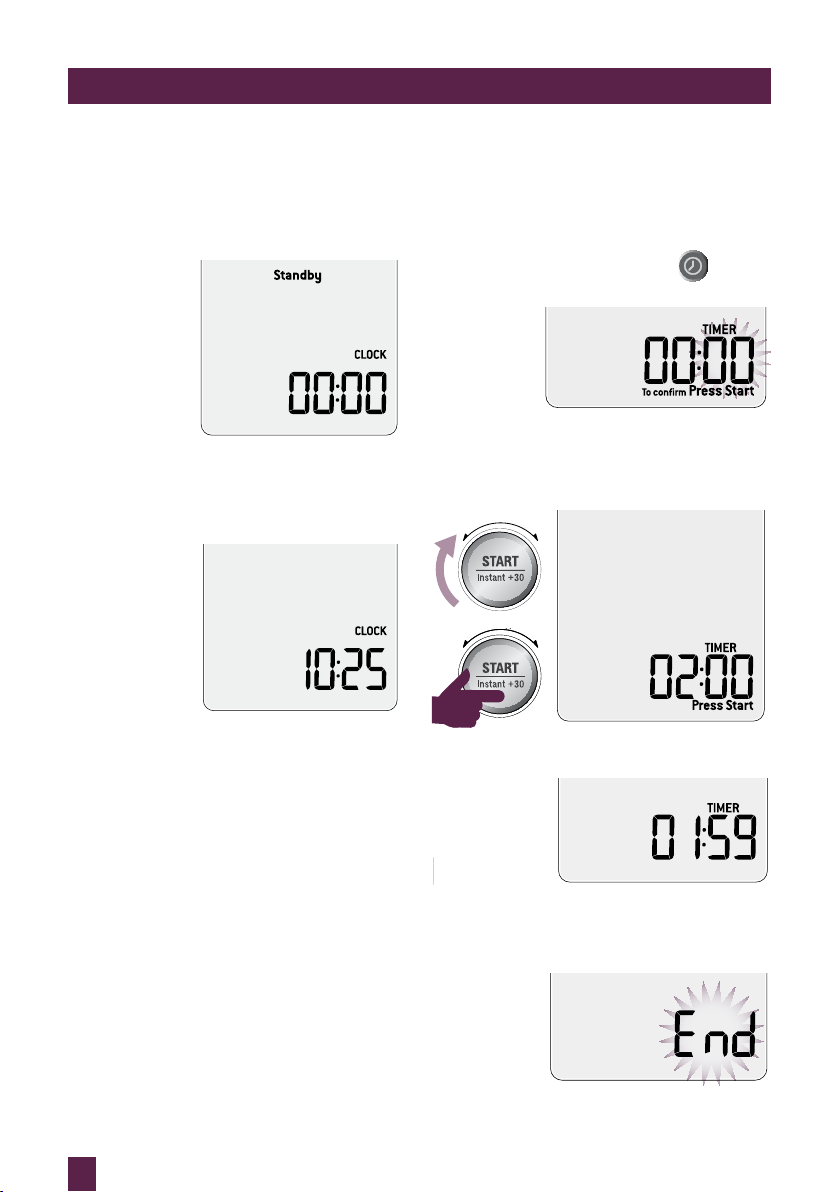
OPERATING YOUR BREVILLE PRODUCT
STANDBY
When the microwave has been idle for
5 minutes, STANDBY mode will be activated.
The backlight of the LCD screen will turn off
and buttons will no longer be illuminated.
Stand-by mode when the time is not set.
When the time has been set STANDBY will not
be displayed on the LCD screen.
Stand-by mode when the time is set.
INDEPENDENT KITCHEN TIMER
The independent kitchen timer can be used as
either a count down or count up timer.
Setting the count down timer
Press TIMER on shortcuts panel.
The default time is 00:00.
The highlighted digits flash to show it can be
adjusted. Turn START dial to adjust to your
desired time in seconds, minutes and hours.
Press START button to begin.
To “wake up” the microwave:
• Open the door
OR
• Press START, SMART REHEAT, COOK
or DEFROST button
OR
• Turn any dial
OR
• Press any button
20
The timer begins to count down.
At the end of the timer function, the microwave
will beep 3 times and the word “End” will flash
on the screen.
OPERATING YOUR BREVILLE PRODUCT
STOP
CLEAR
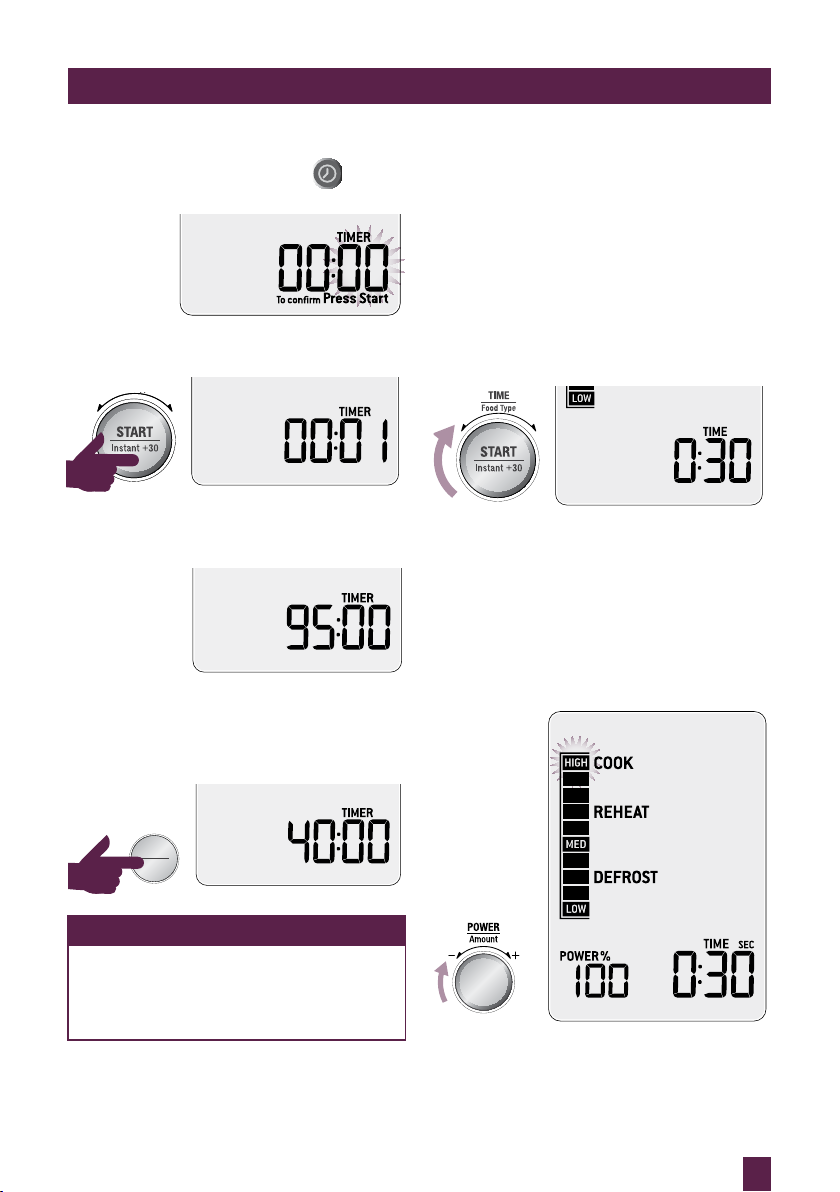
Setting the count up timer
Press TIMER on shortcuts panel.
The default time is 00:00.
The highlighted digits flash to show it can be
adjusted. Press START button to begin.
The maximum count up time is 95:00
(95 minutes).
To stop the timer anywhere between zero
and 95 minutes press STOP/CLEAR button
once to pause or twice to clear and return to
default screen.
TIME & POWER LEVEL ADJUSTMENT
Select different times and microwave power
levels by simply turning the TIME and
AMOUNT dials.
The maximum microwave cooking time is
95 minutes (95:00).
There are 10 power levels available.
TURNING THE TIME DIAL
Turn TIME dial to adjust the time.
The default time will be 30 seconds.
TURNING THE AMOUNT DIAL
Turn the AMOUNT dial clockwise.
When the AMOUNT dial is turned clockwise
HIGH will flash and 100% POWER will
be displayed.
NOTE
No need to adjust your desired
count up time as the microwave will
automatically count up from zero to
95 minutes.
21
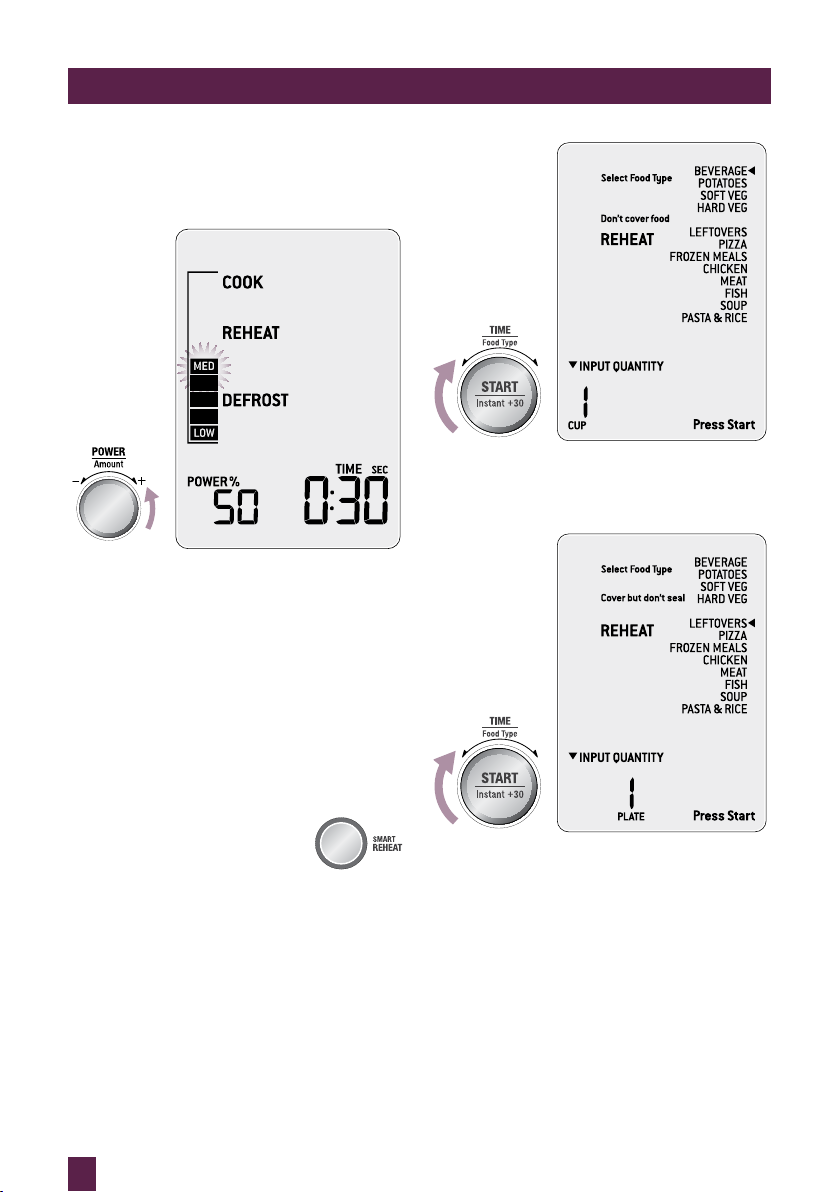
OPERATING yOUR BREvILLE PROdUCT
When the AMOUNT dial is turned
counterclockwise the POWER LEVEL % will
start to decrease from 100% to 10%,
in 10% increments.
dyNAMIC POwER AdJUSTMENT
(SMART SETTINGS & ShORTCUT
SETTINGS)
Smart settings and Shortcut settings have
pre-determined cook times and power levels
to give the best results. However, to suit
your personal preference, adjustment of
both time and power is available during the
cooking cycle. An example of dynamic power
adjustment can be seen below in the
SMART REHEAT mode:
Press SMART REHEAT button,
the microwave will beep once.
Turn TIME/FOOD TYPE dial to
select food type.
As the TIME/FOOD TYPE dial is turned the
arrow shifts and points to what food type is
selected. In this case LEFTOVERS is selected.
22
 Loading...