Braun CLEAN AND CHARGE Manual
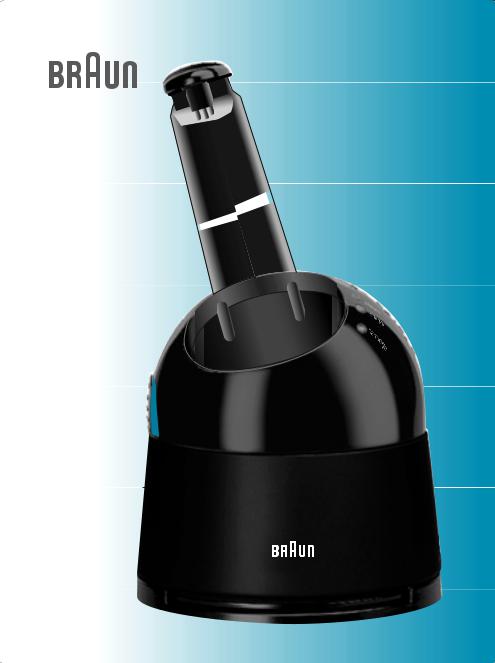
Clean&Charge
Type 5301
|
|
|
|
|
Braun Infoline |
English |
6, 30, 35 |
TR Türkiye’deki Tüketici Danıs¸ ma Servisi: |
|||
Français |
8, 30, 35 |
0 800 261 19 53 |
|||
|
|
|
|||
Magyar |
10, 30, 35 |
|
|
|
|
âesk˘ |
12, 30, 35 |
|
|
|
|
Slovensk˘ |
14, 31, 35 |
|
|
|
|
Hrvatski |
16, 31, 35 |
|
|
|
|
Polski |
18, 32, 35 |
|
|
|
|
Türkçe |
20, |
35 |
|
|
|
|
22, 32, 35 |
|
|
|
|
|
24, 33, 35 |
|
|
|
|
|
29, 27, 35 |
|
|
|
|
Internet:
www.braun.com
5-301-186/00/II-02/G2 GB/F/H/CZ/SK/HR/PL/TR/RUS/UA/Arab Printed in Germany

A |
|
|
|
3 |
|
|
|
2 |
|
|
|
|
|
4 |
|
|
|
5 |
|
|
select |
|
|
|
clean |
6 |
|
|
|
||
1 |
charge |
7 |
|
cartridge |
|||
|
|
||
|
8 |
|
|
4 |
|
|
B  C
C 
3
a u t o m a t i c
l o
c k
2
1
0
 2 1
2 1 
new
 old
old
new
|
3 |
on/off |
a |
|
clean |
a |
|
|
ut |
|
|
o |
|
|
m |
|
|
t |
2 |
charge |
k |
||
i |
|
|
c |
|
|
l |
|
|
o |
|
|
c |
|
cartridge |
|
0 |
|
|
1 |
|
7570
3 |
select |
7570
select
 select
clean charge cartridge
5
English
Braun Clean&Charge has been developed for cleaning, charging and storing your shaver. Clean your shaver daily in the Clean&Charge.
During the automated cleaning process, the shaver is switched on and off at intervals to obtain best cleaning results. Since the specially formulated cleaning fluid contains a small amount of oil, the cleaning procedure also fulfills the lubrication needs of the shaver.
Important
•Only use the power supply cord set supplied with the shaver.
•In order to avoid any leakage of the cleaning fluid, place the appliance on a flat, stable surface or use the wall holder (not included in all versions). Do not tip, move suddenly or transport in any way if a cleaning cartridge is installed.
•Do not place the appliance in a mirror cabinet, nor store it over radiators, nor place it on polished or laquered surfaces. Do not expose to direct sunlight.
•The appliance contains highly flammable liquid. Keep it away from sources of ignition. No smoking.
Keep out of reach of children. Do not refill cartridge. Use only original Braun refill cartridge.
•When cleaning the shaver, its protection cap should be removed.
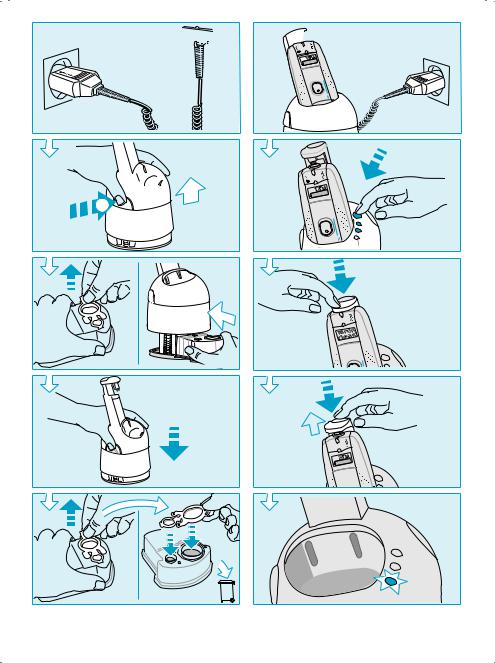
A Description
1Lift button for cartridge exchange
2Contact bow
3Release button
4Operation mode selector
5«clean» light:
cleaning process indicator
6«charge» light:
charging process indicator
7«cartridge» light:
cartridge replacement indicator
8Cleaning cartridge
Wall holder (not included in all versions)
Mount the wall holder with plugs and screws to a smooth wall so that the standing surface for the Clean&Charge is horizontal.
Technical specifications
•Power consumption: 3 W when cleaning 7 W when charging
•Power supply: 100-240 V 2/ 50 or 60 Hz (automatic adaptation)
•Input voltage: 12 V
B Before using Clean&Charge
Only applies for cordless shavers:
For the first charge of the shaver, connect the power supply cord set directly to the shaver, charge it for 4 hours and shave at least once.
Only then can the shaver be cleaned or recharged in the Clean&Charge.
If the rechargeable battery is discharged, select the combined «clean» + «charge» programme rather than the «clean» programme alone.
Installing the cartridge
•Press the lift button (1) to open the housing.
•Hold the cartridge down on a flat, stable surface (e.g. table). Carefully remove the lid from the cartridge. Slide the cartridge into the base as far as it will go.
•Slowly close the housing by pushing it down until it locks.
Replacing the cartridge
After having pressed the lift button to open the housing, wait for a few seconds before removing the used cartridge.
Before discarding the used cartridge, make sure to close the openings using the lid of the
6

new cartridge, since the used cartridge will contain contaminated cleaning solution.
C Operating your Clean&Charge
•Connect your Clean&Charge with the cord set to the mains electricity supply.
Open the contact bow (2) by pressing the release button (3). After shaving, switch the shaver off and place it upside down into the Clean&Charge (without having released the shaver foil).
•Select the operation mode by toggling with the mode selector (4):
«clean» |
(about 15 min) |
«clean» + «charge» |
(about 75 min) |
«charge» |
(about 60 min) |
The corresponding lights will come on. (With cord shavers, only the «clean» function can be selected.)
•Slide down the contact bow to connect the shaver and to start the selected programme. If no programme is selected, the default function «clean» will be started.
(Shaver model 7570/7680 only: The display shows the remaining time of the running programme in 5-minute-steps.)
•Do not interrupt a running programme,
as it leaves the shaver wet and not fit for use. If interruption is needed nonetheless, press the release button.
•After a programme has finished, the corresponding light will go out. Prior to the next shave, press the release button to release the shaver.
•When the «cartridge» light starts flashing, the remaining fluid in the cartridge is sufficient for about 5 more cleaning cycles. After these 5 cycles, the cleaning performance will be reduced and the cartridge has to be replaced.
•When the «cartridge» light illuminates constantly, the cleaning function is locked
and a new cartridge has to be installed. Only then, the next cleaning cycle can be started.
•A cleaning cartridge should be sufficient for about 30 cleaning cycles. With daily use, the cleaning cartridge should be replaced approx. every 4 weeks.
•The hygienic cleaning solution cartridge contains alcohol which, once opened, will naturally evaporate slowly into the surrounding air. Each cartridge, if not used daily, should be replaced after approx. 8 weeks.
•Do not leave the appliance plugged-in without the shaver inserted.
•Clean the housing from time to time with a damp cloth, especially the opening where the shaver rests.
Subject to change without notice.
This product conforms to the EMC-Requirements as laid down by the Council Directive 89/336/EEC and to the Low Voltage Regulation (73/23 EEC).
7
Français
Le chargeur nettoyant Braun Clean&Charge a été développé pour nettoyer, charger et ranger votre rasoir. Nettoyez votre rasoir quotidiennement dans le chargeur nettoyant Clean&Charge.
Pendant le nettoyage automatique, le rasoir se met en marche puis s’arrête alternativement pour obtenir le meilleur nettoyage.
Le liquide nettoyant spécialement conçu contenant un peu d’huile, le cycle de nettoyage couvre également les besoins de lubrification du rasoir.
Important
•Utilisez seulement le cordon d’alimentation fourni avec le rasoir.
•Afin d’éviter que la recharge de liquide ne fuit, placez l’appareil sur une surface plane et stable ou utilisez le support mural (fourni avec certains modèles). Ne pas renverser ou transporter de manière brusque le chargeur nettoyant s’il contient déjà une recharge
de liquide.
•Ne pas poser l’appareil sur une surface fragile telle que revêtue de miroir, polie ou laquée, ni sur un radiateur. Ne pas exposer aux rayons du soleil.
•L’appareil contient un liquide extrêmement inflammable. Conserver
à l’écart de toute flamme ou source d’étincelles. Ne pas utiliser vers une flamme ou un corps incandescent. Ne pas fumer. Conserver hors de la portée des enfants. Utiliser seulement dans un endroit bien ventilé. Ne pas inhaler. Ne pas vaporiser vers les yeux. Utiliser exclusivement pour l’usage indiqué. Ne pas remplir la recharge lorsqu’elle est vide. Utiliser exclusivement des recharges Braun. Ne pas percer ou brûler, même après usage.
•Veillez à enlever le capot de protection transparent du rasoir lorsqu’il est dans le chargeur nettoyant.
ADescription
1Bouton d’ouverture pour changer la recharge
2Embout de contact
3Bouton d’ouverture
4Sélecteur de fonctionnement «select »
5Témoin lumineux «clean » (nettoyage): indicateur de nettoyage
6Témoin lumineux «charge » (recharge): indicateur de charge
7Témoin lumineux «cartridge» (recharge): indicateur de remplacement de recharge
8Recharge nettoyante
Support mural
(fourni avec certains modèles)
Installez le support mural avec ses visses sur un mur lisse afin que le chargeur nettoyant Clean&Charge repose sur une surface horizontale.
Spécificités techniques
•Puissance consommée: 3 W en mode nettoyage 7 W en mode recharge
•Tensions admissibles: 100-240 V 2/ 50 ou 60 Hz (adaptation automatique)
•Tension délivrée: 12 V
BAvant d’utiliser le chargeur nettoyant Clean&Charge
Uniquement pour les rasoirs rechargeables:
Pour la première mise en charge du rasoir, branchez le cordon d’alimentation directement sur le rasoir, chargez-le pendant 4 heures et rasez-vous au moins une fois. Seulement après cette étape, le rasoir peut être nettoyé ou rechargé dans le chargeur nettoyant Clean&Charge.
Si la batterie rechargeable est déchargée, sélectionnez le programme combiné
« clean » + « charge » (nettoyage et recharge) plutôt que le programme seul «clean » (nettoyage).
Mise en place d’une recharge
•Appuyez sur le bouton d’ouverture (1) pour ouvrir le boîtier.
•Mettez la recharge sur une surface plane et stable (ex: une table). Retirez soigneusement le couvercle de la recharge. Introduisez la
8

recharge dans le compartiment jusqu’à ce qu’elle soit bien installée.
•Fermez doucement le boîtier en le rabattant jusqu’à ce qu’il soit verrouillé.
Changement d’une recharge
Après avoir appuyé sur le bouton d’ouverture du boîtier, attendez quelques secondes avant de retirer la recharge usagée.
Avant de vous débarrasser de la recharge usagée, assurez-vous de refermer les ouvertures en utilisant le couvercle de la nouvelle recharge, dès lors que la recharge usagée contient du liquide nettoyant usagé.
CUtilisation du chargeur nettoyant Clean&Charge
•Branchez sur le secteur votre chargeur nettoyant Clean&Charge à l’aide du cordon d’alimentation fourni. Ouvrez l’embout
de contact (2) en appuyant sur le bouton d’ouverture (3). Après le rasage, arrêtez votre rasoir et placez-le la tête de coupe vers le bas dans le chargeur nettoyant Clean&Charge (sans avoir retiré la grille de rasage).
•Choisissez le mode de fonctionnement
en actionnant le sélecteur de fonctionnement
(4) :
« clean » |
nettoyage |
|
(environ 15 minutes) |
« clean » + « charge » |
nettoyage et recharge |
|
(environ 75 minutes) |
« charge » |
recharge |
|
(environ 60 minutes) |
Les témoins lumineux correspondants s’allumeront. (Avec un rasoir secteur, la fonction «clean » (nettoyage) seulement peut être sélectionnée.)
•Abaissez l’embout de contact pour connecter le rasoir et commencer le programme de sélection.
Si aucun programme n’est sélectionné, la fonction «clean » (nettoyage) sera sélectionnée par défaut.
(Uniquement pour le modèle 7570 / 7680) : l’écran de contrôle indique les minutes restantes du programme lancé, par tranches de 5 minutes).
•N’interrompez pas un programme en cours, le rasoir pourrait ne pas être sec et vous
ne pourriez alors pas l’utiliser. Si une interruption est tout de même nécessaire, appuyer sur le bouton d’ouverture pour libérer le rasoir.
•Lorsqu’un programme est terminé, le témoin lumineux correspondant s’éteint.
Avant votre prochain rasage, appuyez sur le bouton d’ouverture pour libérer le rasoir.
•Quand le témoin lumineux «cartridge» (recharge) commence à clignoter, le liquide nettoyant restant dans la recharge est encore utilisable pendant 5 autres cycles de nettoyage. Après ces 5 cycles, la performance de nettoyage sera réduite et la recharge devra être remplacée.
•Quand le témoin lumineux «cartridge» (recharge) s ’allume en permanence, la fonction de nettoyage est bloquée et une nouvelle recharge doit être mise en place. Seulement après cette étape le prochain cycle de nettoyage peut commencer.
•Une recharge de nettoyage devrait être suffisante pour 30 cycles de nettoyage. Avec une utilisation quotidienne, la recharge nettoyante devrait être remplacée environ toutes les 4 semaines.
•La recharge de liquide nettoyant hygiènique contient de l’alcool qui, une fois celle-ci ouverte, va naturellement s’évaporer lentement dans l’air environnant.
Une recharge qui n’est pas utilisée chaque jour a une durée de vie d’environ 8 semaines.
•Ne pas laisser l’appareil branché sur le secteur sans le rasoir mis en place.
•Nettoyez le boîtier de temps en temps avec un tissu humidifié, spécialement la zone où le rasoir est logé.
Sujet à modification sans préavis.
Cet appareil est conforme aux normes Européennes fixées par la directive 89/336/EEC et par la
directive basse tension (73/23 EEC).
9

Magyar
A Braun Clean&Charge, azaz Tisztító
és TöltŒ berendezést a borotva tisztítására, töltésére és tárolására fejlesztettük ki. Tisztítsa borotváját naponta a Clean&Charge berendezés segítségével.
Az automatizált tisztítási folyamat során a borotva kiés bekapcsol a maximális tisztítás elérése érdekében. Mivel a speciális tisztító folyadék kis mennyiségben
olajat is tartalmaz, a tisztítási folyamat során egyben a borotva szükséges kenésére is sor kerül.
Fontos!
•Kizárólag a borotvához tartozó vezetéket használja.
•Helyezze a készüléket stabil vízszintes felületre, vagy használja a falitartót
(nem minden készülékhez alaptartozék!), hogy a tisztítófolyadék ne löttyenjen ki. Ne mozdítsa a készüléket hirtelen mozdulattal ha a tisztítóegységet már behelyezte.
•Ne tárolja a berendezést tükrös fürdŒszobaszekrényben, fıtŒtest fölött, vagy fényezett, illetve lakkozott felületen. Ne tegye ki közvetlen napfénynek.
•A berendezés fokozottan gyúlékony folyadékot tartalmaz. Tızveszélyes helyektŒl tartsa távol! A berendezés közelében kerülje a dohányzást!
GyermekektŒl elzárva tartandó. Ne hagyja nyitva a tisztítópatront! Cserénél kizárólag eredeti Braun patront használjon!
•A borotva tisztításához vegye le a szitavédŒ fedŒt.
A Leírás
1 Kioldó gomb patroncseréhez
2 Csatlakozófej
3 Kioldó gomb
4 Üzemmód kiválasztó
5«clean» (tisztítás) jelzŒfény: a tisztítási folyamat jelzésére
6«charge» (töltés) jelzŒfény: a töltési folyamat jelzésére
7«cartridge» (patron) jelzŒfény: patroncsere szükségességét jelzi
8 Tisztító patron
Falitartó
(nem alaptartozék minden készülékhez)
Tiplik és csavarok segítségével erŒsítse a tartót sima falfelületre, úgy, hogy a tisztító, töltŒ készülék vízszintesen álljon.
Mıszaki adatok
•Energia-felhasználás: Tisztítás során: 3 W Töltés során: 7 W
•Energiaellátás: 100-240 V 2/ 50 vagy 60 Hz (automatikus feszültségigazodás
a hálózathoz)
•Bemeneti feszültségérték: 12 V
BA Clean&Charge használatát megelŒzŒ teendŒk
Csak az akkumulátorosi borotvákra vonatkozik:
A borotva elsŒ töltéséhez csatlakoztassa a vezetéket közvetlenül a borotvához, töltse négy órán keresztül, és borotválkozzon legalább egyszer.
Csak ezután szabad a borotvát tisztítani illetve újratölteni a Clean&Charge berendezés segítségével.
Ha a az akkumulátor lemerül, inkább alkalmazza a kombinált «clean» + «charge» (tisztítás és töltés) funkciót, semmint az önálló «clean» (tisztítás) programot.
A patron behelyezése
•Nyomja meg a kioldó gombot (1) a burkolat felnyitásához.
•Tartsa a patront vízszintes, stabilan rögzített felületen (pl. asztalon). A gyırı segítségével óvatosan távolítsa el a patron fedŒrétegét.
Helyezze a patront a berendezés aljzatába, és csúsztassa be, amennyire csak a berendezés engedi.
10

•Lassan zárja vissza a burkolatot úgy, hogy addig nyomja lefelé, amíg be nem záródik.
Patroncsere
A kioldógomb megnyomása után, mikor a burkolat kinyílik, várjon néhány másod-
percig mielŒtt kiemelné a használt patront. A használt patron eldobása elŒtt zárja le a nyitott részt az új patron gyırıs nyitójának segítségével, mivel a használt patron szennyezett anyagot tartalmaz.
CA Clean&Charge rendszer üzembehelyezése
•A vezeték segítségével csatlakoztassa a Clean&Charge berendezést a hálózati csatlakozóhoz. Nyissa ki a csatlakozófejet
(2) a kioldó gomb (3) megnyomásával. Borotválkozás után kapcsolja ki a borotvát és helyezze fejjel lefelé a Clean&Charge berendezésbe. (A szitát ekkor ne lazítsa ki.)
•Válassza ki a megfelelŒ üzemmódot az üzemmód-kiválasztó gomb (4) nyomogatásával:
«clean» |
tisztítás |
|
(kb. 15 perc) |
«clean» + «charge» |
tisztítás és töltés) |
|
(kb. 75 perc) |
«charge» |
töltés |
|
(kb. 60 perc) |
A megfelelŒ jelzŒfény kigyullad. (Vezetékes borotvák esetében csak a «clean», vagyis a tisztítási funkció választható ki.)
•Csúsztassa le a csatlakozófejet, hogy a borotva a berendezéshez csatlakozzon, és elkezdŒdjön a kiválasztott program futtatása.
Amennyiben nincs kiválasztott program, automatikusan megindul a «clean», azaz a tisztítási funkció.
(Csak a 7570/7680-es villanyborotvamodellre érvényes: a folyadékkristályos kijelzŒ mutatja az aktuálisan futó
programból hátralévŒ idŒt, 5 perces egységekben visszaszámlálva.)
•Ne szakítsa meg a tisztítóprogramot,
mert így a borotva nedves marad, nem kész a használatra. Ha mégis le kell állítania a tisztítást, nyomja meg a kioldó gombot.
•Adott program befejeztével a megfelelŒ jelzŒfény kialszik.
A következŒ borotválkozás elŒtt nyomja meg a kioldó gombot, így kiveheti a borotvát a berendezésbŒl.
•Amikor a «cartridge», azaz «patron» jelzŒfény villogni kezd, a patronban lévŒ folyadék még kb. 5 további tisztítási ciklushoz elegendŒ.
Az 5. ciklus befejezése után a tisztítás minŒsége csökken és a patront ki kell cserélni.
•A «cartridge», vagyis «patron» jelzŒfény folyamatosan világítása jelzi, hogy a tisztítási funkció blokkolva van, és új patron behelyezésére van szükség. A következŒ tisztítási ciklust csak a csere után lehet elkezdeni.
•Egy tisztítópatron kb. 30 tisztítási ciklusra elegendŒ. Mindennapos használat mellett a tisztítópatront kb. négyhetente szükséges cserélni.
•A higiénikus tisztítófolyadék-patron alkoholt tartalmaz, amely felnyitás után lassan elpárolog. Ha a készüléket nem használja minden nap, a tisztítóbetétet kb. 8 hetente cserélje ki.
•Ne hagyja a berendezést hálózathoz csatlakoztatva ha nincs benne a borotva.
•Tisztítsa meg a burkolatot idŒnként nedves ruhával, fŒleg a nyílást, ahol a borotva helyezkedik el.
A változtatás jogát fenntartjuk.
11

âesk˘
Braun Clean&Charge byl vyvinut pro ãi‰tûní, nabíjení a ukládání va‰eho holicího strojku. âistûte dennû svÛj holicí strojek
v Clean&Charge!
Pfii automatickém procesu ãi‰tûní je holicí strojek zapínán a vypínán v takov˘ch intervalech, aby bylo dosaÏeno optimálního v˘sledku. JelikoÏ speciální ãistící tekutina obsahuje malé mnoÏství oleje, je pfii ãi‰tûní zároveÀ zaji‰tûno správné promazání strojku.
DÛleÏité
•PouÏívejte pouze síÈov˘ pfiívod pfiiloÏen˘ k holicímu strojku.
•Aby se pfiede‰lo jakémukoliv vyteãení ãistící tekutiny, poloÏte zafiízení na plochou, stabilní podloÏku, nebo pouÏijte nástûnn˘ drÏák (není pfiiloÏen u v‰ech provedení). Zafiízení nenaklánûjte, prudce jím neh˘bejte ani jej nepfiená‰ejte, pokud je kazeta nainstalována.
•NeumisÈujte zafiízení do zrcadlové skfiíÀky, nad radiátory ani je nepokládejte na le‰tûné ãi lakované povrchy.
Nevystavujte je pfiímému slunci.
•Zafiízení obsahuje vysoce hofilavou tekutinu. DrÏte je v dostateãné vzdálenosti od moÏn˘ch zdrojÛ vznícení. Nekufite. DrÏte z dosahu dûtí. Kazetu nedoplÀujte. PouÏívejte pouze originální náplÀ kazety Braun.
•Pfii ãi‰tûní holicího strojku musí b˘t jeho ochrann˘ kryt sejmut.
APopis
1 Tlaãítko pro vysunutí ãistící kazety pfii její v˘mûnû
2 Kontaktní hlavice
3 UvolÀovací tlaãítko
4 Pfiepínaã reÏimu
5Kontrolka «clean»: indikátor procesu ãi‰tûní
6Kontrolka «charge»: indikátor procesu nabíjení
7Kontrolka «cartridge»: indikátor v˘mûny kazety
8 âistící kazeta
Nástenn˘ drÏák
(není pfiiloÏen u v‰ech provedení)
Namontujte nástûnn˘ drÏák pomocí hmoÏdinek a ‰roubÛ na hladkou zeì tak, aby plocha pro umístûní Clean&Charge byla vodorovnû.
Technické údaje
•Pfiíkon:
3 W pfii ãi‰tûní
7 W pfii nabíjení
•Napájecí napûtí:
100-240 V 2/ 50 nebo 60 Hz (automatické pfiizpÛsobení)
•Vstupní napájecí napûtí: 12 V
B Pfied pouÏitím Clean&Charge
Platí pouze pro holení bez síÈového pfiívodu:
Pfii prvním nabíjení holicího strojku pfiipojte síÈov˘ pfiívod pfiímo ke strojku, nabíjejte jej 4 hodiny a pak se nejménû jednou oholte.
Teprve potom mÛÏe b˘t holicí strojek ãi‰tûn nebo nabíjen v Clean&Charge.
JestliÏe je akumulátorová baterie vybitá, zvolte radûji kombinovan˘ program «clean» + «charge», neÏ samotn˘ program «clean».
Instalace kazety
•Stisknûte tlaãítko pro vysunutí (1), aby se pfiístroj otevfiel.
•PoloÏte kazetu na plochou, stabilní podloÏku (napfi. na stÛl). Z kazety opatrnû sejmûte krouÏek se zátkami. NasuÀte kazetu do základny pfiístroje co nejdále.
•Pomal˘m stlaãením dolÛ pfiístroj uzavfiete, aÏ zacvakne.
12

V˘mûna kazety
Po stisknutí tlaãítka pro vysunutí a po otevfiení pfiístroje poãkejte nûkolik sekund, neÏ pouÏitou kazetu vyjmete.
Pfied odloÏením pouÏité kazety se ujistûte, Ïe jste uzavfieli otvory pomocí krouÏku se zátkami z nové kazety, jelikoÏ pouÏitá kazeta obsahuje kontaminovan˘ ãistící roztok.
C PouÏívání Clean&Charge
•Pfiipojte Clean&Charge pomocí speciálního síÈového pfiívodu k síÈové zásuvce. Otevfiete kontaktní hlavici (2) stisknutím uvolÀovacího tlaãítka (3). Po holení vypnûte holicí strojek a umístûte jej horní ãástí dolÛ do Clean&Charge (bez uvolÀování holicí planÏety).
•Tisknutím pfiepínaãe reÏimu (4) zvolte provozní reÏim:
«clean» |
ãi‰tûní |
|
(asi 15 min.) |
«clean» + «charge» |
ãi‰tûní + nabíjení |
|
(asi 75 min.) |
«charge» |
nabíjení |
|
(asi 60 min.) |
Rozsvítí se odpovídající kontrolka.
(U holicích strojkÛ napájen˘ch pouze ze sítû lze zvolit pouze funkci «clean».)
•PosuÀte dolÛ kontaktní hlavici, aby se strojek pfiipojil a zahájil se zvolen˘ program. JestliÏe není zvolen Ïádn˘ program, zahájí se standardní funkce «clean».
(Pouze holicí strojek model 7570/7680 : displej ukazuje zb˘vající dobu probíhajícího programu v 5-minutov˘ch krocích.)
•Nepfieru‰ujte probíhající program, jelikoÏ by holicí strojek zÛstal vlhk˘ a nebyl pfiipraven k pouÏití. Nicménû, pokud program potfiebujete pfieru‰it, stisknûte uvolÀovací tlaãítko.
•Po ukonãení programu zhasne pfiíslu‰ná kontrolka.
Pfied následujícím holením stisknûte uvolÀovací tlaãítko, aby se holicí strojek uvolnil.
•KdyÏ zaãne blikat kontrolka «cartridge», znamená to, Ïe zb˘vající tekutina v kazetû dostaãuje pro dal‰ích asi 5 ãistících cyklÛ. Po tûchto 5 cyklech bude ãistící v˘kon redukován a kazetu bude tfieba vymûnit.
•JestliÏe kontrolka «cartridge» svítí trvale, je ãistící funkce zablokována a je nutno nainstalovat novou kazetu. Pouze potom mÛÏete zahájit nov˘ cyklus ãi‰tûní.
•âistící kazeta by mûla dostaãovat na
cca 30 cyklÛ ãi‰tûní. Pfii denním pouÏívání je tfieba ãistící kazetu vymûnit po kaÏd˘ch 4 t˘dnech.
•Hygienick˘ ãistící roztok v kazetû obsahuje líh, kter˘, je-li otevfien, pfiirozenû pomalu vyprchává do okolního vzduchu. KaÏdou kazetu, pokud ji dennû nepouÏíváte,
je nutno vymûnit po cca 8 t˘dnech.
•Nenechávejte zafiízení pfiipojeno k síti, aniÏ by byl vloÏen holicí strojek.
•âas od ãasu oãistûte plá‰È zafiízení vlhk˘m hadfiíkem, zvlá‰tû otvor, kde spoãívá holicí strojek.
Zmûny jsou vyhrazeny.
13
 Loading...