


CombiMax 700
CombiMax 750
Type 3202
Food preparation center Combiné culinaire Mutfak Robotu
äÛxÓÌÌ˚È ÍÓÏ·‡ÈÌ
English
4 Use Instructions
8, 33 Guarantee
Français
9 Mode d’emploi 13, 33 Garantie
Türkçe
14 Kullanılıµı hakkında malûmat
19
23, 33
32 24, 33
3-202-302/00/III-06 GB/F/TR/RU/Arab Printed in Germany
a
b
c
d
e
9 |
8 |
7 |
6 |
K 700 K 700 vital K 750
(a)
(b)
(c)
(d)
(e)
 *
*
 * not all models
|
Braun Infolines |
Internet |
GB |
0800 783 70 10 |
www.braun.com |
|
||
IRL |
1 800 509 448 |
|
F |
0 810 309 780 |
|
B |
0 800 14 952 |
|
TR |
0212 - 473 75 85 |
Braun GmbH |
|
|
Frankfurter Straße 145 |
RUS |
8 800 200 11 11 |
61476 Kronberg/Germany |

9
8
11
11a |
14 |
12 |
|
10 


7
13
a
b
c
d
e

 15
15
16
17
18
19
20
21
22
23
6
4
2
8
 10
10
pulse |
|
|
off/0 |
|
|
I |
|
|
1 |
|
|
2 |
|
|
14 |
|
|
|
6...14 |
6...14 |
|
6 |
2... 4 |
CombiMax 700 |
6...14 |
2... 8 |
|
|
1
6 |
5 |
4 |
3 |
2 |

English
Our products are engineered to meet the highest standards of quality, functionality and design. We hope you thoroughly enjoy your new Braun appliance.
Important
•The blades l/n are very sharp!
Take hold of the blades by the knob only. After use, always first remove the blades from the bowls 7/j before removing the processed food.
•Make sure that your voltage corresponds to the voltage printed on the bottom of the appliance. Connect to alternating current only.
•Keep the appliance out of the reach of children.
•This appliance was constructed for household use only to process the listed quantities.
•Do not use any parts in the microwave oven.
•Make sure to avoid touching the running drives with your fingers. Put on the protective cover m whenever a drive place is not in use, since both drives rotate simultaneously when switching on the appliance.
•Do not allow the appliance to operate unsupervised.
•Braun appliances meet applicable safety standards. Repairs on electric appliances must only be done by authorized service personnel. Faulty, unqualified repair work may cause accidents or injury to the user.
•The cord of the appliance may only be replaced by an authorized Braun Service Center, because a special tool is required.
•Switch the appliance off and disconnect it from the mains before storing it.
Specifications
•Voltage/wattage: See typeplate on the bottom of the appliance.
•Operating time and max. capacity: See processing instructions.
Description
The Braun CombiMax with the 2-bowl system meets highest demands for kneading, mixing, blending, chopping, slicing, shredding and grating, both simply and quickly.
To obtain best results, two different working bowls are available: a large food processor bowl 7 and a small chopper bowl j.
Thus, for chopping, puréeing or mixing you can choose between the large and the small working bowl. Moreover, you can use the small bowl to prepare the food which then can be further processed in the large bowl (e. g. to chop nuts for a nut cake dough). Only one bowl can be operated at a time.
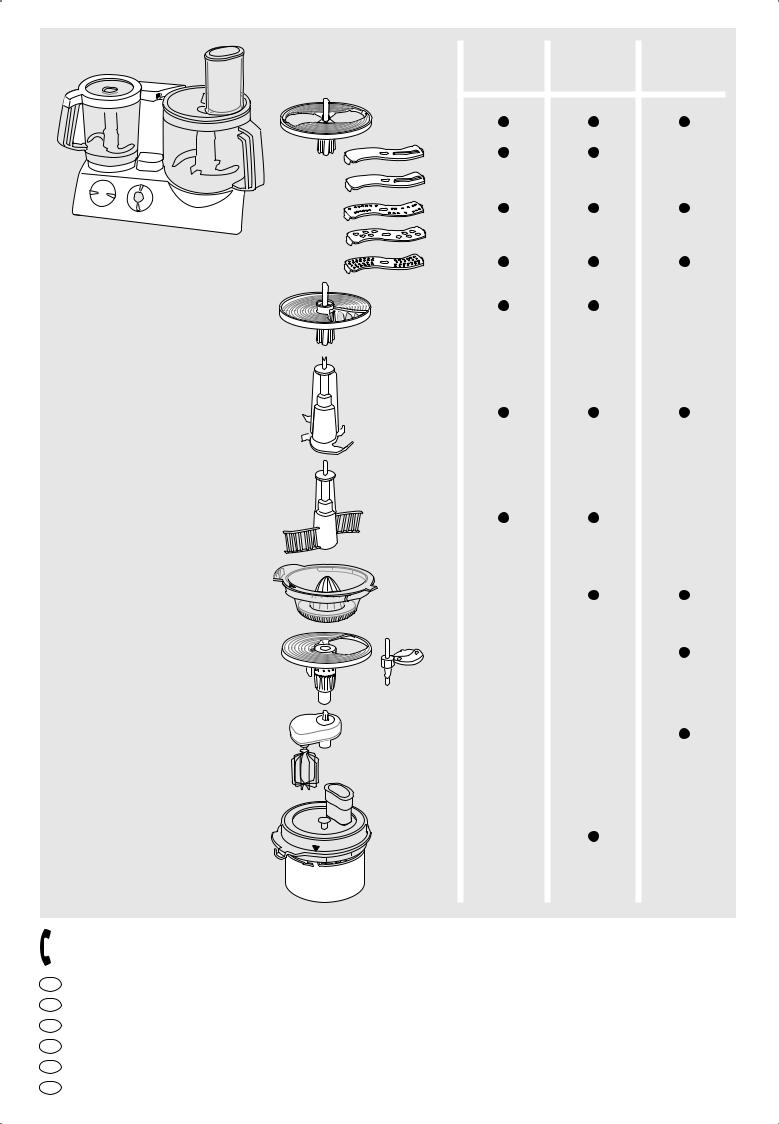
1 Motor block
2 Cord store
3 Motor switch (On = I, off = off/0)
4 Pulse mode «• pulse»
5 Variable speed regulator (2–14)
6 Safety lock (avoids simultaneous operation of both working bowls)
7 Food processor bowl (2 l capacity)
8 Lid for food processor bowl 7
9 Pusher for lid 8
jChopper/mixer bowl for small quantities (0.75 l capacity)
11 Lid for chopper bowl j
11a Seal ring for lid 11
l Blade for chopper bowl j
mProtective cover for motor drive when bowl has been taken off
Attachments for food processor bowl 7
(Important: Not all attachments will be included in the standard equipment of all models).
nBlade for food processor bowl 7 with protective cover
o Insert carrier
p Fine slicing insert – a
q Coarse slicing insert – b r Fine shredding insert – c
s Coarse shredding insert – d t Grating insert – e
u French-fries system
vPlastic or metal kneading hook (depending on model)
w Whipping attachment
Note: Before using the food processor for the first time, clean all parts as described under «Cleaning».
Pulse mode «• pulse» 4
The pulse mode is for example useful for the following applications:
•Chopping delicate and soft food, e.g., eggs, onions or parsley.
•Carefully folding flour into dough or batter to maintain the creaminess.
•Adding whipped eggs or cream to more solid food.
The pulse mode «• pulse» is activated by pressing the green knob on the motor switch 4 with switch setting
«off/0».
Before activating the pulse mode, set the desired speed with the speed regulator 5. When releasing the green pulse knob 4, the appliance is switched off.
Recommended speed ranges for individual attachments
Set the speed range by means of the variable speed regulator 5. It is recommended to first select the speed and then switch on the appliance in order to work whith the desired speed right from the beginning.
Attachments |
Speed range |
|
|
Kneading hock |
6 |
Blade l and n |
6–14 |
Whipping attachment: |
|
– egg-whites |
5 |
– cream |
3 |
Slicing, grating and |
|
shredding inserts |
2–8 |
French-fries system |
2–3 |
(please also refer to product printing)
Working with the 2-bowl system
Only one working bowl can be operated at a time.
The working bowl which is not used must be in the upper position or additionally, can be turned in the «click» direction where it is locked in place. When the arrow markings are aligned, the bowl can be taken off. For safety reasons, always put the protective cover m onto the free drive shaft after a bowl has been taken off.
Overload protection
In order to avoid damages caused by overload, this appliance is equipped with an automatic security switch which shuts off the current supply if necessary. In such case, turn the motor switch 3back to «off/0» and wait approx. 15 minutes to allow the motor to cool off before switching on the appliance again.
Double safety feature:
The appliance can only be switched on when the desired working bowl with lid is properly engaged. If the lid is opened during operation, the motor switches off automatically. As in this case the motor switch 3 is still on «I», turn it back to «off/0» to avoid switching on the motor accidentally.
4

Attaching the working bowls
The food processor bowl 7 is operated on the large drive place of the motor block 1. The chopper bowl jis operated on the small dirve place.
1. With the motor switched off, place the respective bowl onto its drive place matching the arrow on the bowl with the arrow on the motor block (A).
A
|
1 |
|
|
|
1 |
|
|
|
|
|
|
2 |
|
|
pulse |
|
|
8 |
10 |
off/0 |
|
|
|
6 |
|
|
2 |
||
4 |
|
12 |
|
||
|
2 |
|
14 |
|
|
|
|
|
|
6...14 |
6...14 |
|
|
|
|
6 |
2... 4 |
|
|
|
CombiMax 700 |
6...14 |
2... 8 |
Then turn the bowl in the «function» direction until the lower fixed stop is reached. The bowl on the other drive place must be in the lifted position. If the other drive place is free, put on the protective cover m.
2. Put the attachment needed (see instructions for each of the attachments) onto the drive shaft of the bowl and push it down as far as it will go (B).
B
pulse off/0
When inserting the blade l onto the chopper bowl j, push it down until it audibly snaps in place.
3. Put the lid onto the bowl matching the arrow on the lid with the arrow on the bowl (C).
1 C
1
2 
pulse off/0
Then turn the lid clockwise guiding its nose into the safety lock opening of the motor block 1 until it audibly snaps in place.
N.B. |
Using the food processor |
When attaching the lid 11 of the chopper |
bowl 7 |
bowl j, it must be provided with the |
|
seal ring 11a . |
When using the food processor bowl, |
|
|
|
always insert the required attachments |
|
before adding ingredients. |
Removing the working bowls
Switch off the appliance. Turn the lid anticlockwise and lift it off. Then turn the bowl in the «click» direction until the arrow on the bowl matches the arrow on the motor block and lift off the bowl.
When removing the blade from a bowl, take hold of it by the knob and pull it off.
Caution: The blades are very sharp.
The blade n comes with a protective cover. If not in use, store the blade in the protective cover.
Cleaning
First, always switch off the motor and unplug the appliance. Clean the motor block 1 with a damp cloth only.
All parts can be cleaned in the dishwasher. If necessary, clean all parts thoroughly with a spatula or a brush before rinsing them.
Color-intensive food (e.g. carrots) may leave stains on the plastic parts; wipe them off with cooking oil before cleaning with water.
For cleaning the lid 11 , first remove the seal ring 11a . Put the seal ring back in place after cleaning. You can use the seal ring from both sides.
Do not use sharp objects for cleaning purposes.
Clean the blades and the inserts very carefully – they are very sharp.
1. Kneading
For kneading you can use the dough hook v or the blade n. For best results, we recommend using the kneading hook which is specially designed for making yeast dough, pasta and pastries.
Yeast dough (bread/cake)
Max. 500 g flour plus other ingredients Speed 6, 11/2 minutes
Pour the flour into the food processor bowl, then add the other ingredients – except liquids.
Put on the lid 8 and lock in place. Then choose speed 6 and switch the appliance on.
Add liquids by pouring them through the filling tube of the lid while the motor is running.
When kneading with the blade n, do not add ingredients like raisins, candied peel, almonds, etc. which are not supposed to be cut. These have to be added manually after having taken the kneaded dough out of the food processor bowl.
Pasta dough
Max. 500 g flour plus other ingredients Speed 6, 11/2 minutes
Pour the flour into the food processor bowl, then add the other ingredients – except liquids.
Pour the required amount of liquid through the filling tube in the lid when the motor is running.
Do not add any liquid after the dough has formed into a ball as then the liquid will no longer be absorbed evenly.
Pastries
Max. 500 g flour plus other ingredients Speed 6, approx. 1 minute
Pour flour into the food processor bowl, then add the other ingredients. For best results, be butter used must not be too hard, nor too soft.
Put on the lid 8and lock in place. Choose speed 6 and switch on the appliance.
Stop kneading the dough shortly after a ball has formed. Otherwise the pastry dough will become too soft.
5

2. Mixing
For mixing cake dough or sponges use the blade n.
The kneading hook v is not suitable for mixing cake doughs or sponges.
Max. 500 g flour plus other ingredients
Cake mixture |
|
|
(2 methods) |
Speed / time |
|
|
|
|
a) Cream butter with |
|
|
sugar end eggs |
6 |
/ ca. 1 min |
pour in milk and |
6 / ca. 15 secs |
|
carefully fold in |
14 |
/ ca. 10–15 x |
flour with pulse |
|
• pulse |
mode. |
|
|
b)Pour all ingredients except liquids into
the food processor |
|
bowl. |
14 / ca. 1 min |
Add required liquids through the filling tube of the lid while the motor is running. Finally add ingredients like raisins manually.
Sponge |
Speed time |
|
|
|
|
Cream eggs and |
|
|
water (if required) |
14 |
/ ca. 2 mins |
and sugar |
14 |
/ ca. 4 mins |
fold in flour with |
|
|
pulse mode |
8 |
/ 5 x • pulse |
add cocoa powder |
8 |
/ 3 x • pulse |
3. Blending
Use the blade n for blending soups, shakes, etc.
Maximum capacity 2 l Speed 10
(otherwise the bowl may overflow)
For milk-shakes, pour coarsely chopped fruit into the food processor bowl.
Put on the lid 8 and lock in place. With speed 14, blend fruit first, then add liquid at speed 10 and finish blending.
When blending milk, please note that it will froth. Use smaller quantities.
Processing examples
The processing times are approximate and depend on the quality, the amount of food to be processed and the required degree of fineness.
Product |
Max. |
Preparation |
Speed |
Mode |
Time/pulses |
|
amount |
|
|
|
|
|
|
|
|
|
|
Hard bread |
4 |
quartered |
14 |
I |
45 secs |
rolls |
|
|
|
|
|
|
|
|
|
|
|
Ice cubes |
28 |
whole |
14 |
I |
1 minute (snow) |
|
|
|
|
|
|
Apples |
700 g |
quartered |
8 |
• pulse/I |
15 secs |
|
|
|
|
|
|
Chocolate |
400 g |
broken |
14 |
I |
coarse 15 secs |
cool |
|
|
|
|
fine 30 secs |
|
|
|
|
|
|
Eggs |
8 |
whole |
6 |
• pulse |
8 x |
|
|
|
|
|
|
Cheese (soft) |
400 g |
3-cm cubes |
14 |
I |
20 secs |
|
|
|
|
|
|
Cheese (hard) 700 g |
3-cm cubes |
14 |
I |
60–70 secs |
|
|
|
|
|
|
|
Meat |
700 g |
in cubes |
14 |
• pulse/I |
40 secs |
|
|
|
|
|
|
Carrots |
700 g |
in pieces |
14 |
I |
10 secs |
|
|
|
|
|
|
Onions |
700 g |
quartered |
14 |
• pulse |
10–13 x |
|
|
|
|
|
|
5. Slicing, shredding, grating
• Place the inserts you want to use into |
E |
the blade carrier oas shown in (D) and |
|
snap into position. In order to remove |
|
the insert, push up the insert end that |
|
protrudes at the bottom of the insert |
|
carrier. |
|
D |
|
a
•Put the assembled slicer/shredder onto the drive shaft of the food processor bowl (E).
•Put on the lid 8 and lock in place. Set the speed and fill the food to be
processed into the filling tube while the motor is switched off. Refilling should be done with the motor switched off.
•Never reach into the filling tube when the motor is running. Always use the pusher 9 (F).
N.B.: When processing juicy or soft food, you will obtain better results at a lower speed. Hard food should be processed at a higher speed. Do not overload the food processor bowl.
Fine slicing insert – a p
Speed 2–3
Processing examples: cucumbers, cabbage, raw potatoes, carrots, onions, radishes.
4. Chopping
Chopping in the food processor bowl with the blade n
Note: For processing larger quantities, use the food processor bowl 7 with blade n. For processing smaller quantities, we recommend to use the chopper bowl j with blade l.
F
1
2
6

Coarse slicing insert – b q
Speed 2–3
Processing examples: cucumbers, kohlrabi, raw potatoes, onions, bananas, tomatoes, mushrooms, celery.
Fine shredding insert – c r
Speed 4–6
Processing examples: cheese (soft to medium), cucumbers, carrots, raw potatoes, apples.
Coarse shredding insert – d s
Speed 4–6
Processing examples: cheese (soft to medium), cucumbers, kohlrabi, beetroot, carrots, raw potatoes, apples, cabbage.
Grating insert – e t
Speed 8–14
Processing examples: raw potatoes (e.g. for potatoe pancakes), horseradish, parmigiano cheese (hard).
French-fries system u
Place the French-fries system onto the drive shaft, put on the lid 8 and lock in place. For best results, place 3–4 potatoes (depending on size) in the filling tube of the lid 8 while the motor is switched off.
Set speed to 2–3 and switch on the appliance. Before filling in a new load, switch the motor off. Use the pusher 9to apply slight pressure when pushing the potatoes into the filling tube.
6. Whipping with the whipping attachment w
|
Speed time |
|
Whipping sponges |
|
|
Max. 280-300 g |
|
|
plus ingredients |
|
|
Cream eggs and |
|
|
water (if required) |
5 |
/ ca. 2 mins |
add sugar |
5 |
/ ca. 2 mins |
fold in flour |
2 |
/ ca. 30 secs |
Whipping egg-whites |
|
|
Min.: 2 egg-whites |
4–5 / ca. 4 mins |
|
Max.: 6 egg-whites |
4–5 / ca. 6 mins |
|
Whipping cream |
|
|
Min.: 0.15–0.2 l |
3 |
/ ca. 1–2 mins |
Max.: 0.4 l |
3 / ca. 3.5–4 mins |
|
Before whipping sterilized cream, keep the cream cool for several hours (at 4 °C approx.).
Using the chopper bowl j
The blade l can be used for chopping, blending, puréeing and mixing smaller quantities. The chopper bowl is perfectly suited for preparing mousse, pastes or dips.
Maximum capacity: 750 ml liquid.
Caution:
The blade l is extremely sharp.
Important: The maximum processing time in the chopper bowl is 1 minute. Liquids can be processed longer.
Chocolate, hard spices and coffee beans may not be chopped.
With the motor switched off, insert the blade l in the chopper bowl j, then place all ingredients into the chopper bowl.
Liquids can be poured through the opening in the lid when the motor is running.
Put the lid with the seal ring 11a onto the chopper bowl and close it as de-
scribed earlier. After use, always remove the blade from the chopper bowl first and then empty the processed food. When blending milk, please note that it will froth. Use smaller quantities.
Processing examples
The processing times are approximate and depend on the quality and amount of food to be processed and the degree of fineness required.
Chopping
Chopping |
Max. |
Preparation |
Speed |
Switch |
Time/pulses |
|
amount |
|
|
position |
|
|
|
|
|
|
|
Carrots |
150 g |
in pieces |
6 |
• pulse |
7 x |
|
|
|
|
|
|
Onions |
100 g/ |
quartered |
6 |
• pulse |
6–8 x |
|
11/2 onion |
|
|
|
|
Parsley |
30 g/ |
without |
14 |
I |
5–10 seconds |
|
1/2 bunch |
stems |
|
|
|
Garlic |
1 clove |
whole |
14 |
I |
5 seconds |
|
|
|
|
|
|
Meat (lean) |
250 g |
quartered |
14 |
I |
15 seconds |
|
|
|
|
|
|
Blending
Product |
Preparation |
Speed |
Switch |
Time/pulses |
|
|
|
position |
|
|
|
|
|
|
Mixed drinks |
Chop fruit before |
14 |
I |
approx. |
|
processing. Add milk. |
|
|
30 seconds |
|
|
|
|
|
Baby food |
Chopped |
14 |
• pulse |
10 x |
(e.g. fruit, |
|
|
I |
10 seconds |
vegetable) |
|
|
|
|
|
|
|
|
|
Mayonnaise |
Blend 1 egg, seasoning, |
14 |
I |
30–45 seconds |
|
mustard and vinegar. |
|
|
|
|
Slowly pour in oil |
|
|
|
|
through lid opening. |
|
|
|
|
|
|
|
|
Tartar |
Blend 1 egg, seasoning, |
14 |
I |
30–45 seconds |
|
mustard and vinegar. |
|
|
|
|
Slowly pour in oil |
|
|
|
|
through lid opening. |
|
|
|
|
Add quartered egg and |
|
|
|
|
vinegar. |
6 |
• pulse |
3–5 x |
|
|
|
|
|
Avocado paste |
Chop 1 clove garlic, add |
14 |
I |
5 seconds |
|
2 ripe avocados |
|
|
|
|
(quartered, w/o stone), |
|
|
|
|
1 tbsp. lemon juice, |
|
|
|
|
1 tbsp. olive oil, |
|
|
|
|
150 ml yogurt, |
|
|
|
|
1/2 tsp. sugar, |
|
|
|
|
salt, pepper. |
14 |
I |
ca. 45 seconds |
|
|
|
|
|
7

Mixing smaller dough quantities
The chopper bowl is only suitable for processing the following dough type; the recipe reflects maximum quantities:
|
|
Speed |
Switch |
Time |
|
|
|
position |
|
|
|
|
|
|
Pancake mixture |
|
|
|
|
250 g flour |
Mix the flour, eggs, |
6 |
I |
45–60 seconds |
375 ml milk |
salt and half of the milk, |
|
|
|
2 eggs |
add rest of the milk |
|
|
|
salt |
while te motor is |
|
|
|
|
running |
|
|
|
|
|
|
|
|
Whipping cream |
|
6 |
I |
|
200 ml cream |
|
|
|
30 seconds |
|
|
|
|
|
Special accessoires
Braun Citrus press
PJ 600
Type 3200
Speed: 2–4
a |
b |
c |
|
6 |
8 |
10 |
|
|
|
|
4 |
|
12 |
|
|
|
2 |
|
|
14 |
d |
e |
2
1
This product conforms to the European Directives EMC 89/336/ EEC and Low Voltage 73/23/EEC.
Please do not dispose of the product in the household waste at the end of its useful life. Disposal can take place at a Braun Service Centre or at appropriate collection points provided in your country.
Guarantee
We grant 2 years guarantee on the product commencing on the date of purchase. Within the guarantee period we will eliminate, free of charge, any defects in the appliance resulting from faults in materials or workmanship, either by repairing or replacing the complete appliance as we may choose.
This guarantee extends to every country where this appliance is supplied by Braun or its appointed distributor.
This guarantee does not cover: damage due to improper use, normal wear or use as well as defects that have a negligible effect on the value or operation of the appliance. The guarantee becomes void if repairs are undertaken by unauthorised persons and if original Braun parts are not used.
To obtain service within the guarantee period, hand in or send the complete appliance with your sales receipt to an authorised Braun Customer Service Centre.
For UK only:
This guarantee in no way affects your rights under statutory law.
Subject to change without notice.
8

Français
La conception de nos produits leur permet d’offrir les plus hauts standards de qualité, de fonctionnalité et de design. Nous espèrons que vous prendrez plaisir à utiliser votre nouvel appareil Braun.
Important
•Le couteaux l/n sont très acérés!
Les tenir par le manche uniquement. Après l’utilisation, retirer toujours des bols 7/j les cauteaux, puis les aliments travaillés.
•S’assurer que la tension correspond bien à celle indiquée sur la plaque de fond de l’appareil. Brancher sur un courant alternatif uniquement.
•Garder l’appareil hors de portée des enfants.
•Cet appareil est conçu pour un usage domestique uniquement et pour travailler les quantités indiquées.
•Ne mettre aucune pièce de cet appareil au micro-ondes.
•Eviter de toucher les pignons d’entrainement avec les doigts. Poser le capot de protection m à chaque fois qu’un des bols n’est pas dans son logement car les entrainements tournent simultanément dès que l’on branche l’appareil.
•Ne pas laisser l’appareil en marche sans superveillance.
•Les appareils Braun répondent aux normes de sécurité en vigueur. Les réparations sur ces appareils
électriques doivent être uniquement effectuées par du personnel spécialisé. Une réparation incorrecte ou effectuée par du personnel non qualifié peut entrainer des accidents ou blesser l’utilisateur.
•Le cordon de l’appareil ne doit être changé que par un Centre-Service Braun car un matériel spécial est nécessaire.
•Arrêter et débrancher l’appareil avant de le ranger.
Description
Le Braun CombiMax avec son système à 2 bols convient aux plus exigeants pour pétrir, mixer, mélanger, hacher, émincer et râper, aussi simplement que rapidement. Pour obtenir les meilleurs résultants, 2 bols de travail sont disponibles : un grand bol universel 7et un petit bol hachoir j.
Ainsi, pour hacher, réduire en purée ou mélanger, on peut utiliser le grand ou le petit bol de travail. On peut également utiliser le petit bol pour préparer des aliments qui pourront ensuite être travaillés dans le grand bol (par exemple, hacher des noix pour une pâte à gateau). On ne peut faire fonctionner qu’un seul bol à la fois.
1 Bloc-moteur
2 Rangement du cordon
3Commutateur de mise en route (marche = I, arrêt = off/0)
4 Mode intermittent « • pulse »
5 Variateur de vitesses (2–14)
6Sûreté (évite l’utilisation simultanée des 2 bols)
7 Bol universel (contenance 2 L)
8 Couvercle du bol universel 7
9 Poussoir pour de couvercle 8
jBol hachoir/mixeur pour les petites quantités (contenance 0,75 L)
11 Couvercle du bol hachoir/mixeur j
11a Anneau d’étanchéité du couvercle 11 l Couteau du bol hachoir/mixeur j
mProtection du pignon d’entrainement lorsque le bol a été retiré
Accessoires pour le bol universel 7
(Important: tous les accessoires ne sont pas inclus dans l’équipement de base des différents modèles).
nCouteau pour le bol universel 7 avec sa protection
o Porte-disques
p Disque éminceur fin – a q Disque éminceur gros – b r Disque à râper fin – c
s Disque à râper gros – d t Disque à gratter – e
u Système coupe-frites v Crochet-pétrisseur w Fouet
Note: Avant la üremière utilisation du combiné culinaire, nettoyer toutes ses parties comme indiqué dans le paragraphe « Nettoyage ».
Précisions
•Tension/puissance : voir la plaque d’identification sous l’appareil.
•Temps d’utilisation et capacité maximale: voir les instructions d’utilisation.
Protection contre la surcharge
Pour éviter tout accident dû à une surcharge, cet appareil est équipé d’un disjoncteur de sécurité qui coupe le courant si nécessaire. Dans ce cas, repositionner le commutateur 3 sur
« off/0 » et attendre environ 15 minutes avant de le remettre en marche pour permettre le refroidissement du moteur.
Mode intermittent « • pulse » 4
Le mode intermittente est utilisé par exemple pour les préparations suivantes :
•Hacher des aliments délicats et tendres (oeufs, oignons ou persil).
•Ajouter délicatement la farine dans une pâte pour en garder le velouté.
•Additionner des oeufs ou de la crème battus à un aliment plus solide.
Le mode intermittent « • pulse » est activé lorsqu’on appuie sur le bouton vert du commutateur 4 en position
« off/0 ».
Avant d’actionner le mode intermittent, sélectionner la vitesse choisie au moyen du variateur de vitesses 5. En libérant le bouton vert 4 l’appareil s’arrête.
Vitesses conseillées pour l’utilisation de chacun des accessoires
Les différentes vitesses sont sélectionnées à l’aide du variateur de vitesses 5. Il est recommandé de sélectionner d’abord la vitesse souhaitée et de ne mettre qu’ensuite l’appareil en marche afin de pouvoir travailler dès le début avec la vitesse souhaitée.
Accessoires |
Vitesses |
|
|
Crouchet pétrisseur |
6 |
Couteaux l et n |
6–14 |
Fouet – blancs en neige |
5 |
– crème |
3 |
Disques éminceurs et râpes |
2–8 |
Système coupe-frites |
2–3 |
(se référer également aux indications marquées sur l’appareil)
Utilisation avec le système à 2 bols
Un seul bol peut être utilisé à la fois.
Le bol qui n’est pas utilisé doit être placé en position haute ou éventuellement peut être laissé dans son logement s’il est bien bloqué. Lorsque les flèches sont alignées, le bol peut également être retiré. Par sécurité, lorsqu’un bol a été enlevé, poser toujours le couvercle de protection m sur le pignon d’entrainement libéré.
Double sécurité :
L’appareil ne peut être mis en route que lorsque le bol de travail choisi, avec son couvercle, a été correctement mis en place. Si pendant le fonctionnement, le couvercle n’est pas bien bloqué, le moteur s’arrête automatiquement. Dans
ce cas, le commutateur 3 étant encore sur « I », le positionner sur « off/0 » pour éviter que l’appareil ne se mette en route accidentellement.
9

Mise en place des bols de travail
Le bol universel 7 travaille sur le grand logement du bloc-moteur 1, le bol hachoir j sur le petit logement.
1. Moteur arrête, placer le bol correspondant sur son pignon d’entrainement tout en vérifiant que la flèche du bol vient bien se placer sur la flèche du bloc-moteur (A).
A
|
1 |
|
|
|
1 |
|
|
|
|
|
|
2 |
|
|
pulse |
|
|
8 |
10 |
off/0 |
|
|
|
6 |
|
|
2 |
||
4 |
|
12 |
|
||
|
2 |
|
14 |
|
|
|
|
|
|
6...14 |
6...14 |
|
|
|
|
6 |
2... 4 |
|
|
|
CombiMax 700 |
6...14 |
2... 8 |
Puis tourner le bol dans la direction
« function » jusqu’à ce qu’il atteigne le cran de bloquage. Le bol de l’autre logement doit être placé en position haute. Si son logement est vide, poser le couvercle de protection m.
2. Poser l’accessoire désiré (voir les instructions pour chacun des accessoires) sur le pignon d’entraînement du bol et l’enfoncer aussi bas que possible (B).
B
pulse off/0
Lorsque l’on place le couteau l dans le bol hachoir j, le pousser vers le bas jusqu’à entendre un « clic » de blocage.
3. Poser le couvercle sur son bol en vérifiant que la flèche du couvercle se positionne bien sur la flèche du bol (C).
NB : Placer toujours le couvercle 11 sur le bol hachoir j avec l’anneau d’étanchéité 11a .
Démontage des bols de travail
Arrêter l’appareil. Tourner le couvercle dans le sens contraire des aiguilles d’une montre et l’enlever. Tourner le bol dans la direction du « click » jusqu’à ce que la flèche du bol vienne se placer sur la flèche du bloc-moteur et l’enlever.
Lorsqu’on retire la couteau du bol, le tenir par la tête et soulever.
Attention : les lames sont très acérées.
Le lame n est livrée avec un couvercle de protection. Lorsqu’elle n’est pas utilisée, toujours la conserver munie de son couvercle de protection.
Nettoyage
Avant toute chose, toujours arrêter le moteur et débrancher l’appareil. Nettoyer le bloc-moteur 1 uniquement avec un chiffon humide.
Toutes les pièces vont au lave-vaisselle. Si nécessaire, les nettoyer avec une spatule ou une brosse avant le rinçage.
Les aliments colorants (carottes par exemple) peuvent tacher les parties en plastique; les essuyer avec de l’huile de cuisine avant de les nettoyer à l’eau.
Pour nettoyer le couvercle 11 , retirer d’abord l’anneau d’étanchéité 11a puis le replacer après nettoyage. L’anneau d’étanchéité peut être utilisé indifféremment sur ses deux faces. Ne pas utiliser d’objets coupants pour le nettoyage.
Nettoyer les couteaux et les accessoires avec précaution, ils sont très acérés.
1 C
1
2 
pulse off/0
Tourner le couvercle dans le sens des aiguilles d’une montre jusqu’à ce que son bec verseur se place dans l’ouverture du bloquage de sécurité du bloc-moteur 1 en faisant entendre un « clic » de blocage.
Utilisation du bol universel 7
Lors de l’utilisation du bol universel, placer tout d’abord les accessoires avant d’incorporer les ingrédients.
1. Pétrir
Pour le pétrissage de la pâte, utiliser le crochet pétrisseur v ou le couteau n. Pour de meilleurs résultats, il est conseillé d’utiliser le crochet pétrisseur, conçu spécialement pour les pâtes lourdes, les pâtes alimentaires et les pâtisseries.
Pâte lourdes (pain/gâteaux)
Maximum 500 g de farine plus les ingrédients complémentaires Vitesse 6, pendant 11/2 minute
Verser la farine dans le bol universel, ajouter les autres ingrédients sauf les liquides. Poser le couvercle 8et bloquer. Positionner sur la vitesse 6 et mettre en route. Ajouter les liquides en les versant dans la cheminée du couvercle pendant que le moteur tourne.
En pétrissant à l’aide du couteau n, ne pas ajouter d’ingrédients tels que raisins secs, écorces confites, amandes, etc. qui ne doivent pas être coupés. Ils doivent être ajoutés à la main après avoir retiré le couteao du bol.
Pâtes alimentaires
Maximum 500 g de farine plus les ingrédients complémentaires Vitesse 6 pendant 11/2 minute
Verser la farine dans le bol universel, ajouter les autres ingrédients sauf les liquides. Verser la quantité nécessaire de liquide par la cheminée du couvercle pendant que le moteur tourne. Ne plus ajouter de liquide lorsque la pâte a formé une boule car il ne serait plus absorbé uniformément.
Pâte à tartes
Maximum 500 g de farine plus les ingrédients complémentaires Vitesse 6 pendant 1 minute environ
Verser la farine dans le bol universel et ajouter les autres ingrédients. Pour de meilleurs résultants, le beurre utilisé ne doit être ni trop dur ni trop mou.
Placer le couvercle 8 et le bloquer. Positionner sur la vitesse 6 et mettre en route.
Arrêter le pétrissage de la pâte dès qu’une boule s’est formée sinon la pâte à tartes deviendrait trop molle.
10
2. Mélanger
Pour mélanger la pâte gateaux ou pâte à bisquits, utiliser le couteau n.
Le crochet pétrisseur v ne convient pas pour mélanger les pâtes à gateaux ou les pâtes souples.
Maximum 500 g de farine plus les ingédients complémentaires.
Pâte à gâteau |
|
(2 méthodes) |
Vitesse / Durée |
a)Battre le beurre avec
du sucre et des oeufs, 6 / ca. 1 mn
ajouter le lait |
6 / ca. 15 sec |
et recouvrir de farine |
|
avec le mode |
14 / ca. 10–15 x |
intermittent |
• pulse |
b)Verser tous les ingrédients sauf les liquides,
dans le bol universel 14 / ca. 1 mn
Ajouter les liquides nécessaires par la cheminée du couvercle pendant que le moteur tourne. Mettre les ingrédients tels que raisins secs à la main.
Exemples d’utilisation
Les temps d’utilisation sont approximatifs et dépendent de la qualité et de la quantité des aliments ainsi que du degré de finesse désiré.
Aliment |
Quantité |
Préparation |
Vitesse |
Mode |
Durée |
|
maximale |
|
|
|
|
|
|
|
|
|
|
Pain dur |
4 |
en morceaux |
14 |
I |
45 sec |
|
|
|
|
|
|
Cubes de glace |
28 |
entiers |
14 |
I |
1 mn (pilés) |
|
|
|
|
|
|
Pommes |
700 g |
en quartiers |
8 |
• pulse/I |
15 sec |
|
|
|
|
|
|
Chocolat dur |
400 g |
cassé |
14 |
I |
épais 15 sec |
|
|
|
|
|
fin 30 sec |
|
|
|
|
|
|
Oeufs |
8 |
entiers |
6 |
• pulse |
8 x |
|
|
|
|
|
|
Fromage |
400 g |
cubes de 3 cm |
14 |
I |
20 sec |
(pâte molle) |
|
|
|
|
|
|
|
|
|
|
|
Fromage |
700 g |
cubes de 3 cm |
14 |
I |
60–70 sec |
(pâte dure) |
|
|
|
|
|
|
|
|
|
|
|
Viandes |
700 g |
en cubes |
14 |
• pulse/I |
40 sec |
|
|
|
|
|
|
Carottes |
700 g |
en morceaux |
14 |
I |
10 sec |
|
|
|
|
|
|
Oignons |
700 g |
en quartiers |
14 |
• pulse |
10–13 x |
|
|
|
|
|
|
Biscuit de Savoie |
|
(ou pâtes souples) |
Vitesse / Durée |
|
|
Battre les oeufs |
|
(et l’eau si nécessaire) |
14 / ca. 2 mn |
ajouter le sucre |
14 / ca. 4 mn |
verser la farine avec |
|
le mode intermittent |
8 / 5 x • pulse |
ajouter la noix |
|
de coco en poudre |
8 / 3 x • pulse |
3. Mixer
Utiliser le couteau n pour mixer les soupes, les liquides, etc.
Capacité maximale 2 L
Vitesse 10 (respecter la contenance, sinon le bol pourrait déborder)
Pour les milk-shakes, verser les fruits grossièrement coupés dans le bol universel. Placer le couvercle 8 et bloquer. Avec la vitesse 14, mixer d’abord les fruits puis ajouter le liquide en vitesse 10 et terminer le mélange.
Lorsqu’on mixe le lait, ne pas oublier qu’il peut mousser. Utiliser de plus petites quantités.
5. Émincer, râper, tratter
•Poser le disque à utiliser sur le portedisques o (D) ; le mettre en place d’un coup sec. Pour le retirer, pousser vers le haut le dessous du disque qui dépasse du support-disques.
D
a
•Placer l’éminceur ou la râpe sur l’entrainement du bol universel (E).
•Poser le couvercle 8 et bloquer. Sélectionner la vitesse et verser les aliments dans la cgeminée pendant que le moteur est arrêté. Le remplissage ne doit être effectué que lorsque
l’appareil est à l’arrêt.
•Ne jamais introduire les doigts dans la cheminée pendant que le moteur tourne mais utiliser toujours le poussoir 9 (F).
E
NB : Si l’on travaille des aliments juteux ou tendres, on obtiendra de meilleurs résultats avec une vitesse basse; on utilisera par contre une vitesse plus élevée pour les aliments durs. Ne jamais surcharger le bol universel.
4. Hacher
Hacher dans le bol universel avec le couteau n.
Note : Pour travailler des quantités importantes, utiliser le bol universel 7 avec le couteau n. Pour travailler des quantités plus petites, il est recommandé d’utiliser le bol hachoir j avec le couteau l.
F
1
2
11
 Loading...