


Built-In Ovens
500 SERIES
HBL53, HBL54, HBL55, HBL56, HBL57

Table of Contents
About This Manual . . . . . . . . . . . . . . . . . . . . . . . 1 How This Manual is Organized . . . . . . . . . . . . . 1 Safety . . . . . . . . . . . . . . . . . . . . . . . . . . . . . . . . . . 2 Important Safety Instructions . . . . . . . . . . . . . . 2 Getting Started . . . . . . . . . . . . . . . . . . . . . . . . . . 4 Parts . . . . . . . . . . . . . . . . . . . . . . . . . . . . . . . . . . . 4 Accessories . . . . . . . . . . . . . . . . . . . . . . . . . . . . . 6 Control . . . . . . . . . . . . . . . . . . . . . . . . . . . . . . . . . 7 Before Using the Oven for the First Time . . . . . 8 Operation . . . . . . . . . . . . . . . . . . . . . . . . . . . . . . . 9 About the Appliance . . . . . . . . . . . . . . . . . . . . . . 9 Basic Features . . . . . . . . . . . . . . . . . . . . . . . . . . 9
Setting the Clock . . . . . . . . . . . . . . . . . . . . . . . . . . 9 Setting the Cooking Mode and Temperature . . . . 9 Heating Time Limitation . . . . . . . . . . . . . . . . . . . 10 Timer . . . . . . . . . . . . . . . . . . . . . . . . . . . . . . . . . . 10 Sabbath Mode . . . . . . . . . . . . . . . . . . . . . . . . . . 10
Customer Settings . .
Cook Time . . . . . . . . .
Stop Time . . . . . . . . . .
Temperature Offset . . .
Getting the Most Out of
General Tips . . . . . . .
Bake . . . . . . . . . . . . . .
Convection Bake (some
Convection Multi-Rack . . . . . . . . . . . . . . . . . . . 14
Pizza . . . . . . . . . . . . . . . . . . . . . . . . . . . . . . . . . 15
Roast . . . . . . . . . . . . . . . . . . . . . . . . . . . . . . . . . 15
Convection Roast . . . . . . . . . . . . . . . . . . . . . . . 16
Convection Broil. . . . . . . . . . . . . . . . . . . . . . . . . 16
Broil . . . . . . . . . . . . . . . . . . . . . . . . . . . . . . . . . . 16
Warm . . . . . . . . . . . . . . . . . . . . . . . . . . . . . . . . . 17
Proof . . . . . . . . . . . . . . . . . . . . . . . . . . . . . . . . . . 17
Cleaning and Maintenance . . . . . . . . . . . . . . . . 18
Cleaning . . . . . . . . . . . . . . . . . . . . . . . . . . . . . . . 18
Self Clean . . . . . . . . . . . . . . . . . . . . . . . . . . . . . . 18
Avoid These Cleaners . . . . . . . . . . . . . . . . . . . . . 19
Cleaning Guide . . . . . . . . . . . . . . . . . . . . . . . . . . 19
Maintenance . . . . . . . . . . . . . . . . . . . . . . . . . . . . 20
Replacing an Oven Light . . . . . . . . . . . . . . . . . . . 20
Removing the Oven Door . . . . . . . . . . . . . . . . . . 21
Service . . . . . . . . . . . . . . . . . . . . . . . . . . . . . . . . 23
. . . . . . . . . . . . . . . . 23
. . . . . . . . . . . . . . . . 24
. . . . . . . . . . . . . . . . 18
. . . . . . . . . . . . . . 18
PRODUCT WARRANTY
. . . . . . . . . . . . . . . . 24
. . . . . . . . . . . . . . . . 26
This Bosch Appliance is made by
BSH Home Appliances Corporation
1901 Main Street, Suite 600
Irvine, CA 92614
Questions?
1-800-944-2904
www.bosch-home.com/us
We look forward to hearing from you!

About This Manual
How This Manual is Organized
You can get the most out of your new oven by reading this manual from beginning to end. This way, you will systematically get to know your appliance and become familiar with its operation and features.
The manual consists of the following sections:
•The “Safety" section provides information on how to safely operate your oven.
•"Getting Started" introduces you to the oven components and features.
•The "Operation" section offers you step-by-step instructions on how to operate your oven.
•In "Getting the Most Out of Your Appliance" you can find a list of many common foods with the appropriate oven mode, temperature, rack position and bake time. This section also provides
and preparation tips.
•"Cleaning and Maintenance information on how to oven parts.
•The "Service" section yourself troubleshooting
Pay special attention to instructions in the "Safety
Safety Definitions
9WARNING
This indicates that death or serious injuries may occur as a result of non-observance of this warning.
9CAUTION
This indicates that minor or moderate injuries may occur as a result of non-observance of this warning.
NOTICE: This indicates that damage to the appliance or property may occur as a result of non-compliance with this advisory.
Note: This alerts you to important information and/or tips.
English 1

9 IMPORTANT SAFETY INSTRUCTIONS
READ AND SAVE THESE INSTRUCTIONS
Safety
9WARNING
When properly cared for, your new appliance has been designed to be safe and reliable. Read all instructions carefully before use. These precautions will reduce the risk of burns, electric shock, fire and injury to persons. When using kitchen appliances, basic safety precautions must be followed, including those in the following pages.
Proper Installation and Maintenance
Have the installer show you the location of the circuit breaker or fuse. Mark it for easy reference.
This appliance must be
a qualified technician. Connect outlet. Refer to the Installati
This appliance is intended only. It is not approved for you have any questions,
Do not store or use corrosive flammables or nonfood
is specifically designed for food. The use of corrosive will damage the appliance
Do not operate this appliance if it is not working properly, or if it has been damaged. Contact an authorized servicer.
Do not obstruct oven vents.
Do not repair or replace any part of the appliance unless specifically recommended in this manual. Refer all servicing to a factory authorized service center.
In the event of an error, the display flashes and beeps continuously. If this happens during Self Clean, disconnect appliance from the power supply and call a qualified technician.
Fire Safety
Do not use aluminum foil or protective liners to line any part of the appliance, especially the oven bottom. Installing these liners may result in risk of electric shock or fire.
If materials inside an oven should ignite, keep door closed. Turn off the appliance and disconnect the circuit at the circuit breaker box.
Use this appliance only for its intended purpose as described in this manual. For example, never use the appliance for warming or heating the room. Never use the appliance for storage.
Always have a working smoke detector near the kitchen.
In the event that personal clothing or hair catches fire, drop and roll immediately to extinguish flames.
Smother flames from food fires other than grease fires with baking soda. Never use water on cooking fires.
Have an appropriate fire extinguisher available, nearby, highly visible and easily accessible near the oven.
PERSONAL INJURY IN THE
OBSERVE THE
close-fitting lid, cookie off the burner. EVENT BURNS. If the
EVACUATE AND
.
PAN—You may be
•DO NOT USE WATER, including wet rags or towels—a violent steam explosion will result.
•Use an extinguisher ONLY if:
1)You know you have a CLASS ABC extinguisher and you already know how to operate it.
2)The fire is small and contained in the area where it started.
3)The fire department is being called.
4)You can fight the fire with your back to an exit.
English 2

9 IMPORTANT SAFETY INSTRUCTIONS
READ AND SAVE THESE INSTRUCTIONS
Burn Prevention
DO NOT TOUCH HEATING ELEMENTS OR INTERIOR SURFACES OF OVEN — Heating elements may be hot even though they are dark in color. Interior surfaces of an oven become hot enough to cause burns. During and after use, do not touch, or let clothing, potholders, or other flammable materials contact heating elements or interior surfaces of oven until they have had sufficient time to cool. Other surfaces of the appliance may become hot enough to cause burns. Among these surfaces are oven vent openings, surfaces near these openings and oven doors.
Exercise caution when opening the appliance. Standing to the side, open the door slowly and slightly to let hot air and/ or steam escape. Keep your face clear of the opening and make sure there are no children or pets near the unit. After the release of hot air and/or steam, proceed with your cooking. Keep doors shut unless necessary for cooking or cleaning purposes. Do not
Do not heat or warm unopened pressure may cause the injury.
Use caution when cooking (e.g. rum, brandy, bourbon)
evaporates at high temperatures as the alcohol vapors may small quantities of alcohol carefully.
Always place oven racks in
cool. If a rack must be moved while oven is hot, do not let potholder contact the heating elements.
Always use dry potholders. Moist or damp potholders on hot surfaces may result in burns from steam. Do not let potholder touch hot heating elements. Do not use a towel or other bulky cloth.
Secure all loose garments, etc. before beginning. Tie long hair so that it does not hang loose, and do not wear loose fitting clothing or hanging garments, such as ties, scarves, jewelry, or dangling sleeves.
Child Safety
When children become old enough to use the appliance, it is the legal responsibility of the parents or legal guardians to ensure that they are instructed in safe operation of the appliance by qualified persons.
Do not allow anyone to climb, stand, lean, sit, or hang on any part of an appliance, especially a door, warming drawer
or storage drawer. This can damage the appliance, and the unit may tip over, potentially causing severe injury.
Do not allow children to use this appliance unless closely supervised by an adult. Children and pets should not be left alone or unattended in the area where the appliance is in use. They should never be allowed to play in its vicinity,
whether or not the appliance is in use.
9CAUTION
Items of interest to children should not be stored in an appliance, in cabinets above an appliance or on the backsplash. Children climbing on an appliance to reach items could be seriously injured.
Cleaning Safety
it is still hot. Some when applied to a hot
can cause burns from
65 Warnings:
icals known to the State er, birth defects or other
The California Safe Drinking and Toxic Enforcement Act requires the Governor of California to publish a list of substances known to the state to cause cancer, birth defects or other reproductive harm, and requires businesses to warn customers of potential exposure to such substances. The burning of gas cooking fuel and the elimination of soil during Self Cleaning can generate small amounts of Carbon Monoxide. The fiberglass insulation in Self Clean ovens gives off very small amounts of formaldehyde during the first several cleaning cycles. California lists formaldehyde as a potential cause of cancer. Carbon Monoxide is a potential cause of reproductive toxicity. Exposure to these substances can be minimized by:
1.Providing good ventilation when cooking with gas.
2.Providing good ventilation during and immediately after Self Cleaning the oven.
3.Operating the unit according to the instructions in this manual.
English 3

9 IMPORTANT SAFETY INSTRUCTIONS
READ AND SAVE THESE INSTRUCTIONS
When Self Cleaning, confirm that the door locks and will not open. If the door does not lock, do not run Self Clean. Contact service.
Wipe out excessive spillage before Self Cleaning the oven.
Birds have very sensitive respiratory systems . Keep pet birds out of the kitchen or other rooms where kitchen fumes could reach them. During Self Clean, fumes are released that may be harmful to birds. Other kitchen fumes such as overheating margarines and cooking oils may also be harmful.
Keep oven free from grease build up.
Cookware Safety
Do not place food directly on oven bottom.
Follow the manufacturer's roasting bags.
Do not clean parts or
English 4
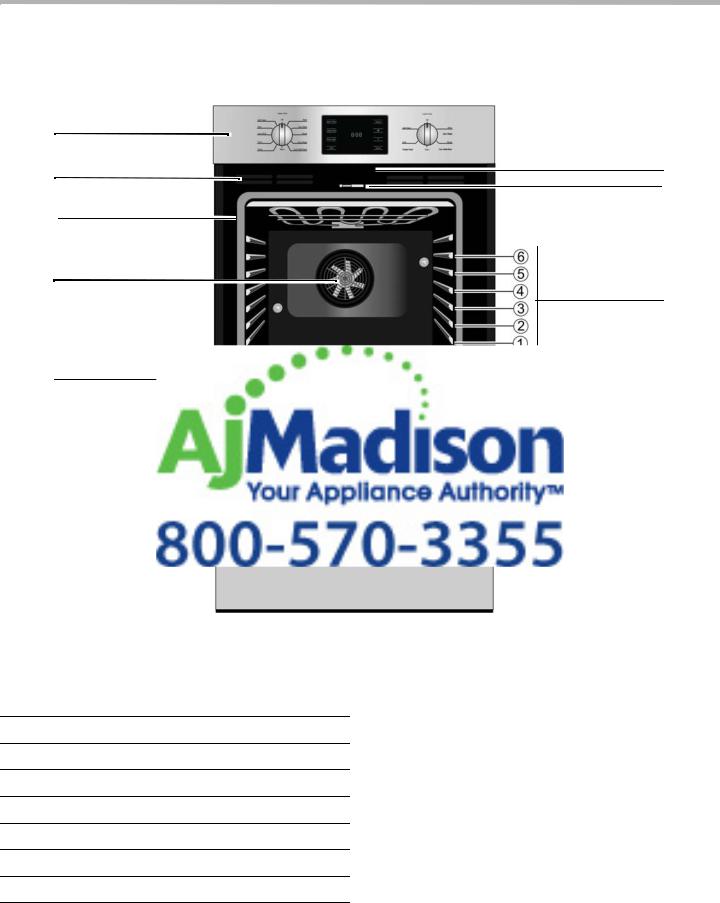
Getting Started
Parts
Picture shows a double oven. Your appliance may vary slightly.
1
8
2
3
4
5
6
7
 8
8
Cooling Fan
1Control Panel
2Door Gasket
3Convection Fan, some models
4Door Hinge
5Oven Vent
6Door Latch
7Rack Position Guides with 6 rack positions
8Oven Bottom
The cooling fan runs during all cooking modes. The fan can be heard when it is running, and warm air may be felt as it is released from the oven vent. The fan may also run after the oven is off.
Oven Vent
The oven vent is located below the control panel. Warm air may be released from the vent before, during and after cooking. It is normal to see steam escaping from the vent, and condensation may collect in this area. This area may be warm when the oven is in use. Do not block the vent, since it is important for air circulation.
English 5
Oven Bottom
The oven bottom conceals the lower heating element. As a result the element is protected from damage and spills.
Note:
Do not place food directly on the oven bottom.
9CAUTION
Do not use aluminum foil or protective liners to line any part of the appliance, especially the oven bottom. Installation of these liners may result in a risk of electric shock or fire.
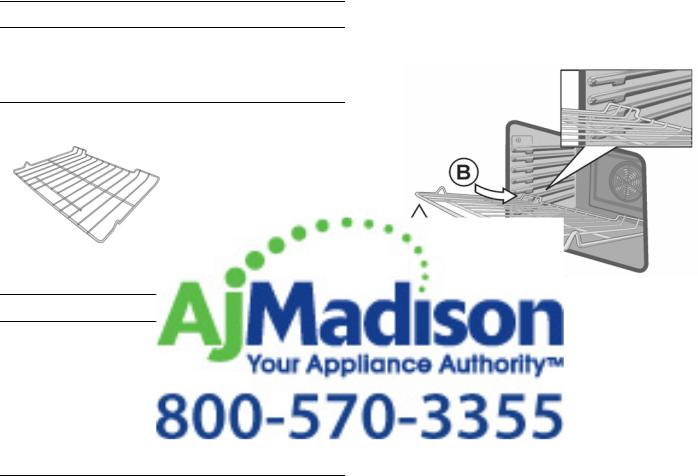
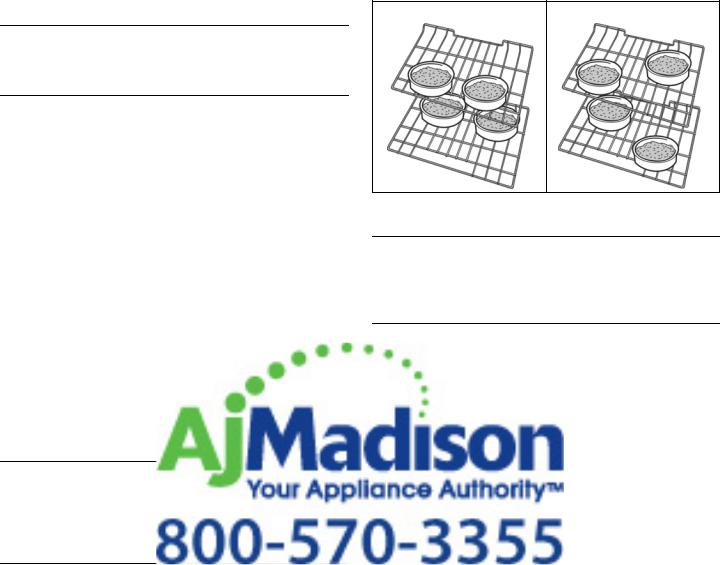
Accessories
Flat Rack
Do not clean in the Self Clean oven.
Inserting Racks
9CAUTION
To avoid burns, place positions before turning mitts when the oven moved while the oven contact hot heating
To avoid possible injury
ensure flat rack is installed exactly per installation instructions and not backwards or upside down.
Flat Rack
The rack is designed with a stop so it will stop before coming completely out of the oven and not tilt.
Inserting Flat Rack into Oven:
1.Grasp rack firmly on both sides.
2.Start the rack into the desired oven rack guide position.
3.Tilt the front of the rack up (A) to allow the rear of the rack to slide under the rack stop (B).
position. Push the rack all be straight and flat. It
sides and pull rack toward
rack up and pull it rack guides.
English 6
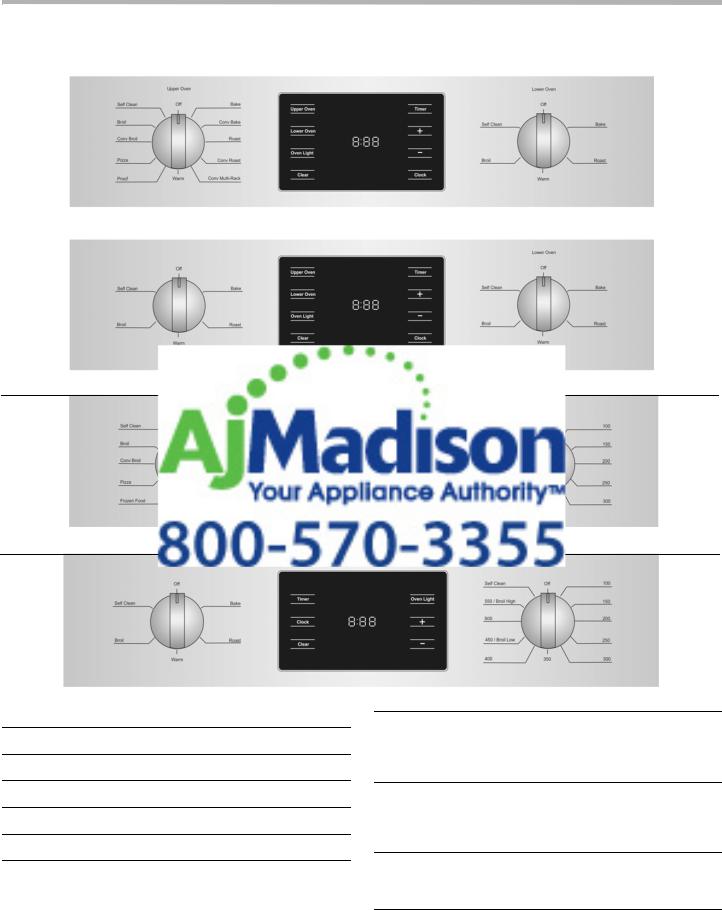
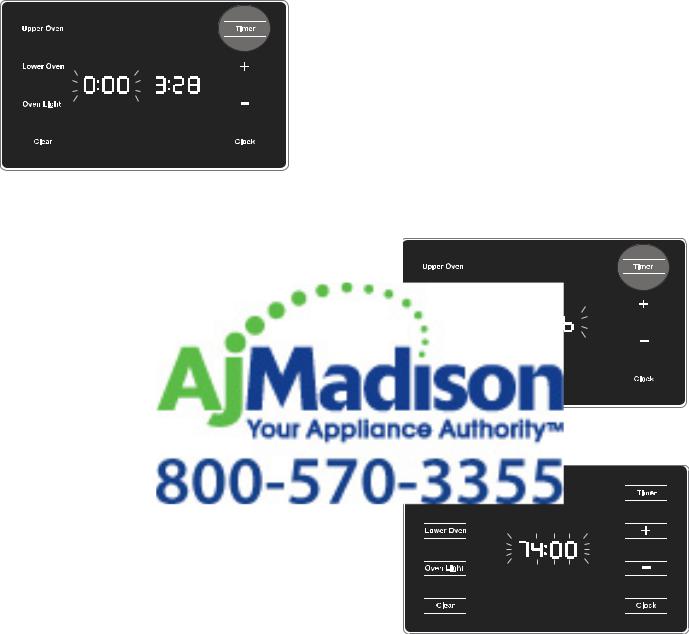
Control
Double Convection Oven Control Panel
1 |
3 |
5 |
Double Non-Convection Oven Control Panel
1 |
3 |
5 |
Single Convection Oven
2
Single Non-Convection Oven
1Upper Oven Mode Dial
2Oven Mode Dial
3Display, 8 button
4Display, 6 button
5Lower Oven Mode Dial
6Temperature Settings Dial
Touchpads
Switches to the upper oven in double oven models. Press before changing settings for the upper oven (double oven models only).
Switches to the lower oven in double oven models. Press before changing settings for the lower oven (double oven models only).
Turns the oven light off or on. Does not operate when the oven is in Self Clean mode.
English 7
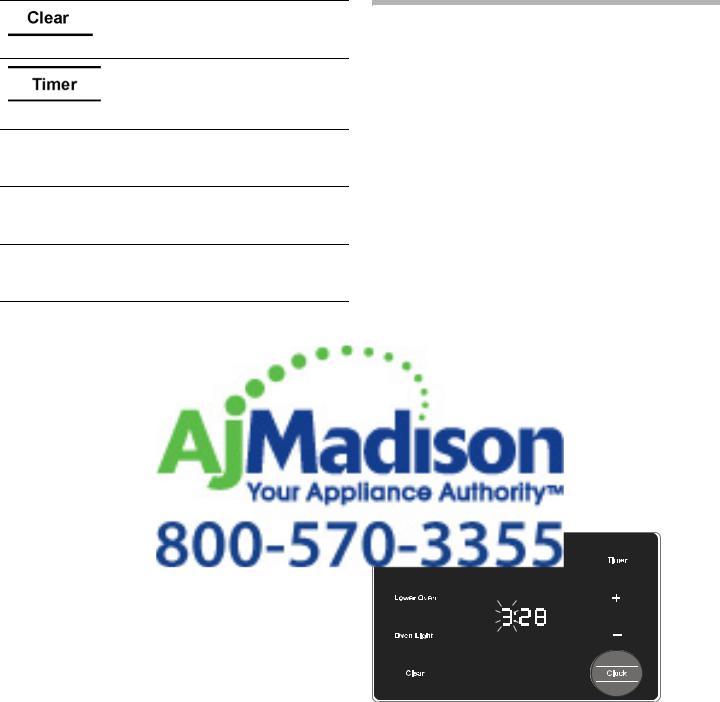
Clears the kitchen timer when editing or when finished.
Sets and displays the kitchen timers (double ovens, Timer for single ovens). The timers do not control the oven activities.
Increases the displayed value when pressed.
Decreases the displayed value when pressed.
Enters the clock set mode.
Before Using the Oven for the First Time
•Oven must be properly technician before use.
•Remove all packing the oven.
•While cool, wipe with a
•There may be a slight normal and will disappear
•Optimum cooking results being used.
•Read and understand and Care Manual
Operation
About the Appliance
Your new oven combines premium cooking results and simple operation.
The oven design has been optimized to improve heat distribution in the oven cavity. The result is even browning, shorter cooking times and lower energy consumption.
Thanks to the Self Clean mode, hours of scrubbing into the darkest corners of the oven is a thing of the past. The oven burns off soil simply and easily. All that is left to do is to remove a few ashes from the oven when Self Clean is done.
Clear labeling of the touch keys and knobs make operating the oven very easy. This manual includes all instructions for operating the oven.
any questions. Our the beginning of this
and suggestions!
1.Turn the Cooking Mode dial to "Off".
2.Press Clock.
The clock will be displayed. The hours will blink to indicate the value can be changed.
3.Use the + or - touchpads to set the hour.
4.Press Clock again to set the minutes. The minutes will blink to indicate the value can be changed.
5.Use the + or - touchpads to set the minutes.
Note: Pressing and holding the + or - touchpads will cause the minutes to change more rapidly.
English 8
If no change is entered for 3 seconds the time displayed will be saved.
Setting the Cooking Mode and
Temperature
Setting the Cooking Mode and temperature for Double Ovens
Double Oven Control Panel
A |
B |
|
|
1.Turn the Upper (A) or Lower (B) Oven Mode dial to the preferred cooking mode.
2.The display shows the mode at the left of the
3.Press the + or - buttons
4.When the desired seconds, or if the Timer mode starts and the
(Note: When the timer does not turn off the
5.Preheating will display temperature until the preheat the selected current oven cavity
6.If a timer is set, the disp
temperature for 3 seconds and will then display the timer countdown.
Note:
•The cooking mode can be changed at any time during operation.
•For double oven models, the upper or lower oven must be selected before the temperature can be changed. Press Upper Oven or Lower Oven to select an oven.
Setting the Cooking Mode and temperature for Single Ovens
Single Convection Oven Control Panel
A |
B |
|
|
1.Turn the Oven Mode Dial (A) to the preferred cooking mode.
2.Turn the Temperature Settings Dial (B) to change the temperature.
3.Preheating will display in red underneath the selected temperature.
Note:
• The cooking mode can be changed at any time
Dial can be turned to the in between to select a
.: 325° would be halfway
)
English 9
Timer
Setting the timer:
1.Press Timers.
If no other timer is running, “00:00” appears in edit mode and flashes.
2.Press the + button to set the amount of time. Holding the button down increases the timer value more quickly.
3.Press Timers again to begin the timer countdown The timer starts.
When the timer reaches and an alarm tone minutes.
4.Press Clear or open timer and terminate the
Note:
•The timer can be set (hours:minutes). When
remaining, the count changes to seconds and counts down from :59 to :00.
•The timer does not change when other settings are changed.
•A timer may not be set during a Self Clean operation.
•A second timer can be set (double ovens only) after the first timer has started. Press Timers twice to enter the editing mode for the second timer.
Sabbath Mode
The Sabbath Mode enables those of particular faiths to use their ovens on the Sabbath. Sabbath Mode can be entered at any time during a bake cycle only.
To set the Sabbath Mode:
1.Turn the Cooking Mode Dial to Bake.
2.Set the temperature to a value within the Sabbath Mode temperature range (100° to 450° F).
If the temperature set is outside this range, and the Timer button is held for 3 seconds, an error tone sounds.
3.Press and hold the Timer (or Timers) button for three seconds.
SAb appears in the display for 3 seconds.
74 hours is the maximum set for Sabbath Mode.
5.Press + or - to edit Sabbath cook time by 30 minute increments. Holding the button more than 1 seconds causes the displayed value to change 30 minutes each 1/2 second until the button is released The maximum time allowed to be set is 74 hours.
6.If no change is made for 3 seconds, or if Timer is pressed, Sabbath mode begins and the timer counts down in 1 minute increments until it reaches :00, then displays SAb. The heating mode ends, but the oven stays in Sabbath Mode.
English 10

Note:
•Pressing any of the touchpads while the oven is in Sabbath mode will have no effect. Turn the Cooking Mode Dial to Off to cancel Sabbath Mode.
•Changing the Oven Mode Selector to any other mode will end Sabbath Mode.
•In double oven models, Sabbath Mode is available for both ovens at the same time. Sabbath Mode can only be set for one oven at a time.
•The allowed temperature in Sabbath Mode is 100° to 450° F.
•The period of time for Sabbath Mode to run can be set between 24 and 74 hours.
•If the oven light is on when Sabbath Mode is set, the light remains on. If it is off when Sabbath Mode is set, the light remains off.
Customer Settings
The Customer Settings menu is used to customize the oven settings.
To Change Settings:
The oven must be turned to access the "Customer
1.To Access the Customer Settings Menu:
•Single Ovens: Press Clock and + for two seconds
•Double Ovens: Press Upper Oven and Timer
The first menu item, S1, appears in the display.
2.Press Clock to move through the settings list.
3.Press + or - to change the setting.
4.Press Clock to move to the next setting option. The next menu item, S2, appears in the display.
Always set the values as described in steps 2 and 3. Press Clear to leave the menu.
The following settings can be adjusted:
Menu item |
Description |
Settings |
|
(Default) |
|||
|
|
||
|
|
|
|
S1: Clock |
12-hour or 24-hour |
1=12hr |
|
Mode |
display mode; 1=12hr, 2 |
|
|
|
=24hr |
|
|
|
|
|
|
S2: |
F = Fahrenheit, 1=F |
1=F |
|
Temperature |
C = Celsius, 2=C |
|
|
Unit |
|
|
|
|
|
|
|
S3: Sound |
Touchpad sound: Yes or |
1=Yes |
|
with each key |
No: 1=Yes, 2=No |
|
|
press |
|
|
|
|
|
|
|
S4: Clock |
Show Clock: Yes or No; |
1=Yes |
|
Visible |
1=Yes, 2=No |
|
|
|
|
|
|
Non- |
Sets the oven offset |
0 |
|
Convection |
value (affects upper cavity |
|
|
Ovens |
only on double ovens). |
|
|
S5: Oven |
This value is added to the |
|
|
Temperature |
oven cavity temperature |
|
|
|
(makes oven |
|
|
|
if food is |
|
|
|
either too |
|
|
|
light). |
|
|
|
range of |
|
|
|
to 35° F |
|
|
|
positive or |
|
|
|
offset does |
|
|
|
Clean, |
|
|
|
Warm |
|
|
|
. |
|
|
(Non- |
|
|
|
convection |
|
|
|
ovens do not |
|
|
|
have a fan at |
|
|
|
the inside |
|
|
|
back of the |
|
|
|
oven cavity) |
|
|
|
|
|
|
|
Convection |
Toggles automatic |
1=On |
|
Ovens |
convection conversion |
|
|
S5: Auto |
adjustment of cooking |
|
|
Convection |
temperatures (available |
|
|
Conversion |
only on convection |
|
|
(Convection |
ovens). |
|
|
|
|
||
ovens have a |
|
|
|
fan at the |
1=On |
|
|
inside back |
2=Off |
|
|
of the oven |
|
|
|
cavity) |
|
|
|
|
|
|
English 11

Menu item |
Description |
Settings |
|
(Default) |
|||
|
|
||
|
|
|
|
Convection |
Sets the oven offset |
0 |
|
Oven |
value (affects upper cavity |
|
|
S6: Oven |
only on double ovens). |
|
|
Temperature |
This value is added to the |
|
|
Offset |
oven cavity temperature |
|
|
Upper Oven |
set point (makes oven |
|
|
hotter or cooler if food is |
|
||
for Double |
|
||
consistently either too |
|
||
Ovens |
|
||
brown or too light). |
|
||
|
|
||
(Convection |
The allowable range of |
|
|
increment is 0° to 35° F |
|
||
ovens have a |
(0° to 19° C), positive or |
|
|
fan at the |
negative. |
|
|
inside back |
Temperature offset does |
|
|
of the oven |
|
||
not affect Self Clean, |
|
||
cavity) |
|
||
Broil, Conv. Broil, Warm |
|
||
|
|
||
|
or Pizza modes. |
|
|
|
|
|
|
Convection |
Sets the oven offset |
0 |
|
Oven |
value |
|
|
S7: Oven |
only on |
|
|
Temperature |
This value |
|
|
Offset |
oven cavity |
|
|
Lower Oven |
set point |
|
|
hotter or |
|
||
for Double |
|
||
consistently |
|
||
Ovens |
|
||
brown or |
|
||
|
|
||
(Convection |
The |
|
|
increment |
|
||
ovens have a |
(0° to 19° |
|
|
fan at the |
negative |
|
|
inside back |
Temperature |
|
|
of the oven |
|
||
not affect Self Clean, |
|
||
cavity) |
|
||
Broil, Conv. Broil, Warm |
|
||
|
|
||
|
or Pizza modes. |
|
|
|
|
|
Getting the Most Out of
Your Appliance
General Tips
Pan Placement
Baking results are better if pans are placed in the center of the oven. If baking more than one pan on a rack, allow at least 1" to 1 ½" of air space around the pan. When baking four cake layers at the same time, stagger pans on two racks so that one pan is not directly above the other.
Rack Position
|
Rack positions |
|
are numbered |
|
from 1 to 6, from |
|
bottom to top. |
|
Consult the food |
|
cooking charts at |
|
the back of this |
|
manual for |
|
recommended |
|
rack positions. |
|
the top rack position (6). |
|
rack positions 1 through 6 |
|
top rail. |
|
|
|
|
|
steaks, melting cheese, |
usable position) |
browning toppings |
|
|
5 |
Toasting bread, broiling most meats |
|
|
4 |
Broiling poultry and thicker meats |
3baked goods on a cookie sheet or baking pan using a single rack, includes frozen convenience foods, cakes, casseroles, frozen pizza
2small roasts or poultry, bundt cakes, pies, breads
1 (lowest |
large roasts, turkey, angel food cake |
position) |
|
Aluminum Foil
Do not use aluminum foil or protective liners to line any part of the appliance, especially the oven bottom. Installing these liners may result in risk of electric shock or fire.
English 12

Preheating the Oven
•Place oven racks in desired position before heating the oven.
•Preheat the oven when using the Bake, Convection Bake, Convection Multi-Rack, Pizza, Broil, and Warm modes.
•Allow oven to preheat while preparing recipe ingredients or food items.
•Setting a higher temperature does not shorten preheat time.
•Once oven is preheated, place food in the oven as quickly as possible to minimize the loss of heat and reduction of oven temperature.
Preheat Reminders
Your oven has one of the fastest preheat times in the market using a concealed bake element. The lower element is hidden under the oven bottom. It is normal that the preheat time is different than your previous oven that had an exposed element on
•Cleaning the oven is cleaning around a coil of the oven. The hidden from food soils and spills easy.
•Preheating is not casseroles and frozen
•Preheat time will be to your house is less
•Increasing the oven preheat time. For example, is longer than the preheat
When broiling, preheat the oven 3-4 minutes. Do not preheat for more than 5 minutes.
For Best Results
•Use the cooking recommendations as a guide.
•Open the door as briefly as possible to avoid temperature reduction.
•Use the interior oven light to view the food through the oven window rather than opening the door frequently.
•Use the Timer to keep track of cooking times.
Baking Pans and Dishes
•Glass baking dishes absorb heat. Follow manufacturers' recommendations.
•Use pans that provide the desired browning. For tender, light, golden-brown crusts, use light, shiny, metal bakeware.
•Dark, rough or dull pans (nonstick or anodized) will absorb heat and result in a browner, crisper crust.
Some manufacturers recommend reducing the temperature 25 ºF when using this type of pan. Follow manufacturers' recommendations.
•Insulated cookie sheets or bakeware will increase the length of cooking time.
•Do not set any heavy object on the open oven door.
•Do not keep empty pans or pizza stones in the oven during cooking as this could change the cooking performance. Store the pans outside the oven.
High Altitude Baking
•When cooking at high altitudes, recipes and cooking times will vary.
•For accurate information, write the Extension Service, Colorado State University, Fort Collins, Colorado 80521. There may be a cost for the guides. Specify which high altitude food preparation guide you prefer: general information, cakes, cookies, breads, etc.
Condensation
of moisture to
any cooking process. moisture content of the
condense on any surface oven, such as the control
Cooking Mode
|
Lowest |
Highest |
|
100 |
550 |
|
100 |
550 |
|
450 |
550 |
Warm |
150 |
225 |
Proof |
85 |
125 |
Convection Bake* |
100 |
550 |
Convection Multi-Rack |
100 |
550 |
Convection Roast |
100 |
550 |
Pizza* |
100 |
550 |
Convection Broil* (Low,High) |
450 |
550 |
* Some models only |
|
|
English 13
Bake
Bake is cooking with dry, heated air.
%Both the upper and lower elements cycle to maintain the oven temperature.
The Bake mode can be used to prepare a variety of food items, from pastries to casseroles. Refer to recipe or package directions for oven temperature and baking time.
Tips
•Preheat the oven if the recipe recommends it.
•Baking time will vary with the size, shape and finish of the bakeware. Dark metal pans or nonstick coatings will cook faster with darker results. Insulated bakeware will lengthen the cook time for most foods.
•For best results, bake food on a single rack with at least 1 to 1 1/2 “ space between pans or dishes and the oven walls.
•Eliminate heat loss from the oven by using the window to periodically check
opening the door.
•If multiple racks are racks. For cookies, use
Convection Bake
Convection
2Heat heating difference the heat oven
The Convection Bake mode is well suited for cakes, bar cookies and breads to take advantage of the bottom heat, yielding a better crust on baked items.
The benefits of Convection Bake include:
•Slight decrease in cook time.
•Greater volume (yeast items rise higher).
Tips
•Place food in shallow, uncovered pans such as cookie sheet without sides.
•If baking more than one pan on a rack, allow at least 1” to 1 1/2” of air space around the pan. Stagger pans so that one is not directly above the other (see graphic below).
•For cakes use rack positions 2 and 5.
27” appliances: |
30” appliances: |
Convection Multi-Rack
Multi-Rack mode cooks with heat
:from a third element behind the back wall of the oven. The heat is circulated throughout the oven by the convection fan.
is well suited for cooking as cookies and biscuits. multiple racks (2 or 3) at the
possible on 6 racks baking time increases
using multiple racks at one
by 25° F if Auto Convection Conversion is not activated.
•Place food in low-sided, uncovered pans such as cookie sheet without sides.
•If baking more than one pan on a rack, allow at least 1” to 1 1/2” of air space around the pan. Stagger pans so that one is not directly above the other (see graphic below).
English 14

Pizza (some models)
In the Pizza mode, heat from the
2upper and lower elements is circulated throughout the oven by the convection fan.
Use the Pizza mode for fresh or frozen pizza.
Tips
•When baking a frozen pizza:
For a crispy crust, place pizza directly on the rack. For a softer crust, use a pizza pan.
•When proofing pizza dough, coat dough with olive oil and place it in a bowl tightly covered with plastic wrap to prevent crust formation.
•Sprinkle cornmeal on the pizza pan to prevent sticking.
•If using a pizza paddle, sprinkle the paddle liberally with corn meal for ease in transferring the dough to the pan.
•If par-baking handmade with a fork before baking
•If using a pizza pan, a more crisp crust and crust.
•Preheat baking stones recommendations while
•Bake homemade pizza of the rack.
•Follow manufacturer’s
•The convection fan mode.
Roast
Roast uses both the upper and lower elements to maintain the oven
%temperature. Roasting uses more intense heat from the upper element than the lower element. This results in more browning of the exterior while the inside remains especially moist.
Roast is best suited for large cuts of meat and poultry.
Tips:
•Preheating the oven is not necessary.
•Use a high-sided pan, or cover dish with a lid or foil for less tender cuts of meat.
•Use a meat thermometer to determine the internal temperature of the meat.
•If the meat is browned to your liking, but is not yet done, a small strip of foil can be placed over the meat to prevent overbrowning.
foil 10–15 minutes after
lid are suitable for use in
or turkey, tuck wings legs with kitchen string.
juice, wine, bouillon or
.
English 15

Convection Roast (some models)
Convection Roast uses heat from
2the top and bottom elements as well as heat circulated by the convection fan.
The Convection Roast mode is well suited for preparing tender cuts of meat and poultry. It is also suitable for roasting vegetables.
The benefits of Convection Roast include:
•As much as 25% faster cooking than non-convection modes.
•Rich, golden browning.
Tips:
•Preheating the oven is not necessary.
•Use the same temperature as indicated in the recipe.
•Check doneness early, since roasting time may decrease. Refer to the Meat/Poultry cooking chart for examples.
•Do not cover meat or
•Use a broil pan with a uncovered pan for
•Use a meat thermometer termperature of the meat
•If the meat is browned done, a small strip of
to prevent overbrowning
•Let meat stand covered after removing it from
•Refer to the Meat/Poultry recommended rack positions.
Broil
(Broil uses intense heat radiated from the upper element.
The Broil mode is best suited for cooking thin, tender cuts of meat (1" or less), poultry and fish. It can also be used to brown breads and casseroles. Always broil with the door closed. The benefits of broiling include:
•Fast and efficient cooking.
•Cooking without the addition of fats or liquids.
Tips:
•Preheat oven 3–4 minutes. Do not preheat for more than 5 minutes.
English 16
•Steaks and chops should be at least ¾" thick.
•Brush fish and poultry with butter or oil to prevent sticking.
•Use a broil pan and grid (or a deep pan with a metal rack) designed to drain fats and oils away from the cooking surface to prevent smoking and spattering.
•Turn meats once during the recommended cook time (see Broil Chart for examples). Fish does not need to be turned.
•When top browning casseroles, use only metal or glass ceramic dishes such as CorningWare ®.
•Never use heat-proof glass (Pyrex ®); it cannot tolerate the high temperature.
•Broiling times are approximate and may vary slightly. Times are based on cooking with a preheated broil element.
Convection Broil (some models)
Convection Broil is similar to Broil. It intense heat from the upper
heat circulated by a
.
ll suited for cooking thick, fish. Convection Broil is not casseroles and other
with the door closed.
standard broiling, convection
•Preheat oven 3–4 minutes. Do not preheat for more than 5 minutes.
•Steaks and chops should be at least 1 1/2" thick.
•Use a broil pan and grid (or a deep pan with a metal rack) for broiling.
•Do not cover the broil grid with foil. It is designed to drain fats and oils away from the cooking surface to prevent smoking and spattering.
•Turn meats once during the recommended cook time.
•Never use heat-proof glass (Pyrex ®); it cannot tolerate the high temperature used for broiling.
For Convection Broil times, refer to the Meat/ Poultry Cooking Chart.

Warm
In Warm, the upper and lower
%elements maintain a low temperature in the oven cavity in order to keep food at serving temperature.
•Use the Warm mode to keep cooked foods hot until ready to serve.
•Warm mode temperatures are 150 ºF – 225 ºF.
•The default temperature in the Warm mode is 170 ºF.
•Foods that must be kept moist should be covered with a lid or aluminum foil.
9CAUTION
When using Warm mode, follow these guidelines:
•Do not use the Warm mode to heat cold food.
•Be sure to maintain proper food temperature. The USDA recommends holding hot food at 140 ºF or warmer.
•DO NOT warm
Proof
In Proof
%element temperature yeast
•No preheat is necessary
•Proofing is the rising of
•The Proof mode
•The default temperature in the Proof mode is 100 ºF.
•Loosely cover the the bowl or pan and use any rack that accommodates the size of the container.
•Keep the oven door closed and use the oven light to check the rising of the dough.
English 17
Cleaning and Maintenance
Cleaning
Self Clean
9WARNING
Children should not be left alone or unattended in an area where appliances are in use. During the Self Clean cycle, parts of the appliance may become potentially harmful to persons who lack adult knowledge of appliances and adult reactions to potentially harmful conditions.
During the elimination of soil during Self Cleaning, small amounts of carbon monoxide can be created. Fiberglass insulation could give off very small amounts of formaldehyde during the first several cleansing cycles. To minimize exposure to these substances, provide good ventilation with an open window, or use a
During Self Clean, the oven temperature. Soil is burned
NOTICE:
Wipe out excessive spillage
NOTICE:
Do not clean parts or
Remove baking dishes and
Single Ovens
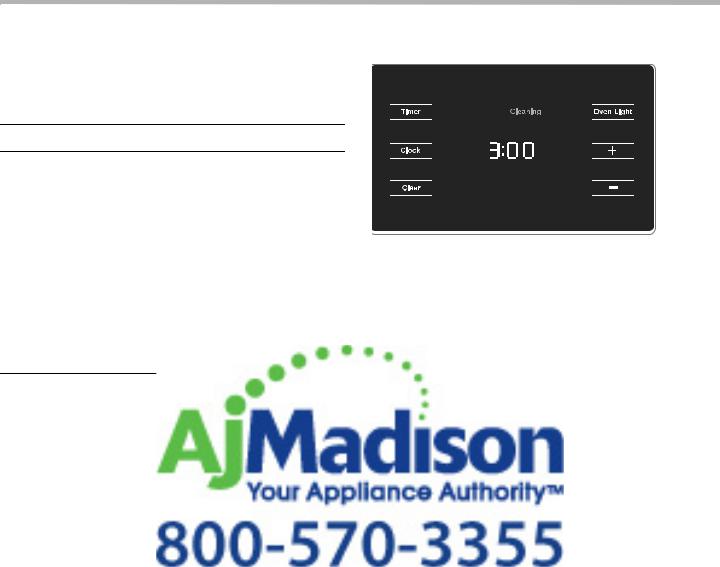
To set the Self Clean mode:
1.Remove all accessories and racks from the oven.
2.Self Clean will not run if a timer is active. Clear all running timers before attempting to start Self Clean.
3.Turn the Cooking Mode Dial to Self Clean.
4.Turn the Temperature Settings Dial to Self Clean.
5.After 3 seconds, the display blinks “--:--”.
6.Press the + or - key. The display shows the default Self Clean time, “3:00” hours. Press the + or - key to increase or decrease the Self Clean time. The maximum is 4 hours and the minimum is 2 hours.
7.When the time in the display is unchanged for 3 seconds, Self Clean begins. The Self Clean LED is illuminated.
The oven door is automatically locked during Self Clean.
8.When the Self Clean display shows “0:00”, Self Clean ends.
9.Wipe remaining ash from the oven using a moist cloth.
10.To cancel Self Clean, turn the Cooking Mode Dial to "Off".
turned on during Self
enamel and the polished become discolored over s not affect operation. Do
abrasive cleaners to treat
Self Clean mode at a
given time.
To set the Self Clean mode:
1.Remove all accessories and racks from the oven.
2.Self Clean will not run if a timer is active. Clear all running timers before attempting to start Self Clean.
3.Turn the Cooking Mode Dial for the selected oven cavity (upper or lower) to Self Clean.
4.After 3 seconds, the display blinks “--:--”.
5.Press the + or - key. The display shows the default Self Clean time, “3:00” hours. Press the + or - key to increase or decrease the Self Clean time. The maximum is 4 hours and the minimum is 2 hours.
6.When the time in the display is unchanged for 3 seconds, Self Clean begins. The Self Clean LED for the cavity is illuminated.
English 18
7.When the Self Clean display shows “0:00”, Self Clean ends.
8.Wipe remaining ash from the oven using a moist cloth.
9.To cancel Self Clean, turn the Cooking Mode Dial to "Off".
Note:
•The oven light cannot be turned on during Self Cleaning.
•The special heat-resistant components in the oven time. This is normal and not use scouring pads discolorations.
Avoid These Cleaners
Do not use commercial oven
They may damage the oven
Never use scouring pads cleansers containing Clorox
Do not use flammable cleaners such as ligher fluid or WD40.
Cleaning Guide
Part |
Recommendations |
|
|
|
|
Flat Rack |
Wash with hot soapy water. Rinse |
|
thoroughly and dry, or gently rub |
|
with cleansing powder or soap-filled |
|
pads as directed. DO NOT clean the |
|
rack in the Self Cleaning oven. |
|
If flat racks are cleaned in the oven |
|
during the Self Clean mode, they will |
|
loose their shiny finish and may not |
|
glide smoothly. If this happens wipe |
|
the rack edges with a small amount |
|
of vegetable oil. Then wipe off |
|
excess. |
|
|
Fiberglass |
DO NOT CLEAN GASKET. |
Gasket |
|
|
|
Part |
Recommendations |
|
|
|
|
Glass |
Wash with soap and water or glass |
|
cleaner. Use Fantastik® or Formula |
|
409® to remove grease spatters and |
|
stubborn stains. |
|
|
Painted |
Clean with hot soapy water or apply |
Surfaces |
Fantastik® or Formula 409® to a |
|
clean sponge or paper towel and |
|
wipe clean. Avoid using powder |
|
cleaning agents, steel wool pads |
|
and oven cleaners. |
|
|
Porcelain |
Immediately wipe up acid spills like |
Surfaces |
fruit juice, milk and tomatoes with a |
|
dry cloth. Do not use a moistened |
|
sponge/cloth on hot porcelain. When |
|
cool, clean with hot soapy water or |
|
apply Bon-Ami® or Soft Scrub® to a |
|
damp sponge. Rinse and dry. For |
|
stubborn stains, use soap-filled |
|
pads. It is normal for porcelain to |
|
lines with age due to |
|
heat and food soil. |
|
|
|
or rub in the direction of |
|
Clean with a soapy |
|
rinse and dry, or wipe |
|
or Formula 409® |
|
a paper towel. Protect |
|
with Stainless Steel |
|
a soft cloth. Remove |
|
with a cloth dampened |
|
vinegar. Do not use any |
|
such as steel wool pads, |
|
BonAmi® or Clorox ® |
|
|
Plastic & |
When cool, clean with soapy water, |
Controls |
rinse and dry. |
|
|
Printed Areas |
Do not use abrasive cleansers. |
(Words and |
When cool, clean with soapy water, |
Numbers) |
rinse, dry. |
|
|
English 19
 Loading...