


 Loading...
Bosch Recording Station
en Installation Manual

Bosch Recording Station |
Table of Contents | en |
3 |
|
|
|
Table of Contents
1 |
Safety Notes |
6 |
1.1 |
Safety symbols used here |
6 |
1.2 |
Installation/Configuration |
6 |
1.3 |
Disposal |
6 |
2 |
Introduction |
7 |
2.1 |
System Description |
7 |
2.2 |
Supported Operating Systems |
7 |
2.3 |
Virus Scanner/Windows Firewall |
8 |
2.3.1 |
Virus Scanners |
8 |
2.3.2 |
Configuring Windows Firewall |
8 |
3 |
Configuration Wizard |
9 |
3.1 |
Starting the Configuration Wizard |
9 |
3.2 |
License Activation |
10 |
3.3 |
Dialog box Activate license |
11 |
3.4 |
Configure Remote Stations |
13 |
3.5 |
Set Up Users |
14 |
3.6 |
Set Up Time Profiles |
15 |
3.7 |
MPEG4/H.264 Show IP Cameras Automatically |
16 |
3.8 |
Edit MPEG4/H.264 IP Cameras |
17 |
3.9 |
Configuring Camera Recording Settings |
19 |
4 |
Default configuration |
20 |
4.1 |
Configure Recording Drives |
20 |
4.2 |
IP Cameras and Encoders |
22 |
4.2.1 |
MPEG4/H.264 Show IP Cameras Automatically |
23 |
4.2.2 |
Edit MPEG4/H.264 IP Cameras |
24 |
4.2.3 |
Configure MPEG4/H.264 IP Cameras |
26 |
4.2.4 |
Configuring Dome Cameras and Pan/Tilt Cameras |
28 |
4.2.5 |
Setting the comparison image |
31 |
4.2.6 |
Configure JPEG IP Cameras |
32 |
4.3 |
Configuring Time Profiles |
35 |
4.4 |
Configure Recording Settings |
37 |
4.4.1 |
Configure Recording Settings for MPEG4/H.264 IP Cameras |
37 |
4.4.2 |
Enhanced settings of the MPEG4/H.264 IP cameras |
39 |
4.4.3 |
Configure Recording Settings of JPEG IP Cameras |
40 |
4.5 |
Configure Inputs and Outputs |
42 |
4.5.1 |
Configure Alarm Simulation |
42 |
4.5.2 |
Configure Virtual Inputs |
43 |
4.5.3 |
Configure Automatic Teller Machines |
44 |
4.5.4 |
Configure Foyer Card Reader |
46 |
4.5.5 |
Configure foyer card reader time control |
48 |
4.5.6 |
Configure Inputs from Alarm Panels (AP) |
49 |
4.5.7 |
Assign Line Statuses to Inputs (Not for Bosch G Series) |
50 |
4.5.8 |
Assign Addresses to Inputs (Not for Bosch G Series) |
51 |
Bosch Sicherheitssysteme GmbH |
Installation Manual |
- | V3 | 2012.12 |

4 en | Table of Contents Bosch Recording Station
4.5.9 |
Assign Addresses to Inputs (Bosch G Series) |
52 |
4.5.10 |
Configure POS Inputs |
53 |
4.5.11 |
Configure ATM/POS Inputs |
55 |
4.5.12 |
Configure I/O module |
57 |
4.6 |
Configure Alarm Processing |
59 |
4.7 |
Configure the E-mail Server Setup |
62 |
4.8 |
Configure Remote Stations |
63 |
4.9 |
Configure alarm transmission |
65 |
4.10 |
Configure Export Video Scheduler |
68 |
4.11 |
Create Authorization Levels |
70 |
4.11.1 |
Select LDAP Server User Group |
72 |
4.12 |
Configure users |
75 |
4.13 |
Configure Security and Network Settings |
77 |
4.14 |
Configure Error Forwarding |
79 |
4.14.1 |
Adding a Recipient/Editing Recipient Data |
81 |
4.15 |
Configure Options |
82 |
4.15.1 |
MIB List for SNMP |
85 |
4.15.2 |
Notification via SNMP |
86 |
4.15.3 |
Configure Automatic Alarm Recording |
87 |
4.16 |
Activate Software Licenses |
88 |
4.16.1 |
Dialog box Activate license |
89 |
|
|
|
5 |
Remote Configuration |
91 |
|
|
|
6 |
Connections |
92 |
6.1 |
Network Connection via DSL |
92 |
6.2 |
Connecting External Hard Disks |
94 |
6.3 |
Connecting an ATM (Serial) |
95 |
6.4 |
Connecting an Alarm Panel |
99 |
6.4.1 |
General |
99 |
6.4.2 |
Connecting to NZ 500 (20 mA) |
101 |
6.4.3 |
Connecting to BZ 500 (20 mA) |
101 |
6.4.4 |
Connecting to AZ 1010/NZ 1008 |
102 |
6.4.5 |
Connecting to NZ 1012 |
103 |
6.4.6 |
Connecting to NZ 1060 |
104 |
6.4.7 |
Connecting to UEZ 1000 (20 mA) |
105 |
6.4.8 |
Connecting to UEZ 2000 (20 mA) |
105 |
6.4.9 |
Connecting to UGM 2020 |
106 |
|
|
|
7 |
Troubleshooting and Checks |
107 |
7.1 |
Troubleshooting |
107 |
7.2 |
Checking the Network Connection |
109 |
7.3 |
Checking the Optional ATM Connection |
110 |
7.4 |
Installing a web server |
111 |
7.5 |
Checking the Web Connection |
111 |
|
|
|
8 |
Notes on Service and Maintenance |
112 |
8.1 |
Maintenance Work to be Carried Out |
112 |
- | V3 | 2012.12 |
Installation Manual |
Bosch Sicherheitssysteme GmbH |

Bosch Recording Station Table of Contents | en 5
8.2 |
Software Update |
113 |
8.3 |
Troubleshooting |
113 |
|
|
|
9 |
Technical Specifications |
114 |
|
|
|
|
Index |
115 |
Bosch Sicherheitssysteme GmbH |
Installation Manual |
- | V3 | 2012.12 |
6 en | Safety Notes Bosch Recording Station
1 |
Safety Notes |
|
Follow the safety instructions below when handling the device. |
1.1 |
Safety symbols used here |
|
The safety instructions shown below must be followed: |
|
|
|
NOTICE! |
|
Indicates information relating directly or indirectly to personnel safety or the protection of |
|
property. |
|
|
|
|
|
CAUTION! |
|
Indicates a potentially dangerous situation that can lead to material damage if it is not |
|
prevented. |
|
|
1.2 |
Installation/Configuration |
|
|
|
NOTICE! |
|
The installation/configuration of Bosch Recording Station should be implemented by qualified |
|
customer service personnel only. |
|
|
1.3 |
Disposal |
|
|
|
Disposal |
|
Your Bosch product has been developed and manufactured using high-quality materials and |
|
components that can be reused. |
|
This symbol means that electronic and electrical devices that have reached the end of their |
working life must be disposed of separately from household waste.
In the EU, separate collecting systems are already in place for used electrical and electronic products. Please dispose of these devices at your local communal waste collection point or at a recycling center.
- | V3 | 2012.12 |
Installation Manual |
Bosch Sicherheitssysteme GmbH |

Bosch Recording Station Introduction | en 7
2 |
Introduction |
2.1 |
System Description |
|
The Bosch Recording Station is a monitoring software program that saves video images |
|
recorded by IP cameras directly on site and transmits them across any distance to any |
|
location determined by you. Analog cameras can be connected via an encoder. |
|
The Bosch Recording Station can be used for a variety of purposes such as, for instance, in |
|
banks, large retail stores, railway stations, airports, city centers, industrial complexes and |
|
office buildings. |
|
The system offers extended display characteristics, very high flexibility for recording as well |
|
as fast and easy access to video images and information. Video images can be called up at any |
|
location worldwide 24/7. Communication with and access to the Bosch Recording Station |
|
take place via the private or public network. To this end the system can be connected to a |
|
number of peripheral devices and systems. |
|
Search and navigation functions in the tree structure make it easy to reproduce recorded |
|
images. Images can be accessed locally or remotely via a corporate network or the internet. |
|
Several different camera views can be selected. Fast and powerful image search functions |
|
make time-consuming manual searches unnecessary. Functions include searching for image |
|
changes (Smart Motion Search) as well as searching by criteria such as camera number and |
|
the date and time of recording. |
|
Access is controlled via user authorizations to maintain a high level of security. Events such as |
|
login, logout, status change, image transmission and system shutdown are stored in a |
|
database. Integrated video authentication prevents images being manipulated. |
|
Various storage devices such as external disk arrays, RAID and NAS devices and external hard |
|
disks can be used to retrieve and store images. |
|
Installation is quick and easy thanks to a configuration wizard. Bosch alarm systems, |
|
automated teller machines, Allegiant matrix switches and foyer card readers can be |
|
connected to serial inputs. |
2.2 |
Supported Operating Systems |
|
The Bosch Recording Station is compatible with the following operating systems: |
– Windows 7 (32-bit/64-bit)
– Windows Server 2008 R2 (64-bit)
– Windows Server 2008 (32-bit)
– Windows XP Professional SP 3 (32-bit)
– Windows Server 2003 (32-bit)
Note:
Observe the installation requirements for the individual operating systems!
The Quick Installation Guide provides you with information on installation requirements and a detailed description of how to complete the initial installation process using the configuration wizard.
Bosch Sicherheitssysteme GmbH |
Installation Manual |
- | V3 | 2012.12 |
8 en | Introduction Bosch Recording Station
2.3 Virus Scanner/Windows Firewall
NOTICE!
We recommend that you install a virus scanner and firewall to protect against computer viruses, computer worms and Trojans.
2.3.1 |
Virus Scanners |
|
Always use the most up-to-date virus scanner. |
Note:
–The virus scanner can affect the performance of the system.
–The real-time virus scanner must be activated to ensure sufficient protection against viruses.
–If possible, all partitions on the hard disk that contain saved images should be excluded from the scanning process.
–If possible, the C drive should be scanned at scheduled times. We recommend you carry out a scan on a weekly basis. When the C disk is scanned, the performance of the system is noticeably lowered and with it the image retrieval and storage rates.
Individual images may be lost.
–Removable drives, e. g. USB memory sticks, USB drives, CD/DVD drives and diskette drives, must be manually checked when inserted to ensure sufficient protection.
2.3.2 |
Configuring Windows Firewall |
|
|
|
We recommend that you disable the Windows firewall. If the Windows firewall is activated, |
|
|
the following exceptions must be added and selected in the Windows firewall: |
|
|
|
|
|
Bosch Recording Station |
|
|
Exceptions in Windows firewall settings |
|
|
|
|
|
ConnectionServer.exe |
|
|
|
|
|
DBServer.exe |
|
|
|
|
|
DiBosExplorer.exe |
|
|
|
|
|
DomeCameraUnit.exe |
|
|
|
|
|
DVRServiceShimWrapper.exe |
|
|
|
|
|
JobServer.exe |
|
|
|
|
|
Parametrierung.exe |
|
|
|
|
|
VCSModule.exe |
|
|
|
|
|
VSDKPluginModule.exe |
|
|
|
|
|
DCOM (TCP) Port 135 |
|
|
|
|
|
DCOM (UDP) Port 135 |
|
|
|
|
|
Remote Configuration (TCP) Port 8080 |
|
|
|
Note:
–The Bosch Recording Station processes must also be activated in the firewall of the virus scanner software.
–The ports required to bypass the firewall can be set in the configuration.
- | V3 | 2012.12 |
Installation Manual |
Bosch Sicherheitssysteme GmbH |
Bosch Recording Station Configuration Wizard | en 9
3 |
Configuration Wizard |
|
Use the enclosed Quick Installation Guide to install the Bosch Recording Station. |
|
The Quick Installation Guide provides you with information on installation requirements and a |
|
detailed description of how to complete the initial installation process using the configuration |
|
wizard. |
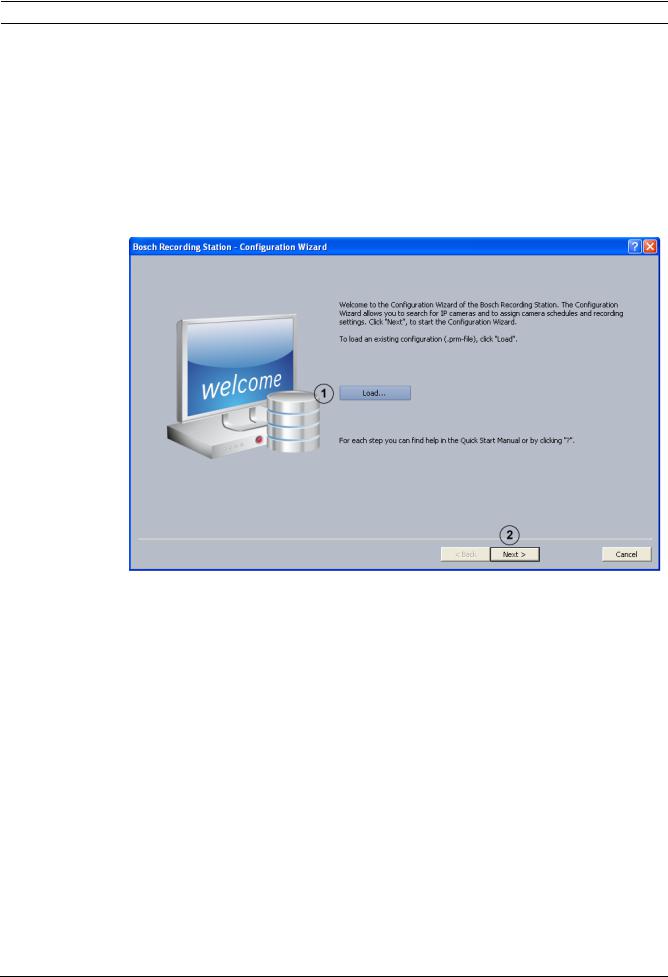
3.1 |
Starting the Configuration Wizard |
|
The configuration wizard will be displayed the first time the Bosch Recording Station is |
|
started following installation. |
The configuration wizard allows you to search for IP cameras in the network and assign camera schedules and recording settings.
Note:
It is not possible to load DiBos configurations.
1 |
...Load |
Loads an existing configuration file (.prm file). |
|
|
Note: |
|
|
Click Start, right-click Bosch Recording Station, and then |
|
|
click Run as Administrator to load an existing Bosch |
|
|
Recording Station configuration file. |
|
|
|
2 |
Next > |
Starts the configuration wizard. The configuration wizard |
|
|
allows you to search for IP cameras in the network and assign |
|
|
camera schedules and recording settings. |
|
|
|
Bosch Sicherheitssysteme GmbH |
Installation Manual |
- | V3 | 2012.12 |

10 en | Configuration Wizard Bosch Recording Station
3.2 License Activation
Configuration wizard > Dialog box License activation
You can activate licenses in this dialog box.
1 |
Recorder - Receiver |
Select whether you want to install a recorder or a receiver. |
|
|
|
2 |
License: |
Shows the license package to be activated. |
|
|
|
3 |
Activate... |
Opens a dialog box to activate the license package (see |
|
|
Section 4.16.1 Dialog box Activate license). |
|
|
|
4 |
Activated packages: |
Shows a list of activated license packages. |
|
|
|
5 |
Next > |
Shows the next dialog box of the configuration wizard. |
|
|
|
- | V3 | 2012.12 |
Installation Manual |
Bosch Sicherheitssysteme GmbH |
Bosch Recording Station Configuration Wizard | en 11
3.3 Dialog box Activate license
Menu Software licenses > Dialog box License activation > Select license > Button Activate...
or
Configuration wizard > Dialog box License activation > Select license > Button Activate...
You can enter the license activation key in this dialog box in order to activate the license package.
Note:
If your computer hardware does not provide a unique computer signature, you can purchase a dongle with a fixed dongle ID.
Packages that already have a license must be transferred to the dongle ID. To do this, please contact Bosch Security Systems Technical Support.
The dongle does not include the license itself. Activation with a license activation key is still required.
You have an authorization number and need a license activation key:
1.Make a note of the computer signature or use the copy and paste function to insert it into a text file.
2.On a computer with Internet access, enter the following URL in the browser: https://activation.boschsecurity.com
You are now in Bosch License Manager.
Follow the instructions to call up a license activation key. Make a note of the license activation key or use the copy and paste function to it into a text file.
3.In the Activate license dialog box in the Bosch Recording Station configuration, enter the license activation key called up from the Bosch License Manager and then click on Activate. The license package is activated.
Bosch Sicherheitssysteme GmbH |
Installation Manual |
- | V3 | 2012.12 |

12 en | Configuration Wizard |
Bosch Recording Station |
|
|
Note:
Keep hold of the authorization number, computer signature and activation key in case you have any technical queries.
- | V3 | 2012.12 |
Installation Manual |
Bosch Sicherheitssysteme GmbH |
Bosch Recording Station Configuration Wizard | en 13
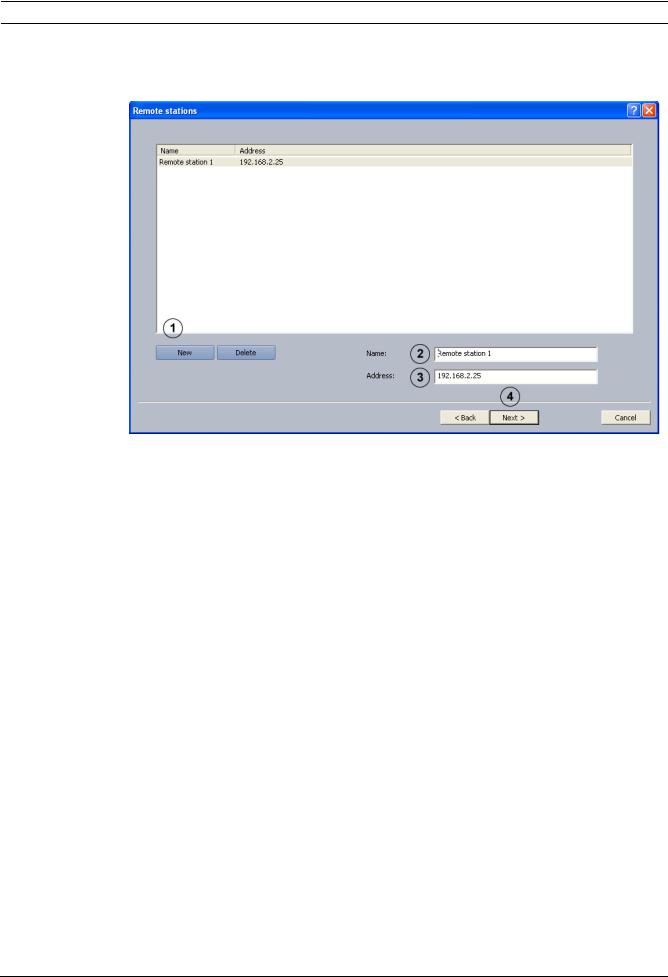
3.4 Configure Remote Stations
Configuration wizard > Dialog box Remote stations
Use this dialog box to create remote stations.
1 |
New |
Creates a new remote station. |
|
|
|
2 |
Name: |
Enter a name for the remote station. |
|
|
|
3 |
Address: |
Enter the remote station IP address or the computer name. |
|
|
|
|
|
Create more remote stations as and when required. |
|
|
|
4 |
Next > |
Shows the next dialog box of the configuration wizard. |
|
|
|
Bosch Sicherheitssysteme GmbH |
Installation Manual |
- | V3 | 2012.12 |
14 en | Configuration Wizard Bosch Recording Station
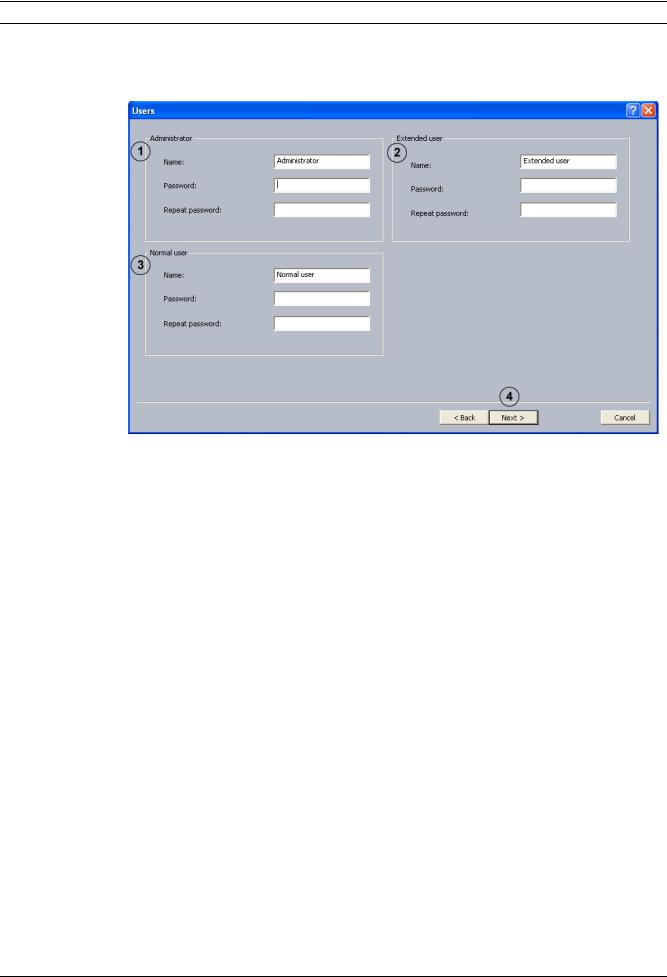
3.5 Set Up Users
Configuration wizard > Dialog box Users
In the case of an initial installation, the system automatically creates three authorization levels and three users. These cannot be deleted.
1 |
Administrator |
Possesses all rights concerning operation and configuration |
|
|
of the system. |
|
|
|
2 |
Extended user |
Possesses all rights concerning operation of the system. |
|
|
Does not possess the right to configure the system with the |
|
|
exception of the right to create a user with the authorization |
|
|
Normal user. |
|
|
|
3 |
Normal user |
Possesses all rights concerning operation of the system. He |
|
|
possesses no rights for configuration. |
|
|
|
4 |
Next > |
Shows the next dialog box of the configuration wizard. |
|
|
|
Proceed as follows to create a new user:
1.Create a new user by entering Name: and Password: in the corresponding authorization. Make a note of the name and password, as you will need it afterwards to log on.
2.Enter the same password again under Repeat password:.
3.Click Next > to call up the next page of the wizard or Finish to save the entries and exit the wizard.
Note:
By default, no password is assigned for the authorization levels.
- | V3 | 2012.12 |
Installation Manual |
Bosch Sicherheitssysteme GmbH |
Bosch Recording Station Configuration Wizard | en 15
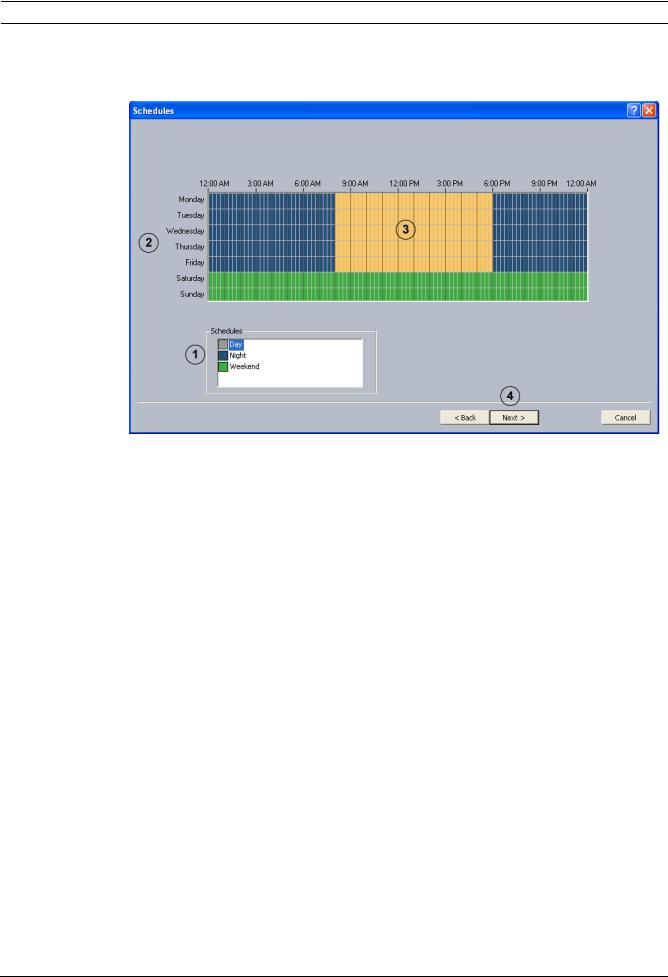
3.6 Set Up Time Profiles
Configuration wizard > Dialog box Schedules
Assignment of the time profiles is done with the mouse cursor in a graphical time planner. There are 3 time profiles available. These time profiles can be assigned to any day of the week. The time profiles are displayed in different colors.
1 |
Schedules |
Select the time profile that you want to assign to a day. |
|
|
|
2 |
Monday - Sunday |
Different times are possible for every day of the week. |
|
|
|
3 |
Graphical time planner |
Move the mouse cursor into the graphical time planner. |
|
|
Clicking with the left mouse button marks a cell. Dragging up |
|
|
a square while pressing the left mouse button marks a time |
|
|
profile. All selected cells take the color of the selected time |
|
|
profile. To edit selected cells in the graphical time planner, |
|
|
select another time profile and overwrite the cell already |
|
|
selected. |
|
|
|
4 |
Next > |
Shows the next dialog box of the configuration wizard. |
|
|
|
Bosch Sicherheitssysteme GmbH |
Installation Manual |
- | V3 | 2012.12 |
16 en | Configuration Wizard Bosch Recording Station
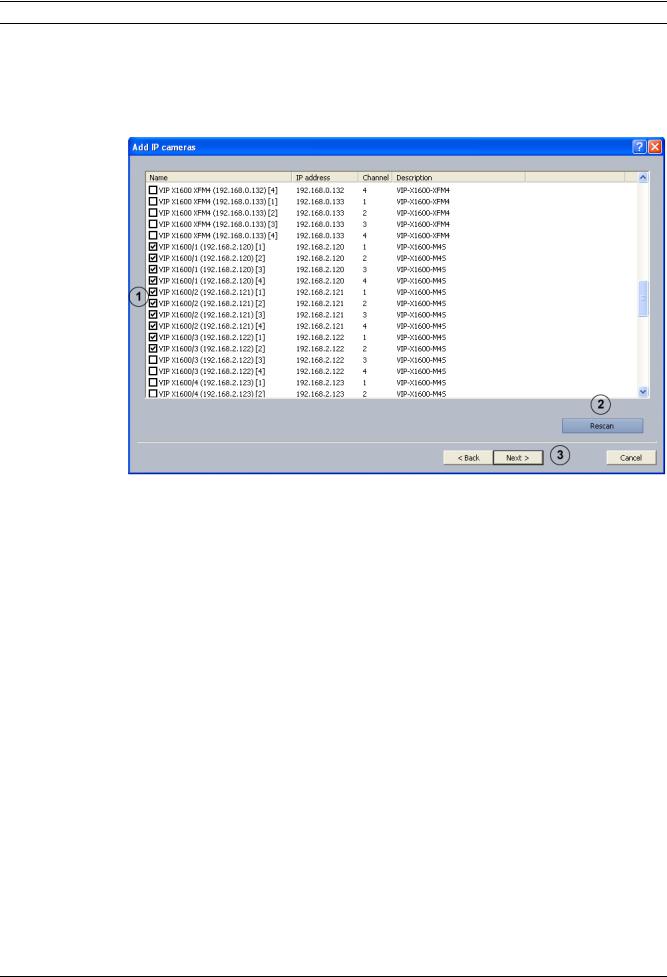
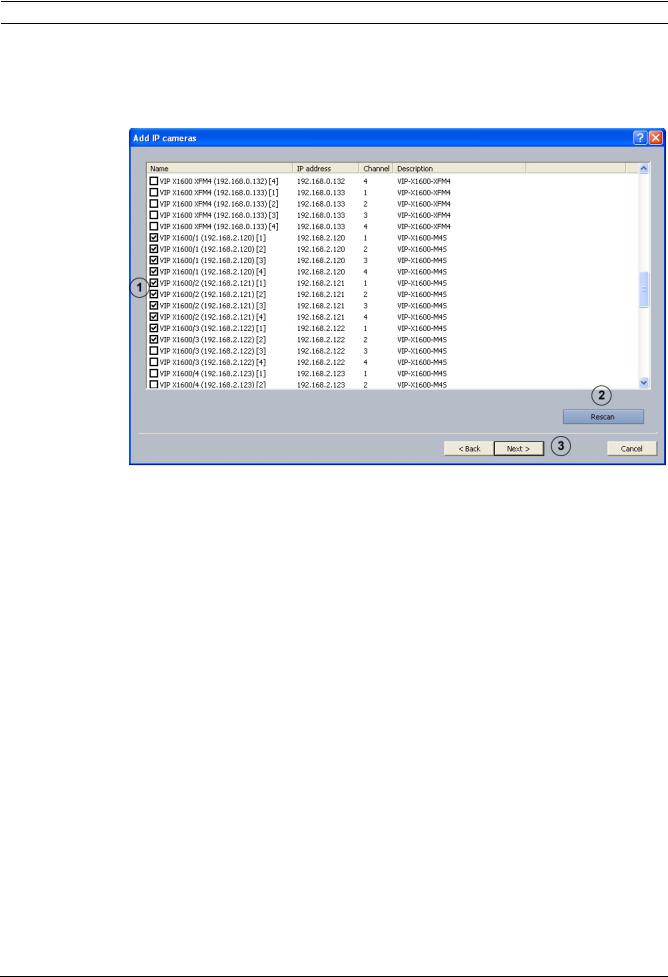
3.7 MPEG4/H.264 Show IP Cameras Automatically
Menu IP cameras and encoders > Scan network...
or
Configuration wizard > Dialog box Add IP cameras
This dialog box displays all of the MPEG4/H.264 IP cameras in the system.
1 |
|
Activate the check boxes of the cameras to be added to the |
|
|
Bosch Recording Station. |
|
|
|
2 |
Rescan |
Searches the network for MPEG4/H.264 IP cameras. |
|
|
|
3 |
Next > |
Adopts your input and shows the next dialog box. |
|
|
|
- | V3 | 2012.12 |
Installation Manual |
Bosch Sicherheitssysteme GmbH |
Bosch Recording Station Configuration Wizard | en 17
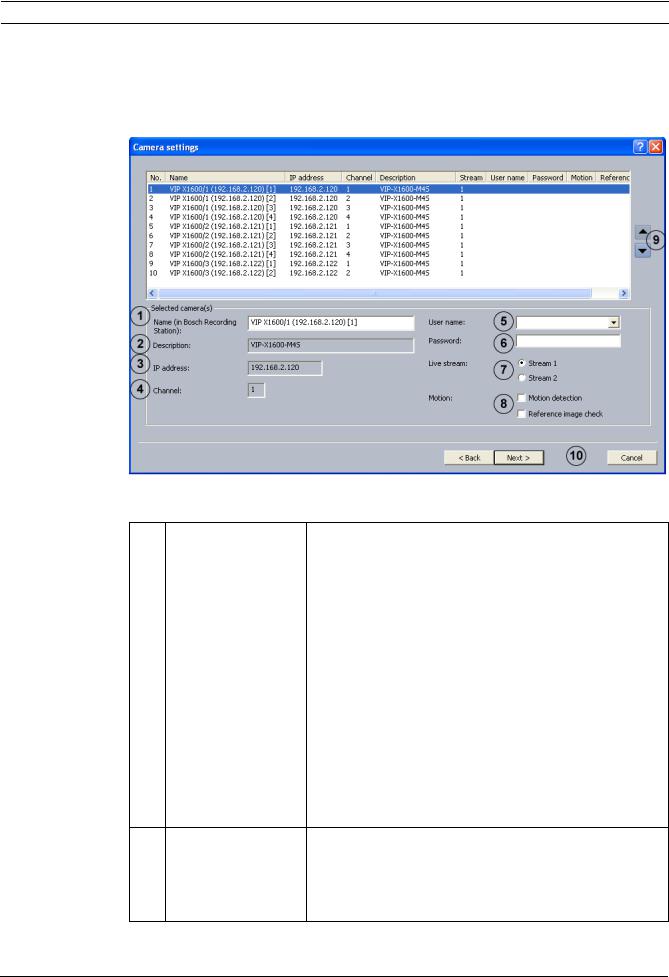
3.8 Edit MPEG4/H.264 IP Cameras
Menu IP cameras and encoders > Scan network... > Next > or
Configuration wizard > Dialog box Camera settings
Use this dialog box to assign specific properties to MPEG4/H.264 IP cameras, for instance motion detection and reference image check.
1 |
Name (in Bosch |
Select the camera from the overview and enter the name of |
|
Recording Station): |
the camera. This name is displayed as the camera name in the |
|
|
Bosch Recording Station. |
|
|
Note: |
|
|
It is possible to select multiple cameras. |
|
|
|
2 |
Description: |
Shows the type of IP camera. |
|
|
|
3 |
IP address: |
Shows the IP address of the IP camera. |
|
|
|
4 |
Channel: |
Shows the channel of the IP camera. |
|
|
|
5 |
User name: |
Enter the relevant user name and password for MPEG4/H.264 |
|
|
devices, where required for login purposes (e.g. when a user |
6 |
Password: |
|
|
|
name and password are configured in the MPEG4/H.264 |
|
|
device). |
|
|
Note: |
|
|
Select the user name Service if a service password has been |
|
|
assigned for the MPEG4/H.264 device. Enter the |
|
|
corresponding password. |
7Live stream: Select the stream of the MPEG4/H.264 device (Stream 1 or
Stream 2) to be used for viewing live images.
Note:
Stream 2 is not available for selection if the camera only delivers one stream.
Bosch Sicherheitssysteme GmbH |
Installation Manual |
- | V3 | 2012.12 |

18 en | Configuration Wizard Bosch Recording Station
8 |
Motion: |
Activate the Motion detection option and/or Reference image |
|
|
check option of the MPEG4/H.264 device. |
|
|
Note: |
|
|
– The motion detection and reference image check must |
|
|
also be activated in the MPEG4/H.264 device. |
|
|
– The name of the MPEG4/H.264 device appears in the |
|
|
Alarm processing menu in the Trigger section. The |
|
|
trigger can, for example, be selected such that it |
|
|
controls recording. To do so, you must select the job you |
|
|
require. |
|
|
|
9 |
|
Changes the sequence of cameras in the overview as well as |
|
|
in the configuration and user interface. |
|
|
|
10 |
Next > |
Adopts your input and shows the next dialog box. |
|
|
|
- | V3 | 2012.12 |
Installation Manual |
Bosch Sicherheitssysteme GmbH |
Bosch Recording Station Configuration Wizard | en 19
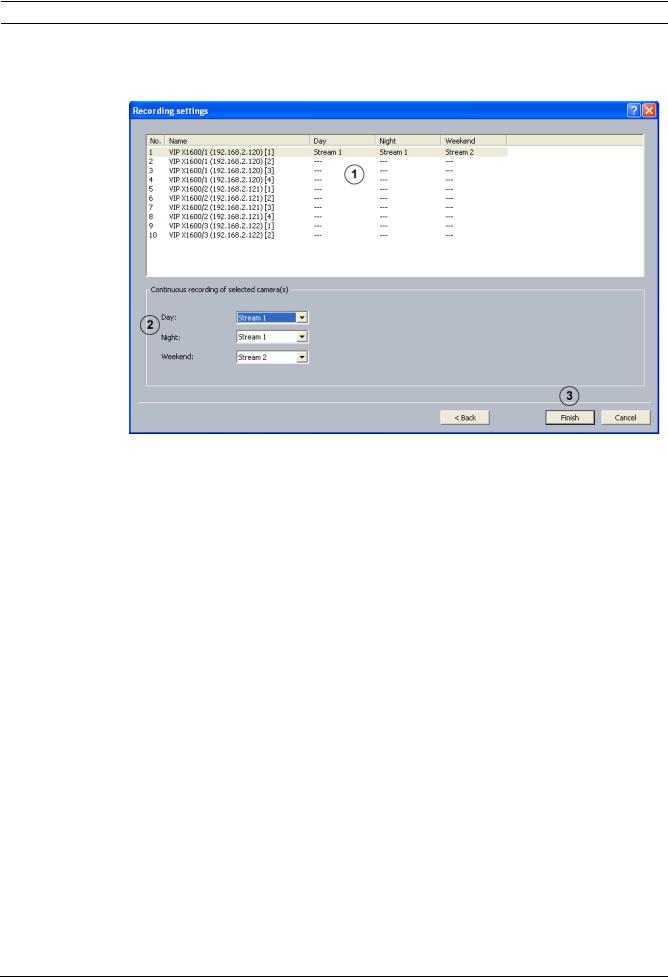
3.9 Configuring Camera Recording Settings
Configuration wizard > Dialog box Recording settings
Use this dialog box to define continuous recording for each camera.
1 |
|
Shows the cameras assigned to the Bosch Recording Station. |
|
|
Select the camera in the overview. |
|
|
Note: |
|
|
It is possible to select multiple cameras. |
|
|
|
2 |
Day: |
Apply the setting that is used for continuous recording. Then |
|
Night: |
select a stream for each time profile. |
|
Weekend: |
|
|
|
|
3 |
Finish |
Saves the settings and finishes the wizard. |
|
|
|
Bosch Sicherheitssysteme GmbH |
Installation Manual |
- | V3 | 2012.12 |
20 en | Default configuration Bosch Recording Station
4 |
Default configuration |
|
The default configuration allows more complex requirements or customer wishes to be |
|
catered for than the Configuration wizard. |
|
Go through the configuration tree from top to bottom by clicking on individual menu points |
|
and making the corresponding entries. |
|
It is not possible to switch from standard configuration to the configuration wizard. |
|
|
|
CAUTION! |
|
For security reasons, it is advisable to save the configuration on external data carriers. |
|
|
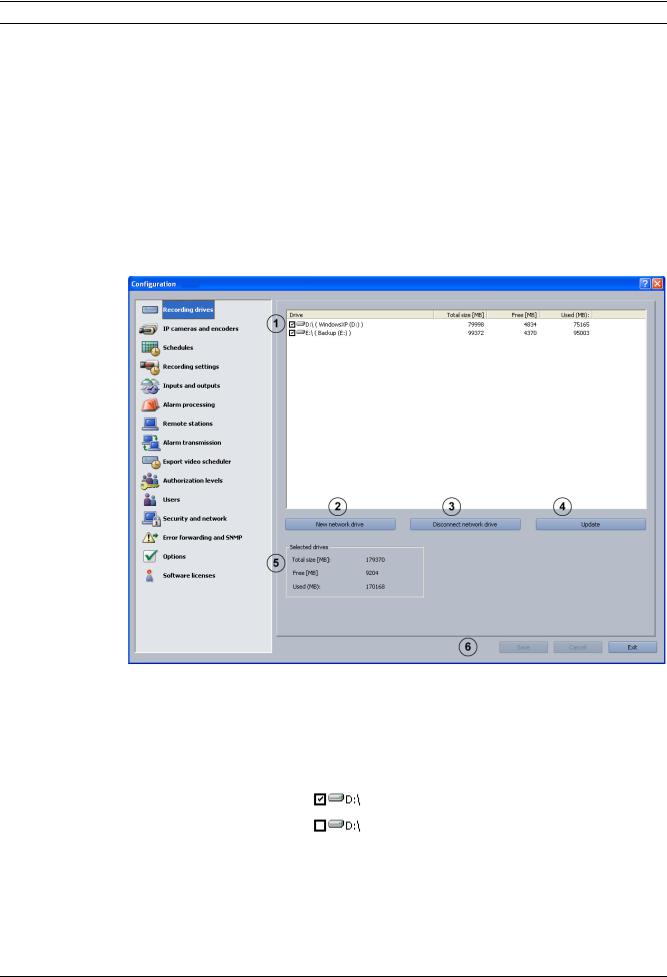
4.1 |
Configure Recording Drives |
|
Menu Recording drives |
This dialog box gives you an overview of the hard disks and network drives available.
1 |
|
The list field contains all the hard disks and network drives |
|
|
known to the system. The total size, the free storage capacity |
|
|
and the used storage capacity are shown in MByte. |
|
|
The drives listed can be activated or deactivated. |
|
|
Activate the drive by clicking on the check box. |
|
|
The drive is activated. |
|
|
The drive is not activated. |
|
|
|
2 |
New network drive |
Adds a new network drive. |
|
|
|
3 |
Disconnect network |
Disconnects a network drive. Select the drive and click on the |
|
drive |
button. |
|
|
|
- | V3 | 2012.12 |
Installation Manual |
Bosch Sicherheitssysteme GmbH |
Bosch Recording Station Default configuration | en 21
4 |
Update |
If an additional network drive is put into operation during |
|
|
configuration, this can be included in the list field by clicking |
|
|
Update. |
|
|
|
5 |
Selected drives |
Shows the total recording memory capacity for the activated |
|
|
cameras as well as the free memory space and occupied |
|
|
memory in MByte. |
|
|
|
6 |
Save |
Saves your input. |
|
|
|
Bosch Sicherheitssysteme GmbH |
Installation Manual |
- | V3 | 2012.12 |

22 en | Default configuration Bosch Recording Station
4.2 IP Cameras and Encoders
Menu IP cameras and encoders
This dialog box provides an overview of configured network components (IP cameras).
Note:
You can configure a maximum of 64 IP cameras. Cameras must be activated via software licenses (see Section 4.16.1 Dialog box Activate license).
1 |
|
The system detects connected MPEG4/H.264 IP cameras |
|
|
automatically. |
|
Scan network... |
The network scan searches the network for available IP |
|
cameras. You cannot configure the actual IP cameras in the |
|
|
|
|
|
|
Bosch Recording Station. IP cameras must be configured in |
|
|
advance with the appropriate tool (e.g. BVIP-Configuration |
|
|
Manager) |
|
|
|
2 |
Add |
Adds MPEG4/H.264 IP cameras or JPEG IP cameras. |
|
|
|
3 |
Edit |
Changes the settings of existing IP cameras. |
|
|
|
4 |
Remove |
Removes IP cameras from the configuration. |
|
|
|
5 |
Save |
Saves your input. The menu stays open |
|
|
|
6 |
Cancel |
Resets menu entries to the most recently saved |
|
|
configuration. |
|
|
|
7 |
Exit |
Ends configuration. |
|
|
|
- | V3 | 2012.12 |
Installation Manual |
Bosch Sicherheitssysteme GmbH |
Bosch Recording Station Default configuration | en 23
4.2.1 MPEG4/H.264 Show IP Cameras Automatically
Menu IP cameras and encoders > Scan network...
or
Configuration wizard > Dialog box Add IP cameras
This dialog box displays all of the MPEG4/H.264 IP cameras in the system.
1 |
|
Activate the check boxes of the cameras to be added to the |
|
|
Bosch Recording Station. |
|
|
|
2 |
Rescan |
Searches the network for MPEG4/H.264 IP cameras. |
|
|
|
3 |
Next > |
Adopts your input and shows the next dialog box. |
|
|
|
Bosch Sicherheitssysteme GmbH |
Installation Manual |
- | V3 | 2012.12 |

24 en | Default configuration Bosch Recording Station
4.2.2 Edit MPEG4/H.264 IP Cameras
Menu IP cameras and encoders > Scan network... > Next > or
Configuration wizard > Dialog box Camera settings
Use this dialog box to assign specific properties to MPEG4/H.264 IP cameras, for instance motion detection and reference image check.
1 |
Name (in Bosch |
Enter the name of the IP camera. This name is displayed as |
|
Recording Station): |
the camera name in the Bosch Recording Station. |
|
|
|
2 |
Description: |
Shows the type of IP camera. |
|
|
|
3 |
IP address: |
Shows the IP address of the IP camera. |
|
|
|
4 |
Channel: |
Shows the channel of the IP camera. |
|
|
|
5 |
User name: |
Enter the relevant user name and password for MPEG4/H.264 |
|
|
devices, where required for login purposes (e.g. when a user |
6 |
Password: |
|
|
|
name and password are configured in the MPEG4/H.264 |
|
|
device). |
|
|
Note: |
|
|
Select the user name Service if a service password has been |
|
|
assigned for the MPEG4/H.264 device. Enter the |
|
|
corresponding password. |
|
|
|
7 |
Live stream: |
Select the stream of the MPEG4/H.264 device (Stream 1 or |
|
|
Stream 2) to be used for viewing live images. |
|
|
Note: |
|
|
Stream 2 is not available for selection if the camera only |
|
|
delivers one stream. |
|
|
|
- | V3 | 2012.12 |
Installation Manual |
Bosch Sicherheitssysteme GmbH |

Bosch Recording Station Default configuration | en 25
8 |
Motion: |
Activate the Motion detection option and/or Reference image |
|
|
check option of the MPEG4/H.264 device. |
|
|
Note: |
|
|
– The motion detection and reference image check must |
|
|
also be activated in the MPEG4/H.264 device. |
|
|
– The name of the MPEG4/H.264 device appears in the |
|
|
Alarm processing menu in the Trigger section. The |
|
|
trigger can, for example, be selected such that it |
|
|
controls recording. To do so, you must select the job you |
|
|
require. |
|
|
|
9 |
|
Changes the order of the cameras in the overview. |
|
|
|
10 |
Next > |
Adopts your input and shows the next dialog box. |
|
|
|
Bosch Sicherheitssysteme GmbH |
Installation Manual |
- | V3 | 2012.12 |

26 en | Default configuration Bosch Recording Station
4.2.3 Configure MPEG4/H.264 IP Cameras
Menu IP cameras and encoders > Section MPEG4/H.264 IP cameras > Button Edit > Tab
General settings
In this menu you can only configure MPEG4/H.264 devices that are able to deliver MPEG4/ H.264 images on call (e.g. Dinion IP, VIPX 1600). Depending on the model, a maximum of 64 network devices (JPEG cameras and MPEG4/H.264 devices) can be connected.
1 |
Camera name |
|
|
|
|
|
Device type: |
Select the MPEG4/H.264 device you require. |
|
|
|
|
IP address: |
Enter the IP address of the MPEG4/H.264 device. |
|
|
|
|
Channel: |
Select the channel of the MPEG4/H.264 device. |
|
|
|
|
Name: |
Enter the name of the MPEG4/H.264 device. The choice of |
|
|
name is up to you. |
|
|
|
|
Live stream: |
Select the stream of the MPEG4/H.264 device (Stream 1 or |
|
|
Stream 2) to be used for viewing live images. |
|
|
|
|
Motion: |
Activate the Motion detection option and/or Reference |
|
Motion detection |
image check option of the MPEG4/H.264 device. |
|
Reference image check |
Note: |
|
|
– The motion detection and reference image check must |
|
|
also be activated in the MPEG4/H.264 device. |
|
|
– The name of the MPEG4/H.264 device appears in the |
|
|
Alarm processing menu in the Trigger section. The |
|
|
trigger can, for example, be selected such that it |
|
|
controls recording. To do so, you must select the job |
|
|
you require. |
|
|
|
|
Schedules |
Choose the time profiles during which reference image |
|
|
checks will take place. |
|
|
|
- | V3 | 2012.12 |
Installation Manual |
Bosch Sicherheitssysteme GmbH |

Bosch Recording Station Default configuration | en 27
|
Display |
Displays the live image of the selected MPEG4/H.264 device |
|
|
if the settings have been made correctly. |
|
|
|
|
Configure |
Displays the configuration of the selected MPEG4/H.264 |
|
|
device in a browser window. |
|
|
|
2 |
Camera login |
|
|
|
|
|
User name: |
Enter the relevant user name and password for MPEG4/ |
|
|
H.264 devices, where required for login purposes (e.g. |
|
Password: |
|
|
when a user name and password are configured in the |
|
|
|
|
|
|
MPEG4/H.264 device). |
|
|
Note: |
|
|
Select the user name Service if a service password has |
|
|
been assigned for the MPEG4/H.264 device. Enter the |
|
|
corresponding password. |
|
|
|
3 |
Activate alarm input |
Activate this check box if you want the Bosch Recording |
|
|
Station to be controlled by an input trigger to the MPEG4/ |
|
|
H.264 device. |
|
|
Note: |
|
|
Depending on the type of IP device (e.g. VIP X1600), more |
|
|
than 1 alarm input can be configured. Under No.:, select the |
|
|
alarm input of the MPEG4/H.264 device and activate the |
|
|
Activate alarm input check box for this alarm input. |
|
|
|
|
Name: |
Enter the name of the alarm input. The choice of name is up |
|
|
to you. |
|
|
|
|
No.: |
Choose the alarm input of the selected MPEG4/H.264 |
|
|
device. |
|
|
|
4 |
Activate relay |
Activate the check box if you want the relay output of the |
|
|
MPEG4/H.264 device to be controlled by the Bosch |
|
|
Recording Station. |
|
|
Note: |
|
|
Depending on the type of IP device (e.g. VIP X1600), more |
|
|
than 1 relay output can be configured. Select the relay |
|
|
output of the MPEG4/H.264 device under No.: and activate |
|
|
the Activate relay check box for this relay output. |
|
|
|
|
Name: |
Enter the name of the relay output. The choice of name is |
|
|
up to you. |
|
|
|
|
No.: |
Choose the relay output of the selected MPEG4/H.264 |
|
|
device. |
|
|
|
5 |
Activate audio input |
Activate this check box if the audio input of the MPEG4/ |
|
|
H.264 device is to be used. |
|
|
|
|
Name: |
Enter the name of the audio input. |
|
|
|
|
No.: |
Choose the audio input output of the selected MPEG4/ |
|
|
H.264 device. |
|
|
|
6 |
OK |
Saves your input. |
|
|
|
Bosch Sicherheitssysteme GmbH |
Installation Manual |
- | V3 | 2012.12 |
28 en | Default configuration Bosch Recording Station
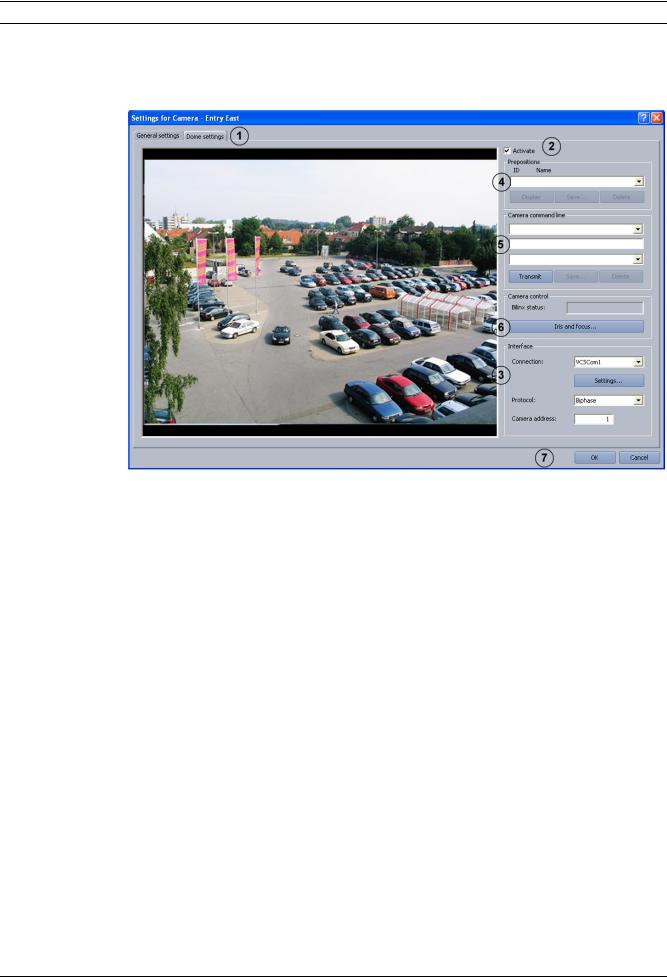
4.2.4 Configuring Dome Cameras and Pan/Tilt Cameras
Menu IP cameras and encoders > Section MPEG4/H.264 IP cameras > Button Edit > Tab
Dome settings
Perform the settings for each camera as required.
1 |
Dome settings |
Click on the tab. |
|
|
|
2 |
Activate |
Select the check box if the camera is a dome camera or a |
|
|
pan/tilt camera. |
|
|
|
Performing interface settings |
|
|
|
|
|
3 |
Interface |
The interface settings must be made first. Only then can |
|
|
further dome settings follow. |
|
|
|
|
Connection: |
Click on the down arrow and select the interface (VCSCom = |
|
|
serial RS232 port of the encoder). |
|
|
|
|
Settings... |
Click on the button. A dialog box opens. Perform the settings |
|
|
for the VCSCom interface (bits per second, data bits, stop |
|
|
bits, parity etc.). |
|
|
The settings depend on the type of camera. |
|
|
JVC: 9600/8/1/even |
|
|
Panasonic 9600/8/1/none (on the Panasonic Dome, the |
|
|
bitrate must be set manually) |
|
|
Pelco: 2400/8/1/none |
|
|
Bosch domes: The dome settings must be saved. |
|
|
|
|
Protocol: |
Select the protocol depending on the camera connected. |
|
|
|
|
Camera address: |
Enter the address of the camera. The address is set in the |
|
|
camera. |
|
|
|
- | V3 | 2012.12 |
Installation Manual |
Bosch Sicherheitssysteme GmbH |

Bosch Recording Station |
Default configuration | en 29 |
|
|
Saving camera positions
You can specify positions for dome cameras and pan/tilt cameras to which you can repeatedly pan automatically or manually. The user can quickly select these positions in the live image, provided that these have been enabled for his level of authorization. An automatic go-to if an event occurs is also possible.
Proceed as follows to save a new position:
–Select a free ID.
–Pan the camera to the position and zoom the image as desired.
–Save the procedure.
4 |
Prepositions |
|
|
|
|
|
ID Name |
Click on the down arrow next to the list field and select an |
|
|
unused number when you want to save a new position, or |
|
|
select a saved position to edit it. |
|
|
Note: |
|
|
When the user selects this name, the camera automatically |
|
|
moves to this camera position. |
|
|
|
|
Pan/Zoom |
Panning cameras: |
|
|
Move the mouse cursor around in the camera image until the |
|
|
directional arrow points in the direction in which you want to |
|
|
pan the camera. Then hold the left mouse button down. The |
|
|
camera pans in the direction of the arrow, the speed |
|
|
increasing the further you move the arrow outwards (with the |
|
|
left mouse button pressed). |
|
|
Zooming cameras: |
|
|
Move the mouse cursor around in the camera image window |
|
|
until a magnifying glass with a plus or minus sign appears. |
|
|
Left-click with the mouse to zoom the camera. |
|
|
Magnifying glass with a plus sign: Camera moves in toward |
|
|
the object. |
|
|
Magnifying glass with a minus sign: Camera moves away from |
|
|
the object. |
|
|
|
|
Save... |
Click on the button to save the positions. A dialog box opens. |
|
|
Enter a meaningful name and confirm the entry. |
|
|
Note: |
|
|
Some dome cameras require you to set aperture and focus |
|
|
when saving positions. In this case a query will appear during |
|
|
the save process. |
|
|
|
|
Display |
To check, select a saved position and click on the button. The |
|
|
camera moves to the saved position. |
|
|
|
|
Delete |
Select a saved position and click on the button. |
|
|
|
Bosch Sicherheitssysteme GmbH |
Installation Manual |
- | V3 | 2012.12 |
30 en | Default configuration |
Bosch Recording Station |
|
|
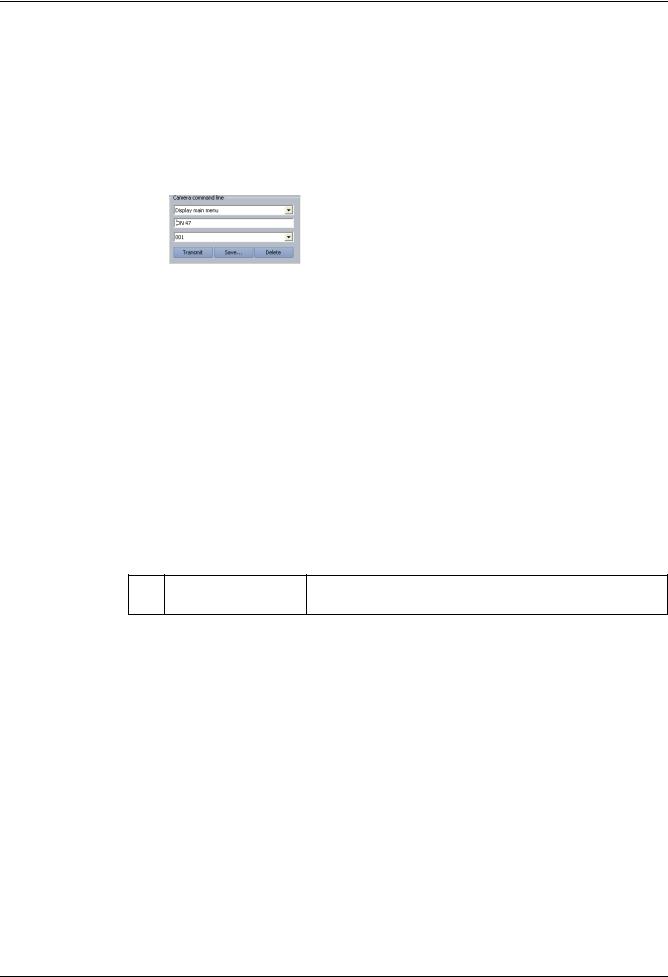
Entering macros (control commands) via the command line
Here you can specify various macros (commands) for dome cameras, pan/tilt cameras or matrix switches via a command line. These macros can be called up manually or automatically. The choice of macros available can be found in the operating manual of the respective camera or matrix switch. The user can quickly select these macros in the live image, provided they have been enabled for his level of authorization.
5 |
Camera command line |
|
|
|
|
|
|
First line: |
|
|
The list contains predefined macros (commands). Select the |
|
|
macro. |
|
|
Middle line (command line): |
|
|
Displays the macro you selected in the first line. |
|
|
As an alternative, this line also offers you the option of |
|
|
creating a new macro if you cannot find it in the list field for |
|
|
the first line. |
|
|
Bottom line: |
|
|
Assign a free number to the macro. |
|
|
|
|
Save... |
Click on the button to save. A dialog box opens. Enter a |
|
|
meaningful name and confirm the entry. A message confirms |
|
|
that this has been saved. |
|
|
Note: |
|
|
The macro is available to the user on the user interface. |
|
|
|
|
Transmit |
Click on the button to check the macro. |
|
|
|
|
Delete |
Deletes the saved macro. |
|
|
|
Camera control
The focus and iris can be set for each camera
6Iris and focus... Click on the button. A dialog box opens. Set the aperture and
focus.
Saving entries
7 |
OK |
Saves your input. |
|
|
|
- | V3 | 2012.12 |
Installation Manual |
Bosch Sicherheitssysteme GmbH |
Loading...