Bosch BO-B56 Installation Manual

1 | Overview
The B56 Keypad Surface Mount Box allows for mounting a keypad to concrete or block. The box accommodates conduit through any of 5 knockouts. The keypad mounts to the box front cover.
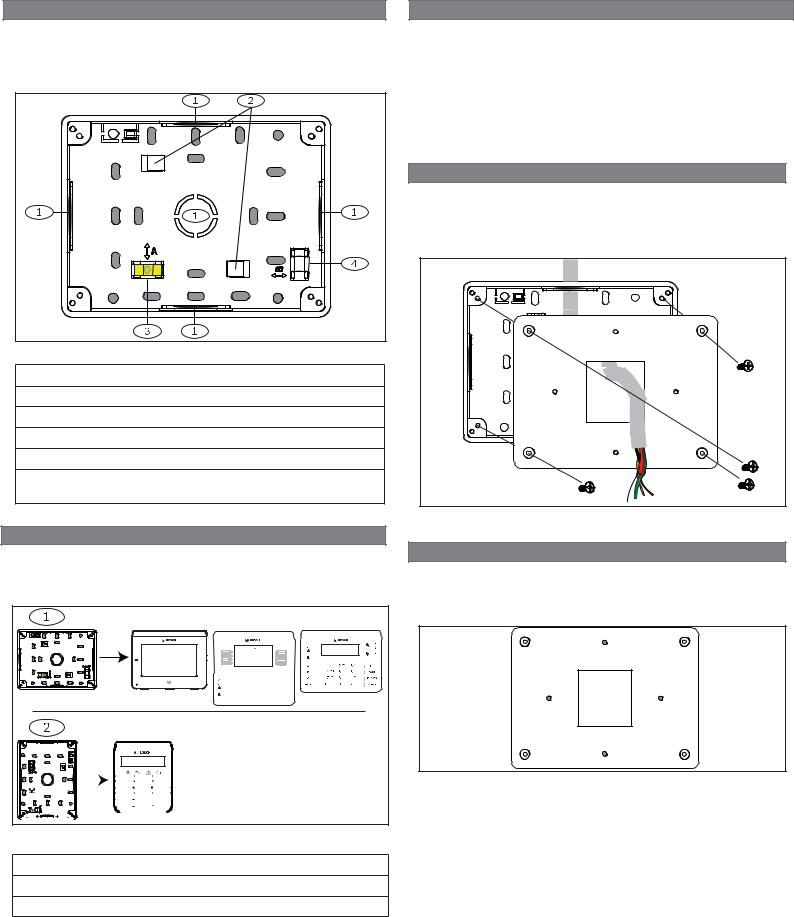
Figure 1.1: Box mounting and wiring overview (without cover)
Callout ― Description
1 ― Conduit knockouts
2 ― Ground screws
3 ― Bubble level holder for horizontal mounting (A)
4 ― Bubble level holder for vertical mounting (B)
Mounting holes shown as gray. (Multiple mounting patterns available.)
2 | Prepare the box for mounting
Before mounting the box, choose between horizontal or vertical mounting, and then remove the desired conduit knockout. Refer to Figures 1.1 and 2.1.
Area 1 Off |
A1 Lobby |
A1 Lobby |
Ready to turn on |
Ready to turn on |
|
<Shortcuts |
Menu> |
PREV |
HELP |
NEXT |
1 |
2 ABCABC |
3 DEFDEF |
4 GHIGHI |
5 JKLJKL |
6MNOMNO |
|
|
7PQRSPQRS |
8 TUVTUV |
9WXYZWXYZ |
|
|
ESC 0 CMD
A1 Lobby
Ready to turn on
|
|
|
|
|
|
|
|
|
PREV |
HELP |
NEXT |
|
|
|
|
|
|
|
|
|
|
1 |
2 ABC |
3 DEF |
|
|
|
|
|
|
|
|
|
|
4 GHI |
5 JKL |
6MNO |
|
|
|
|
|
|
|
|
|
|
7PQRS |
8 TUV |
9WXYZ |
|
|
|
|
|
|
|
|
|
|
ESC |
0 |
CMD |
|
|
|
|
|
|
|
|
|
|
|
|
|
|
|
|
|
|
|
|
|
|
|
|
|
|
|
Figure 2.1: Horizontal/vertical mounting options per keypad model
Callout ― Description
1 ― Horizontal mounting
2 ― Vertical mounting
3 | Mount the base
1.Use the base as a template to mark the desired mounting surface with mounting locations.
2.To level the base, use the provided bubble level. For horizontal mounting, use the level in the A location. For vertical mounting, remove the bubble level, and install it in the B location.
3.Use the appropriate mounting hardware to mount the box to the desired mounting surface.
4 | Complete the box installation
1.Pull the conduit through the box knockout.
2.Pull the wire through the wire opening on the box cover.
3.Place the cover on the box base and secure the cover with the supplied screws.
Figure 4.1: Pulling wire and securing the cover
5 | Mount the keypad base
Follow the installation instructions for the keypad to mount the keypad base on the box cover. The cover includes four mounting holes, as shown gray in Figure 5.1.
Figure 5.1: Keypad mounting locations
 Loading...