


 Loading...
Owner's Manual for Vehicle
Contents
A to Z
Online Edition for Part No. 01 41 0 157 631 - © 07/03 BMW AG

X3 2.5i
X3 3.0i
We are very glad that you have decided to purchase a BMW.
The more familiar you are with it, the more secure you will be on the roads. This is why we ask you:
Please read the information we have gathered for you in this owner's manual before you set off with your new BMW. You receive important information on vehicle operation that enables you to make full use of the technical benefits of your BMW. You will also find information on maintenance that serves to retain the operating and road safety as well as the best possible value retention of your vehicle. You will find supplementary information in other brochures.
This Owner's Manual should be considered a permanent part of this vehicle. It should stay with the vehicle when sold to provide the next owner with important operating, safety and maintenance information.
We wish you good and safe driving.
BMW AG
Online Edition for Part No. 01 41 0 157 631 - © 07/03 BMW AG
© 2003 Bayerische Motoren Werke Aktiengesellschaft
Munich, Germany
Reprints, including excerpts, only with the written consent of BMW AG, Munich. Order No. 01 41 0 157 631
US English VIII/03
Printed in Germany
Printed on environmentally friendly paper, bleached without chlorine, suitable for recycling.
Online Edition for Part No. 01 41 0 157 631 - © 07/03 BMW AG

Contents
The fastest way to find specific topics is to use the index, refer to page 119.
Using this Owner's Manual
4 Notes
At a glance
10 Cockpit
Controls
18 Opening and closing
27 Adjustments
34 Transporting children safely
37 Driving
45 Everything under control
49Technology for comfort, convenience and safety
57 Lamps
60 A congenial climate
66 Practical interior accessories
Driving tips
76 Things to remember when driving
Mobility
84 Refueling
86 Wheels and tires
92 Under the engine hood
97Maintenance
98Laws and regulations
99Replacing components
107 Giving and receiving assistance
Reference
114 Technical data
117 Everything from A to Z
Online Edition for Part No. 01 41 0 157 631 - © 07/03 BMW AG
At a glance
Controls
Driving tips
Mobility
Reference

Notes
Notes
Using this Owner's Manual
We have made every effort to ensure that you are able to find what you need in this Owner's Manual as quickly as possible.
The fastest way to find certain topics is by using the detailed index at the end. For a brief initial overview, please refer to the first chapter.
Should you sell your BMW some day, please remember to hand over the Owner's Manual as well; it is an important component of your vehicle.
Additional sources of information
If you have additional questions, your BMW Sports Activity Vehicle Center is always happy to advise you.
You can find information on BMW, e.g. technology, on the Internet at www.bmwusa.com.
Symbols used
Indicates precautions that must be followed precisely in order to avoid the possibility of personal injury and seri-
ous damage to the vehicle.
Contains information that will assist you in gaining the optimum benefit from your vehicle and enable you to care
more effectively for your vehicle.
Refers to measures that can be taken to help protect the environment.
< Marks the end of a specific item of information.
* Indicates special equipment, countryspecific equipment and optional extras when available.
Vehicle Memory, Key Memory, refer to page 33. Identifies functions that can be specifically adapted for a particular
key or vehicle. These adjustments can be performed either by yourself or by your BMW Sports Activity Vehicle Center.
Symbols on vehicle components
Indicates that you should consult the relevant section of this Owner's Man-
ual for information on a particular part or assembly.
4
Online Edition for Part No. 01 41 0 157 631 - © 07/03 BMW AG

The individual vehicle
On buying your BMW, you have decided in favor of a model with individualized equipment and features. This Owner's Manual describes all models and equipment that BMW offers within the same group.
We hope you will understand that equipment and features are included that you might not have chosen for your vehicle.
Sections describing options and special equipment are marked by asterisks * to assist you in identifying possible differences between the descriptions in this manual and your own vehicle's equipment.
Should your BMW be equipped with features or accessories not described in this manual, e.g. car radio or portable phone, please consult the enclosed supplementary owner's manuals.
Editorial notice
BMW pursues a policy of continuous, ongoing development that is conceived to ensure that our vehicles continue to embody the highest quality and safety standards combined with advanced, state- of-the-art technology. For this reason, the features described in this Owner's Manual may differ from those on your vehicle. Nor can errors and omissions be entirely ruled out. You are therefore asked to appreciate that no claims can be entertained on the basis of the data, illustrations or descriptions in this Owner's Manual.
5
Online Edition for Part No. 01 41 0 157 631 - © 07/03 BMW AG
At a glance
Controls
Driving tips
Mobility
Reference

Notes
For your own safety
Fuels
Use unleaded gasoline only. Fuels containing up to and including 10%
ethanol or other oxygenates with up to 2.8% oxygen by weight, i.e. 15% MTBE or 3% methanol plus an equivalent amount of co-solvent – will not void the applicable warranties respecting defects in materials or workmanship. Field experience has indicated significant differences in fuel quality – i.e. volatility, composition, additives, etc. – among gasolines offered for sale in the United States and Canada. The use of poor-quality fuels may result in driveability, starting and stalling problems especially under certain environmental conditions, such as high ambient temperature and high altitude.
Should you encounter driveability problems which you suspect could be related to the fuel you are using, we recommend that you respond by switching to a recognized high-quality brand.
Failure to comply with these recommendations may result in unscheduled maintenance.
Follow the relevant safety rules when you are handling gasoline.<
Maintenance and repair
Advanced technology, e.g. the use of modern materials and high-perfor-
mance electronics, requires specially adapted maintenance and repair methods. Therefore, only have corresponding work on your BMW carried out by a BMW Sports Activity Vehicle Center or a workshop that works according to BMW repair procedures with correspondingly trained personnel. If work is carried out improperly, there is a danger of consequential damage and the related safety risks.<
6
Parts and accessories
For your own safety, use genuine parts and accessories approved by
BMW.
When you purchase accessories tested and approved by BMW and Genuine BMW Parts, you simultaneously acquire the assurance that they have been thoroughly tested by BMW to ensure optimum performance when installed on your vehicle. BMW warrants these parts to be free from defects in material and workmanship. BMW will not accept any liability for damages resulting from installation of parts and accessories not approved by BMW.
BMW cannot test every product made by other manufacturers to verify if it can be used on a BMW safely and without risk to either the vehicle, its operation, or its occupants.
Genuine BMW Parts, BMW Accessories and other products approved by BMW, together with professional advice on using these items, are available from all BMW Sports Activity Vehicle Centers. Installation and operation of non-BMW approved accessories such as alarms, radios, amplifiers, radar detectors, wheels, suspension components, brake dust shields, telephones – including operation of any portable phone from within the vehicle without using an externally mounted antenna – or transceiver equipment, for instance, CBs, walkie-talkie, ham radio or similar accessories, may cause extensive damage to the vehicle, compromise its safety, interfere with the vehicle's electrical system or affect the validity of the BMW Limited Warranty. See your BMW Sports Activity Vehicle Center for additional information.<
Maintenance, replacement, or repair of the emission control devices and systems may be performed by any automotive repair establishment or individual using
any certified automotive part.<
Online Edition for Part No. 01 41 0 157 631 - © 07/03 BMW AG

Service and warranty
This manual is supplemented by a Service and Warranty Information Booklet for US models or a Warranty and Service Guide Booklet for Canadian models.
We recommend that you read this publication thoroughly.
Your BMW is covered by the following warranties:
>New Vehicle Limited Warranty
>Rust Perforation Limited Warranty
>Federal Emissions System Defect Warranty
>Federal Emissions Performance Warranty
>California Emission Control System Limited Warranty.
Detailed information about these warranties is listed in the Service and Warranty Information Booklet for US models or in the Warranty and Service Guide Booklet for Canadian models.
Reporting safety defects
The following only applies to vehicles owned and operated in the US.
If you believe that your vehicle has a defect which could cause a crash or could cause injury or death, you should immediately inform the National Highway Traffic Safety Administration NHTSA in addition to notifying BMW of North America, LLC, P.O. Box 1227, Westwood, New Jersey 076751227, telephone toll-free 1-800-831-1117.
If NHTSA receives similar complaints, it may open an investigation, and if it finds that a safety defect exists in a group of vehicles, it may order a recall and remedy campaign. However, NHTSA cannot become involved in individual problems between you, your dealer, or BMW of North America, LLC.
To contact NHTSA, you may either call the Auto Safety Hotline toll-free at 1-800-424-9393 or 366-0123
in Washington, D.C. area, or write to: NHTSA, U.S. Department of Transportation, Washington, D.C. 20590. You can also obtain other information about motor vehicle safety from the Hotline.
At a glance
Controls
Driving tips
7
Online Edition for Part No. 01 41 0 157 631 - © 07/03 BMW AG
Mobility
Reference
Online Edition for Part No. 01 41 0 157 631 - © 07/03 BMW AG
At a glance
This overview of buttons, switches and displays is intended to serve as a source of orientation in your vehicle's operating environment. The section will also assist you in becoming acquainted with the control concepts and options available for operating the various systems.
Online Edition for Part No. 01 41 0 157 631 - © 07/03 BMW AG
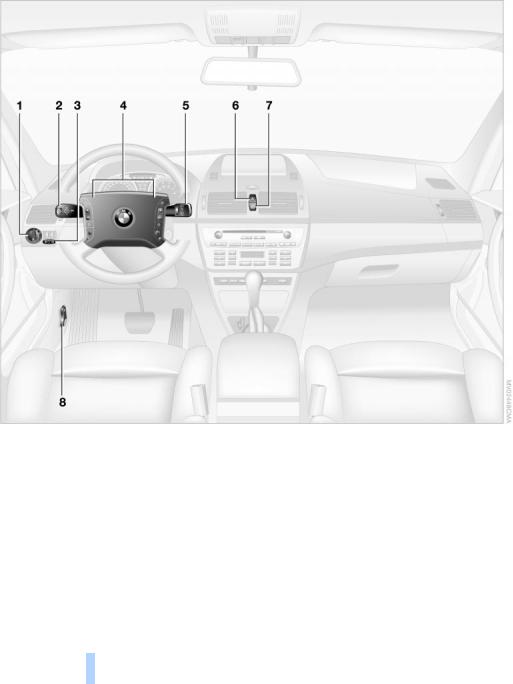
Cockpit
Cockpit
Controls
1 |
Parking lamps/low beams |
57 |
4 |
Horn |
2 |
> Turn signal indicators |
41 |
5 |
Washer/Wiper system/Rain sensor 41 |
|
> Standing lamps 58 |
|
6 |
Hazard warning flashers |
|
> High beams 58 |
|
7 |
Central locking system 18 |
|
> Headlamp flasher 41 |
|
8 |
Unlocking the engine hood 92 |
|
> Computer 47 |
|
|
|
3 |
Fog lamps 58 |
|
|
|
10
Online Edition for Part No. 01 41 0 157 631 - © 07/03 BMW AG
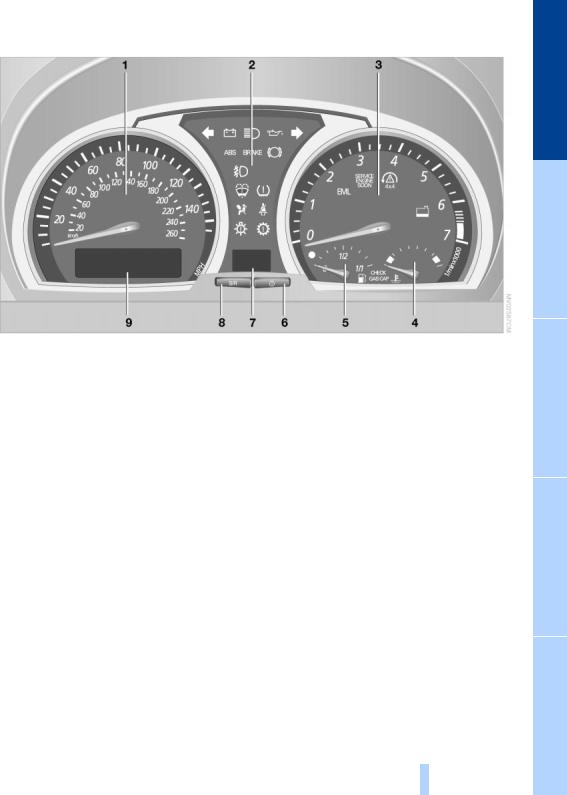
Instrument cluster
1 |
Speedometer |
7 |
Selector lever and program display for |
||
2 |
Indicator and warning lamps |
12 |
automatic transmission 40 |
|
|
|
|
|
|||
3 |
Tachometer 45 |
8 |
Button for |
|
|
|
|
|
|
||
|
with indicator and warning lamps 12 |
> Resetting trip odometer |
45 |
||
4 |
Coolant temperature gauge |
45 |
> Setting the time |
46 |
|
5 |
Fuel gauge 45 |
9 |
Display for |
|
|
6 |
Button for |
|
> Trip odometer/odometer |
45 |
|
|
> Displaying the time 46 |
|
> Time 46 |
|
|
|
> Service Interval Display 46 |
> Service Interval |
46 |
|
|
|
|
|
> Computer 47 |
|
|
At a glance
Controls
Driving tips
Mobility
11
Online Edition for Part No. 01 41 0 157 631 - © 07/03 BMW AG
Reference
Cockpit
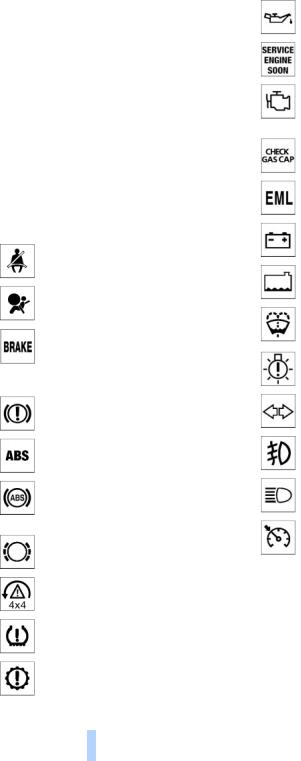
Indicator and warning lamps
Technology that monitors itself
The indicator and warning lamps identified by the + symbol are subjected to an operation check each time you switch on the engine. They each light up once for different periods of time.
When a malfunction occurs in a monitored system, the corresponding lamp will either fail to go out when the engine is started, or it will come on again during normal driving. Detailed information is provided on the specified pages.
Please fasten safety belt + 30
Airbags + 54
Brake system +
With handbrake released 52/ 96 With handbrake set 38
With other warning lamps 52
Brake warning lamp for Canadian models
Driving stability control systems/ Antilock Brake System + 53
Antilock Brake System ABS/ Chassis control system for Canadian models
Brake pads + 96
Dynamic Stability Control DSC/ xDrive + 50/ 52
Flat Tire Monitor + 53
Automatic transmission + 39
12
Engine oil + 94
Service Engine Soon + 98
Service Engine Soon + 37 warning lamp for Canadian models.
Check Gas Cap +
Engine electronics + 37
Battery charge current + 105
Topping up coolant 95
Topping up washer fluid 94
Lamp defective 57
Turn signal indicators 41
Fog lamps 58
Headlamp flasher 41
High beams 58
Cruise control 43
Online Edition for Part No. 01 41 0 157 631 - © 07/03 BMW AG

Colors
The indicator and warning lamps can light up in different colors and combinations.
The following section explains the significance of the individual colors as well as how you should respond when they appear.
>Red:
Stop the vehicle immediately or
an important reminder
>Yellow:
Have the system inspected as soon as possible
or
for your information
>Green:
For your information
>Blue
For your information.
13
Online Edition for Part No. 01 41 0 157 631 - © 07/03 BMW AG
At a glance
Controls
Driving tips
Mobility
Reference

Cockpit
Buttons in steering wheel*
The buttons integrated in the steering wheel are provided so that you can operate a number of accessories quickly and without being distracted from traffic conditions. You may operate:
>selected audio source functions
>Recirculating air mode/steering wheel heating*
>the cruise control
>some telephone functions
>the voice command system.
In order to operate a system, the corresponding system must be switched
on.<
Telephone/voice command system
Press briefly:
Accept incoming call, start dialing, terminate call.
Extended pressure:
Switch voice command system on and off
Telephone/audio sources
Switching between telephone and radio, cassette, CD or MD
Fast forward/reverse
>Radio
Press briefly: next station
>CD
Press briefly: skipping tracks Maintain pressure on the button: fast forward/reverse
>Telephone
Browse name directory
Volume
14
Cruise control
Cruise control: calling up
Cruise control: storing and accelerating + as well as braking and storing –
Cruise control: activate/interrupt/deactivate
Recirculated-air mode/steering wheel heating
Depending on the equipment, there is a button for the recirculated-air mode
or steering wheel heating.<
Switching the recirculated-air mode and automatic recirculated-air control on and off
Steering wheel heating: switching on/off, refer to page 31.
Online Edition for Part No. 01 41 0 157 631 - © 07/03 BMW AG

15
Online Edition for Part No. 01 41 0 157 631 - © 07/03 BMW AG
At a glance
Controls
Driving tips
Mobility
Reference
Online Edition for Part No. 01 41 0 157 631 - © 07/03 BMW AG

Controls
This chapter is intended to provide you with information for complete control of your vehicle. Its extensive array of
features and accessories, both for driving and for your own safety, comfort and convenience, are described here.
Online Edition for Part No. 01 41 0 157 631 - © 07/03 BMW AG
Opening and closing
Opening and closing
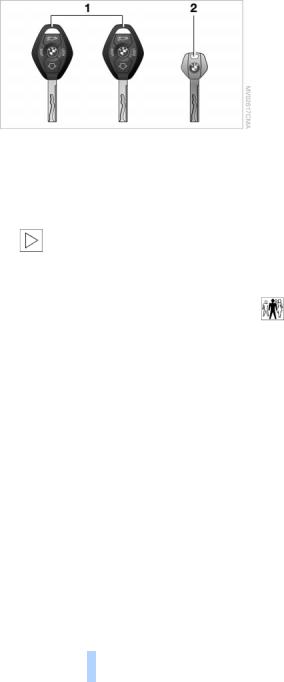
Key set
1Master keys with remote control determine the functions of the Key Memory, refer to page 33.
You can mark the keys using the colored decals you received on taking delivery of the vehicle
There is an extended-life battery in every master key which is
charged automatically in the ignition lock as you drive.
If you have any master keys that are not being used on a regular basis, you should therefore remember to recharge these units by using them to drive the vehicle for an extended period at least once a year.<
> fuel filler door.
The central locking system can be operated from the outside
>via the remote control
>via the driver's door lock
and from inside via the button for the central locking system.
When the system is locked from inside, the fuel filler door remains unlocked, refer to page 20.
The anti-theft system is automatically activated whenever you activate the central locking system from outside the vehicle. This prevents the doors from being unlocked via the safety lock buttons or door handles. The alarm system is also armed or disarmed.
In an accident, the central locking system automatically unlocks the vehicle. In addition, the hazard warning flashers and interior lamps switch on.
You can have an acknowledgment signal set to confirm that the vehicle is
correctly locked.<
2Spare key for storage in a safe place, such as in your wallet.
This key cannot be used to open the lock for the glove compartment. This is an advantage, e.g. at a hotel. The key is not intended for constant use.
Central locking system
The concept
The central locking system is ready for operation whenever the driver's door is closed. The system engages or releases the locks on the
>doors
>tailgate
18
Opening and closing – from outside
Using the remote control
The remote control provides two additional functions for the central locking system:
>Switching on the interior lamps, refer to page 19.
You can also use this function to locate your vehicle in parking garages etc.
>Opening the tailgate, refer to page 19. The tailgate will open slightly, regardless of whether it was previously locked or unlocked.
Online Edition for Part No. 01 41 0 157 631 - © 07/03 BMW AG
In addition, the remote control offers you another function:
>Panic mode
In case of danger, you can trigger an alarm.
When you engage/release the vehicle locks, you simultaneously activate/deactivate the anti-theft system, arm/disarm the alarm system, and switch the interior lamps on/off.
As a reminder that the ignition key is still in the ignition lock after you open the driver's door, you can have a sound sig-
nal set.<
Protect the remote control against unauthorized use by handing over
only the spare key, for example when using hotel valet parking.<
Because any persons or animals left unattended in a parked vehicle could lock the doors from the inside, you should
always take the vehicle's keys with you so that the vehicle can be opened again from the outside at any time.<
Unlocking
Press the  button.
Press the button once to unlock the driver’s door only; press a second time to unlock all remaining doors as well as the tailgate and the fuel filler door.
Switching off the tilt alarm sensor* and interior motion sensor*
Press the  button once again directly after locking.
For details, refer to page 25.
Switching on the interior lamps
If the vehicle is locked, press the  button.
Panic mode*
By pressing and holding the  button for more than approx. two seconds, you can trigger the alarm system in response to any impending danger.
To switch off the alarm: press any of the buttons.
Unlocking tailgate
Press the  button.
The tailgate will open slightly, regardless of whether it was previously locked or unlocked.
Before and after a trip, ensure that the tailgate has not been opened uninten-
tionally.
A previously locked tailgate is also locked after closing.<
If you desire, the tailgate can only be opened using the remote control if the vehicle is unlocked. This can be adjusted.<
Convenience opening mode |
Malfunctions |
|
Press and hold the  button. The windows and the sliding panel of the panorama glass roof are opened.
Press the  button a second time and hold. The panorama glass roof is opened.
If you desire, you can have this special feature activated/deactivated on
a vehicle-specific basis.<
Locking and securing
Press the  button.
If you desire, the vehicle locks automatically if no door or lid is opened after unlocking. You may have this function set on a vehicle-specific basis if you wish.<
The remote control system may be affected by other units or equipment operating in the immediate vicinity of your vehicle. Should the remote control fail to operate owing to interference of this kind, you can respond by using the master key to unlock your vehicle at one of the doors.
In case of faults, please contact your BMW Sports Activity Vehicle Center. You can also obtain replacement keys there.
If it is no longer possible to lock the vehicle via the remote control, the battery is discharged. Use this remote control during an extended drive; this will recharge the battery, refer to page 18.
19
Online Edition for Part No. 01 41 0 157 631 - © 07/03 BMW AG
At a glance
Controls
Driving tips
Mobility
Reference
Opening and closing
For US owners only
The transmitter and receiver units comply with part 15 of the FCC – Federal Communications Commission – regulations. Operation is governed by the following:
FCC ID: |
LX8EWS |
|
LX8FZVS |
|
LX8FZVE |
Compliance statement:
This device complies with part 15 of the FCC Rules. Operation is subject to the following two conditions:
>This device may not cause harmful interference, and
>this device must accept any interference received, including interference that may cause undesired operation.
Any unauthorized modifications or changes to these devices could void
the user's authority to operate the equipment.<
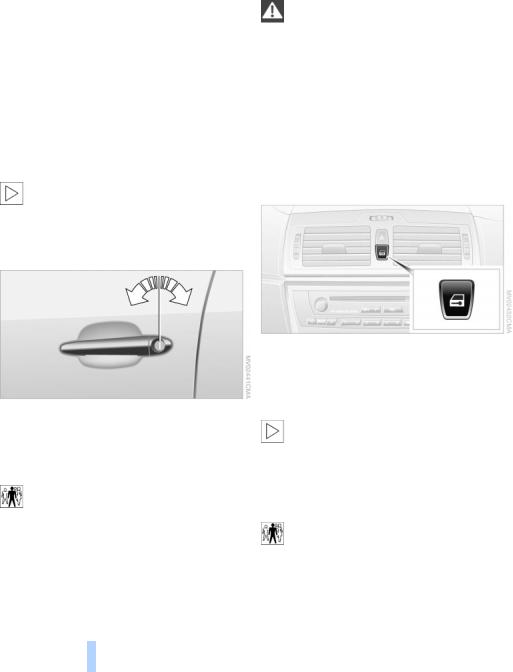
Using the door lock
One turn of the key in the driver's door lock unlocks the driver's door only.
Turning the key a second time unlocks all of the remaining doors, the tailgate and the fuel filler door.
You can have a signal set to confirm that the vehicle's locks have engaged
securely.<
Convenience operation
You also have the option of operating the windows and the panorama glass roof from the driver's door lock.
20
>To open:
With the door closed, turn the key to the Unlock position and hold it there.
>To close:
With the door closed, turn the key to the Lock position and hold it there.
Watch during the closing process to be sure that no one is injured. Releas-
ing the key stops the operation.<
Manual operation
In the event of an electrical defect: You can turn the key all the way to the right or left in the door lock to lock or unlock the driver's door.
Opening and closing – from inside
You can use this button to operate the central locking system when the front doors are closed. With this button, only the doors and the tailgate are unlocked or locked. The anti-theft system is not activated.
If only the driver's door was unlocked from the outside and you press the
button, then, with the driver's door still open, the passenger-side door, the tailgate and the fuel filler door will also unlock.
If the driver's door is closed, it will be locked.<
The central locking system locks automatically after driving off. This
can be adjusted to be vehicle-specific or key-specific.<
Online Edition for Part No. 01 41 0 157 631 - © 07/03 BMW AG
Unlocking and opening the doors |
Manual unlocking |
1.Press the button for central locking system
2.Pull the respective door handle above the armrest
or
individually pull on the door handle of each door twice to unlock and open.
Engaging the locks
>Press button for central locking system or
>press down the individual safety lock buttons.
To prevent you from being locked out, the opened driver's door cannot be locked using the safety lock but-
ton.<
Because any persons or animals left unattended in a parked vehicle could lock the doors from the inside, you should
always take the vehicle's keys with you so that the vehicle can be opened again from the outside at any time.<
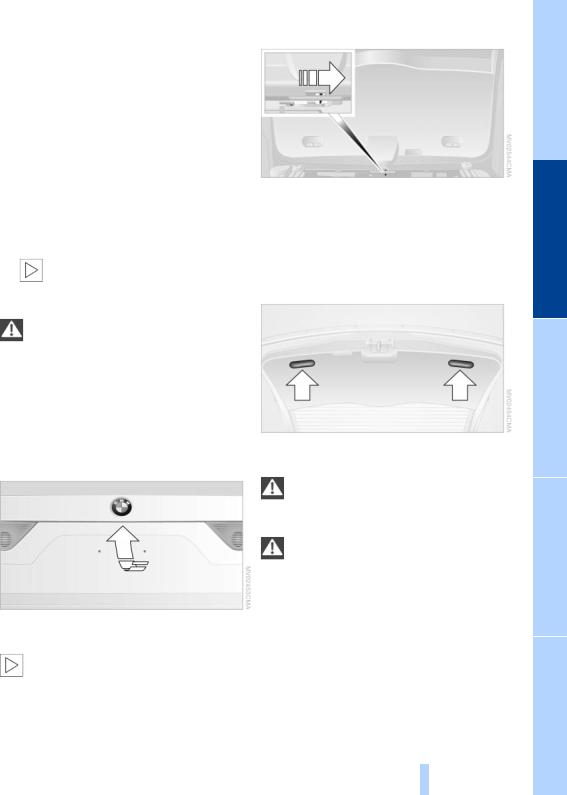
In the event of an electrical defect:
1.Fold up the floor cover in the cargo area
2.Press the lever to the right.
The tailgate is locked again as soon as you close it.
Closing
Tailgate
Opening from outside
Press the button in the handle strip. The tailgate is unlocked and opens somewhat.
During opening, the tailgate pivots upward and to the rear. Ensure that
adequate clearance is available before opening.<
When the tailgate is open, the cargo area and interior are lit up.
The handle recesses on the interior trim of the tailgate make it easier to pull down.
To avoid injuries, be sure that the travel path of the tailgate is clear
when it is closed, as with all closing procedures.<
Operate the vehicle only when the tailgate is completely closed. Other-
wise, exhaust fumes could penetrate the interior of the vehicle.<
If special circumstances should make it absolutely necessary to operate the vehicle with the tailgate open:
1.Close all windows and the glass roof
2.Greatly increase the air supply of the air conditioner or automatic climate control, refer to page 60 or 63.
21
Online Edition for Part No. 01 41 0 157 631 - © 07/03 BMW AG
At a glance
Controls
Driving tips
Mobility
Reference

Opening and closing
Electric power windows
Opening and closing windows
As of ignition key position 1:
>Press the switch up to the resistance point:
The window continues to move as long as you continue to press the switch
>Press the switch beyond the resistance point:
The window moves downward automatically. Briefly press the switch again to stop the opening movement.
You can close the windows in the same manner by pulling the switch.
After switching off the ignition
You can operate the electric power windows for up to 15 minutes as long as neither of the front doors has been opened.
When leaving the vehicle parked, always remove the remote control
from the ignition lock and close the doors; this precaution prevents children from operating the electric power windows and injuring themselves, etc.<
For convenience operation with the door lock, refer to page 20.
Anti-trapping mechanism
If the closing force rises beyond a predefined threshold during closing, the system will immediately stop moving the window prior to lowering it slightly.
Despite the anti-trapping mechanism you should always inspect the win-
dow's travel path prior to closing it, as the safety system might fail to detect certain
22
kinds of obstructions, such as very thin objects, and the window would continue closing.
You can disable the anti-trapping mechanism by pressing the switch beyond the resistance point and holding it.<
Following interruptions in electrical power supply
After disconnecting the battery, the antitrapping mechanism must be reinitialized. To do this, open and close the windows once and continue pull the switch for 2 seconds after closing.
Safety switch
With the safety switch, you can prevent the rear windows from being opened or closed via the switches in the rear passenger area, by children, for example. The indicator lamp lights up when this safety feature is activated.
Press the safety switch whenever children are riding in the rear of the
vehicle. Careless use of the electric power windows can lead to injury.<
You can deactivate the function again as of ignition key position 1.<
Accessories in the window area
After installing any accessory – such as a clamp-on antenna for a portable phone – within the window's travel range, you will need to have the system reinitialized for use under the new conditions. Please contact your BMW Sports Activity Vehicle Center.
Online Edition for Part No. 01 41 0 157 631 - © 07/03 BMW AG
Panorama glass roof* |
Operating sliding panel |
To prevent injuries, exercise care when closing the panorama glass roof
and keep it in your field of vision until it is shut.
When leaving the vehicle, always remove the remote control and close the doors to prevent children from operating the glass roof and injuring themselves, etc.<
Raising, opening, closing
>Opening, closing:
Slide the switch up to the resistance point in the desired direction.
The motion continues for as long as the switch is held
>Automatic opening, closing:
Slide the switch beyond the resistance point in the desired direction.
Sliding the switch again stops the motion.
Operating glass roof
The glass roof and sliding panel are operational as of ignition key position 1.
After the ignition has been switched off: You can operate the panorama glass roof for up to 1 minute as long as neither of the doors has been opened.
Opening the glass roof and sliding panel together
Within 2 seconds, push the switch backward twice beyond the resistance point. The glass roof moves to the convenience position and the sliding panel opens completely. To open the glass roof fully at a standstill, slide the switch backward beyond the resistance point.
Sliding the switch again stops the motion.
Closing the glass roof and sliding panel together
Within 2 seconds, push the switch forward twice beyond the resistance point.
The glass roof and sliding panel close completely.
Sliding the switch again stops the motion.
>Opening, closing:
Slide the switch up to the resistance point in the desired direction.
The motion continues for as long as the switch is held
>Automatically in convenience position: Slide the switch beyond the resistance point in the desired direction.
In the convenience position, the glass roof is not fully opened.
Sliding the switch again stops the motion.
>Automatic opening and closing:
Slide the switch beyond the resistance point in the desired direction. The glass roof moves initially into the convenience position. To open or close fully at a standstill, slide the switch beyond the resistance point in the desired direction.
Sliding the switch again stops the motion
>To raise: slide switch
To lower: slide switch forward.
Sliding the switch again stops the motion.
Ventilation setting
In the ventilation setting, the glass roof is raised and the sliding panel opens to a gap: Press the switch twice within 2 seconds.
Pressing the switch again stops the motion.
23
Online Edition for Part No. 01 41 0 157 631 - © 07/03 BMW AG
At a glance
Controls
Driving tips
Mobility
Reference
Opening and closing
If the glass roof and sliding panel are closed:
Press the switch once.<
Anti-trapping mechanism
If the glass roof and sliding panel encounter resistance when closing from roughly one third of the roof opening or when closing from the raised position, the closing action is interrupted and the glass roof and sliding panel reopen a little.
Despite the anti-trapping mechanism you should always inspect the roof's travel path prior to closing it, as the safety system might fail to detect certain kinds of obstructions, such as very thin objects, and
the window would continue closing. The anti-trapping mechanism for closing the panorama glass roof is deactivated if the switch is pressed beyond the resistance point and held there. The closing
action is interrupted when you release the switch.<
Following interruptions in electrical power supply
Following interruptions in electrical power, for instance, when the battery is disconnected, it is possible that the glass roof will extend to its tilt-up position, but fail to respond to other commands. For initialization, please contact your BMW Sports Activity Vehicle Center.
Manual operation
In the event of an electrical malfunction, you can operate the glass roof manually:
24
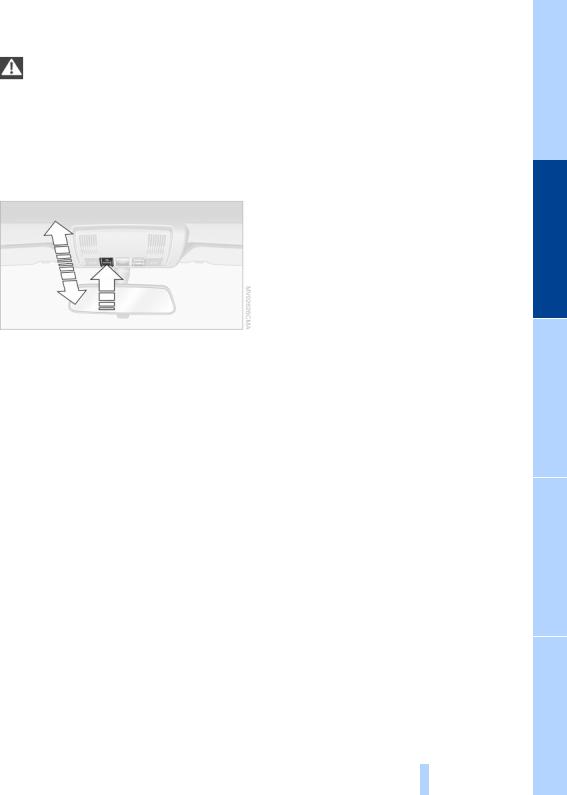
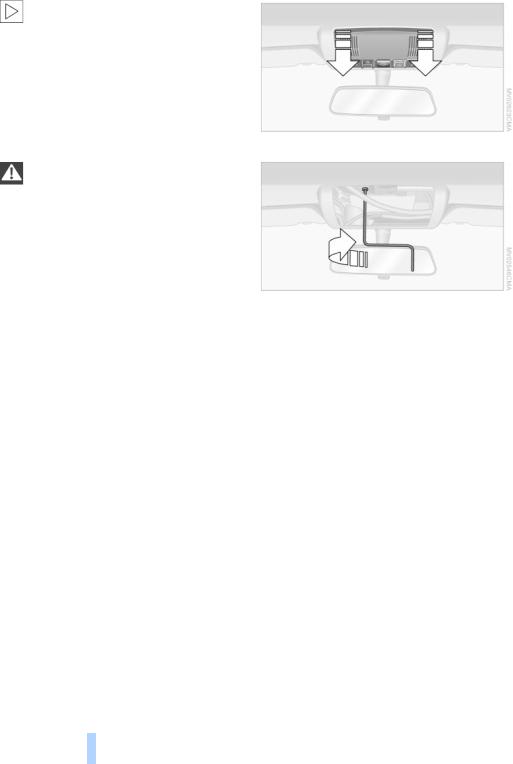
1. Pull the cover downward
2.Insert the Allen key from the compartment beneath the cargo area floor, refer to page 103, in the proper opening and turn the panorama glass roof in the desired direction. Direction of rotation for closing, refer to arrow.
Alarm system*
The concept
The vehicle alarm system responds:
>When a door, the hood, or the tailgate is opened
>To movement in the vehicle's interior – interior motion sensor
>To variations in the vehicle tilt angle such as occur during attempts to steal the wheels or tow the vehicle
>To interruption of battery voltage.
The system responds to unauthorized vehicle entry and attempted theft by simultaneously activating:
>An acoustic alarm, which lasts for a period of approx. 30 seconds
>The hazard warning flashers for approx. 5 minutes
Online Edition for Part No. 01 41 0 157 631 - © 07/03 BMW AG
>The high beams, which flash on and off in the same rhythm.
Arming and disarming the alarm system
When the vehicle is locked or unlocked with the key or the remote control, the alarm system is also simultaneously armed or disarmed.
If the alarm system has been properly armed, the hazard warning flashers light up once.
>If the indicator lamp goes out when the system is disarmed: no manipulation or attempted intrusions have been detected in the period since the system was armed
>If the indicator lamp flashes for 10 seconds after the system is disarmed: an attempted entry has been detected in the period since the system was armed.
Following triggering of an alarm, the indicator lamp will flash continuously.
You can have different acknowledgment signals set to confirm arming
and disarming.<
You can also open the tailgate with the system armed using the  button on the remote control, refer to page 19. When you close the tailgate, the system is rearmed.<
Avoiding unintentional alarms
The tilt alarm sensor and interior motion sensor may be switched off at the same time. You can do this to prevent a false alarm from being triggered in garages with elevator ramps, for instance, or when the vehicle is transported by trailer or train:
Lock twice:
Switching off the alarm
>Unlock the vehicle using the remote control, refer to page 19
>Turn the ignition key to position 1.
Indicator lamp displays
>Press the  button on the remote control twice consecutively
>Lock using the door lock twice.
The indicator lamp lights up briefly and then flashes continuously. The tilt alarm sensor and the interior motion sensor are deactivated as long as the system is armed.
If you wish, the tilt alarm sensor and interior motion sensor are perma-
nently switched off. You can have this set at your BMW Sports Activity Vehicle Center.<
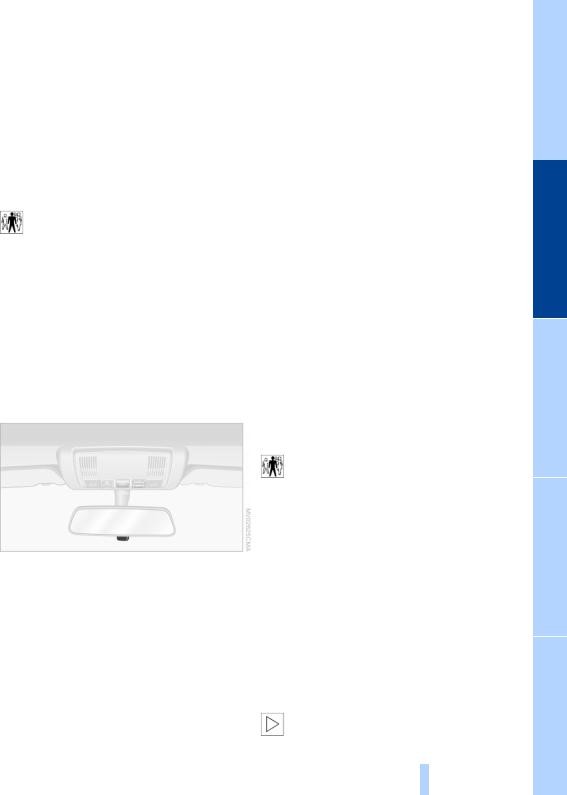
Interior motion sensor
>The indicator lamp below the interior rearview mirror flashes continuously: the system is armed
>The indicator lamp flashes during arming: door(s), the hood or tailgate are not completely closed. Even if you do not close the alerted area, the system begins to monitor the remaining areas, and the indicator lamp flashes continuously after 10 seconds. However, the interior motion sensor is not activated
In order for the interior motion sensor to function properly, the windows and panorama glass roof must be completely closed.
However, be sure to switch off the interior motion sensor – refer to Avoiding unintentional alarms – when you
>leave children or animals in the vehicle
>the windows or panorama glass roof are to remain open.
The tilt alarm sensor and interior motion sensor are switched off inad-
25
Online Edition for Part No. 01 41 0 157 631 - © 07/03 BMW AG
At a glance
Controls
Driving tips
Mobility
Reference

Opening and closing
vertently if convenience closing of windows and panorama glass roof is interrupted within the first 10 seconds and then reinitiated. If this has occurred, the system must be disarmed and then rearmed.<
26
Online Edition for Part No. 01 41 0 157 631 - © 07/03 BMW AG

Adjustments
Sitting safely |
Sitting safely with safety belts |
The ideal sitting position can make a vital contribution to relaxed driving that is as fatigue-free as possible. The sitting position plays an important role together with the safety belts and airbags in providing occupants with maximum levels of passive safety in an accident. Therefore, observe the following instructions, as otherwise the protective function of the safety systems may be impaired.
For additional information on transporting children safely, refer to page 34.
Sitting safely with airbags
Always maintain an adequate distance between yourself and the air-
bags. Always hold the steering wheel by its rim with hands at the 9 o'clock and
3 o'clock positions, to minimize the risk of injuries to your hands and arms in the event of airbag deployment.
No one and nothing is to come between the airbags and the seat occupant.
Do not use the cover of the front airbag on the front passenger side as a storage area. Make sure that the front passenger is correctly seated, i.e. feet or legs not resting on the instrument panel, as otherwise leg injuries can result if the knee and front airbag is triggered.
Never let an occupant's head rest near or on a side airbag because the inflating airbag could cause a serious or fatal injury.<
Even if you adhere to all the instructions injuries resulting from contact with airbags cannot be fully excluded, depending on the circumstances. The ignition and inflation noise may provoke a mild – usually temporary – hearing loss in extremely sensitive individuals.
For airbag locations and additional information on airbags, refer to page 54.
Even though there is an airbag, wear a safety belt every time you get in the vehicle. Although airbags enhance safety by providing added protection, they are not a substitute for safety belts.
Your vehicle has five seats that are all equipped with a safety belt.
Occupants should sit upright and be properly restrained at all times:
infants and small children in appropriate child-restraint systems; larger children and adults using the safety belts.
Expectant mothers should always wear their safety belts, taking care to position the lap belt against the lower hips, where it will not exert pressure against the abdominal area.
Never allow more than one person to wear a single safety belt. Never allow infants and small children to ride in a passengers lap. Do not route the belt across your neck, or run it across sharp edges. Be sure that the belt does not become caught or jammed. Avoid twisting the belt while routing it firmly across the hips and shoulder. Do not allow the belt to rest against hard or fragile objects. Otherwise, in the event of a frontal impact, a loose lap belt could slide over your hips, leading to abdominal injury. Avoid wearing clothing that prevents the belt from fitting properly and pull the lap belt periodically to readjust the tension across your shoulder in order to avoid a reduction in the retention effect of the safety belt.<
For fastening safety belts, refer to page 30.
Seats
Note before adjusting
Never try to adjust your seat while operating the vehicle. The seat could
respond with unexpected movement, and
27
Online Edition for Part No. 01 41 0 157 631 - © 07/03 BMW AG
At a glance
Controls
Driving tips
Mobility
Reference
Adjustments
the ensuing loss of vehicle control could lead to an accident.
Especially on the passenger's side, do not incline the backrest too far to the rear while the vehicle is being driven, as otherwise there is a danger in the event of an accident of sliding under the safety belt, eliminating the protection normally provided by the belt.<
Please observe the information on using safety belts provided on page 30 and the information on the head restraints on page 28.
Seat adjustment
To ensure that the safety systems continue to provide optimized protec-
tion, please observe the adjustment instructions above.<
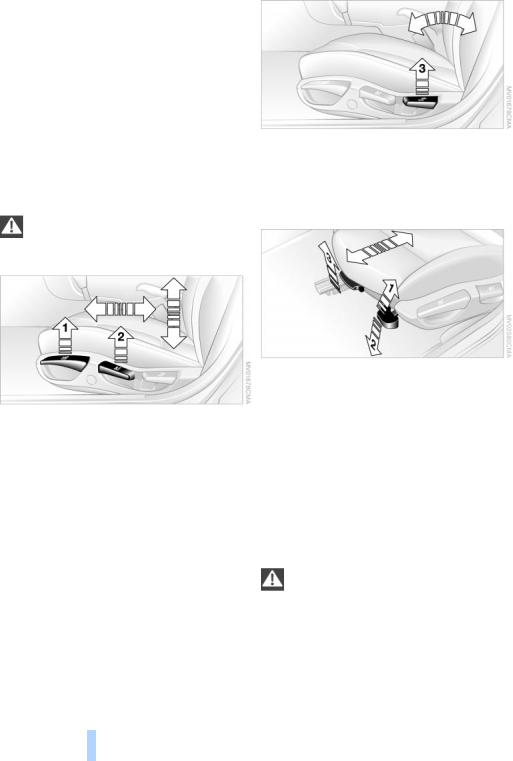
1Longitudinal direction
Pull the lever and slide the seat into the desired position.
After you release the lever, move the seat forward or backward slightly so that it engages fully
2Height
Pull the lever and apply weight to or remove weight from the seat as required
28
3Backrest angle
Pull the lever and apply weight to or remove weight from the backrest as required
Adjusting the BMW sports seat*
You can also adjust the tilt and the thigh support:
1Upward tilt:
Pull the lever as many times as required to set the desired tilt
2Downward tilt:
Press the lever as many times as required to set the desired tilt
3Thigh support:
Pull the lever and move the thigh support in the longitudinal direction
Head restraints
Align the head restraints so that their center is approximately at ear level,
as otherwise the risk of spinal injuries is increased in the event of an accident.<
Online Edition for Part No. 01 41 0 157 631 - © 07/03 BMW AG
Loading...