


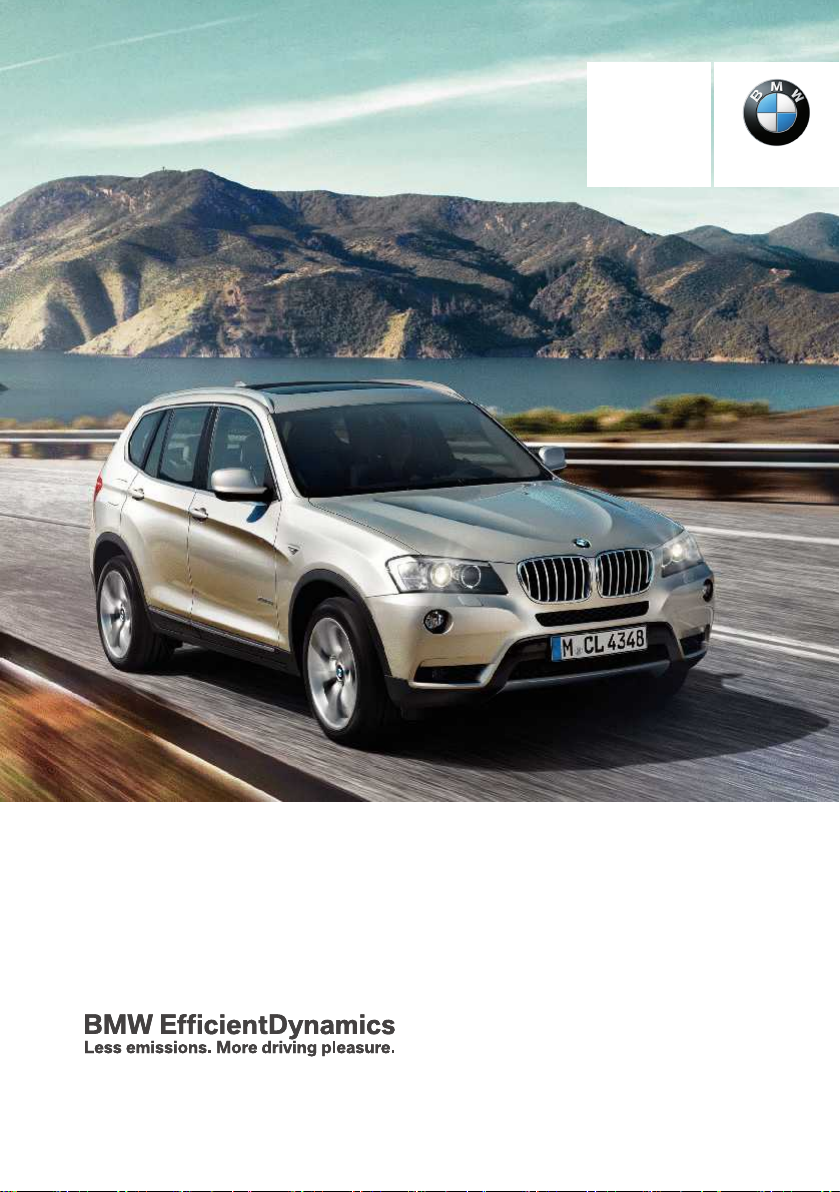
X3 xDrive20i 2013
Table of contents
 Loading...
BMW X3 xDrive20i 2013, X3 xDrive35i 2013, X3 xDrive28i 2013, X3 xDrive35d 2013, X3 xDrive20d 2013 Owner's Handbook Manual
...
Contents
Owner's Handbook
for the Vehicle
A-Z
The Ultimate Driving
Machine
THE BMW X3.
THE BMW X3.
OWNER'S HANDBOOK.
OWNER'S HANDBOOK.
Online Edition for Part no. 01 40 2 900 867 - 03 12 490


X3 xDrive20i
X3 xDrive28i
X3 xDrive35i
X3 xDrive20d
X3 xDrive30d
X3 xDrive35d
Owner's Handbook for Vehicle
Congratulations on your choice of a BMW.
The better you are acquainted with your car, the easier you will
find it is to handle. We would therefore like to offer you the
following advice:
Please read the Owner's Handbook before setting out in your new
BMW. Also use the integrated Owner's Handbook in your vehicle.
It contains important notes on how to operate the car, enabling
you to derive maximum benefit from the technical advantages of
your BMW. It also contains useful information which will help you
to uphold both your BMW's operating safety and its full resale
value.
Updates to the printed or integrated Owner's Handbook after go‐
ing to press are located as needed in the appendix to the printed
quick reference to the vehicle.
Supplementary information is provided in the other documents of
on-board literature.
We wish you a safe and enjoyable journey,
BMW AG
Online Edition for Part no. 01 40 2 900 867 - 03 12 490

© 2012 Bayerische Motoren Werke
Aktiengesellschaft
Munich, Germany
Not to be reproduced, wholly or in part, without written
permission from BMW AG, Munich.
English II/12, 03 12 490
Printed on environmentally friendly paper, bleached
without chlorine, suitable for recycling.
Online Edition for Part no. 01 40 2 900 867 - 03 12 490

Contents
For quick access to a particular topic or item,
please consult the detailed alphabetical index,
see page 302.
6 Notes
Overview
10 Cockpit
14 iDrive
21 Voice control system
24 Integrated Owner’s Handbook in the
vehicle
Controls
28 Opening and closing
44 Adjusting
54 Carrying children in safety
59 Driving
71 Displays
86 Lights
92 Security
99 Driving stability control systems
105 Driving comfort
118 Climate
125 Interior equipment
131 Storage compartments
Driving hints
138 Driving precautions
142 Loads
144 Towing a trailer
148 Saving fuel
Entertainment
174 Sound
176 Radio
181 CD/multimedia
Communication
208 Telephone
218 Office
227 Contacts
230 ConnectedDrive
239 Extended BMW Online services
Mobility
242 Refuelling
244 Fuel
246 Wheels and tyres
254 Engine compartment
256 Engine oil
259 Coolant
260 Maintenance
263 Replacing parts
271 Help in the event of a breakdown
277 General care
Reference
284 Technical data
293 Short commands of the voice control
system
302 From A to Z
Navigation
154 Navigation system
Online Edition for Part no. 01 40 2 900 867 - 03 12 490

Notes
Notes
About this Owner’s
Handbook
The quickest access to a particular topic or item
is by consulting the alphabetical index.
The first chapter is recommended for an initial
overview of the vehicle.
Updates after going to press
Updates to the Owner's Handbook after going
to press are found in the appendix of the printed
quick reference to the vehicle.
Additional sources of information
Should you require any further information,
please contact your Service centre, who will be
pleased to advise you.
Information on BMW, for example on technol‐
ogy, on the Internet: www.bmw.com
Symbols
Indicates precautions that must be followed
precisely in order to avoid the possibility of per‐
sonal injury and serious damage to the vehicle.
◄ Marks the end of a specific item of informa‐
tion.
"..." Identifies texts on the control display for se‐
lecting functions.
›...‹ Identifies commands for the voice control
system.
»...« Identifies replies by the voice control sys‐
tem.
Refers to measures that can be taken to help
protect the environment.
Symbol for components and
assemblies
Recommends that you study the relevant
section of this Owner's Handbook in connection
with a particular part or assembly.
Vehicle Equipment
This Owner's Handbook describes all models
and all standard, national and special equipment
provided in the model series. This Owner's
Handbook therefore also describes and illus‐
trates equipment not present in your vehicle, for
example due to selected special equipment and
national version.
That also applies to safety-relevant functions
and systems.
If certain equipment and models are not descri‐
bed in this Owner's Handbook, refer to the Sup‐
plementary Owner's Handbooks provided.
In right-hand drive vehicles, some of the control
functions are arranged differently from those
shown in the illustrations.
Built-date
The 'built-date' of your vehicle is indicated un‐
derneath the door post on the driver's door.
The ‘built-date’ is defined as ‘the calendar
month and the calendar year in which the body
shell and the powertrain subassemblies are con‐
joined and the vehicle is driven or moved from
the production line’.
Status of the Owner's
Handbook
The high level of safety and quality of vehicles is
ensured by continuous enhancement. In rare in‐
6
Online Edition for Part no. 01 40 2 900 867 - 03 12 490

Notes
stances, your car may therefore differ from the
information supplied here.
For Australia/New Zealand
When reading this Owner's Handbook, please
bear the following in mind: to ensure that our
vehicles continue to embody the highest quality
and safety standards, we pursue a policy of con‐
tinuous, ongoing development. Because modi‐
fications in the design of both vehicles and ac‐
cessories may be introduced at any time, your
own vehicle's equipment may vary from that de‐
scribed in this manual. For the same reason, it is
also impossible to guarantee that all descrip‐
tions will be completely accurate in all respects.
We must therefore request your understanding
of the fact that the manufacturer of your vehicle
is unable to recognise legal claims based on dis‐
crepancies between the data, illustrations and
descriptions in this Owner's Handbook and your
own vehicle's equipment. Please note, too, that
some of the optional equipment described in
this manual is not available on Australian models
due to restrictions imposed by Australian De‐
sign Rules and other requirements.
Should you require any further information,
please contact your Service centre, who will be
pleased to advise you.
Updates after going to press
Updates to the Owner's Handbook after going
to press are found in the appendix of the printed
quick reference to the vehicle.
Your own safety
Your vehicle is configured for the operating con‐
ditions and registration requirements of your
country. If the vehicle is to be operated in an‐
other country, your vehicle must be adapted to
any prevailing different operating conditions
and permit requirements. Information on possi‐
ble exclusion of warranty or warranty restrictions
for your vehicle can be obtained from your Serv‐
ice centre.
Maintenance and repair
The advanced technology behind this car, for
example the use of modern materials and highperformance electronics, means that adapted
methods of maintenance and repair are re‐
quired.
Always have the corresponding work performed
either by a BMW Service centre or by a work‐
shop that operates to BMW specifications and
has suitably trained personnel.
If such work is performed inexpertly, it could re‐
sult in consequential damage and thus consti‐
tute a safety risk.
Parts and accessories
BMW recommends using parts and accessory
products that are specifically approved for this
purpose by BMW.
You are recommended to consult a BMW Serv‐
ice centre for advice on genuine BMW parts and
accessories, other BMW approved products
and competent advice on all related matters.
The safety and compatibility of these products
in conjunction with BMW vehicles have been
checked by BMW.
BMW accepts product liability for them. BMW
cannot accept liability for parts or accessory
products of any kind which it has not approved.
BMW is unable to assess each individual prod‐
uct of outside origin as to its suitability for use
on BMW vehicles without safety risk. Nor can
suitability be assured if an official permit has
been issued for it in a specific country. Tests
performed for such permits cannot always cover
all operating conditions for BMW vehicles, and
some of them therefore are insufficient.
Online Edition for Part no. 01 40 2 900 867 - 03 12 490
7

Online Edition for Part no. 01 40 2 900 867 - 03 12 490

Overview
This summary of buttons, switches and displays
serves as an initial guide.
In addition, it gives you an insight into the
principles behind the various ways in which
functions can be performed.
Online Edition for Part no. 01 40 2 900 867 - 03 12 490
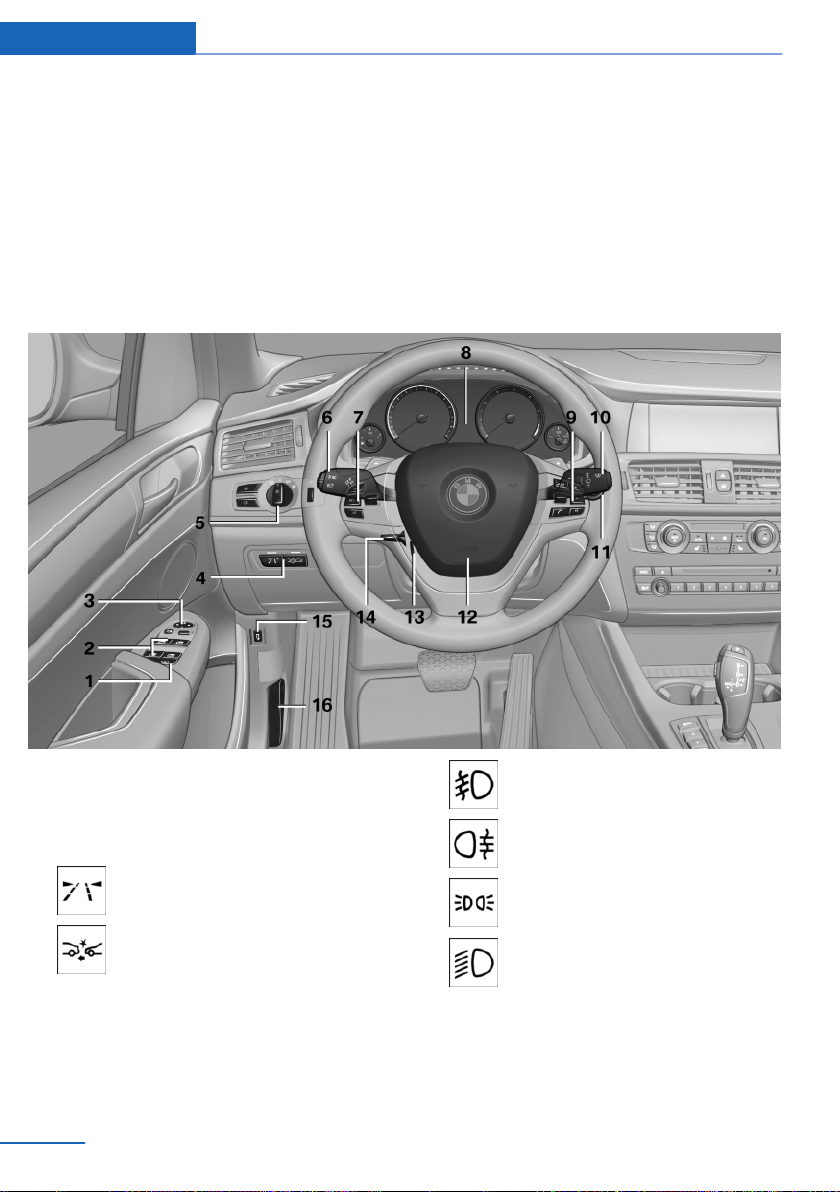
Overview Cockpit
Cockpit
Vehicle Equipment
This chapter describes all standard, national and
special equipment provided in the model series.
Around the steering wheel
Therefore equipment not available in a vehicle is
also described, for example the selected special
equipment or national version. That also applies
to safety-relevant functions and systems.
1 Safety switch for window in rear passenger
compartment 41
2 Power windows 40
3 Exterior mirror operation 51
4 Lane departure warning 97
Forward alert 105
5 Lights
10
Online Edition for Part no. 01 40 2 900 867 - 03 12 490
Front fog lights 90
Rear fog lights 90
Side lights 86
Low-beam headlights 86
Cockpit Overview
Automatic driving lights con‐
trol 87
Daytime driving lights 87
Adaptive Headlights 88
High-beam assistance 88
Instrument lighting 90
6 Steering-column lever, left
Turn indicator 65
High-beam headlights, headlight
flasher 65
High-beam assistance 88
Parking lights 87
On-board computer 80
7 Buttons on steering wheel, left
Set speed 107
Voice control 21
Telephone 208
Knurled wheel for selection lists 107
10 Steering-column lever, right
Windscreen wipers 66
Rain sensor 66
Cleaning the windows and head‐
lights 67
Rear wipers 67
11 Start/stop engine and switch igni‐
tion on/off 60
Auto Start Stop function 61
12 Horn
13 Steering wheel heating 53
Resume speed 108
Cruise control on/off, inter‐
rupt 107
Paddle for Cruise Control 80
8 Instrument cluster 71
9 Buttons on steering wheel, right
Entertainment source
Volume control
Online Edition for Part no. 01 40 2 900 867 - 03 12 490
14 Steering wheel adjustment 53
15 Opening the tailgate 35
16 Unlock bonnet 254
11
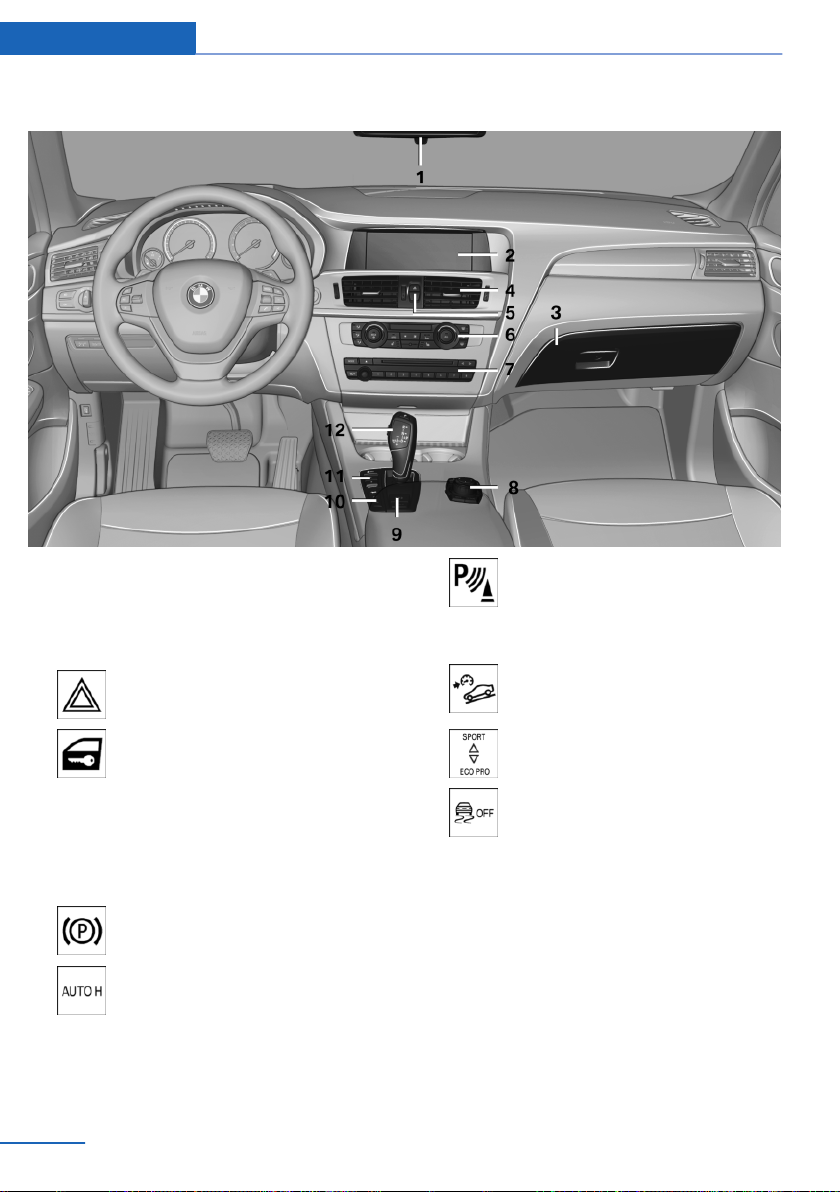
Overview Cockpit
Around the centre console
1 Roof lining 13
2 Control display 14
3 Glove box 131
4 Air outlets 123
5 Hazard warning flashers 271
Central locking system 31
6 Automatic air conditioning 118
7 Radio 176
CD/multimedia 181
8 Controller with buttons 14
9 Parking brake 63
Auto Hold 64
10 Park Distance Control,
PDC 109
Rear view camera 111
Top View 114
Hill Descent Control HDC 100
11 Drive experience switch 102
Dynamic Stability Control,
DSC 99
12 Manual gearbox 68
Automatic transmission 68
12
Online Edition for Part no. 01 40 2 900 867 - 03 12 490

Around the headlining
Cockpit Overview
1 Emergency call 271
2 Panorama glass roof 41
3 Front passenger airbag indicator
lamp 94
4 Reading lights 91
5 Interior light 90
Online Edition for Part no. 01 40 2 900 867 - 03 12 490
13

Overview iDrive
iDrive
Vehicle Equipment
This chapter describes all standard, national and
special equipment provided in the model series.
Therefore equipment not available in a vehicle is
also described, for example the selected special
equipment or national version. That also applies
to safety-relevant functions and systems.
Principle
iDrive integrates the functions of a large number
of switches. These functions can thus be con‐
trolled from one central point.
Operate iDrive while the vehicle is in mo‐
tion
Only make adjustments if the traffic conditions
are appropriate. Otherwise, you may become
distracted and endanger the vehicle occupants
and other road users.◀
Overview of controls
Control functions
Control display
Notes
▷ To clean the control display, comply with the
information regarding care.
▷ To avoid risk of damage to the control dis‐
play, please do not place objects in front of
it.
Switching off
1. Press the button.
2. "Switch off control display"
Switch on
Press the controller to switch on.
1 Control display
2 Controller with buttons
The buttons can be used to call up menus
directly. The controller can be used to select
menu items and make settings.
14
Online Edition for Part no. 01 40 2 900 867 - 03 12 490
Controller
Select menu items and making settings.
Turning.
1.
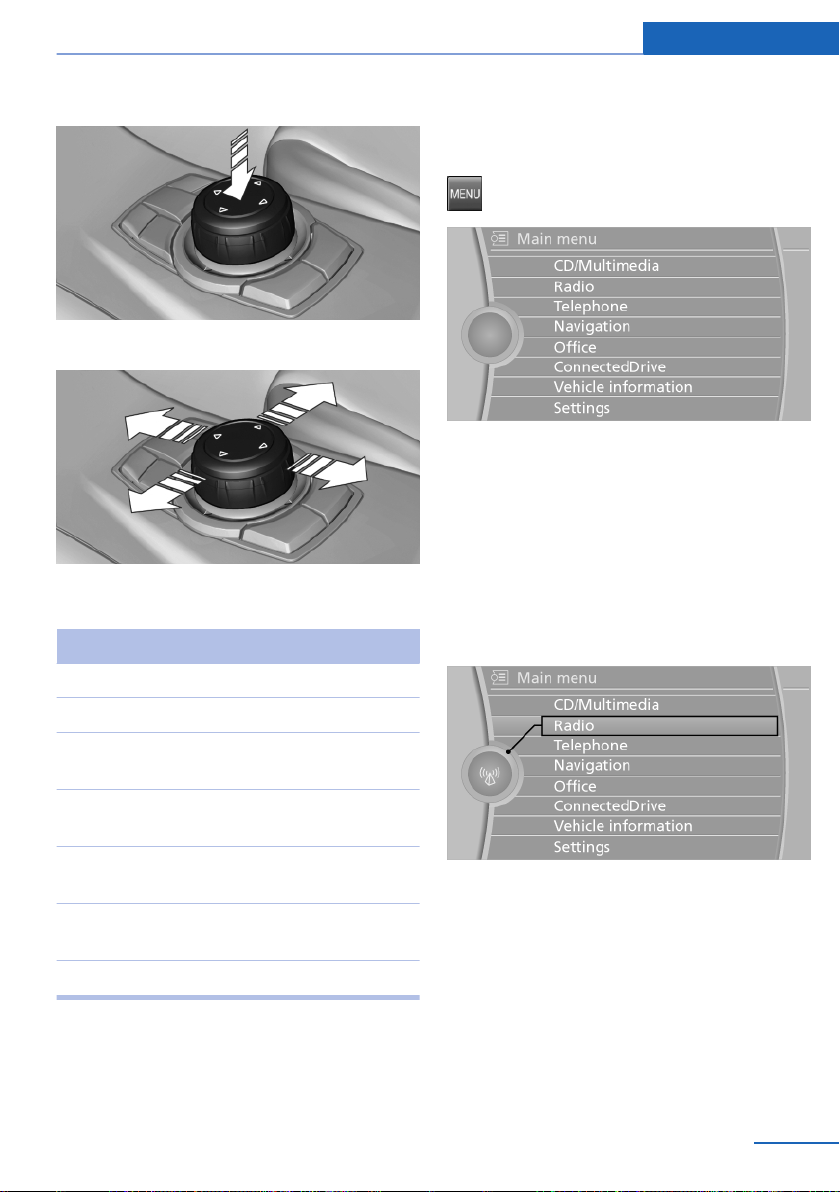
iDrive Overview
2. Pressing.
3. Tilting in four directions.
Buttons on the controller
Press the button Function
MENU Call up the main menu.
Operating principle
Calling up the main menu
Press the button.
The main menu is displayed.
All iDrive functions can be called up via the main
menu.
Selecting a menu item
Menu items in white can be selected by high‐
lighting them.
Turn the controller until the desired menu
1.
item is highlighted.
RADIO Calls up the Radio menu.
CD Calls up the CD/multimedia
menu.
NAV Calls up the Navigation
menu.
TEL Calls up the Telephone
menu.
BACK Displays the previous
screen.
OPTION Calls up the Options menu.
Online Edition for Part no. 01 40 2 900 867 - 03 12 490
2. Press the controller.
Menu items in the Owner’s Handbook
In this Owner's Handbook, the menu items that
are to be selected are shown in quotation marks,
for example "Settings".
15
Overview iDrive
Switching between screens
After a menu item has been selected, for exam‐
ple "Radio", a new screen is displayed. Screens
can lie one on top of the other.
▷ Tilt the controller to the left.
The current screen is closed and the previ‐
ous screen is displayed.
Pressing the BACK button reopens the pre‐
vious screen. The current screen is not
closed.
▷ Tilt the controller to the right.
A new screen is opened and overlaid.
Alternatively, tilt the controller repeatedly to the
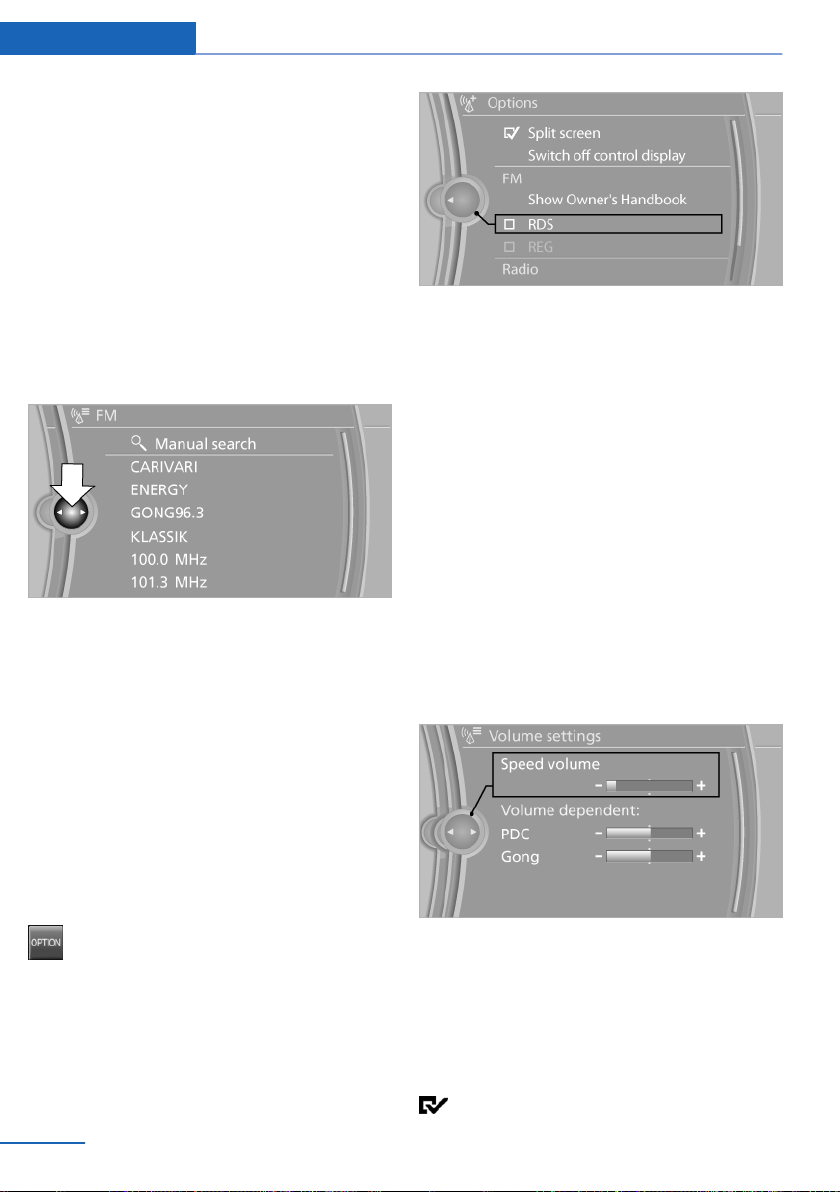
right until the "Options" menu is displayed.
Options menu
The "Options" menu consists of various areas:
▷ Screen settings, for example "Split screen".
Area remains unchanged.
▷ Operating options for the selected main
menu, for example for "Radio".
▷ If applicable, other operating options for the
selected main menu, for example "Save
station".
White arrows to the left or right indicate that
other screens can be called up.
View of an opened menu
In general, when a menu is called up, the screen
that was last selected in this menu is displayed.
To display the first screen of the menu:
▷ Tilt the controller repeatedly to the left until
the first screen is displayed.
▷ Press the menu button on the controller
twice.
Calling up the Options menu
Press the button.
The "Options" menu is displayed.
16
Online Edition for Part no. 01 40 2 900 867 - 03 12 490
Adjusting the settings
Select a field.
1.
2. Turn the controller until the desired setting
is displayed.
3. Press the controller.
Enabling/disabling functions
Some menu items are preceded by a checkbox.
This indicates whether the function is enabled
or disabled. Selecting the menu item enables or
disables the function.
Function is enabled.
iDrive Overview
Function is disabled.
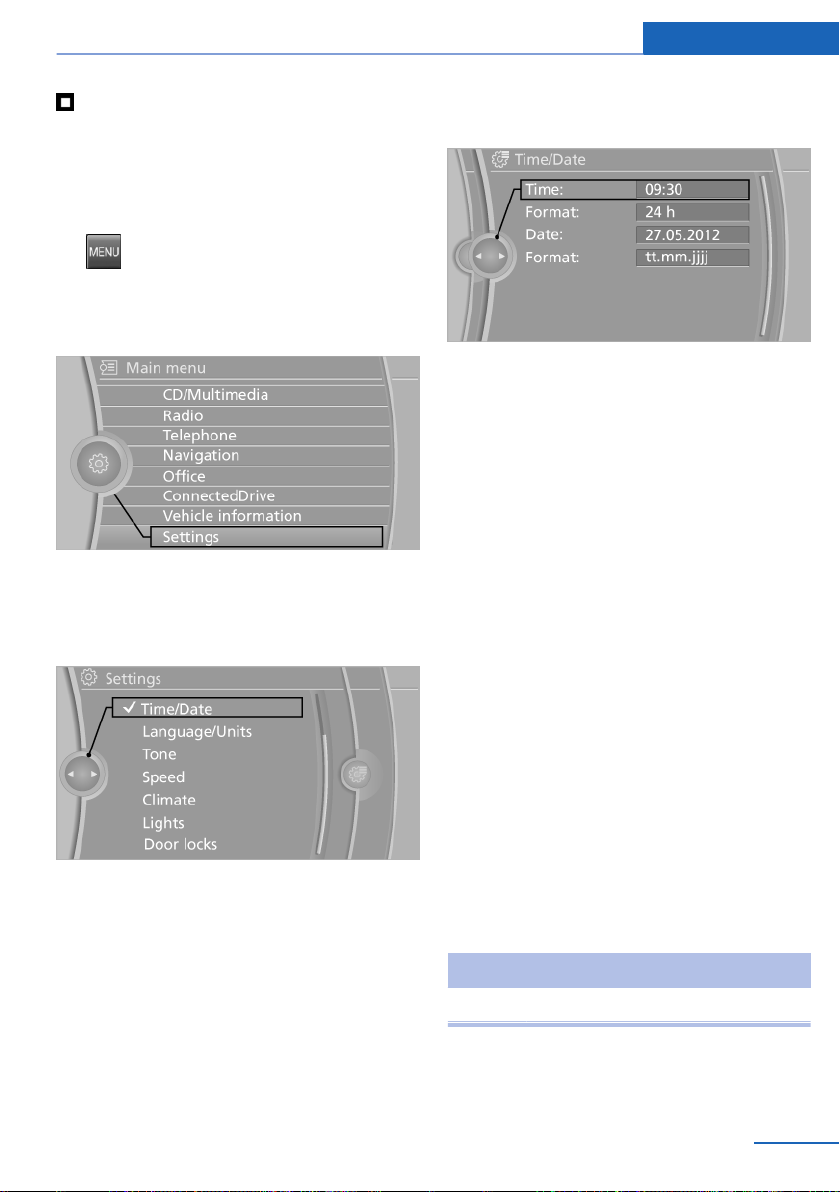
Example: setting the clock
Setting the clock
1. Press the button. The main menu is
displayed.
2. Turn the controller until "Settings" is high‐
lighted and press the controller.
3. If necessary, tilt the controller to the left to
display "Time/Date".
4. Turn the controller until "Time/Date" is high‐
lighted and press the controller.
5. Turn the controller until "Time:" is highligh‐
ted and press the controller.
6. Turn the controller to set the hour and press
the controller.
7. Turn the controller to set the minutes and
press the controller.
Status information
Status field
The following items of information are displayed
in the status field on the top right:
▷ Time
▷ Current entertainment source.
▷ Sound output on/off.
▷ Reception level of mobile telephone net‐
work.
▷ Phone status.
▷ Reception of traffic reports.
Symbols in the status field
The symbols are combined in the following
groups.
Symbols for radio
Symbol Meaning
TP Traffic Information switched on.
Online Edition for Part no. 01 40 2 900 867 - 03 12 490
17
Overview iDrive
Symbols for telephone
Symbol Meaning
Incoming or outgoing call.
Missed call.
Reception level of mobile telephone
network symbol flashes: network
search.
No mobile phone network available.
Bluetooth switched on.
Data transfer active.
Roaming active.
Text message received.
SIM card check.
SIM card disabled.
SIM card not found.
PIN required.
Symbols for entertainment
Symbol Meaning
CD/DVD player.
Music collection
Gracenote® database.
AUX-IN port
USB audio interface/Audio interface,
mobile phone
Other functions
Symbol Meaning
Spoken instructions switched off.
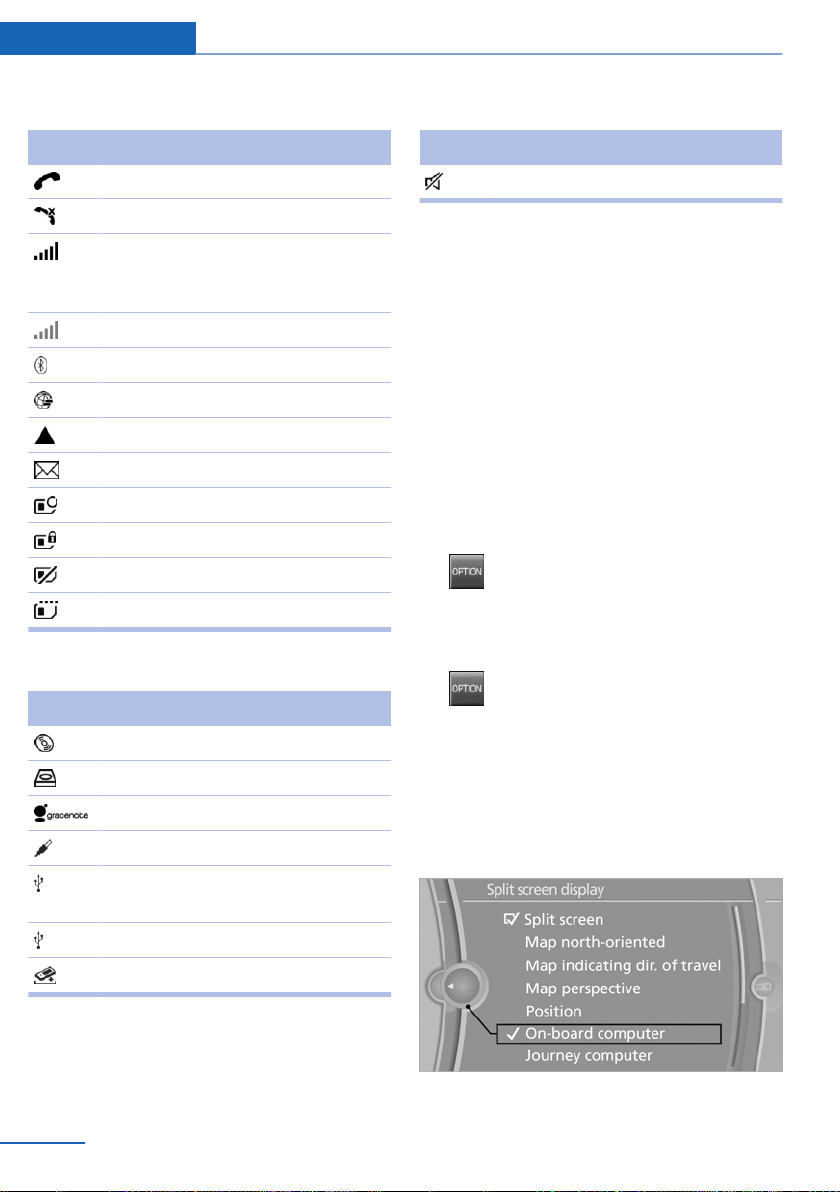
Split screen
General
In the split screen view, additional information
can be displayed on the right-hand side of the
screen, for example information from the onboard computer.
This information remains visible in the split
screen view even if a switch is made to another
menu.
Switching the split screen view on and
off
1.
2. "Split screen"
Selecting display
1.
2. "Split screen"
3. Tilt the controller until the split screen is se‐
4. Press the controller or select "Split screen
5. Select the desired menu item.
Press the button.
Press the button.
lected.
display"
USB audio interface.
Audio interface for mobile phone.
18
Online Edition for Part no. 01 40 2 900 867 - 03 12 490

iDrive Overview
Favourites buttons
General
iDrive functions can be saved on the favourites
buttons and called up directly, for example radio
stations, navigation destinations, telephone
numbers and shortcuts into the menu.
The settings are saved for the remote control
currently in use.
Saving a function
1. Highlight the function using the iDrive.
2. Press the desired button for longer
than 2 seconds.
Performing a function
Press the button.
The function is carried out immediately.
If you have selected a telephone number, for ex‐
ample, the connection will also be established.
Displaying assignment of buttons
Touch the buttons with your finger. Do not wear
gloves or use objects.
The assignment of the buttons is displayed at
the top edge of the screen.
Clearing assignment of buttons
1. Press buttons 1 and 8 simultaneously for
approximately five seconds.
2. "OK"
Entering letters and digits
General
1. Turn controller and select letters or digits.
2. If applicable, select other letters or digits.
3. Select "OK" to confirm the input.
Symbol Function
Press the controller: deletes a letter
or digit.
Press and hold down the controller:
deletes all numbers or letters.
Enters a space.
Change between upper/lower case,
numbers and symbols
Depending on the menu, you can switch be‐
tween the input of lower case or upper case let‐
ters, numbers and symbols:
Symbol Function
▷ To display brief information: touch the but‐
ton.
▷ To display detailed information: touch the
button for longer.
Online Edition for Part no. 01 40 2 900 867 - 03 12 490
Enter letters.
Enter digits.
or Tilt the controller up.
Entry comparison
Input of names and addresses: the selection is
gradually narrowed down and possibly supple‐
mented with every subsequent letter that you
enter.
Inputs are continuously compared with the data
saved in the vehicle.
▷ Only letters that are present in the data are
offered for entry.
19

Overview iDrive
▷ Destination search: place names can be en‐
tered in the writing of any language available
on the control display.
20
Online Edition for Part no. 01 40 2 900 867 - 03 12 490

Voice control system
Voice control system Overview
Vehicle Equipment
This chapter describes all standard, national and
special equipment provided in the model series.
Therefore equipment not available in a vehicle is
also described, for example the selected special
equipment or national version. That also applies
to safety-relevant functions and systems.
Principle
▷ Through the voice control system most
functions shown in the Control Display can
be operated by spoken commands. The
system supports spoken input.
▷ Functions that can only be used when the
vehicle is stationary cannot be operated via
the voice control system.
▷ The system has a special microphone on the
driver's side.
▷ ›...‹ Identifies commands for the voice con‐
trol system in the Owner's Handbook.
Requirements
On the control display set a language that is also
supported by the voice control system, so that
the vehicle can identify spoken commands.
Setting the language, see page 84.
Issuing voice commands
Activating the voice control system
The command is shown in the instrument
cluster.
Symbol in the instrument cluster indicates
that the voice control system is active.
If no further spoken commands are possible,
switch to iDrive to control the function in this
case.
Switching off the voice control system
Press the button on the steering wheel
or say ›Cancel‹.
Possible commands
Most of the menu items on the control display
can be called up by means of spoken com‐
mands.
The possible commands depend on which
menu is currently displayed on the Control Dis‐
play.
There are commands for the functions of the
main menu.
Several list entries, for example, telephone book
entries, can also be selected using the voice
control system. When doing this, list entries are
to be spoken exactly as they are shown in the
relevant list.
Having possible commands read aloud
Possible commands can be read aloud: ›Voice
commands‹
If, for example, the menu "Settings" is displayed,
the commands for the settings are announced.
1.
2. Wait for acoustic signal.
3. Issue the command.
Press the button on the steering
wheel.
Online Edition for Part no. 01 40 2 900 867 - 03 12 490
Running functions using short
commands
Main menu functions can be performed imme‐
diately using short commands, almost irrespec‐
21

Overview Voice control system
tive of which menu item is selected, for exam‐
ple ›Vehicle status‹.
List of Short commands of the voice control sys‐
tem, see page 293.
Help dialogue to voice entry system
Call up help dialogue: ›Help‹
Further commands for help dialogue:
▷ ›Help with examples‹: information on the
current possible operations and the most
important commands for this are read out.
▷ ›Help with voice input‹: information on the
operating principle of the voice entry system
is read out.
Example: playing a CD
If necessary, switch on entertainment audio
1.
output.
2. Press the button on the steering
wheel.
3. ›C D and multimedia‹
The last medium played is played.
4. ›C D track ...‹, for example CD track 4.
Setting the speech dialogue
You can set whether the system uses the stand‐
ard dialogue or the short variant,
With the short variants of the speech dialogue,
the system announcements are played in short‐
ened form.
On the control display:
"Settings"
1.
2. "Language/Units"
3. "Speech mode:"
4. Select the setting.
Adjusting volume
Turn the volume knob during the voice instruc‐
tions until the desired volume is obtained.
▷ The volume is retained even if you change
the volume of other audio sources.
▷ The volume is saved for the remote control
currently in use.
Information regarding emergency calls
The voice control system should not be used for
emergency calls. Under stress, the spoken lan‐
guage and voice pitch can change, which could
unnecessarily delay the connection of your call.
Instead, use the SOS button, see page 271, in
the area of the interior mirror.
Operating conditions
▷ Commands, digits and letters should be
pronounced fluently, with the usual empha‐
sis, and at a normal volume and speed.
▷ Always speak the commands in the lan‐
guage of the voice control system.
▷ When selecting a radio station, use the
standard pronunciation of the station name:
22
Online Edition for Part no. 01 40 2 900 867 - 03 12 490

›Station ...‹ for example, Classic Radio sta‐
tion
▷ Doors, windows and the glass roof should be
kept closed to avoid noise interference.
▷ Avoid background noises in the car while
you are speaking.
Voice control system Overview
Online Edition for Part no. 01 40 2 900 867 - 03 12 490
23
Overview Integrated Owner’s Handbook in the vehicle
Integrated Owner’s Handbook in the vehicle
Vehicle Equipment
This chapter describes all standard, national and
special equipment provided in the model series.
Therefore equipment not available in a vehicle is
also described, for example the selected special
equipment or national version. That also applies
to safety-relevant functions and systems.
Integrated Owner’s Handbook in the vehicle
The integrated Owner's Handbook can be
shown in the control display. It particularly de‐
scribes the equipment and functions present in
the vehicle.
Components of the integrated Owner's
Handbook
The integrated Owner's Handbook consists of
three parts, which provide various information
depths or access possibilities.
Quick Reference
Important information is found in the quick ref‐
erence for the operation of the vehicle, the op‐
eration of fundamental vehicle functions or in
case of breakdown. This information can also be
displayed when driving.
Search by pictures
Using the search by pictures, information and
descriptions can be searched using pictures.
For example, that is particularly helpful when the
description of a piece of equipment is needed,
which cannot be named.
Owner's Handbook
Here, information and descriptions can be
searched via the index by directly entering a
search term.
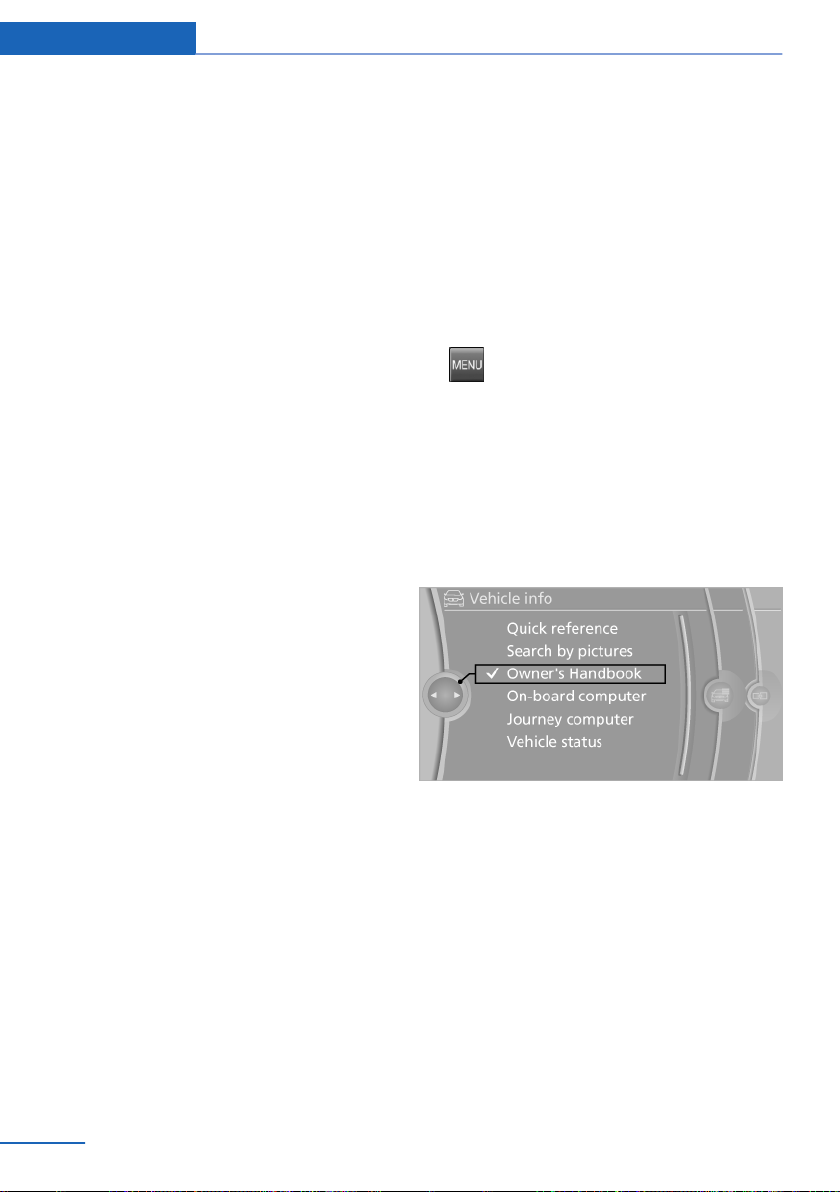
Select components
1. Press the button.
2. Turn the controller and select "Vehicle
information".
3. Press the controller.
4. Select desired area:
▷ "Quick reference"
▷ "Search by pictures"
▷ "Owner's Handbook"
Browsing within the Owner’s
Handbook
Page by page with link access
Turn the controller until the next or previous
page is displayed.
Page by page without link access
Browse the pages directly, skipping links.
Highlight the symbol once. Then simply press
the controller to browse from page to page.
24
Online Edition for Part no. 01 40 2 900 867 - 03 12 490
Integrated Owner’s Handbook in the vehicle Overview
Browse back.
Browse forward.
Context-sensitive help - Owner's
Handbook for the currently selected
function
Suitable information can be displayed directly.
Call-up when operating via iDrive
Switch to the Options menu directly from the
application on the control display:
1.
2. "Show Owner's Handbook"
Press the button or tilt the controller
repeatedly to the right until the "Options"
menu appears.
Calling up with display of a Check
Control message
Directly from the Check Control message on the
control display:
"Show Owner's Handbook"
Switching between function and
Owner’s Handbook
You can use the control display to switch from a
function, for example radio, to the Owner's
Handbook, and then back and forth between the
two displays:
4. Press the button again to switch back
to the last displayed function.
5. Press the button again to switch back
to the last displayed page of the Owner’s
Handbook.
To switch continuously between the last dis‐
played function and the last displayed page of
the Owner’s Handbook, repeat steps 4 and 5. As
you do so, new screens are opened.
Favourites buttons
General
The Owner's Handbook can be stored in the fa‐
vourite buttons and called up directly.
Saving
Select "Owner's Handbook" using the
1.
iDrive.
2. Hold down the desired button for
longer than two seconds.
Use
Press the button.
The Owner's Handbook is displayed
immediately.
1.
2. "Show Owner's Handbook"
3. Select the desired page in the Owner’s
Press the button or tilt the controller
repeatedly to the right until the "Options"
menu appears.
Handbook.
Online Edition for Part no. 01 40 2 900 867 - 03 12 490
25
Online Edition for Part no. 01 40 2 900 867 - 03 12 490

Controls
This chapter enables you to operate your car with
greater ease, explaining in detail the features
designed to make your journey safer, more
comfortable and more enjoyable.
Online Edition for Part no. 01 40 2 900 867 - 03 12 490
Controls Opening and closing
Opening and closing
Vehicle Equipment
This chapter describes all standard, national and
special equipment provided in the model series.
Therefore equipment not available in a vehicle is
also described, for example the selected special
equipment or national version. That also applies
to safety-relevant functions and systems.
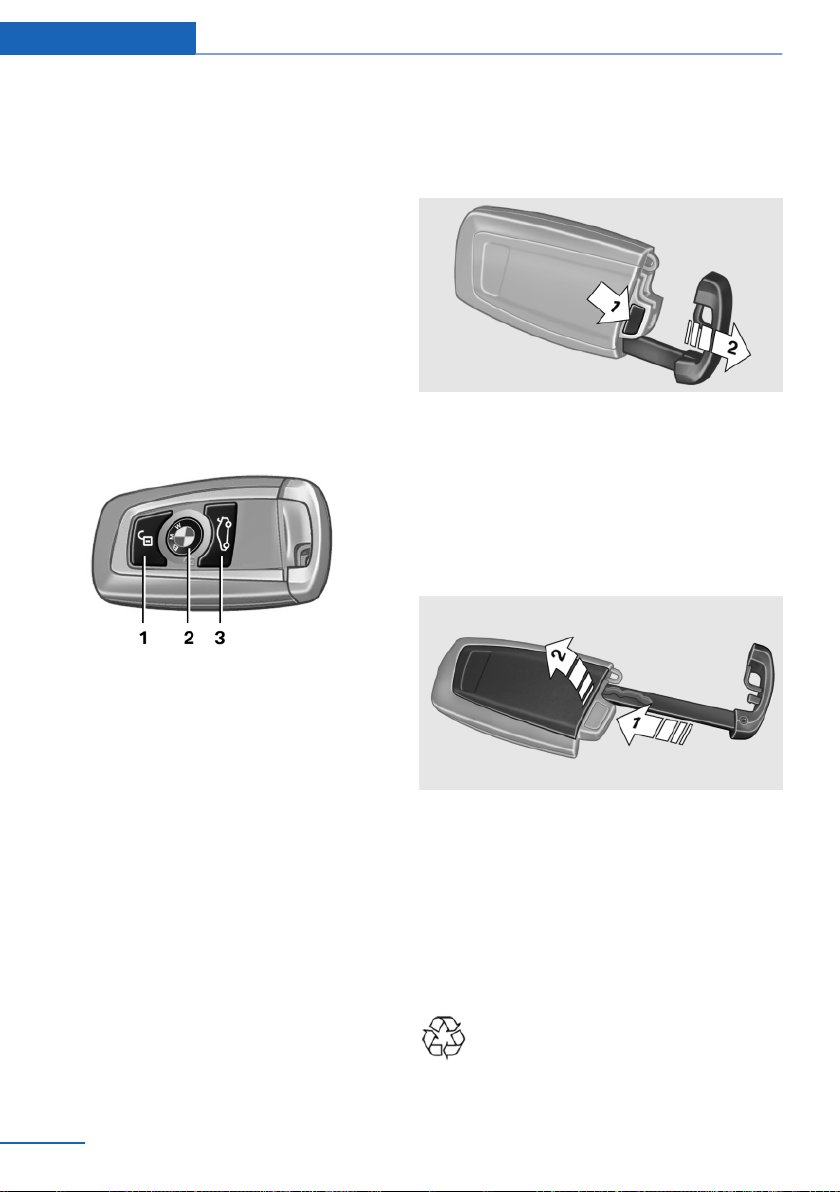
Remote control/keys
Buttons on the remote control
1 Unlocking
2 Locking
3 Opening the tailgate
Integrated key
Press the button on the back of the remote con‐
trol, arrow 1, and pull out the key, arrow 2.
The integrated key fits the following locks:
▷ Driver's door.
▷ Glove box on the passenger side.
Replacing the battery
General
The delivery specification includes two remote
controls with keys.
Every remote control contains a replaceable
battery.
The settings called up and implemented when
the car is unlocked depend on which remote
control is used to unlock the car. See Personal
Profile, see page 29.
Information regarding service requirements is
also saved in the remote control. See Service
data in the remote control, see page 260.
28
Online Edition for Part no. 01 40 2 900 867 - 03 12 490
Remove the integrated key from the remote
1.
control.
2. Push in catch with the key, arrow 1.
3. Remove the cover for the battery compart‐
ment, arrow 2.
4. Insert a new battery of the same type with
the positive side facing upwards.
5. Press the cover back into position.
Dispose of the old battery at an author‐
ised collecting point or hand it in to a
Service centre.
Opening and closing Controls
New remote controls
New remote controls can be obtained from your
Service Centre.
Loss of remote controls
A lost remote control can be blocked by the
Service Centre.
Emergency detection of the remote
control
The ignition can be switched on or the engine
started even in one of the following situations:
▷ Interference in the radio transmission to the
remote control from external sources.
▷ Flat battery in the remote control.
▷ Fault in radio transmission due to mobile
radio device in the immediate vicinity of the
remote control.
▷ Fault in radio transmission due to the
charger when charging in the vehicle, for ex‐
ample, for mobile radio devices.
If an attempt is made to switch on the ignition or
start the engine, a Check Control message is
displayed.
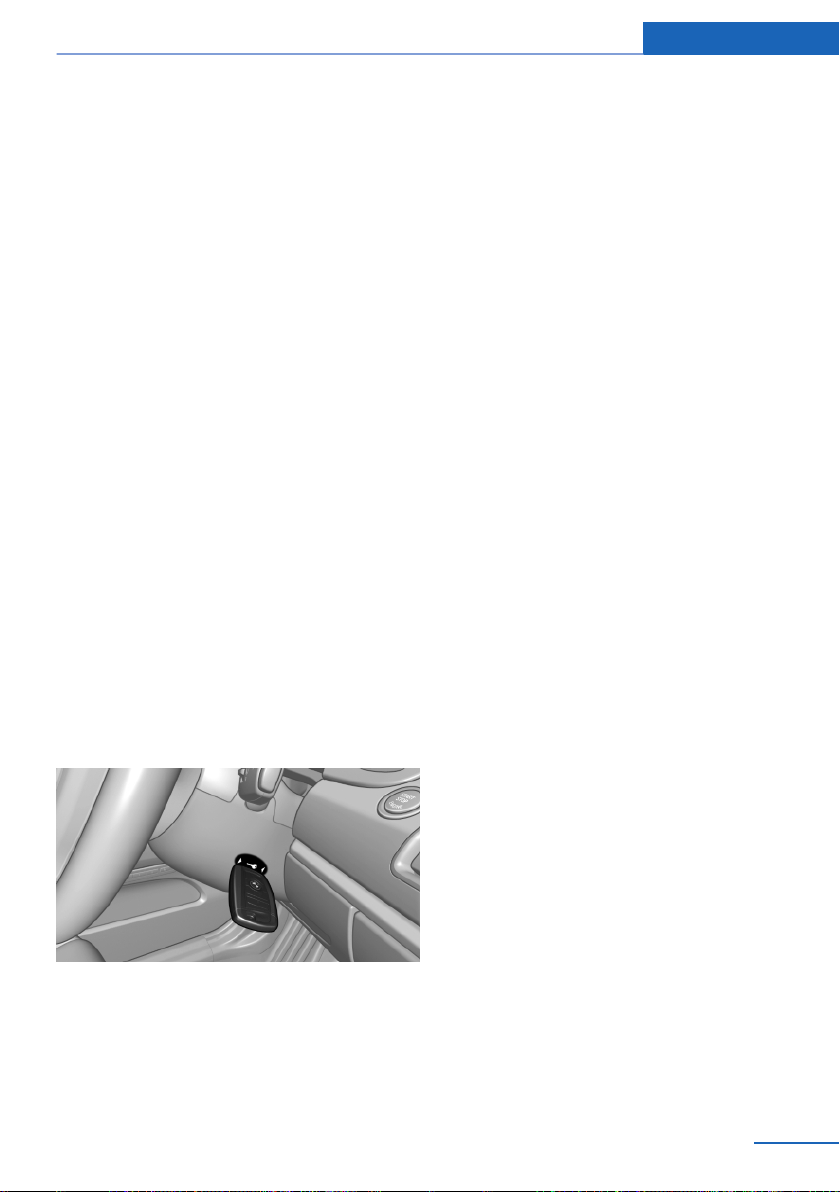
Starting the engine in the event of
emergency detection of the remote
control
Gearbox Hold the corresponding check control
message of the remote control, as illustrated, to
marking of the steering column and press the
start/stop button within 10 seconds with the
clutch depressed.
Personal Profile
Principle
Personal profile principle
Some functions of the vehicle can be adjusted
to individual needs.
▷ Settings are saved automatically in the cur‐
rently activated profile.
▷ When you unlock the vehicle, the last profile
used with the remote control is recognised
and called up.
▷ Personal settings are also found and called
up if the vehicle has been driven in the mean‐
time by other persons with their own remote
controls.
Individual settings for three personal profiles
and a guest profile are stored.
Transferring settings
The personal settings can be taken to another
vehicle with the Personal Profile function. More
detailed information is available from your Serv‐
ice centre.
The transfer takes place:
▷ Via the USB interface in the glove box or the
centre console on a USB medium.
▷ Via BMW Online.
Automatic gearbox: Hold the corresponding
check control message of the remote control, as
illustrated, to marking of the steering column
and press the start/stop button within 10 sec‐
onds with the brake depressed.
Online Edition for Part no. 01 40 2 900 867 - 03 12 490
Profile management
Calling up profiles
Independently of the remote control that is
used, another profile can be called up.
"Settings"
1.
29

Controls Opening and closing
2. "Profiles"
3. Select a profile.
The profile called up is assigned to the remote
control currently used.
Renaming profiles
"Settings"
1.
2. "Profiles"
The current profile is selected.
3. Call up "Options".
4. "Rename current profile"
Resetting profiles
Settings of the active profile are reset to factory
settings.
Switch on ignition.
1.
2. "Settings"
3. "Profiles"
The current profile is selected.
4. Call up "Options".
5. "Reset current profile"
Importing profiles
Existing settings and contacts are overwritten
with the imported profile.
1. "Settings"
2. "Profiles"
3. "Import profile"
4. BMW Online: "BMW Online"
USB interface: "USB device"
Exporting profiles
Most settings of the active profile and the saved
contacts can be exported.
This can be beneficial for safeguarding and re‐
calling personal settings, for example if items are
accidentally moved or deleted.
"Settings"
1.
2. "Profiles"
3. "Export profile"
4. BMW Online: "BMW Online":
USB interface: "USB device"
Using a guest profile
With the guest profile, individual settings can be
made without affecting the three personal pro‐
files.
This can be beneficial if a driver without their
own profile uses the vehicle temporarily.
"Settings"
1.
2. "Profiles"
3. The current profile is selected.
30
Online Edition for Part no. 01 40 2 900 867 - 03 12 490
Loading...