


 Loading...
Contents
A-Z
Owner's Manual for
Vehicle
The Ultimate Driving
Machine
THEBMWX5M ANDTHEBMWX6M.
OWNER'SMANUAL.
Online Edition for Part no. 01 40 2 918 440 - III/13

X5
X5 M
X6
X6 M
Owner's Manual for Vehicle
Thank you for choosing a BMW.
The more familiar you are with your vehicle, the better control you will have on the road. We therefore strongly suggest:
Read this Owner's Manual before starting off in your new BMW. It contains important information on vehicle operation that will help you make full use of the technical features available in your BMW. The manual also contains information designed to en hance operating reliability and road safety, and to contribute to maintaining the value of your BMW.
Please also note the additional items of onboard literature, for instance the BMW X5 M / BMW X6 M Supplementary Owner's Manual.
We wish you a safe and enjoyable drive. BMW AG
Online Edition for Part no. 01 40 2 918 440 - III/13
© 2012 Bayerische Motoren Werke Aktiengesellschaft
Munich, Germany
Reprinting, including excerpts, only with the written consent of BMW AG, Munich.
US English III/13, 04 13 500
Printed on environmentally friendly paper, bleached without chlorine, suitable for recycling.
Online Edition for Part no. 01 40 2 918 440 - III/13
Contents
The fastest way to find information on a partic ular topic or item is by using the index, refer to page 330.
6Notes
At a glance
12 Cockpit
18 iDrive
25 Voice activation system
Controls
30 |
Opening and closing |
49 |
Adjusting |
61 |
Transporting children safely |
67 |
Driving |
79 |
Displays |
90 |
Lamps |
95 |
Safety |
105 |
Driving stability control systems |
111 |
Driving comfort |
130 |
Climate |
139 |
Interior equipment |
147 |
Storage compartments |
Driving tips
156 Things to remember when driving
160 Loading
164 Saving fuel
Navigation
168 Navigation system
170 Destination entry
179 Destination guidance
187 What to do if...
Entertainment
190 |
Tone |
192 |
Radio |
200 |
CD/multimedia |
220 |
DVD system in rear |
Communication
236 Telephone
249 Office
258 Contacts
261 ConnectedDrive
Mobility
268 |
Refueling |
270 |
Fuel |
275 |
Wheels and tires |
288 |
Engine compartment |
293 |
Maintenance |
295 |
Replacing components |
307 |
Breakdown assistance |
312 |
Care |
Reference
318 Technical data
322Short commands for voice activation system
330 Everything from A to Z
Online Edition for Part no. 01 40 2 918 440 - III/13

Notes
Notes
Using this Owner's Manual
The fastest way to find information on a partic ular topic is by using the index.
An initial overview of the vehicle is provided in the first chapter.
Additional sources of information
Should you have any questions, your service center will be glad to advise you at any time.
Information on BMW, e.g., on technology, is available on the Internet: bmwusa.com
series.Therefore, this Owner's Manual also de scribes and depicts equipment that may not be contained in your vehicle because of the se lected special equipment or country version, for example.
This also applies to safety-related functions and systems.
For options and equipment not described in this Owner's Manual, please refer to the Sup plementary Owner's Manuals.
On right-hand drive vehicles, some controls are arranged differently than shown in the illus trations.
Symbols
 Indicates precautions that must be followed precisely in order to avoid the possibility of personal injury and serious damage to the ve hicle.
◄ Marks the end of a specific item of informa tion.
"..." Identifies Control Display texts used to se lect individual functions.
›...‹ Verbal instructions to use with the voice ac tivation system.
››...‹‹ Identifies the answers generated by the voice activation system.
 Refers to measures that can be taken to help protect the environment.
Symbols on vehicle components
 Indicates that you should consult the rele vant section of this Owner's Manual for infor mation on a particular part or assembly.
Vehicle equipment
This Owner's Manual describes all models, all series equipment, as well as country-specific and special equipment offered in the model
Status of this Owner's Manual at time of printing
The manufacturer of your vehicle pursues a policy of constant development that is con ceived to ensure that our vehicles continue to embody the highest quality and safety stan dards. In rare cases, therefore, the features de scribed in this Owner's Manual may differ from those in your vehicle.
Updates made after the editorial deadline
Any updates made after the editorial deadline for the Owner's Manuals are located in the ap pendix of the printed quick reference for the vehicle.
For your own safety
Maintenance and repairs
Advanced technology, e.g., the use of modern materials and high-performance electronics, requires suitable maintenance and repair methods.
6
Online Edition for Part no. 01 40 2 918 440 - III/13
|
Notes |
|
|
|
Therefore, have this work performed only by a |
California Proposition 65 Warning |
|||
BMW center or a workshop that works accord |
California laws require us to state the following |
|||
ing to BMW repair procedures with appropri |
warning: |
|
||
ately trained personnel. |
Engine exhaust and a wide variety of automo |
|||
|
||||
If this work is not carried out properly, there is |
bile components and parts, including compo |
|||
the danger of subsequent damage and related |
nents found in the interior furnishings in a vehi |
|||
safety hazards. |
cle, contain or emit chemicals known to the |
|||
Parts and accessories |
State of California to cause cancer and birth |
|||
defects and reproductive harm. In addition, |
||||
For your own safety, use genuine parts and ac |
certain fluids contained in vehicles and certain |
|||
cessories approved by BMW. When you pur |
products of component wear contain or emit |
|||
chase accessories tested and approved by |
chemicals known to the State of California to |
|||
BMW and Genuine BMW Parts, you simultane |
cause cancer and birth defects or other repro |
|||
ously acquire the assurance that they have |
ductive harm. Battery posts, terminals and re |
|||
been thoroughly tested by BMW to ensure op |
lated accessories contain lead and lead com |
|||
timum performance when installed on your ve |
pounds. Wash your hands after handling. Used |
|||
hicle. BMW warrants these parts to be free |
engine oil contains chemicals that have caused |
|||
from defects in material and workmanship. |
cancer in laboratory animals. Always protect |
|||
BMW will not accept any liability for damage |
your skin by washing thoroughly with soap and |
|||
resulting from installation of parts and acces |
water. |
|
||
sories not approved by BMW. BMW cannot |
Service and warranty |
|
||
test every product made by other manufactur |
|
|||
ers to verify if it can be used on a BMW safely |
We recommend that you read this publication |
|||
and without risk to either the vehicle, its opera |
thoroughly. Your vehicle is covered by the fol |
|||
tion, or its occupants. Genuine BMW Parts, |
lowing warranties: |
|
||
BMW Accessories and other products ap |
New Vehicle Limited Warranty |
|
||
proved by BMW, together with professional |
Rust Perforation Limited Warranty |
|
||
advice on using these items, are available from |
|
|||
all BMW centers. Installation and operation of |
Federal Emissions System Defect War |
|||
non-BMW approved accessories such as |
ranty |
|
||
alarms, radios, amplifiers, radar detectors, |
Federal Emissions Performance Warranty |
|||
wheels, suspension components, brake dust |
California Emission Control System Lim |
|||
shields, telephones, including operation of any |
||||
ited Warranty |
|
|||
mobile phone from within the vehicle without |
|
|||
Detailed information about these warranties is |
||||
using an externally mounted antenna, or trans |
||||
ceiver equipment, for instance, CBs, walkie- |
listed in the Service and Warranty Information |
|||
Booklet for US models or in the Warranty and |
||||
talkies, ham radios or similar accessories, may |
||||
Service Guide Booklet for Canadian models. |
||||
cause extensive damage to the vehicle, com |
||||
Your vehicle has been specifically adapted and |
||||
promise its safety, interfere with the vehicle's |
||||
electrical system or affect the validity of the |
designed to meet the particular operating con |
|||
BMW Limited Warranty. See your BMW center |
ditions and homologation requirements in your |
|||
for additional information. Maintenance, re |
country and continental region in order to de |
|||
placement, or repair of the emission control |
liver the full driving pleasure while the vehicle |
|||
devices and systems may be performed by any |
is operated under those conditions. If you wish |
|||
automotive repair establishment or individual |
to operate your vehicle in another country or |
|||
using any certified automotive part. |
region, you may be required to adapt your ve |
|||
|
|
|
|
|
Online Edition for Part no. 01 40 2 918 440 - III/13 |
7 |
|||
|
||||

 Notes
Notes
hicle to meet different prevailing operating conditions and homologation requirements. You should also be aware of any applicable warranty limitations or exclusions for such country or region. In such case, please contact Customer Relations for further information.
Maintenance
Maintain the vehicle regularly to sustain the road safety, operational reliability and the New Vehicle Limited Warranty.
Specifications for required maintenance meas ures:
BMW Maintenance system
Service and Warranty Information Booklet for US models
Warranty and Service Guide Booklet for Canadian models
If the vehicle is not maintained according to these specifications, this could result in seri ous damage to the vehicle. Such damage is not covered by the BMW New Vehicle Limited Warranty.
Data memory
Numerous electronic components in your vehi cle contain data memories that store technical information on the vehicle condition, events and faults, either temporarily or permanently. This technical information generally docu ments the state of a component, a module, a system or the environment.
Operating conditions of system compo nents, such as filling levels.
Status messages from the vehicle and its individual components, such as wheel rpm/ speed, motion delay, transverse accelera tion.
Malfunctions and defects in important sys tem components, such as lights and brakes.
Vehicle responses to special driving situa tions, such as airbag deployment, use of the stability control systems.
Ambient conditions, such as the tempera ture.
These data are of a technical nature only and are used to detect and eliminate faults and to optimize vehicle functions. Travel profiles of routes driven with the vehicle cannot be cre ated from these data. If services are used, for instance in the event of repairs, service proc esses, warranty cases, quality assurance, etc., this technical information can be read out from the event and fault data memories by service personnel, including the manufacturer, using special diagnosis tools. This service personnel can provide you with more information if needed. After troubleshooting, the information in the fault memory is cleared or overwritten continuously.
Situations are conceivable during the use of the vehicle in which these technical data could become associated with a specific person in combination with other information, such as an accident report, damage to the vehicle, wit ness accounts, etc., possibly with the involve ment of an authorized expert.
Additional functions that are contractually agreed with the customer, such as vehicle lo calization in the event of an emergency, permit the transfer of certain vehicle data out of the vehicle.
Reporting safety defects
For US customers
The following only applies to vehicles owned and operated in the US.
If you believe that your vehicle has a defect which could cause a crash or could cause in jury or death, you should immediately inform the National Highway Traffic Safety Adminis tration NHTSA, in addition to notifying BMW of North America, LLC, P.O. Box 1227, West
8
Online Edition for Part no. 01 40 2 918 440 - III/13

Notes 
wood, New Jersey 07675-1227, Telephone 1-800-831-1117.
If NHTSA receives similar complaints, it may open an investigation, and if it finds that a safety defect exists in a group of vehicles, it may order a recall and remedy campaign.
However, NHTSA cannot become involved in individual problems between you, your dealer, or BMW of North America, LLC.
To contact NHTSA, you may call the Vehicle Safety Hotline toll-free at 1-888-327-4236 (TTY: 1-800-424-9153); go to http:// www.safercar.gov; or write to: Administrator, NHTSA, 400 Seventh Street, SW., Washing ton, DC 20590. You can also obtain other in formation about motor vehicle safety from http://www.safercar.gov
For Canadian customers
Canadian customers who wish to report a safetyrelated defect to Transport Canada, Defect Investigations and Recalls, may tele phone the toll-free hotline 1-800-333-0510. You can also obtain other information about motor vehicle safety from http://www.tc.gc.ca/ roadsafety.
9
Online Edition for Part no. 01 40 2 918 440 - III/13
Online Edition for Part no. 01 40 2 918 440 - III/13
At a glance
These overviews of buttons, switches and displays are intended to familiarize you with your vehicle. You will also become quickly acquainted with the available control concepts and options.
Online Edition for Part no. 01 40 2 918 440 - III/13

At a glance Cockpit
Cockpit
Vehicle equipment
This chapter describes all series equipment as well as country-specific and special equipment offered for this model series.Therefore, it also
describes equipment that may not be found in your vehicle, for instance due to the selected special equipment or the country version. This also applies to safety-related functions and systems.
All around the steering wheel
1 |
Rear window safety switch 44 |
Instrument lighting 94 |
||
2 |
Power windows 43 |
|
|
|
3 |
Exterior mirror operation 58 |
Front fog lamps 93 |
||
4 |
Lamps |
|
|
|
|
|
|
|
|
|
12 |
|
Online Edition for Part no. 01 40 2 918 440 - III/13 |
|
|
|
|
||

Cockpit At a glance
|
Parking lamps 90 |
|
Low beams 90 |
|
Automatic headlamp con |
|
trol 91 |
|
Adaptive light control 91 |
|
High-beam Assistant 92 |
5 |
Head-up Display 127 |
6Steering column stalk, left
Turn signal 72
High beams, head lamp flasher 92
High-beam Assistant 92
Roadside parking lamps 92
Computer 81
Settings and information about the vehicle 79
7BMW X6: shifting up or down with auto matic transmission 75
8Instrument cluster 14
9Steering column stalk, right
Windshield wipers 73
Rain sensor 74
BMW X5: rear window wip ers 74
10Start/stop the engine and switch the ignition on/off 67
11Ignition lock 67
12Steering wheel buttons, right
Change the radio station
Stopping a traffic announcement
Select a music track
Scrolling through the redial list
Next entertainment source
Recirculated-air mode 133
Steering wheel heating 60
Lane departure warning 102
13Horn, the entire surface
14
15Cruise control lever
Cruise control 118
Active cruise control 111
16 Steering wheel buttons, left
13
Online Edition for Part no. 01 40 2 918 440 - III/13
At a glance Cockpit
Telephone 236 17 Releasing the hood 289
Volume
Activate/deactivate the voice acti vation system 25
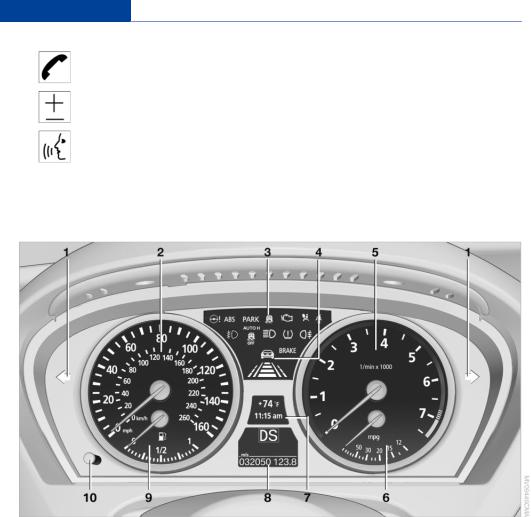
Instrument cluster
1 |
Turn signal indicator lamp |
|
Indicator/warning lamps 15 |
||
2 |
Speedometer |
|
Cruise control 118 |
||
3 |
Indicator/warning lamps 15 |
|
Active Cruise Control 111 |
||
4 |
Active Cruise Control 111 |
BMW X5: reserve display for diesel ex |
|||
5 |
Tachometer 80 |
|
haust fluid 271 |
||
6 |
BMW X5: current fuel consumption 80 |
8 Display for |
|||
|
BMW X6: engine oil temperature 80 or |
|
Automatic transmission position 75 |
||
|
current fuel consumption 80 |
HDC Hill Descent Control 108 |
|||
7 |
Display for |
|
Computer 81 |
||
|
|
Clock 79 |
Date of next scheduled service, and re |
||
|
|
External temperature 79 |
|
maining distance to be driven 83 |
|
|
|
|
|
|
|
|
14 |
Online Edition for Part no. 01 40 2 918 440 - III/13 |
|||
|
|
|
|||
|
|
|
Cockpit |
At a glance |
Odometer and trip odometer 79 |
|
Adaptive Drive: sport chassis and sus |
||
|
High-beam Assistant 92 |
9 |
pension tuning 109 |
|
|
Check Control message |
Fuel gauge 81 |
||
|
present 85 |
10 |
Resetting the trip odometer 79 |
|
|
|
|
Viewing service requirement display 80 |
|
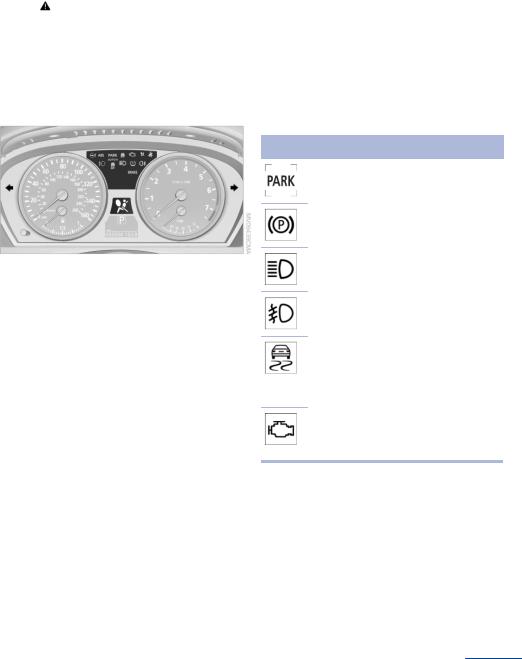
Indicator/warning lamps |
Indicator lamps without text |
|||
The concept |
messages |
|||
The following indicator lamps notify you that |
||||
certain functions are active: Symbol Function or system
Parking brake set, refer to page 69
Canada: parking brake set, refer to page 69.
High beams/headlamp flasher, refer The indicator and warning lamps can light up in to page 92
a variety of combinations and colors.
Several of the lamps are checked for proper functioning when the engine is started or the ignition is switched on, and light up briefly.
Text messages
Text messages at the upper edge of the Con trol Display explain the meaning of the dis played indicator and warning lamps.
Supplementary text messages
You can call up more information, e.g., on the cause of a malfunction and on how to respond, via Check Control, refer to page 85.
In urgent cases, this information will be shown as soon as the corresponding lamp comes on.
Front fog lamps, refer to page 93
Lamp flashes:
DSC or DTC controls the drive and braking forces for maintaining vehi cle stability, refer to page 105
Engine malfunction with adverse ef fect on emissions, refer to
page 294
15
Online Edition for Part no. 01 40 2 918 440 - III/13
At a glance Cockpit
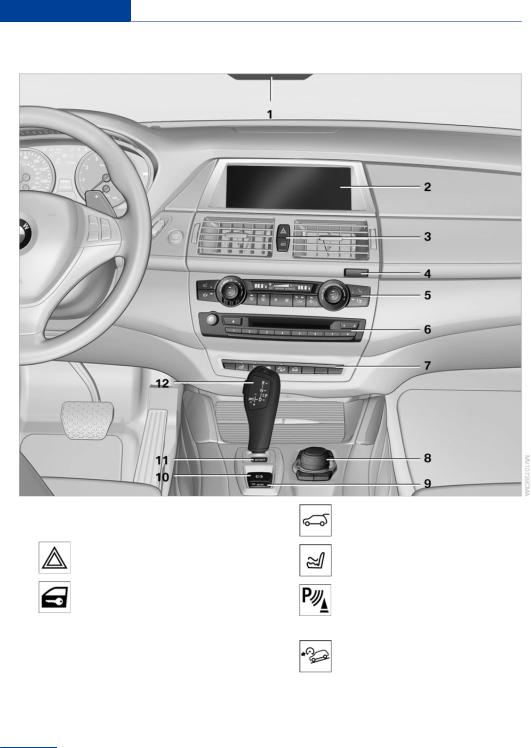
All around the center console
1 Headliner 17 |
7 |
Open the tailgate 38 38 |
2Control Display 19
3 |
Hazard warning system 307 |
Active seat 54 |
Central locking system 35
4Opening glove compartment 147
5Automatic climate control with 2-zone con trol 131
Automatic climate control with 4-zone con trol 135
6Radio and CD/DVD drive 192
Park Distance Control PDC 120
Top View 124
Backup camera 122
HDC Hill Descent Control 106
16
Online Edition for Part no. 01 40 2 918 440 - III/13

|
|
Cockpit |
At a glance |
DSC Dynamic Stability Con |
10 |
Parking brake 69 |
|
trol 105 |
|
|
|
DTC Dynamic Traction Con |
11 |
Adaptive Drive 109 |
|
trol 106 |
|||
Side View 126 |
12 |
Selector lever for automatic transmis |
|
|
|
sion 76 |
|
8Controller with buttons 18
9 |
Automatic Hold 70 |
All around the headliner
1 |
Emergency Request 307 |
4 |
Reading lamps 94 |
2 |
Glass sunroof 45 46 |
5 |
Interior lamps 94 |
3Indicator lamp for the front pas senger airbags 97
17
Online Edition for Part no. 01 40 2 918 440 - III/13

At a glance iDrive
iDrive
Vehicle equipment
This chapter describes all series equipment as well as country-specific and special equipment offered for this model series.Therefore, it also describes equipment that may not be found in your vehicle, for instance due to the selected special equipment or the country version. This also applies to safety-related functions and systems.
Using the iDrive during a trip
To avoid becoming distracted and pos ing an unnecessary hazard to your vehicle's occupants and to other road users, never at tempt to use the controls or enter information unless traffic and road conditions allow this.
The concept
The iDrive combines the functions of a multi tude of switches. Thus, these functions can be operated from a central location.
Controls at a glance
Controls
1 Control Display |
2 Controller with buttons |
18
Online Edition for Part no. 01 40 2 918 440 - III/13
iDrive At a glance
The buttons can be used to open the me nus directly. The controller can be used to select menu items and create the settings.
The buttons can be used to open the me nus directly. The controller can be used to select menu items and create the settings.
Move in four directions, arrow 3
Turn, arrow 4
Push, arrow 5
Buttons on controller
Press the but |
Function |
ton |
|
MENU |
Opens the main menu. |
RADIO |
Opens the Radio menu. |
|
|
MEDIA |
Opens the CD/Multimedia |
|
menu. |
NAV |
Opens the Navigation menu. |
|
|
TEL |
Opens the Telephone menu. |
BACK |
Displays the previous panel. |
|
|
OPTION |
Opens the Options menu. |
|
|
Control Display
Notes
To clean the Control Display, follow the care instructions, refer to page 315.
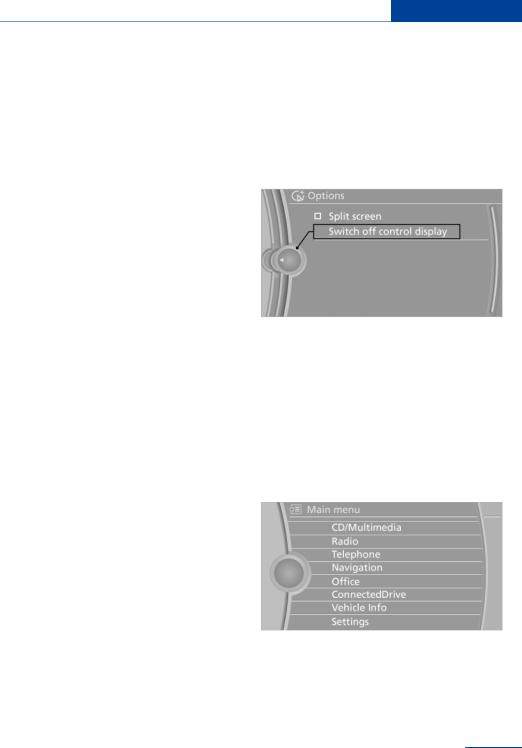
2. "Switch off control display"
Switching on
Press the controller again to switch the screen back on.
Operating concept
Opening the main menu
 Press the button.
Do not place objects close to the Control Display; otherwise, the Control Display can be damaged.
Switching off
1.  Press the button.
The main menu is displayed.
All iDrive functions can be called up via the main menu.
19
Online Edition for Part no. 01 40 2 918 440 - III/13
At a glance iDrive
Selecting menu items
Menu items shown in white can be selected.
1.Turn the controller until the desired menu item is highlighted.
White arrows pointing to the left or right indi cate that additional panels can be opened.
View of an opened menu
2. Press the controller.
Menu items in the Owner's Manual
In the Owner's Manual, menu items that can be selected are set in quotation marks, e.g., "Settings".
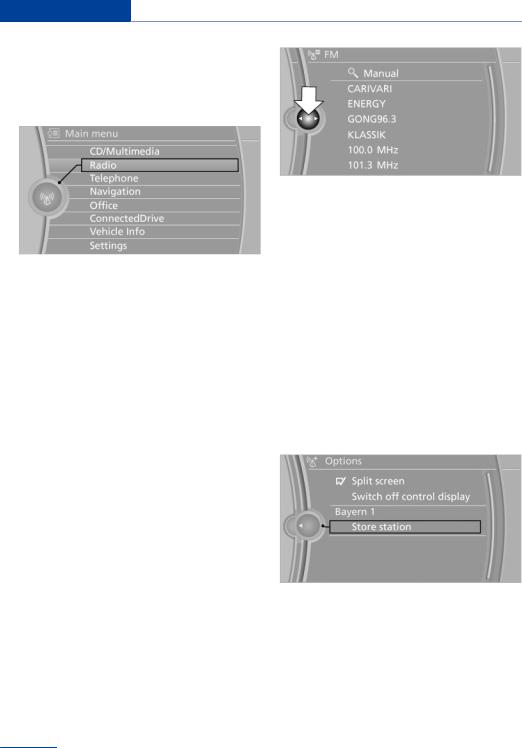
Changing between panels
After a menu item is selected, e.g., "Radio", a new panel is displayed. Panels can overlap.
Move the controller to the left.
The current panel is closed and the previ ous panel is displayed.
When a menu is opened, it generally opens with the panel that was last selected in that menu. To display the first panel of a menu:
Move the controller to the left repeatedly until the first panel is displayed.
Press the menu button on the controller twice.
Opening the Options menu
 Press the button.
The "Options" menu is displayed.
The previous panel is opened again by pressing the BACK button. In this case, the current panel is not closed.
Move the controller to the right.
A new panel is opened on top of the previ ous display.
Additional options: move the controller to the right repeatedly until the "Options" menu is displayed.
Options menu
The "Options" menu consists of various areas:
Screen settings, e.g., "Switch off control display".
20
Online Edition for Part no. 01 40 2 918 440 - III/13
|
iDrive |
At a glance |
Control options for the selected main |
Example: setting the clock |
|
menu, e.g., for "Radio". |
|
|
If applicable, further operating options for the selected menu, for instance "Store station".
Changing settings
1.Select a field.
2.Turn the controller until the desired setting is displayed.
Setting the clock
1. Press the button. The main menu is displayed.
2.Turn the controller until "Settings" is high lighted, and then press the controller.
|
3. |
If necessary, move the controller to the left |
|
|
to display "Time/Date". |
3. Press the controller. |
4. |
Turn the controller until "Time/Date" is |
|
|
highlighted, and then press the controller. |
Activating/deactivating the functions
Several menu items are preceded by a check box. It indicates whether the function is acti vated or deactivated. Selecting the menu item activates or deactivates the function.
 The function is activated.
 The function is deactivated.
5. Turn the controller until "Time:" is high
lighted, and then press the controller.
21
Online Edition for Part no. 01 40 2 918 440 - III/13
|
At a glance |
iDrive |
|
|
|
6. |
Turn the controller to set the hours and |
|
|
||
Symbol |
Meaning |
||||
|
press the controller. |
|
|
||
|
|
Roaming is active. |
|||
7. |
Turn the controller to set the minutes and |
|
|||
|
|
||||
|
press the controller. |
|
Text message, e-mail was received. |
||
|
|
|
|
|
|
Status information |
|
Check the SIM card. |
|||
|
SIM card is blocked. |
||||
|
|
|
|
||
Status field |
|
SIM card is missing. |
|||
The following information is displayed in the |
|
Enter the PIN. |
|||
status field at the top right: |
|
|
|||
|
|
||||
|
Time. |
Entertainment symbols |
|||
|
Current entertainment source. |
|
|
||
Symbol |
Meaning |
||||
|
Sound output, on/off. |
||||
|
Wireless network reception strength. |
|
CD/DVD player. |
||
|
Telephone status. |
|
|
||
|
Music collection. |
||||
|
Traffic bulletin reception. |
|
|||
|
Gracenote® database. |
||||
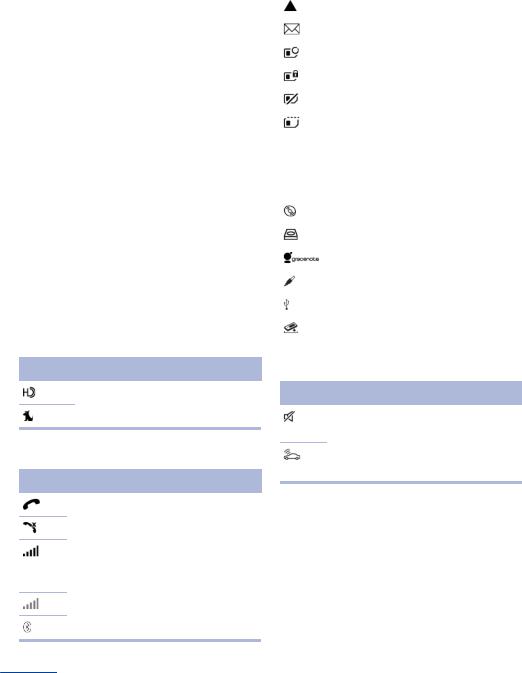
Status field symbols |
|
||||
|
|
||||
|
AUX-IN port. |
||||
The symbols are grouped into various catego |
|
|
|||
|
|
||||
ries. |
USB audio interface. |
Radio symbols |
Music interface for smartphones. |
|
|
|
Symbol Meaning
HD Radio™ is switched on.
Satellite radio is switched on.
Telephone symbols
Symbol Meaning
Incoming or outgoing call.
Missed call.
Wireless network reception strength Symbol flashes: searching for network.
Wireless network is not available.
Bluetooth is switched on.
Additional symbols
Symbol Meaning
Spoken instructions are switched off.
Request of the current vehicle posi tion.
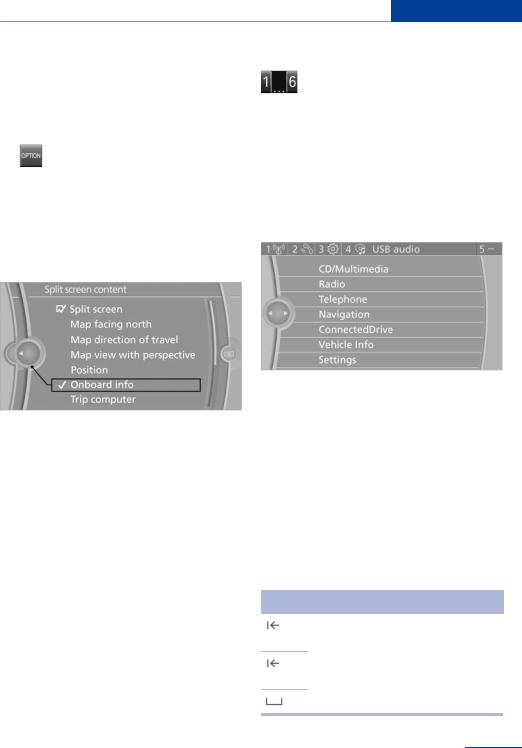
Split screen
General information
Additional information can be displayed on the right side of the split screen, e.g., information from the computer.
In the divided screen view, the so-called split screen, this information remains visible even when you change to another menu.
22
Online Edition for Part no. 01 40 2 918 440 - III/13
iDrive At a glance
Switching the split screen on and off |
Running a function |
1. Press the button.
2."Split screen"
Selecting the display
Press the button.
The function will run immediately. This means, for example, that the number is dialed when a phone number is selected.
1. |
Press the button. |
Displaying the button assignment |
|
2. |
"Split screen" |
Use a finger to touch the buttons. Do not wear |
|
3. |
Move the controller until the split screen is |
gloves or use objects. |
|
The key assignment is displayed at the top |
|||
|
selected. |
||
4. |
Press the controller or select "Split screen |
edge of the screen. |
|
|
|||
|
content". |
|
|
5. |
Select the desired menu item. |
|
To display short information: touch the
|
button. |
|
To display detailed information: touch the |
Programmable memory |
button for an extended period. |
|
|
buttons |
Entering letters and numbers |
|
General information
The iDrive functions can be stored on the pro grammable memory buttons and called up di rectly, e.g., radio stations, navigation destina tions, phone numbers and entry points into the menu.
The settings are stored for the remote control currently in use.
Saving a function
1.Highlight the function via the iDrive.
2. Press the desired button for more than two seconds.
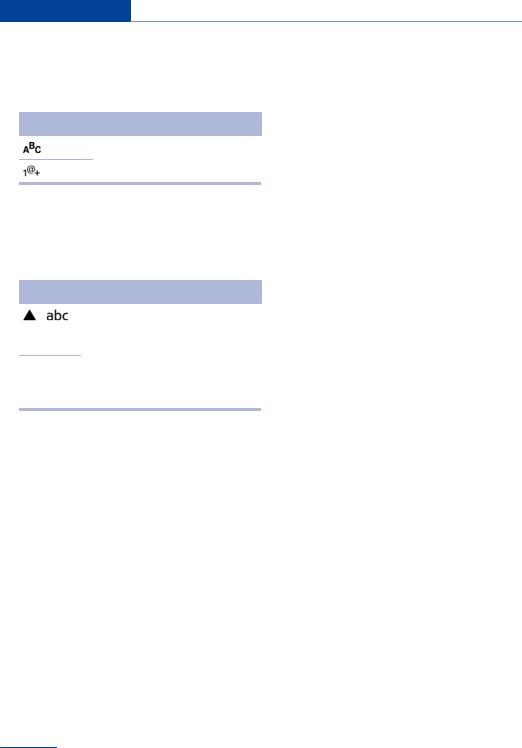
1.Turn the controller: select letters or num bers.
2.Select additional letters or numbers if needed.
3."OK": confirm the entry.
Symbol Function
Press the controller: delete the let ter or number.
Press the controller for an extended period: delete all letters or numbers.
Enter a blank space.
23
Online Edition for Part no. 01 40 2 918 440 - III/13
At a glance iDrive
Switching between letters and numbers
Depending on the menu, you can switch be tween entering letters and numbers.
Symbol Function
Enter the letters.
Enter the numbers.
Switching between upper and lower case letters
Depending on the menu, you can switch be tween entering uppercase and lowercase let ters.
Symbol Function
Move the controller forward: switch from upper to lower case letters.

 Move the controller forward: switch from lower to upper case letters.
Entry comparison
Entry of names and addresses: the selection is narrowed down every time a letter is entered and letters may be added automatically.
The entries are continuously compared to the data stored in the vehicle.
Only those letters are offered during the entry for which data is available.
Destination search: town/city names can be entered using the spelling of language available on the Control Display.
24
Online Edition for Part no. 01 40 2 918 440 - III/13

Voice activation system At a glance
Voice activation system
Vehicle equipment
This chapter describes all series equipment as well as country-specific and special equipment offered for this model series.Therefore, it also describes equipment that may not be found in your vehicle, for instance due to the selected special equipment or the country version. This also applies to safety-related functions and systems.
The concept
Most functions that are displayed on the Control Display can be operated with the voice activation system using spoken com mands. The system prompts you to make your entries.
Functions that can only be used when the vehicle is stationary cannot be operated using the voice activation system.
The system uses a special microphone lo cated in the area of the interior rearview mirror.
›...‹ Verbal instructions in the Owner's Manual to use with the voice activation system.
Requirements
Via the Control Display, set a language that is also supported by the voice activation system so that the spoken commands can be identi fied.
Set the language, refer to page 88.
Using voice activation
Activating the voice activation system
1. Press the button on the steering wheel.
2.Wait for the signal.
3.Say the command.
The command appears on the Control Dis play.
 The symbol on the Control Display indi cates that the voice activation system is active.
If no other commands are available, operate the function via iDrive in this case.
Terminating the voice activation system
 Briefly press the button on the steer ing wheel or ›Cancel‹.
Possible commands
Most menu items on the Control Display can be voiced as commands.
The available commands depend on the menu that is currently displayed on the Control Dis play.
The functions of the main menu have short commands.
Some list items, such as the phone book en tries, can also be selected via the voice activa tion system. Say the list items exactly as they are displayed on the list.
Having possible commands read aloud
You can have the system read possible com mands aloud: ›Voice commands‹.
25
Online Edition for Part no. 01 40 2 918 440 - III/13

At a glance Voice activation system
For example, if the "Settings" menu is dis played, the commands for the settings are read out loud.
Executing functions using short commands
Functions on the main menu can be performed directly by means of short commands, usually irrespective of which menu item is currently selected, for instance ›Vehicle status‹.
List of short commands of the voice activation system, refer to page 322.
Help dialog for the voice activation system
Calling up help dialog: ›Help‹
Additional commands for the help dialog:
›Help with examples‹: information about the current operating options and the most im portant commands for them are an nounced.
›Help with voice activation‹: information about the principle of operation for the voice activation system is announced.
6. Press the button on the steering wheel again to select a specific track.
7.›Track ...‹ e.g., CD track 4.
Via short commands
Playback of the CD can also be started using a short command.
1.Switch on the Entertainment sound output if necessary.
2. Press the button on the steering wheel.
3.›C D drive Track ...‹ e.g., CD track 4.
Setting the voice dialog
You can set whether the system should use the standard dialog or a shorter version.
In the shorter variant of the voice dialog, the announcements from the system are issued in an abbreviated form.
On the Control Display:
1. "Settings"
Example: playing back a CD
Via the main menu
The commands of the menu items are spoken out loud, in the same way as they are selected via the controller.
1.Switch on the Entertainment sound output if necessary.
2. Press the button on the steering wheel.
3.›C D and multimedia‹
The medium last played is played back.
4.›C D‹
5.›C D drive‹
The CD is played back.
2."Language/Units"
3."Speech mode:"
4.Select the setting.
Adjusting the volume
Turn the volume knob while giving an instruc tion until the desired volume is set.
26
Online Edition for Part no. 01 40 2 918 440 - III/13

Voice activation system At a glance
The volume remains constant even if the volume of other audio sources is changed.
The volume is stored for the remote con trol currently in use.
Notes on Emergency
Requests
Do not use the voice activation system to ini tiate an Emergency Request. In stressful situa tions, the voice and vocal pitch can change.
This can unnecessarily delay the establish ment of a telephone connection.
Instead, use the SOS button, refer to
page 307, in the vicinity of the interior mirror.
Environmental conditions
Say the commands, numbers, and letters smoothly and with normal volume, empha sis, and speed.
Always say commands in the language of the voice activation system.
Keep doors, windows and /panoramic glass sunroof closed to prevent noise in terference.
Avoid making other noise in the vehicle while speaking.
27
Online Edition for Part no. 01 40 2 918 440 - III/13
Online Edition for Part no. 01 40 2 918 440 - III/13

Controls
This chapter is intended to provide you with information that will give you complete control of your vehicle. All features and accessories that are useful for driving and your safety, comfort and convenience are described here.
Online Edition for Part no. 01 40 2 918 440 - III/13

Controls Opening and closing
Opening and closing
Vehicle equipment
This chapter describes all series equipment as well as country-specific and special equipment offered for this model series.Therefore, it also describes equipment that may not be found in your vehicle, for instance due to the selected special equipment or the country version. This also applies to safety-related functions and systems.
The settings called up and implemented when the vehicle is unlocked depend on which re mote control is used to unlock the vehicle, re fer to Personal Profile.
In addition, information about service require ments is stored in the remote control, Service data in the remote control, refer to page 293.
Integrated key
Remote control/key
Buttons on the remote control
1 Unlocking
2Locking
3Opening tailgate
General information
The vehicle is supplied with two remote con trols with keys.
Each remote control contains a rechargeable battery that is automatically recharged when it is in the ignition lock while the car is being driven. Use each remote control at least twice a year for longer road trips in order to maintain the batteries' charge status.
In vehicles equipped with Comfort Access, the remote control contains a replaceable battery, refer to page 42.
Press button 1 and pull out the key.
The integrated key fits the following locks:
Driver's door, refer to page 34.
Cargo floor cover in cargo area, refer to page 150.
New remote controls
You can obtain new remote controls from your service center.
Loss of the remote controls
Lost remote controls can be blocked by your service center.
Personal Profile
The concept
You can set several of your vehicle's functions to suit your personal needs and preferences.
30
Online Edition for Part no. 01 40 2 918 440 - III/13
Loading...