


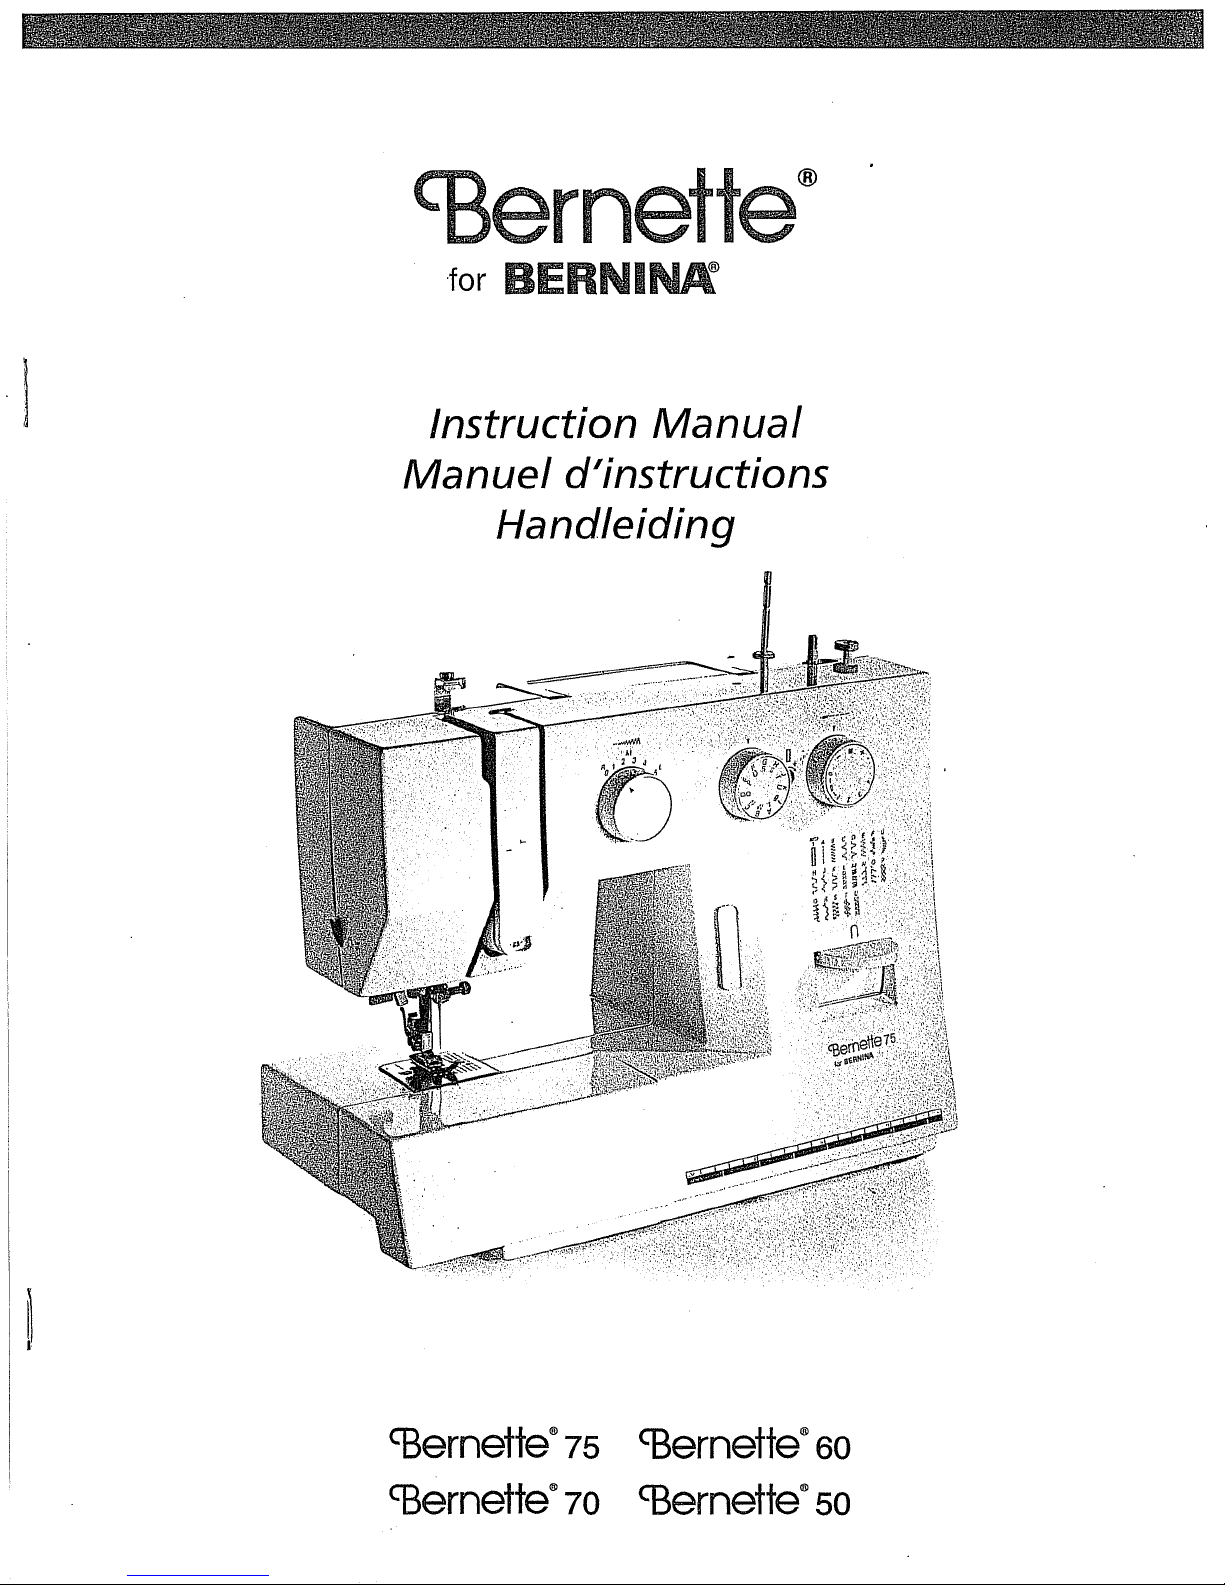
Bernette 56
r
·tor
BERNINPl
Instruction
Manuel
Handleiding
d'instructions
Manual
'Barnette®
'Bernette®
75
10
'Barnette®
'Bernette®
60
so
"IMPORTANT SAFETY INSTRUCTIONS"
When using
DANGER -
1. The sewing machine should never be left unattended when plugged in. Always unplug this sewing machine from the electrical outlet
immediately
2.
Always unplug before changing
WARN I N G -
1.
Do not allow this machine to be used as a toy; Close attention is necessary when
2. Use this sewing machine only
t!Jrer as contained
3.
Never operate this sewing machine if it has a damaged cord or plug, if it is'not working properly, if it has been dropped or damaged,
or
dropped into water. Return the sewing machine
or
mechanical adjustment.
cal
4. Never operate
5.
6. Do not use this machine outdoors.
7. Do not operate this machine where
8.
9.
10. Keep fingers away from all moving parts. Special care is required around the sewing machine needle.
11. Always use the proper needle plate. The wrong plate can cause the needle
12. Do not use a bent
13. Do not pull
14. Switch the sewing machine to the off,
15.
16. Appliance (220V - 240V) is provided with double insulation. Use only identical replacement parts. See instructions for Servicing
17. This sewing machine is
18. Young
controller free from the accumulation of lint, dust and loose cloth.
foot
Never drop or insert
To
disconnect, turn the main switch to the symbol
Do
not
unplug by pulling on the cord.
or
needle, changing the needl\3, threading the bobbin, or changing
Always unplug the sewing machine from the electrical outlet when removing covers, lubricating, or when making any other user
service adjustments mentioned in this instruction
Double Insulated appliances.
children should be supervised to ensure that they
the
sewing machine, basic safety precautions should always
"Read all instructions before using."
To
reduce the risk of electric shock:
after using and before cleaning.
in
this manual.
the
sewing machine with any of the air openings blocked. Keep the ventilation openings of the sewing machine and
any
needle.
push the fabric while stitching. It
the
light bulb. Replace bulb with same type rated 15 watts.
To
reduce the risk of burns, fire, electric shock, or injury to persons:
for
its intended use as described in this manual. Use only accessories recommended by the manufac-
to
the nearest authorized dealer
object into any openings.
aerosol (spray) products are being used
"0"
position which represents off, then ·remove plug from outlet.
To
unplug, grasp the plug and pull, not the cord.
may
deflect the needle causing it to break.
symbol
"0"
position when making any adjustments in the needle area, such as threading the
manual.
not
intended for use by young children or infirm persons without supervision.
the
presser foot.
do
not play with this sewing machine.
be
followed, including the following:
the
sewing machine is used
or
service center for examination, repair, electri-
or
where oxygen is being administered.
to
break.
by
or near children.
Servicing double-insulated
In
a double-insulated product, two systems of insulation are provided instead of grounding. No grounding means is provided on a doubleinsulated
and
must be
The
product nor should a means for grounding be added to the product. Servicing a double-insulated product requires extreme care
knowledge of the system and should only be done
identical to those parts in the product.
symbol
[J
is marked on the double-insulated product.
"SAVE THESE INSTRUCTIONS"
"This
sewing
machine
products
by
qualified service personnel. Replacement parts
is
intended
for
household
(220V -240V)
for
a double-insulated product
·
..
use."
"IMPORTANTES CONSIGNES
Lars de
I'
utilisation de
Ia
machine a coudre, il convient de toujours suivre les consignes de securite essentielles
notamment
toutes les instructions avant d'utiliser Ia machine:•
"Lire
les precautions suivantes: ·
DE
SECURITE"
et
de prendre
DANG E R - Pour reduire le risque de decharge electrique:
1.
Ne jamais laisser Ia machine sans surveillance lorsqu'elle est branches. Toujours debrancher Ia machine a coudre apres son
utilisation et avant de proceder
2.
Toujours debrancher
Ia
au
machine avant de changer
nettoyage.
I'
ampoule de Ia lampe. Remplacer
I'
ampoule par une du meme type, de 15 watts.
AvERT
1.
Ne pas utiliser cette machine comme un jouet.
ou dans leur entourage.
2.
Ne jamais utiliser cette machine a d'autres fins que celles pour lesquelles elle a ete congue, telles que decrites dans le present
manuel. Utiliser uniquement les accessoires recommandes par le fabricant tels que repris dans le manuel.
3.
Ne jamais faire fonctionner
nement, si
revendeur autorise ou du service technique
electriques ou mecaniques.
4.
Ne jamais faire fonctionner Ia machine
pied ne scient jamais encombres de peluches, poussieres et morceaux de tissus.
5.
Ne jamais laisser tomber
6.
Ne pas utiliser Ia machine a l'exterieur.
7. Ne pas faire fonctionner
8.
Pour l'eteindre, mettre l'interrupteur principal sur le symbols "O".pour "Off", puis retirer Ia fiche de Ia prise.
9.
Ne jamais debrancher en tirant sur le cordon d'alimentation. Pour debrancher, saisir Ia fiche (et non
10. Tenir ses doigts a l'ecart de toute piece mobile. Faire tout specialement attention a proximite de l'aiguille.
11.
Toujours utiliser Ia plaque a aiguille adequate. Une mauvaise plaque peut casser l'aiguille.
12. Ne jamais utiliser une aiguille tordue.
13. Ne pas tirer ou pousser le tissu en cousant. Cela peut entraver le fonctionnement de
14. Eteindre
en place de
15. Toujours debrancher
modification accessible
16. Les machines fonctionnant sur 220V-240V sont equipees d'une double isolation. Toujours utiliser des pieces de remplacement
identiques
Iss
elle est tombee ou a ete abimee,
Ia machine (mettre sur "0") Iars des reglages dans Ia zone de l'aiguille, tels que l'en!ilage, le changement d'aiguille,
Ia canette
et
lire les instructions concernant les interventions techniques sur les appareils munis d'une double isolation.
EM
EN
T - Pour reduire le risque de brulures, d'incendie, de choc electrique ou de blessures:
II
convient de faire particulierement attention lorsqu'elle est utilises par des enfants
Ia
machine si le cordon d'alimentation ou Ia fiche ant ete endommages, s'il y a un problema de fonction-
ou
si elle a ete plongee dans du liquids. Retourner Ia machine a coudre aupres du
le plus proche afin qu'il puisse !'examiner,
si
l'un des orifices de ventilation est obstrue. Veiller
ou
inserer des objets dans ces ouvertures.
Ia machine
ou
le changement de pied-de-biche.
Ia machine a coudre avant de retirer les plaques de protection, de
a l'utilisateur telles qu'elles sont reprises dans le present manuel d'utilisation.
en
cas d'utilisation de produits aerosols (vaporisateurs) ou d'administration d'oxygene.
Ia
reparer ou effectuer certains reglages
ace
que ces orifices et Ia commands
le
cordon) et tirer.
l'aiguille et causer sa rupture.
Ia
graisser ou avant d'effectuer toute
Ia
au
mise
Interventions techniques sur des appareils
a double isolation (220V-240V)
Les elements a double isolation possedent deux systemes d'isolation
ces produits et aucune
certaines precautions et une bonne connaissance du
pieces de rechange d'un
symbols
Le
"!Ci]
"Cette machine a coudre est prevue pour un
ne
doit y etre ajoutee. Les interventions· techniques effectuees sur de tels appareils demandant
element a double isolation doivent etre identiques aux pieces d'origine. .
"apparait
sur les appareils a double isolation.
"CONSERVER CES INSTRUCTIONS"
au
lieu d'une mise a
systems; c'est pourquoi seul du personnel qualifie est autorise a intervenir. Les
Ia
usage domestique
terre. Aucune prise de terre n'est prevue sur
Ia
prise de
..
"
"BELANGRIJKE VEILIGHEIDSINSTRUCTIES"
Bij het gebruik van de naaimachine moeten altijd enkele fundamentele voorzorgsmaatregelen worden genomen, waaronder:
"Voor gebruik eerst aile instructies doorlezen:'
G E V AA R l I J K - Om het risico
1.
De naaimachine nooit aan Iaten staan als
gereinigd, de stekker van de naaimachine uit het stopcontact verwijderen.
2.
Voor het verwisselen van het lampje altijd eerst de stekker uit het stopcontact verwijderen. Gebruik uitsluitend 15 watt lampjes van
hetzelfde type.
W AA R S C H U
1.
De machine nooit als speelgoed Iaten gebruiken. Pas altijd goed op als de machine door of in de nabijheid van kinderen wordt
gebruikt.
2.
De machine
door de fabrikant in de handleiding worden aanbevolen.
3.
Gebruik deze naaimachine nooit indien de stroomkabel. of de stekker zijn beschadigd, als de machine niet goed werkt, indien
iemand de machine heeft
controle of elektrische of mechanische reparatie naar de dichtstbijzijnde dealer of service-centrum.
4.
Zorg altijd dat de ventilatiegaten vrij zijn en niet geblokkeerd. Zorg dat de ventilatiegaten van de naaimachine
zijn van pluizen, stof
5.
Zorg, dat
6.
Gebruik deze machine nooit buiten.
7.
Gebruik deze machine nooit op plaatsen waar aerosol-produkten (spuitbussen) worden gebruikt of waar zuurstof wordt toegediend.
8.
De machine wordt uitgezet door de Aan/Uit schakelaar in de positie
ren.
9.
Trek de stekker niet aan het snoer uit het stopcontact. Trek aan de stekker, niet aan het snoer.
10, Houd uw vingers uit de buurt van aile bewegende delen. Wees vooral voorzichtig in de buurt van de naald.
11. Gebruik altijd de juiste naaldplaat. Door gebruik van een foute naaldplaat kan de naald breken.
12. Gebruik nooit een kromme naald.
13. Tijdens het naaien, niet aan de stof trekken of de stof doorduwen daar hierdoor de naald kan buigen en breken.
14. Bij handelingen in het gebied rand de naald, zoals draad inrijgen, naald verwisselen, spoel winden of vervanging van de persvoet,
dient de Aan/Uit schakelaar in de positie
15. Bij het verwijderen van
beschreven in de handleiding, moet altijd eerst de stekker uit het stopcontact worden verwijderd.
16. De machine
gebruiksaanwijzing voor onderhoud van dubbel ge'isoleerde machines.
is
uitsluitend geschikt voor gebruik zoals wordt beschreven in de handleiding. Gebruik ook aileen de accessoires die
er
nooit voorwerpen in de openingen van de machine worden geduwd of terecht komen.
(220V - 240V) is voorzien van dubbele isolering. Vervang aileen met onderdelen van hetzelfde type. Raadpleeg de
WI
N G - Ter voorkoming van brandwonden, brand, elektrische schokken of
•·.
Iaten vallen of als de machine in aanraking
en
stukjes materiaal.
sen
van de deksels, bij
"0"
~an
er
niemand in de buurt is. Altijd onmiddellijk na gebruik en voordat de machine wordt
(uit) gezet te worden.
net
elektrische schokken te beperken moet
soonlijk letsel:
is
gekomen met water. Breng ·de machine in dit geval voor
"0" te draaien (uit) en de stekker uit het stopcontact te verwijde-
smeren of wanneer een van de instellingen van de machine wordt gewijzigd zoals
u;
a:nder
en
het voetpedaal vrij
per-
Onderhoud van dubbel geisoleerde machines
(220V - 240V)
Een dubbel gei'soleerde machine heeft twee isolatiesystemen in plaats van een aarding. Een dubbel ge'isoleerde machine is niet geaard
en
mag ook niet geaard worden. Onderhoud van een dubbel ge'isoleerde machine vereist uiterste zorg en kennis van het systeem en
mag
aileen worden verricht door bevoegd personeel. Vervang de onderdelen in een dubbel ge'isoleerde machine uitsluitend met onder-
delen van hetzelfde type.
Dit symbool
g staat op de dubbel ge'isoleerde machine.
"BEWAAR DEZE INSTRUCTIES"
"Deze naaimachine is uitsluitend gesohikt
voor
huishoudelijk gebruik."
FOR USERS IN
If your sewing machine is fitted with a 3 pin non-rewireable BS plug then please read the following.
THE
UK, EIRE, MALTA AND CYPRUS
ONL
V.
IMPORTANT
If the available socket outlet is not suitable for the plug
supplied with this equipment, it should be cut off and
an appropriate three pin plug fitted. With alternative
an
plugs
NOTE: The plug severed from the main leads must
be destroyed as a plug with bared flexible cords is
hazardous if engaged in a live socket outlet.
event of replacing the plug fuse, use a fuse approved
by
rating as marked on plug.
Always replace the fuse cover. Never use plugs with
the fuse cover removed.
WARNING: DO NOT CONNECT EITHER WIRE TO
THE EARTH TERMINAL WHICH IS MARKED WITH
THE LETTER 'E', BY
OR COLOURED
approved fuse must be fitted in the plug.
AST A to BS 1362, i.e. carrying the
THE
EARTH SYMBOL-:!:-
GREEN OR YELLOW. -
~
In the
mark,
The wires in these main leads are coloured in
cordance with the following code:
Blue
Brown
As
the colours of the wiring in the main lead of this
appliance may not correspond with the coloured
markings identifying the terminals in your plug,
ceed as follows:
The wire which is coloured blue must be connected
to the terminal which is marked with the letter 'N' or
coloured black or blue.
The wire which is coloured brown must be connected
·to the terminal which is marked with the letter 'L' or
coloured red or brown.
Neutral
Live
ac-
pro-
1.
Connect the three-prong plug into the machine.
2.
Connect the electrical supply plug into a wall
outlet.
When leaving the sewing machine unattended,
the main switch ofthe machine must be switched
off or the plug must be removed from the socket
outlet.
Turn on or off the switch for the main power and
light.
0 Turn on
8 Turn off
When servicing the sewing machine, or when
removing covers or changing lamps, the
chine or the electrical set must be disconnected
from the supply by removing the plug from the
socket outlet.
sew-
ma-
PRINCIPAL
ACCESSORIES
OPERATING
VARIOUS
THREADING
PARTS
............................................................. 1
.................................................................... 3
YOUR
SEWING
Connecting
Main
Foot Controller .......................................................... 7
Inserting the Needle .................................................. 8
Checking the Needle ................................................. 8
Changing the
Converting to Free-Arm
Steadying the Machine ............................................
Plugs .......................... : ............................ 6
Power and Sewing Light Switches .................... 7
Presser
CONTROLS
Pattern Selection Dial ... : ...
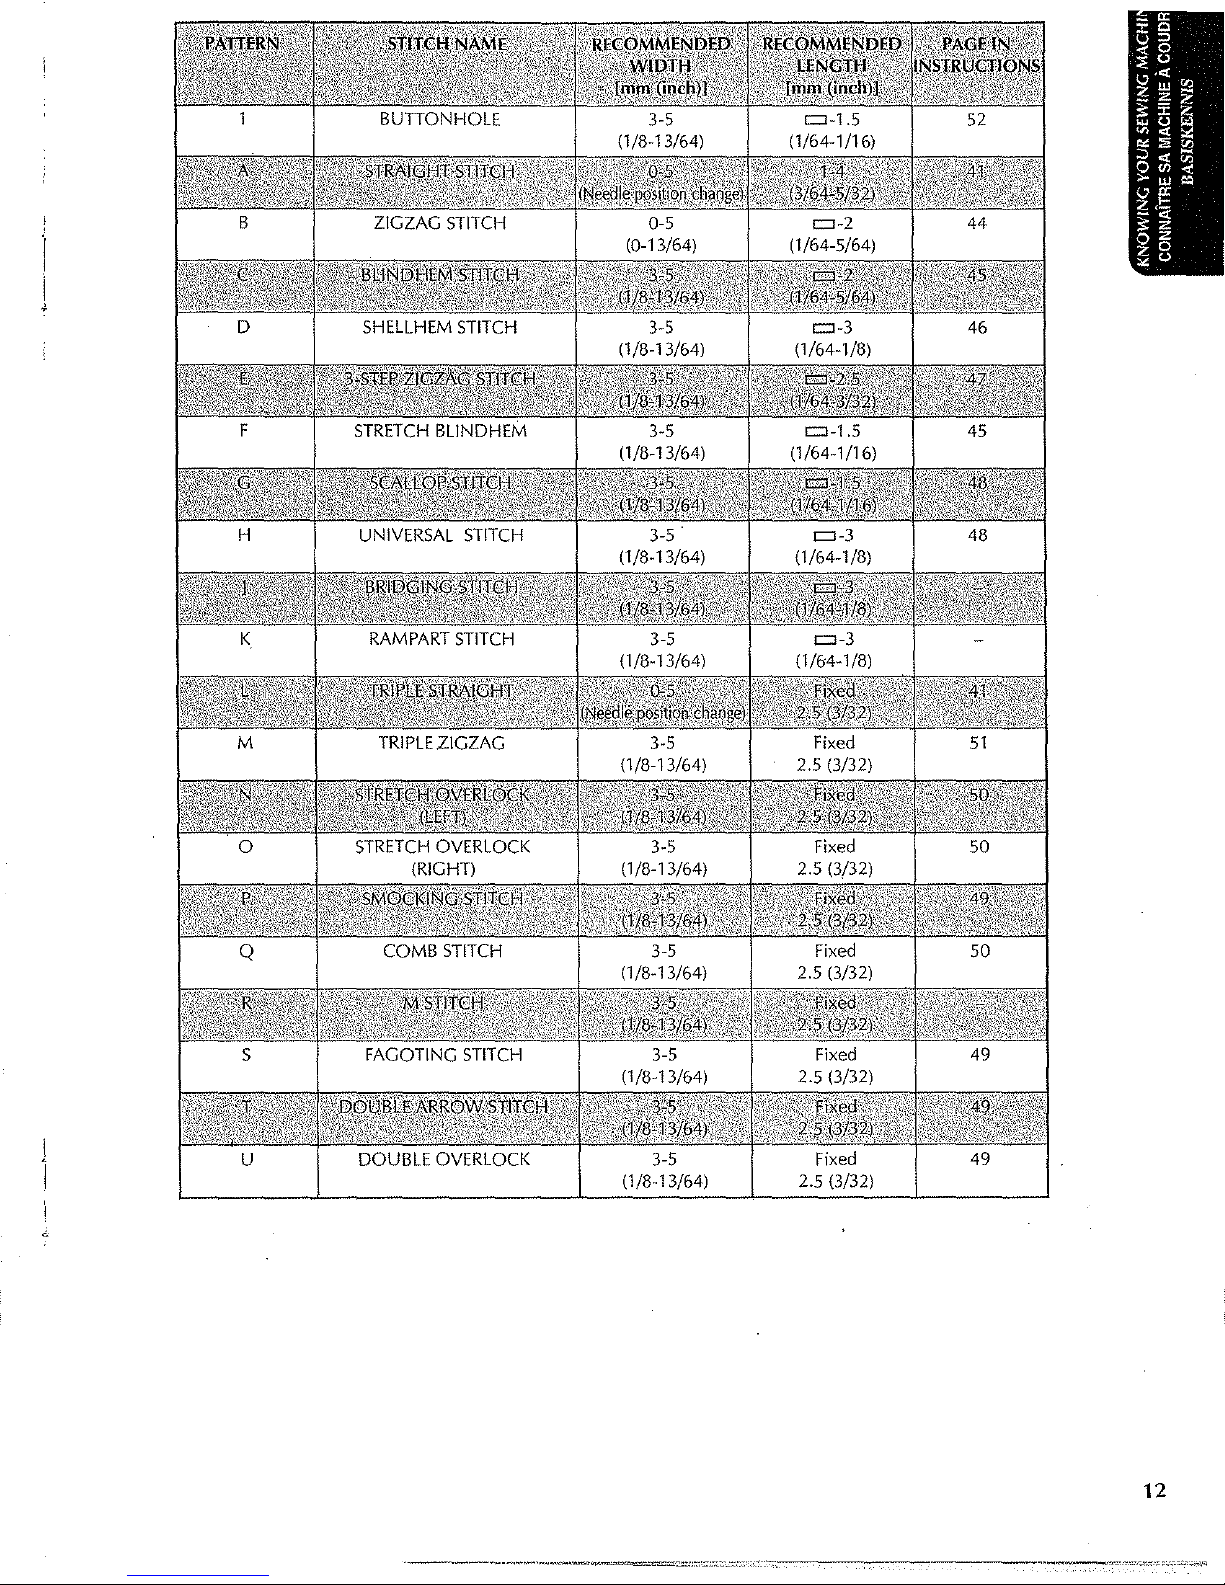
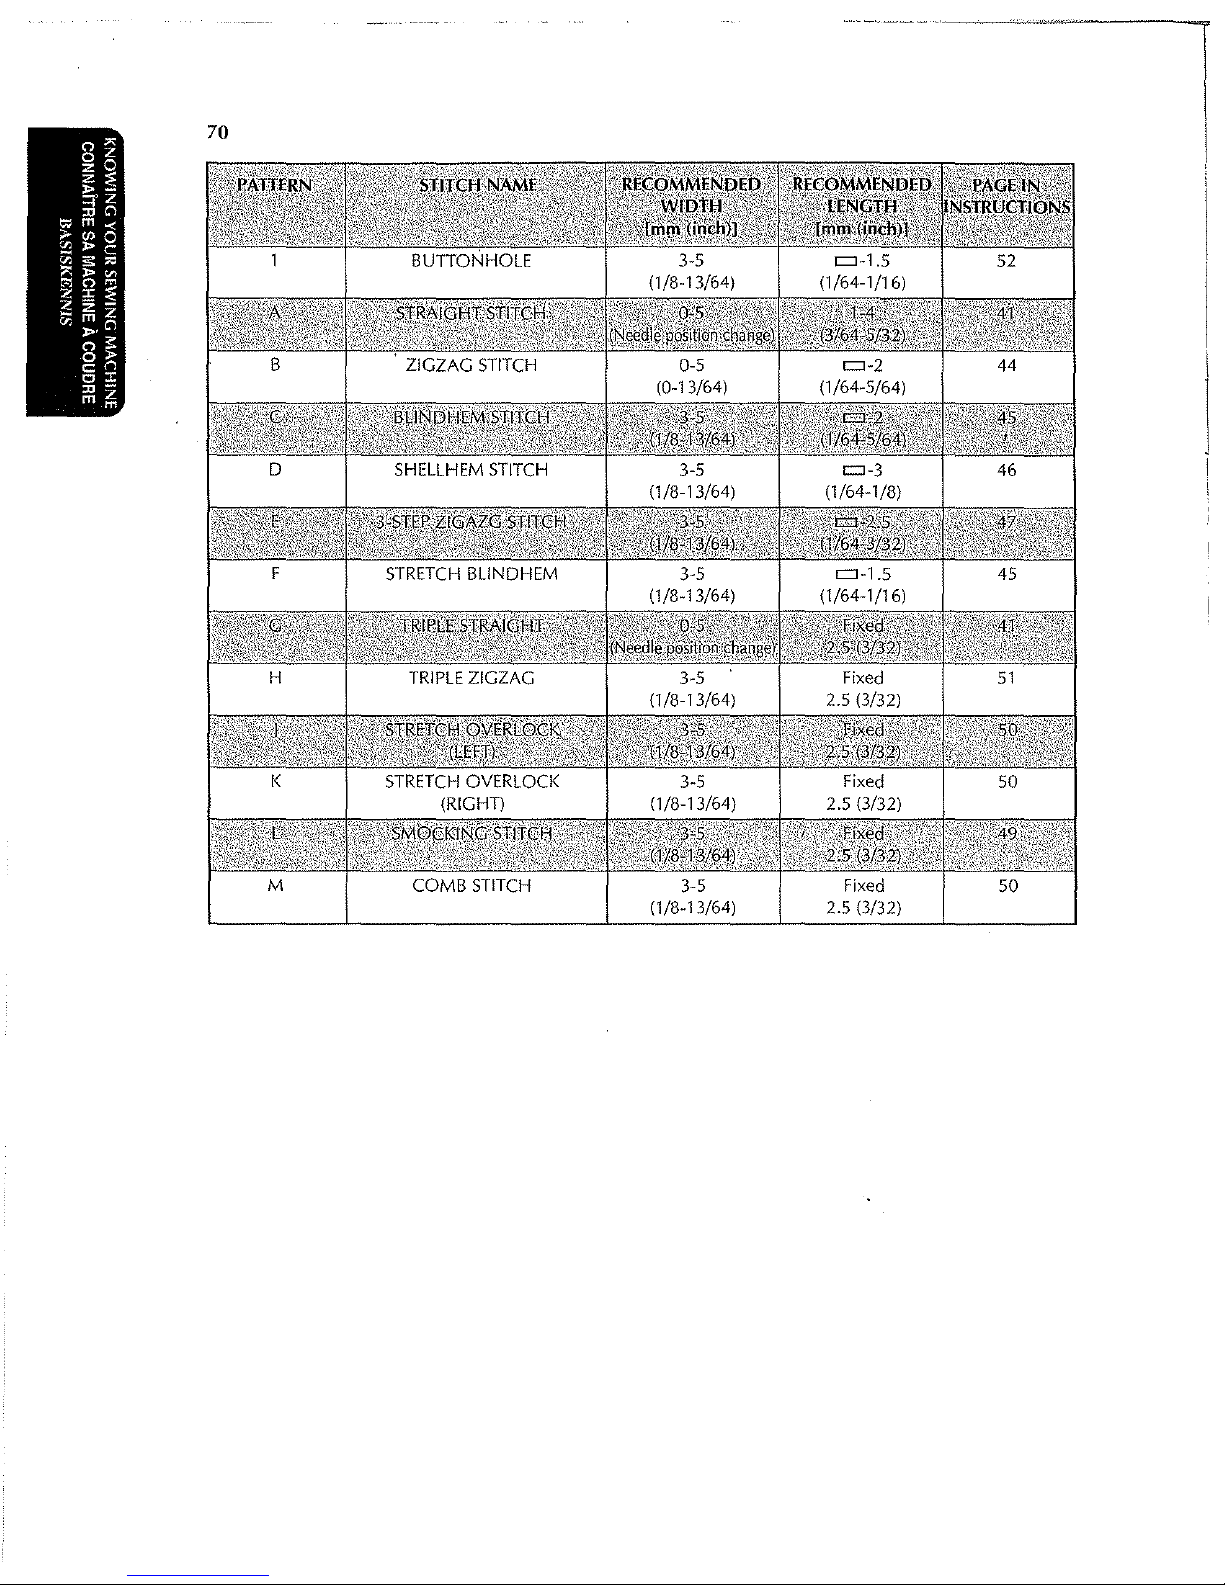
RECOMMENDED WIDTHS
FOR
STITCHES
Stitch Length Dial .................................................... 24
Stretch Stitching ....................................................... 25
Stitch
Width
Reverse Sewing Lever .............................................. 27
Drop
Feed
THE
Winding
Lower Threading ..................................................... 29
Upper (Needle) Threading ....................................... 30
the Needle Threader (75 only) ....................... 32
Using
Quick
Thread-setting System
FAST
START
Drawing
Twin-Needle Sewing (60, 70 and 75 only) ............... 36
Thread Tension ........................................................ 37
CHART
THREAD COMBINATIONS ..................................... 39
........................................................ 12
Dial (60, 70 and 75 only) .................... 26
Lever ...................................................... 27
MACHINE
the Bobbin ................................................ 28
BOBBIN (75 only) ............................... 34
Up
Lower Thread (50, 60 and 70 only) .....
OF SEWING
MACHINE
Foot ......................................... 9
Style ................................... 10
.......................... 6
.....................................................
,.:
... , .................................
AND
LENGTHS
.......................................... 28
FABRICS,
NEEDLES
AND
10
11
11
35
Making
Making
Buttonhole Fine Adjustment .................................... 57
Button
,
Zipper
Gathering ................................................................
Darning ................................................................... 63
Appliques ................................................................ 64
Monogrammingand
. " . - '
Changing the Bulb .................. ; ................................ 67
Oiling
Cleaning .................................................................. 69
Performance Checklist ............................................. 70
Repacking the machine ........................................... 76
a Buttonhole (70 and
a Buttonhole (50 and 60 only) .................... 54
Sewfng ......................................................... 59
USING
ATTACHMENTS
Inserting .......................................................
Embroidering .......................... 65
. . . .
...................................................................... 68
MAINTENANCE
75
only) .................... 52
AND
APPLICATIONS
.
·.
·
. .
61
61
:
Straight Stitching ......................................................
Zigzag Stitching .......................................................
Blindhem Stitching .................................................. 45
Shell hem Stitching ...................................................
3-Step Zigzag Stitching ............................................ 47
Universal Stitching .................................................. 48
.
Scallop Stitching ...................................................... 48
Patchworking .......................................................... 49
Overedge Stitching .................................................. 50
Triple Zigzag Stitching .............................................
41
44
46
51
TABLE DES MATIERES
~ ~ ~~
~CONNAiTRE
' c '
PIECES PRINCIPALES .................................................... 2
ACCESSOIRES ................................................................ 3
FONCTIONNEMENT DE LA MACHINE A COUDRE ...... 6
Raccordement .......................................................... 6
lnterrupteur principal et de
· Pedale
Pour mettre l'aiguille en place .................................. 8
Verification de l'aiguille ............................................. 8
Changement
Modele bras libre .......................................
Pour
DESCRIPTIF DES DIFFERENTES COMMANDES
ENFILAGE DE LA MACHINE ........................................ 28
...................................................................... 7
stabiliser Ia machine ...................................... 1 0
Selecteur de modele de point.. ...............................
LONGUEURS ET LARGEURS DE POINT
RECOMMANDEES
Selecteur de longueur de point .............................. 24 Remplacement de !'ampoule .................................. 67
Couture
Selecteur de largeur de point (modeles 60, 70 et
75 uniquement) ....................................................... 26
Levier de couture en marche arriere ...................... 27
Levier des griffes d'entralnement ........................... 27
Remplissage de
Mise
Mise en place du
Utilisation de l'enfileur d'aiguille (Modele 75
uniquement) ............................................................ 33
SYSTEME RAPIDE (modele 75 uniquement) ........ 34
Remontee du til inferieur (modeles 50, 60 et 70
uniquement) ............................................................ 35
Couture
75 uniquement)
Tension des fils ....................................................... 38
TABLEAU
AIGUILLE/FIL
en
en
place du til inferieur ................................... 29
avec
SA MACHINE A COUDRE
Ia lampe ......................... 7
de
pied-de-biche ................................. 9
: ............ 10
................................................ 16
points elastiques .................
Ia canette ..................................... 28
·.····
............ 25
til superieur (fil de l'aiguille) ........
l'aiguille jumelee (modeles 60, 70 et
··················································:···· 36
DES COMBINAISONS TISSU/
......................................................... 39
.......
11
11
31
COUTURE
Pour coudre une boutonniere (modeles 70 et 75
uniquement) ............................................................ 53
Pour faire une boutonniere (Modeles 50 et 60
uniquement) ............................................................ 54
Equilibrage des boutonnieres ................................. 58
Pour coudre un bouton ........................................... 60
UTILISATION
Insertion de fermeture a glissiere ........................... 62
Pour froncer un tissu .............................................. 62
Reprisage ............................................................... 63
Appliques ................................................................ 64
Monogrammes et broderies .................................... 65
Graissage ............................................................... 68
Nettoyage ............................................................... 69
Liste de verification en cas de defaillances ............ 72
Emballage de
DE BOUTONNIERES ET DE BOUTONS
DES
ACCESSOIRE;S
Ia machine ....................................... 76
ET
LEURS
APPLICATIONS
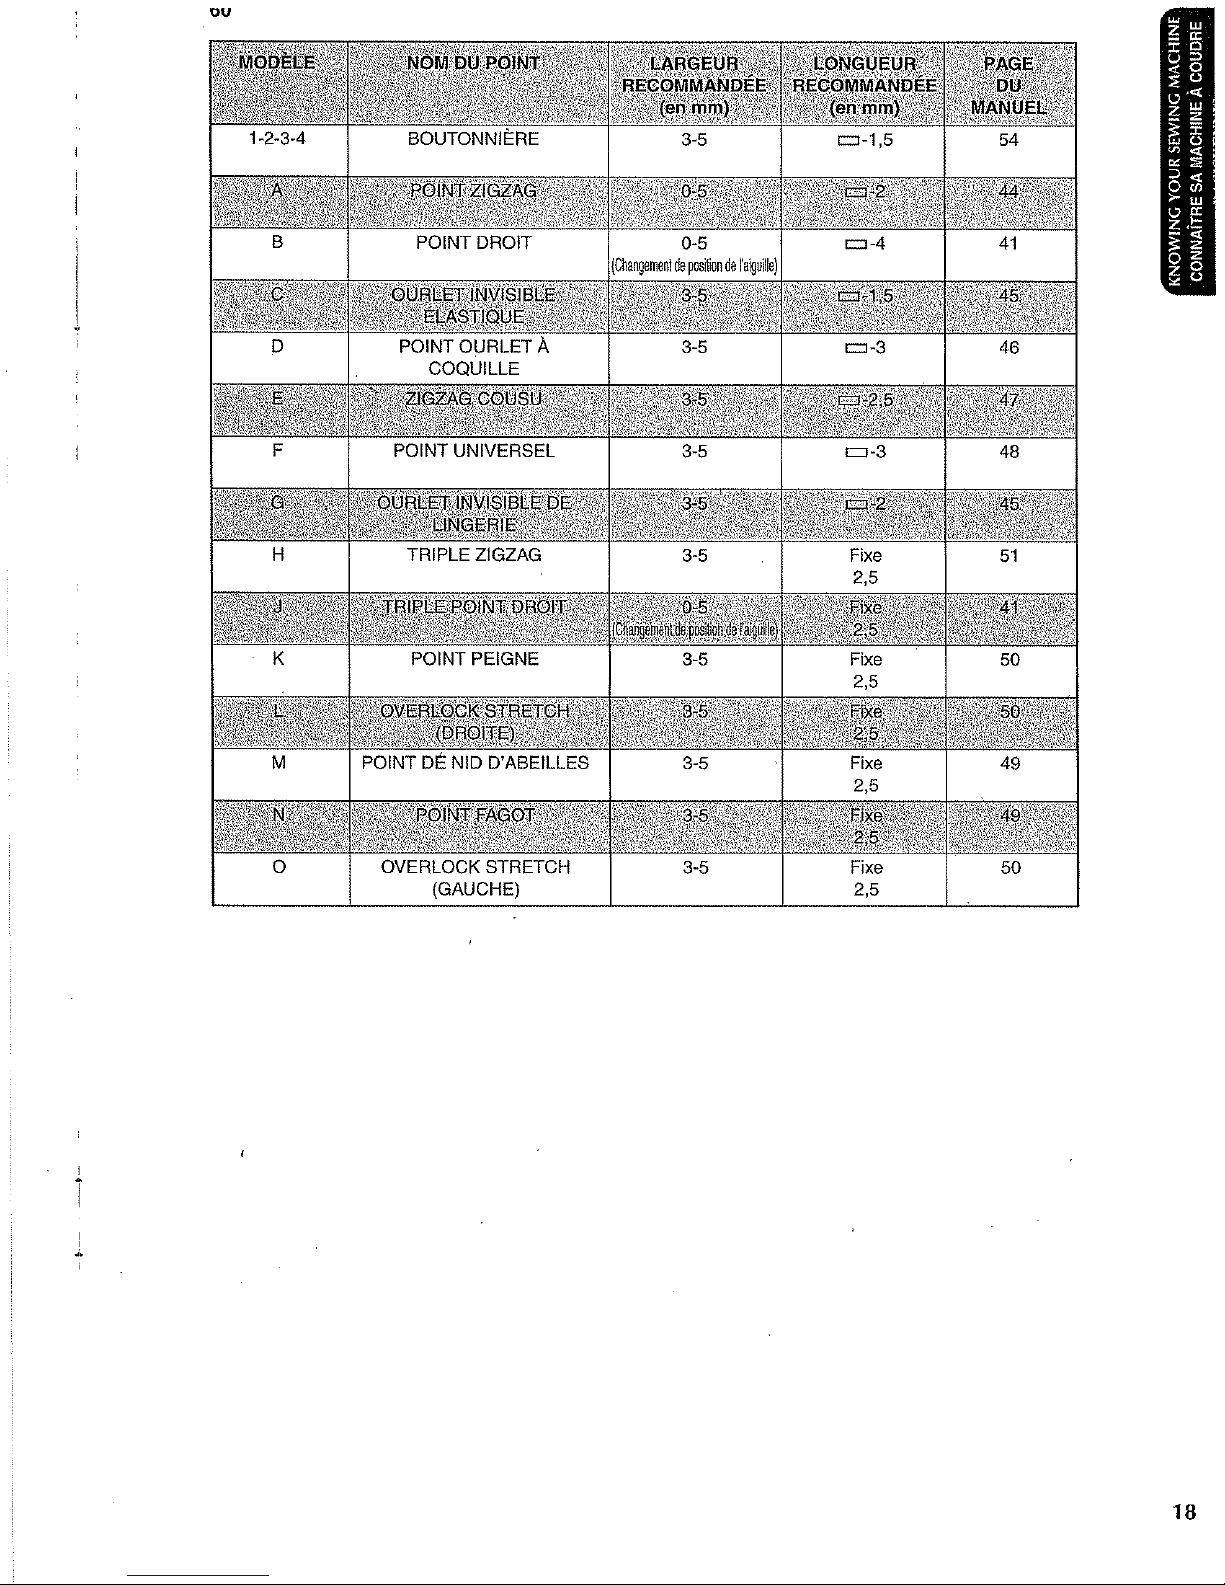
Point droit ...............................................................
Point zigzag ............................................................ 44
Ourlet invisible de lingerie ...................................... 45
Point ourlet a coquille ............................................. 46
Zigzag cousu .......................................................... 47
Point universe! ........................................................ 48
Point feston ............................................................. 48
Patchwork ............................................................... 49
Points sur le bord .................................................... 50
Point
triple zigzag ...................................................
41
51
BELANGRUKSTE ONDERDELEN ...................................... 2
TOEBEHOREN ................... , ..................................................... 3
GEBRUIK
VAN
DE NAAlMACIDNE .................................... 6
Stekkers en contacten ......................................................... 6
Aan/uit- en lichtschakelaar ................................................ 7
Voetpedaal ....................
, ..................................................... 7
De naald erin doen ............................................................. 8
De
naald controleren .......................................................... 8
De
persvoet vervangen ....................................................... 9
Omschakelen naar vrije armmachine ............................... 10
De
machine stabiliseren ................................................... 10
BEDIENINGSTOETSEN ...........
Patroonkeuzeknop ...................
,.
...........................................
:·:
.......................................
!!
11
AAl\lBEVOLEN STEEKLENGTEN EN -BREEDTEN ... 20
Steeklengteknop ............................................................... 24
Elastische steek ................................................................ 25
Steekbreedteknop (alleen
60, 70 en 75) ........................... 26
Achteruitnaaiknop ............................................................ 27
Transporteurverzinkknop .................................................
27
DRAAD INRIJGEN ................................................................ 28
De spoel opwinden ..............
· ............................................. 28
De onderdraad aanbrengen .............................................. 29
De bovendraad inrijgen .................................................... 31
Gebruiken van de Naaldinrijger (alleen bij 75) ............... 33
Vlug
draadinlegsysteem (Vlug systeem) (aileen bij 75)
..
34
Oppakken van de onderdraad (aileen 50, 60 en 70) ......... 35
Naaien met een dubbele naald (alleen
60, 70 en 75) ....... 36
Draadspanning ................................................................. 38
OVERZICHT
MATERlALEN,
VAN COMBINATIES VAN
NAALDENEN
GARENS ................... 40
Knoopsgat maken (alleen 70 en 75) ................................. 53
Knoopsgat maken
(aileen 50 en 60) .................................
54
Afstelling voor knoopsgaten ............ : ................ , .............. 58
Knopen aanzetten .............................................................
Ben rits inzetten .....................................
~
.......................... 62
60
Plooien ............................................................................. 62
Stoppen ............................................................................
63
Applicaties ....................................................................... 64
Monogrammen en borduren ............................................. 65
Het lampje verwisselen .................................................... 67
Smeren ............................................................................. 68
Reiniging .......................................................................... 69
Controlelijst ......................................................
, .............. 74
De machine opnieuw inpakken ........................................ 76
Re~hte
steek ..................................................................... 41
Zigzagsteek ......................................................................
44
Blindzoomsteek ............................................................... 45
Tricotsteek ........................................................................ 46
Gestikte·zigzagsteek ......................................................... 47
Universele steek ............................................................... 48
Schelpsteek ...................................................................... 48
Patchwork ........................................................................ 49
Overhandse steken ...........................................................
Drievoudige zigzagsteek ..................................................
50
51
•
•
•
•
(j)
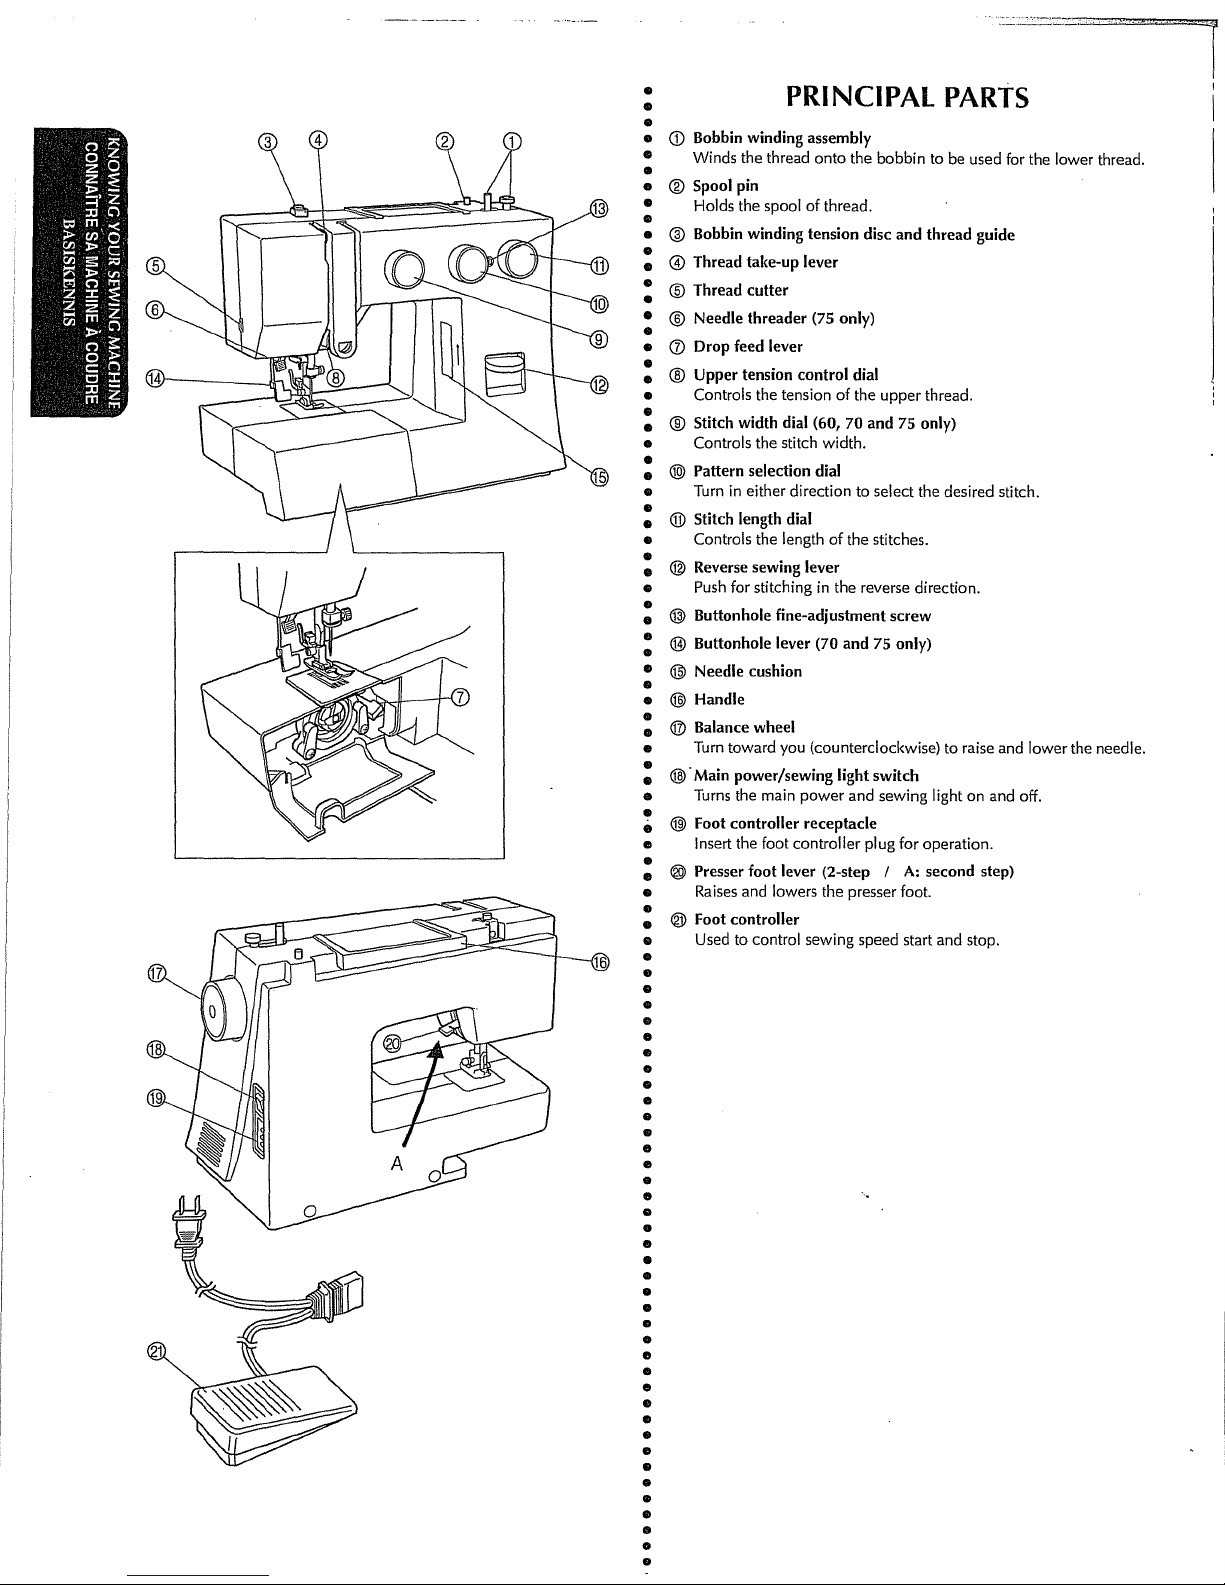
Bobbin winding assembly
• Winds the thread onto the bobbin to be used
•
•
®Spool
• Holds the spool of thread .
•
• ® Bobbin winding tension disc and
@ Thread take-up lever
® Thread cutter
® Needle threader (75 only)
IJ) Drop feed lever
® Upper tension control dial
Controls the tension of the upper thread.
® Stitch width dial (60, 70 and 75 only)
Controls the stitch width.
(@
Pattern selection dial
Turn
@ Stitch length dial
Controls the length of the stitches.
@ Reverse sewing lever
Push for stitching
•
@ Buttonhole fine-adjustment screw
@ Buttonhole lever (70 and 75 only)
@ Needle cushion
@Handle
® Balance wheel
Turn
(@·Main power/sewing light switch
Turns
(@
Foot controller receptacle
Insert the foot controller plug for operation.
® Presser foot lever (2-step I
Raises and lowers the presser foot.
@ Foot controller
Used to control sewing speed start and stop .
PRINCIPAl
pin
in
either direction to select the desired stitch.
in
the reverse direction .
toward you (counterclockwise) to raise and lower the needle.
the main power and sewing light on and
PARTS
thread
A:
second step)
guide
for
the lower thread .
off.
•
•
•
•
•
•
•
•
•
•
•
•
•
•
•
•
•
•
•
•
•
•
•
•
.,
PIECES PRINCIPALES
(j)
Devidoir
Enroule
le
fil inferieur sur
® Porte-bobine
Sert
a tenir Ia bobine de fil a coudre. ·
@ Disque
@ Levier
@ Coupe-fils
@
(J)
@ Selecteur de
@ Selecteur de largeur
@)
® Selecteur de
@
@
@ Levier
@)
@ Poignee
@ Volant a
@
@)
® Levier
@ Pedale
de
fil
Enfileur
Levier d'abaissement des griffes d'entrainement
Centrale
ment)
Permet de
Selecteur
Tourner dans l'une
souhaite.
Centrale Ia longueur des points.
Bouton
Pousser sur
Vis
Pelote a epingles
Tourner vers sci (dans le sens oppose aux aiguilles d'une montre) pour lever
lnterrupteur
Met Ia machine sous
de couture.
Logement
Pour faire fonctionner Ia pedale, inserer
prevu.
Leve et abaisse
Sert a contraler
ret.
tension
de
remontee
(75 uniquement)
tension
Ia
tension
regler
de
modele de
longueur
de
couture
le
bouton pour coudre
d'equilibrage
pour
boutonnieres (modeles 70
main
ou
principal/
de Ia
du
pied-de-biche (a 2 phases I
le
du
rheostat
Ia
Ia
canette.
pour
le remplissage de Ia canette
du
fil
superieure
du
fil superieur.
de
point
(modeles 60, 70
Ia
largeur des points.
point
ou
I'
autre direction pour selectionner le point
de
point
en marche arriere
en
marche arriere.
des boutonnieres
abaisser l'aiguille.
de Ia lampe
ou
hers tension et eteint
prise
de Ia pedale
Ia
pied-de-biche.
vitesse de couture,
Ia
mise
et
et
75 uniquement)
ou
allume
prise dans le logement
A:
deuxieme phase)
en
marche et
75
et
guide- .
unique-
Ia
lampe
BELANGRIJKSTE ONDERDELEN
(j)
Spoelwinder
Voor het opwinden van de spoeiiJes voor de onderdraad.
® Klospen
Houder voor
@ Spanningsschijfje van de spoelwinder en draadgeleider
@ Draadgever
® Draadknipper
® Naaldinrijger (aileen 75)
•
(J)
Transporteurverzinkknop
® Bovenspanningslmop
Voor het instellen van
® Steekbreedteknop (aileen 60,70 en 75)
Voor het
@)
Patroonkeuzelmop
Voor het instellen van de gewenste sleek.
® Knop voor steeklengte
Voor het instellen van de lengte van de steken.
@ Achteruitnaaiknop
e Voor bet omdraaien van de naairichting.
(@
Schroef voor afstellen van knoopsgat
@ Knoopsgathendeltje (aileen 70 en 75)
@
Speldenkusse~
@)
Handvat
® Handwiel
Draai het handwiel naar u toe (linksom) om de naald op en neer te be-
wegen.
@)
Aanluit- en lichtschakelaar
Voor het aan- en uitzetten van de machine en het naailampje.
•
@ Contact voor voetpedaal,
Sluit bet voetpedaal aan op deze aansluiting.
® Persvoethefboom (2-traps I
Voor het neerlaten en opheffen van de naaldvoet.
@ Voetpedaal
Pedaal voor bet starten en stoppen van de machine en voor besturing
van de naaisnelheid.
I'
ar-
•
uw
garen.
de
in~tellen
van de steekbreedte.
'
spanning van de bovendraad.
A:
in
twee stappen)
•
·
..
<D
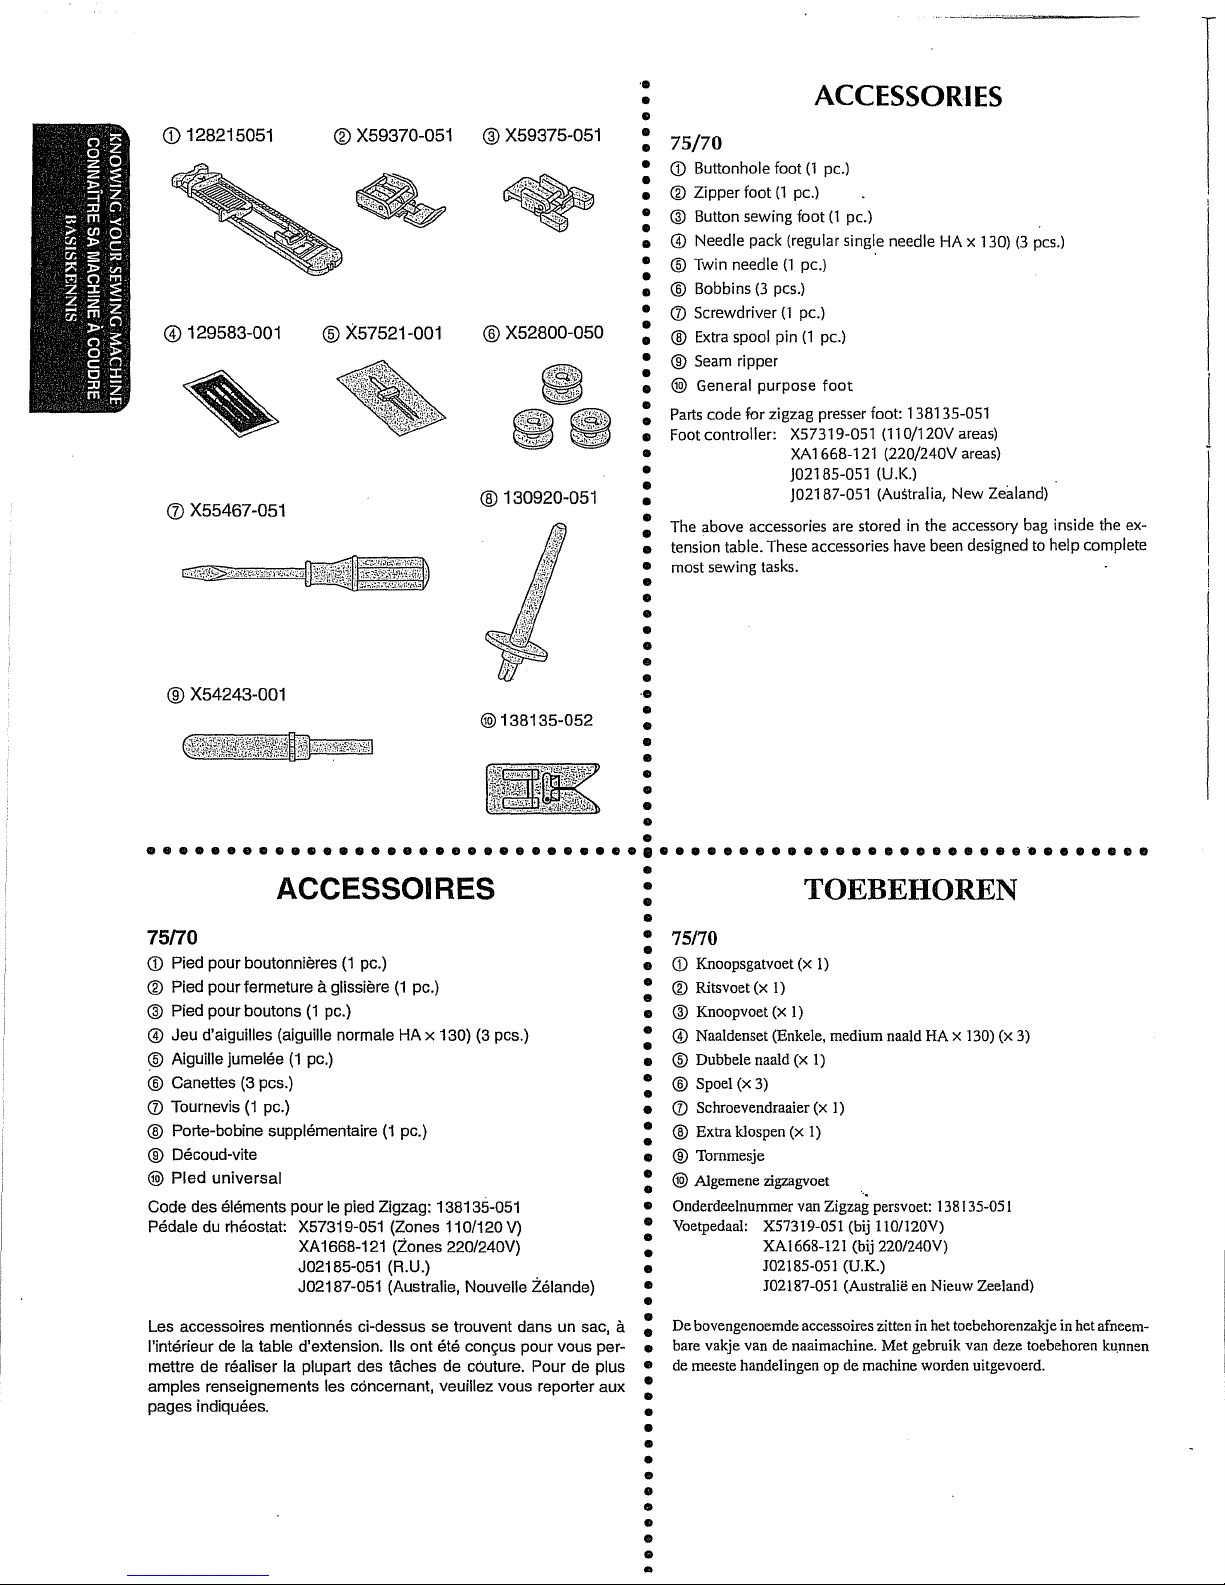
128215051
@ 129583-001
(j) X55467-051
® X59370-051
® X57521-001
® X59375-051
® X52800-050
® 130920-051
..
•
•
•
75/70
•
CD
Buttonhole foot
•
•
®
Zipper
•
@ Button sewing
@ Needle pack (regular single needle
@ Twin needle
foot
® Bobbins
(f) Screwdriver
® Extra spool pin
®
Seam
ripper
@ General
Parts
code
for
Footcontroller:
The above accessories are stored
tension table. These accessories have been designed to help complete
most sewing tasks.
ACCESSORIES
(1
pc.)
(1
pc.)
foot
(1
pc.)
HA
(1
pc.) ·
(3
pes.)
(1
pc.)
(1
pc.)
purpose
foot
zigzag presser foot: 138135-051
X57319-051 (110/120Vareas)
XA 1 668-121 (220/240V
]02185-051 (U.K.)
]02187-051 (Australia,
New
in
the accessory bag inside the ex-
x 130)
areas)
Zealand)
(3
pes.)
® X54243-001
@
138135-052
••••••••••••••••••••••••••••••••••••••••••••••••••••••••••••••
ACCESSOIRES
75/70
CD
Pied
pour
boutonnieres
® Pied
pour
fermeture a glissiere
@ Pied
pour
boutons
@
Jeu
d'aiguilles (aiguille
@ Aiguille
jumelee
® Canettes (3 pes.)
(f) Tournevis
(1
pc.)
® Porte-bobine supplementaire
® Decoud-vite
@
Pled
universal
Code
des
Pedals
elements
du
rheostat: X57319-051 (Zones 110/120 V)
(1
pc.)
(1
pc.)
normals
(1
pc.)
pour
le pied Zigzag: 138135-051
XA
1668-121 (Zones 220/240V)
J02185-051 (R.U.)
J02187-051 (Australis,
(1
pc.)
HA
x 130} (3 pes.)
(1
pc.)
Nouvelle Zelande}
•
•
•
75170
CD
Knoopsgatvoet
® Ritsvoet
@ Knoopvoet
@ Naaldenset (Enkele, medium naald
@ Dubbele naald
® Spoel
(f) Schroevendraaier
(x
® Extra klospen
® Tornmesje
@ Algemene zigzagvoet
Onderdeelnummer
Voetpedaal: X57319-051 (bij
TOEBEHOREN
(x
1)
(x
1)
(X
1)
HA
(x
1)
3)
(x
I)
(X
1)
·
van
XAI668-121 (bij 220/240V)
102185-051 (U.K.)
102187-051 (Australie
..
Zigzag persvoet:
ll0!120V)
en
138135-051
Nieuw Zeeland)
x 130)
(x
3)
Les accessoires mentionnes ci-dessus
l'interieur de Ia table d'extension. lis
de
mettre
amples renseignements les concernant, veuillez
pages indiquees.
realiser Ia plupart
des
ont
taches
se
trouvent dans
ete
con~us
de
couture.
pour
vous
un
vous
Pour
reporter
sac, a
per-
de
plus
aux
De bovengenoemde
bare
vakje
van
de
meeste
de
handelingen
accessoires
naaimachine.
op
de
machine worden uitgevoerd.
zitten
in
het toebehorenzakje in het
Met
gebruik
van
deze
toebehoren
afneem-
kunnen

CD
X59369-051
@ 129583-001
(j)
X55467-051
® X54243-001
® X59370-051 "@ X59375-051
® X57521-001
® X52800-050
® 130920-051
60
•
•
CD
Buttonhole
•
• ®
Zipper
•
® Button sewing foot
•
• @ Needle pack (regular single needle
•
• ® Twin needle
• ® Bobbins
•
(j) Screwdriver
® Extra spool
®
Seam
@ General
Parts
code for zigzag presser foot: 138135-051-
Foot controller: X57319-051 (110/120V areas)
The above accessories are stored in the accessory bag inside the
• tensioh table. These accessories have been designed to help complete
most sewing tasks.
foot
(1
pc.)
foot
(1
pc.)
(1
pc.)
(3
pes.)
(1
pc.)
pin
(1
pc.)
ripper
purpose
foot
XA 1668-121
]02185-051 (U.K.)
]02187-051 (Australia,
(1
pc.)
HA
(220/240V
x 130)
areas)
New
(3
pes.)
Zealanp)
exc
@
138135-052
••••••••••••••••••••••e••••••••@•••••••o•••••••••••••••••••••••
60
CD
Pied
pour
boutonnieres
® Pied
® Pied
@
pour
fermeture a glissiere
pour
boutons
Jeu
d'aiguilles (aiguille normale
® Aiguille jumelee
(1
pc.)
(1
(1
pc.)
HA
(1
pc.)
® Canettes (3 pes.)
(j)
Tournevis
(1
pc.)
® Porte-bobine supplementaire(1 pc.)
® Decoud-vite
@
Pled
universal
Code
des
elements
du rheostat: X57319-051 (Zones 110/120 V)
Pedale
Les accessoires mentionnes ci-dessus
l'interieur
mettre
amples renseignements
pages indiquees.
de
de
realiser Ia plupart des taches
pour
le pied Zigzag: 138135-051
XA
1668-121 (Zones 220/240V)
J02185-051
J02187-051 (Australia, Nouvelle Zelande)
Ia table d'extension.
les concernant, veuillez vous reporter aux
(R.U.)
Us
ont
pc.)
x 130) (3 pes.)
se
trouvent dans un sac, a
ete
con<;:us
pour
de
couture.
Pour
vous
de
perplus
60
CD
Knoopsgatvoet (x
® Ritsvoet
(x
® Knoopvoet
@ Naaldenset (Enkele, medium naald HA x 130) (x 3)
® Dubbele naald
1)
(x
1)
1)
(X
I)
® Spoel (x 3)
(j) Schroevendraaier (x I)
• ® Extra klospen (x I)
• ® Tommesje
•
e @ Algemene zigzagvoet
• Onderdeelnummer van Zigzag persvoet: 138135-051
•
• Voetpedaal: X57319-051 (bij 110/120V)
e
• 102185-051 (U.K.) ·
De
bovengenoemde accessoires zitten in het toebehorenzakje in het afneembare vakje van de naaimachine. Met gebruik van deze toebehoren kunnen
de meeste handelingen op de machine worden uitgevoerd.
XA1668-121 (bij 2Z0/240V)
.
J02187-051 (Australie en Nieuw Zeeland)
-J
•
•
•
•
•
•
•
•
(f) X59369-051 @ X59370-051
@ 129583-001 ® X55467 -051
@ X52800-050 (f) X54243-001
@138135-052
•••••••••••••••••••••••••••••••
50
<D
Pied pour boutonnieres
® Pied pour fe.rmeture a glisshhe
® Pied pour boutons
® Jeu d'aiguilles (aiguille normale HA x 130) (3 pes.)
® Canetles (3 pes.)
® Tournevis
(J)
oecoud~vite
(1
pe.)
® Pled universal
Code des elements pour le pied Zigzag:
Pedale
du
rheostat: X57319·051 (Zones 110/120
Les accessoires mentionnes
l'int9rieur de la table d'extension. lis ant
mettre de r€aliser
amples renseignements les concernant, veuillez vous reporter
pages
indiqueles.
(1
pc.)
(1
pc.)
(1
pe.)
XA 1668-121 (Zones 220/240V)
J02185-051 (R.U.)
J02187-051 (Australie,
ci~dessus
Ia
plupart des taches de couture. Pour de plus
@ X59375-051
138135~051
V)
Nouvelle Zelande)
se trouvent
ete
dans
conyus pour vous
un sac, a
per~
aux
•
50
•
CD
Buttonhole
•
®
Zipper
•
•
@ Button sewing
•
@ Needle pack (regular single needle
•
•
® Bobbins
•
@ Screwdriver
•
CD
Seam
® General purpose
Parts
code
Foot controller: X57319w051
The above accessories are stored
tension table. These accessories have been designed
•
most
sewing tasks.
•
•
•
•
•
•
•
•
•
•
•
•
•
•
•
•
•
•
•
•
•
•
foot
(1
pc.)
foot
(1
pc.)
foot
(1
pc.}
(3
pes.)
(1
pc.)
ripper
foot
for
zigzag presser foot: 138135-051
{11
0/120V
XA
1668-121 (220/240V areas)
)02185-051
!02187-051 (Australia,
(U.K.)
in
HA
x 130)
(3
pes.)
areas)
New
Zealand)
the accessory bag inside the
to
help complete
ex-
•••••••••••••••••••••••••••••••
so
G)
Knoopsgatvoet
® Ritsvoet
@ Knoopvoet
@ Naaldenset (Enkele, medium naald HA x 130) (x 3)
® Spool (x 3)
• ® Schroevendraaier
(J)
Tornmesje
•
•
® AJgemene zigzagvoet
•
• Onderdeelnummer van Zigzag persvoet: 138135-051
•
Voetpedaal: X57319-05t (bij t10/120V)
0
o
• !02185'051 (U.K.)
• J02187-051 (Australie
•
: De bovengenoemde acc.essoires zitten in het toebehorenzakje
• bare vakje van de naaimachine. Met gebruik van deze toebehoren kunnen
• de meeste handelingen op
•
•
•
•
•
•
•
•
•
•
•
•
•
•
•
•
•
•
•
•
(x.l)
(x
I)
(x
l)
(x
I)
XA t 668-121 (bij 220/240V)
en
de
machine worden uitgevoerd.
Nieuw Zeeland)
in
het
afneem~
•
•
•
•
•
1.
Insert the foot controller plug, located between
•
and the power supply plug on the cord, into the jack
•
chine .
•
•
2.
Insert the power supply plug into
•
•
CAUTION:
•
1.
When
•
•
•
•
•
(for
•
•
2.
•
•
•
•
•
•
•
•
•
•
•
•
•
•
•
•
•
•
•
•
•
•
•
•
Ia
•
•
•
•
•
•
•
•
•
•
J.
•
•
•
•
2.
•
•
VOORZICHTIG:
•
•
1.
•
•
•
•
•
•
•
•
•
•
•
•
•
•
•
•
•
•••••••••••••••••••••••••••••••••••••••••••••••••••••••••••••••
FONCTIONNEMENT DE
MACHINE A COUDRE
Raccordement
1.
Brancher Ia fiche qui se trouve sur !e cordon d'a!imentation entre
Ia pedale
2.
Brancher Ia fiche d'alimentation a une prise secteur.
PRECAUTION:
1.
Lors du remplacement de !'ampoule, de
l'alguille ou lorsque
commande de
toute decharge etectrique.
(Pour les
2.
Cette machine est equipee d'une fiche polarisee, c'est-8-dire
qu'elle possede une lame plus grande que !'autre. Par mesure de securite, il n'est possible d'introduire
une prise de courant que d'une seule
vient pas 8 inserer
j
:
!'autre sens.
brancher, veuillez contacter un etectricien
remplacer
securite des fiches polarisees.
et
Ia fiche d'alimentation dans Ia machine.
Ia
machine n'est pas utilisee,
Ia
d6brancher de
E.-U.
et
le Canada uniquement)
Ia
fiche a fond dans
Si malgre cela, il est toujours impossible de
Ia
prise.
Ne
jamais passer outre cette mesure de
Ia
prise secteur
fac;on. Si I' on ne par-
Ia
LA
Ia
canette, de
i1
est re-
pour
eviter
Ia
fiche dans
prise, essayer dans
pour
qu'il vienne
changing
in use,
the
socket
to
U.S.A. and Canada only)
This appliance has a polarized plug (one blade
other).
To
fit in a polarized outlet
If
the
plug does
If
it still does
proper outlet •
Do
not
modify
Steek de stekker van het voetpedaal in de aansluiting in de machine.
Deze stekker zit tussen bet voetpedaal en de stekker voor het
tact.
Steck
nude
U wordt aangeraden
lampje
of
uit
bet
stop contact te verwijderen om gevaar voor elektrische
ken te voorkomen •
Connecting Plugs
the
foot controller
on
the ma-
an
electrical outlet
the
light bulb
power
supply plug
avoid electrical hazards .
reduce the risk of electric shock, this plug
not
fit fully in
not
fit, contact a qualified electrician to install
the
plug
GEBRUIK
in
only
in
any way .
or
when
must
be
one
way .
the
outlet, reverse
VAN
the
sewing machine
disconnected from
is
wider
is
intended
the
plug .
DE
the
than
is
walt
not
the
the
NAAIMACHINE
Stekkers
(stroom) stekker
wanneer de naaimachine niet wordt gebruikt, de stekk;er
o~
bij
en
contacten
in
het stopcontact.
bet
wisselen van een
stopcon-
naald~
spoel of
scbokM
to
6
A
Main Power and Sewing Light Switches
This switch turns the
A.)
(j)
®
main
Turn
on (toward
Turn
off (toward the
power
and sewing
the"!"
mark)
"0"
mark)
light
Foot Controller
When
the foot
controller
low
speed.
machine's speed
released, the
placed
B.)
0
B
•••••••••••••••••••••••••••••••••••••••••••••••••••••••••••••••
•
•
•
•
•
•
•
•
•
•
•
•
•
•
•
•
•
•
•
•
•
•
•
•
•
NOTE
This
machines .
When
on
the foot
(For U.S.A.
foot
controller
machine
(j)
is depressed lightly, the
the pressure
will
increase.
controller
and
can be used
Foot controller: Model N
on
the
When
will
stop. Care shoulq be taken that
when
the
Canada only):
with
ma<.:hine
foot
controller
pressure
on
machine
the 50, 60, 70 and 75 sewing
is
•
lnterrupteur principal et de
Get interrupteur permet d'allumer
Ia lampe
de
couture. (Voir fig.
Q) Al!umer (pousser vers !a marque
® Eteindre (pousser vers Ia marque "0»)
et
d'8teindre Ia machine ainsi que
A.)
"r)
Ia
lampe
•
•
•
•
Met deze schakelaar
•
(Zie fig. A.)
•
•
Aan/uit- en lichtschakelaar
':"Orden
de machine en het naailampje aan- en uitgezet.
(j) Aan (op het
®
Uit
(op het
"!"
"0"
symbool)
symboo!)
on
·or off.
is
the foot
not
in use.
(See
fig.
will
run at a
increased, the
controller
nothing
(See
fig.
is
is
Pedale
Lorsque l'on appuie 18g€!rement sur Ia p8dale,
a faible vitesse. Si I' on augmente Ia
tionner
couture
rete
de
lorsque
Ia machine
Ia
pression sur
va
augmenter 8galement. La machine s'ar-
Ia
p8dale est
a ne rien placer sur Ia p8dale lorsque Ia machine n'est pas utilis8e.
(Voir
fig.
B.)
REMARQUE
Cette p9dale
70
et75.
(pour
les
E.-U.
et
le
Canada
est
destin6e aux mod81es de machine a coudre 50, 60,
(j) Pedale: modele N
Ia
pression,
re18.chee.
uniquement):
machine
Ia vitesse
I!
faut
done
va
fonc-
de
veiller
Voetpedaal
Als het voetpedaal een klein stukje wordt ingedrukt, begint de machine
langzaam te !open. Hoe dieper het pedaal wordt ingedrukt, hoe sneller de
machine draait. Wanneer het pedaal wordt losgelaten, stopt de machine.
Zorg,
dater
gebruik is. (Zie fig.
•
•
•
•
•
•
•
•
•
•
•
•
•
•
•
•
•
•
•
•
•
•
•
nooit iets op bet
(j) Voetpedaal
vo~tpedaal
B.)
wordt gelegd als
de
machine niet
in
A
8
G
"",.
:-: - -
'
0
.:''
-.-.-"
·"- "'"'•'"""/'1
,,
•
•
•
•
Turn
•
•
power switch to
1.
Remove the power supply
2.
Raise
3.
lower the presser foot
4.
If a needle
damp
5.
With the flat side toward the back, insert the new needle as far as
possible
6. Tighten the
Inserting
"0"
the needle bar to its highest position.
is
already installed, remove
with a coin and pulling the needle down.
up
against the needle stopper.
needle
damp.
CD
Coin
the
Needle
.
plug
from the electrical outlet.
it
by
loosening
{See
.the
fig.
Checking the Needle
•
1. The sewing needle must always be straight and sharp for smooth
sewing.
2.
To
check
if
down as shown
3. Replace
the needle
the
needle
is
bent, place the flat side of the needle
in
the illustration. (See fig.
if
it
is
bent
or
dull.
B.)
needle
A.)
X
•
•
•
•
•
•
•
•
······································~························
Pour mettre l'aiguille en place
Mettre
l'interrupt~ur
1.
Retirer Ia fiche de !a prise de courant.
2.
Remonter complf3tement l'aiguille.
3. Abaisser
4. Retirer l'aiguille eventuel!ement presente en dSyissant
avec une piece de monnaie et en tirant l'aigullle vers !e bas. (Voir •
fig, A.)
5. !ntroduire une autre aiguille
au maximum jusqu'a ce qu'e!le vienne heurter !e butoir: •
6. Resserrer
principal sur
le
pied~de~biche.
Ia
fixation.
<D
Piece
de
"0".
cOte
m6nnai·e
Ia
fixation •
plat vers l'arri6re, en l'enfonyant •
•
•
•
•
•
Hoofdschakelaar op
•
1.
Haal de
•
•
2. Zet de naaldhouder
•
3.
Laat de persvoet zakken.
•
•
4. Als
er
al
en verwijder de naald
5. Schuif de nieuwe naald er met de platte kant naar achteren
•
lijk
•
in
tot hij tegen de naaldstopper
6.
Draai de naaldklem weer vast.
•
•
De
"0"
ste~ker
uit het stopcontact.
in
een
naa1d
inzit, draai de naaldklem dan los met een muntstuk
<D
Muntstuk
naald erin doen
zetten .
de hoogste positie.
door bet naar beneden te trekken. (Zie fig. A.)
aankomt
r.o
ver moge-
Verification de l'aiguille
1. L:aiguille dolt toujours etre droite et pointue pour piquer
ment.
2. Pour verifier si
l'aiguille vers
3. Remplacer
l'aiguille n'est pas tordue, placer
le
bas, comme
l'aigui!le
si
le
m<;>ntre
el!e est tordue ou usee.
!'illustration.
correcte~
le
cOtS
plat de
"(Voir
fig.
B.)
De naald controleren
l. Voor het beste resultaat moel de naald altijd recht en scherp zijn.
2.
Door de naald zoals in de illustratie met de platte kant op een platte
of
ondergrond te 1eggen, kunt u controleren
·3. Indien de naald verbogen
•
•
•
•
•
•
•
•
•
•
•
•
of
bot is, moet deze worden vervangen.
deze recht is. (Zie fig. B.)
8
•••••••••••••••••••••••••••••••••••••••••••••••••••••••••••••••
Changement de pied-de-biche
En
fonction des besoins, il peut s'averer necessaire de changer le
pied~de-biche.
MODELE
Mettre l'interrupteur principal
1. Remonter comphHement !'aiguille en tournant le volant vers sol
2.
3.
4. Abaisser le levier
A CLIQUET
sur
"0".
{dans
le
sens
oppose
aux
levier du pied-de-biche.
Ub8rer
!e pied
en
Placer un pied different sur Ia plaque a aiguille de sorte que Ia
tige du pied-de-biche s'aligne avec Ia fente situee dans l'axe du
pied-de-blche.
pied-de-biche est correctement
en place avec un declic.
du
aiguilles
levant le levier situS a l'arri&re du support.
pied-de-biche et fixer le pied sur !'axe. Si le
instane,
d'une
montre)
et
Ia tige devrait se mettre
remonter
•
•
•
•
It may
•
•
ing needs .
•
•
SNAP-ON
•
Turn
•
1.
Raise
•
toward you .{counterclockwise) and raise the presser foot lever .
•
•
2.
Release
•
foot holder assembly .
•
Place a different presser
3.
•
•
the presser
•
4. Lower the presser foot lifter and fix the presser
•
lf
•
•
place .
•
•
•
•
•
•
•
•
•
•
•
•
•
•
•
•
•
•
•
•
•
•
•
•
•
•
•
Changing the Presser Foot
be
necessary
TYPE
power
the needle to
the foot
the presser
switch
foot
foot
to
change the presser
to
"0"
.
its
highest position
by
raising the lever located
foot
is
in line
with
is
in the correct location, the bar should snap
•
•
•
•
•
Voor bet uitvoeren van de verschil!ende functies met uw machine, zijn er
•
verschillende naaldvoeten,
•
•
TYPE MET KNIPBEVEST!GlNG
•
Hoofdschakelaar op
•
•
I.
Draai .het handwiel naar u toe (linksom) en zet de naald
•
le
positie. Trek
•
2.
Zet de persvoet los door de hendel aan de achterkant van de persvoet-
•
•
houder omhoog te trekken.
•
3.
Zet vervo!gens de gewenste persvoet
•
de pin
•
•
staat.
•
4. Laat de persvoethendel
•
der. Wanneer de persvoetjuisi
•
•
juiste positie
•
•
•
•
•
•
•
•
•
•
•
•
•
•
•
•
•
•
•
•
De persvoet vervangen
ook we! 'persvoeten' genoemd, nodig .
"0"
zetten .
d~
persvoethendel omhoog.
in
de persvoet recht onder de uitsparing
weer zakken en zet de persvoet vast op de hou-
in
de uitsparing.
•
foot
according to your sew-
by
turning the balance wheel
at
the back
on the needle plate
the slot
in
the presser'foot holder .
los
op
de naaldplaat, en zorg dat
is
aangebracht, klikt de pin precies
of
so
that the bar on
foot
onto the holder .
in
in
de persvoethouder
the presser
into
de hoogste
in
de
areas
on garments.
up
on the extension fable and pull it out.
0
Uft
the bottom
8 Pull the extension table out to
•
•
•
•
•
• •
obte~
Ia
Ia
•
•
•
•
When the sewing machine
•
rubber cushion
•
•
_height
its
•
•
•
•
•
•
•
•
•
•
•
•
•
•
•
•
•
•
•
•
Het gebruik van de vrije
•
pijpvormige
•
ontstaat door het toebehorenvakje naar boven te tillen en weg te trekken .
•
•
(Zie
•
0 Trek de onderkant van het
•
•
8 Het toebehorenvakje wegtrekken .
•
•
•
•
•
•
•
•
•
•
•
•
Als de naaimachine op een oneven oppervlak
•
•
ber voetje aan de linkervoorkant van de voetplaat om de hoogte aan te pas-
•
sen totdat de naaimachine stabiel staat. (Zie fig. B.)
0
until the sewing machine
Omschakelen
fig. A.)
B
•••••••••••••••••••••••••••••••••••••••••••••••••••••••••••••••
Modele bras libre
La couture a bras libre s'impose pour des coutures tubulaires ou
pour des·endroits difficiles a atteindre sur des vetements. Pour
nir
Ia
configuration a bras libre,
table d'extension. (Voir fig. A.)
0 Soulever
re
bas de
!a
8 Tirer Ia table d'extension vers I' ext€ rieur pour !'enlever.
<D
Table d'extension
Pour stabiliser
Lbrsque Ia machine a coudre est insta!lee sur une surface inegale,
tourner
le
coussin
plaque
de
qu'el!e soit stable. (Voir
en
caoutchouc sur le
base de Ia machine pour r€gler sa hauteur jusqu'8. ce
fig.
ll
suffit de soulever et de retirer
table d'extension vers
Ia
machine
cote
B.)
soL
avant gauche de
To
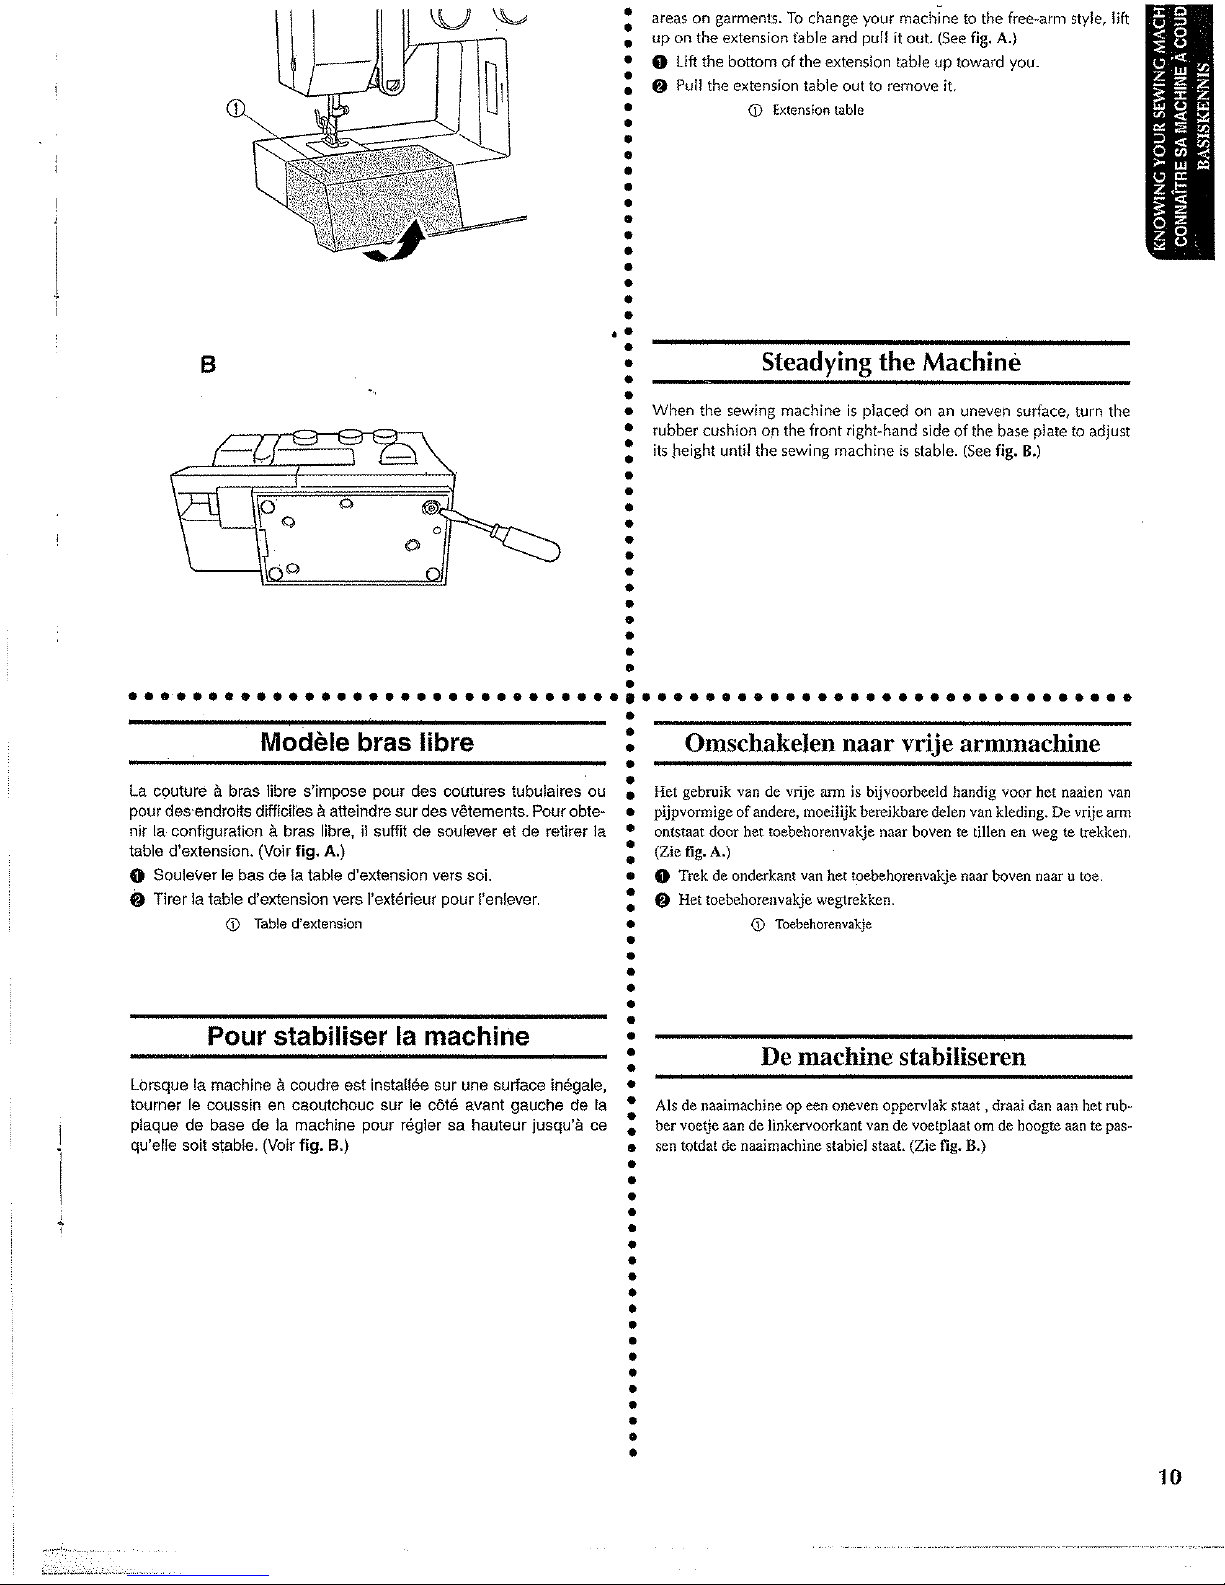
change your machine to the free"arm style, lift
(See
fig. A.}
of
the extension table up toward you.
remove
it
<D
Extension table
Steadying
on
the front right-hand side
of
andere, moeilijk bereikbare delen van kleding. De vrije arm
CD
Toebehorenvakje
the
Machine
is
placed on
naar
ann
is bijvoorbeeld handig voor het naaien van
t~ebehorenvakje
an
uneven surface, turn the
of
is
the base plate to adjust
stable.
(See
vrije armmachine
naar boven naar u toe .
De machine stabiliseren
staat,
•
•
•
•
•
•
•
•
•
•
•
•
•
•
•
•
•
•
•
fig.
B.)
draai dan aan het rub·
10
•
•
•
•
•
•
•
To
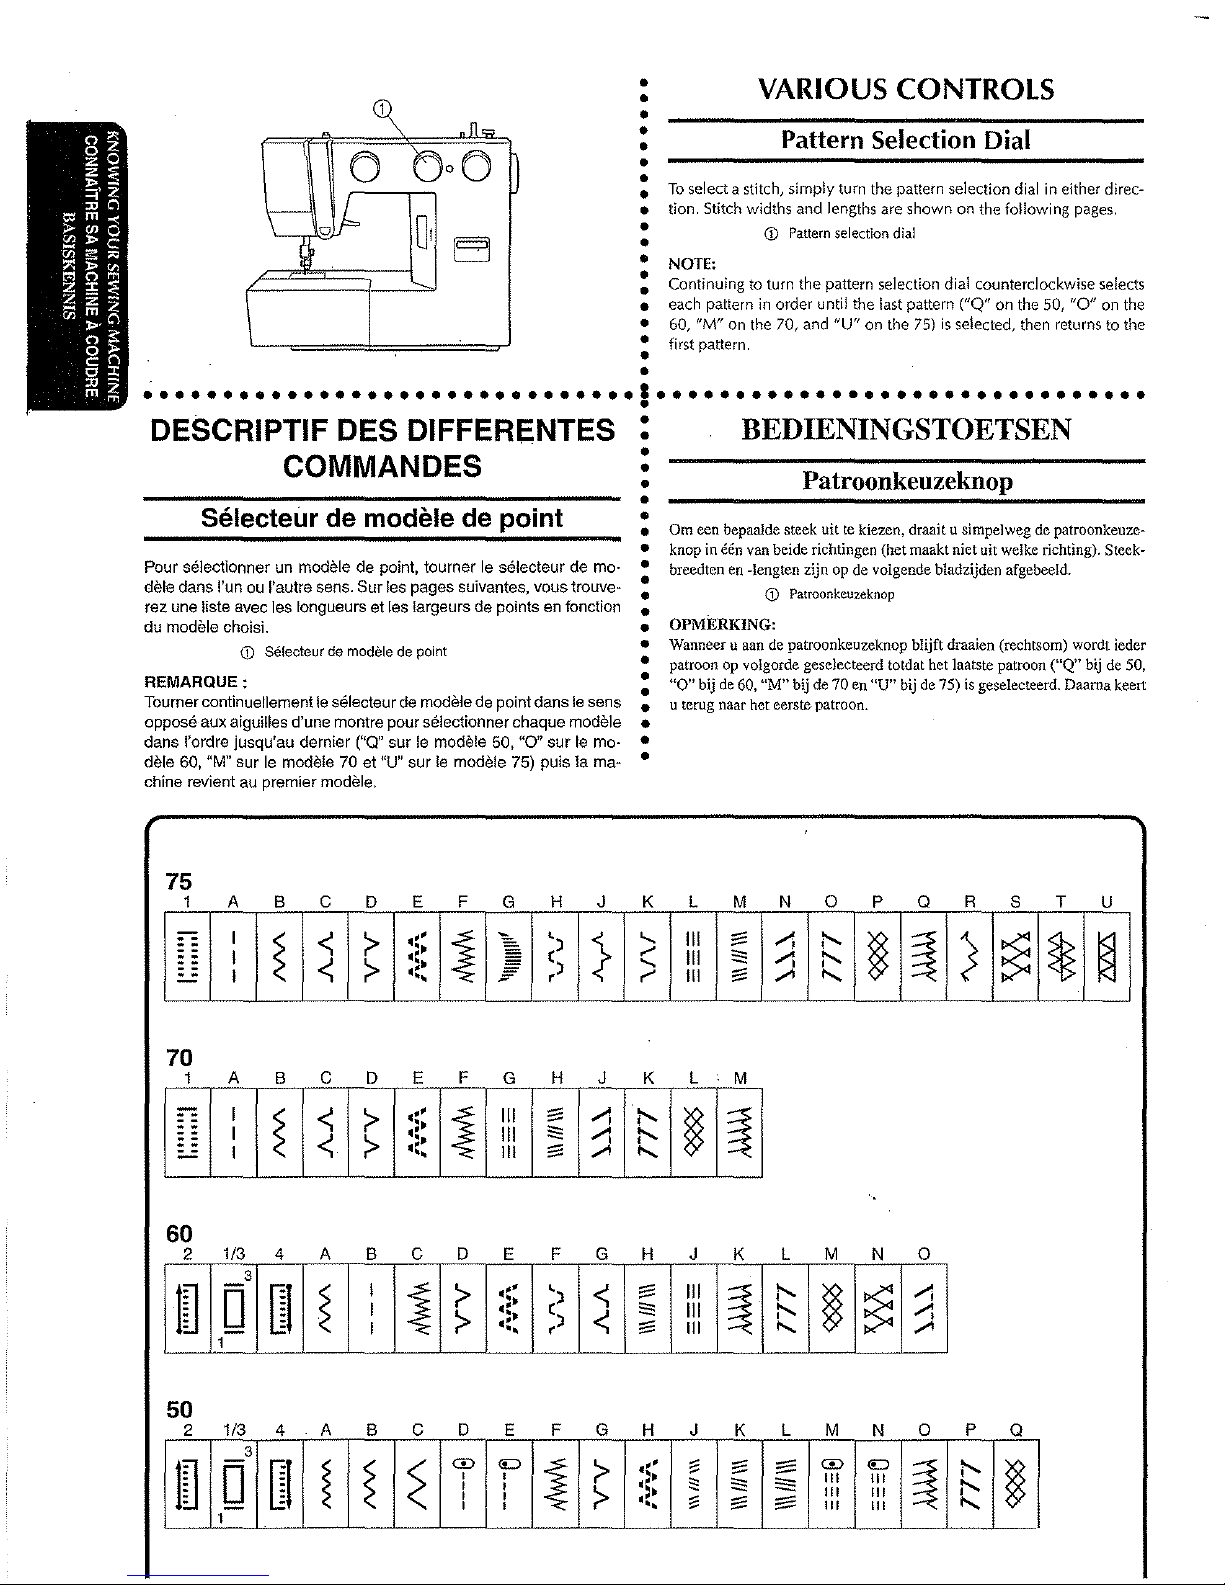
select a stitch, simply turn the pattern selection dial
•
tion.
•
•
•
NOTE:
•
•
Continuing
•
each pattern in order
•
60, ''M" on the 70, and "U" on the
•
first
•
•
•
VARIOUS CONTROLS
Pattern Selection Dial
Stitch widths and lengths are shown on the following pages .
CD
to
turn the pattern selection dial counterclockwise selects
pattern .
•••••••••••••••••••••••••••••••I•••••••••••••••••••••••••••••••
DESCRIPTIF DES DIFFERENTES
COMMANDES
Selecteur de modele de
Pour
s91ectionner
dele dans !'un
rez
une
!iste
du
modele choisi.
REMARQUE:
Tourner continuellement
oppose aux aiguilles d'une montre pour se!ectionner chaque modele
dans l'ordre jusqu'au dernier
dele
60,
"M" sur
chine revient au premier modele.
un
ou
!'autre
avec
les longueurs et
G)
SEi!ecteur
le
modele 70 et
modele de point, tourner
sens.
Surles pages suivantes, vous
les
!argeurs de points
de modele
le
s€1ecteur
("Q"
sur
"U"
de
de
sur
point
modele
!e
modele
le
le
de
50,
modele
point
s€1ecteur
en
point dans
"0" sur
75)
puis
de
mo-
trouveM
fonction
le
sens
le
mo-
la
ma-
•
•
•
•
•
•
•
Om een bepaa!de steek uit te kiezen, draait u simpelweg de patroonkeuze-
•
knop
•
breedten en -lengten zijn op de volgende bladzijden afgebeeld .
•
•
•
•
OPMERKING:
•
Wanneer u aan de patroonkeuzeknop blijft draaien (recbtsom) wordt ieder
•
patroon op volgorde geselecteerd totdat bet laatste patroon
•
•
"0"
•
u terug naar bet eerste- patroon .
•
•
•
•
BEDIENINGSTOETSEN
in
een
van
beide richtingen (het maakt niet uit welke richting). Steek-
G)
bij de 60,
"M"
Pattern selection
until
dial
the last pattern ("Q" on the 50,
75)
is
selected, then returns to the
Patroonkeuzeknop
Patroonkeuzeknop
bij de
70
en
"U"
bij de 75) is geselecteerd. Daarna keert
in
either direc-
"0"
("Q"
bij de 50,
on the
75
1 A
-
I
I
I
c
B
<
~
<
D
:>
:>
70
1 A B c D E
I
I
~
I
-
<
<
:>
:>
60
1/3
2
tu
4 A B c D E F G
03
1
m
I
I
·~
I
50
2 1/3
A B c D E F G
4
3
D
lU
1
m
~
~
E F
4=;
4:.
-:
...
~
F
•••
4=·
4=·
~
••
:>
:>
~
CD
'
'
~
'
'
H J
G
')
()
jF
r
G H J
~
Ill
Ill
~
Ill
""
••
')
4=·
()
:=·
r
••
<D
'
'
~
'
'
K
.....
~
...,
r'
>
K
.....;
:-....
.....;
:-....
,.A
t-..,
H
~
<
~
<
""
H
•••
:>
~=·
:>
••
-=·
L
M
Ill
~
Ill
Ill
~
""
L M
~
~
J
K
Ill
Ill
Ill
~
J
K
-
""
"'
;;;
~
"'
""
N 0
.....;
.....;
,.A
L M
:-...
:-....
t-..,
L M
~
~
~
p Q
:-...
:-...
t-..,
~
N
~
~
N
CD
<D
Ill
Ill
Ill
Ill
Ill
Ill
R
~
f
0
.....;
.....;
,.A
p
0
:-...
:-....
t-..,
~
T
s
~
~
Q
~
u
~
12
70
I
1
j
"
'
14
--'~'l
50
I
Q
SMOCKING
STITCH
5
(13/64)
49
16
70
ov
I
i
I
.L
18
 Loading...