

Page 1

Contents
Introduction
Principles of operation
Remote control
Make music available
Cover art
Make photos available
Make websites available
Daily use of BeoPlayer
Organise your content
Using BeoMedia 1
Using BeoMaster 5 and BeoSound 5
Coloured lists
Functions specic to BeoMaster 5
Use portable devices with BeoPlayer
Especially for BeoSound 2
Conguration of BeoPlayer
Basic settings
The Advanced settings – This only applies if
BeoPort is part of your setup
System requirements for BeoPlayer and
BeoPort
Supported media formats
Software update – BeoMaster 5
Registration of BeoPlayer or BeoPort
What to do if you need to remove BeoPlayer/
BeoPort
About
Page 2
Introduction
BeoPlayer
BeoMaster 5
Guide to BeoPlayer and BeoPort
This Guide will give you information on how to use the
BeoPlayer and BeoPort software, which is part of your
Bang & Olufsen product. BeoPlayer is also available as
a free download from www.bang-olufsen.com.
As the user interaction for BeoPort is similar to the one
for BeoPlayer, BeoPort is only mentioned when the
described operation specically requires a BeoPort
installation.
BeoPort
BeoSound 5
The available features and operation of the software in
connection with a BeoMaster 5 and BeoSound 5 are
also similar. Therefore, the sections describing
operation with BeoMaster 5 only mention BeoSound 5
when the operation specically requires a BeoSound 5
installation also.
This Guide also provides information on the use of the
software with BeoSound 2, BeoSound 6 and Serenata.
Page 3
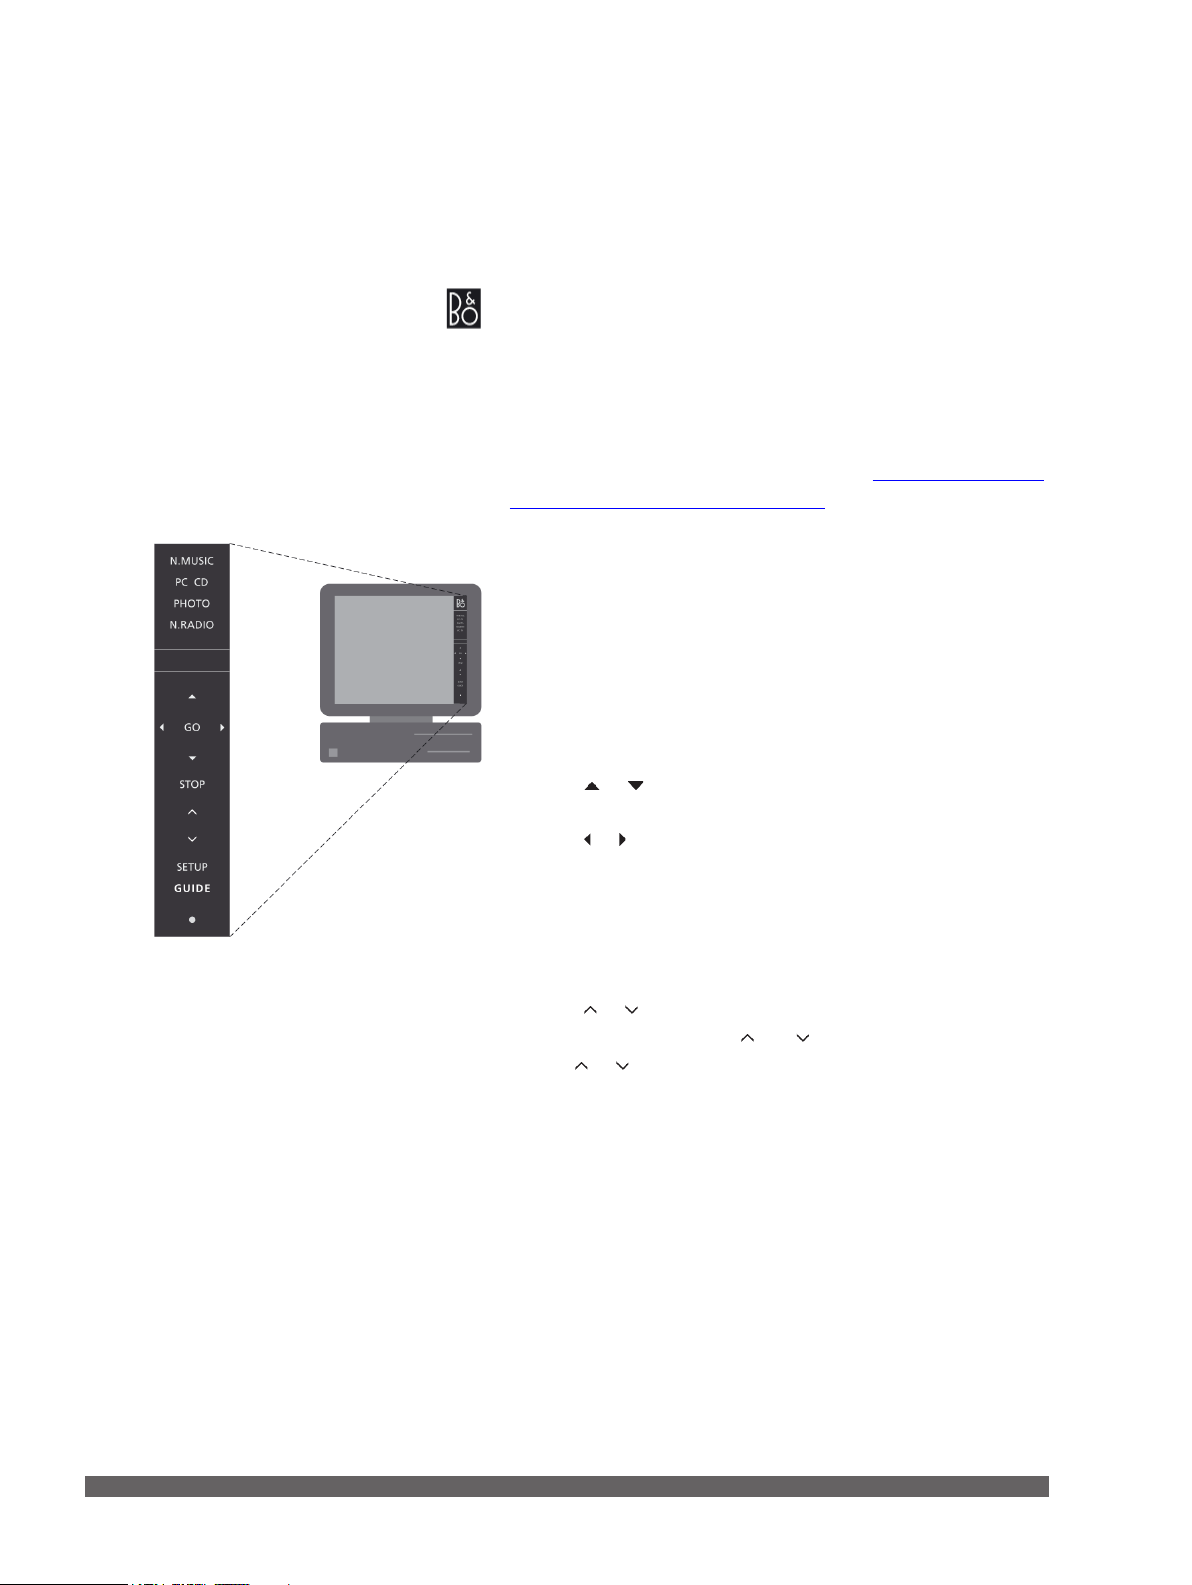
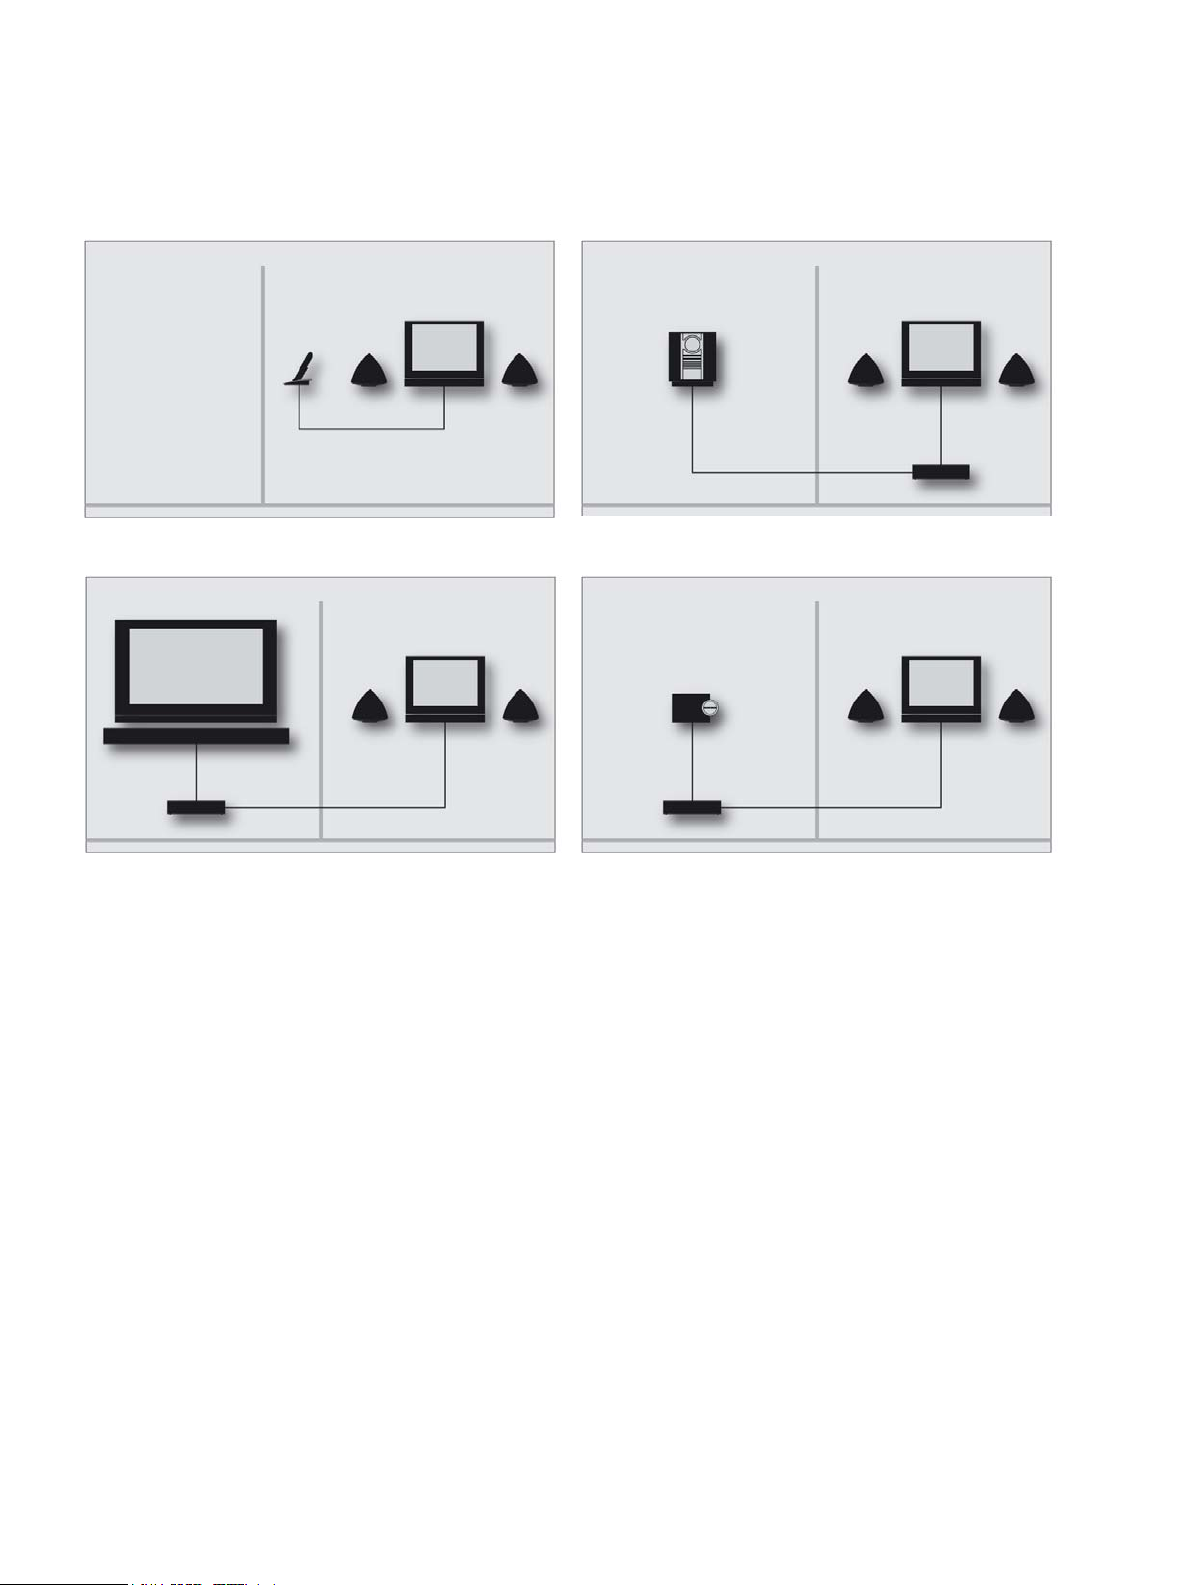
Principles of operation
The control bar
The control bar allows you to activate and operate the
BeoPlayer or BeoPort sources.
> Click on the Bang & Olufsen shortcut in your system tray to
start up BeoPlayer.
> Move your cursor to the far right of the screen.
> Click the triangular tab to bring up the control bar.
Note that the appearance of the control bar depends on
whether you have installed BeoPort or BeoPlayer.
The default sources are N.RADIO, N.MUSIC, PHOTO and
PC CD. Note that only BeoPort gives you additional sources,
depending on the products in your home. Refer to ‘Customise
the control bar’ for more information.
To activate a source in BeoPlayer …
> Click twice on one of the sources to make the source
appear on the left of the computer screen.
When you activate a source, it appears on the control bar in
red.
Control bar operation …
> Click or to step between tracks, radio stations, TV
channels, photos, etc.
> Click or to step to the next group in the active source, or
when PC CD is selected …
> … switch between CDs if you have two CD-rom drives or a
connected BeoSound 9000 (BeoPort only).
> Click STOP to pause playback.
> Click GO to resume playback.
> Click or to adjust sound.
> To mute, click between and to mute playback.
Use or to restore volume.
> Click SETUP to view individual options for each source.
Alternatively, the mouse can be used to select and play your
content showing on the left side of the computer screen. A
group in BeoPlayer is, for example, an album, a playlist, a
genre or a coloured list.
3
Page 4
> Click INFO to see information on the current track, radio
station or photo.
> Click • to switch to standby.
> Click and hold • for 2 seconds to switch off all sources.
> Click • twice to close the control bar and the application.
> Click the Bang & Olufsen shortcut once in your system tray
to re-activate BeoPlayer.
The coloured buttons which are only available on the BeoPort
control bar are for playing the coloured list. Refer to ‘Coloured
lists’ for further information.
Customise the control bar …
The number of sources available via your control bar can be
changed. You can add, delete or hide sources. Up to eight
sources can be made visible on the control bar at the same
time.
> Click SETUP to set up the control bar.
> Click SOURCES to add or remove sources. A list of available
sources appears on the control bar. With BeoPort you have
more options depending on the products present in your
home.
> Click and hold on the source you wish to add from the list
and drag it to the existing sources.
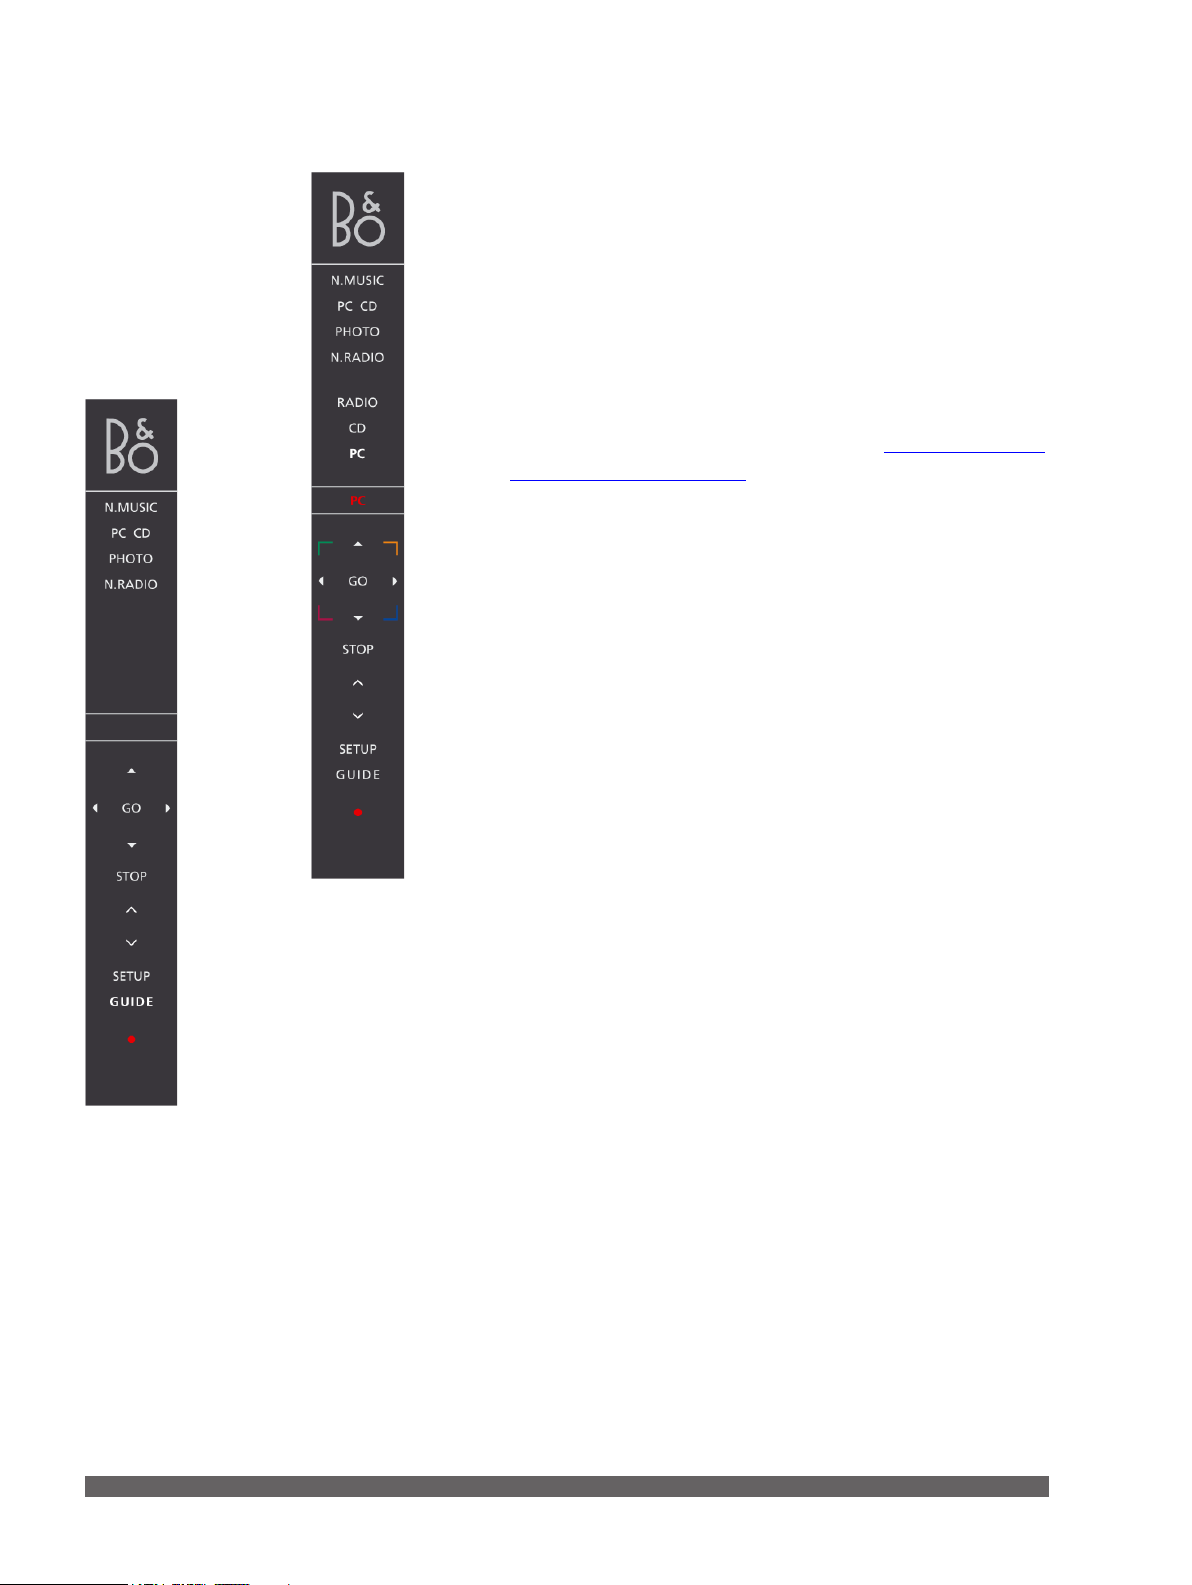
The BeoPort
control bar
The BeoPlayer control bar
Under all visible sources, you can hide a second source, which
is indicated by < and > around the source.
> Click on a source on the control bar and drag it to the list of
available sources to remove it.
> Click EXIT to leave SETUP.
4
Page 5

Note! With the US version of BeoPort you cannot watch
video sources from your main room on your computer
screen.
The TV viewer
If your computer setup includes a BeoPort box and the
computer is equipped with a TV tuner cards, the TV viewer
function is available and you can watch television on the
computer screen by selecting the source PC TV. Once the TV
viewer is displayed, you can move, close or enlarge the TV
viewer window.
How to move and resize the TV viewer window …
> Select the TV viewer window and drag it to move it.
> Double-click the TV viewer window to get a full-screen TV
picture on the computer screen.
> Right-click the mouse to make the TV viewer window
disappear from the screen – the sound is still available.
> Bring up the control bar and click on TV to bring the TV
viewer window back.
> Drag a side of the TV viewer window to enlarge the TV
viewer proportionally in a 4:3 picture format.
Select sound mode …
You can select specic sound modes for the TV channels or
select AV stereo sound for audio or video sources.
Mono, stereo or language …
If additional sound modes are available …
> Click SETUP then SOUND on the control bar to change the
current sound mode.
> Click SOUND repeatedly to switch between the available
sound modes, mono or stereo.
> Click SETUP to be able to select a sound mode.
If no alternative sound modes are available, you will not
experience any difference.
> Click EXIT to leave SETUP.
5
Page 6

Select AV stereo sound …
If you select a video source on the control bar, you can choose
to receive stereo sound via BeoLink for this particular source.
Simply use the AV button located under SETUP in the control
bar.
> Bring up a source – click on e.g. DTV.
> Click SETUP to be able to select AV sound.
> Click AV to select AV sound, e.g. stereo sound.
> Click AV again to return to mono sound.
> Click EXIT to leave SETUP.
6
Page 7
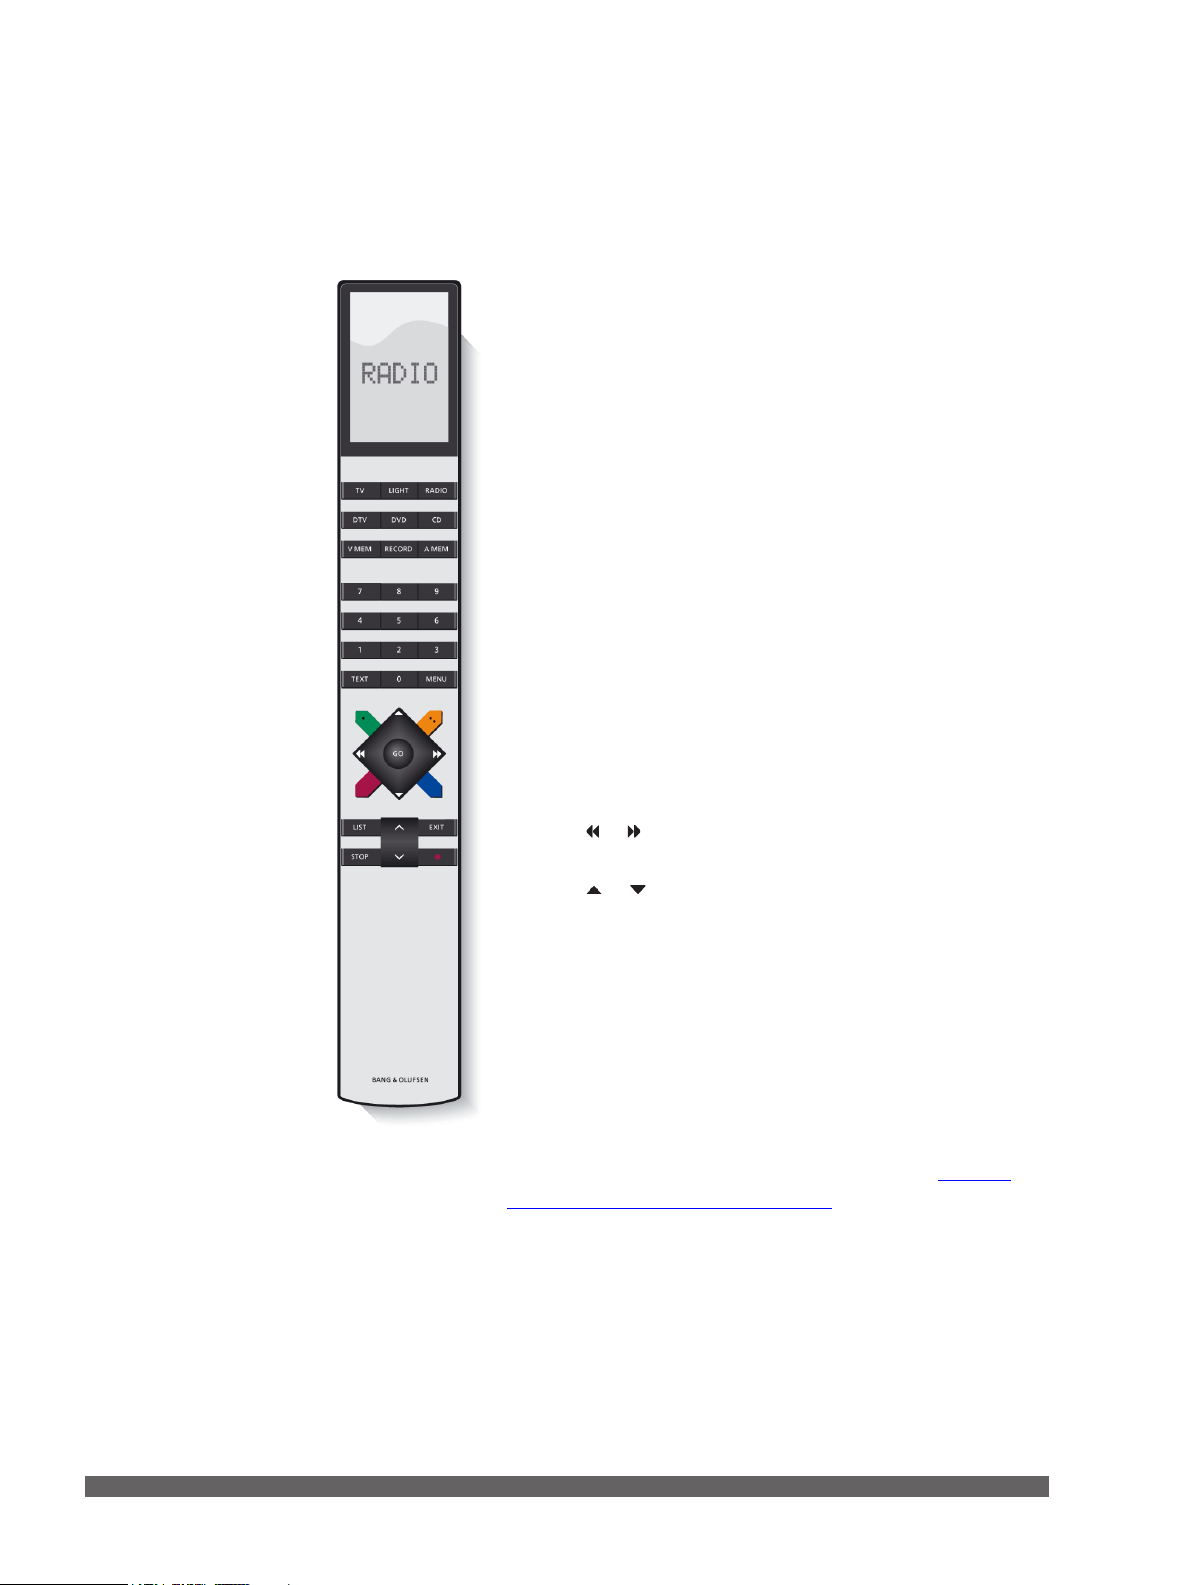
Remote control
If you have BeoPort installed together with an IR receiver, you
can use either Beo4 or Beo5 to operate the available sources in
your system.
On Beo4 …
> Press RADIO to switch on the radio.
> Press TV to watch television, if available.
> Press LIST repeatedly to display N.MUSIC on Beo4, then
press GO to activate.
> Press LIST repeatedly to display N.RADIO on Beo4, then
press GO to activate.
> Press DTV to receive digital TV from a connected video
source, if available.
> Press DVD to receive a DVD signal from a connected DVD
player.
> Press CD to listen to an audio CD.
> Press V.MEM to watch video from a connected DVD/video
player, on the computer screen.
> Press A.MEM to play a connected audio source.
The digit buttons have context specic functions. They can, for
example, be used to select a specic track, a TV channel or a
radio station.
> Press or to search through a track or to step to the next
or previous group.
> Press or to step to the next or previous track in the
current list or on a CD, step to another TV channel or radio
station.
With your remote control, you can, for example, switch
available link and main room sources on and off, switch
between TV channels, radio stations or tracks, and adjust
volume.
The coloured buttons …
The coloured buttons have different functions according to the
selected source. If you are watching a set-top box channel on
your computer, the coloured buttons are used as indicated in
the set-top box menu overlay.
In a setup with BeoSound 5, or with a BeoMaster 5 alone, the
coloured buttons are used to select coloured lists. Refer to
‘Coloured lists’ for further information.
7
Page 8
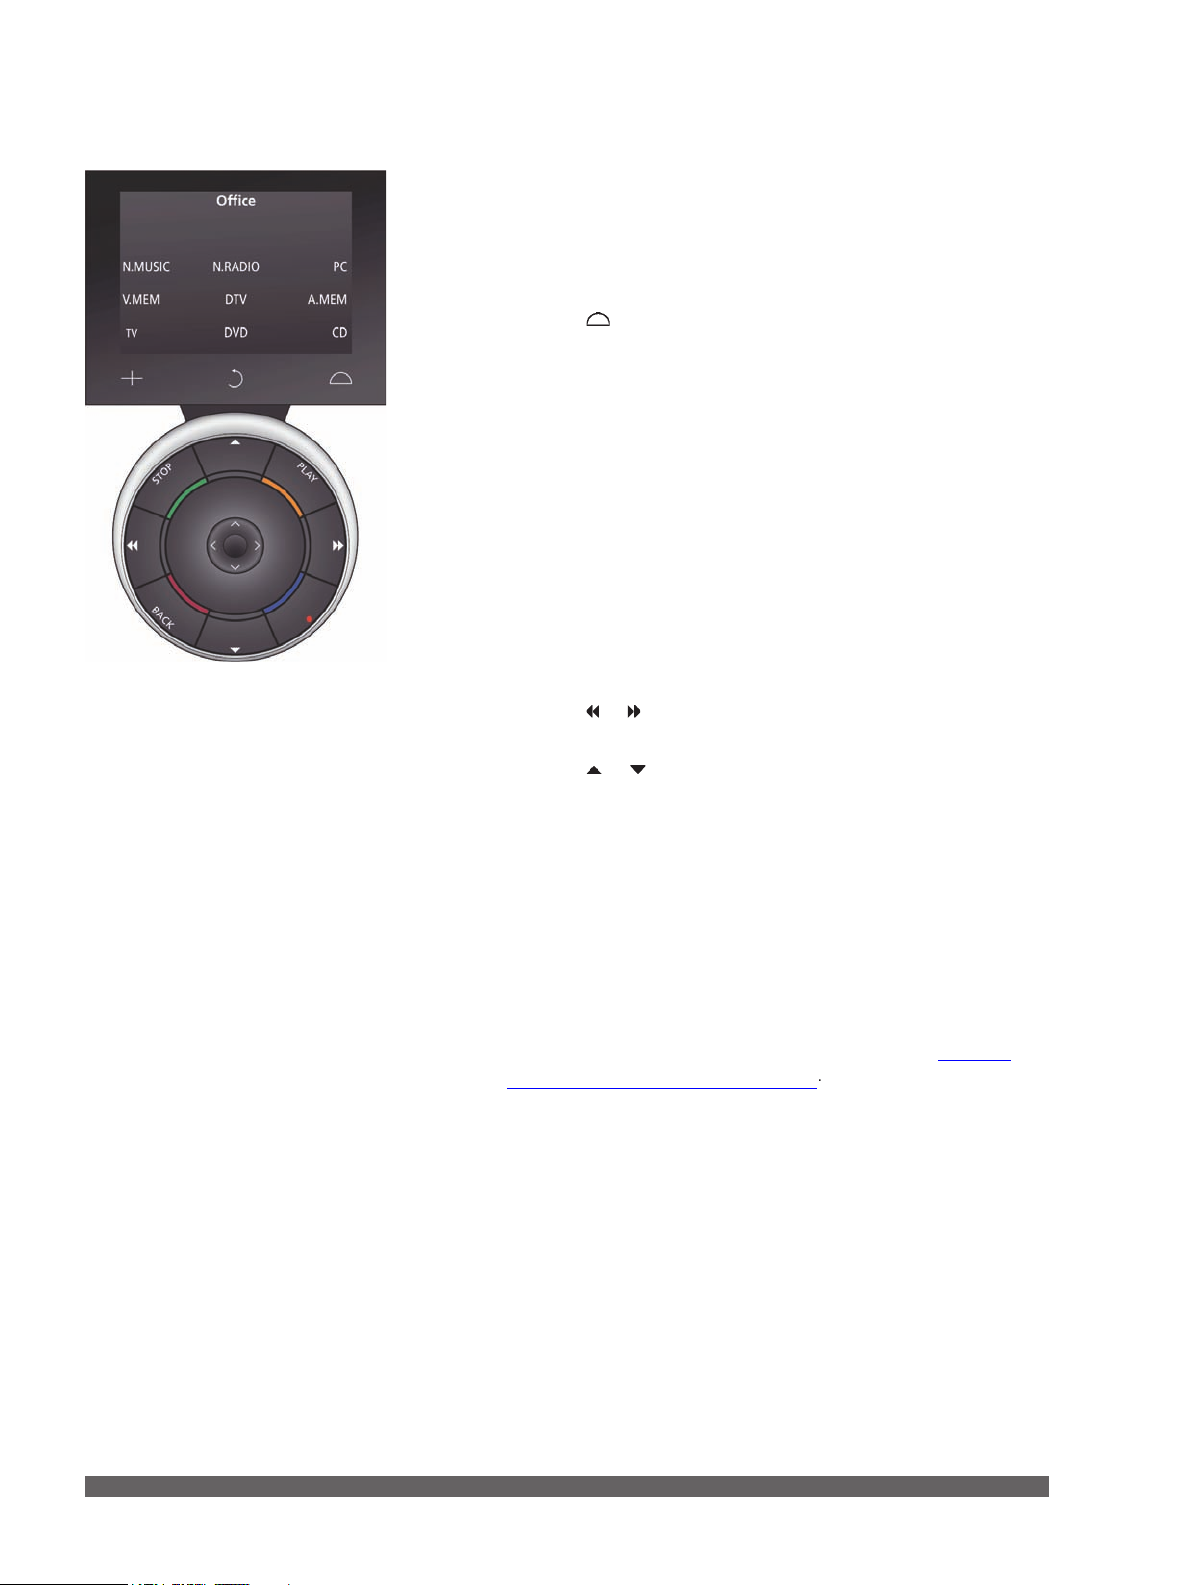
8
The Beo5 remote control must be set up to operate the
to switch on the N.Music source.
to switch on N.Radio.
to use the PC source.
to watch video from a connected DVD/video
to watch television, if available.
to receive digital TV from a connected video
to receive a DVD signal from a connected DVD
to listen to an audio CD.
to play a connected audio source.
or
to search through a track or to step to the next
or
to step to the next or previous track in the
‘Coloured lists’ for more information
Refer to
Page 9

Make music available
BeoPlayer/BeoPort uses your Internet connection to
download CD information from BeoPortal. To receive
information from BeoPortal, you must register BeoPlayer and
enable the function in the ‘Conguration’ menu and your
computer must be online. If BeoPortal is not available after
approximately 10 seconds, your tracks will be registered as
‘unkno wn’.
Find music on the computer
To create playlists in BeoPlayer, music must be available on your
computer. Scan your computer for music already present, or
copy from your audio CDs.
When you start the BeoPlayer source N.MUSIC for the rst
time, you are prompted to search the computer for playable
content.
Scan for music on the computer …
A scan must be performed the rst time you use BeoPlayer, or
if you want to add a new storage drive.
> Click once to tick the box next to the drive.
> Click again to remove the tick.
> Click START to begin the scan.
Search for tracks if added to another drive …
> Click SETUP on the control bar when N.MUSIC is active.
> Click SCAN.
> Tick the box next to the relevant drive(s).
Progress is shown in red below the drive selection box.
> Click STOP to cancel a scan in progress.
> Click HIDE SCAN to conceal scan options.
Scans in progress will continue until they are complete. Before
you copy from an audio CD, be sure to specify your copy
settings. This is done in the ‘Conguration’ menu, under
SETUP on the control bar. Refer to ‘Conguration of BeoPlayer’
for more information.
If your existing tracks contain information tags, such as ‘Artists’,
‘Albums’ or ‘Genre’, this information is stored during a scan.
Refer to ‘View and edit N.MUSIC, N.RADIO or PHOTO
information’ for more information.
As default, N.MUSIC will always scan for music in the folder
called ‘My Music’ under ‘Documents and settings\user name’
and the drives you initially scanned, when you activated N.
MUSIC the rst time. It is therefore necessary to scan your hard
disc again, if you store music on another drive or in a different
folder.
9
Page 10

Copy music from an audio CD
BeoPlayer uses the Internet connection to connect to BeoPortal
in order to receive information about the CD, when available.
If your destination view is closed, you can follow the
progress of your copying under the COPY button. Progress is
indicated by a red line. Furthermore, you can follow the
copying progress in the control bar display.
Before you copy from a CD …
> Place the CD in the CD-rom drive and click PC CD.
> Click the COPY button located in the lower left side to
open ‘Folder view’.
> Drag and drop the entire album as a new folder, or …
> … click NEW FOLDER to create a folder and drag and
drop single tracks.
BeoPlayer starts copying while the music being copied is
playing. Once an album or track is copied, it is stored as a
WMA le.
You can use the control bar while copying. However, copying
music will be disrupted if you exit BeoPlayer completely.
N.MUSIC from folders on the computer …
When you drag content from a Windows folder into BeoPlayer,
you can drop it wherever you prefer. After you have dragged
and dropped, you can organise your content as you wish, and
also move tracks or albums to the coloured lists.
Refer to ‘Create or edit playlists’ for more information.
From BeoPlayer to other applications …
You can also transfer content from BeoPlayer into non-Bang &
Olufsen software, such as CD-burner applications. Usually, you
can just ‘drag and drop’ content from BeoPlayer into the
application. This will work provided that the function is
supported by the software.
10
Page 11
Cover art
In order to receive information and covers from BeoPortal,
you must register BeoPlayer. The function must be enabled
in the ‘Conguration’ menu and the computer must be
online.
BeoPlayer supports cover art for N.MUSIC tracks, either as
pictures embedded in the tracks or as a picture placed in the
same folder as the tracks or the album.
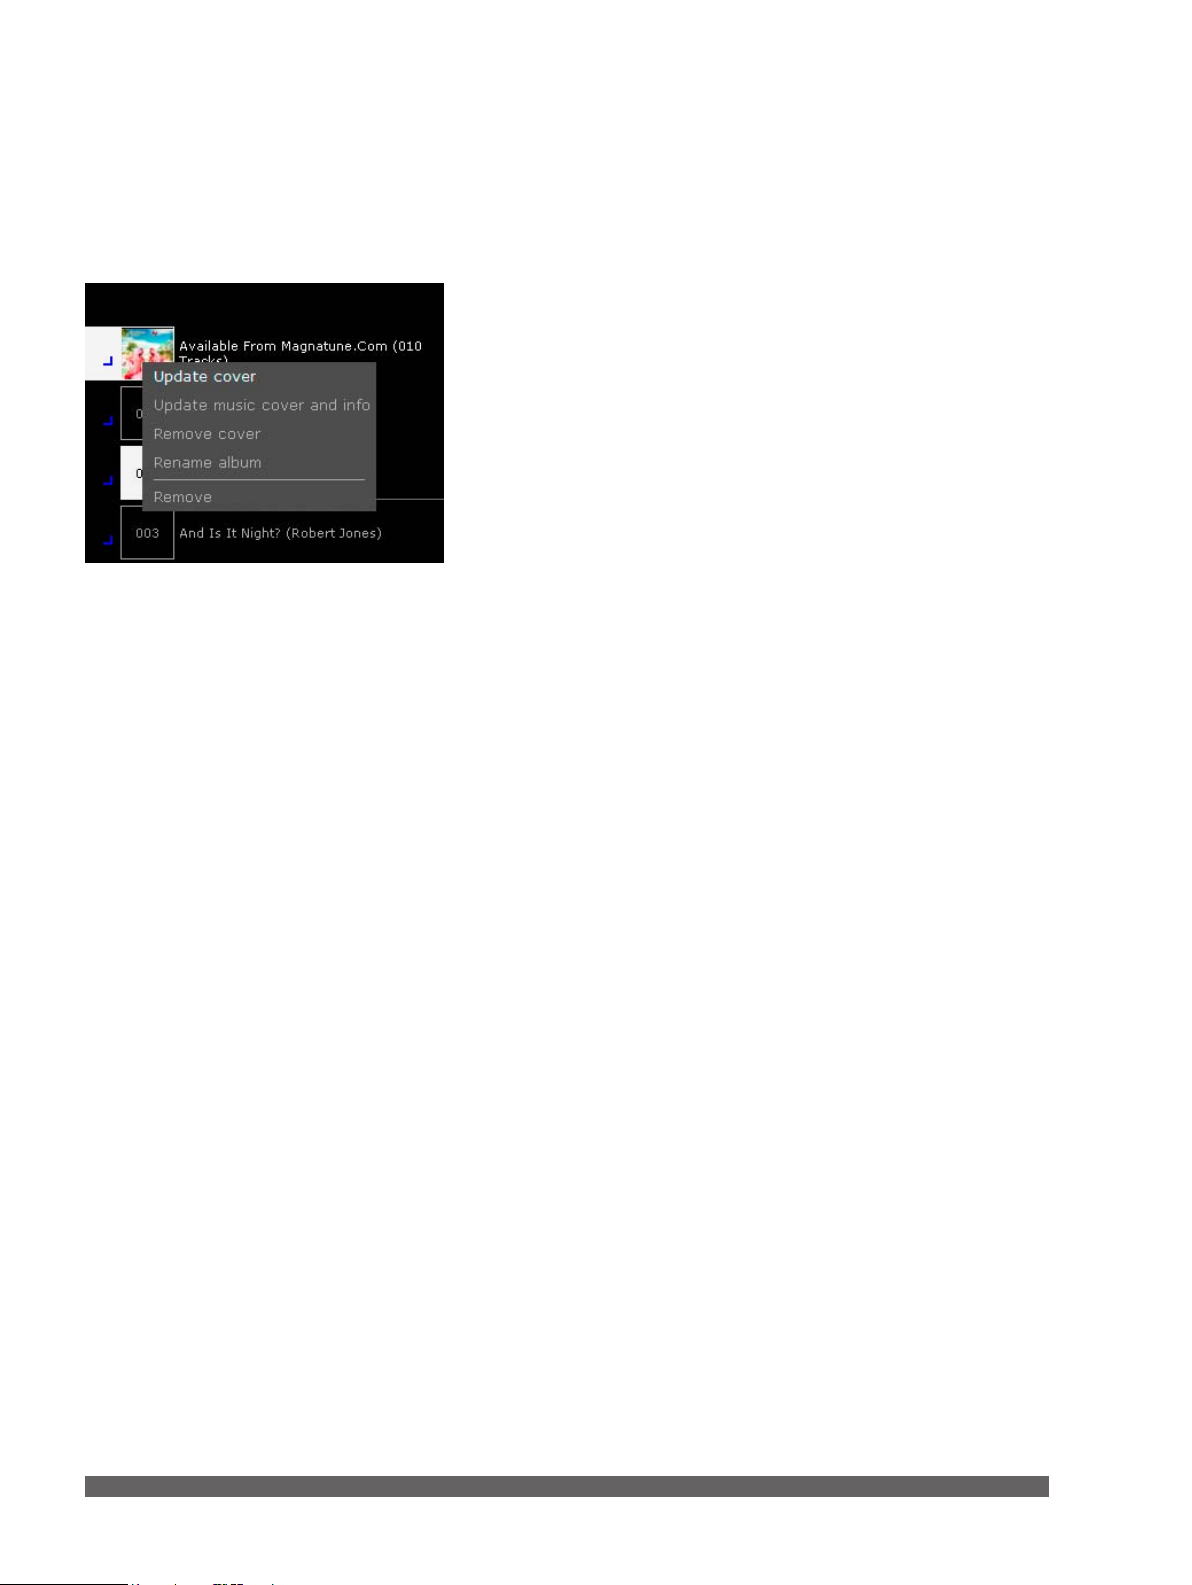
To download or update album covers …
Cover art shows in BeoPlayer in all views on the left side of your
screen. If you have registered BeoPlayer, you have access to
BeoPortal, and after you have scanned your computer for music,
you can start updating your current album covers or downloading
album covers.
> Click and hold on the current view in BeoPlayer in the top
left-hand corner.
> Move the cursor to ‘Albums’ and let go of the mouse
button.
> Right-click an album to see the available options.
Alternatively you can drag and drop a photo onto a track or an
album directly in BeoPlayer.
When you insert a CD and click PC CD, BeoPlayer will show
cover art automatically, if present in the le.
11
Page 12
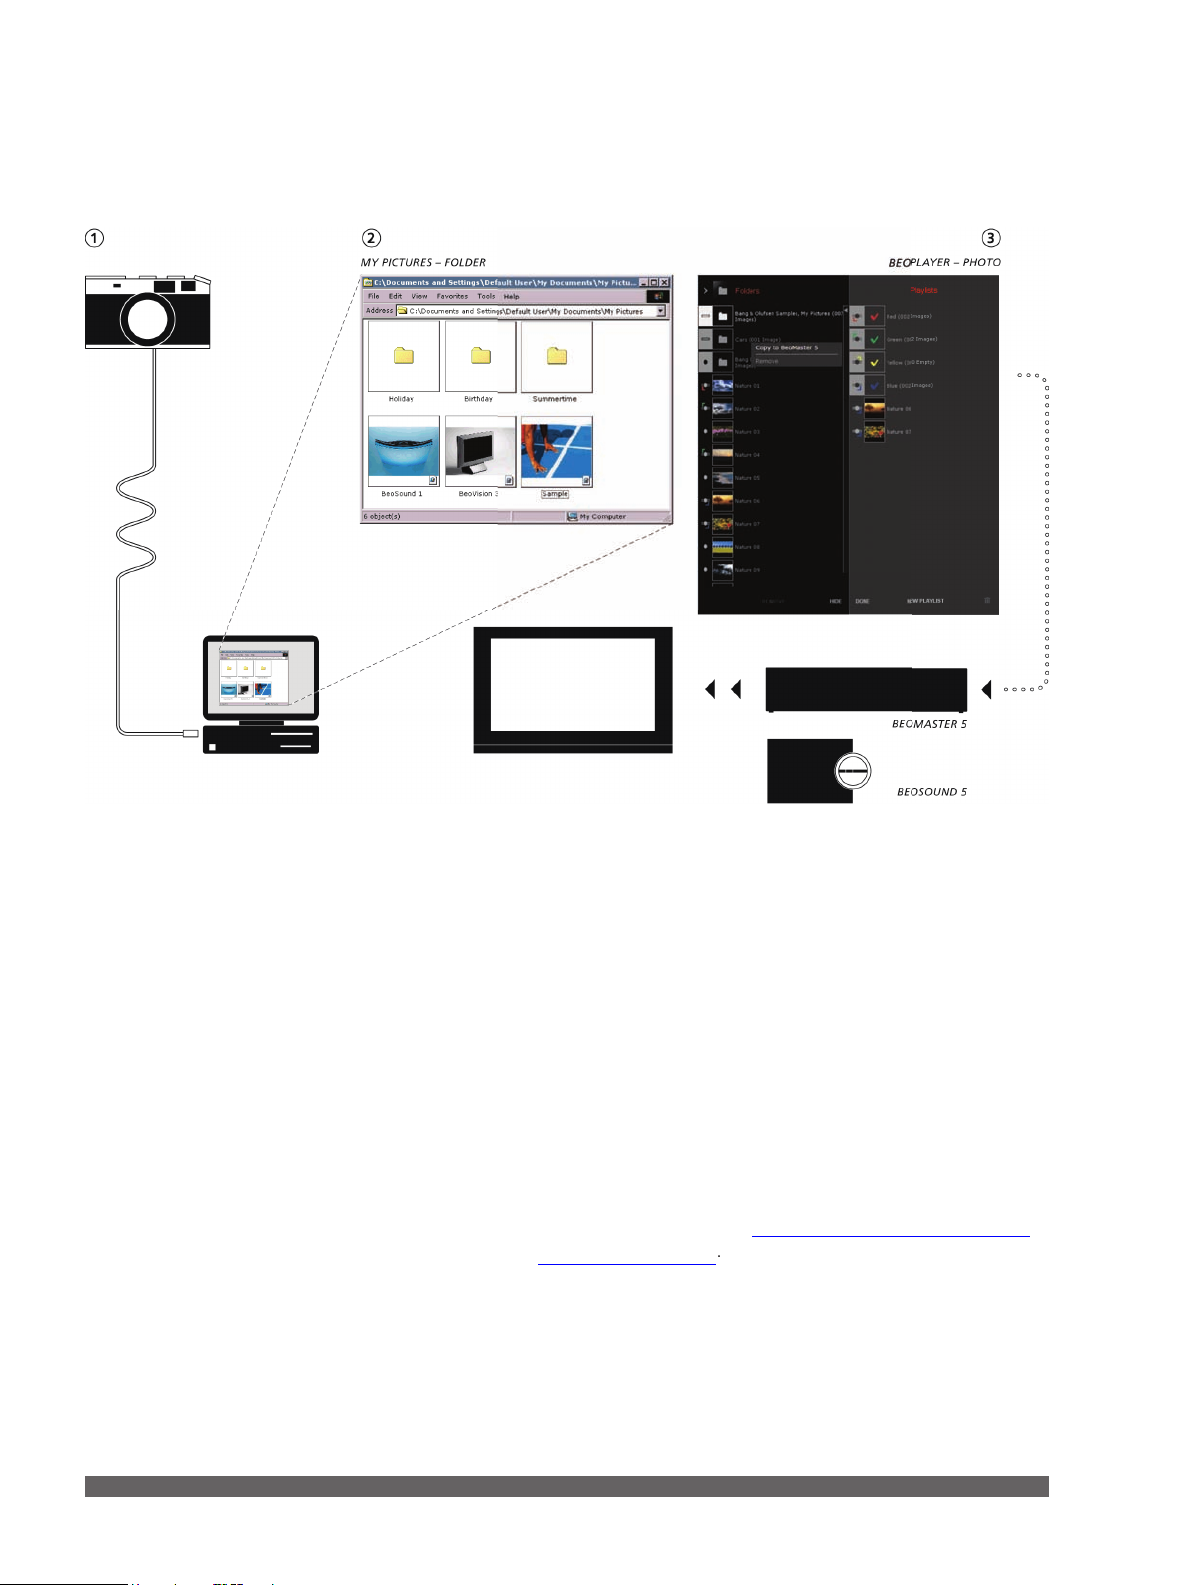
in BeoPlayer, the folder ‘My
Refer to ‘Organise your content’
for more information
Page 13
Make websites available
Add the websites you want to view on the television.
For information on how to use the Web source on your
television, refer to the BeoMaster 5 Guide.
The web function is only relevant, if BeoMaster 5 is part of your
setup.
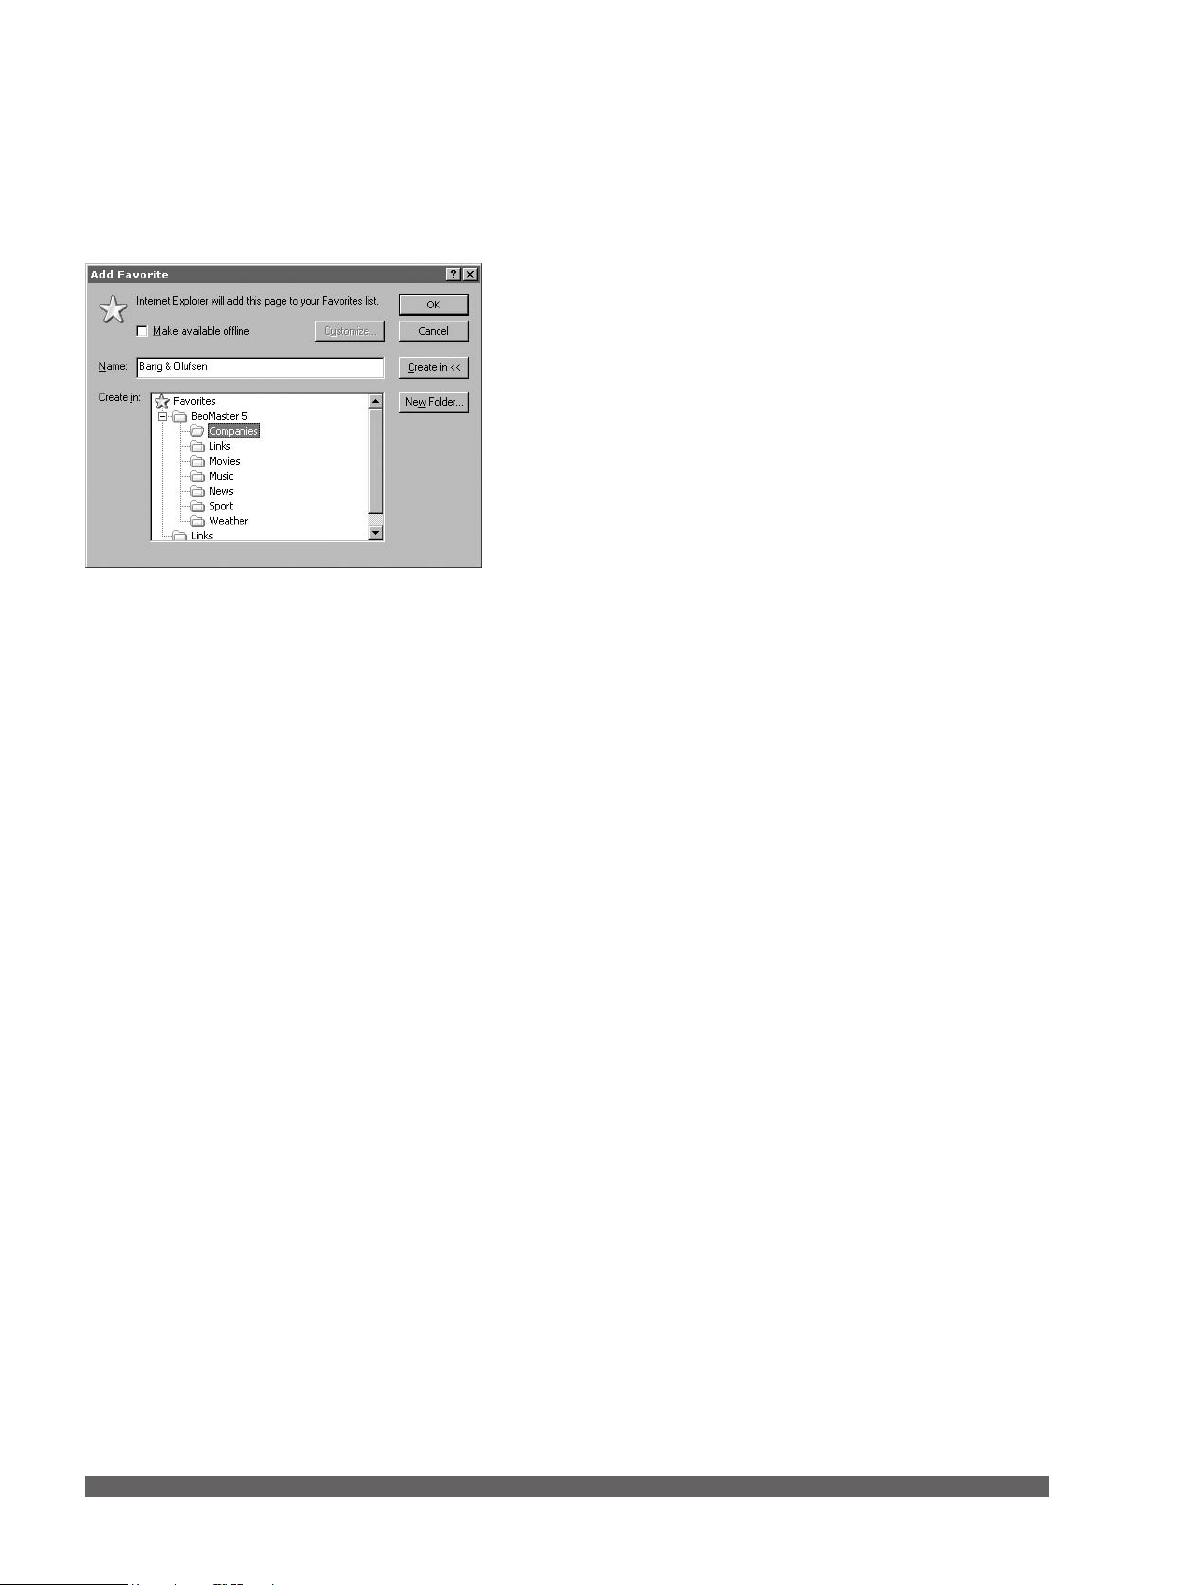
In Internet Explorer, a folder called ‘BeoMaster 5’ is placed
under ‘Favourites’. When you store websites in this folder, they
can be viewed on your television via the source ‘WEB’.
You can create sub-folders within the folder called
‘BeoMaster 5’ and they will appear as groups on the television
screen.
In Internet Explorer …
> Click ‘Favourites’.
> Click ‘Add to favourites’.
> Select the ‘BeoMaster 5’ folder, or …
> … click ‘Create in’ and create a sub-folder.
You can now view the website on the television screen.
13
Page 14
Daily use of BeoPlayer
Play tracks, radio stations and view photos
To play an audio CD on your computer, load the CD in the
CD-rom drive and click PC CD. Use the control bar to select
tracks, pause playback, or switch between multiple CDs, if you
have more than one CD-rom drive.
For information about how you copy music from an audio CD
to BeoPlayer, refer to ‘Copy from an audio CD.
To play an audio CD …
> Click PC CD. Playback of the rst track begins.
In order to receive information and covers from BeoPortal,
you must register BeoPlayer. The function must be enabled
in the ‘Conguration’ menu and the computer must be
online.
Once you have clicked PC CD, BeoPlayer connects to BeoPortal
to receive information about the tracks playing. If you want an
overview and to play your CDs directly from the lists, simply
click PC CD again to make the PC CD list appear. Otherwise,
use the keys on the control bar.
> Click to step to the next track.
> Click to step to the previous track.
> Click or to step to the next group in the activated source.
> Click STOP to pause playback of a track.
> Click GO to resume playback.
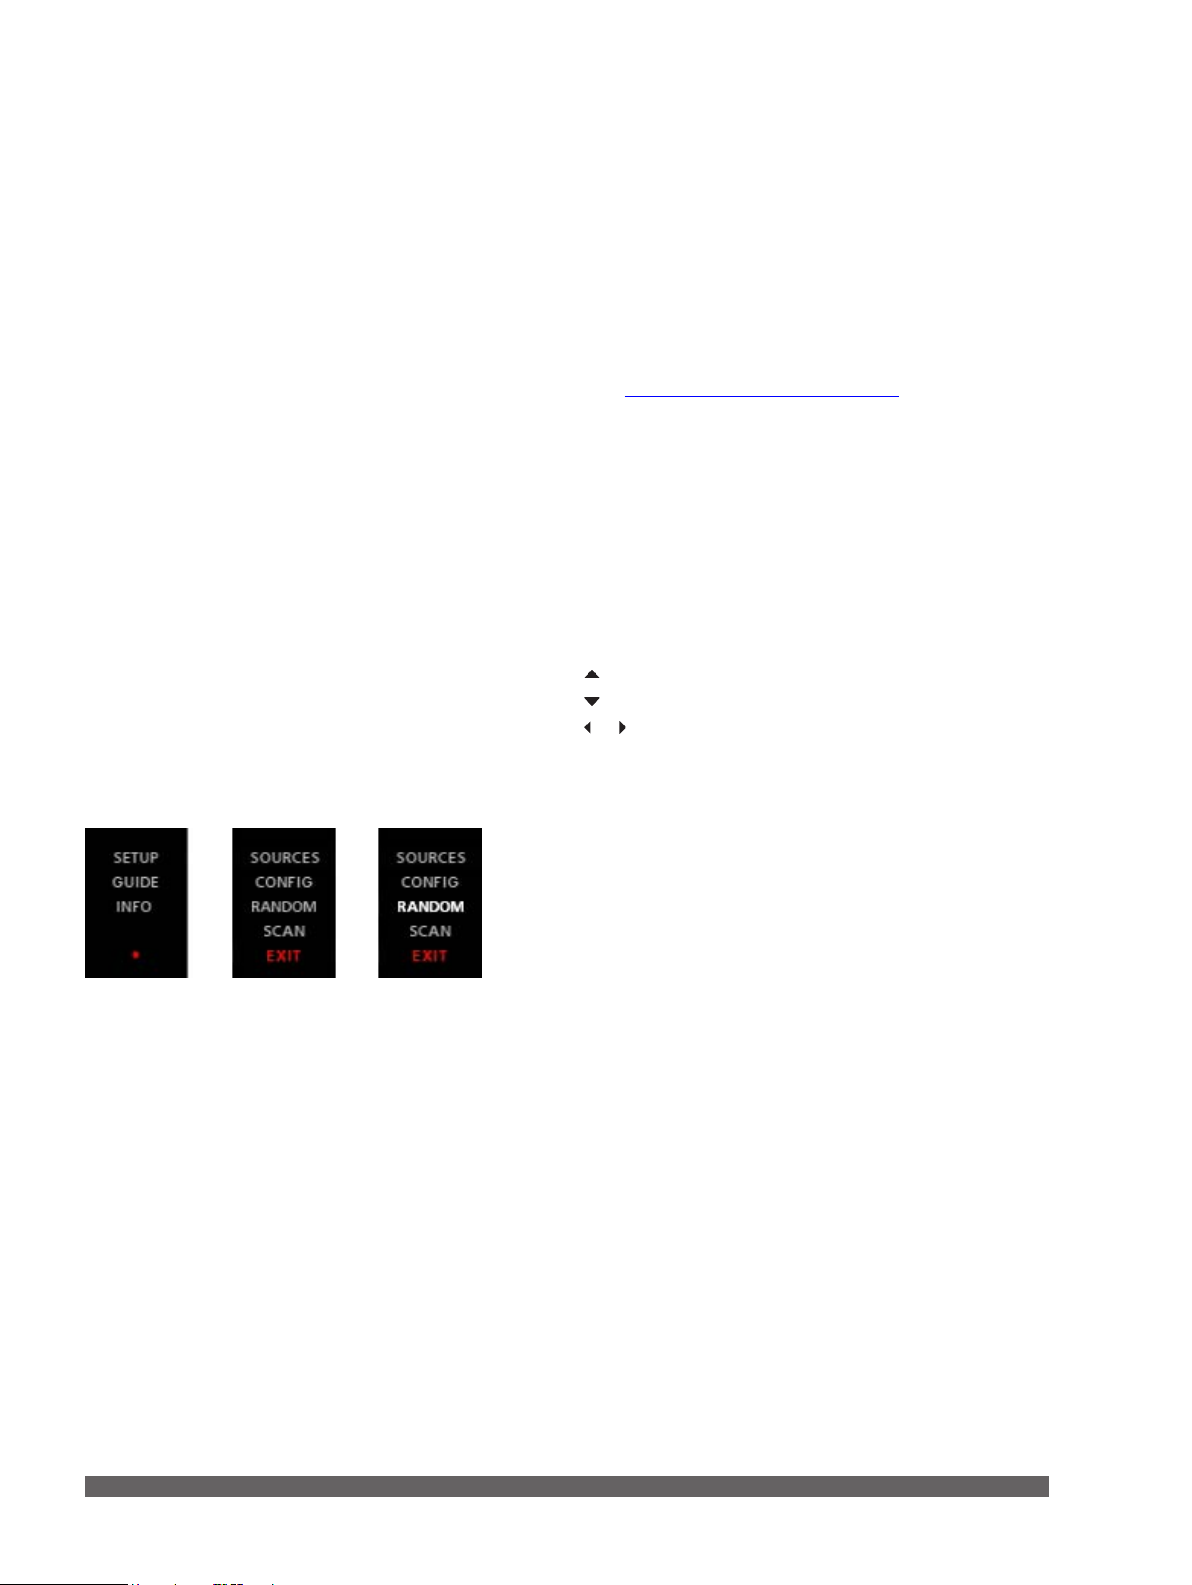
Play tracks in random order …
> Click SETUP on the control bar to reveal RANDOM.
> Click RANDOM to play the CD tracks in random order.
RANDOM turns white.
All subsequent tracks are played in random order until you
change the setting.
> To return to normal play mode, click SETUP to reveal
RANDOM.
> Click RANDOM once and RANDOM turns grey again.
> Click EXIT to leave SETUP.
14
Page 15
Listen to N.RADIO …
Use the control bar to start listening to radio stations or step to
a new station or group.
> Click N.RADIO to start playback of available radio stations.
> Click to move to the next radio station.
> Click to move to the previous station.
> Click or to move to the previous or following group.
> Use the number keys on your keyboard to play a station.
View photos …
You can use the control bar to view available pictures and
navigate between them. You can also zoom in on the chosen
picture or rotate the picture or view the pictures as a slideshow.
> Click PHOTO to view photos.
> Double-click on a photo to view it.
> Click or to move to the previous or next photo.
> Click or to go to the next group.
> Use ‘ROTATE’ in the player window to rotate the photo.
> Use – ‘ZOOM’+ in the player window to zoom in or out.
> Use the number keys on your keyboard to select a photo in
a list.
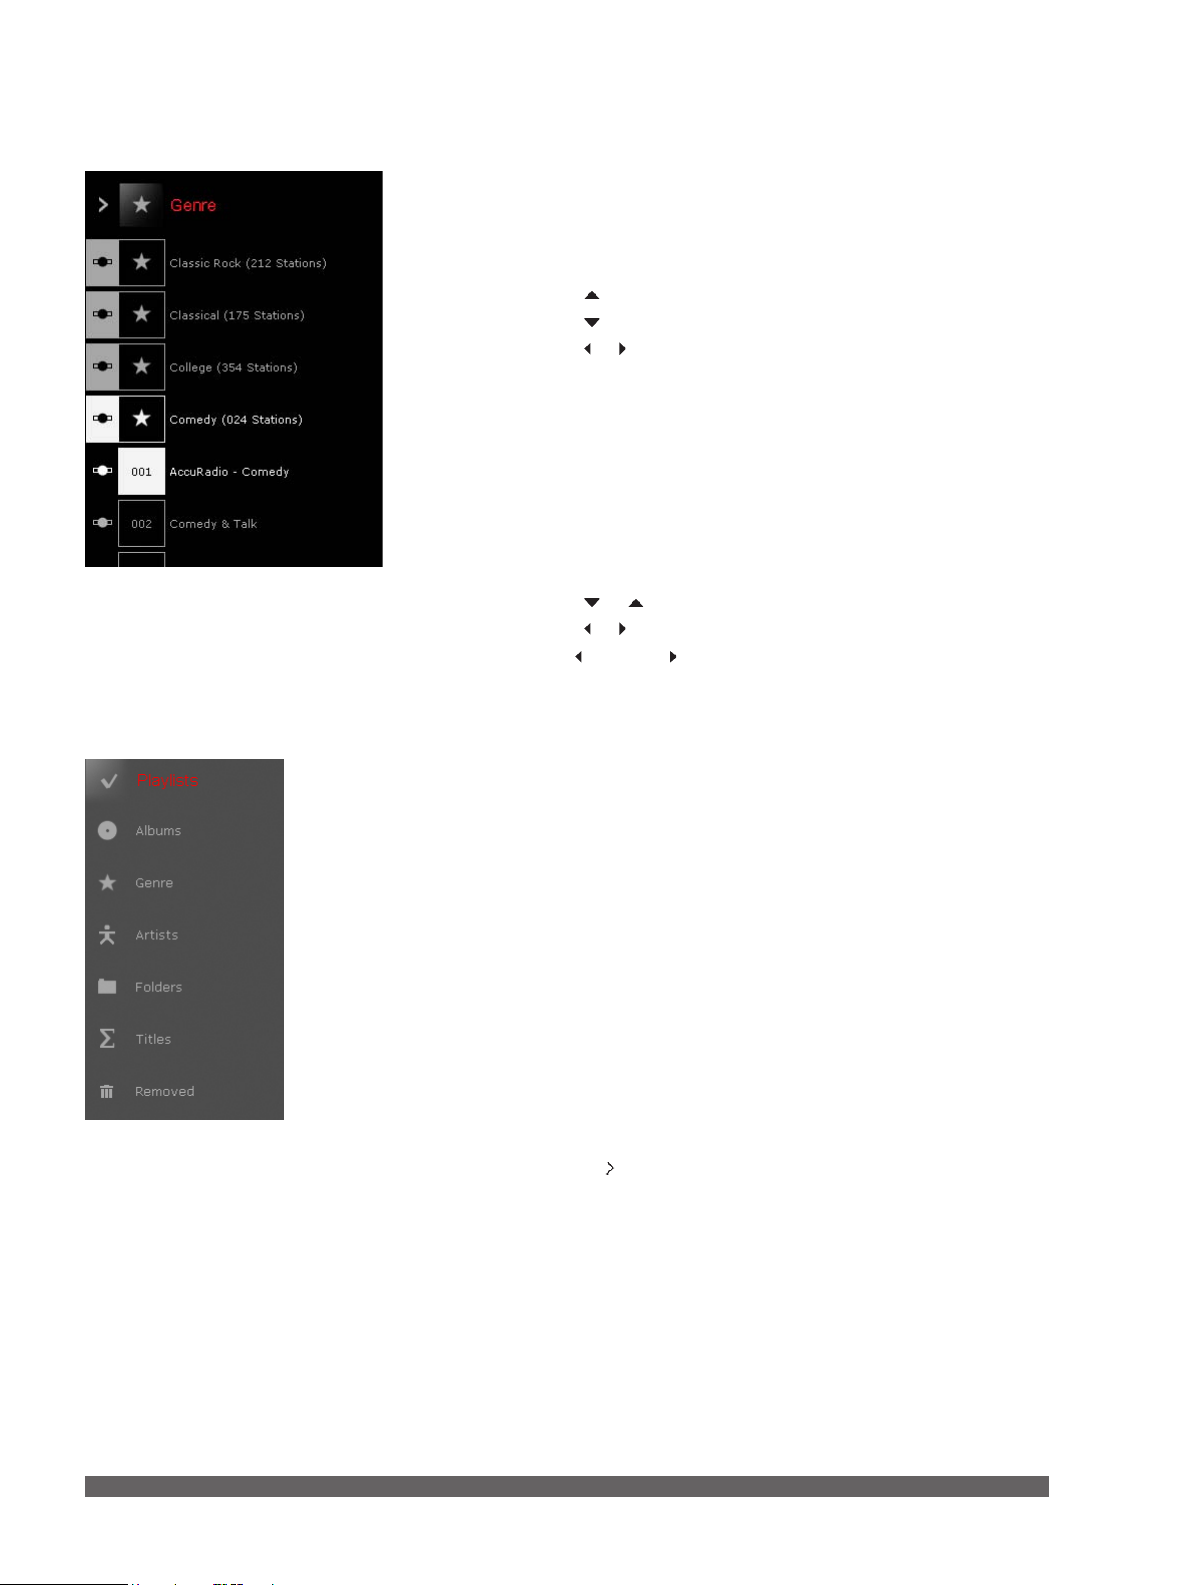
The different views, here shown from N.MUSIC.
Switch between views in a source
Once you activate a source in BeoPlayer, you can switch views
to view your collection differently. The way to change views is
the same for all sources.
Accessing the lists by clicking the source button twice makes
the list view remain on the screen.
To change view …
> Activate a source.
> Press ‘TAB’, or …
> … click and hold on view-icon in the top left-hand then
move the cursor to the view you want and let go, or …
> … click in the top left-hand corner repeatedly.
15
Page 16
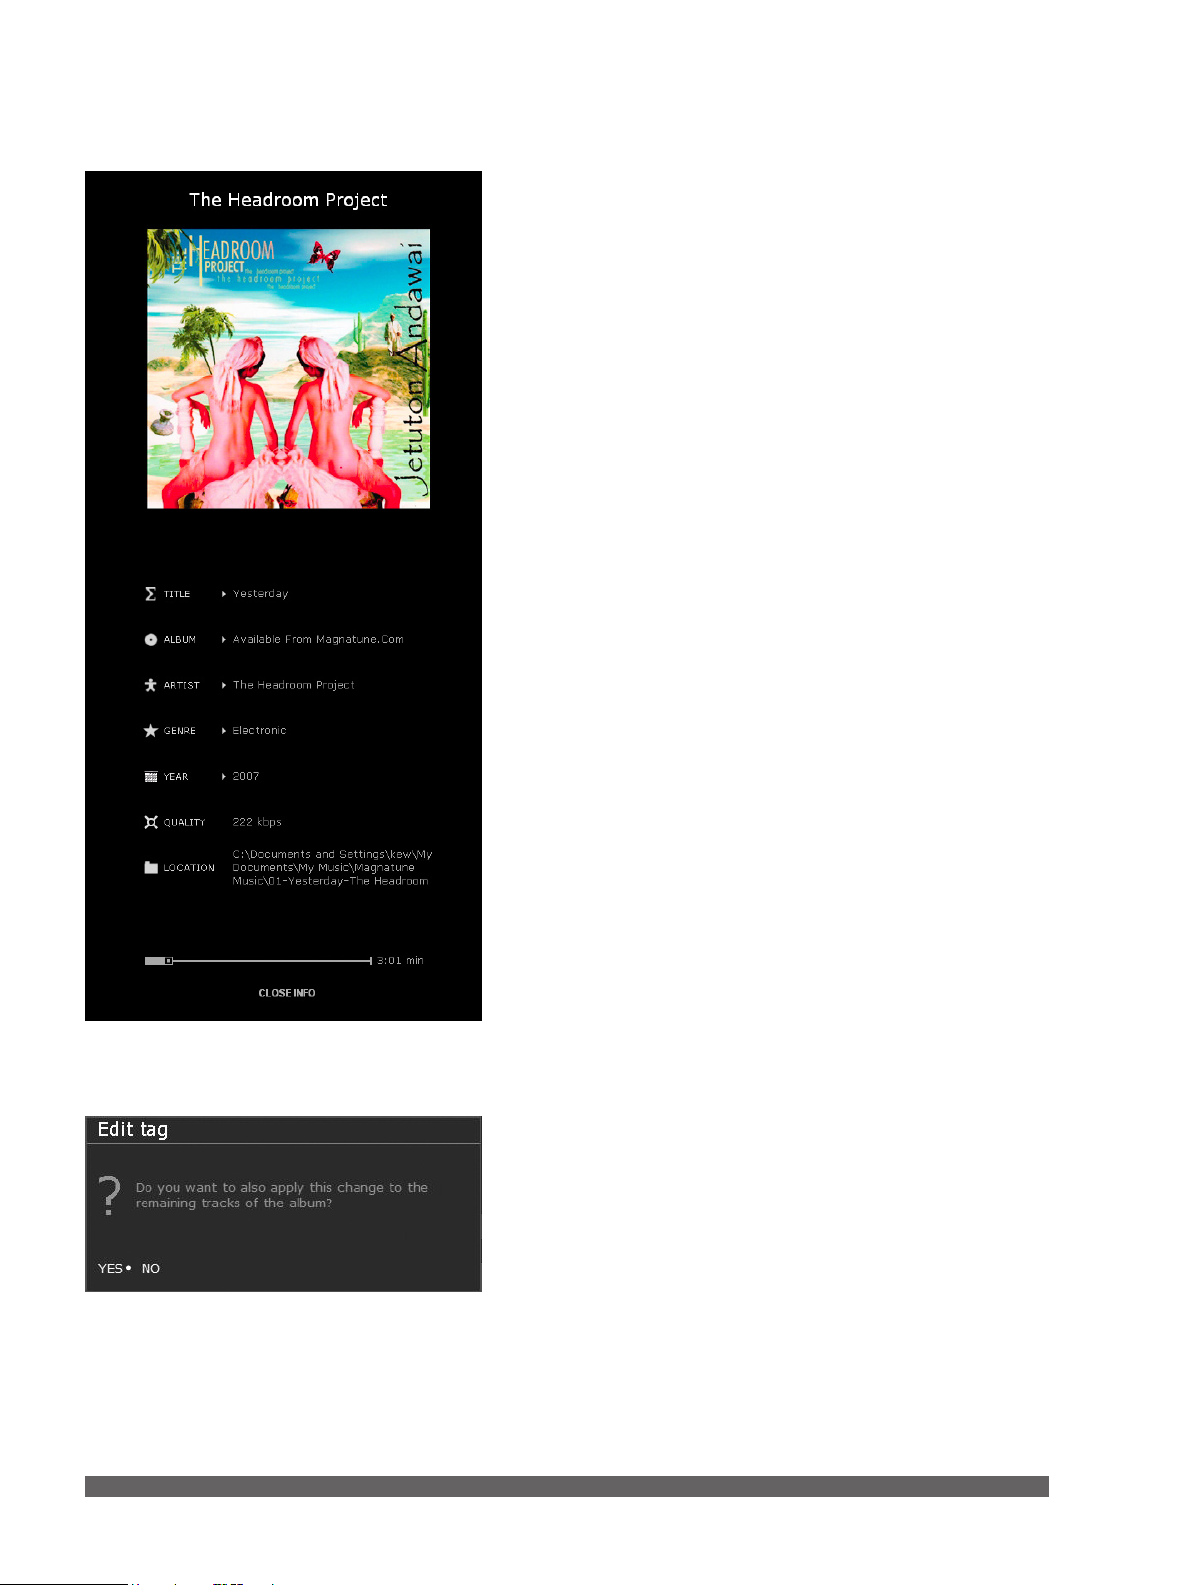
View and edit N.MUSIC, N.RADIO or PHOTO information
When you are listening to a track or viewing a photo, you can
bring up information about the content currently playing.
> Click INFO on the control bar to view information.
To edit track information …
> Move the cursor to the category you wish to edit.
> Click once on the information you want to edit, e.g. title.
> Type in the information.
> Press ‘ENTER’ on your keyboard to save and exit.
You will be asked to conrm the change you make.
You can move the grey playback bar to ‘skip’ to a particular
point in the track.
When you edit track information, BeoPlayer prompts you to
conrm.
16
Page 17

View N.RADIO information…
> Click INFO on the control bar.
Information about the current station appears on the
screen.
INFO turns white on the control bar.
> Click CLOSE INFO on the menu, or …
> … click INFO on the control bar to exit the INFO menu.
View information on your N.RADIO stations
17
Page 18

Edit tag information on your photos.
View picture information …
> Click INFO on the control bar.
Information about the current picture appears on the
screen.
To edit PHOTO information …
> Move the cursor to the category you wish to edit.
> Click once on the information you want to edit, e.g. title.
> Type in the information.
> Press ‘ENTER’ or ’TAB’ on your keyboard to save and exit.
> Click CLOSE INFO at the bottom of the info window, or …
> … click INFO on the control bar to exit INFO.
Search for tracks, stations or photos.
BeoPlayer can search the content and nd the track, station or
photo you are looking for.
To search …
Activate the source and the view you want to search in.
> Type in exactly what you are looking for, e.g. Madonna. The
content with that name is highlighted, or …
> … type the rst letter or number of what you are looking
for. E.g. type ‘g’ for German in ‘Language’ or ‘r’ for ‘Rock’
in ‘Genre’.
18
Page 19

Playlist view in BeoPlayer.
Create and edit playlists
You can place your favourite tracks, radio stations, photos and
video clips in playlists. You can also edit playlists at any time.
Furthermore, you can drag tracks, photos or video clips directly
from BeoPlayer and drop them into other applications on the
computer.
Note that creating a playlist does not occupy additional space
on your computer, as it is only an indication of the playback
order and not an extra copy of les.
To create a playlist in BeoPlayer …
> Click COPY.
> Click NEW PLAYLIST (or right-click, press and hold on
NEW PLAYLIST).
> Choose which kind of list you want:
BeoPlayer (a local playlist only available on your computer).
BeoMaster 5 (a playlist available on BeoMaster 5), BeoPlayer
& BeoMaster 5 (a playlist is available on both BeoMaster 5
and BeoPlayer).
To add more than one le to a playlist …
> Hold down the ‘SHIFT’ key and click the rst and the last of
a series of tracks, stations, photos and video clips.
> Hold down the ‘CTRL’ key instead, you can select several
tracks, stations, photos or video clips by clicking them
individually.
> Now ‘drag and drop’ the items you selected into the new
playlist.
> Click DONE to save.
Choose where the playlist is available.
Rename your playlists as you like.
When content has been added in BeoPlayer, the content is
copied to BeoMaster 5. Likewise, if you add content to playlists
on the television screen, it is mirrored on the playlists in
BeoPlayer.
To rename playlist or coloured list …
> Right-click the list and choose ‘Rename playlist’.
> Type the new name.
> Press ‘ENTER’ to save.
19
Page 20

To remove content from playlists …
> Click and drag content from the playlist to the waste basket,
or …
> … right-click content and select ‘Remove’.
Note that tracks, stations or photos or video clips removed
from a playlist are not deleted from your computer.
The BeoPlayer/BeoPort waste basket shown to the right in
the illustration above.
Restore from the waste basket …
You can restore previously removed tracks, stations or photos
at any time (but not when removed from playlist views).
> Change view.
> Click ‘Removed’.
> Right-click content and select ‘Restore’.
Note: Deleting a playlist does not delete the content from your
music collection.
Note that you cannot restore playlists once they have been
removed. Photos, videos and tracks can only restored if
removed from any views other than playlist view.
20
Page 21

Organise your content
When you have BeoMaster 5 as part of your system, music,
photos and video can easily and quickly be moved between
your computer and BeoMaster 5. It is an advantage to keep
copies on both locations.
Once an audio CD has been copied, the tracks are available on
BeoMaster 5 but only if you have set the conguration to
‘Copy to BeoMaster 5’.
If BeoPlayer is congured to store CDs locally on the computer,
you must transfer music to BeoMaster 5 to access the content
on your television. The same applies for photos or video clips
imported into BeoPlayer. Refer to ‘Conguration of BeoPlayer’
for more information.
Location of your content
There are icons in front of the content, which show where the
content is located. The icons are only available when your
computer is connected to BeoMaster 5.
If you have a BeoSound 5 in your setup, the menu options
correspond accordingly, e.g ‘Move to BeoSound 5’.
Content is placed on your computer.
Content is placed on BeoMaster 5.
Content is placed both on your computer and on
BeoMaster 5.
Change the location of your content …
> Right-click content.
> Select the desired option:
‘Copy from BeoMaster’
‘Move from BeoMaster’
‘Delete from BeoMaster’
Note that content stored only on the BeoMaster is deleted
completely when deleting it from BeoMaster 5.
21
Page 22

It is recommended to always keep a copy of your music les
and photos either on the computer or a storage media, such
as a portable hard disc.
Synchronise les
If you make changes in your playlists either on the computer,
or from the television when BeoMaster 5 is not connected to
the computer, it is important to know how these changes
work.
Any change made on either location will automatically be
copied to the other location when you reconnect BeoPlayer/
BeoPort and BeoMaster 5.
If changes have been made on both locations, the version
stored on the computer will overwrite the one stored locally on
the BeoMaster 5. For example: You rotate a photo using a
software on the computer. Once you reconnect BeoMaster 5
to the computer, the change will take effect on BeoMaster 5.
Files can be synchronised between the computer and
BeoMaster 5 at any time.
> Right-click the Bang & Olufsen icon.
> Select `Start BeoPlayer <–> BeoMaster 5´.
If connection fails
When you want to transfer les to BeoMaster 5 or
BeoSound 5, connection may fail if, for example, your network
has been reset. A dialogue box appears asking you to enter
the IP-address of BeoMaster 5 or BeoSound 5.
BeoMaster 5 IP-address
To see the IP-address of BeoMaster 5, switch on BeoMaster 5,
bring up the menu overlay and press 9 to open the
Conguration menu, press the red button on the remote
control immediately followed by GO. Use the arrow buttons to
move to ‘Network info’ and press GO. You can then see the IPaddress of your BeoMaster 5. Now enter the IP-address in the
BeoPlayer menu and connection can be established.
BeoSound 5 IP-address
To see the IP-address of BeoSound 5, switch on BeoSound 5,
move the lever to ‘MODE’, use the wheel to highlight
SETTINGS, press the right arrow button twice, immediately
followed by GO to activate ‘Service Settings’. Move the lever to
NETWORK INFO. You can then see the IP-address of your
BeoSound 5. Now enter the IP-address in the BeoPlayer menu
and connection can be established.
22
Page 23

Page 24

Using BeoMedia 1
If your system contains a BeoMedia 1, the descriptions in this
Guide do not apply.
Please refer to the on-line Guide for description of how to use
BeoPlayer/BeoPort with BeoMedia 1.
Use the below link to open the on-line Guide. The Guide is
available in English only.
Link to BeoMedia 1/BeoPlayer Guide.
(http://www.bang-olufsen.com/beomedia1-userguide/index.
html)
24
Page 25

Using BeoMaster 5 and
BeoSound 5
This section describes setups with BeoMaster 5 and BeoSound 5.
Throughout this guide setups with BeoMaster 5 and BeoSound 5
are referred to as BeoMaster 5 setups. All video options described
with BeoMaster 5 depend on the BeoMaster 5 being connected
to a compatible television. All descriptions of BeoSound 5
depends on BeoSound 5 being part of your setup.
Before you start
In order to use the sources N.MUSIC, PHOTO and WEB, you
must use BeoPlayer to transfer your digital music and photos
from your computer to the BeoMaster 5, and store your
favourite websites as described earlier in this Guide.
With BeoMaster 5 you get easy access to your digital music,
your personal photos, your favourite websites and to more
than 5000 Internet radio stations world wide.
Switch on BeoMaster 5
There are two ways you can activate BeoMaster 5. You can
activate an audio source in BeoSound 5 or you can activate the
BeoMaster 5 sources via the television.
Refer to the BeoMaster 5 or BeoSound 5 Guides for
descriptions on how to operate the products.
The four sources
BeoMaster 5 offers various ways to browse the four sources N.
MUSIC, N.RADIO, PHOTO and WEB.
As described in the Guides, menu overlays for each source
provides you with additional operation possibilities, these are
not described here.
Note that if BeoSound 5 is part of your setup, the BeoSound 5
acts as browser for N.MUSIC and N.RADIO, and you cannot
browse the contents of these sources on the television screen.
25
Page 26

Coloured lists
When BeoMaster 5 is part of your setup, an additional feature
becomes available; coloured lists.
These are playlists which are selected by means of the coloured
buttons on the remote control. This gives easy access to these
lists by a single press on one button also from a link room
when applicable.
The basics about coloured lists
You can add your favourite tracks, radio stations and photos to
coloured lists. Coloured lists can be edited via your computer
in the same way as any other playlist, but also by means of the
remote control, this is described in the Guides supplied with
your products.
Source Limits in coloured lists
N.MUSIC Default limit is 9
PHOTO No limit
N.RADIO Default limit is 99
Playlist view with coloured lists in BeoPlayer.
You can change the limit of entries for N.MUSIC and N.RADIO
in the ‘Conguration‘ menu under SETUP.
The content is indicated by the corresponding colour. Note that
any content can belong to all four lists. When you play tracks
from a coloured list, BeoMaster 5 or BeoSound 5 only plays the
content of that particular list.
26
Page 27

Functions specic to BeoMaster 5
To rename content …
The easiest way to rename items in BeoPlayer is via the
computer. However it is also possible to use the rename
function made available by the menu overlay of the source on
the television screen:
> From the menu overlay, select ‘Rename’.
Press to reveal a ‘spelling bar’, press and to move
between characters and press GO to select a character.
To switch between upper- and lower case characters, press
repeatedly. Return to the name eld by pressing .
In the name eld; use and to move between characters,
press STOP to delete a character, and press GO to store a
name.
Play Timer
If your main video or audio product in a link system has a Play
Timer function, BeoMaster 5 can be selected as source of a Play
Timer. When BeoMaster 5 is selected as source of a Play Timer,
the items in the red list will play when the Play Timer starts. This
means that the content you want to listen to in the Play Timer
function must be placed in the red list.
27
Page 28

to
Page 29

Page 30

until the source ‘N.RADIO’ or ‘N.MUSIC’ appears
Page 31

to access the portable device(s).
to ‘Copy music from an audio CD’
Refer
Page 32

NOTE: While you copy, you can hide the N.MUSIC view and
follow the progress of your copying on the control bar in the
right side of the screen. You can use the control bar while
copying.
Note: You cannot use the playback feature and copy music at
the same time on BeoSound 6 and Serenata.
Organise tracks on a portable player
Organising music les on your portable player is done in much
the same way as you organise N.MUSIC in BeoPlayer. To
organise the music, your portable player must be connected to
the PC.
General handling of DRM les
BeoPlayer only supports playback of music protected with
Microsoft’s Windows Media DRM. This means you have to
replay DRM protected music once with Windows Media Player
before you can copy the tracks to BeoPlayer. Apple’s Fairplay
DRM is not supported. DRM protected music tracks are limited
to a certain number of transfers to portable devices. The
number is decided by the music store or record company and
may also be unlimited.
DRM protected music can be transferred and played in
Serenata and BeoSound 6, provided that the license is placed
in BeoPlayer. However, BeoSound 6 does not support ‘time
limited’ licenses.
When transferring music to BeoMaster 5 and BeoMedia 1,
DRM protected music is also transferred, and it appears in the
lists but it cannot be played.
Note that BeoSound 2 does not support DRM les.
32
Page 33

Especially for BeoSound 2
To activate BeoSound 2…
> Click N.MUSIC in BeoPlayer.
Note that it is not possible to operate BeoSound 2 and copy
music at the same time.
If you wish to copy les after having started playback in
BeoPlayer …
> Disconnect BeoSound 2 from the base.
> Reconnect BeoSound 2.
> Alternatively, press and hold GO for 3 seconds.
BeoSound 2 with Windows Vista
To make your BeoSound 2 work correctly with Windows Vista
you need ‘Service Pack 1’ installed on the computer. BeoSound 2
needs to be in iTunes mode (or Mass Storage Mode) as
described in the BeoSound 2 Guide.
BeoSound 2 will be represented and treated as a generic
portable device, and will not be displayed in BeoPlayer with a
BeoSound 2 icon. BeoSound 2 under Vista will not have the
same functionality as in Windows XP, where you can move
les within folders etc.
Due to these limitations in BeoSound 2 with Windows Vista,
you need to create a folder for the tracks in the root of the
SD card to play the tracks.
Also note that the BeoSound 2 ‘Firmware update application’
called ‘BeoSound 2_PC.exe’ will not run under Windows Vista;
which means you will not be able to update the BeoSound 2
rmware under Windows Vista.
33
Page 34

Format a memory card for BeoSound 2
In some cases it can be useful to format your storage media
(the memory card), to allow copying tracks to BeoSound 2.
Formatting a card will delete the entire content on the card.
How to format …
Place BeoSound 2 on the base. PC CD or N.MUSIC must not
be active in BeoPlayer.
> Click CONFIG on the control bar to access the
‘Conguration’ menu.
> Select the tab ‘Portable devices’.
The right side of the ‘Portable devices’ tab in BeoPlayer informs
you how much space is available on the memory card, as well
as the total storage capacity the media has in total.
> Click ‘Refresh’ to list the available devices.
> Select the storage media you wish to format.
> Click ‘Format’.
The text ‘formatting portable …’ appears and formatting is
performed. Note that formatting is not possible if you have
write-protected the device.
34
Page 35

Conguration of BeoPlayer
Settings for N.MUSIC
Before you copy, or ‘rip,’ your audio CDs for storage on your
computer, it is a good idea to adjust how you would like
copying to occur.
Copying quality
Choose the quality you want for your copied music. You can
set the quality for two different copying destinations: your
hard drive or a portable device.
> On the BeoPlayer bar, click SETUP.
> Click CONFIG.
> Click the tab ‘CD Copying’.
The quality of the copy increases with the bit rate (kbps)– the
amount of data per second – but the size of the le increases
at the same time. This means high quality tracks will ll up your
hard disk faster.
Copy to BeoMaster 5
> Check the box ‘Copy to BeoMaster 5’.
All your N.MUSIC tracks will be copied to BeoMaster 5.
File location
(If you do not have a BeoMaster 5 in your setup)
> Choose where to store the copied track or tracks on your
computer.
> Click ‘Browse’ to look through your drives and folders.
> Click OK when done, or …
> … click ‘Cancel’ to return to the ‘Standard’ tab.
Licenses
The ‘Licenses’ tab contains information about usage licenses for
CDs. It is a good idea to make a backup of your licenses. If you
wish to e.g. install a new operating system on your computer,
you will need to save a copy of the licenses on a disk or on a
network drive. The licenses can be restored when installation
of the system is complete.
DRM protection
The ‘Use DRM protection’ option protects your music from
being moved onto other drives or portable devices.
Note that the option ‘Use DRM protection’ is not enabled by
default. BeoPlayer/BeoPort is not able to transfer DRM
protected les. Therefore, we recommend that you do not alter
35
Page 36

the default setting if you wish to download music les to a
portable device such as BeoMaster 5 or BeoSound 2.
Furthermore, enabling DRM protection will prevent you from
accessing your music anywhere else than on your computer
where the licenses are stored.
Rip from CD to a coloured list
When you copy from a CD, you can under the ‘Favourites’ tab
decide to add your ripped N.MUSIC track to a specic coloured
list. If you activate this setting, the content of the coloured list
will change every time you rip from a CD.
Limits on coloured lists
Under ‘Favourites’ you set the limit for tracks/albums in each
coloured list.
Settings for N.RADIO
You can select the quality of N.RADIO reception. If you
increase the reception quality in N.RADIO, you will decrease
the number of N.RADIO stations available.
Note that the ‘Conguration’ menu changes the tab name
according to the products connected, in this case BeoMaster 5
as shown.
To optimise reception from a poor connection, you should
increase buffer time. Note this increases the start-up time of N.
RADIO.
36
Page 37

Settings for PHOTO
You can select how long you wish each photo to remain on the
screen when you start a slideshow.
‘Mode’ allows you to choose whether a slideshow should
continue across groups, or if it should repeat the photos/video
clips from the selected group.
Settings for ‘skip interval’ determine how many seconds you
wind or rewind your video clips when using the skip function.
The number of photos you set for ‘Thumbnails Cache’ decides
how much space you want to use for photos on the hard drive.
Settings for BeoMaster 5 – Only available if BeoMaster 5
is part of your setup
Password
Here you can change your password for access to BeoMaster 5.
You must also specify here, which drive BeoMaster 5 should be
mapped to. Only change the password if the password on
BeoMaster 5 or BeoSound 5 has been changed.
Drive setting
That is to specify the name of the BeoMaster 5 drive, where all
les are transferred to when you move or copy folders, playlists,
etc. If you are in doubt about these settings, contact your
Bang & Olufsen retailer, who can assist you. You can change
the password for your music system by pressing ‘Change
pas s wo rd’.
37
Page 38

Guide language
When you install BeoPlayer/BeoPort, this Guide is installed
according to your Windows language settings, you can change
to a different Guide language at any time. Just enter the
BeoPlayer/BeoPort Conguration menu and open the ‘Guide’
tab.
38
Page 39

Basic settings
All information concerning TV tuning only applies if BeoPort is
part of your setup and you have a compatible TV tuner card.
Before you start auto tuning TV channels for your TV tuner
card, make sure that the correct broadcast system is displayed
under ‘Video System’, that you have indicated whether your
connection is via cable or antenna, and that the correct
country is displayed.
> Click ‘AutoTune’ to start auto tuning TV channels.
During the tuning sequence, the located channels are shown
in the display. At any time you can stop the tuning and the
channels already found will be stored.
On the TV tuner cards, the TV channels you tune in are
registered as channel numbers and frequencies. Note that not
all TV tuner cards observe standard channel numbers for TV
channels.
Manual tuning
When you want to tune in a channel manually, if e.g. it was
not found during auto tuning, go to the ‘Manual’ section of
the ‘Tune’ menu.
> Scroll through the frequencies to nd the frequency you
want to add.
> Click ‘Add’.
Moving or deleting tuned TV channels …
Once you have tuned and stored your TV channels, you can
rearrange the order in which they appear in the channel list.
You can, for example, rearrange them in accordance with the
order of TV channels on your television.
You can also delete channels from the channel list. Both actions
are performed in the ‘Conguration’ menu.
39
Page 40

To move tuned TV channels …
> Click the ‘Tune’ tab to be able to rearrange the order of
your tuned TV channels.
> Click the TV channel you wish to move in the channel list.
Check whether the TV channel you want to move is actually
shown in the TV viewer window.
> Use the mouse to drag the channel to its new channel
number in the channel list.
If a TV channel is already stored in the desired channel number,
the moved channel is inserted between the existing channel
numbers.
To delete tuned TV channels …
> Click the ‘Tune’ tab to be able to delete a tuned TV channel.
> Click and select the TV channel you wish to delete in the
channel list.
> Check if the TV channel you want to delete is actually
shown in the TV viewer window.
> Click ‘Delete’.
Adjust sound and picture …
Once you have tuned and stored your TV channels, you can
adjust the sound presets. These sound adjustments will apply
for all sources accessed from the control bar.
If your TV tuner allows picture adjustment, you can adjust
the picture presets for your TV tuner card. These picture
adjustments will now also apply for the video sources from
your main room when you bring them up on your computer
screen via the control bar.
40
Page 41

What to do if you need to adjust the sound on the
computer …
In order to align the sound levels for your computer sources
with a connected source, activate that source via the control
bar, and then bring up the sound card mixer device in your
computer. Then you can compare and adjust the sound levels.
How to adjust sound on the computer …
> Click TV on the control bar to bring up a TV channel.
> Click SETUP to be able to select AV sound.
> Click AV to select AV stereo sound. AV is highlighted and
the sound you hear is the Master Link sound.
> Click AV again to listen to sound and compare volume
between the two. When in sound mode the AV button is
not highlighted.
> Bring up your sound card mixer device.
> Use the AV button to switch between AV sound and
computer sound.
> Adjust the sound levels via your sound mixer device as you
prefer.
Relevant channels to adjust can be:
VOLUME CONTROL
Adjusts the general sound output level from the sound card.
WAVE
Adjusts the input level on N.MUSIC.
AUX/LINE/ T V
Adjusts the level of the sound from the TV card.
CD AUDIO
Adjusts the sound level on the internal CD-rom drive.
The adjustment options may vary depending on the built-in
sound card.
41
Page 42

The Advanced settings – This only
applies if BeoPort is part of your
setup
Option programming
If your computer is part of a BeoLink setup (with BeoPort or
BeoMaster 5) you may need to programme it to the correct
Option. Consult your Bang & Olufsen retailer for further
information.
Main computer
It is possible to have several BeoPorts set up in a BeoLink
system, but you can only distribute N.MUSIC and N.RADIO
from the main computer. To indicate which computer is the
distributor of e.g. N.MUSIC, you must indicate under ‘Main PC’,
whether the computer is the main, or secondary computer.
> Check the ‘Yes’ button to indicate a main computer, or …
> … check the ‘No’ button to indicate a secondary computer.
Play Timer
Control a ‘Timer’ to make it play an audio or video source,
if your computer is part of a BeoLink setup. This function is
useful if you want a wake-up ‘Timer’ to play from an audio
system, or if you want to watch the news every night directly
on your computer screen.
You can also select the source ‘Standby’, to make your sources
switch off automatically at a specic time every night.
Note that all settings for ‘Timer’ programming must be set
on the connected source (e.g. your audio system or your
television).
> Check ‘ON’ to activate the Play Timer, or…
> … check ‘OFF’ to deactivate the Play Timer.
Mix sound
Sound from any available Master Link source can be mixed
with the sound from your computer. If you want to listen
to a CD and sounds from a computer game simultaneously,
set mixed sound to ‘ON’ to listen to both sounds from your
speakers.
42
Page 43

Default source …
When you start up BeoPlayer, the source computer is selected
automatically per default. You may want to change this setting,
if you do not want to listen to sound from your computer.
> Check ‘PC’ to select the computer as your default setting,
or …
> … check ‘None’ to make BeoPlayer start up without any
source being active.
BeoPort USB box …
Along with each software update comes software for the
BeoPort box. The update-rmware-key checks if you have the
latest version of the software (from the Internet or a CD-rom)
installed in the BeoPort box.
> Click ‘Update rmware’.
> Follow the instructions on the screen.
Link frequency …
In order to receive sound and pictures from your video system,
you must tune in the particular channel number on which this
signal is distributed. For certain Bang & Olufsen systems, the
link frequency is found automatically.
You can adjust the link frequency manually even in a Bang &
Olufsen system which supports automatic search.
> Check the option ‘Manual’ before clicking ‘Find’.
The on-screen instructions inform you whether the frequency is
found automatically. If it is, this frequency is stored.
NOTE: The US version of BeoPlayer/BeoPort does not support
transmission of video sources from the main room to the
computer.
43
Page 44

If the frequency is not found automatically …
Follow the instructions on the computer screen, which will
guide you through to nd the link frequency manually.
How to make video system settings …
> Click CONFIG located under SETUP in the control bar.
> Select the tab ‘Advanced’.
> Click the ‘Manual’ check box in the section ‘Link frequency’.
> Click ‘Find’.
> Follow the instructions on the screen.
Once you have initiated a search by pressing ‘OK’, you can
change the video system.
Video system settings …
Before you can watch television on your computer screen,
you must make sure that you have made the correct country
and video system settings. Some areas and countries, such as
France, use a SECAM television system.
If you live in such an area, you may have to make video system
adjustments when using a link room product. If you want to
watch certain set-top box channels or videotapes using the
PAL system, you must change the ‘Video system’ setting in the
‘Conguration’ menu to PAL.
Find the ‘Video system’ setting under ‘Tune’ tab.
Contact your retailer for information about available TV tuner
cards and their handling of the PAL and SECAM systems.
> Select ‘PAL’ instead of ‘SECAM’ to change video system.
44
Page 45

System requirements for
BeoPlayer and BeoPort
Hardware requirements:
Processor: Min. 1GHz
System memory: Min. 512MB RAM
Graphic card: Min. 32MB video RAM, support for Super VGA
(800x600)
Hard drive: Min. 100 Mb of available space
USB socket: One available for BeoPort
Operating system requirements:
Windows Vista or Windows XP
DirectX 8.1 or above
Media Player 9.0 or above
Supported media formats
Software update – BeoMaster 5
Default supported photo formats are: jpg, jpeg, tif, tiff, gif,
bmp and png.
Default supported video clip formats are: avi, asf, wmv, mpg,
mpeg. However, this depends on which codec is installed on
your computer.
Supported N.MUSIC formats are: Mp3, WMA, WAV (with
BeoMaster 5 also, M4A, AAC, MP4).
On a regular basis the software of BeoMaster 5 is updated.
New BeoMaster 5 software will also be offered to you. When
a dialogue box appears, asking you whether or not you wish to
install new software, you can answer ‘Later’.
If you have chosen ‘Later’, you get the option ‘Update
software’, when you right-click on the Bang & Olufsen icon.
Just click this option and the update process begins.
45
Page 46

Registration of BeoPlayer or
BeoPort
Once you have congured BeoPlayer or BeoPort for the rst
time, you are prompted to register if you have access to the
Internet. Registration is necessary in order to receive the
service provided by BeoPortal. Naturally, Bang & Olufsen
handles your registration data with the utmost condentiality.
Registration is for BeoPortal purposes only. If you choose not
to register, your tracks will be recorded as ‘unknown’. If you
still wish to use tag information for your recorded CD tracks,
you must key in the information manually. Do this in the ‘INFO’
section which appear on the control bar when you select
N.MUSIC.
If you have not registered …
A registration form automatically appears on the screen.
> Select ‘New User’ and complete the form.
If you have already registered …
> Enter your user name and e-mail address.
In order to receive information from BeoPortal, your computer
must be connected to the Internet and be on-line. If you have
no Internet access, you are not prompted to register, but at
any given point that you obtain Internet access, you will be
prompted to register.
If you have forgotten your user name …
Simply follow the instructions on the screen. You will be
prompted to submit your e-mail address and your user name
will then be sent to you by e-mail.
46
Page 47

What to do if you need to remove
BeoPlayer/BeoPort
If it should become necessary to remove the application, you
can choose to remove the entire BeoPlayer/BeoPort directory,
or perform a customised removal where only les directly
related to the BeoPlayer/BeoPort application are removed.
If you reinstall the BeoPort application, any existing version of
BeoPort will be overwritten automatically.
How to remove …
> Bring up the ‘Add or Remove Programs’ function from your
computer control panel.
> Click and select BeoPlayer/BeoPort from the list of
applications.
> Click ‘Change/Remove’ to remove.
> Click Remove’ to remove.
> Click ‘Next’ to continue.
> Follow the instructions on your computer screen.
> Click ‘Finish/Exit’ to complete removal of the BeoPlayer/
BeoPort application.
> You must run the SETUP.EXE le on the BeoPort CD-rom to
restart the installation.
BeoPlayer software can be updated from www.beoplayer.com.
47
Page 48

Page 49

identier in a database and keep track of the number of times
you attempt restore. Note that we do not share this unique
machine identier with any other services either internal or
external to Microsoft. You also are sending some security
information that enables us to restore your licenses to the
new computer (or same computer that has either re-installed
the OS or changed some hardware component). None of the
security information is stored permanently. In the event that
you exceed the limits of our restore schema you will be asked
to provide some personally identiable information. This
information is necessary to prevent fraudulent restores and
piracy of protected content. In addition, the data may be used
internally to perform aggregate analysis of the restore service,
such as helping to ensure that we have adequate capacity and
security to meet the demand for the service. The personally
identiable information that you provide will not be used for
any other purpose. It will be securely stored in a dedicated
database located in the United States of America, and will
be kept separate from information you may have provided to
Microsoft in other contexts. This information will not be shared
with any other services either internal or external to Microsoft.
Both the unique machine identier and any personally
identiable information will be transported and stored in a
secure environment that protects against unauthorised access,
data corruption or loss, and unwanted use or distribution. If
you would like to access the personally identiable information
you have provided to Microsoft through the restore service,
you can send your request by e-mail to drmpii@microsoft.com.
Security Upgrade (Individualization):
In order to use content with a higher security rating, some
vendors require that you upgrade your security components in
the Windows Media Rights Manager. Microsoft provides this
service and no unique information is shared with the content
providers or any third parties. When you upgrade your security
level, you are sending some information to Microsoft that
uniquely identies your machine for internal tracking purposes.
We store this unique machine identier in a database and
keep track of the number of times you attempt to upgrade
your security. We may also use this data internally to perform
aggregate analysis of the security upgrade service, such as
helping to ensure that we have adequate capacity and security
to meet the demand for the service. Note that we do not share
this unique machine identier with any other services either
internal or external to Microsoft. You also are sending some
49
Page 50

security information that enables us to deliver the appropriate
security upgrade to your machine. None of the security
information is stored permanently. We also keep track of which
security upgrade les were downloaded to your machine. This
information is not used to identify your machine, but to help
Microsoft prevent security breaches that could affect legitimate
users. The unique machine identier and the security upgrade
le information will be transported and stored in a secure
environment that protects against unauthorized access, data
corruption or loss, and unwanted use or distribution.
Contacting Microsoft:
If you believe that Microsoft has not adhered to these privacy
principles, please notify us by e-mail at drmpriv@microsoft.
com or by postal mail at the following address: Microsoft
Corporation, Attn: Windows Media Rights Manager Service,
One Microsoft Way, Redmond, Washington 98052-6399,
USA. We will use commercially reasonable efforts to promptly
determine and correct the problem.
Metadata Content and Media Recognition Software
Provided by All Media Guide, LLC
© 2007 All Media Guide, LLC
AMG Flow-Down License Terms (Terms of Use)
This application incorporates software and technology of
All Media Guide, LLC. (“AMG”). The AMG software and
technology (the “AMG Technology”) allows End Users to
access music-related data (“AMG Data”) over the Internet
and otherwise from proprietary AMG databases (the “AMG
Databases”) located on AMG servers (the “AMG Servers”)
and to perform other functions (collectively with the AMG
Technology, AMG Data, AMG Databases and AMG Servers,
the “AMG Services”). AMG grants you a limited, non-exclusive,
non-transferable, and non-sublicensable right and license to
access and use AMG Services only by means of the intended
End User functions of this application software. You agree
that you will use the AMG Services for your own personal
non-commercial use only. You agree not to: (i) assign, copy,
transfer or transmit the AMG Data to any third party; (ii) use
or exploit the AMG Services, except as expressly permitted
herein; (iii) decompile, disassemble or reverse engineer the
AMG Services or any component thereof; (iii) remove any
copyright, trademark, trade names, logos or other intellectual
property notices in the AMG Services; or (iv) sell, distribute,
publish, disclose, lease, license transfer or otherwise use the
50
Page 51

Page 52

SPECIAL, PUNITIVE OR OTHER DAMAGES INCLUDING
WITHOUT LIMITATION ANY LOST PROFITS OR LOST REVENUES
OR INTERRUPTION WITH BUSINESS UNDER ANY THEORY
OF LAW, INCLUDING CONTRACT, TORT, NEGLIGENCE,
INDEMNITY, STRICT LIABILITY, PRODUCT LIABILITY, OR
OTHERWISE ARISING OUT OF OR IN ANY WAY RELATED TO
THE USE OF THE AMG SERVICES. IN NO EVENT WILL AMG’S
LIABILITY FOR DAMAGES WITH RESPECT TO THE AMG
SERVICES BE IN EXCESS OF TEN DOLLARS REGARDLESS OF
THE FORM OF THE CLAIM. SOME JURISDICTIONS DO NOT
ALLOW THE EXCLUSION OF LIABILITY FOR INCIDENTAL OR
CONSEQUENTIAL DAMAGES, SO THE ABOVE EXCLUSION MAY
NOT APPLY TO YOU.
52
 Loading...